Monday, 10 June 2024

Create a NAT gateway using the Azure portal


Create a NAT gateway using the Azure portal

In this quickstart, learn how to create a NAT gateway by using the Azure portal. The NAT Gateway service provides outbound connectivity for virtual machines in Azure.

Diagram of resources created in nat gateway quickstart.

Prerequisites

Sign in to Azure

Sign in to the Azure portal with your Azure account.

Create a NAT gateway

Before you deploy the NAT gateway resource and the other resources, a resource group is required to contain the resources deployed. In the following steps, you create a resource group, NAT gateway resource, and a public IP address. You can use one or more public IP address resources, public IP prefixes, or both.

For information about public IP prefixes and a NAT gateway, see Manage NAT gateway.

  1. In the search box at the top of the portal, enter NAT gateway. Select NAT gateways in the search results.

  2. Select + Create.

  3. In Create network address translation (NAT) gateway, enter or select this information in the Basics tab:

    SettingValue
    Project Details
    SubscriptionSelect your Azure subscription.
    Resource GroupSelect Create new.
    Enter test-rg.
    Select OK.
    Instance details
    NAT gateway nameEnter nat-gateway
    RegionSelect East US 2
    Availability ZoneSelect No Zone.
    TCP idle timeout (minutes)Leave the default of 4.

    For information about availability zones and NAT gateway, see NAT gateway and availability zones.

  4. Select the Outbound IP tab, or select the Next: Outbound IP button at the bottom of the page.

  5. In the Outbound IP tab, enter or select the following information:

    SettingValue
    Public IP addressesSelect Create a new public IP address.
    In Name, enter public-ip-nat.
    Select OK.
  6. Select the Review + create tab, or select the blue Review + create button at the bottom of the page.

  7. Select Create.

Create a virtual network and bastion host

The following procedure creates a virtual network with a resource subnet, an Azure Bastion subnet, and an Azure Bastion host.

  1. In the portal, search for and select Virtual networks.

  2. On the Virtual networks page, select + Create.

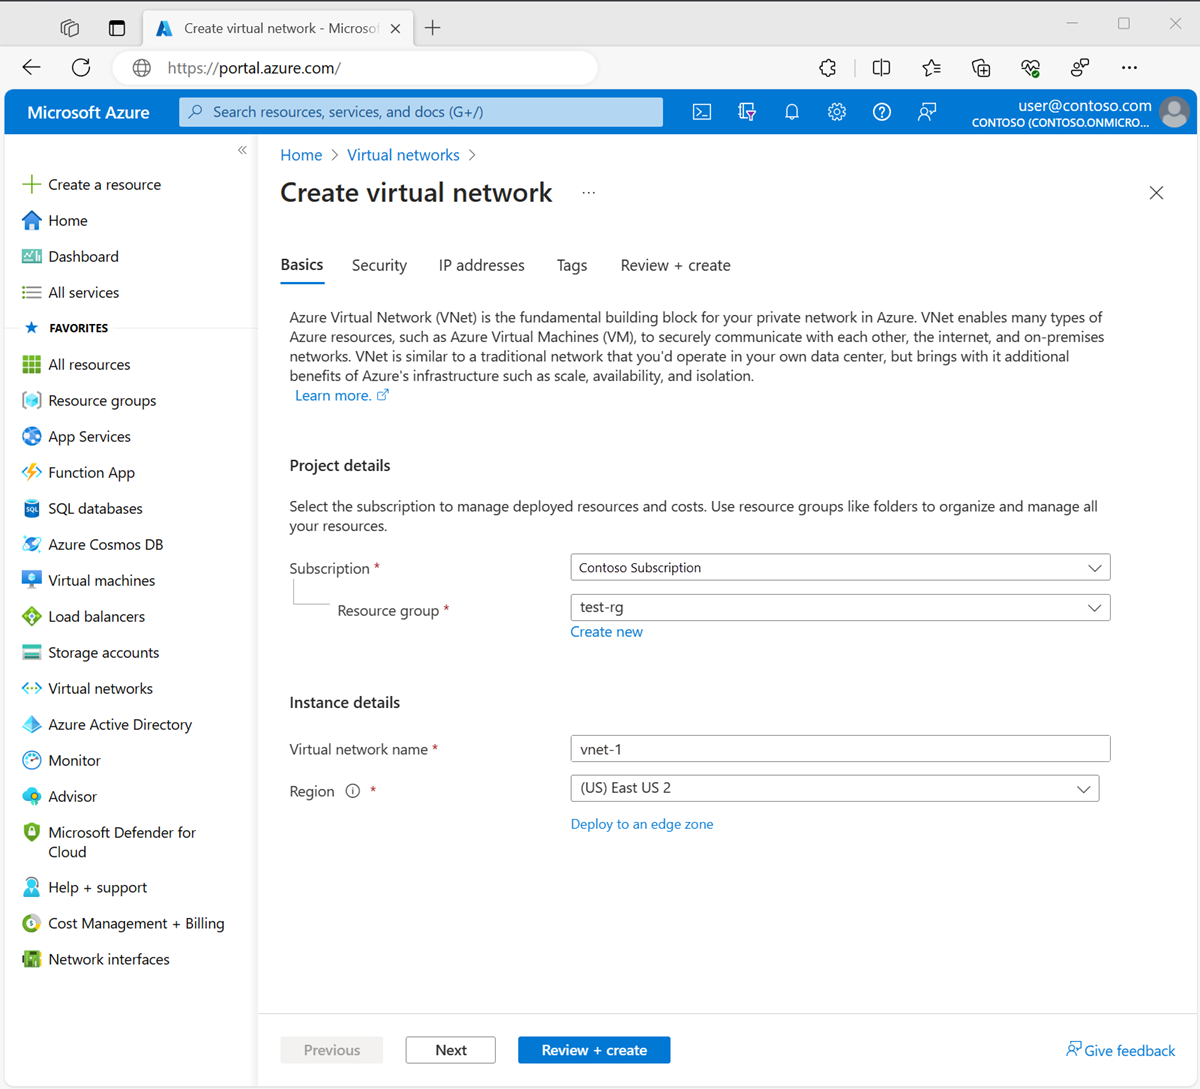
  3. On the Basics tab of Create virtual network, enter or select the following information:

    SettingValue
    Project details
    SubscriptionSelect your subscription.
    Resource groupSelect test-rg.
    Instance details
    NameEnter vnet-1.
    RegionSelect East US 2.

    Screenshot of Basics tab of Create virtual network in the Azure portal.

  4. Select Next to proceed to the Security tab.

  5. Select Enable Bastion in the Azure Bastion section of the Security tab.

    Azure Bastion uses your browser to connect to VMs in your virtual network over secure shell (SSH) or remote desktop protocol (RDP) by using their private IP addresses. The VMs don't need public IP addresses, client software, or special configuration. For more information about Azure Bastion, see Azure Bastion


  6. Enter or select the following information in Azure Bastion:

    SettingValue
    Azure Bastion host nameEnter bastion.
    Azure Bastion public IP addressSelect Create a public IP address.
    Enter public-ip in Name.
    Select OK.
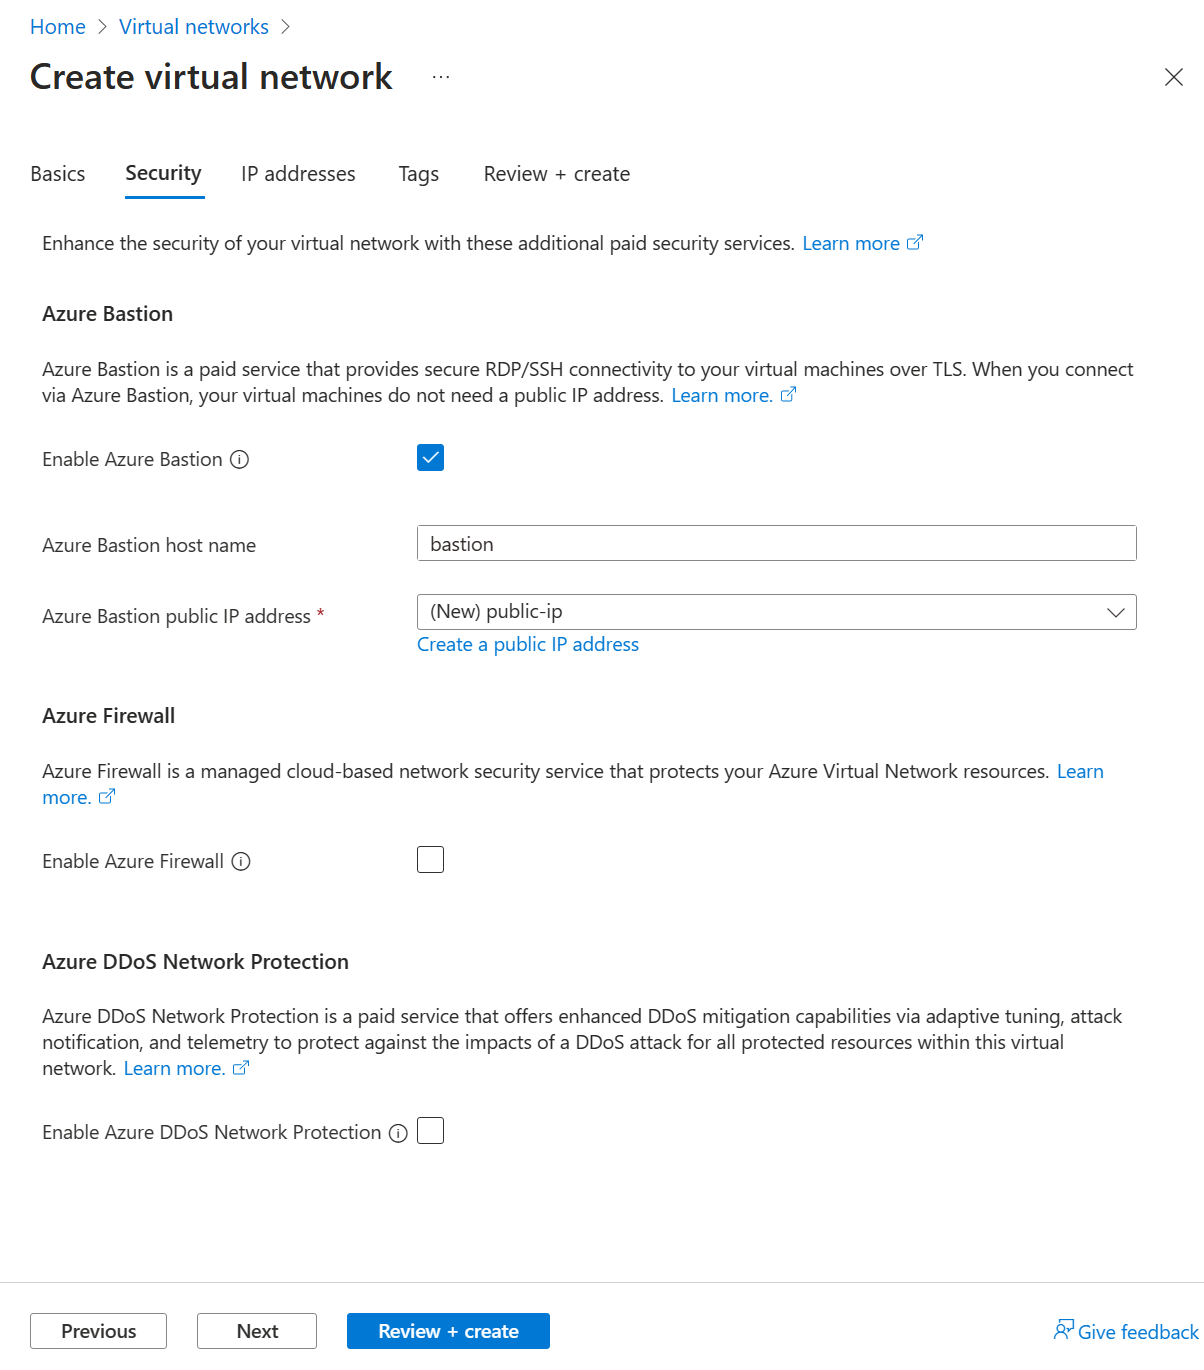
    Screenshot of enable bastion host in Create virtual network in the Azure portal.

  7. Select Next to proceed to the IP Addresses tab.

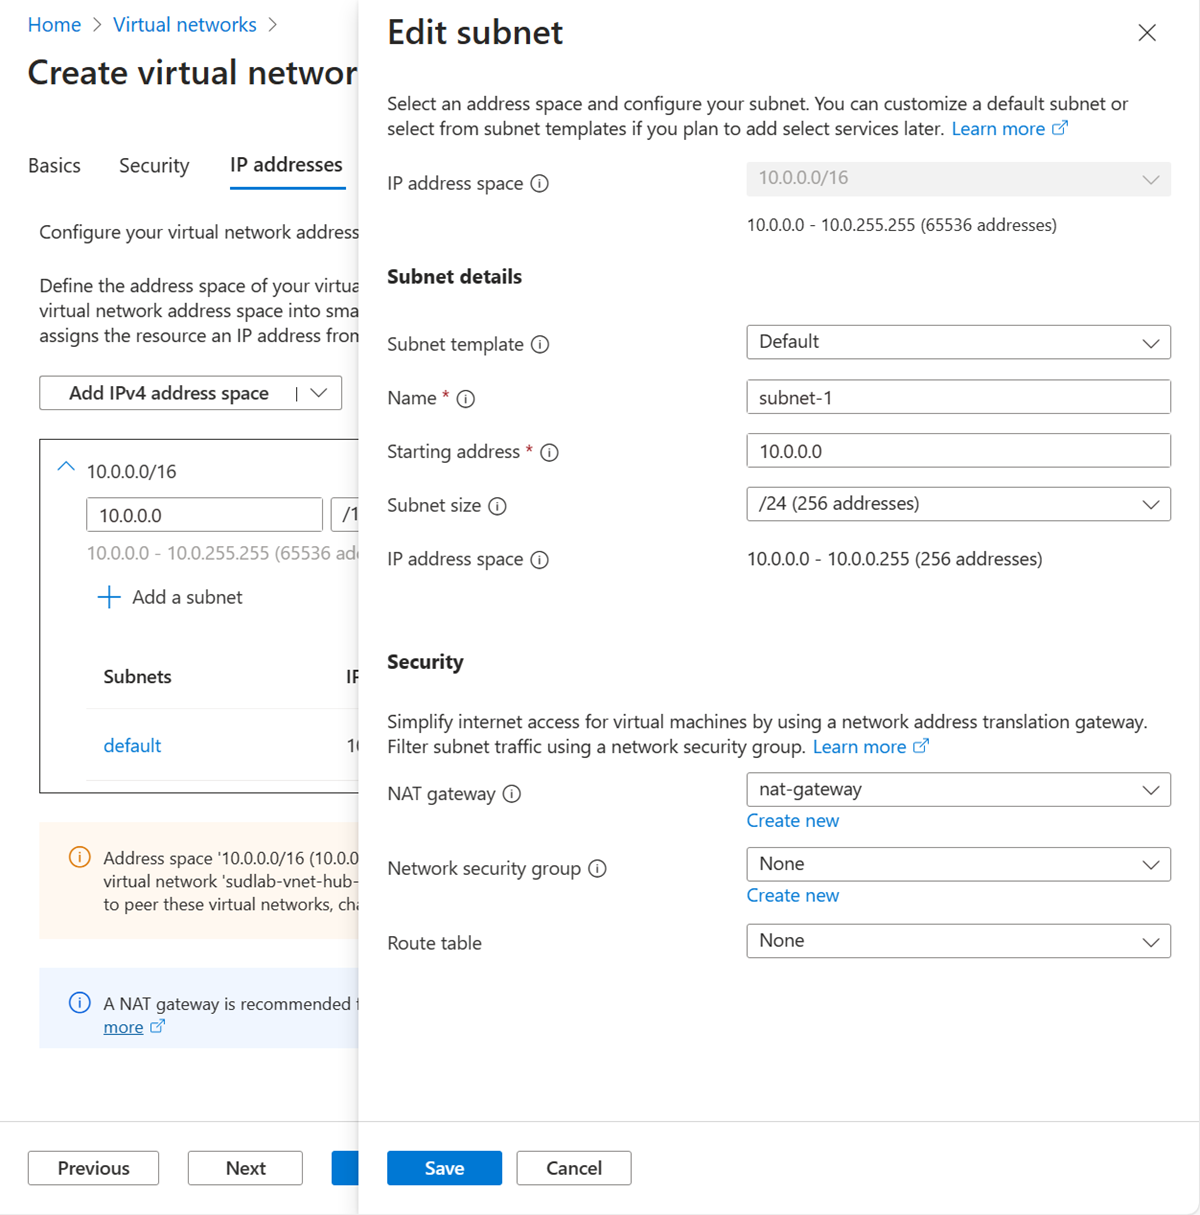
  8. In the address space box in Subnets, select the default subnet.

  9. In Edit subnet, enter or select the following information:

    SettingValue
    Subnet details
    Subnet templateLeave the default Default.
    NameEnter subnet-1.
    Starting addressLeave the default of 10.0.0.0.
    Subnet sizeLeave the default of /24(256 addresses).
    Security
    NAT gatewaySelect nat-gateway.

    Screenshot of default subnet rename and configuration.

  10. Select Save.

  11. Select Review + create at the bottom of the screen, and when validation passes, select Create.

Create test virtual machine

The following procedure creates a test virtual machine (VM) named vm-1 in the virtual network.

  1. In the portal, search for and select Virtual machines.

  2. In Virtual machines, select + Create, then Azure virtual machine.

  3. On the Basics tab of Create a virtual machine, enter or select the following information:

    SettingValue
    Project details
    SubscriptionSelect your subscription.
    Resource groupSelect test-rg.
    Instance details
    Virtual machine nameEnter vm-1.
    RegionSelect East US 2.
    Availability optionsSelect No infrastructure redundancy required.
    Security typeLeave the default of Standard.
    ImageSelect Ubuntu Server 22.04 LTS - x64 Gen2.
    VM architectureLeave the default of x64.
    SizeSelect a size.
    Administrator account
    Authentication typeSelect Password.
    UsernameEnter azureuser.
    PasswordEnter a password.
    Confirm passwordReenter the password.
    Inbound port rules
    Public inbound portsSelect None.
  4. Select the Networking tab at the top of the page.

  5. Enter or select the following information in the Networking tab:

    SettingValue
    Network interface
    Virtual networkSelect vnet-1.
    SubnetSelect subnet-1 (10.0.0.0/24).
    Public IPSelect None.
    NIC network security groupSelect Advanced.
    Configure network security groupSelect Create new.
    Enter nsg-1 for the name.
    Leave the rest at the defaults and select OK.
  6. Leave the rest of the settings at the defaults and select Review + create.

  7. Review the settings and select Create.


The default outbound access IP is disabled when one of the following events happens:

  • A public IP address is assigned to the VM.
  • The VM is placed in the backend pool of a standard load balancer, with or without outbound rules.
  • An Azure NAT Gateway resource is assigned to the subnet of the VM.

VMs that you create by using virtual machine scale sets in flexible orchestration mode don't have default outbound access.

For more information about outbound connections in Azure, see Default outbound access in Azure and Use Source Network Address Translation (SNAT) for outbound connections.

Test NAT gateway

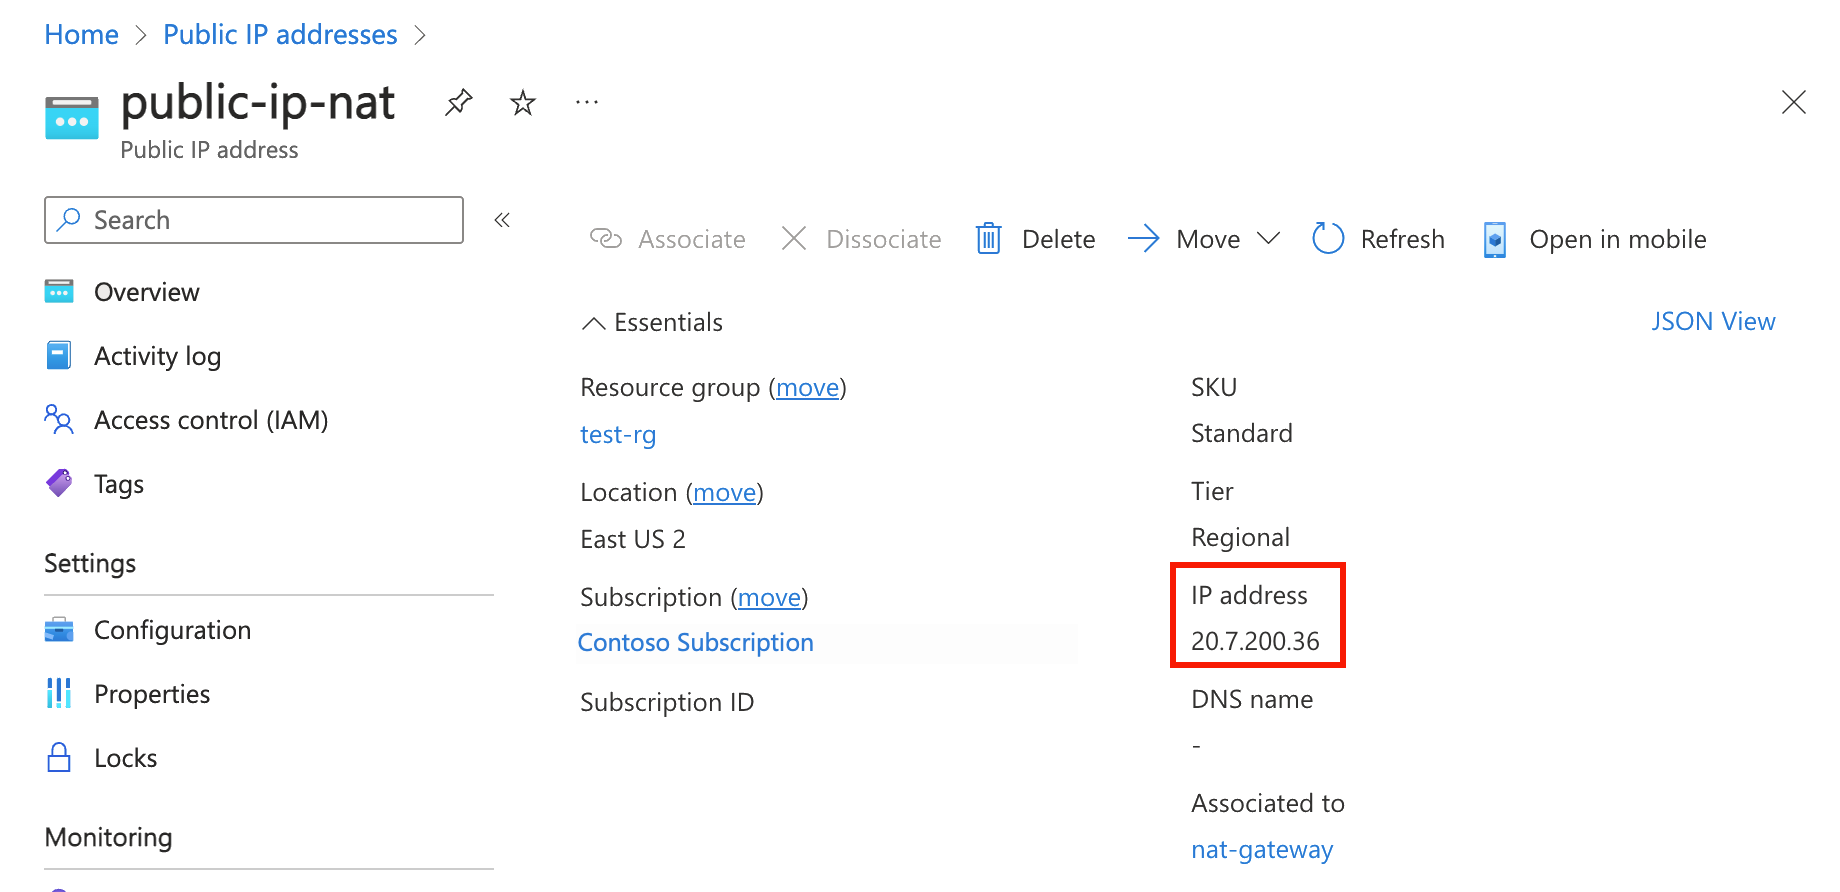
In this section, you test the NAT gateway. You first discover the public IP of the NAT gateway. You then connect to the test virtual machine and verify the outbound connection through the NAT gateway.

  1. In the search box at the top of the portal, enter Public IP. Select Public IP addresses in the search results.

  2. Select public-ip-nat.

  3. Make note of the public IP address:

    Discover public IP address of NAT gateway

  4. In the search box at the top of the portal, enter Virtual machine. Select Virtual machines in the search results.

  5. Select vm-1.

  6. On the Overview page, select Connect, then select the Bastion tab.

  7. Select Use Bastion.

  8. Enter the username and password entered during VM creation. Select Connect.

  9. In the bash prompt, enter the following command:

    Bash
    curl ifconfig.me
    
  10. Verify the IP address returned by the command matches the public IP address of the NAT gateway.

    Outputazureuser@vm-1:~$ curl ifconfig.me
    20.7.200.36

Friday, 7 June 2024

Manage DNS records and record sets by using the Azure portal


Manage DNS records and record sets by using the Azure portal

This article shows you how to manage record sets and records for your DNS zone by using the Azure portal.

It's important to understand the difference between DNS record sets and individual DNS records. A record set is a collection of records in a zone that have the same name and are the same type. For more information, see Create DNS record sets and records by using the Azure portal.

Create a new record set and record

To create a record set in the Azure portal, see Create DNS records by using the Azure portal.

View a record set

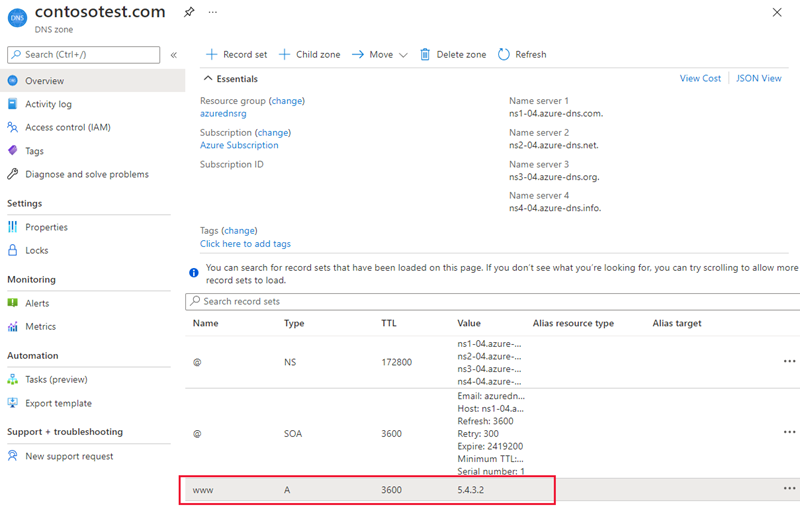
  1. In the Azure portal, go to the DNS zones overview page.

  2. Select your DNS zone. The current record sets are displayed.

    Screenshot of contosotest.com zone overview page.

Add a new record to a record set

You can add up to 20 records to any record set. A record set may not contain two identical records. Empty record sets (with zero records) can be created, but don't appear on the Azure DNS name servers. Record sets of type CNAME can contain one record at most.

  1. On the Record set properties page for your DNS zone, select the record set that you want to add a record to.

    Screenshot of selecting www record set.

  2. Specify the record set properties by filling in the fields.

    Screenshot of add a record page.

  3. Select Save at the top of the page to save your settings. Then close the page.

After the record has been saved, the values on the DNS zone page will reflect the new record.

Update a record

When you update a record in an existing record set, the fields you can update depend on the type of record you're working with.

  1. On the Record set properties page for your record set, search for the record.

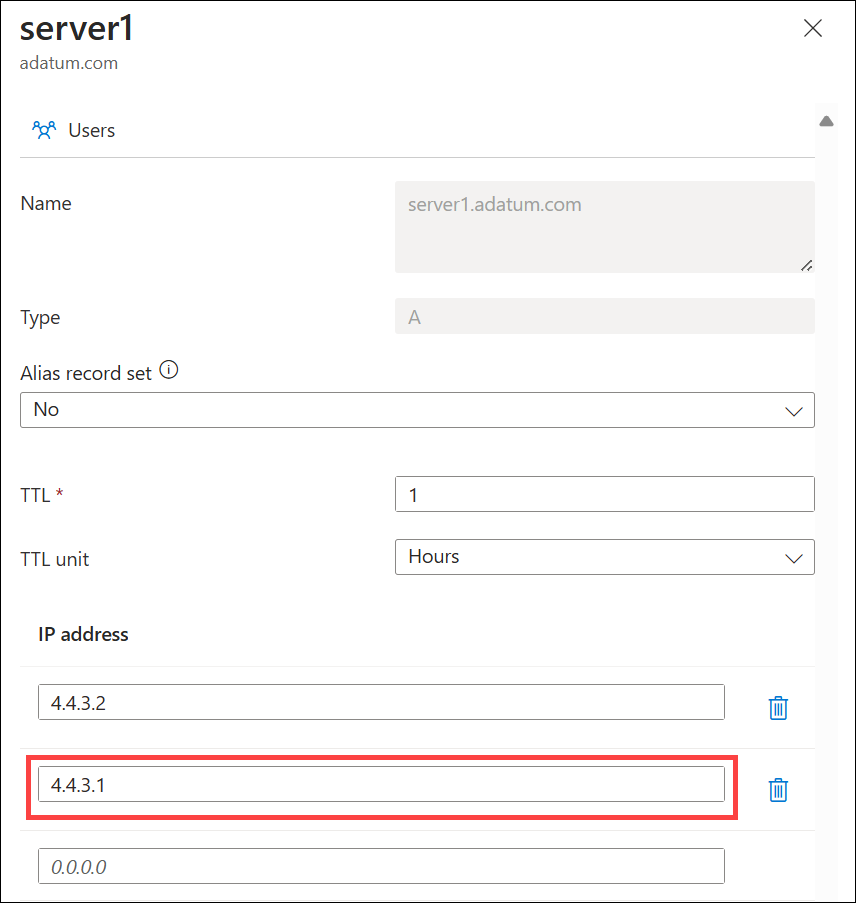
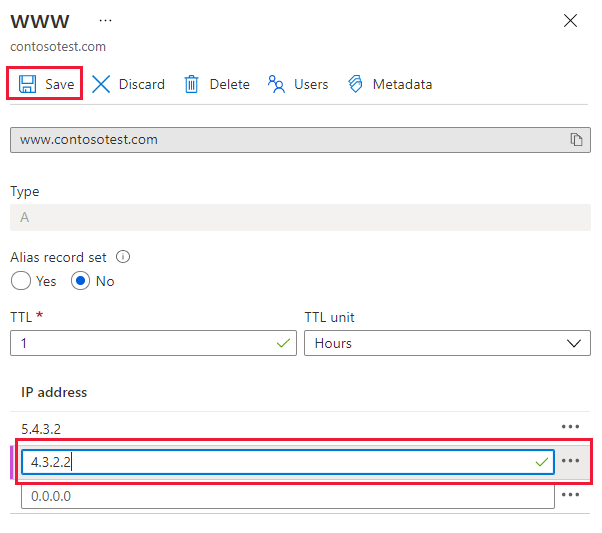
  2. Modify the record. When you modify a record, you can change the available settings for the record. In the following example, the IP address field is selected, and the IP address is being modified.

    Screenshot of update a record page.

  3. Select Save at the top of the page to save your settings. In the upper right corner, you'll see the notification that the record has been saved.

    Screenshot of a successfully saved record.

After the record has been saved, the values for the record set on the DNS zone page will reflect the updated record.

Remove a record from a record set

You can use the Azure portal to remove records from a record set. Removing the last record from a record set doesn't delete the record set.

  1. On the Record set properties page for your record set, search for the record.

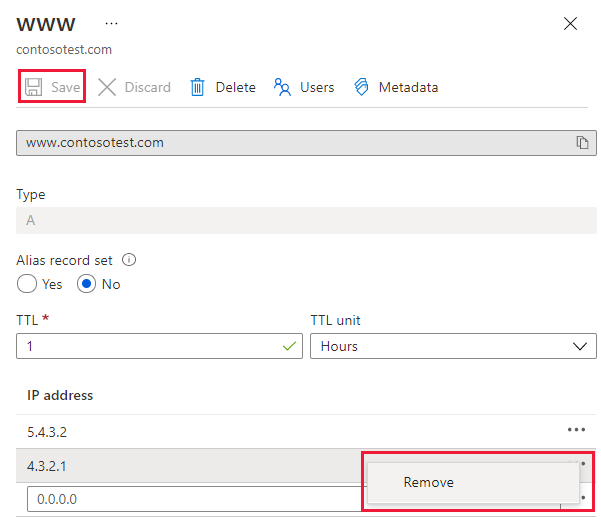
  2. Select the ... next to the record, then select Remove to delete the record from the record set.

    Screenshot of how to delete a record.

  3. Select Save at the top of the page to save your settings.

  4. After the record has been removed, the values for the record on the DNS zone page will reflect the removal.

Delete a record set

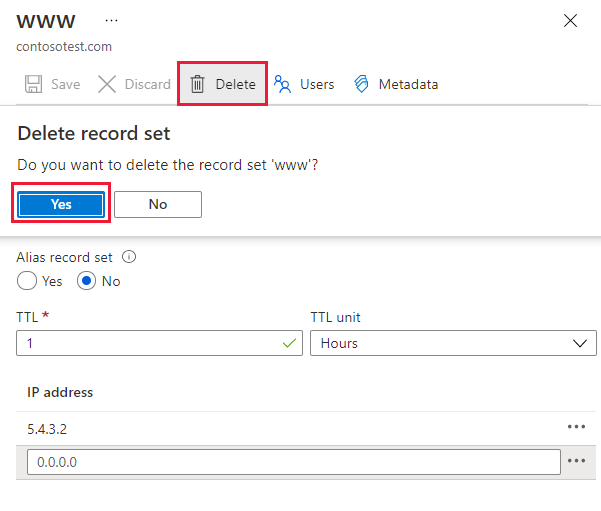
  1. On the Record set properties page for your record set, select Delete.

    Screenshot of how to delete a record set.

  2. A message appears asking if you want to delete the record set.

  3. Verify that the name matches the record set that you want to delete, and then select Yes.

  4. On the DNS zone page, verify that the record set is no longer visible.

Work with NS and SOA records

NS and SOA records that are automatically created are managed differently from other record types.

Modify SOA records

You can't add or remove records from the automatically created SOA record set at the zone apex (name = "@"). However, you can modify any of the parameters within the SOA record, except "Host" and the record set TTL.

Modify NS records at the zone apex

The NS record set at the zone apex is automatically created with each DNS zone. It contains the names of the Azure DNS name servers assigned to the zone.

You may add more name servers to this NS record set, to support cohosting domains with more than one DNS provider. You can also modify the TTL and metadata for this record set. However, you can't remove or modify the pre-populated Azure DNS name servers.

This restriction only applies to the NS record set at the zone apex. Other NS record sets in your zone (as used to delegate child zones) can be modified without constraint.

Delete SOA or NS record sets

You can't delete the SOA and NS record sets at the zone apex (name = "@") that gets automatically created when the zone gets created. They're deleted automatically when you delete the zone.

What is Azure Private DNS


What is Azure Private DNS?

Azure Private DNS provides a reliable and secure DNS service for your virtual network. Azure Private DNS manages and resolves domain names in the virtual network without the need to configure a custom DNS solution. By using private DNS zones, you can use your own custom domain name instead of the Azure-provided names during deployment.

Azure_Private_DNS

Using a custom domain name helps you tailor your virtual network architecture to best suit your organization’s needs. It provides a naming resolution for virtual machines (VMs) within a virtual network and connected virtual networks. Additionally, you can configure zones names with a split-horizon view, which allows a private and a public DNS zone to share the name.

Benefits of Azure Private DNS

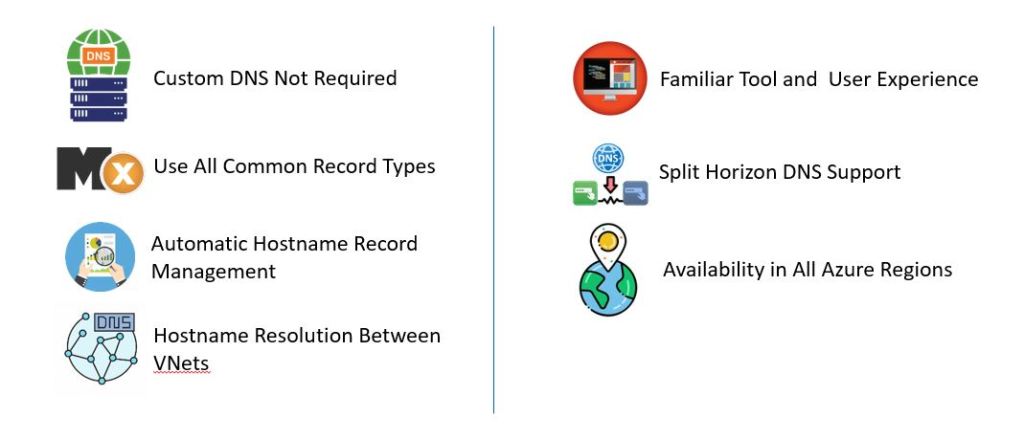
1. Removes the need for custom DNS solutions. Previously, many customers created custom DNS solutions to manage DNS zones in their virtual network. You can now manage DNS zones using the native Azure infrastructure, which removes the burden of creating and managing custom DNS solutions.

2. Automatic hostname record management. Along with hosting your custom DNS records, Azure automatically maintains hostname records for the VMs in the specified virtual networks. In this scenario, you can optimize the domain names you use without needing to create custom DNS solutions or modify applications.

3. Hostname resolution between virtual networks. Unlike Azure-provided hostnames, private DNS zones can be shared between virtual networks. This capability simplifies cross-network and service-discovery scenarios, such as virtual network peering.

4. Familiar tools and user experience. To reduce the learning curve, this service uses well-established Azure DNS tools (Azure portal, Azure PowerShell, Azure CLI, Azure Resource Manager templates, and the REST API).

5. Available in all Azure regions. The Azure DNS private zones feature is available in all Azure regions in the Azure public cloud.

Benefits_of_Azure_Private_DNS


Azure DNS Provides the Following Capabilities

  • Automatic registration of virtual machines from a virtual network that’s linked to a private zone with auto-registration enabled. Virtual machines get registered to the private zone as A records pointing to their private IP addresses. When a virtual machine in a virtual network link with auto-registration enabled gets deleted, Azure DNS also automatically removes the corresponding DNS record from the linked private zone.
  • Forward DNS resolution is supported across virtual networks that are linked to the private zone. For cross-virtual network DNS resolution, there’s no explicit dependency such that the virtual networks peer with each other. However, you might want to peer virtual networks for other scenarios (for example, HTTP traffic).
  • Reverse DNS lookup is supported within the virtual-network scope. Reverse DNS lookup for a private IP associated with a private zone will return an FQDN that includes the host/record name and the zone name as the suffix.

Configure the Azure DNS

In this section, you will learn how to create an Azure Private DNS Zone using the Azure portal. A DNS zone contains the DNS entries for a domain. To start hosting your domain in Azure DNS, you create a DNS zone for that domain name.

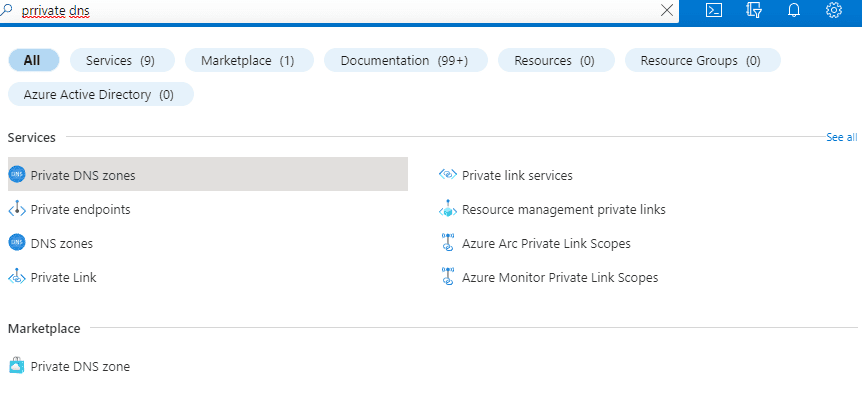
1. In the Azure portal, search for Private DNS zones and select Private DNS Zone.

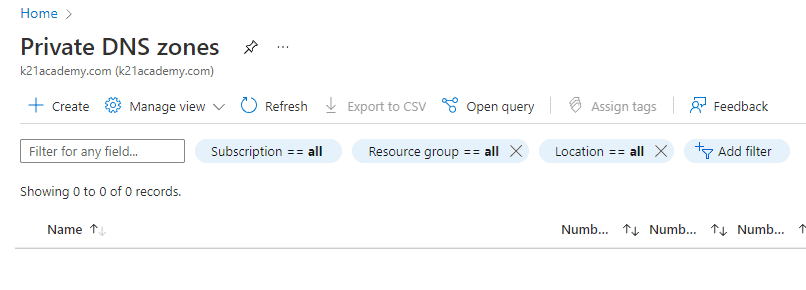
2. Click on +Create to create a new Private DNS zone.dns

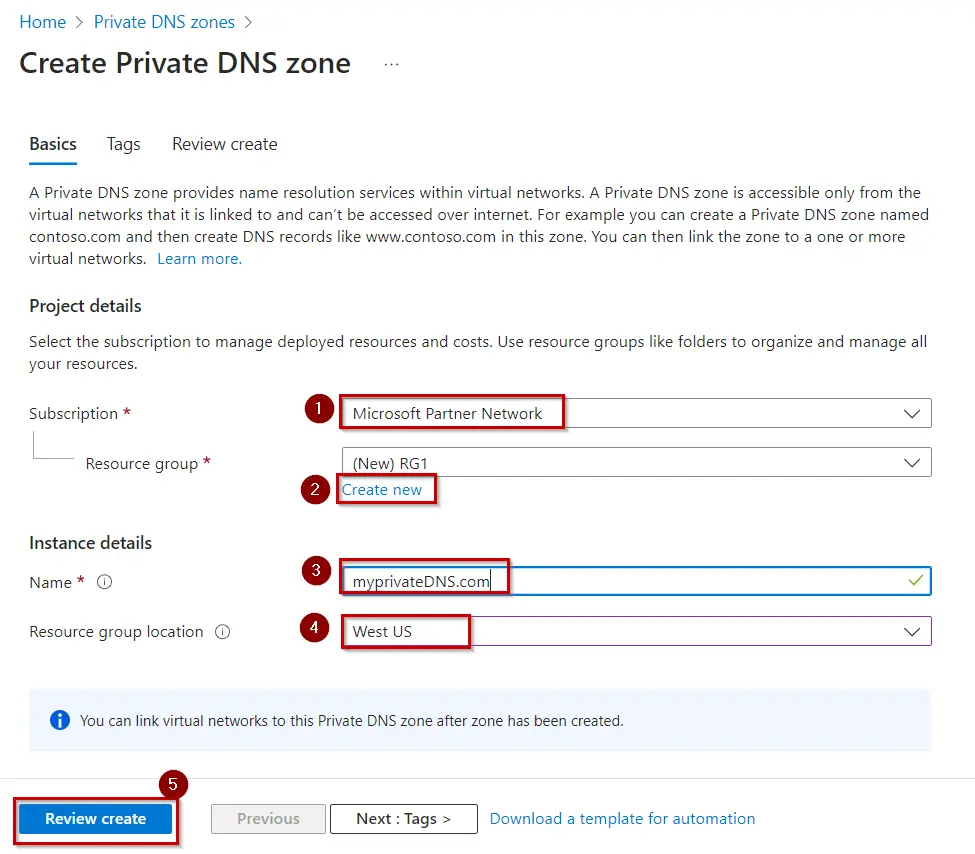
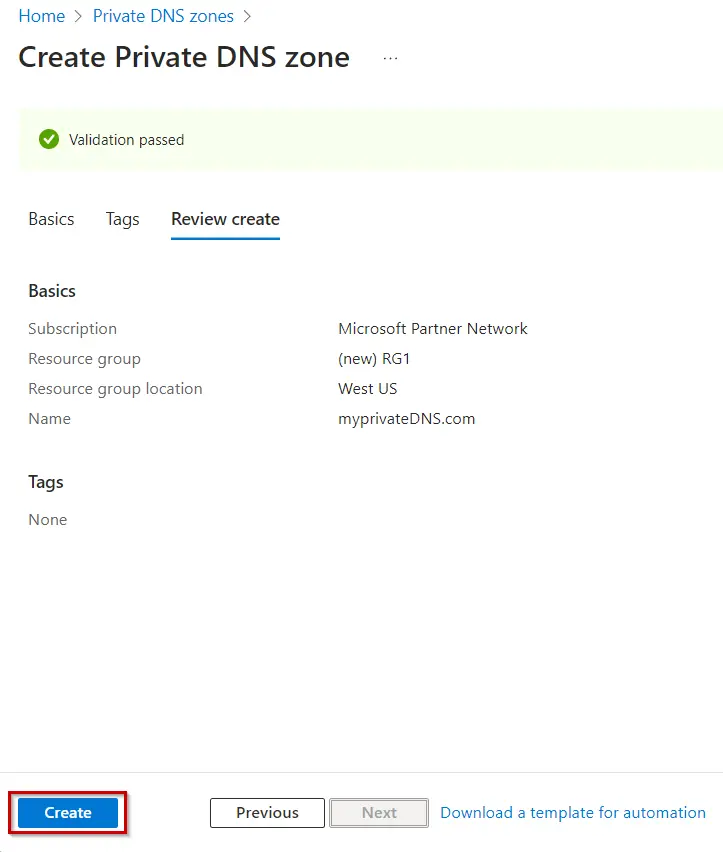
3.On the Create Private DNS zone page, type or select the following values:
Resource group: Select Create new, enter MyAzureResourceGroup, and select OK. The resource group name must be unique within the Azure subscription.
Name: Type private.contoso.com for this example.
DNS1

4.Select Create Once validation is passed.
DNS2

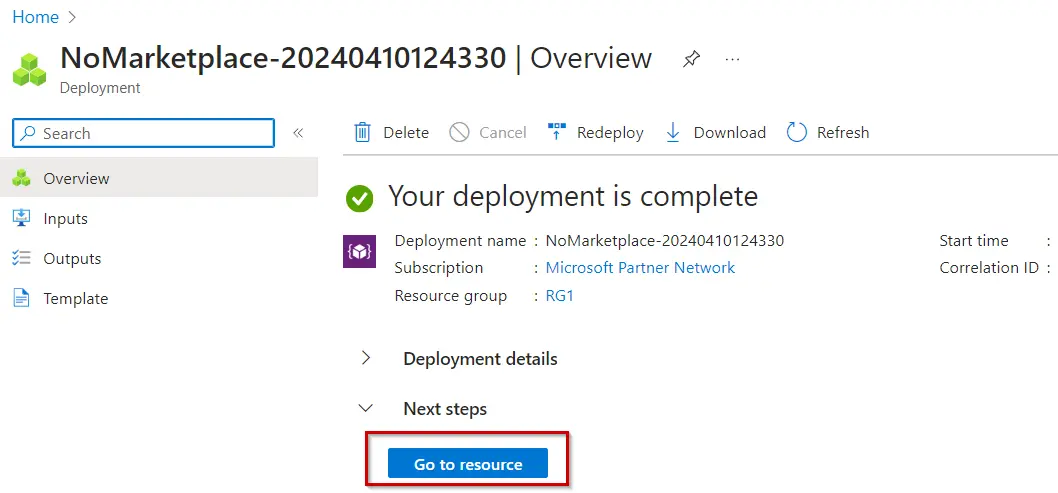
5. Click on Go to Resource.
DNS3

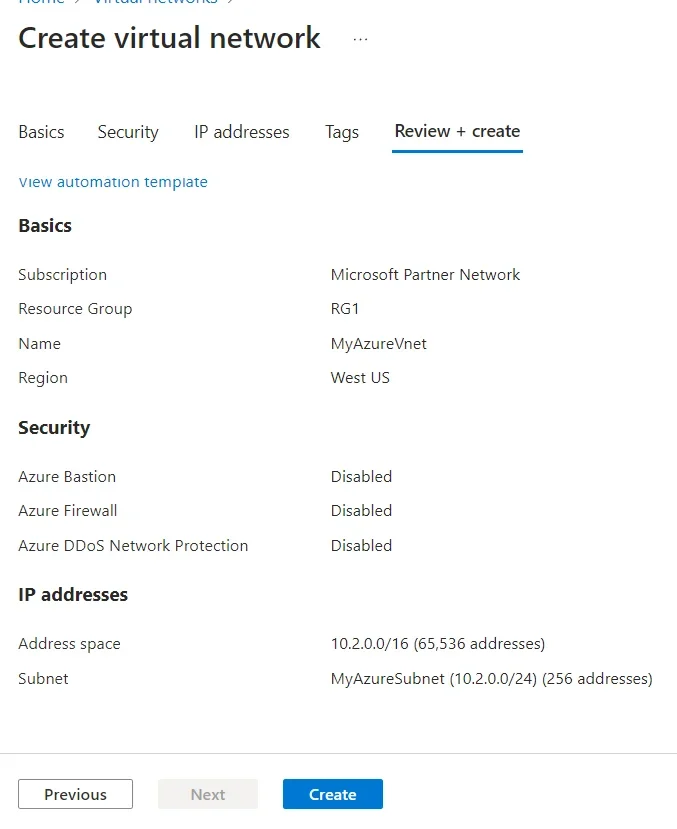
6.Now we will create Create the virtual network and subnet

SettingValue
Project Details
SubscriptionSelect your Azure subscription
Resource GroupSelect Create new, enter <resource-group-name>, then select OK, or select an existing <resource-group-name> based on parameters.
Instance details
NameEnter <virtual-network-name>
RegionSelect <region-name>

7.Select the IP Addresses tab or select the Next: IP Addresses button at the bottom of the page. In the IP Addresses tab, enter this information:

SettingValue
IPv4 address spaceEnter <IPv4-address-space>

8.Under Subnet name, write any name. In Edit subnet, enter this information:

SettingValue
Subnet nameEnter <subnet-name>
Subnet address rangeEnter <subnet-address-range>

9.In Create virtual network, enter or select this information in the Basics tab:

10. Click on Create.
DNS6

11.Now we will link the Virtual Network.

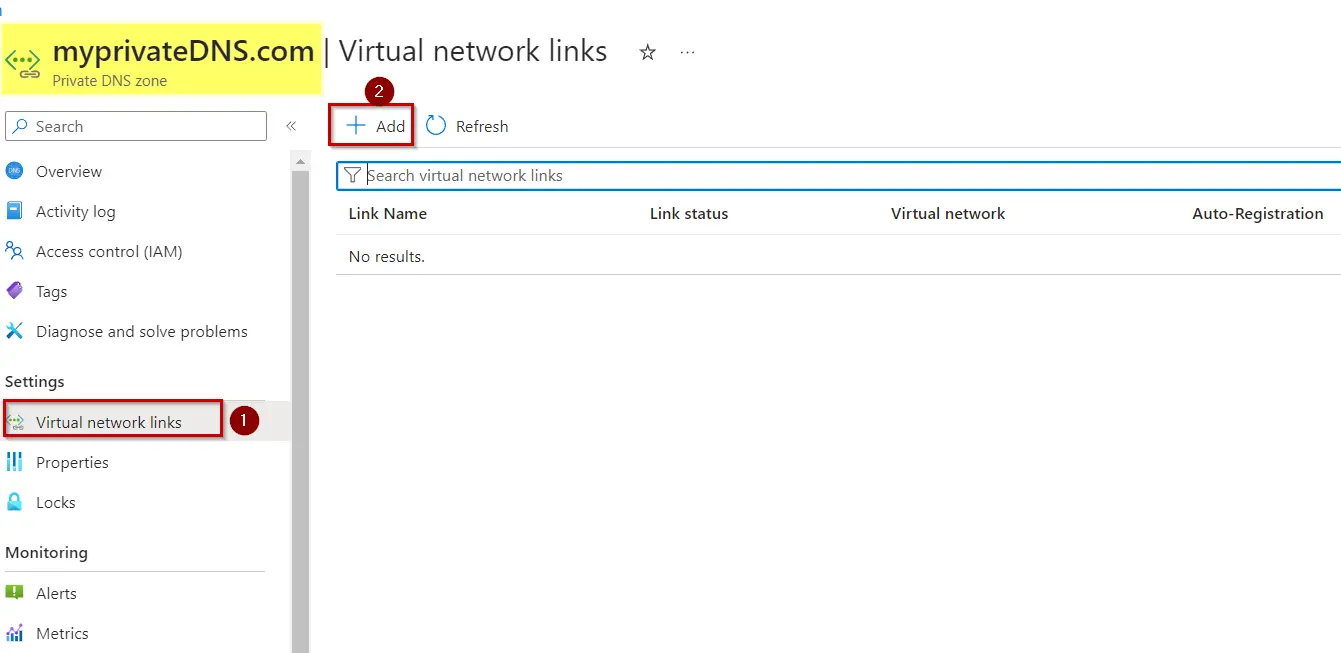
12.Open your Private DNS Zone.

13.On the left pane, select Virtual network links then Select Add.
DNS5

14. Type myLink for the Link name & For Virtual network, select myAzureVNet. Select the Enable auto registration check box & select OK
DNS7

Create the test virtual machine.

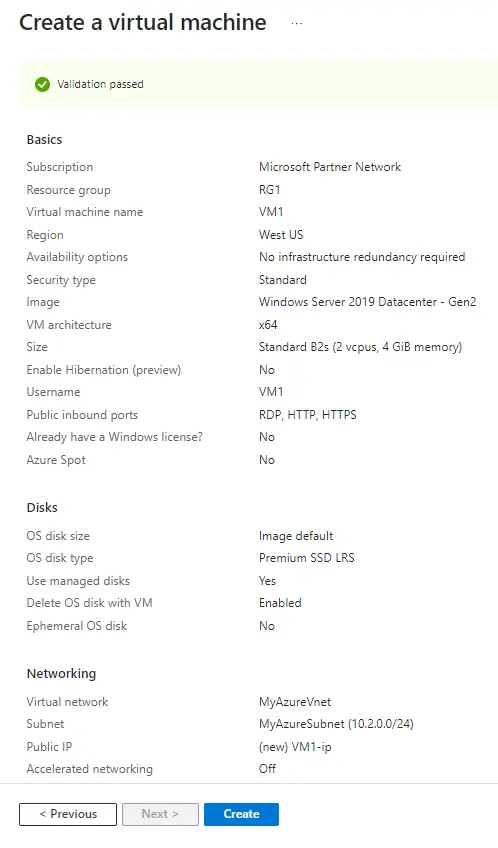
Create a Windows Virtual Machine of Windows Server 2019 Image of 2vcpu with in the same Virtual network.
You can  checkout the detailed Azure Windows VM BlogDNS9

DNS13

Creating DNS Records

DNS entries or records for your domain inside the DNS zone. Create a new address record or ‘A’ record to resolve a hostname to an IPv4 address.

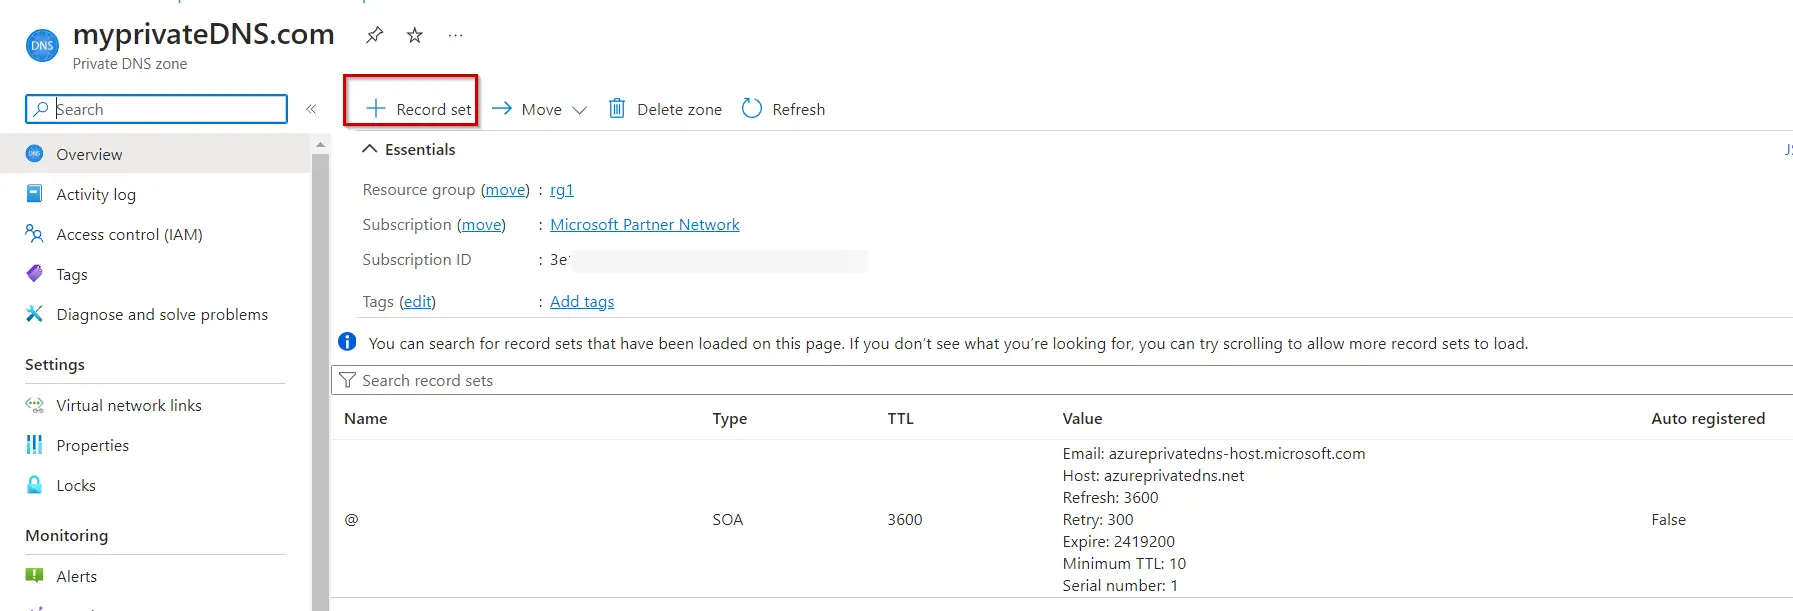
1. Go back to Portal > Private DNS zone > select +Record set to create a Recordset in Private DNS Zone.
DNS4

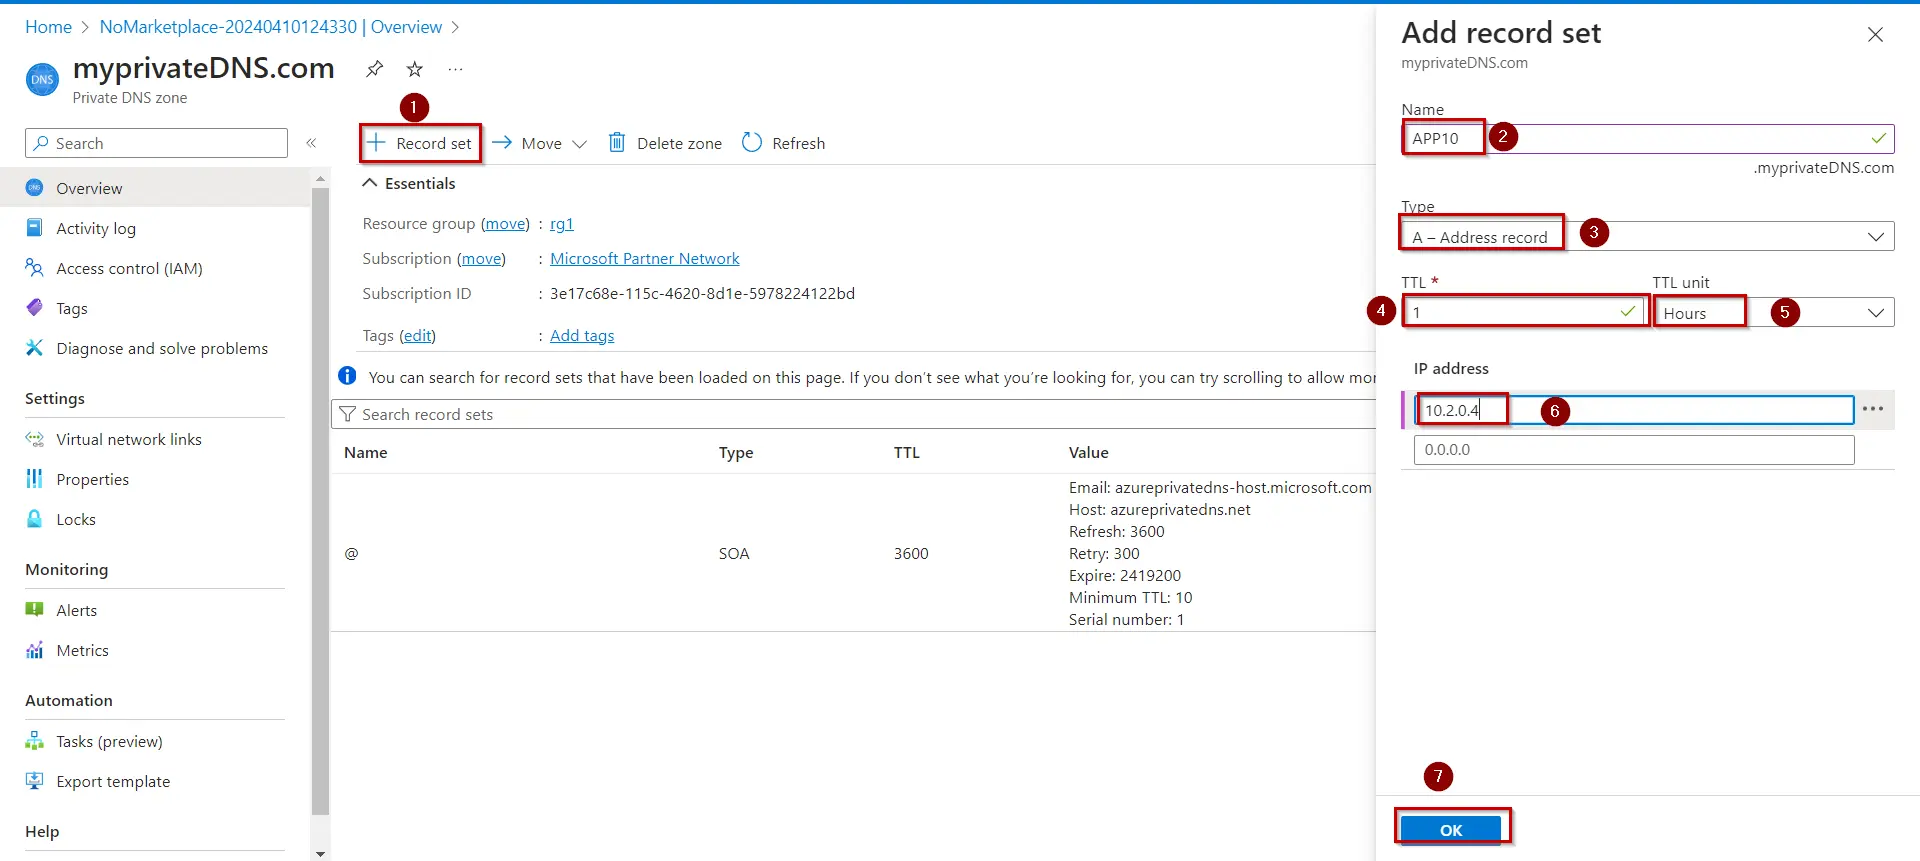
2. Give the name APP10 and IP 10.2.0.4 which is the IP address of VM with Web Server Role configured previously.

    • Name: The record name is the hostname that you want to resolve to the specified IP address.You can give APP10
    • Type: Select A. ‘A’ records
    • TTL: Type 1. Time-to-live of the DNS request specifies how long DNS servers and clients can cache a response.
    • TTL Unit: Select Hours. This is the time unit for the TTL value.
    • IP address: This value is the IP address the record name resolves to. Enter the Private Ip of your VM.
      DNS10

3.Your DNS record is set now
DNS12

Test the private zone

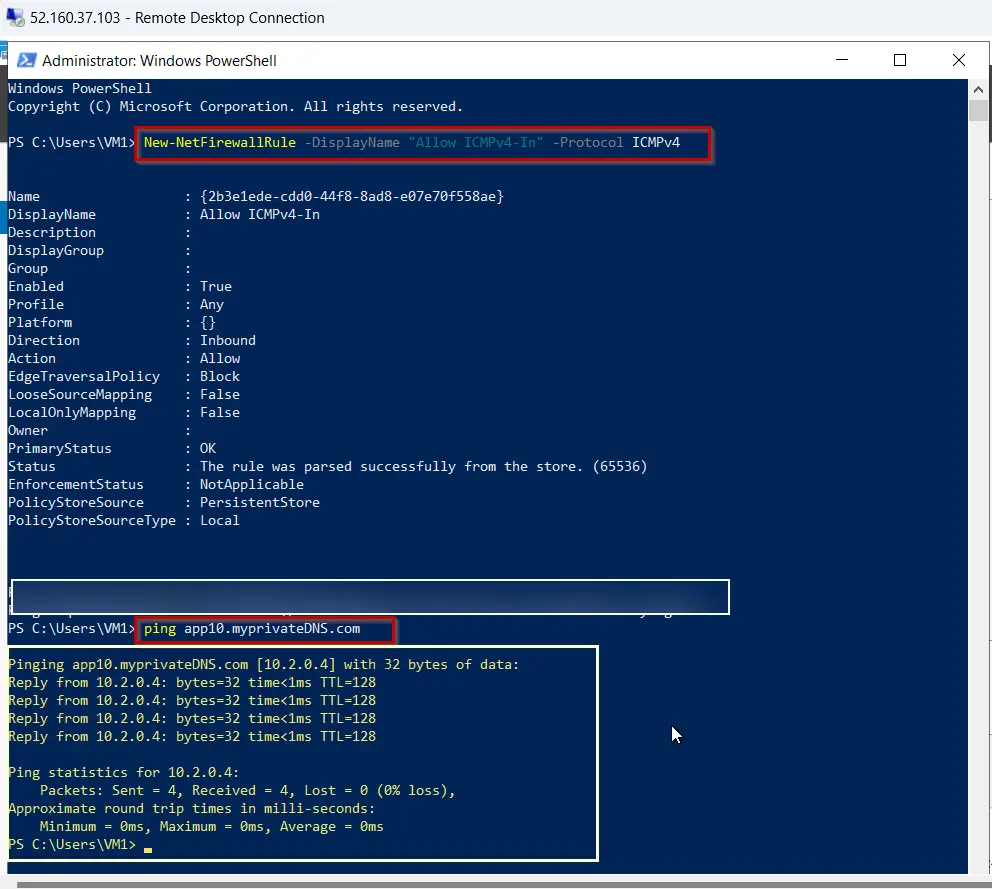
  1. Connect to your VM1, and open a Windows PowerShell window with administrator privileges.
  2. Run the following command to configure firewall:
    New-NetFirewallRule –DisplayName “Allow ICMPv4-In” –Protocol ICMPv4
  3. Now ping your VM01 using your registered host name:
    DNS11


How to manage DNS Zones in the Azure portal

How to manage DNS Zones in the Azure portal

This article shows you how to manage your DNS zones by using the Azure portal. You can also manage your DNS zones using the cross-platform Azure CLI or the Azure PowerShell.

Create a DNS zone

  1. Sign in to the Azure portal.

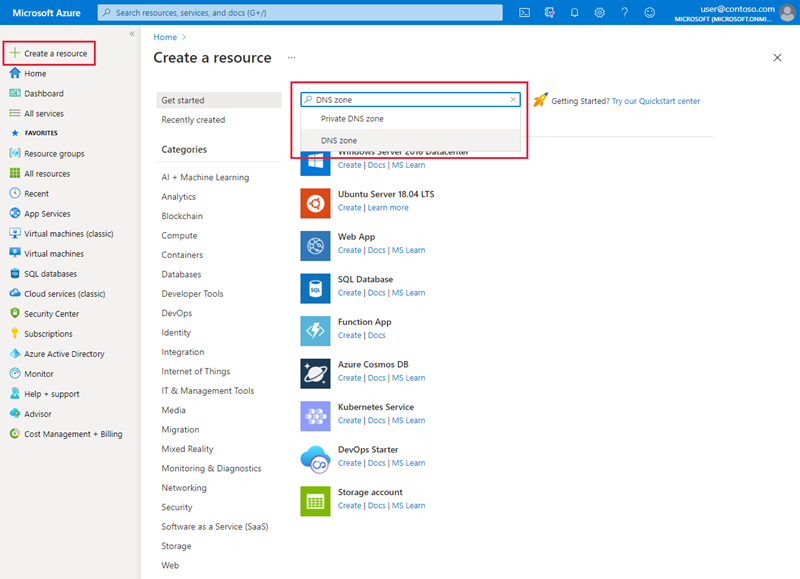
  2. On the top left-hand side of the screen, select Create a resource and search for DNS zone. Then select Create.

    Screenshot of create a resource search for DNS zone.

  3. On the Create DNS zone page enter the following values, then select Create:

    SettingDetails
    SubscriptionSelect a subscription to create the DNS zone in.
    Resource groupSelect or create a new resource group. To learn more about resource groups, read the Resource Manager overview article.
    NameEnter a name for the DNS zone. For example: contoso.com.
    LocationSelect the location for the resource group. The location will already be selected if you're using a previously created resource group.


List DNS zones

In the search resources at the top of the Azure portal, search for DNS zones. Each DNS zone is its own resource. Information such as number of record-sets and name servers are viewable from this page. The column Name servers isn't in the default view. To add it, select Managed view > Edit columns > + Add Column, then from the drop-down select Name servers. Select Save to apply the new column.

Screenshot of DNS zone list page.

Delete a DNS zone

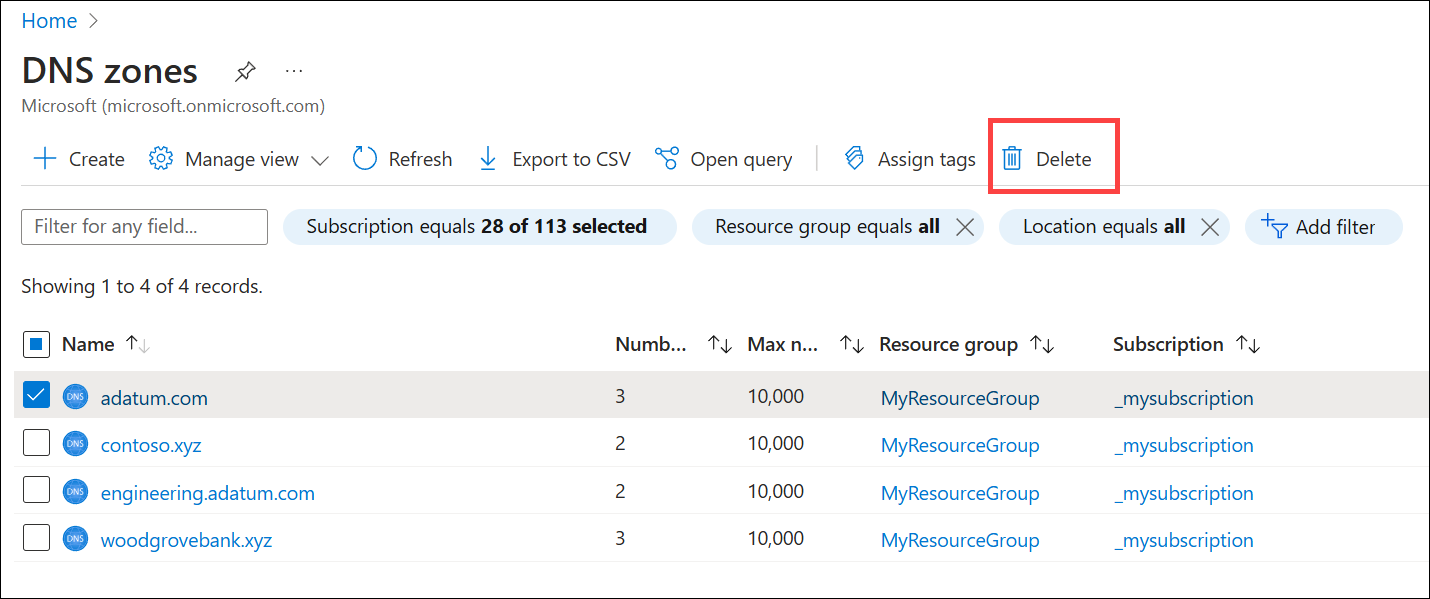
Navigate to a DNS zone in the portal. On the selected DNS zone overview page, select Delete zone. You're then prompted to confirm that you want to delete the DNS zone. Deleting a DNS zone also deletes all records that are contained in the zone.

Screenshot of delete DNS zone button on overview page.