Thursday 12 September 2019

Prevent unexpected charges with Azure billing and cost management

Prevent unexpected charges with Azure billing and cost management

When you sign up for Azure, there are several things you can do to get a better idea of your spending:

Get estimated costs before adding Azure services

Here is some additional information about estimating costs using the following tools:
  • Azure pricing calculator
  • Azure portal
  • Spending limit
The images in the following sections show example pricing in US Dollars.

Estimate cost online using the pricing calculator

Check out the pricing calculator to get an estimated monthly cost of the service you're interested in. You can add any first party Azure resource to get an estimated cost. In the pricing calculator, you can change the currency type.
Screenshot of the pricing calculator menu
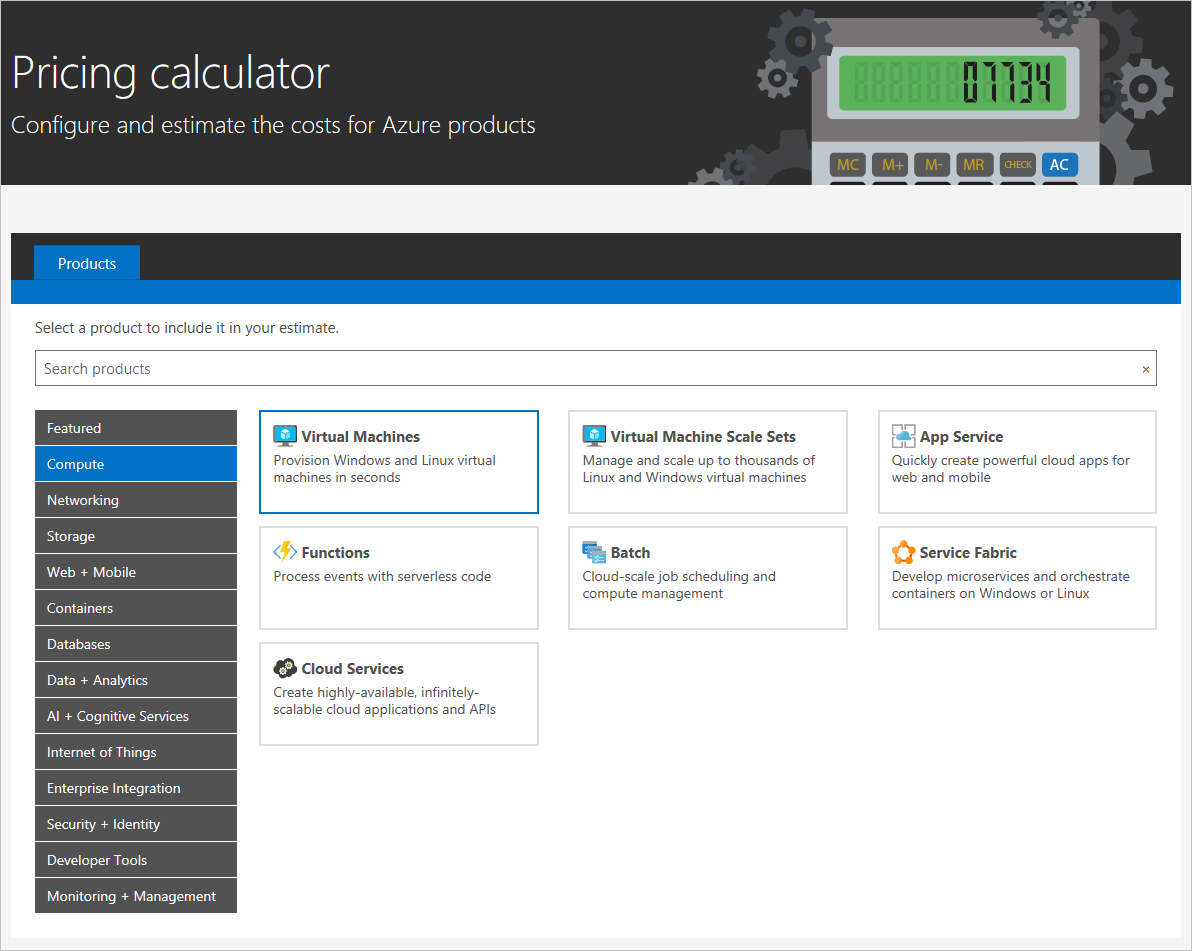
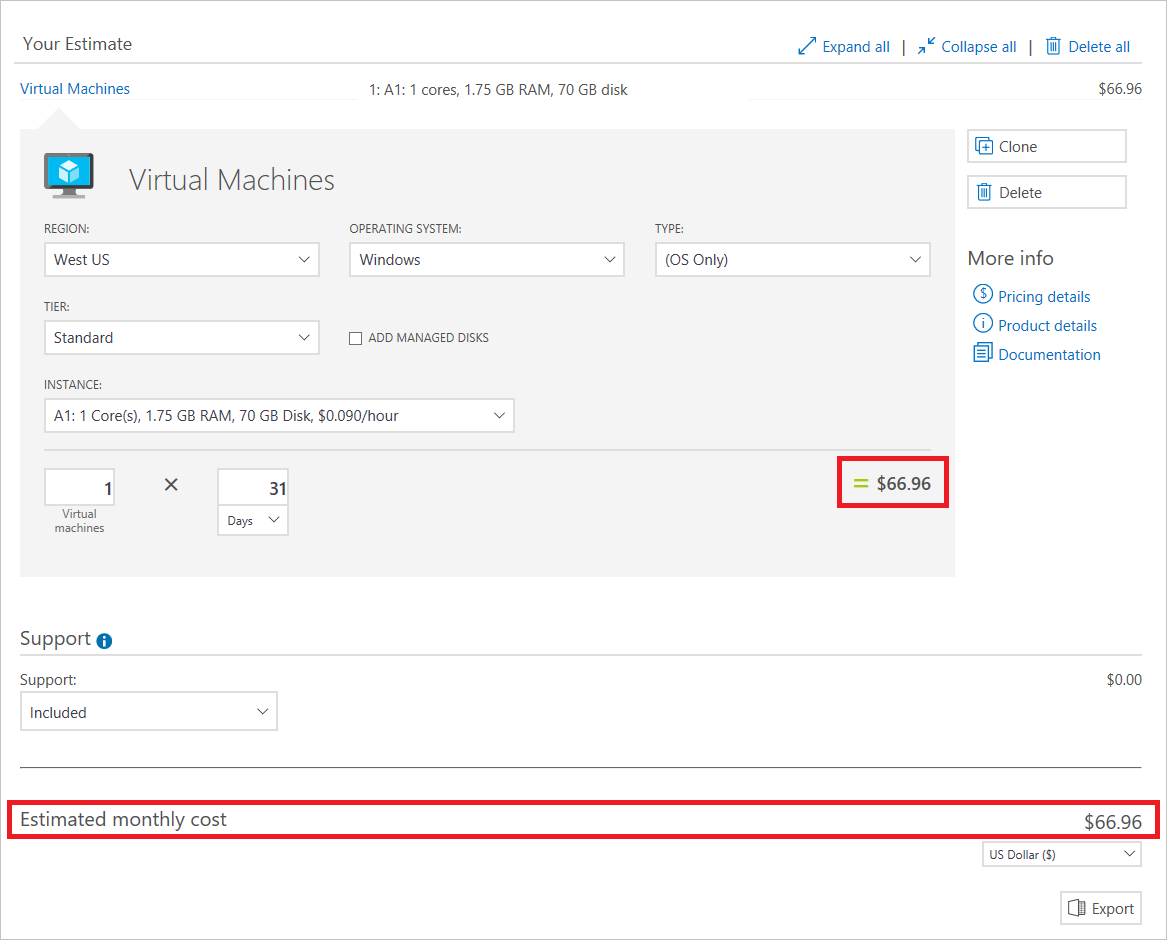
For example, in the pricing calculator, an A1 Windows Virtual Machine (VM) is estimated to cost a certain amount/month in compute hours if you leave it running the whole time:
Screenshot of the pricing calculator showing an A1 Windows VM estimated cost per month
For more information about pricing, see the Pricing FAQ. If you want to talk to an Azure salesperson, call the phone number shown at the top of the FAQ page.

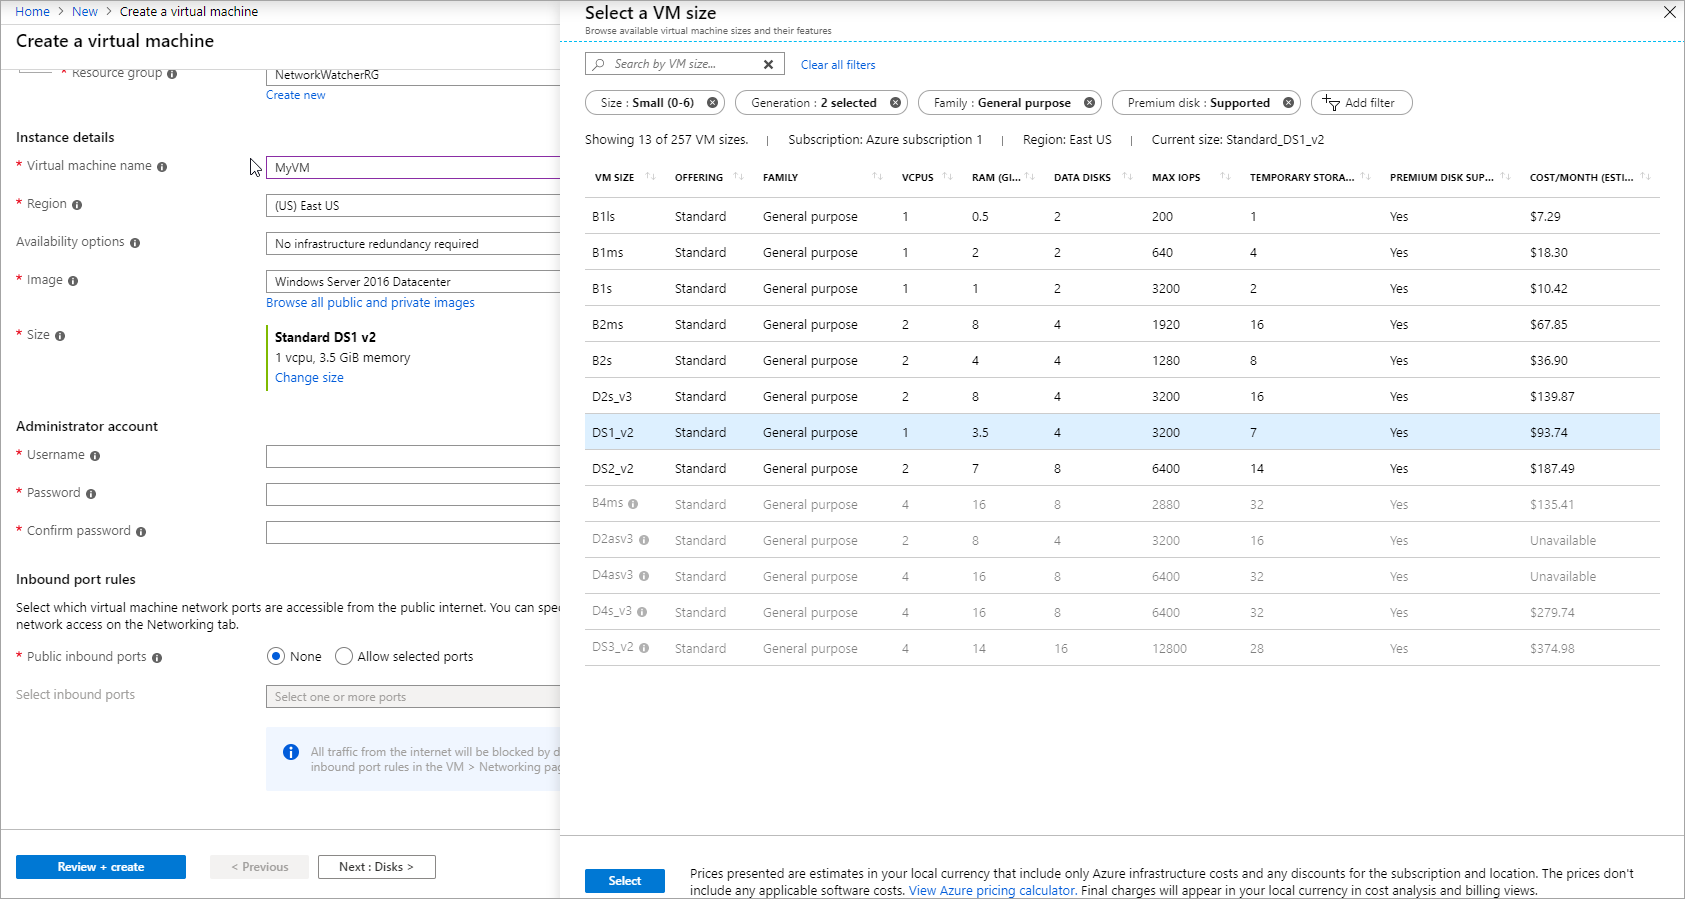
Review estimated costs in the Azure portal

Typically, when you add a service in the Azure portal, there's a view that shows you an estimated cost per month in your billed currency. For example, when you choose the size of your Windows VM, you see the estimated monthly cost for the compute hours:
Example: an A1 Windows VM showing estimated cost per month

Check if you have a spending limit on

If you have a subscription that uses credits, then the spending limit is turned on for you by default. This way, when you spend all your credits, your credit card doesn't get charged. See the full list of Azure offers and the availability of spending limit.
However, when you reach your spending limit, your services get disabled. That means your VMs are deallocated. To avoid service downtime, you must turn off the spending limit. Any overage gets charged onto your credit card on file.
To see if you've got a spending limit on, go to the Subscriptions view in the Account Center. A banner appears if your spending limit is on, similar to the following:
Screenshot that shows a warning about spending limit being on in the Account Center
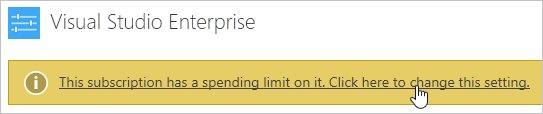
Click the banner and follow the prompts to remove the spending limit. If you didn't enter credit card information when you signed up, you must enter it to remove the spending limit. For more information, see Azure spending limit – How it works and how to enable or remove it.

Use budgets and cost alerts

You can create budgets to manage costs and create alerts that automatically notify stakeholders of spending anomalies and overspending risks. Alerts are based on spending compared to budget and cost thresholds.

Monitor costs when using Azure services

You can monitor costs with the following tools:
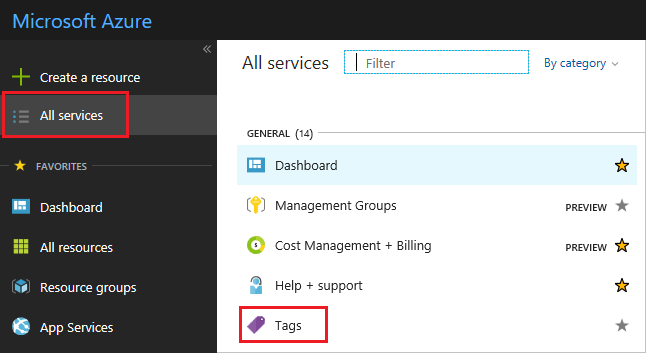
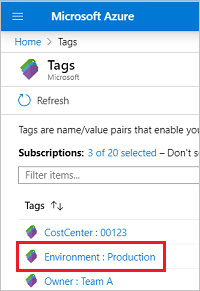
  • Tags
  • Cost breakdown and burn rate
  • Cost analysis

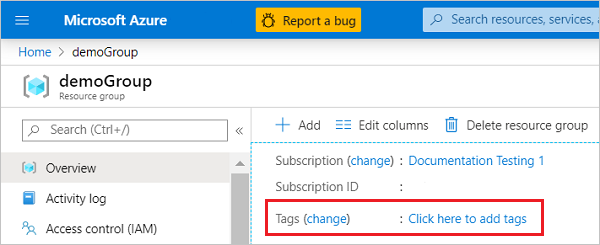
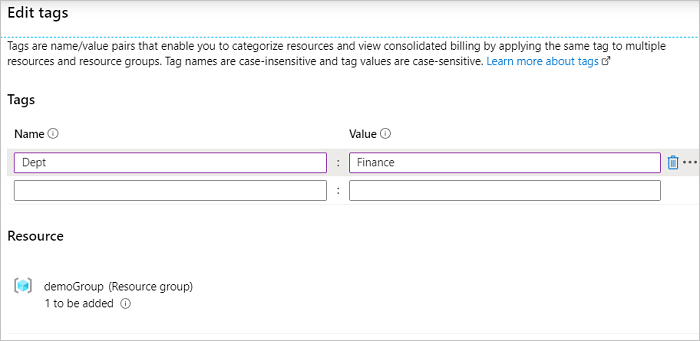
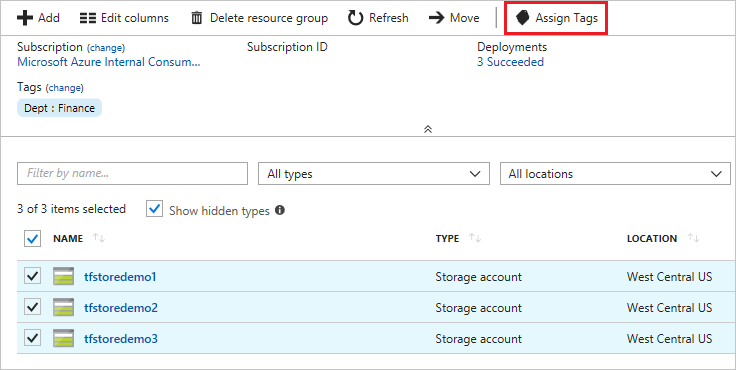
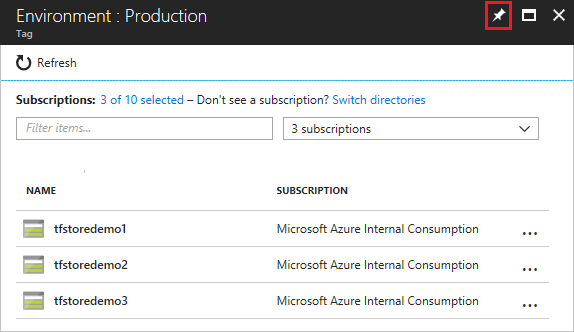
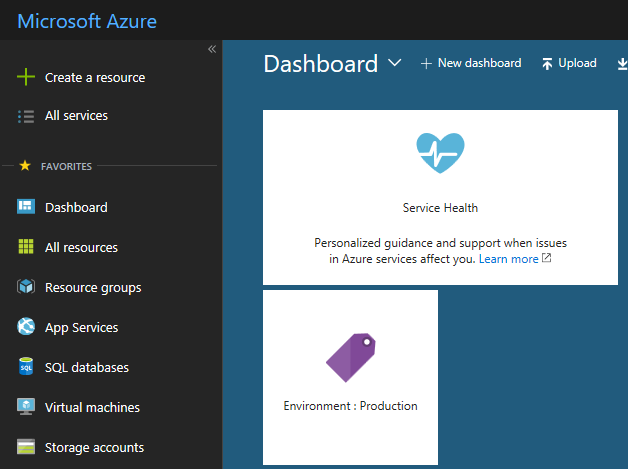
Add tags to resources to group billing data

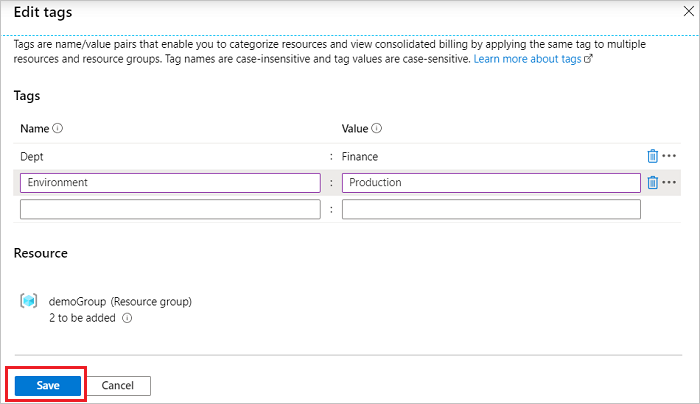
You can use tags to group billing data for supported services. For example, if you run several VMs for different teams, then you can use tags to categorize costs by cost center (for example: HR, marketing, finance, etc.) or environment (for example: production, pre-production, test).
Screenshot that shows setting up tags in the portal
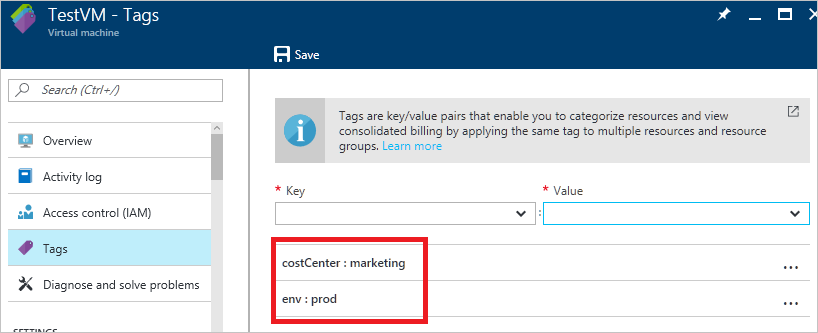
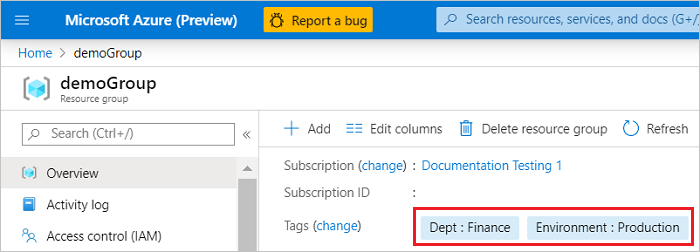
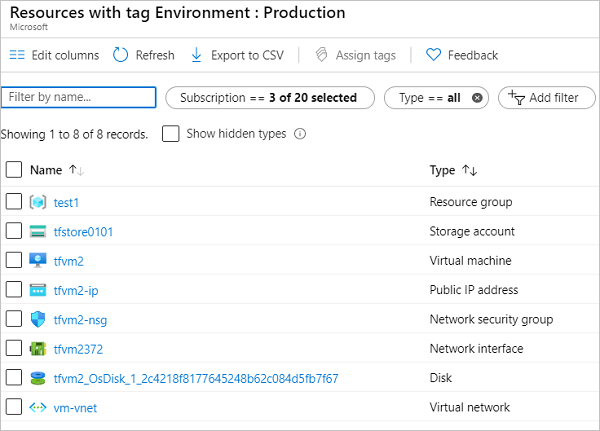
The tags show up throughout different cost reporting views. For example, they're visible in your cost analysis view right away and in the detailed usage CSV file after your first billing period.
For more information, see Using tags to organize your Azure resources.

Monitor cost breakdown and burn rate

After you have your Azure services running, regularly check charges. You can see the current spending and burn rate in the Azure portal.
  1. Visit the Subscriptions in the Azure portal and select a subscription.
  2. If it's supported for your subscription, you see the cost breakdown and burn rate.
    Screenshot of burn rate and breakdown in the Azure portal
  3. Click Cost analysis in the list one the left to see the cost breakdown by resource. After you add a service, wait 24 hours for the data to display.
    Screenshot of the cost analysis view in Azure portal
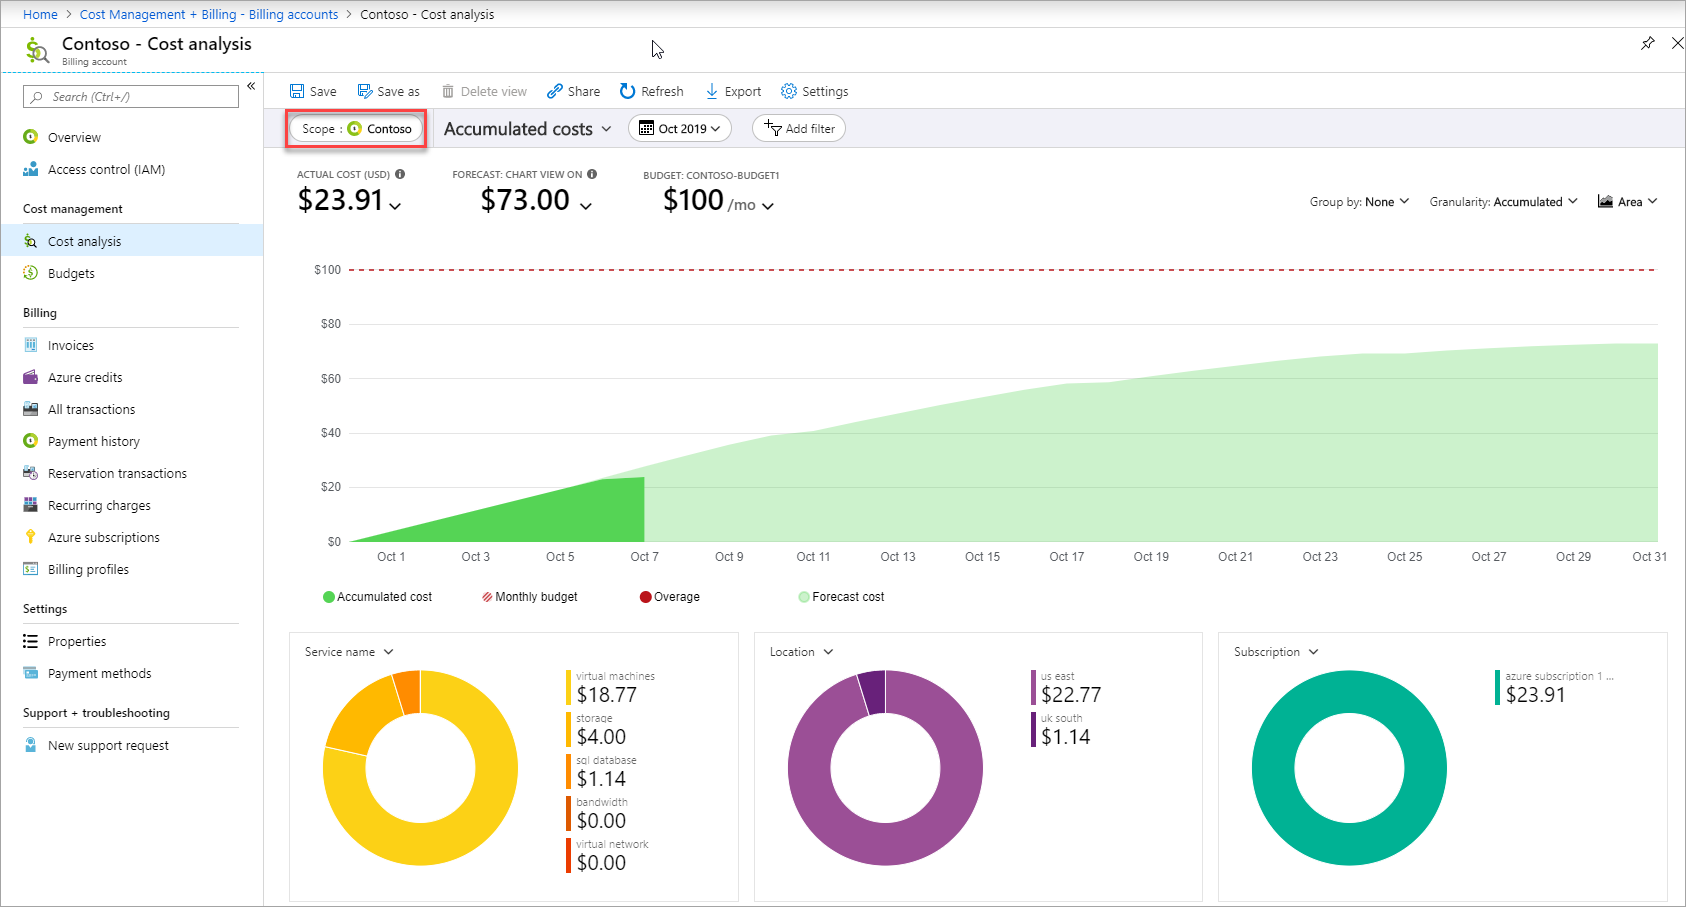
  4. You can filter by different properties like tags, resource type, resource group, and timespan. Click Apply to confirm the filters and Download if you want to export the view to a comma-separated values (.csv) file.
  5. Additionally, you can click a resource to see your daily spend history and how much the resource costs each day.
    Screenshot of the spend history view in Azure portal
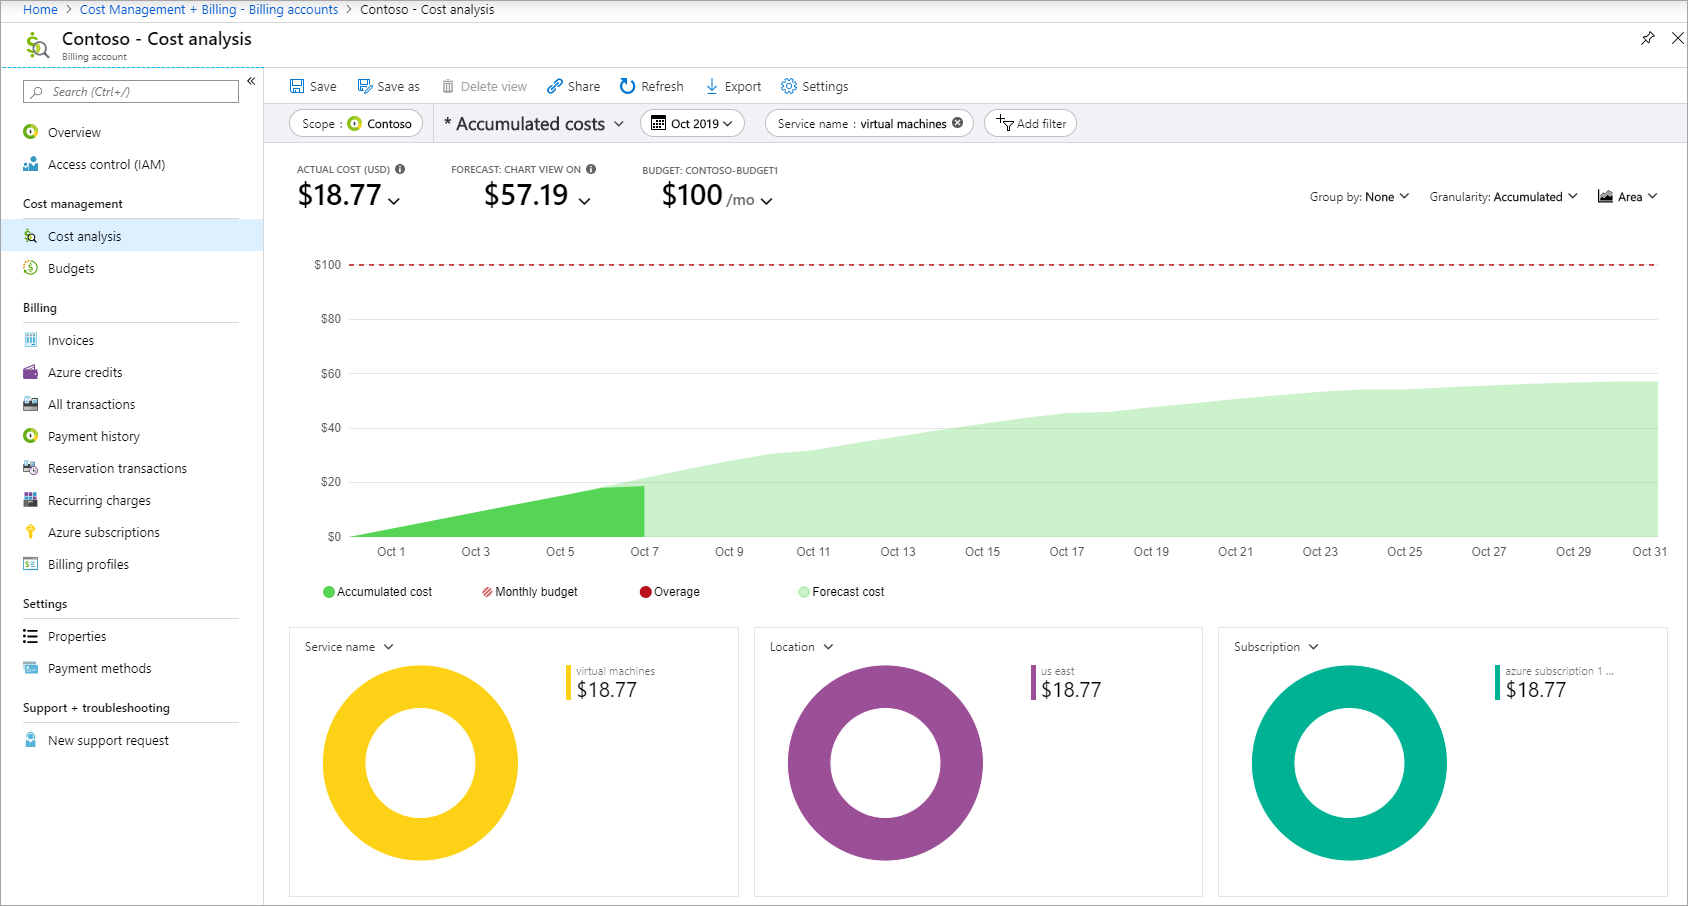
Compare the costs that you see with the estimates that you saw when you selected the services. If the costs are significantly different from the estimates, check the pricing plan that you've selected for your resources.

Optimize and reduce costs

If you're unfamiliar with the principles of cost management, read How to optimize your cloud investment with Azure Cost Management.
In the Azure portal, you can also optimize and reduce Azure costs with auto shutdown for VMs and Advisor recommendations.

Consider cost-cutting features like auto shutdown for VMs

Depending on your scenario, you can configure auto shutdown for your VMs in the Azure portal. For more information, see Auto shutdown for VMs using Azure Resource Manager.
Screenshot of auto shutdown option in the portal
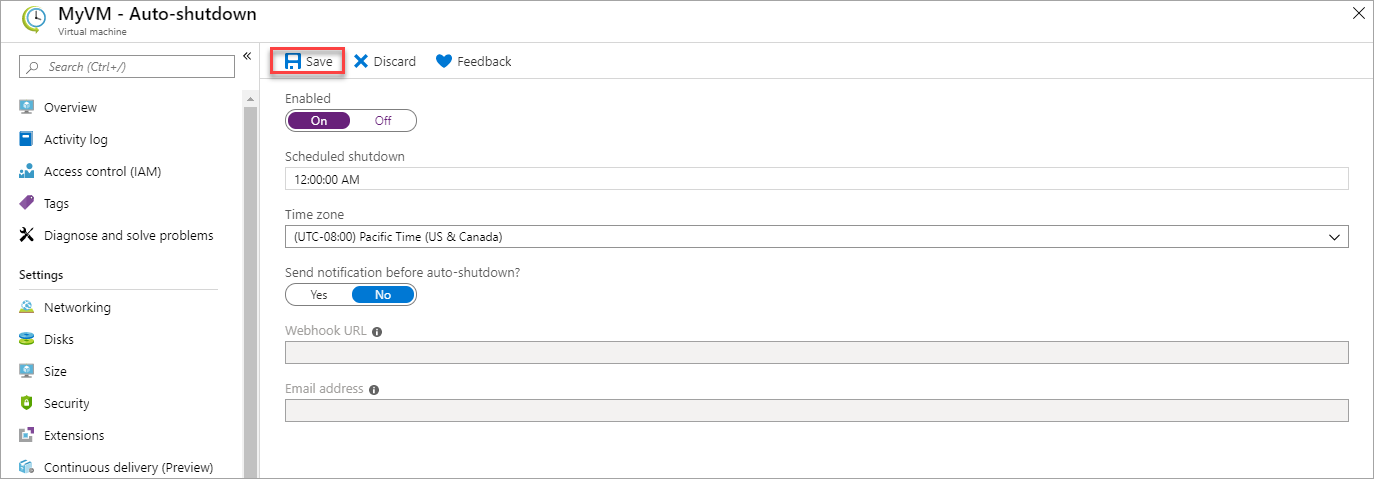
Auto shutdown isn't the same as when you shut down within the VM with power options. Auto shutdown stops and deallocates your VMs to stop additional usage charges. For more information, see pricing FAQ for Linux VMs and Windows VMs about VM states.
For more cost-cutting features for your development and test environments, check out Azure DevTest Labs.

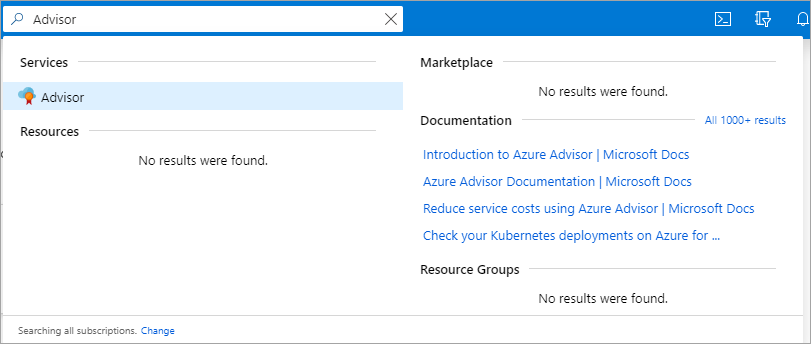
Turn on and review Azure Advisor recommendations

Azure Advisor helps you reduce costs by identifying resources with low usage. Visit Advisor in the Azure portal:
Screenshot of Azure Advisor button in Azure portal
You can get actionable recommendations in the Cost tab in the Advisor dashboard:
Screenshot of Advisor cost recommendation example
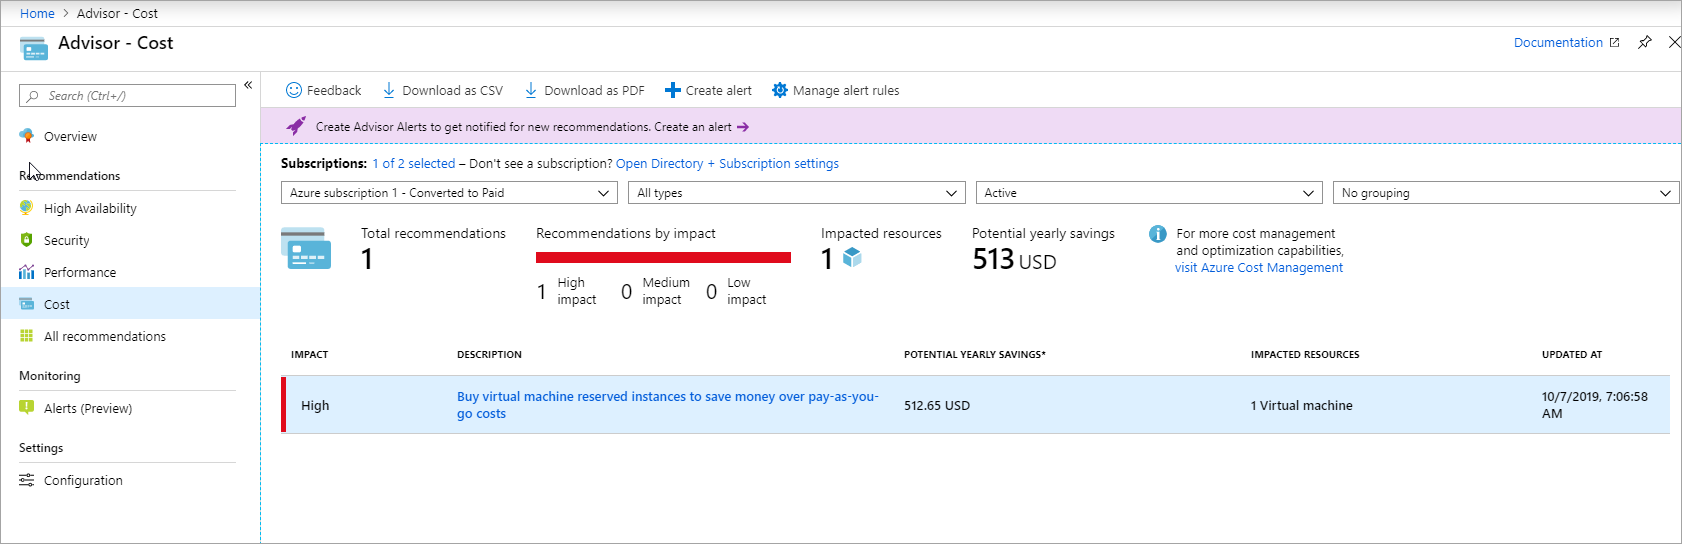
Review the Optimize costs from recommendations tutorial for a guided tutorial about cost-saving Advisor recommendations.

Review costs against your latest invoice

At the end of the billing cycle, your latest invoice is available. You can also download invoices and detailed usage files to make sure you were charged correctly. For more information about comparing your daily usage with your invoice, see Understand your bill for Microsoft Azure.

Billing API

Use the Azure billing API to programmatically get usage data. Use the RateCard API and the Usage API together to get your billed usage. For more information, see Gain insights into your Microsoft Azure resource consumption.

Additional resources and special cases

EA, CSP, and Sponsorship customers

Talk to your account manager or Azure partner to get started.
OfferResources
Enterprise Agreement (EA)EA portalhelp docs, and Power BI report
Cloud Solution Provider (CSP)Talk to your provider
Azure SponsorshipSponsorship portal
If you're managing IT for a large organization, we recommend reading Azure enterprise scaffold and the enterprise IT white paper (.pdf download, English only).

Enterprise Agreement cost views in the Azure portal

Enterprise cost views are currently in Public Preview. Items to note:
  • Subscription costs are based on usage and don't include prepaid amounts, overages, included quantities, adjustments, and taxes. Actual charges are computed at the Enrollment level.
  • Amounts shown in the Azure portal might be different than what's in the Enterprise portal. Updates in the Enterprise portal may take a few minutes before the changes are shown in the Azure portal.
  • If you aren't seeing costs, it might be for one of the following reasons:
    • You don't have permissions at the subscription level. To see enterprise cost views, you must be a Billing Reader, Reader, Contributor, or Owner at the subscription level.
    • You're an Account Owner and your Enrollment Administrator has disabled the "AO view charges" setting. Contact your Enrollment Administrator to get access to costs.
    • You're a Department Administrator and your Enrollment Administrator has disabled the DA view charges setting. Contact your Enrollment Administrator to get access.
    • You bought Azure through a channel partner, and the partner didn't release pricing information.
  • If you update settings related to cost access in the Enterprise portal, there's a delay of a few minutes before the changes are shown in the Azure portal.
  • Spending limit, and invoice guidance don't apply to EA Subscriptions.

Check your subscription and access

To view costs, you must have subscriptions-level access to billing information. Only the Account Admin can access the Account Center, change billing information, and manage subscriptions. The Account Admin is the person who went through the sign-up process. For more information, see Add or change Azure administrator roles that manage the subscription or services.
To see if you're the Account admin, go to Subscriptions in the Azure portal. View the list of subscriptions and find My role. If Account admin is the role, then you have full privileges. If it says something else, like Owner, you don't have full privileges.
Screenshot of your role in the Subscriptions view in the Azure portal
To manage subscriptions and change billing info, find the Account Admin. Ask the Account Admin to complete the tasks or transfer the subscription to you.
If your Account admin is no longer with your organization and you need to manage billing, contact us.

Request a Service Level Agreement credit for a service incident

The Service Level Agreement (SLA) describes Microsoft’s commitments for uptime and connectivity. A service incident is reported when Azure services experience an issue that impacts uptime or connectivity, often referred to as an outage. If we do not achieve and maintain the Service Levels for each service as described in the SLA, then you might be eligible for a credit towards a portion of your monthly service fees.
To request a credit:
  1. Sign-in to the Azure portal. If you have multiple accounts, make sure that you use the one that was affected by Azure downtime.
  2. Create a new support request.
  3. Under Issue type, select Billing.
  4. Under Problem type, select Refund Request.
  5. Add details to specify that you’re asking for an SLA credit, mention the date/time/time-zone as well as the impacted services (VMs, Web Sites, etc.)
  6. Verify your contact details and select Create to submit your request.
SLA thresholds vary by service. For example, the SQL Web Tier has an SLA of 99.9%, VMs have an SLA of 99.95%, and SQL Standard Tier has an SLA of 99.99%.
For some services, there are prerequisites for the SLA to apply. For example, virtual machines must have two or more instances deployed in the same Availability Set.
For more information, see Service Level Agreements and the SLA summary for Azure services documentation.

Use tags to organize your Azure resources

You apply tags to your Azure resources giving metadata to logically organize them into a taxonomy. Each tag consists of a name and a value pair. For example, you can apply the name "Environment" and the value "Production" to all the resources in production.
After you apply tags, you can retrieve all the resources in your subscription with that tag name and value. Tags enable you to retrieve related resources from different resource groups. This approach is helpful when you need to organize resources for billing or management.
Your taxonomy should consider a self-service metadata tagging strategy in addition to an auto-tagging strategy to reduce the burden on users and increase accuracy.
The following limitations apply to tags:
  • Not all resource types support tags. To determine if you can apply a tag to a resource type, see Tag support for Azure resources.
  • Each resource or resource group can have a maximum of 50 tag name/value pairs. Currently, storage accounts only support 15 tags, but that limit will be raised to 50 in a future release. If you need to apply more tags than the maximum allowed number, use a JSON string for the tag value. The JSON string can contain many values that are applied to a single tag name. A resource group can contain many resources that each have 50 tag name/value pairs.
  • The tag name is limited to 512 characters, and the tag value is limited to 256 characters. For storage accounts, the tag name is limited to 128 characters, and the tag value is limited to 256 characters.
  • Generalized VMs don't support tags.
  • Tags applied to the resource group are not inherited by the resources in that resource group.
  • Tags can't be applied to classic resources such as Cloud Services.
  • Tag names can't contain these characters: <>%&\?/
To apply tags to resources, the user must have write access to that resource type. To apply tags to all resource types, use the Contributor role. To apply tags to only one resource type, use the contributor role for that resource. For example, to apply tags to virtual machines, use the Virtual Machine Contributor.
 Note
This article provides steps for how to delete personal data from the device or service and can be used to support your obligations under the GDPR. If you’re looking for general info about GDPR, see the GDPR section of the Service Trust portal.

Policies

You can use Azure Policy to enforce tagging rules and conventions. By creating a policy, you avoid the scenario of resources being deployed to your subscription that don't comply with the expected tags for your organization. Instead of manually applying tags or searching for resources that aren't compliant, you can create a policy that automatically applies the needed tags during deployment. The following section shows example policies for tags.

Tags

Apply tag and its default valueAppends a specified tag name and value, if that tag is not provided. You specify the tag name and value to apply.
Billing Tags Policy InitiativeRequires specified tag values for cost center and product name. Uses built-in policies to apply and enforce required tags. You specify the required values for the tags.
Enforce tag and its valueRequires a specified tag name and value. You specify the tag name and value to enforce.
Enforce tag and its value on resource groupsRequires a tag and value on a resource group. You specify the required tag name and value.

PowerShell

 Note
This article has been updated to use the new Azure PowerShell Az module. You can still use the AzureRM module, which will continue to receive bug fixes until at least December 2020. To learn more about the new Az module and AzureRM compatibility, see Introducing the new Azure PowerShell Az module. For Az module installation instructions, see Install Azure PowerShell.
To see the existing tags for a resource group, use:
Azure PowerShell
(Get-AzResourceGroup -Name examplegroup).Tags
That script returns the following format:
PowerShell
Name                           Value
----                           -----
Dept                           IT
Environment                    Test
To see the existing tags for a resource that has a specified resource ID, use:
Azure PowerShell
(Get-AzResource -ResourceId /subscriptions/<subscription-id>/resourceGroups/<rg-name>/providers/Microsoft.Storage/storageAccounts/<storage-name>).Tags
Or, to see the existing tags for a resource that has a specified name and resource group, use:
Azure PowerShell
(Get-AzResource -ResourceName examplevnet -ResourceGroupName examplegroup).Tags
To get resource groups that have a specific tag, use:
Azure PowerShell
(Get-AzResourceGroup -Tag @{ Dept="Finance" }).ResourceGroupName
To get resources that have a specific tag, use:
Azure PowerShell
(Get-AzResource -Tag @{ Dept="Finance"}).Name
To get resources that have a specific tag name, use:
Azure PowerShell
(Get-AzResource -TagName Dept).Name
Every time you apply tags to a resource or a resource group, you overwrite the existing tags on that resource or resource group. Therefore, you must use a different approach based on whether the resource or resource group has existing tags.
To add tags to a resource group without existing tags, use:
Azure PowerShell
Set-AzResourceGroup -Name examplegroup -Tag @{ Dept="IT"; Environment="Test" }
To add tags to a resource group that has existing tags, retrieve the existing tags, add the new tag, and reapply the tags:
Azure PowerShell
$tags = (Get-AzResourceGroup -Name examplegroup).Tags
$tags.Add("Status", "Approved")
Set-AzResourceGroup -Tag $tags -Name examplegroup
To add tags to a resource without existing tags, use:
Azure PowerShell
$r = Get-AzResource -ResourceName examplevnet -ResourceGroupName examplegroup
Set-AzResource -Tag @{ Dept="IT"; Environment="Test" } -ResourceId $r.ResourceId -Force
To add tags to a resource that has existing tags, use:
Azure PowerShell
$r = Get-AzResource -ResourceName examplevnet -ResourceGroupName examplegroup
$r.Tags.Add("Status", "Approved")
Set-AzResource -Tag $r.Tags -ResourceId $r.ResourceId -Force
To apply all tags from a resource group to its resources, and not keep existing tags on the resources, use the following script:
Azure PowerShell
$groups = Get-AzResourceGroup
foreach ($g in $groups)
{
    Get-AzResource -ResourceGroupName $g.ResourceGroupName | ForEach-Object {Set-AzResource -ResourceId $_.ResourceId -Tag $g.Tags -Force }
}
To apply all tags from a resource group to its resources, and keep existing tags on resources that aren't duplicates, use the following script:
Azure PowerShell
$group = Get-AzResourceGroup "examplegroup"
if ($null -ne $group.Tags) {
    $resources = Get-AzResource -ResourceGroupName $group.ResourceGroupName
    foreach ($r in $resources)
    {
        $resourcetags = (Get-AzResource -ResourceId $r.ResourceId).Tags
        if ($resourcetags)
        {
            foreach ($key in $group.Tags.Keys)
            {
                if (-not($resourcetags.ContainsKey($key)))
                {
                    $resourcetags.Add($key, $group.Tags[$key])
                }
            }
            Set-AzResource -Tag $resourcetags -ResourceId $r.ResourceId -Force
        }
        else
        {
            Set-AzResource -Tag $group.Tags -ResourceId $r.ResourceId -Force
        }
    }
}
To remove all tags, pass an empty hash table:
Azure PowerShell
Set-AzResourceGroup -Tag @{} -Name examplegroup

Azure CLI

To see the existing tags for a resource group, use:
Azure CLI
az group show -n examplegroup --query tags
That script returns the following format:
JSON
{
  "Dept"        : "IT",
  "Environment" : "Test"
}
Or, to see the existing tags for a resource that has a specified name, type, and resource group, use:
Azure CLI
az resource show -n examplevnet -g examplegroup --resource-type "Microsoft.Network/virtualNetworks" --query tags
When looping through a collection of resources, you might want to show the resource by resource ID. A complete example is shown later in this article. To see the existing tags for a resource that has a specified resource ID, use:
Azure CLI
az resource show --id <resource-id> --query tags
To get resource groups that have a specific tag, use az group list:
Azure CLI
az group list --tag Dept=IT
To get all the resources that have a particular tag and value, use az resource list:
Azure CLI
az resource list --tag Dept=Finance
Every time you apply tags to a resource or a resource group, you overwrite the existing tags on that resource or resource group. Therefore, you must use a different approach based on whether the resource or resource group has existing tags.
To add tags to a resource group without existing tags, use:
Azure CLI
az group update -n examplegroup --set tags.Environment=Test tags.Dept=IT
To add tags to a resource without existing tags, use:
Azure CLI
az resource tag --tags Dept=IT Environment=Test -g examplegroup -n examplevnet --resource-type "Microsoft.Network/virtualNetworks"
To add tags to a resource that already has tags, retrieve the existing tags, reformat that value, and reapply the existing and new tags:
Azure CLI
jsonrtag=$(az resource show -g examplegroup -n examplevnet --resource-type "Microsoft.Network/virtualNetworks" --query tags)
rt=$(echo $jsonrtag | tr -d '"{},' | sed 's/: /=/g')
az resource tag --tags $rt Project=Redesign -g examplegroup -n examplevnet --resource-type "Microsoft.Network/virtualNetworks"
To apply all tags from a resource group to its resources, and not keep existing tags on the resources, use the following script:
Azure CLI
groups=$(az group list --query [].name --output tsv)
for rg in $groups
do
  jsontag=$(az group show -n $rg --query tags)
  t=$(echo $jsontag | tr -d '"{},' | sed 's/: /=/g')
  r=$(az resource list -g $rg --query [].id --output tsv)
  for resid in $r
  do
    az resource tag --tags $t --id $resid
  done
done
To apply all tags from a resource group to its resources, and keep existing tags on resources, use the following script:
Azure CLI
groups=$(az group list --query [].name --output tsv)
for rg in $groups
do
  jsontag=$(az group show -n $rg --query tags)
  t=$(echo $jsontag | tr -d '"{},' | sed 's/: /=/g')
  r=$(az resource list -g $rg --query [].id --output tsv)
  for resid in $r
  do
    jsonrtag=$(az resource show --id $resid --query tags)
    rt=$(echo $jsonrtag | tr -d '"{},' | sed 's/: /=/g')
    az resource tag --tags $t$rt --id $resid
  done
done

Templates

To tag a resource during deployment, add the tags element to the resource you're deploying. Provide the tag name and value.

Apply a literal value to the tag name

The following example shows a storage account with two tags (Dept and Environment) that are set to literal values:
JSON
{
    "$schema": "https://schema.management.azure.com/schemas/2015-01-01/deploymentTemplate.json#",
    "contentVersion": "1.0.0.0",
    "parameters": {
        "location": {
            "type": "string",
            "defaultValue": "[resourceGroup().location]"
        }
    },
    "resources": [
        {
            "apiVersion": "2019-04-01",
            "type": "Microsoft.Storage/storageAccounts",
            "name": "[concat('storage', uniqueString(resourceGroup().id))]",
            "location": "[parameters('location')]",
            "tags": {
                "Dept": "Finance",
                "Environment": "Production"
            },
            "sku": {
                "name": "Standard_LRS"
            },
            "kind": "Storage",
            "properties": {}
        }
    ]
}
To set a tag to a datetime value, use the utcNow function.

Apply an object to the tag element

You can define an object parameter that stores several tags, and apply that object to the tag element. Each property in the object becomes a separate tag for the resource. The following example has a parameter named tagValues that is applied to the tag element.
JSON
{
    "$schema": "https://schema.management.azure.com/schemas/2015-01-01/deploymentTemplate.json#",
    "contentVersion": "1.0.0.0",
    "parameters": {
        "location": {
            "type": "string",
            "defaultValue": "[resourceGroup().location]"
        },
        "tagValues": {
            "type": "object",
            "defaultValue": {
                "Dept": "Finance",
                "Environment": "Production"
            }
        }
    },
    "resources": [
        {
            "apiVersion": "2019-04-01",
            "type": "Microsoft.Storage/storageAccounts",
            "name": "[concat('storage', uniqueString(resourceGroup().id))]",
            "location": "[parameters('location')]",
            "tags": "[parameters('tagValues')]",
            "sku": {
                "name": "Standard_LRS"
            },
            "kind": "Storage",
            "properties": {}
        }
    ]
}

Apply a JSON string to the tag name

To store many values in a single tag, apply a JSON string that represents the values. The entire JSON string is stored as one tag that can't exceed 256 characters. The following example has a single tag named CostCenter that contains several values from a JSON string:
JSON
{
    "$schema": "https://schema.management.azure.com/schemas/2015-01-01/deploymentTemplate.json#",
    "contentVersion": "1.0.0.0",
    "parameters": {
        "location": {
            "type": "string",
            "defaultValue": "[resourceGroup().location]"
        }
    },
    "resources": [
        {
            "apiVersion": "2019-04-01",
            "type": "Microsoft.Storage/storageAccounts",
            "name": "[concat('storage', uniqueString(resourceGroup().id))]",
            "location": "[parameters('location')]",
            "tags": {
                "CostCenter": "{\"Dept\":\"Finance\",\"Environment\":\"Production\"}"
            },
            "sku": {
                "name": "Standard_LRS"
            },
            "kind": "Storage",
            "properties": {}
        }
    ]
}

Apply tags from resource group

To apply tags from a resource group to a resource, use the resourceGroup function. When getting the tag value, use the tags.[tag-name] syntax instead of the tags.tag-name syntax, because some characters aren't parsed correctly in the dot notation.
JSON
{
    "$schema": "https://schema.management.azure.com/schemas/2015-01-01/deploymentTemplate.json#",
    "contentVersion": "1.0.0.0",
    "parameters": {
        "location": {
            "type": "string",
            "defaultValue": "[resourceGroup().location]"
        }
    },
    "resources": [
        {
            "apiVersion": "2019-04-01",
            "type": "Microsoft.Storage/storageAccounts",
            "name": "[concat('storage', uniqueString(resourceGroup().id))]",
            "location": "[parameters('location')]",
            "tags": {
                "Dept": "[resourceGroup().tags['Dept']]",
                "Environment": "[resourceGroup().tags['Environment']]"
            },
            "sku": {
                "name": "Standard_LRS"
            },
            "kind": "Storage",
            "properties": {}
        }
    ]
}

Portal

  1. To view the tags for a resource or a resource group, looks for existing tags in the overview. If you have not previously applied tags, the list is empty.
    View tags for resource or resource group
  2. To add a tag, select Click here to add tags.
  3. Provide a name and value. Select + to add the tag.
    Add tag
  4. Continue adding tags as needed. When done, select Save.
    Save tags
  5. The tags are now displayed in the overview.
    Show tags
  6. To add or delete a tag, select change.
  7. To delete a tag, select the trash icon. Then, select Save.
    Delete tag
To bulk assign tags to multiple resources:
  1. From any list of resources, select the checkbox for the resources you want to assign the tag.
    Select multiple resources
  2. Select Assign tags
    Assign tags
  3. After each name and value, select +. When done, select Assign.
    Select assign
To view all resources with a tag:
  1. Select All services and Tags.
    Find by tag
  2. Select the tag for viewing resources.
    Select tag
  3. All resources with that tag are displayed.
    View resources by tag
  4. For quick access, pin the view to the dashboard.
    Pin to dashboard
  5. The view is available from the dashboard.
    Dashboard

REST API

The Azure portal and PowerShell both use the Resource Manager REST API behind the scenes. If you need to integrate tagging into another environment, you can get tags by using GET on the resource ID and update the set of tags by using a PATCH call.

Tags and billing

You can use tags to group your billing data. For example, if you're running multiple VMs for different organizations, use the tags to group usage by cost center. You can also use tags to categorize costs by runtime environment, such as the billing usage for VMs running in the production environment.
You can retrieve information about tags through the Azure Resource Usage and RateCard APIs or the usage comma-separated values (CSV) file. You download the usage file from the Azure Account Center or Azure portal. For more information, see Download or view your Azure billing invoice and daily usage data. When downloading the usage file from the Azure Account Center, select Version 2. For services that support tags with billing, the tags appear in the Tags column.
For REST API operations, see Azure Billing REST API Reference.

Next steps