Tuesday 30 January 2024

Exploring AWS CodeCommit: Benefits and Overview

 AWS CodeCommit is a fully managed source control solution offered by Amazon Web solution. It is a version code service. It aids in the management and storage of assets such as codes, papers, and other file types such as binary files. It enables the team to collaborate in a secure and highly scalable environmen
t. It does away with the requirement for third-party version control as well as your own source control system. By using the CodeCommit service, you can effortlessly work with your existing Git tools. You may easily save your source code and other files, as well as push, pull, and commit data.


Overview Of AWS CodeCommit

AWS CodeCommit is a version control service hosted by Amazon  Web Services (AWS) that you can use to privately store and manage assets such as documents, source code, and binary files. It is an in-house repository or infrastructure that lets you host or hold repositories. AWS CodeCommit basically gives you an environment where you can actually go ahead and commit your code, code pushes it or pull it.

CodeCommit

AWS CodeCommit is a fully-managed source control service that hosts your secure Git-based repositories. It makes it easy for groups to collaborate on code in a secure and highly scalable ecosystem. CodeCommit eliminates the need to operate your source control system or worry about scaling its infrastructure. CodeCommit securely stores anything from source code to binaries, and it runs seamlessly with your existing Git tools.


Benefits Of AWS CodeCommit

  • Store any type of Code: AWS CodeCommit lets you store any type of code as there are very fewer restrictions on the type and the extensions of the code that you store.
  • Fully Managed:  AWS CodeCommit eliminates the need to host, maintain, back up, and scale your own source control servers. The service automatically scales to meet the growing needs of your project.
  • Faster development lifecycle: AWS CodeCommit keeps your repositories close to your build, staging, and production environments in the AWS cloud. You can transfer incremental changes instead of the entire application. This allows you to increase the speed and frequency of your development lifecycle.
  • Ensures Collaborative Work: AWS CodeCommit allows you to collaborate on code with teammates via pull requests, branching, and merging, and you can grant appropriate access to people who can access this piece of code, make changes to it, and this process becomes very engaging and collaborative under different IAM users and security groups.
  • Highly Secure: Security is something that you don’t need to worry about with AWS Code Commit., like the code, you push or pull is encrypted. CodeCommit is integrated with AWS Identity and Access Management (IAM) allowing you to customize user-specific access to your repositories.
  • Scale Easily: When you talk about cloud platforms and any service, it ensures scalability so does the amount of code you push on this particular service.
  • Integrate with third-party tools:The best thing about AWS CodeCommit is that it places your code in areas where it is really easy to interact with third-party solutions. With CodeCommit, you may continue to use your preferred development environment plugins, continuous integration/continuous delivery systems, and graphical clients.

Note: Do Checkout Our Blog On AWS Solution Architect Training, To Get an Overview of Training.

Benefits of AWS CodeCommit

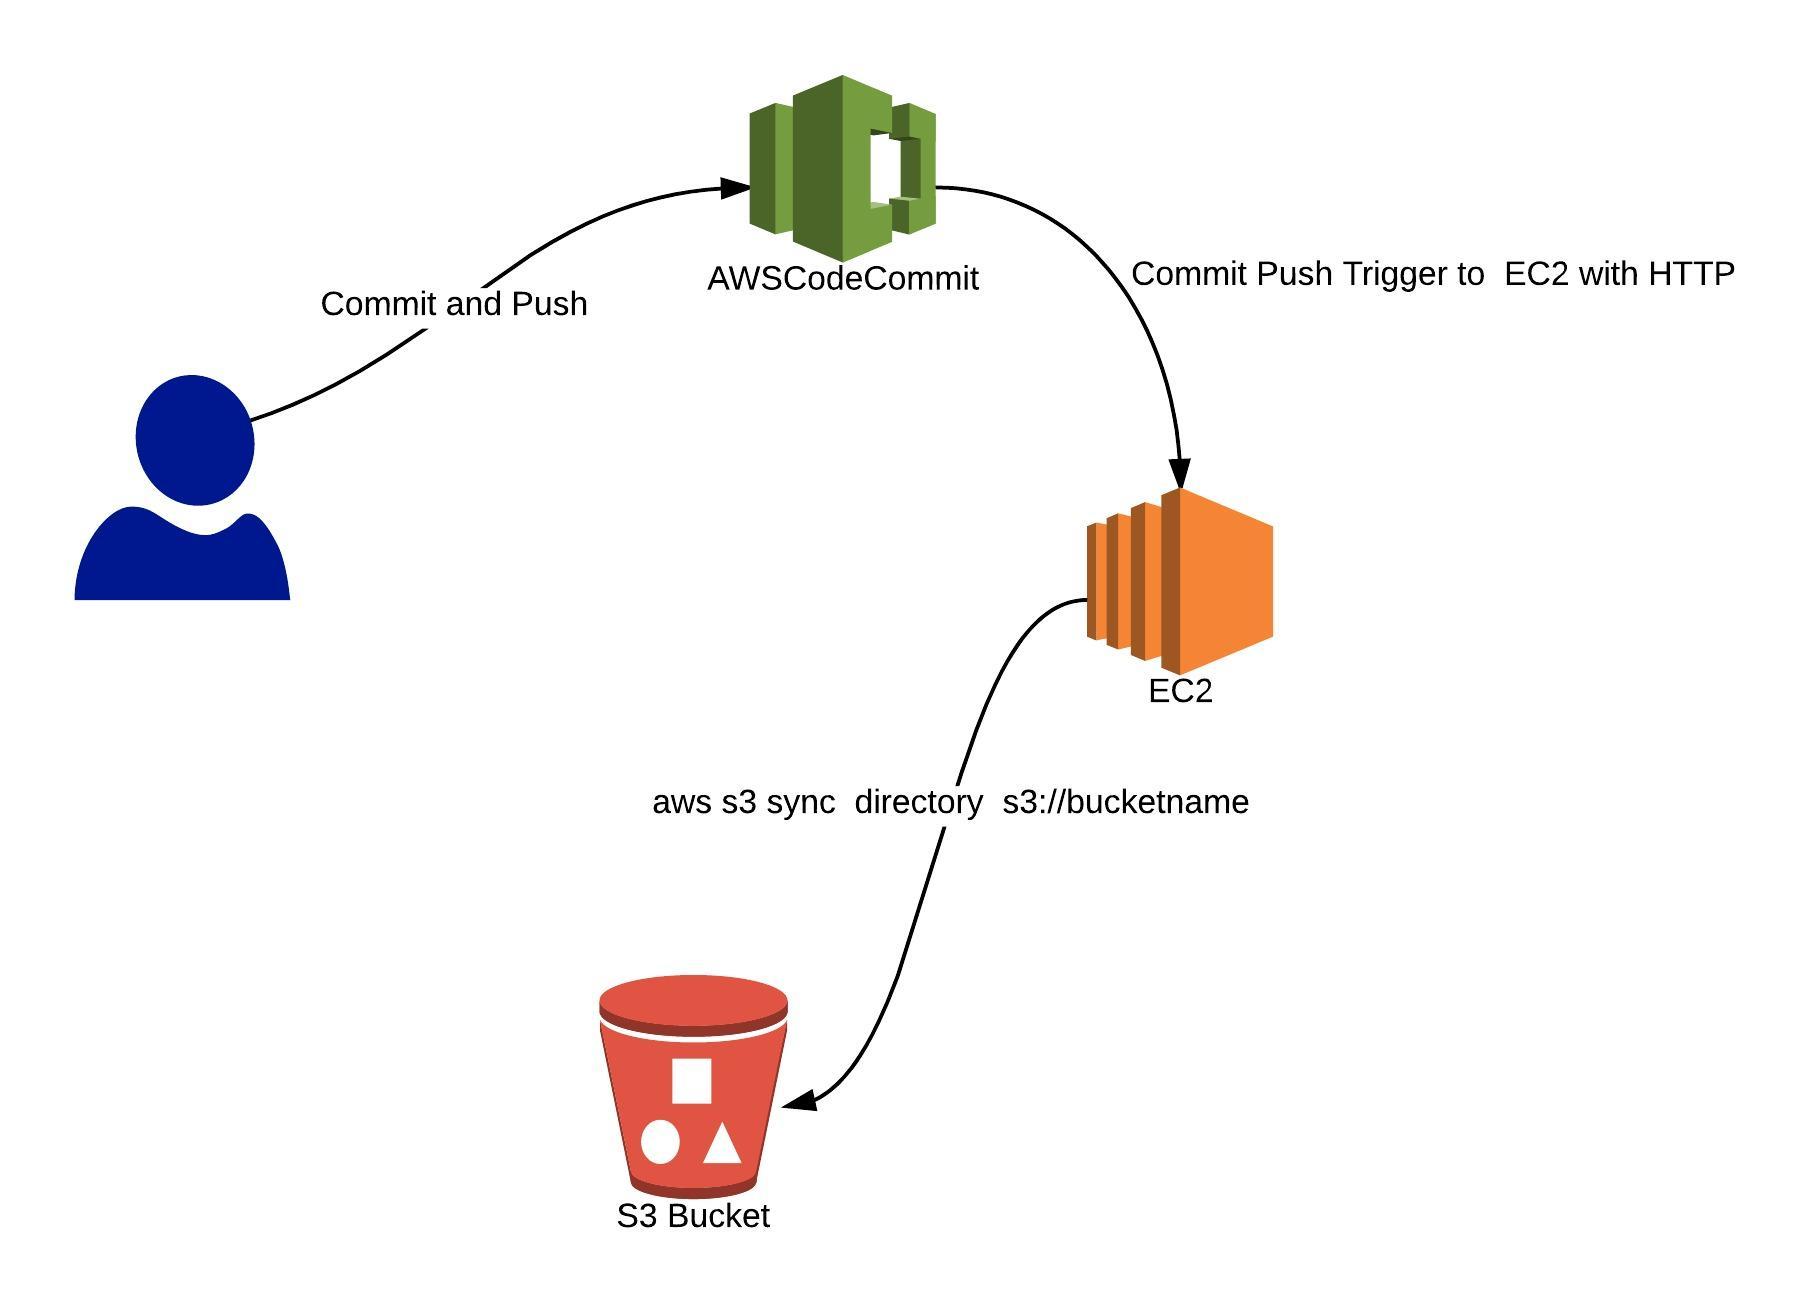
Before creating an AWS CodeCommit Repository let’s check its working first.


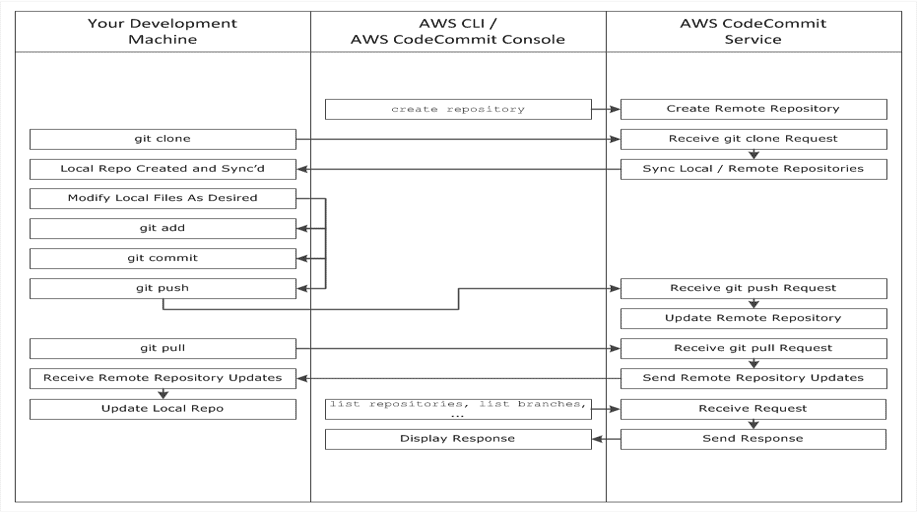
Working On AWS Code Commit

Working of CodeCommit

Creating AWS Code Commit Repository

1)Log in to your AWS account by clicking here

Note: If you have not created the free tier account yet, please check this blog. How to create a free tier account


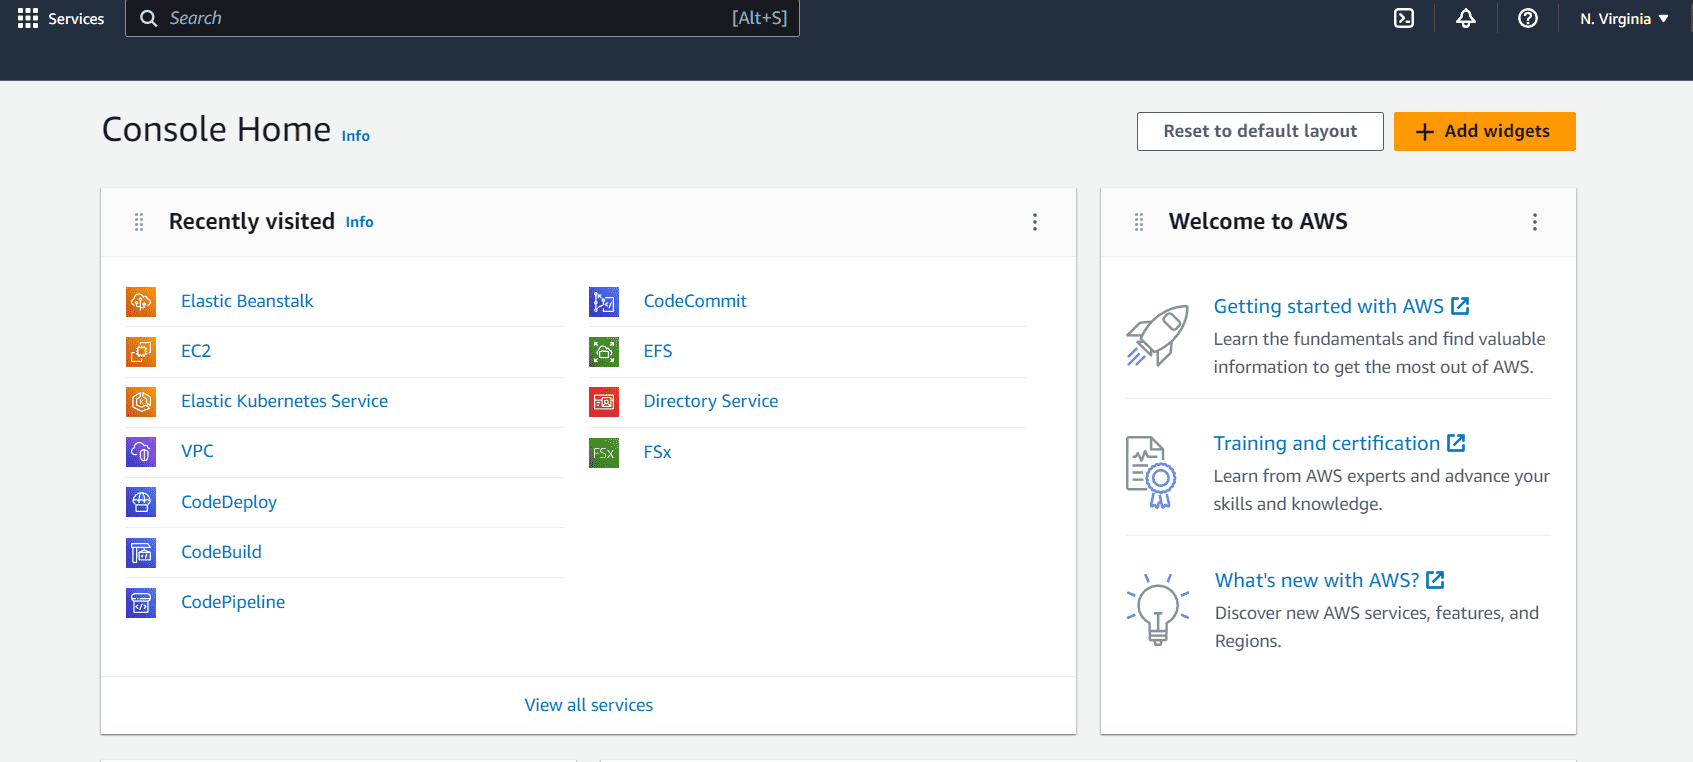
2) Search for CodeCommit and Open it.

3) In the region selector, choose the AWS Region where you want to create the repository.


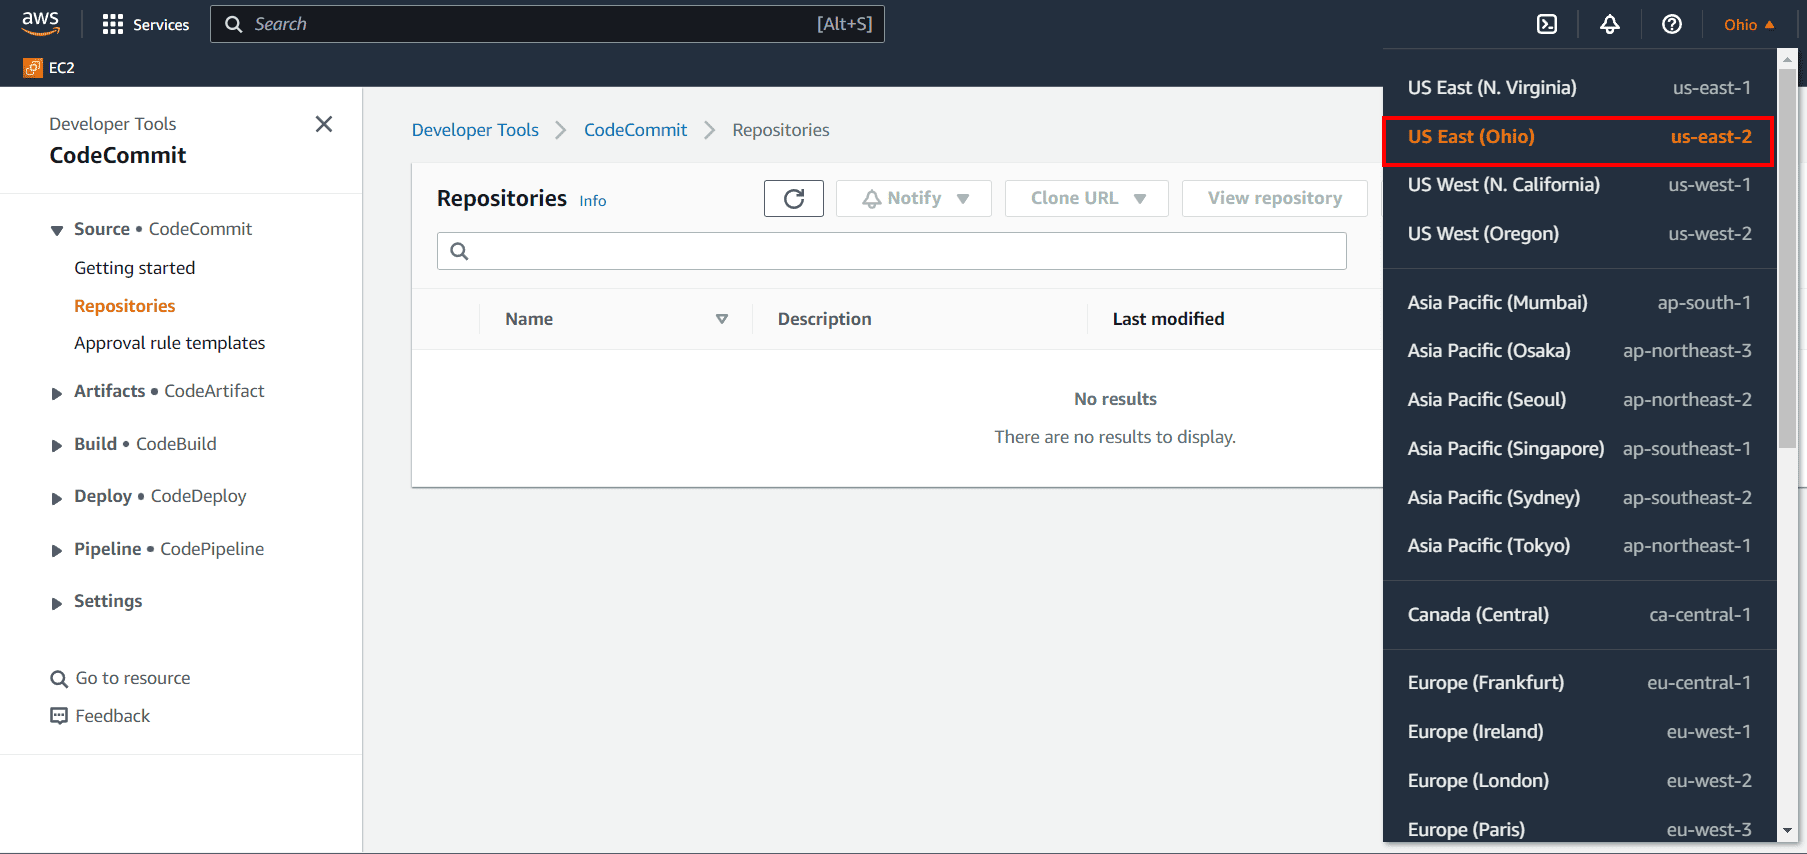
Note: You can create and use CodeCommit repositories in the following AWS Regions:

US East (Ohio), US East (N. Virginia), US West (N. California), US West (Oregon), Europe (Ireland), Europe (London), Europe (Paris), Europe (Frankfurt), Europe (Stockholm), Europe (Milan), Asia Pacific (Tokyo), Asia Pacific (Singapore) Asia Pacific (Sydney), Asia Pacific (Seoul), Asia Pacific (Mumbai), Asia Pacific (Hong Kong), South America (São Paulo), Middle East (Bahrain), Canada (Central), China (Beijing), China (Ningxia), AWS GovCloud (US-West), AWS GovCloud (US-East)

Know More :  About What Are The Roles and Responsibilities Of An AWS Certified Solutions Architect.

4) Click on Create Repository.
Repository

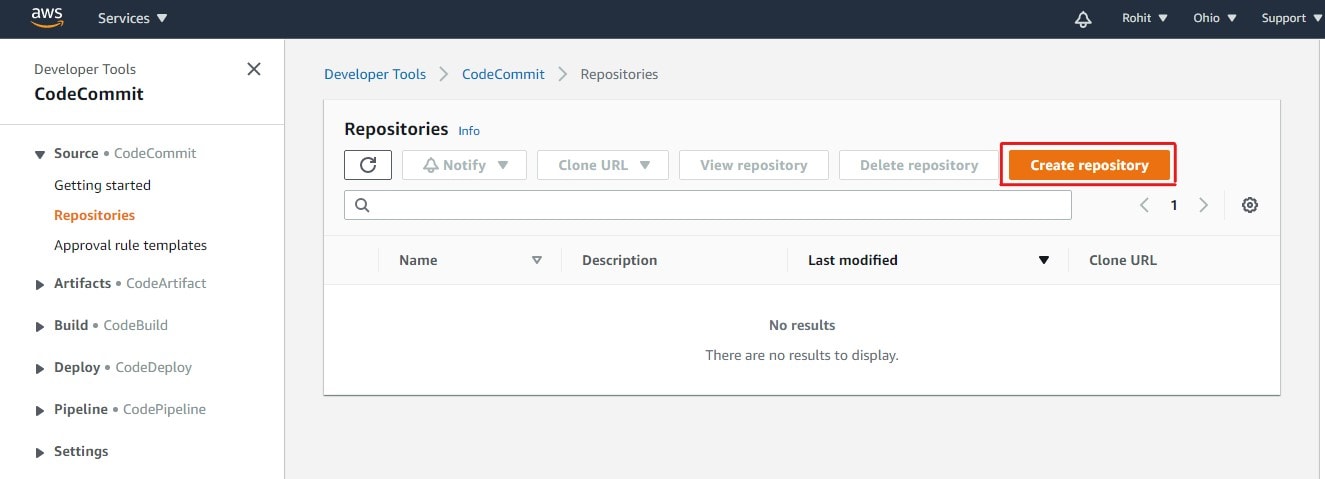
5) Give your repository a name and then click on Create

Name
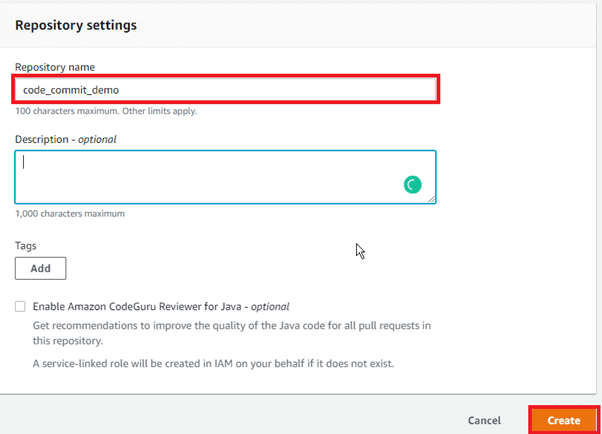
Note:
 In Description, enter a description for the repository. This can help you and other users identify the purpose of the repository and Choose to Add a tag to add one or more repository tags (a custom attribute label that helps you organize and manage your AWS resources) to your repository.
Select Enable Amazon CodeGuru Reviewer for Java if this repository contains Java code, and you want CodeGuru Reviewer to analyze it. CodeGuru Reviewer uses multiple machine learning models to find Java code defects and to suggest improvements and fixes in pull requests.

6) CodeCommit Repository will be created.
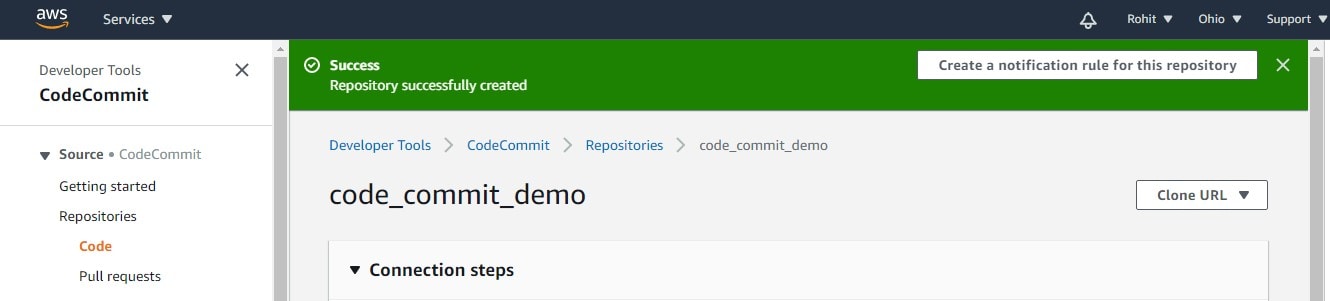
Repository Created

Check out: Our blog on AWS Key Management Service

What are the Branches?

Branches are merely references or pointers to a commit. They are a convenient approach to organizing your work in development. You can use branches to keep work on a new or different version of a file separate from work in other branches. Branches can be used to develop new features, store a specific version of your project from a given commit, and more.

Benefits Of Branches

  • A convenient way to organize your work by using branches to separate work impacting work in other branches
  • Used for developing new features, storing a specific version of the project from a particular commit
  • In CodeCommit, one can change the default branch for your repository.
  • The default branch is the one used as the base or default branch in local repositories when users clone the repository.
  • Creating, deleting, and viewing branch details is possible in Codecommit.

Pricing Of AWS CodeCommit

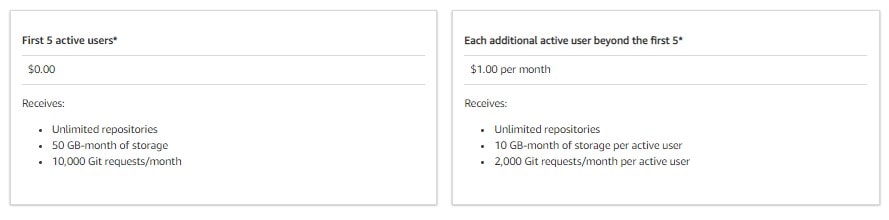
With an AWS account, anyone can get started with AWS CodeCommit for free. Your account gets 5 active users per month for free (within limits), after which you pay $1.00 per additional active user per month. There are no upfront fees or commitments.

This AWS free tier offer for AWS CodeCommit is available to both new and existing AWS customers indefinitely and does not expire at the end of the standard 12 months free tier term.

AWS CodeCommit Pricing

[AWS] Lab: Configure and Work with CodeCommit from the CLI


Introduction

In this hands-on lab, we go through the process of configuring a CodeCommit repository from the AWS Command Line Interface. We also go through some key prerequisite steps, such as installing Git, configuring HTTPS credentials, and preparing the environment to work with Git and CodeCommit. This lab covers the steps that need to be taken anytime you work with CodeCommit from the CLI.

Solution

Log in to the live AWS environment using the credentials provided. Make sure you're in the N. Virginia (us-east-1) region throughout the lab.

Create a Server from an Amazon Linux 2 AMI

  1. Navigate to the EC2 dashboard, and click Launch Instance.
  2. On the AMI page, select the Amazon Linux 2 AMI.
  3. Leave t2.micro selected, and click Next: Configure Instance Details.
  4. On the Configure Instance Details page:
    • Network: Leave default
    • Subnet: Select one provided
    • Auto-assign Public IP: Enable
  5. Click Review and Launch > Launch.
  6. In the key pair dialog, select Create a new key pair.
  7. Give it a Key pair name of "confighttps".
  8. Click Download Key Pair, and then Launch Instances.
  9. Click View Instances, and give it a few minutes to enter the running state.

Install Git and Create IAM CodeCommit Credentials

  1. Select the newly created instance.
  2. Click Connect at the top of the screen.
  3. Open a terminal window and navigate to the folder for your downloads.
  4. Linux/Mac users: Execute the following command:

    chmod 400 confighttps.pem
  5. Linux/Mac users: Run the example SSH command from the Connect window in the AWS Management Console in your terminal application.

    Note: If you are using Windows/PuTTY, use the link in the Connect window in the AWS Management Console for Connect using PuTTY and follow those instructions to connect.

  6. In the terminal, run the following command:

    sudo yum update -y
  7. In the AWS Management Console, navigate to IAM > Users.

  8. Click on cloud_user.
  9. Click Add permissions > Attach existing policies directly.
  10. Type "AWSCodeCommit" in the filter search box.
  11. Select the AWSCodeCommitFullAccess policy.
  12. Click Cancel.

    Note: We were just showing how to create this, but the permissions already exist in this lab.

  13. In the terminal, run the following command to install Git:

    sudo yum install git -y
  14. In the AWS Management Console, with cloud_user opened, click the Security credentials tab.

  15. Navigate to the bottom of the screen, and click Generate under HTTPS Git credentials for AWS CodeCommit.
  16. Click Download credentials > Close.

Create IAM User Access Key and CodeCommit Repository

  1. Click Create access key.
  2. Click Download .csv file.

    Note: The access keys will be used for the AWS Command Line Interface access in our lab. Generally, you would use an IAM role attached to the instance in production environments. The HTTPS Git credentials for AWS CodeCommit will provide access to CodeCommit.

  3. Open the terminal window.

  4. Configure the AWS CLI credentials:

    aws configure
  5. Enter the AWS Access Key and Secret Access Key from the file downloaded in the previous step when prompted to do so.

  6. Enter us-east-1 as the region.
  7. Hit Enter to accept the Default output format.
  8. Run the following command to create a CodeCommit repository from the AWS CLI:

    aws codecommit create-repository --repository-name RepoFromCLI --repository-description "My demonstration repository"
  9. In the AWS Management Console, open CodeCommit and refresh the screen.

  10. Click on the RepoFromCLI repository link to open it.
  11. Click Add file > Upload file.
  12. Click Choose file.
  13. Select any small file from your machine you don't mind uploading.
  14. Enter your name as the author name and your email as the email address.
  15. Click Commit changes.
  16. Click Clone URL > Clone HTTPS.
  17. Open up your terminal window.
  18. Run the following command to clone the repository to the server:

    git clone [paste the URL from the clipboard]
  19. Enter the Git credentials username from the file downloaded earlier for the username prompt.

  20. Enter the Git credentials password from the file downloaded earlier for the password prompt.
  21. Run the following commands:

    ls
    cd RepoFromCLI
    ls
  22. Run the following command to create a local text file:

    vim test.txt
  23. Hit i to enter insert mode and type the text:

    This is just a test of working with CodeCommit from the CLI
  24. Hit the Escape key, type :wq!, and press Enter.

  25. Add the file to Git:

    git add test.txt
  26. Commit the file to the local repository:

    git commit -m "added test.txt"
  27. Verify the file was committed:

    git log
  28. Push the change to the CodeCommit repository:

    git push -u origin main
  29. Enter the Git credentials username from the file downloaded earlier for the username prompt.

  30. Enter the Git credentials password from the file downloaded earlier for the password prompt.
  31. Refresh the AWS Management Console view of the CodeCommit repository for RepoFromCLI and verify the new file was uploaded.

Friday 19 January 2024

Ansible ad-hoc Commands

 Ad-hoc commands are one of the simplest ways of using Ansible. These are used when you want to issue some commands on a server or bunch of servers. The ad-hoc commands are not stored for future use, but it represents a fast way to interact with the desired servers.

The Ansible ad-hoc command uses the /usr/bin/ansible command-line tool to automate a single task on one or more managed nodes. The Ad-hoc commands are quick and easy, but they are not re-usable. The Ad-hoc commands demonstrate the simplicity and power of Ansible.

Syntax

  1. ansible <hosts> [-m <module_name>] -a <"arguments"> -u <username> [--become]  

Explanation

Hosts: It can be an entry in the inventory file. For specifying all hosts in the inventory, use all or "*".

module_name: It is an optional parameter. There are hundreds of modules available in the Ansible, such as shell, yum, apt, file, and copy. By default, it is the command.


Arguments: We should pass values that are required by the module. It can change according to the module used.

Username: It specifies the user account in which Ansible can execute commands.

Become: It's an optional parameter specified when we want to run operations that need sudo privilege. By default, it becomes false.

1. Parallelism and shell commands

You can reboot your company server in 12 parallel forks at the same time. For this, you need to set up the SSHagent for connection.

  1. $ ssh-agent bash  
  2. $ ssh-add ~/.ssh/id_rsa  

To run reboot for all your company servers in the group, 'abc', in 12 parallel forks:

  1. $ ansible abc -a "/sbin/reboot" -f 12  

By default, Ansible will run the above ad-hoc commands from the current user account. If you want to change then pass the username in ad-hoc command as follows:


  1. $ ansible abc -a "/sbin/reboot" -f 12 -u username  

2. File Transfer

You can use ad-hoc commands for doing SCP (secure copy protocol) which means lots of files in parallel on multiple machines or servers.

Transferring file on many machines or servers

  1. $ ansible abc -m copy -a "src = /etc/yum.conf dest = /tmp/yum.conf"  

Creating new directory

  1. $ ansible abc -m file -a "dest = /path/user1/new mode = 888 owner = user1 group = user1 state = directory"   

Deleting all directory and files

  1. $ ansible abc -m file -a "dest = /path/user1/new state = absent"  

3. Managing Packages

Ad-hoc commands are available for apt and yum module. Here are the following ad-hoc commands using yum.

Below command checks, if the yum package is installed or not, but not update it.

  1. $ ansible abc -m yum -a "name = demo-tomcat-1 state = present"  

Below command checks the package is not installed.


  1. ansible webservers -m service -a "name=httpd state=started"  

Alternatively, restart a service on all webservers:

  1. $ ansible webservers -m service -a "name=httpd state=restarted"  

Ensure a service is stopped:

  1. $ ansible webservers -m service -a "name=httpd state=stopped"  

6. Gathering Facts

Fact represents the discovered variables about a system. You can use the facts to implement conditional execution of tasks, and also used to get ad-hoc information about your systems. To see all the facts:

  1. $ ansible all -m setup