What is AWS Database Migration Service?
AWS Database Migration Service (DMS) is a managed and automated service that provides a quick and secure way to migrate database from on-premise databases, DB instance, or database running on EC2 instance to the cloud. It helps you modernize, migrate, and manage your environments in the AWS cloud. Amazon provides a wide spectrum of databases to work with such as Amazon RDS, Aurora, DynamoDB, ElasticCache, and Redshift.
Check out this blog to know more in detail about AWS Database Service – Amazon RDS, Aurora, DynamoDB, ElastiCache
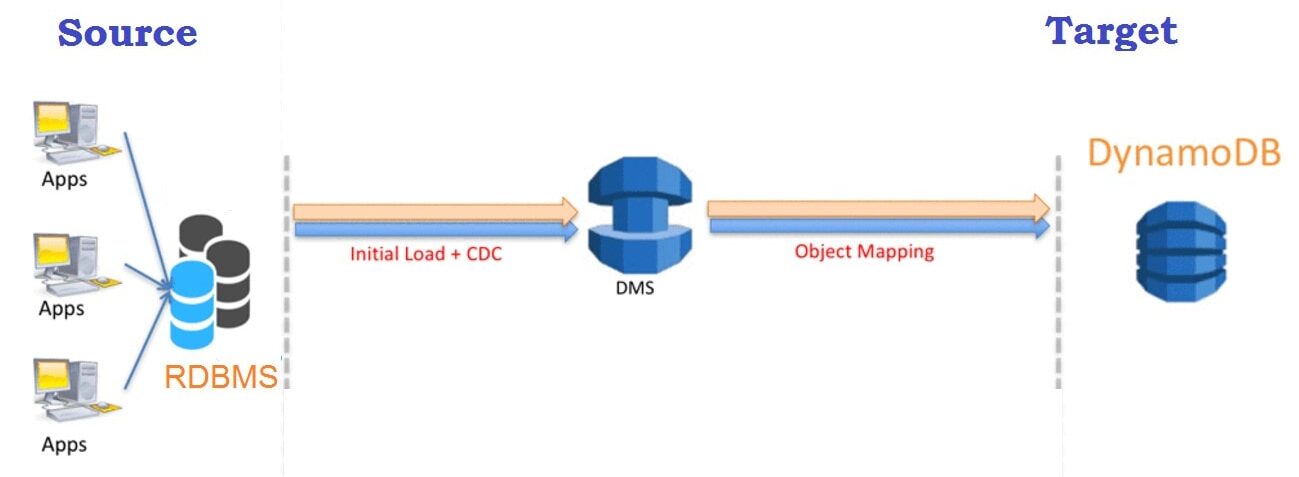
DMS can be used to migrate relational databases, data warehouses, NoSQL databases, and other types of databases into the cloud. AWS DMS supports homogeneous (i.e. Oracle to Oracle) and heterogeneous (i.e. Oracle to Amazon Aurora) database migration. During migration the source database remains operational, thereby minimizing the downtime. The entire migration process can be controlled from the AWS Management Console.
Learn With Us: Join our AWS Solution Architect Training and understand AWS basics in an easy way.
AWS DMS Benefits
AWS Database Migration Service has various benefits over traditional migration methods such as:
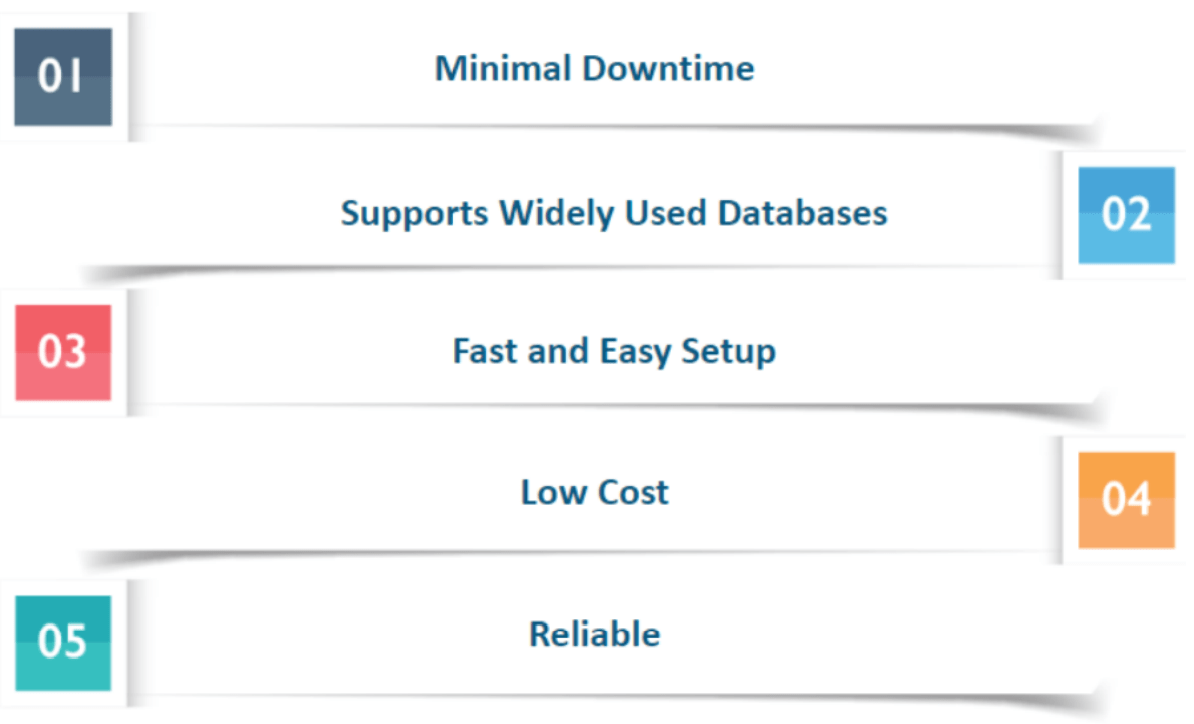
- Minimal downtime – DMS continuously replicates the changes to your source database during migration while keeping your source database operational. This allows you to switch over at any time without shutting down either database.
- Supports Widely Used Databases – AWS Database Migration Service can migrate your data to and from most of the widely used commercial and open-source databases.
- Fast & Easy Setup – A migration task can be set up within a few minutes in the AWS Management Console.
- Low cost – DMS is a free migration service for migration to Aurora, Redshift, DynamoDB, or DocumentDB. For other databases, you have to pay based on the amount of log storage and computational power needed to transfer.
- Reliability – DMS is a self-healing service and will automatically restart in case of an interruption occurs. DMS provides an option of setting up a Multi-AZ (availability zone) replication for disaster recovery.
Know More: About AWS Route 53.
How does AWS DMS work?
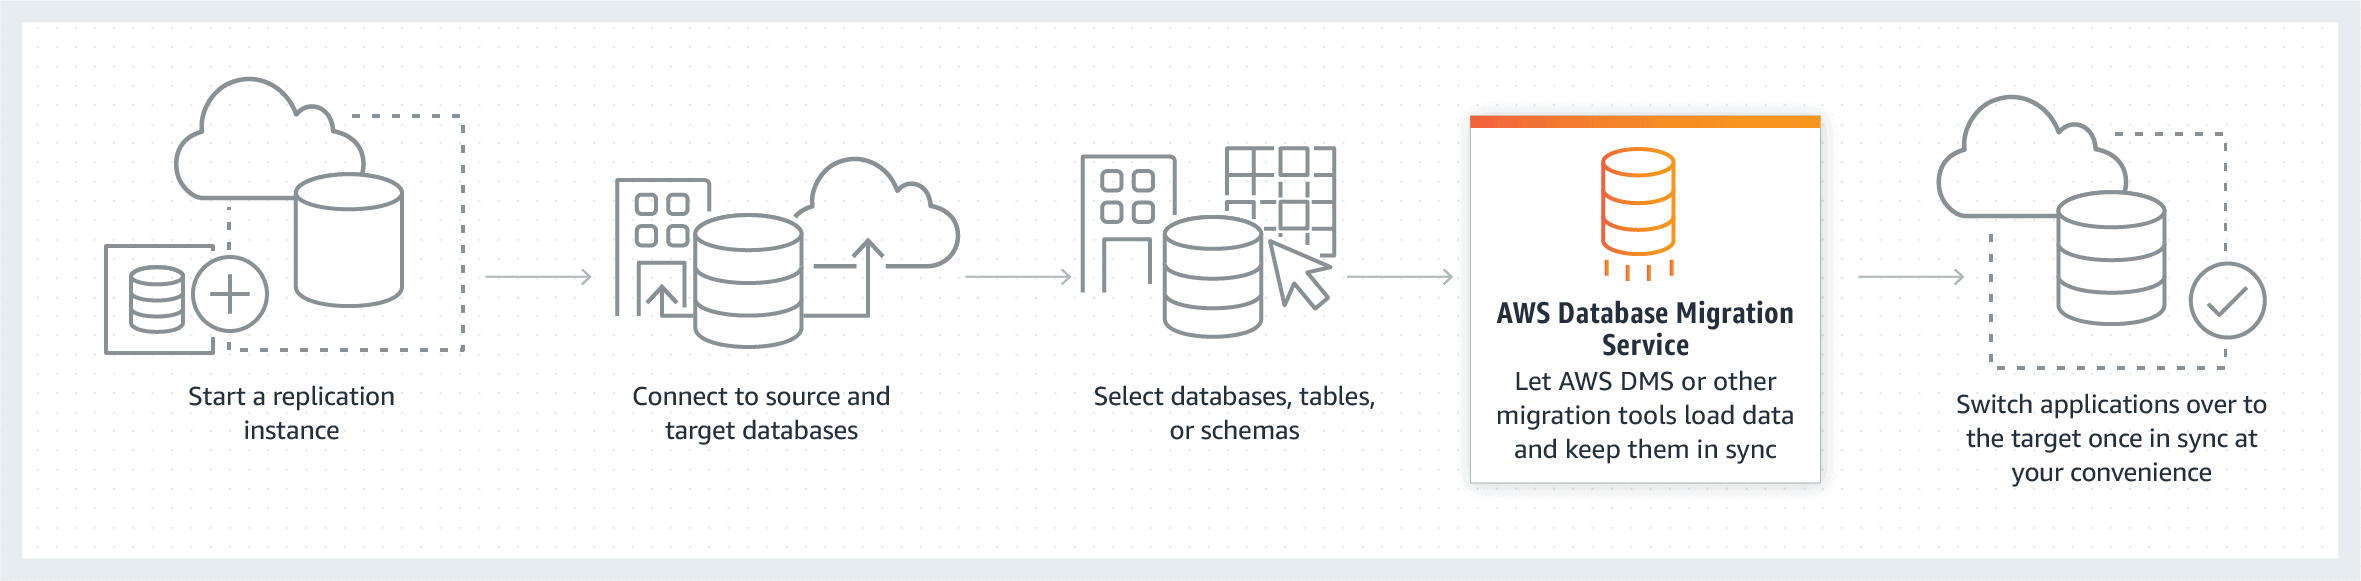
AWS Database Migration Service (DMS) is a managed and automated migration service that allows you to migrate your data from one database to another. The process starts by first connecting DMS to the endpoints; source, and target endpoints. The only requirement to use AWS DMS is that one of your endpoints must be on an AWS service.
AWS Database migration starts by first connecting to your source database, the service then reads the data, formats the data according to the target database. It then loads the data into the target database. It goes through a full load migration where the source data is moved to the target. During full load, any changes made to the tables being loaded are cached on the replication server; these are the cached changes. Once the full load completes, AWS DMS immediately begins to apply the cached changes to the database to keep both the source and target database in sync with each other.
Components of AWS Database Migration Service
AWS DMS migration consists of three components that you should know about before starting with migration:
- Replication instance
- Source & Target Endpoints
- Replication tasks
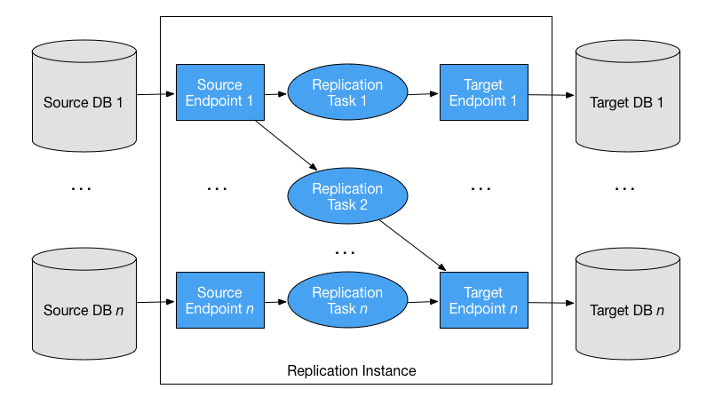
Replication Instance
A replication instance is simply a managed Amazon Elastic Compute Cloud (EC2) instance that is used to host one or more replication tasks. The above image shows a replication instance running several associated replication tasks.
Endpoints
DMS uses an endpoint to connect to your source and target databases. When you create an endpoint, you require the following information:
- Endpoint type
- Engine type
- Server name
- Port number
- Encryption protocols
- Credentials
You can create an endpoint using AWS DMS console, where you test the endpoint connection that verifies whether the database exists at the given server name and port, and the supplied credentials can be used to connect to the database.
Replication Tasks
A replication task is used to move data from the source endpoint to the target endpoint, this is where you specify what tables and schemas are moved between your source and target databases and when. Creating a replication task is the last step you need before you start a migration.
When you create a replication task, you need to specify which replication instance to use, your target and source endpoints, and your migration type option.
AWS Schema Conversion Tool
For a homogenous migration, DMS attempts to create a target schema. However, it is not always possible. In these cases, we use tools such as MySQL Workbench, Oracle SQL Developer, and pgAdmin III.
For heterogeneous migrations, AWS Database Migration Service is not able to perform schema conversions. In these cases, you can use AWS Schema Conversion Tool (SCT). SCT automatically converts source schema to a compatible format for your target database. It can create a target schema and also can generate and create an entire schema, with tables, indexes, views, and so on.
Use Cases
DMS supports migration to Amazon RDS, Aurora, Redshift, DynamoDB, and DocumentDB. There are several use cases of AWS DMS, some of them are listed below:
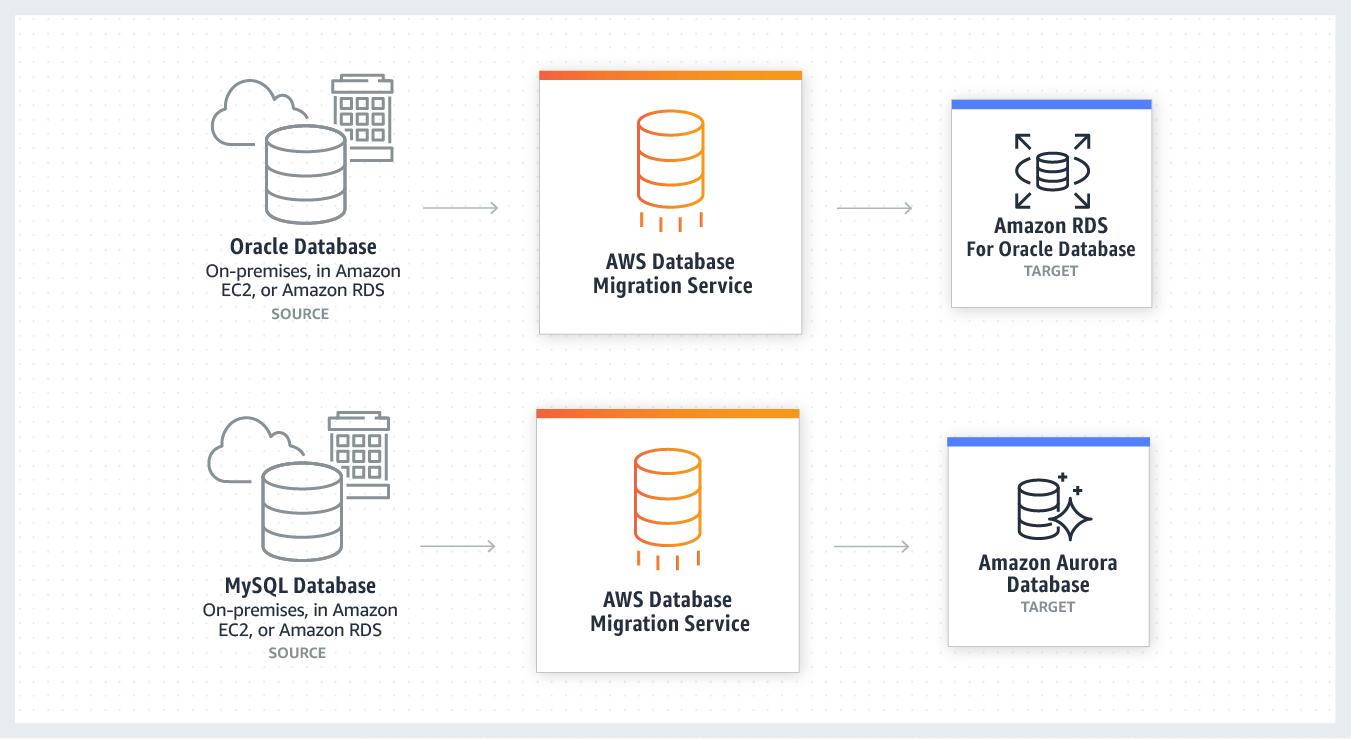
1. Homogeneous Database Migration
Homogeneous Database Migration is when the source and target databases are the same or compatible with each other such as Oracle to Amazon RDS for Oracle, MySQL to Amazon Aurora, MySQL to Amazon RDS for MySQL, or Microsoft SQL Server to Amazon RDS for SQL Server. Since the schema structure and data types of source and target database are compatible, it is a one-step process as there is no need for schema conversion.
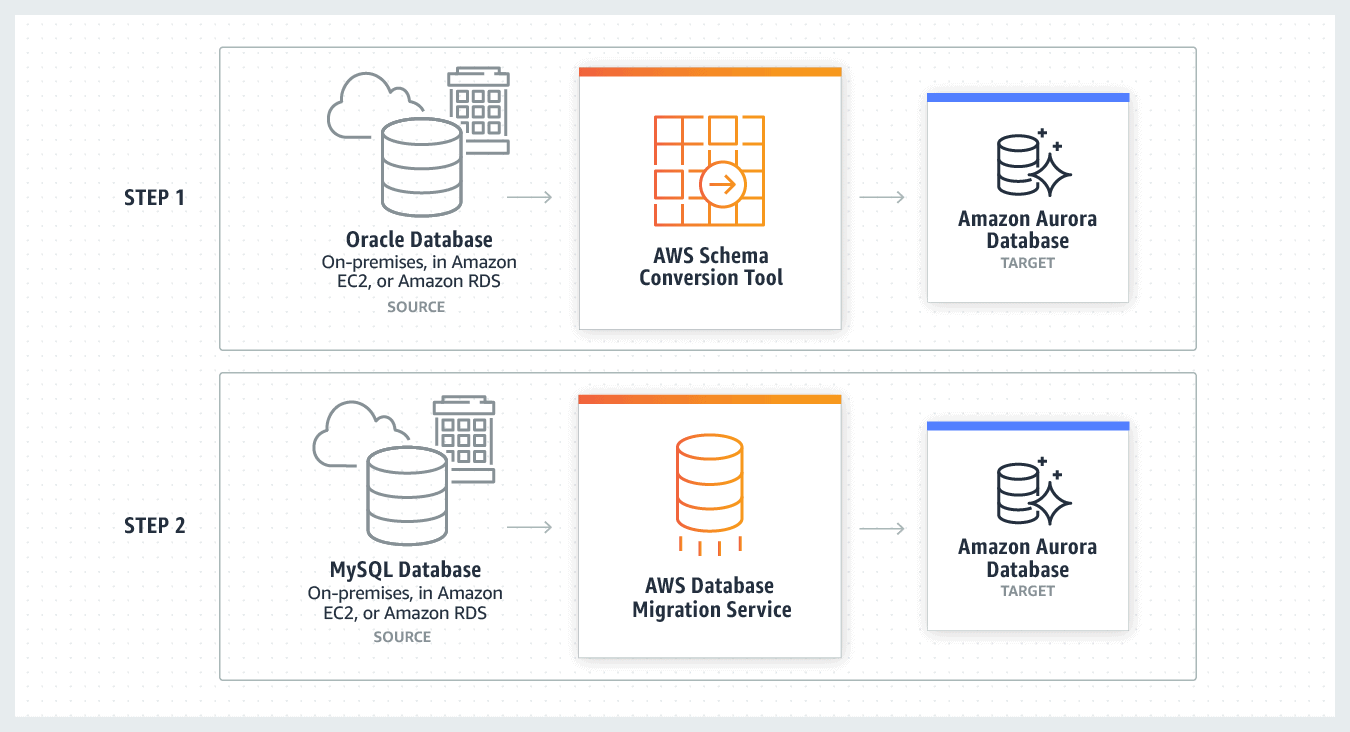
2. Heterogeneous Database Migration
Heterogeneous Database Migration is when the source and target database engines are different from each other such as Oracle to Amazon Aurora, Oracle to PostgreSQL, or Microsoft SQL Server to MySQL migrations. In this case, the schema structure and data types of source and target databases are different from each other, this requires a schema and code transformation before migration, which makes it a two-step process.
Migrating an On-Premises Oracle Database to Amazon Aurora MySQL
In this section, we will look at the step-by-step process for migrating an on-premises Oracle database (the source endpoint) to an Amazon Aurora with MySQL compatibility (the target endpoint) using AWS Database Migration Service (AWS DMS).
Before starting, you must have an AWS cloud account, if you don’t know how to create one, read our blog on How To Create AWS Free Tier Account.
Step 1: Configure Your Source Oracle Database
1. Run the following command to enable supplemental logging at the database level for AWS DMS
ALTER DATABASE ADD SUPPLEMENTAL LOG DATA;
2. If you are using an account with the minimal privileges required by AWS DMS, then you need to make sure it has the required privileges.
Step 2: Configure Your Target Aurora MySQL Database
If you want to create a temporary dms_user with the minimal privileges required for migration, then follow the steps in official AWS docs.
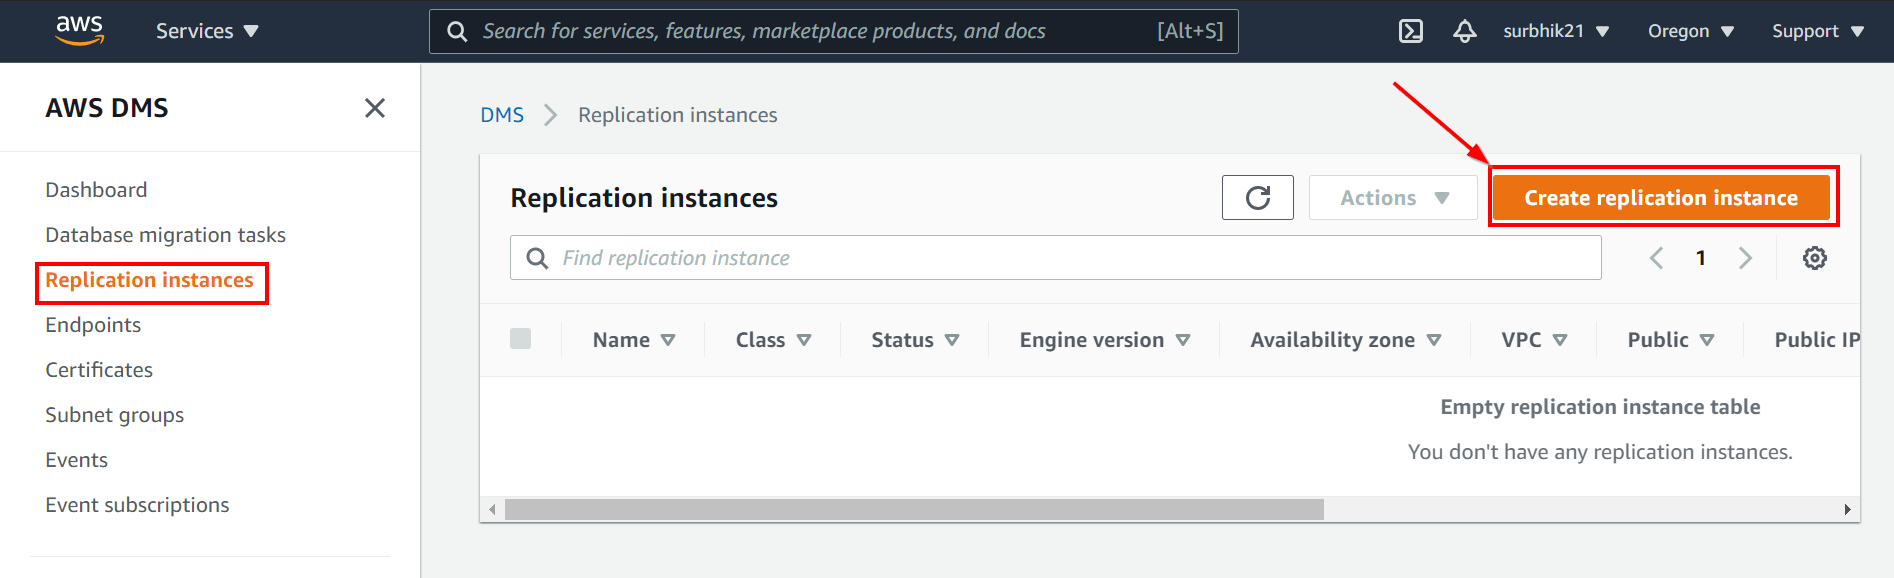
Step 3: Create a Replication Instance
1. Sign in to the AWS Management Console, and open the AWS DMS console and choose Replication instances.
2. Click on Create replication instance.
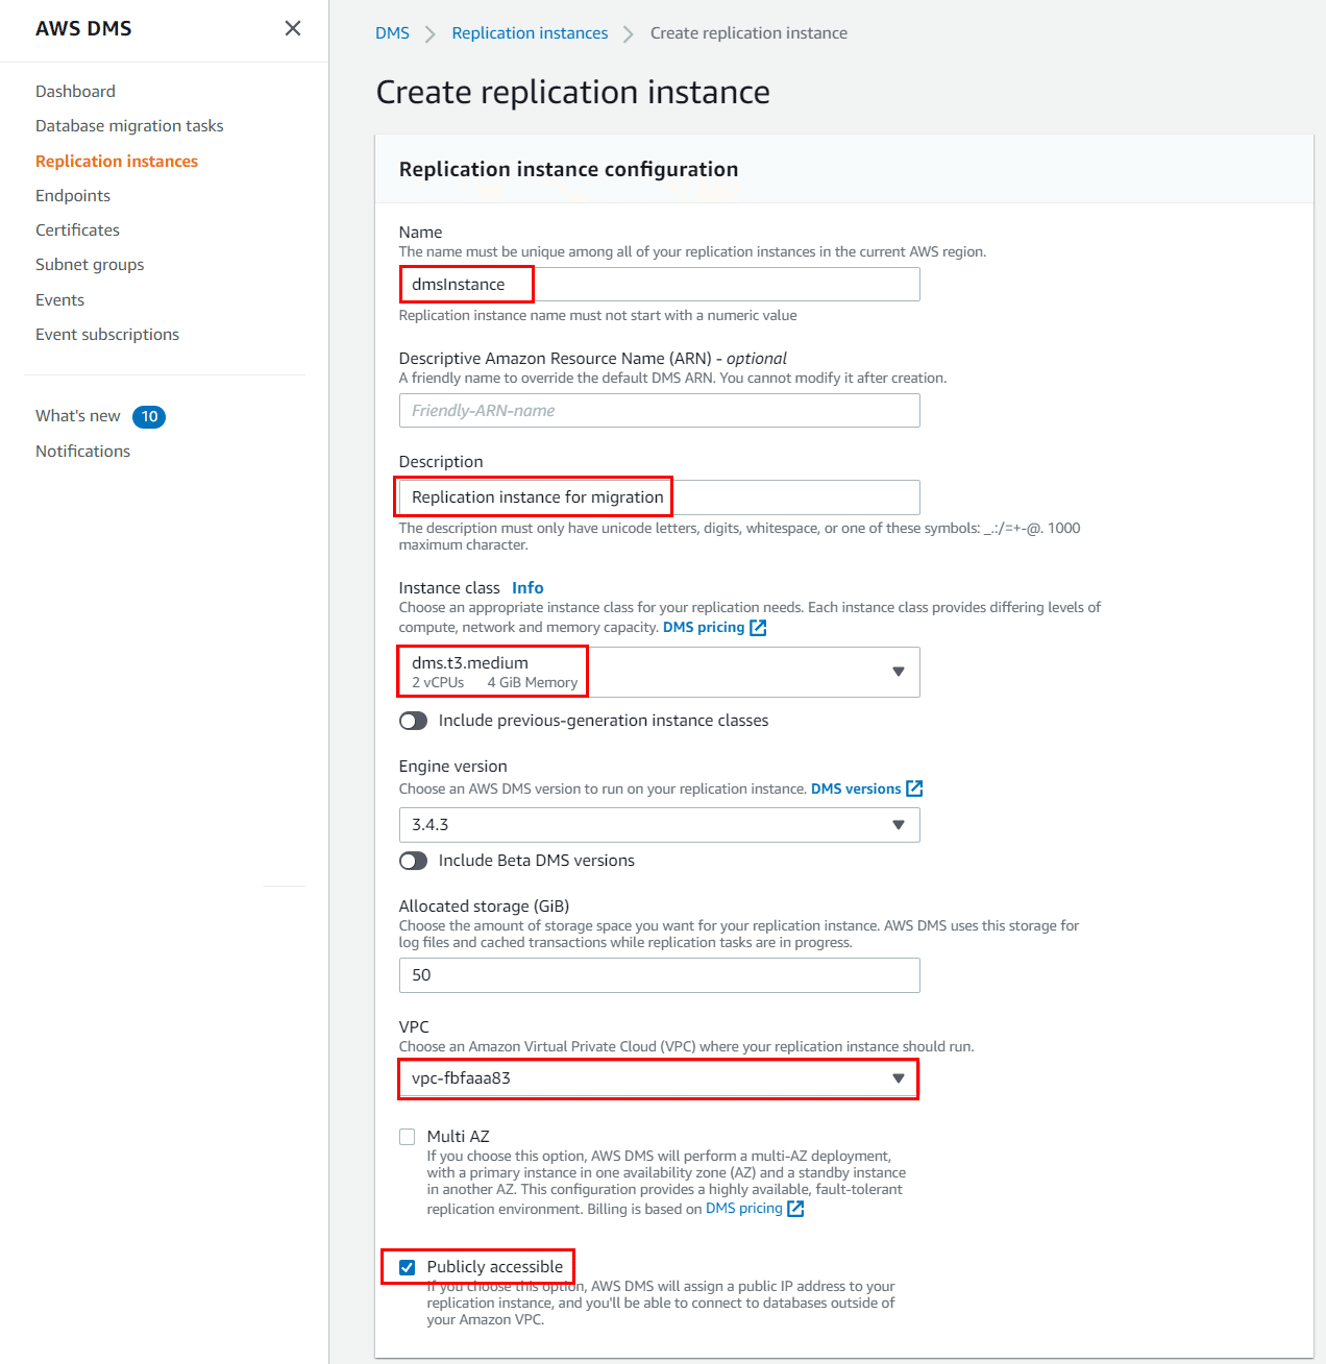
3. On the Create replication instance page, enter the required details. Once done, click Create.
Step 4: Create Oracle Source Endpoint
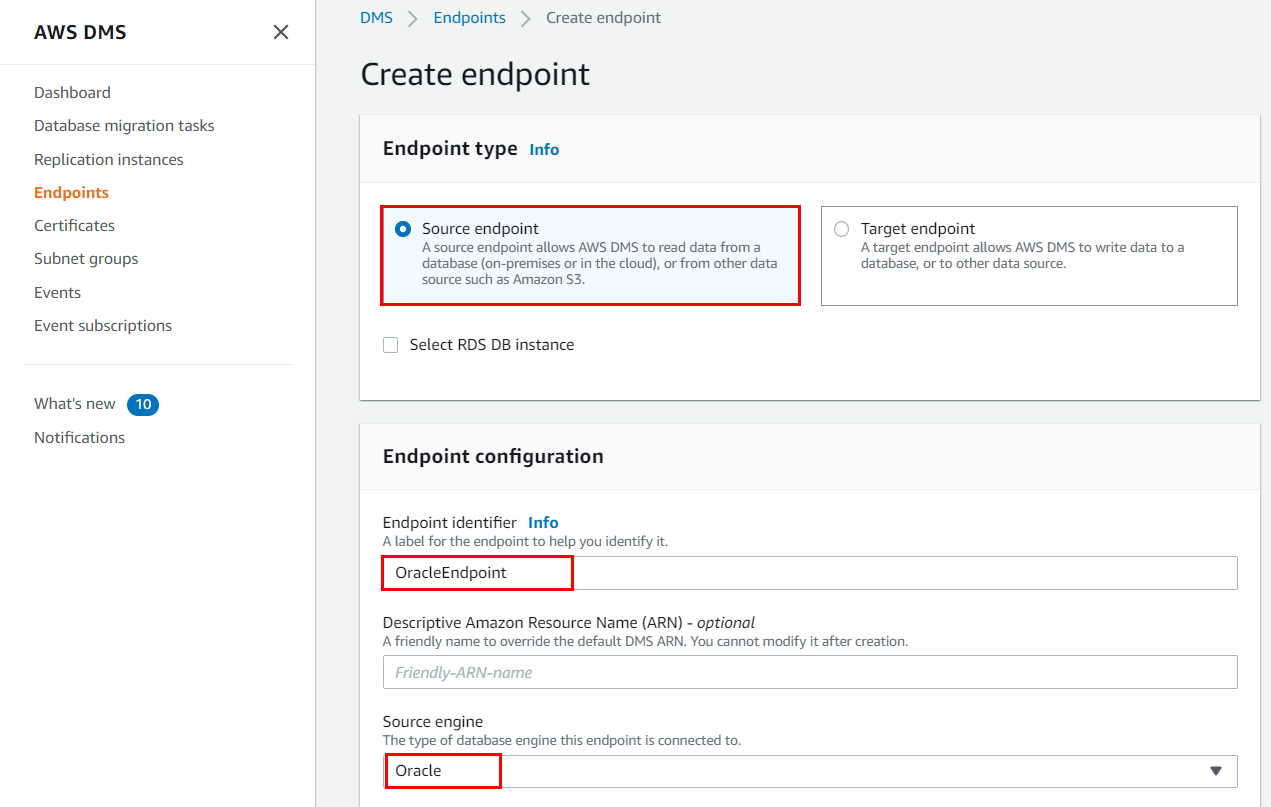
1. Go to the AWS DMS console, choose Endpoints. Select Create Endpoint.
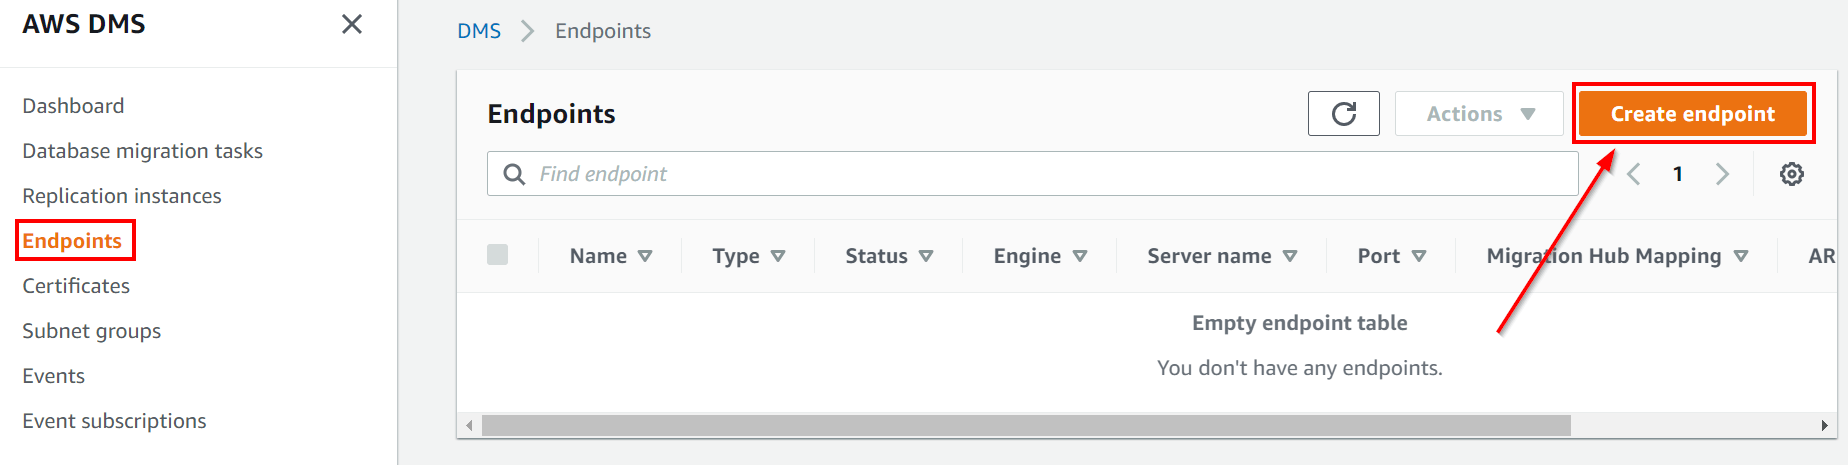
2. On the Create database endpoint page, enter the required details and create the source endpoint.
Step 5: Create Aurora MySQL Target Endpoint
Create a target endpoint in a similar way that you created the source endpoint. Select Target endpoint on the create endpoint details page, select Aurora MySQL as your source engine, enter the database details for Aurora database, and create the endpoint.
Step 6: Create a Migration Task
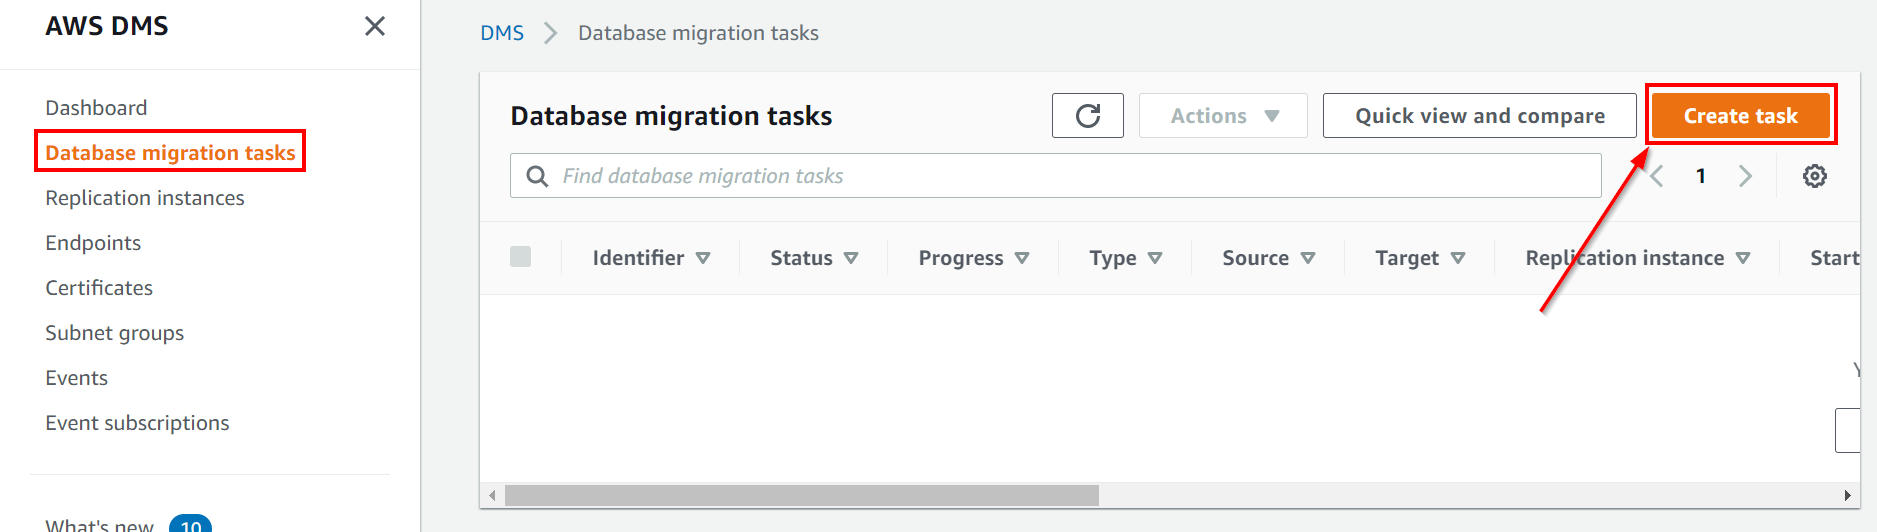
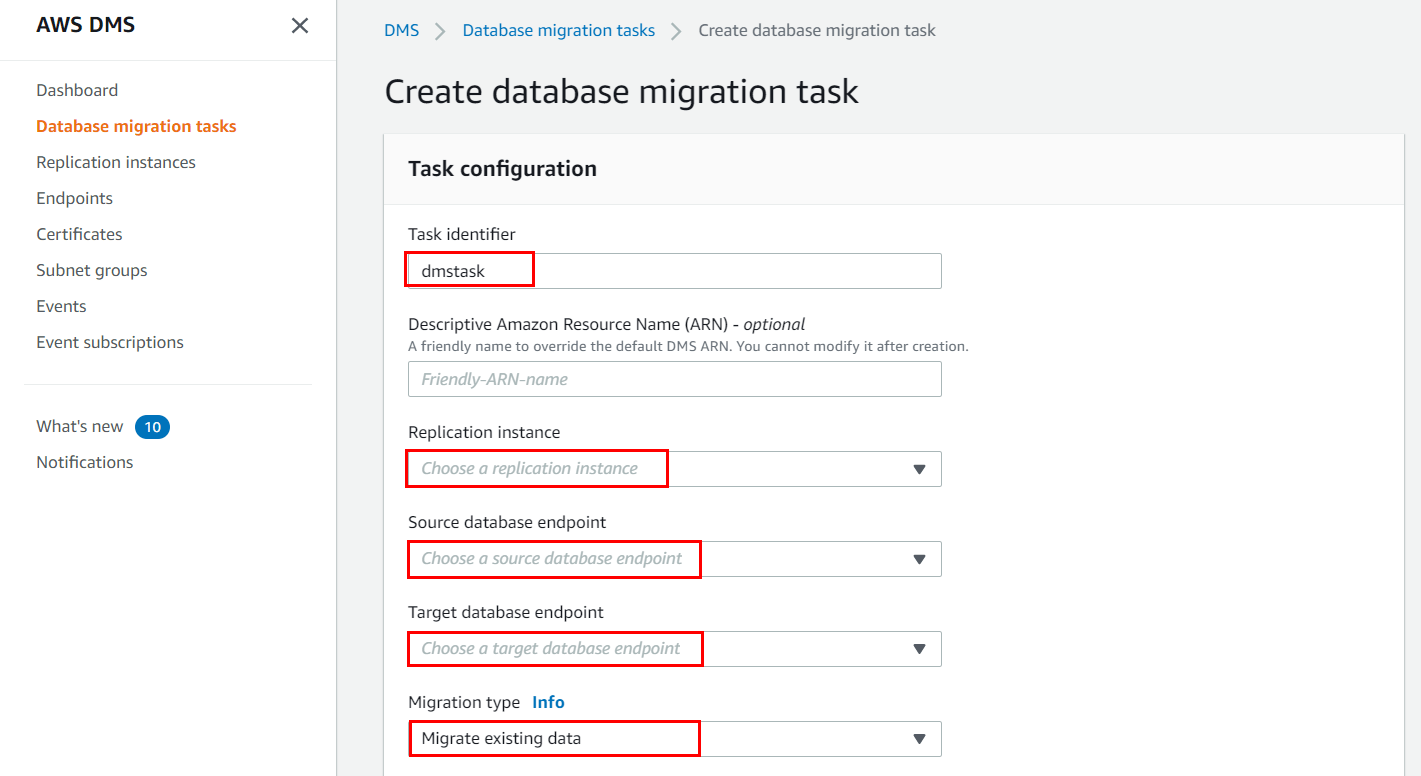
1. Go to the AWS DMS console, choose Database Migration Tasks, click Create Task.
2. On the Create Task page, select the replication instance, source, and target endpoints that we created in previous steps and enter the other required details.
Conclusion
I hope that by now you have a better understanding of AWS Database Migration Service, its benefits, components, and working. This should help you overcome the complex challenges of database migration to AWS.
