Sunday, 15 March 2020

Storage account and Blob service configuration

Storage account and Blob service configuration

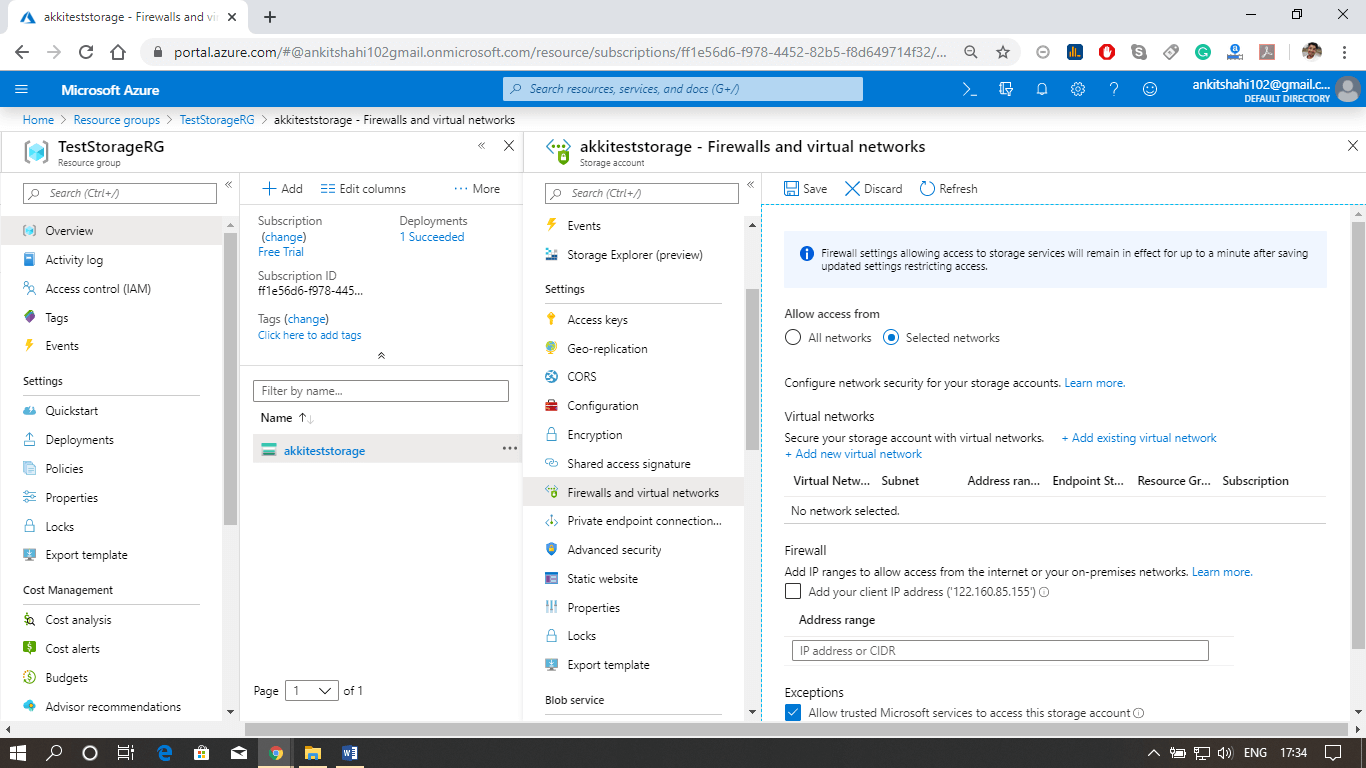
The first key configuration area is related to the network, which is a storage firewall and virtual networks. Every storage account in Azure has its storage firewall. Within the firewall, we can configure the following rules.
  • A set of rules that we can configure is to allow connection from a specific virtual network. If we have an Azure virtual network, we can configure it here to enable the connections from the workloads.
  • The second area of a rule is IP address ranges. We can specify an IP address range from where we won't allow the connections to the storage account to access the data.
  • The third one is enabling connections from certain Azure services. So, we can specify exceptions in such a way that the connections from trusted Azure services are allowed.
We need to remember that there is a storage firewall associated with the storage account in which we can configure three types of rules.
  • We can specify the virtual networks from which the connections are allowed.
  • We can specify allowed IP range from where the connections are allowed.
  • We can define some exceptions.

Custom Domain

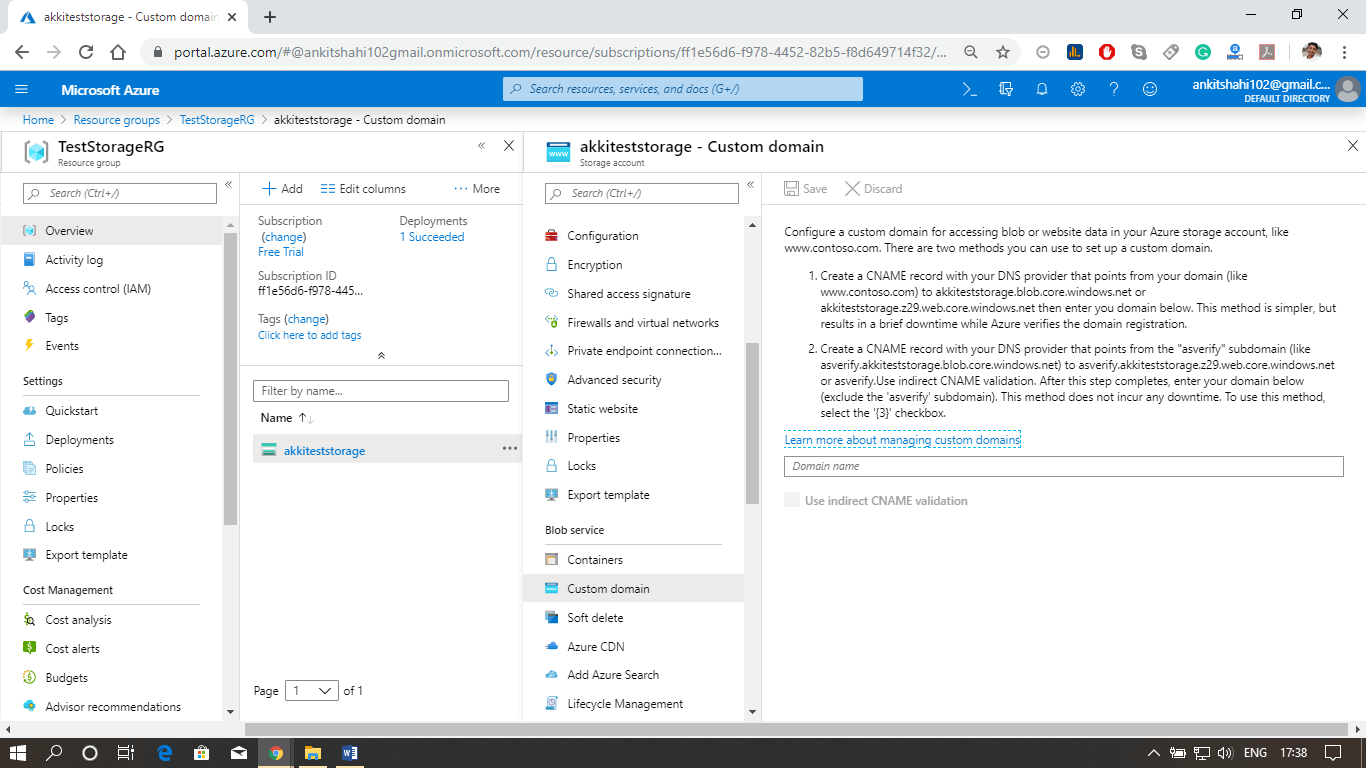
We can configure a custom domain for accessing the block data in our storage account. The default endpoint will be the storage account name ".blob.core.windows.net". But in place of that, we can have our domain for the default storage account URL. We can configure our custom domain also. We need to specify our custom domain as "customdomain/container/myblob" to access the specific blob.
There are two fundamental limitations that we need to understand when we are using custom domains.
  • All Azure storage does not natively support HTTPS with the custom domains. We can currently use Azure CDN access blobs by using custom domains over HTTPS.
  • Storage accounts currently support only one custom domain name per account. So we can use only one custom domain for all the services within that storage account.

Content delivery network

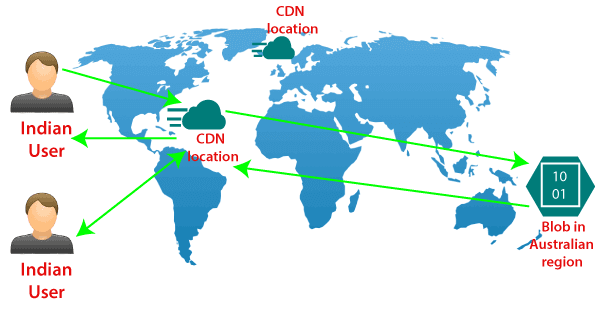
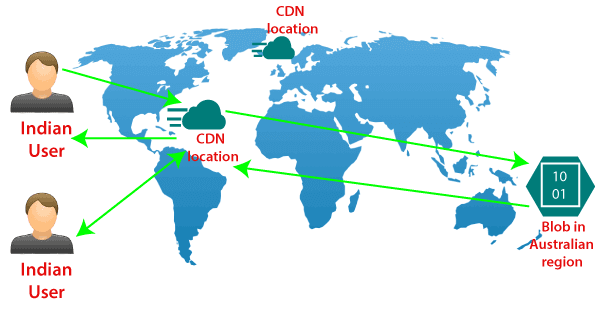
The Azure content delivery Network (CDN) caches static content at strategically placed locations to provide maximum throughput for delivering content to users. So the most crucial advantage of CDN is providing the content to the users in the most optimal way. So let's see how this works.
Storage account and Blob service configuration
We are assuming that we have the blob storage located in the Australia region. So we have most of the users in North India and South India. In that case, we can configure a CDN profile for North India and South India. For example - let's say a North Indian user is trying to access our blob located in the Australia region. So first of all, the request goes to the CDN location. And from the CDN location, the request will further go to blob in the Australian region. For the first user, the block content will be copied to the CDN location, and then eventually delivered to North Indian users. However, when the next North Indian user tries to access that block, they will be redirected to CDN location, and the content will directly be delivered to them from that location in North India itself because the block content is already cached in CDN location.
So from the second user onwards, the content delivery latency is significantly reduced.
Other Configuration areas:
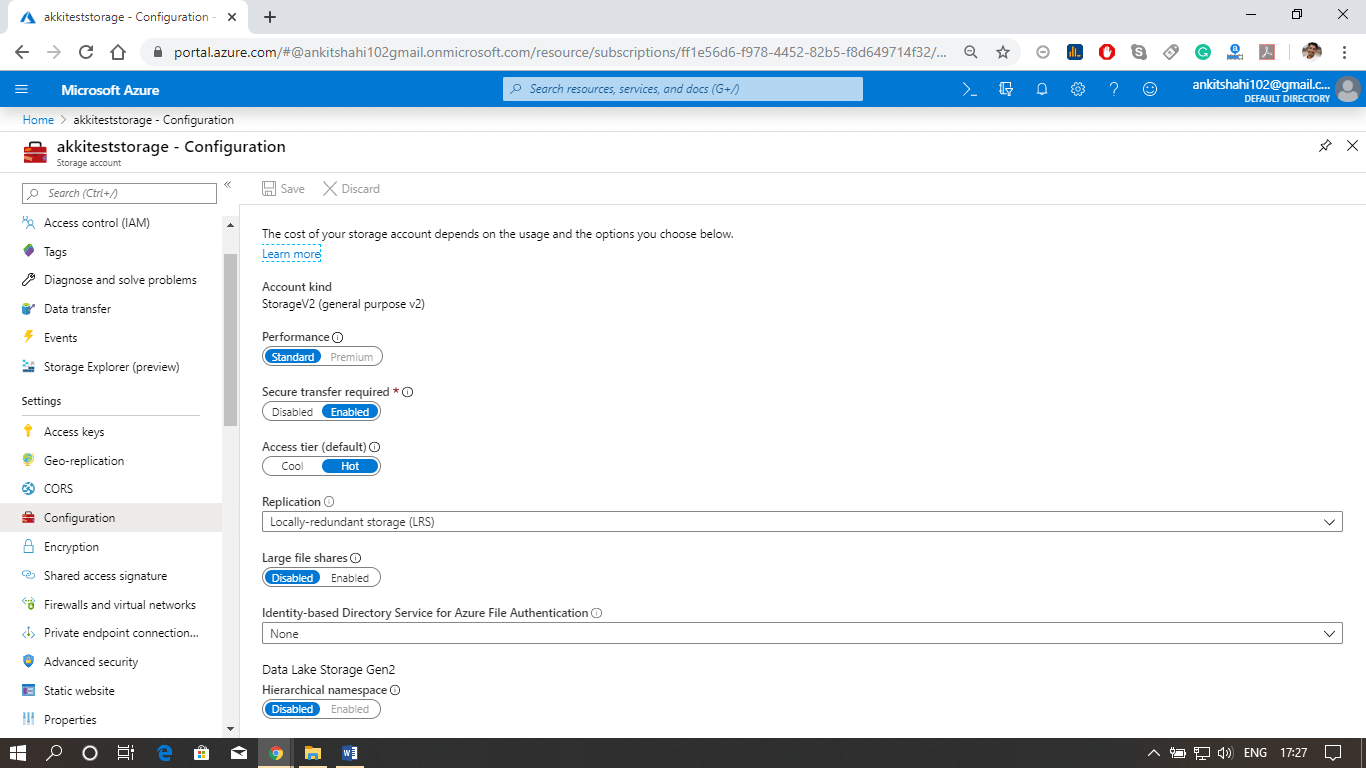
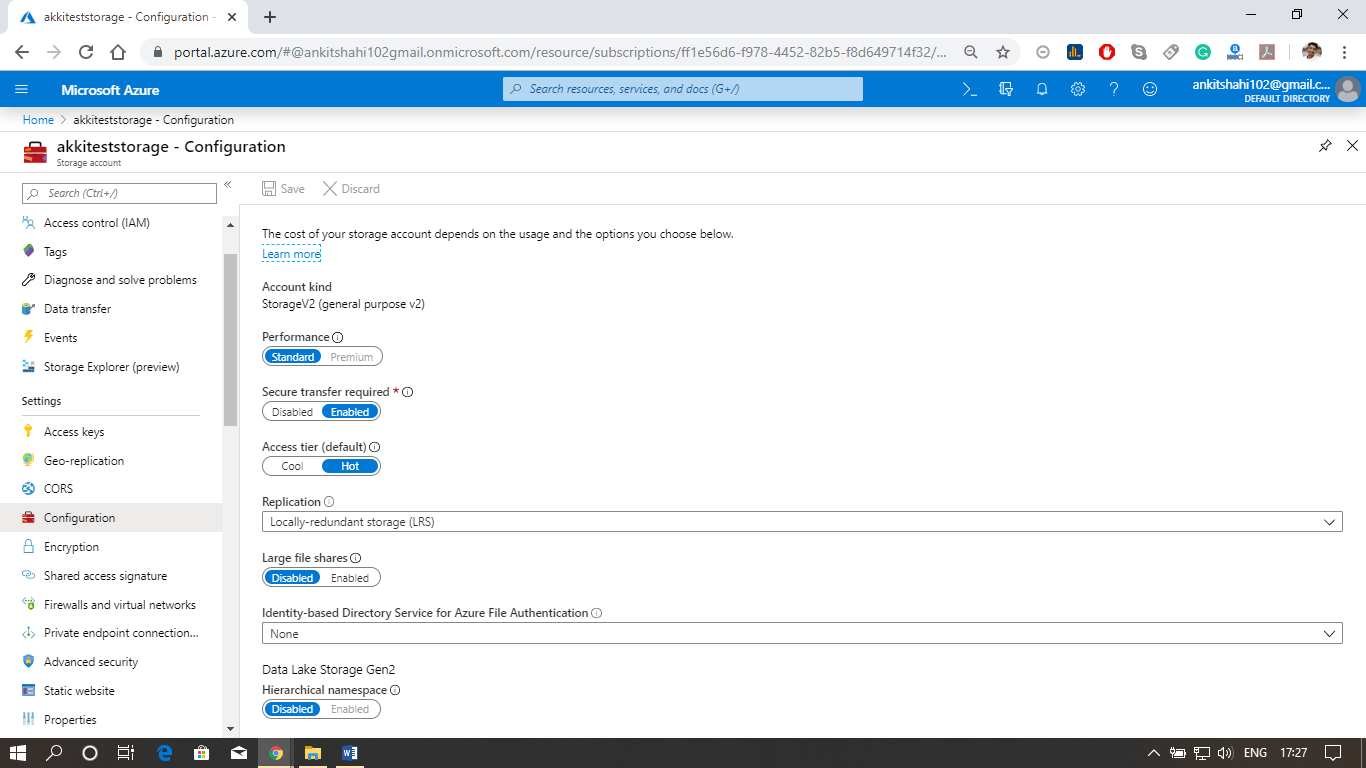
There are some different configuration areas such as performance tier, Access tier, replication strategy, secure transport required, etc.
Storage account and Blob service configuration
Some of them cannot be changed once the storage account is created. For example- performance tier, data lake generation 2 enabled or disabled. But we can switch on/off secure transport required, and we can change from hot to cool and cool to hot access type. We can change the replication strategy and Azure active directory authentication for Azure Files. So there are specific configuration settings that we can change.
Configuring Custom Domain for the storage account.
Let us see how to configure a custom domain for the Azure storage account, and also see some of the configuration settings we discussed above.
Step 1: Log into your storage account. Click on resource group then click on the storage account that you created
Step 2: The first thing we discussed above is firewalls and virtual networks. Here you can configure the virtual network from which you want to accept the connections to the storage account, or you can configure the IP address ranges from where you want to accept the connections and also you can specify some exceptions. For E.g., if you're going to allow the trusted Microsoft services to access this storage account to place the logs or to access the records. So, in that case, you can tick this, and also, if you want to allow read access to storage logging from any network, you can tick this. So there are some exceptions that you can make here.
Storage account and Blob service configuration
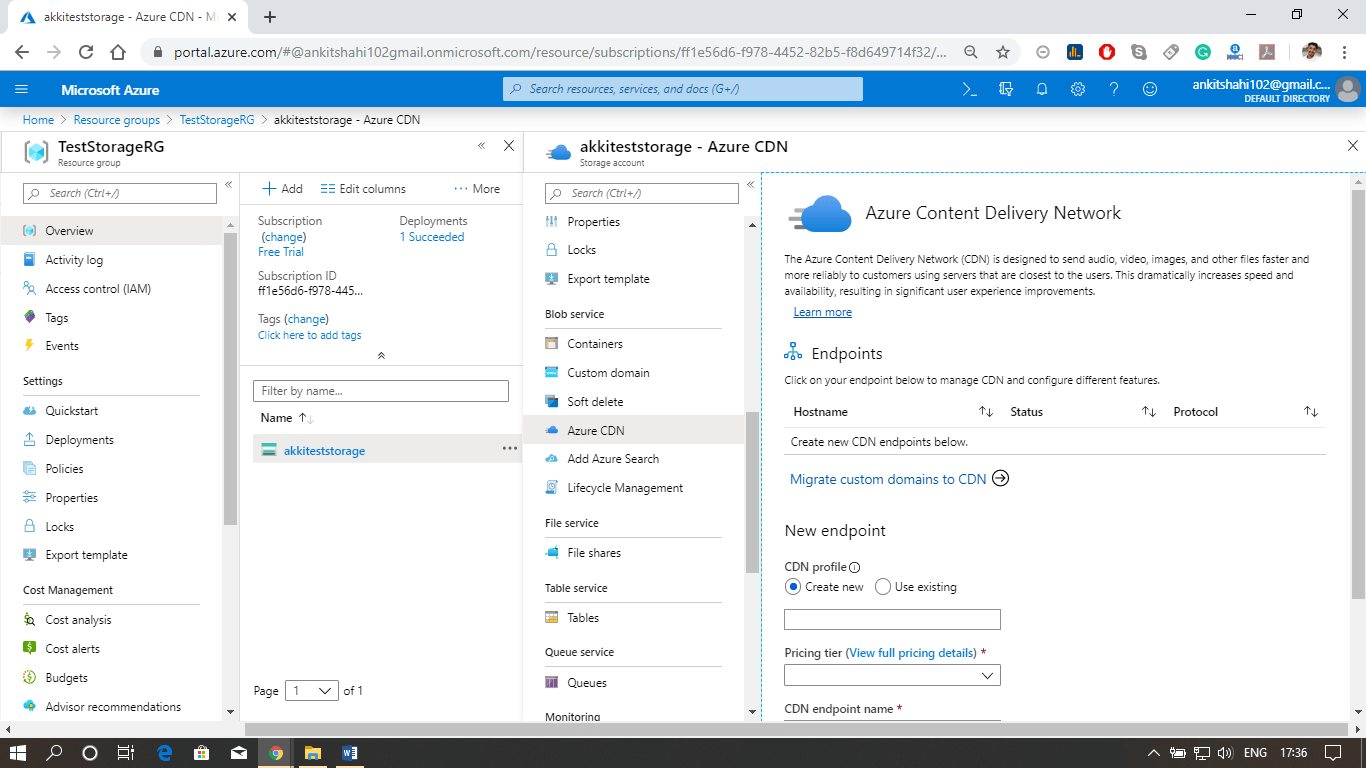
Step 3: Secondly, we discussed Azure CDN also. This is where you can configure the content delivery network endpoint. You can configure a CDN profile and map that CDN endpoint to the storage icon.
Storage account and Blob service configuration

Custom domain

Step 1: Open your resource group, then your storage account, and click on the custom domain tab, as shown in the figure below.
Storage account and Blob service configuration
Step 2: Log in to your domain provider Web-site then click on domain DNS settings and create a Cname record.
There are two ways to do it:
You can use normal Cname, or you can use asverify also.
Step 3: Select a Cname and assign a subdomain name and after that copy and paste your blob storage link that points from your domain (like www.smaple.com) to akkiteststorage.blob.core.windows.net
Step 4: After that, fill your subdomain name inside the Domain text box in the Custom Domain window of your Storage account. Then click on Save.
Step 5: Open the browser and fill your custom domain name
You can now see the image you stored in the blob storage.

Creating a container and adding a blob to the container.

Creating a container and adding a blob to the container.

We have already created a storage account. Now, we are going to create a container in our storage account and upload some files to it.
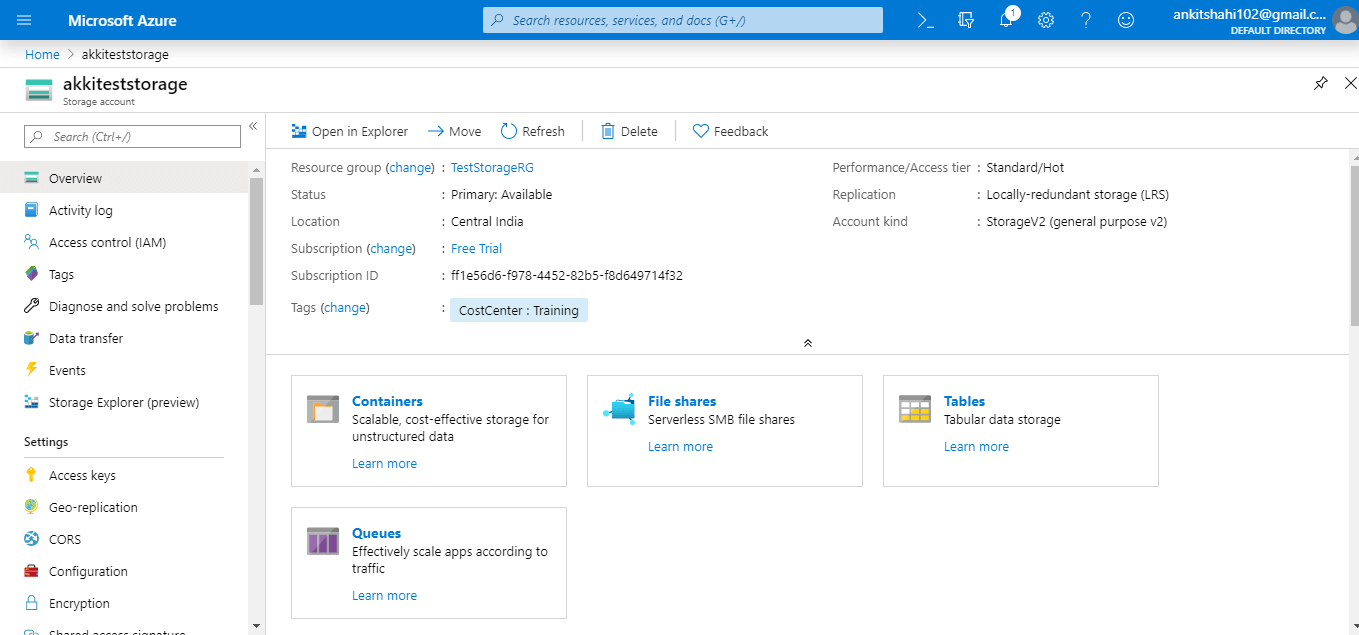
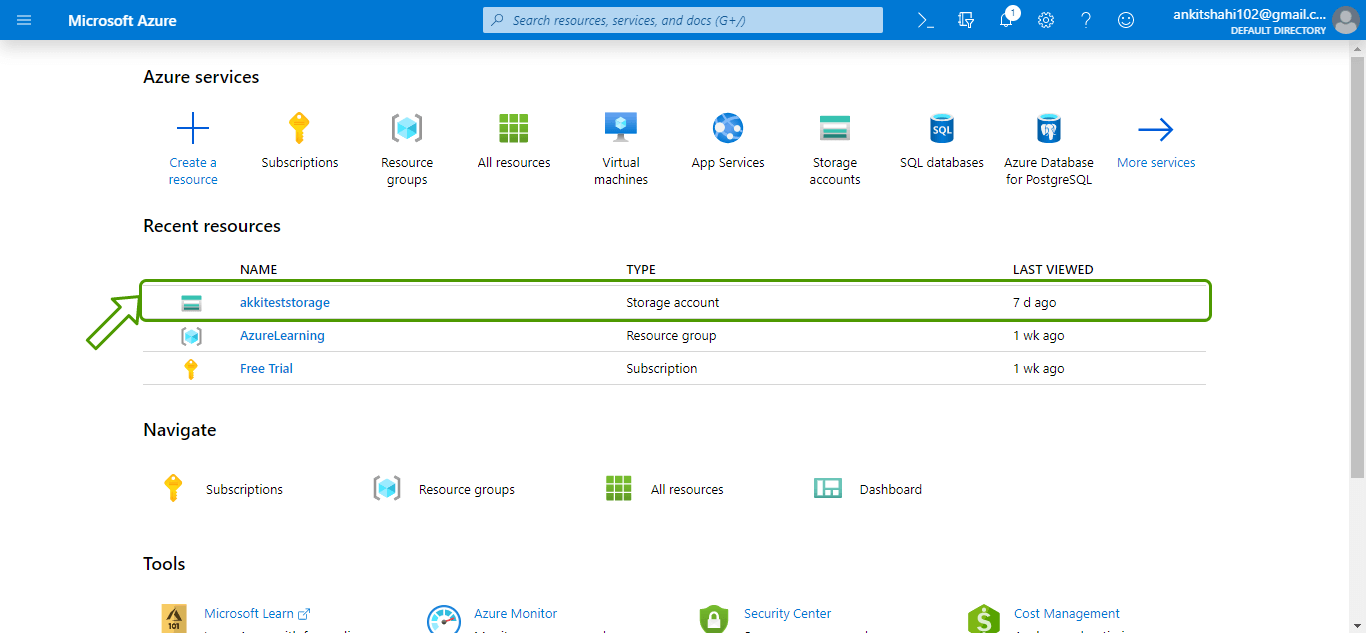
Step 1: Log-in to your Azure Portal and click the storage account that you have created and added to your homepage/dashboard.
Creating a container and adding a blob to the container
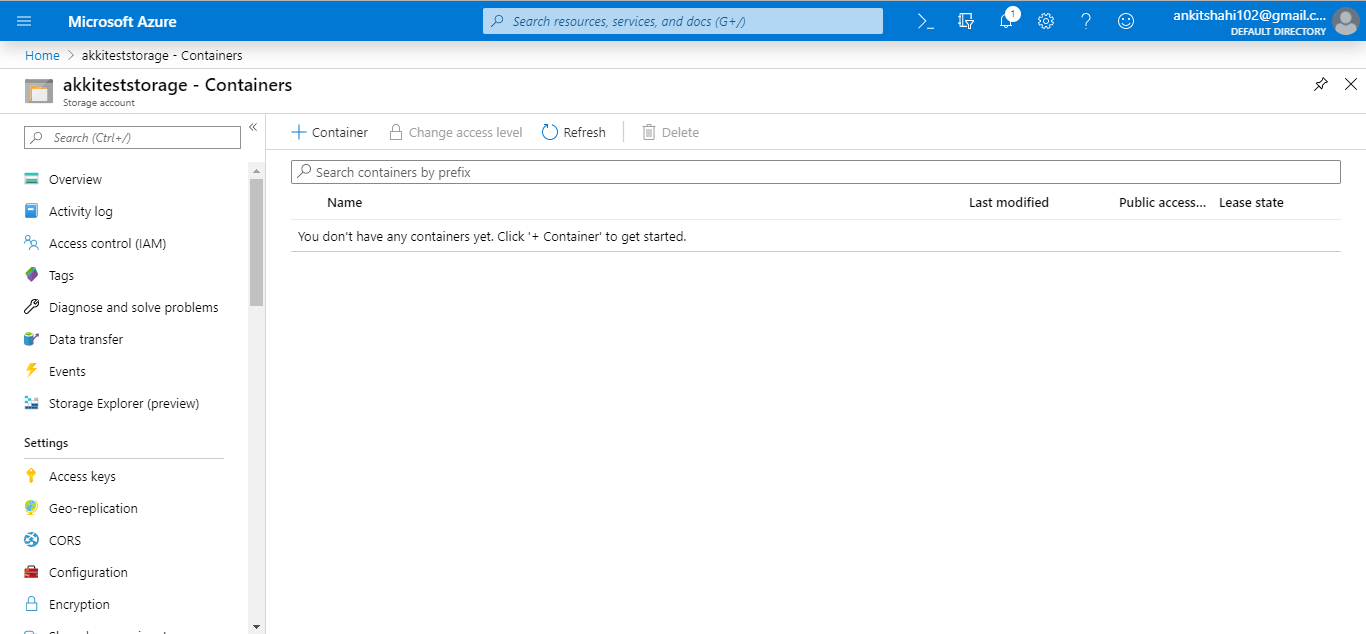
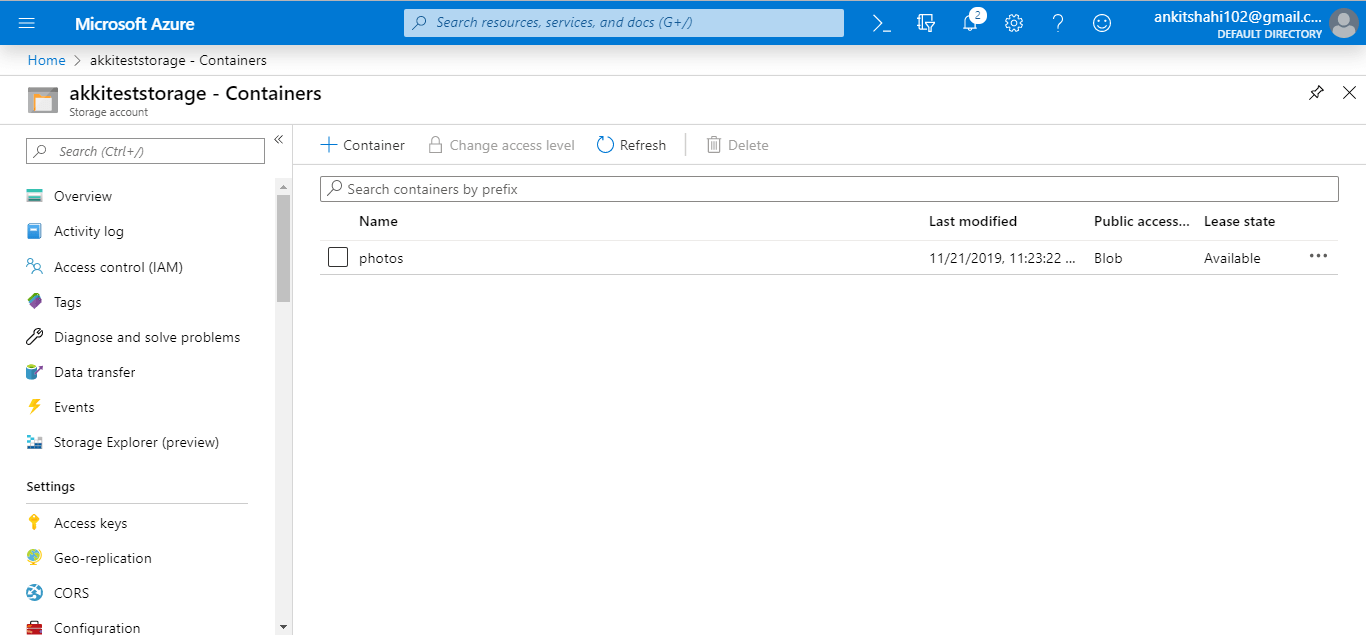
Step 2: Click on the "Containers" box, as shown in the figure below.
Creating a container and adding a blob to the container
Step 3: Now, click on "+Container" tab, it will redirect you to the "container form" window.
Creating a container and adding a blob to the container
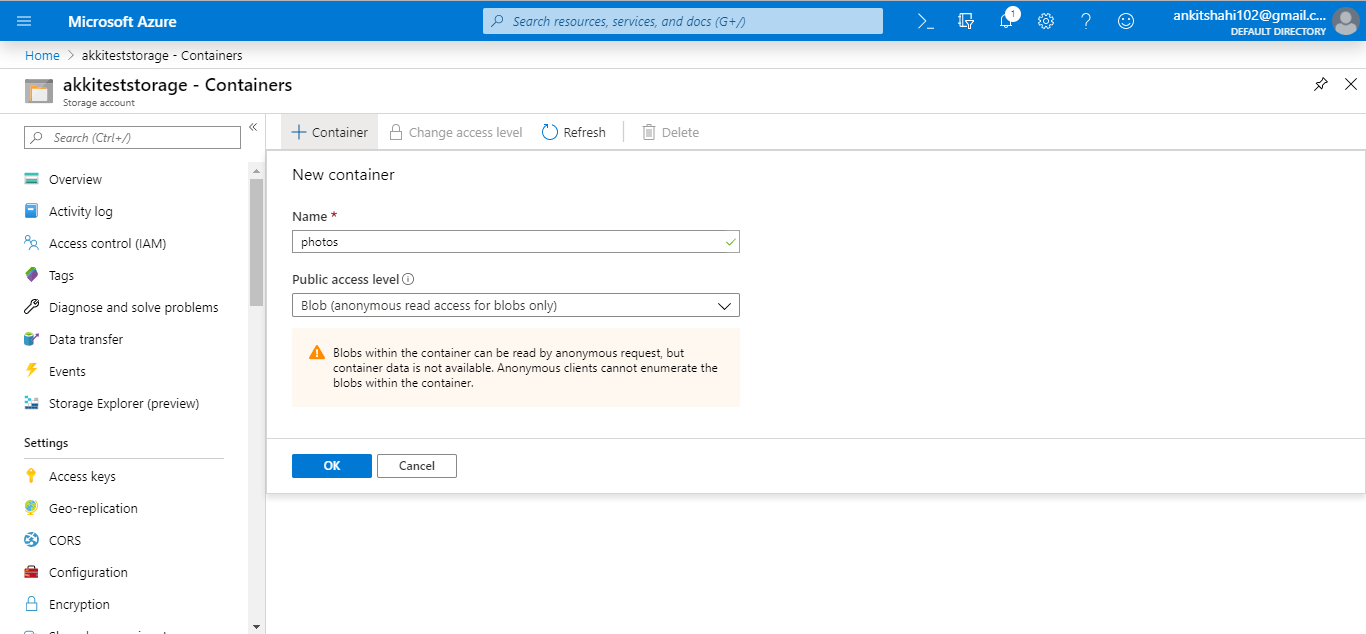
Step 4: Here, you need to assign a name to the container, and the name should be in lowercase. And in terms of access level, you can pick any from them. We are selecting blob here. Then click on, OK.
Creating a container and adding a blob to the container
Step 5: Now, our container has been successfully created.
Creating a container and adding a blob to the container
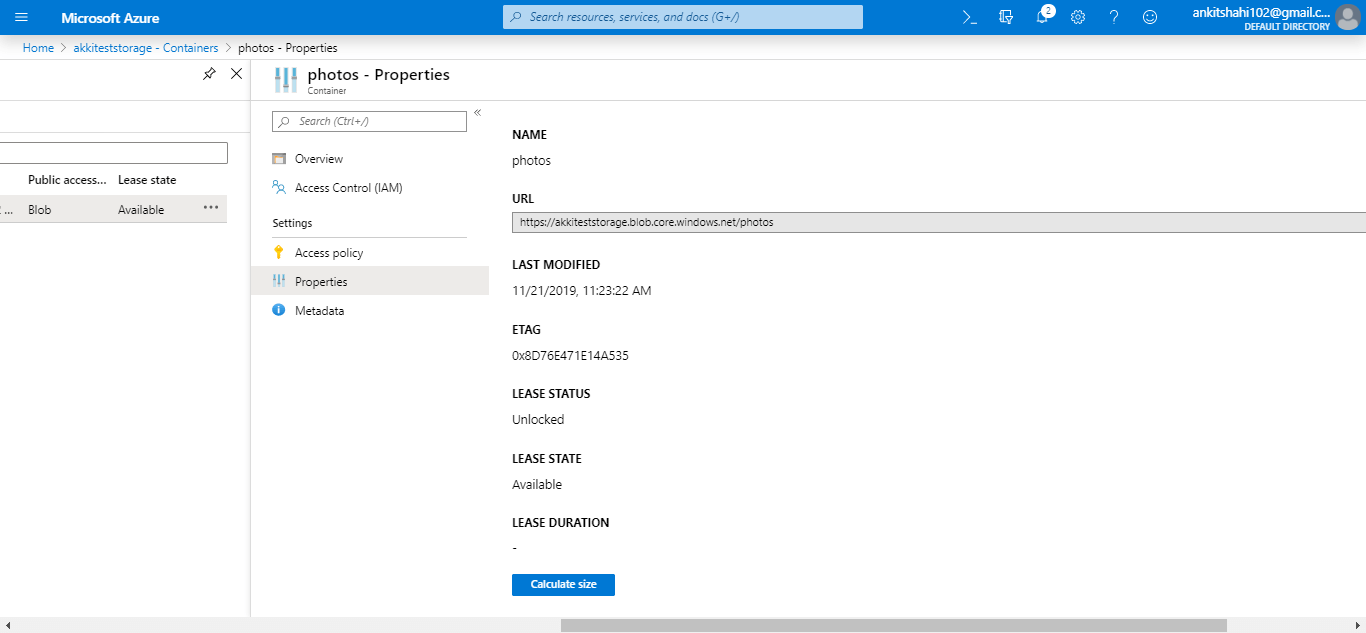
Step 6: So, if you click on the context menu, you can see the container properties and the URL using which you can access the container, last modifies Etag, and Lease status.
Creating a container and adding a blob to the container
As we discussed earlier, we can have metadata at the container level and blob level also, so we can add key-value pairs in the container.
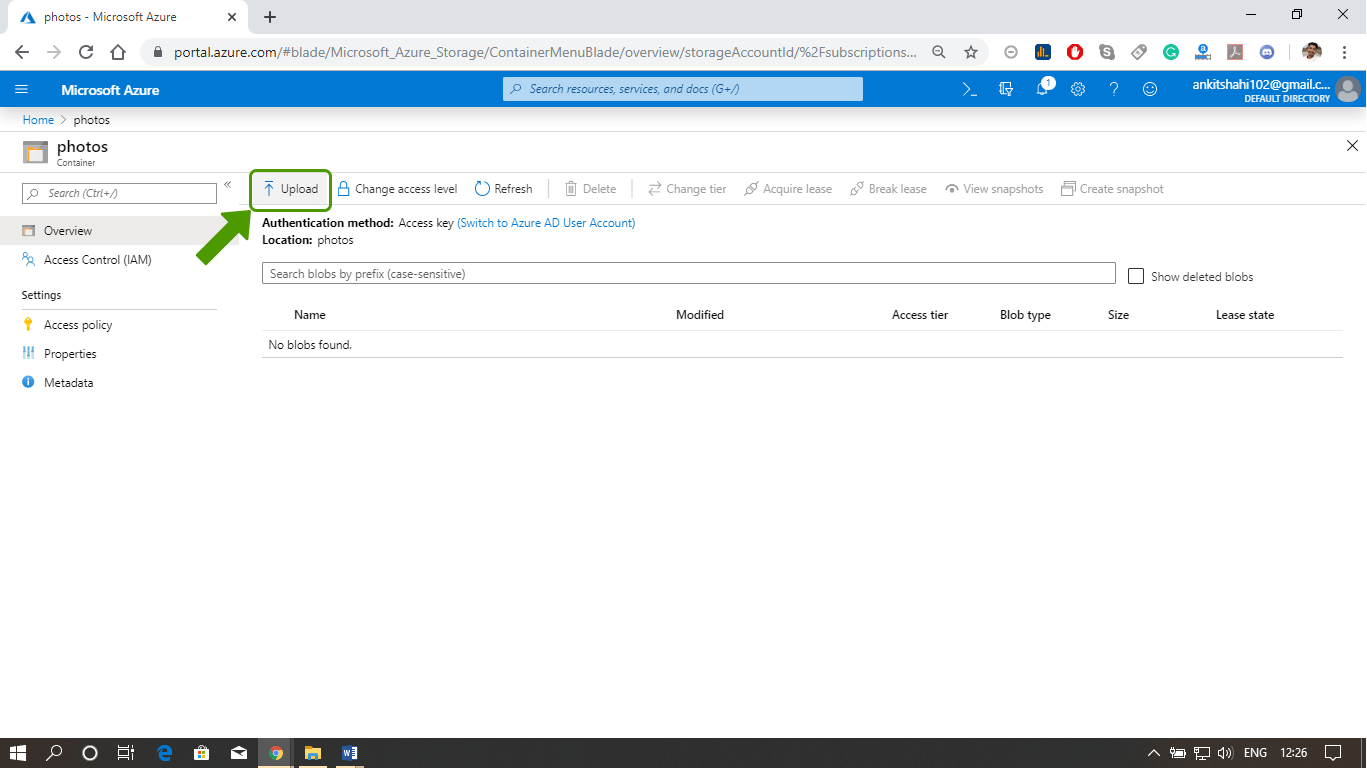
Step 7: Now, let's click on the container and upload a blob into this container.
Creating a container and adding a blob to the container
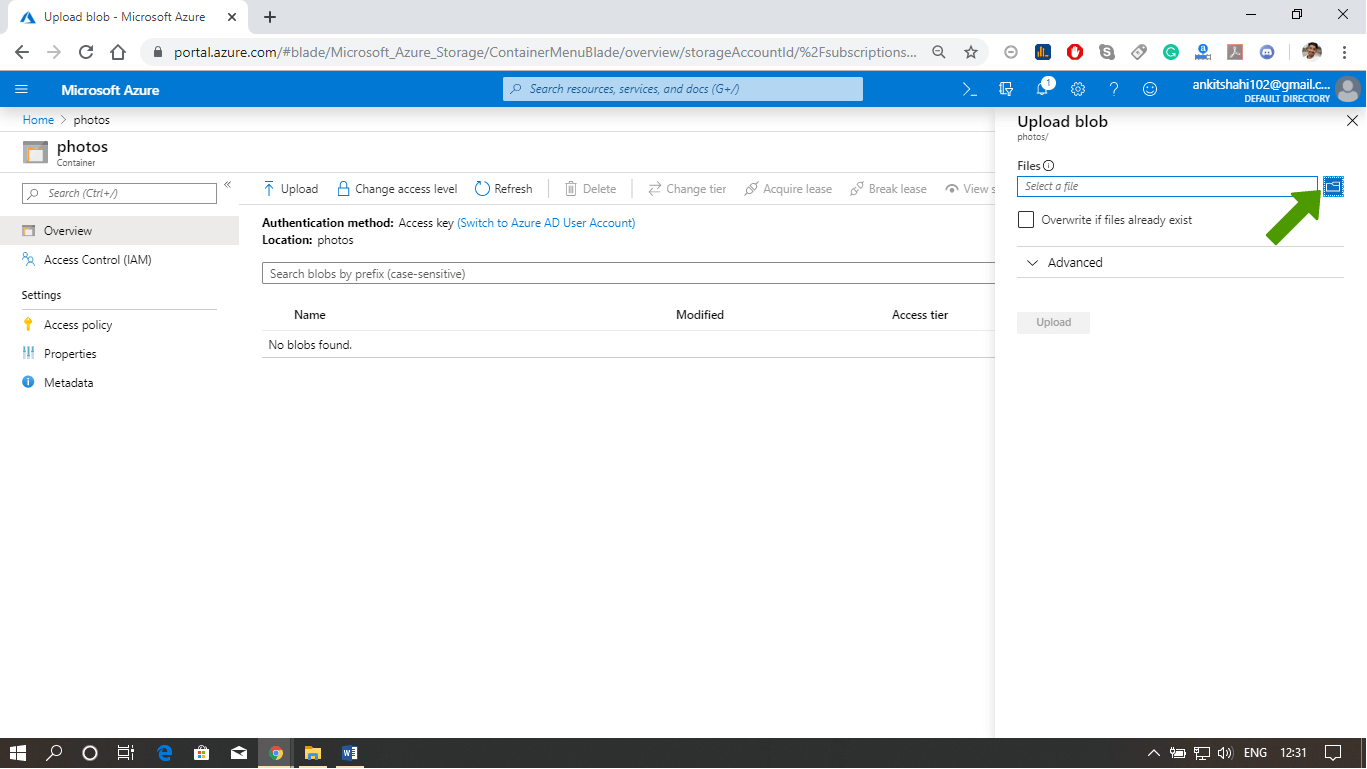
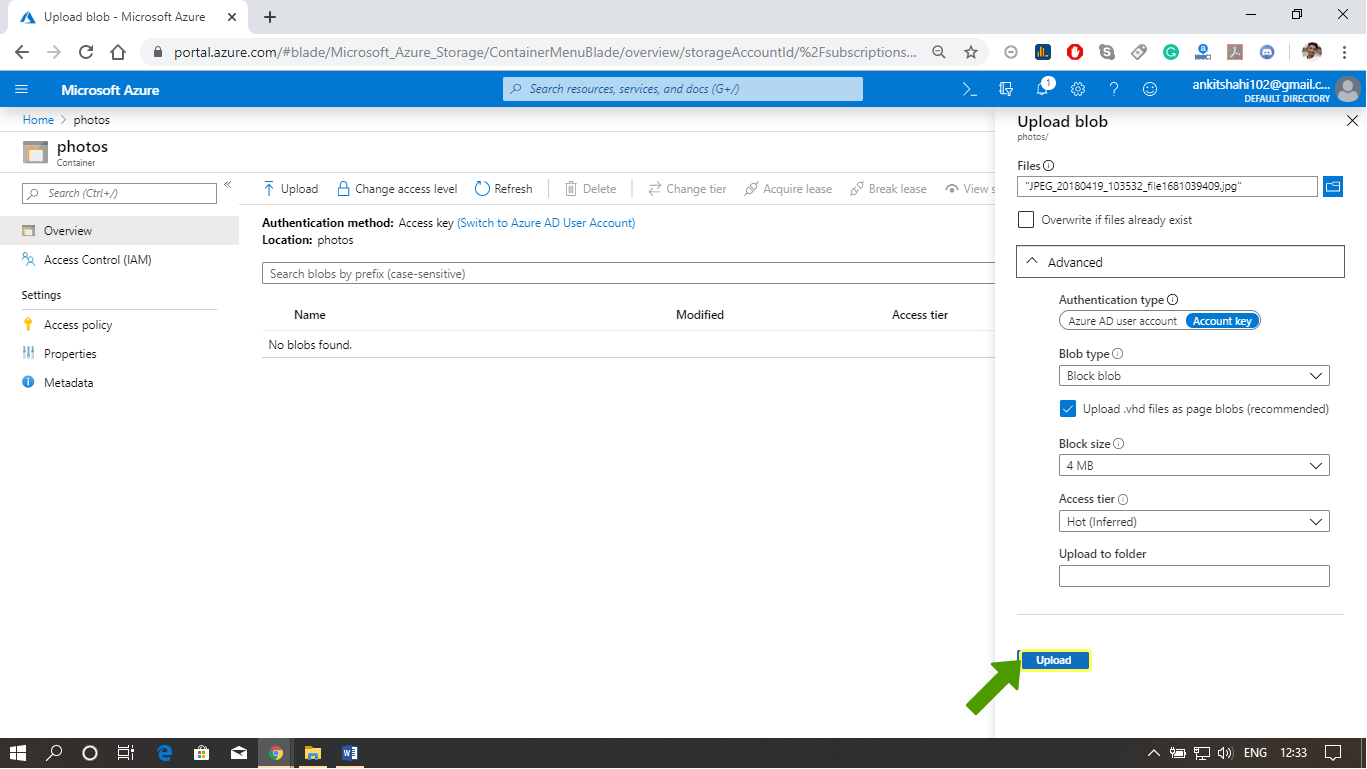
Step 8: Click on the select file option to browse the file you want to upload into the container.
Creating a container and adding a blob to the container
Step 9: We have selected here a JPEG file, and if we click on the advanced option, we can specify the blob type. We can define that in case if we are uploading a large file. So that the upload performance will be significantly increased because each block will be uploaded in parallel. We are thereby reducing the latency in the upload. Finally, click on the upload button.
Creating a container and adding a blob to the container
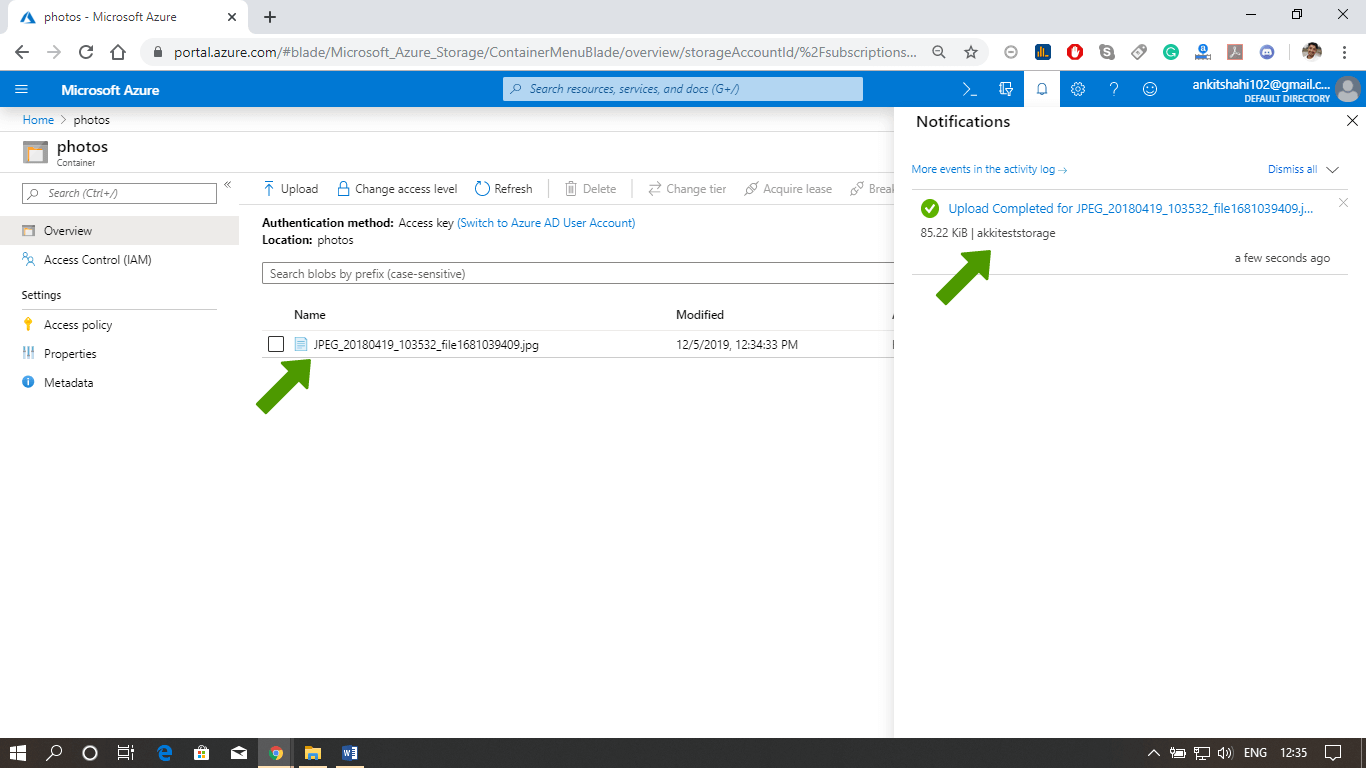
Step 10: A notification will appear once the upload will be completed. As shown in the following figure.
Creating a container and adding a blob to the container
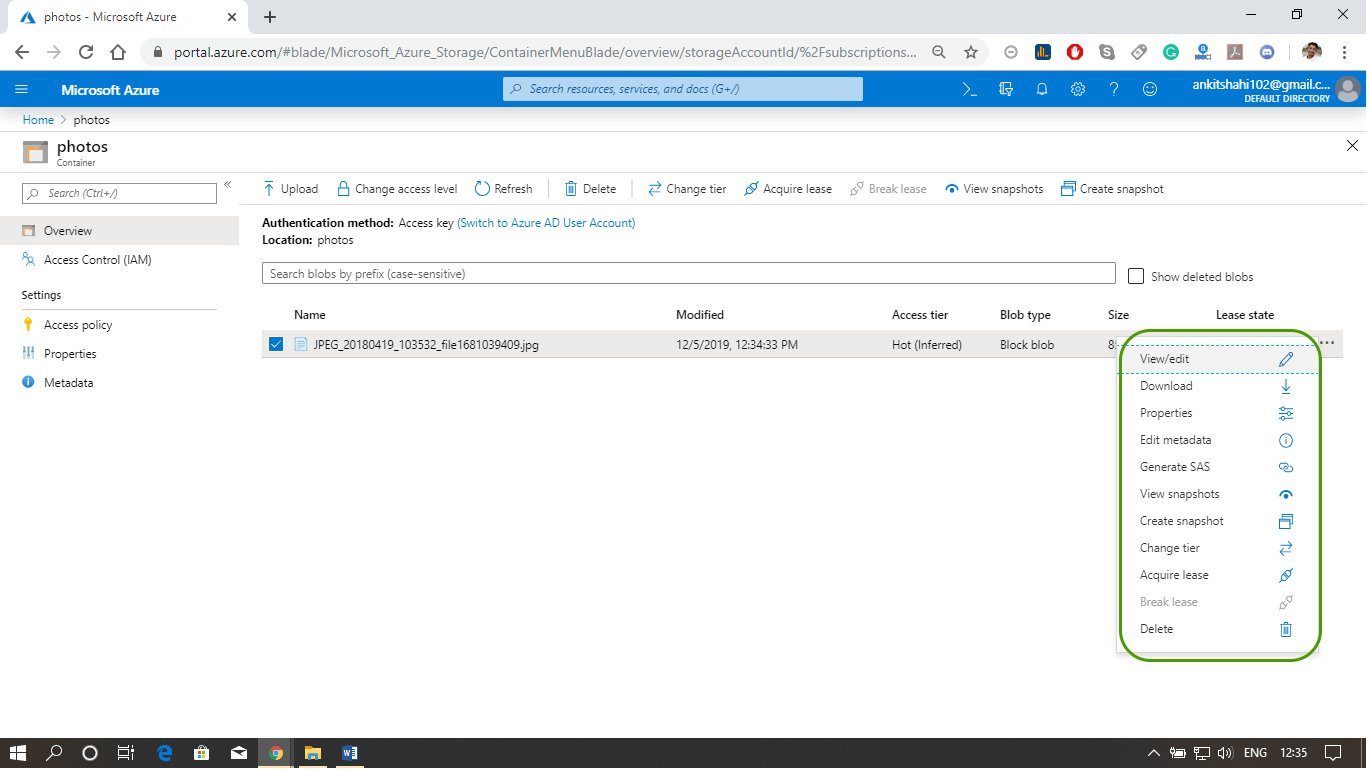
Step 11: Refresh your portal to see your file if it does not appear automatically. After that, we can see here access tier, blob type. And if we click on the menu drawer, we can see view/edit blob, download the blob, blob properties, and URL, which we can use to access this blob. We can create/view the snapshot of this particular file.
Creating a container and adding a blob to the container
This is how we can create a container within the storage account and view the properties associated with it. And also, we can upload blobs into that container using the Azure portal.

Azure blob storage

It is Microsoft's object storage solution for the cloud. Blob storage is optimized for storing a massive amount of unstructured data, such as text or binary data.
Blob storage usages:
  • It serves images or documents directly to a browser.
  • It stores files for distributed access.
  • We can stream video and audio using blob storage.
  • Easy writing to log files.
  • It stores the data for backup, restore, disaster recovery, and archiving.
  • It stores the data for analysis by an on-premises or Azure-hosted service.
Azure blob storage is fundamental for the entire Microsoft Azure because many other Azure services will store the data within a storage account, inside the blob storage, and act upon that data. And every blob should be stored in a container.

Container

The container is more like a folder where different blobs are stored. At the container level, we can define security policies and assign those policies to the container, which will be cascaded to all the blobs under the same container.
A storage account can contain an unlimited number of containers, and each container can contain an unlimited number of blobs up to the maximum limit of storage account size (up to 500 TB).
To refer this blob, once it is placed into a container inside a storage account, we can use the URL, which looks like http://mystorageaccount.blob.core.windows.net/mycontainer/myblob.
Blob storage is based on a flat storage scheme. So you can't create a container within a container. Let's take an example - once we create a container like videos and if we want to differentiate between professional videos and personal videos. Then we can prefix the blob names with personnel for personal videos and professional for professional videos. The blob name will be shown as personal-video1, personal-video2 for personal videos, and for professional videos - professional-video1, professional-video2. Like this, we can create a virtual hierarchy, but we can't create a container within a container inside the Azure blob storage service.

Blob Types:

Azure offers three types of blob service:
  • Block blob: It stores text binary data up-to about 4.7 TB. It is the block of data that can be managed individually. We can use block blobs mainly to improve the upload-time when we are uploading the blob data into Azure. When we upload any video files, media files, or any documents. We can generally use block blobs unless they are log files.
  • Append blob: It is made up of blocks like block blobs, but are optimized for append operations. It is ideal for an application like logging data from virtual machines. For example - application log, event log where you need to append the data to the end of the file. So when we are uploading a blob into a container using the Azure portal or using code, we can specify the blob type at that time.
  • Page blob: It stores random access files up-to 8 TB. Page blobs store the VHD files that backs VMs.
Most of the time, we operate with block blob and append blobs. Page blobs are created by default. When we create a virtual machine, the storage account gets created, and the disks associated with the virtual machine will be stored in the storage account. But for most of the storage solutions like we know, we are developing an application like YouTube, or we are developing a monitoring application, in that case, either we use block blobs or append blobs based on the requirement.

Naming and Referencing

The names of container and blob should adhere to some rules. Because the container name and blob name will be a part of the URL when you are trying to access them. They need to adhere to some rules which are specified below.
Container Names
  • The name of containers must start with a letter or a number, and can contain only letters, numbers, and the dash (-) character.
  • All the letters in a container name must be in lowercase.
  • Container names must be 3 to 63 characters long.
Blob Names
  • The name of blobs can contain any combination of characters.
  • The name of blobs must be at least one character long and cannot be more than 1024 characters long.
  • The Azure Storage emulator supports blob names up-to 256 characters long.
  • The name of the blobs is case-sensitive.
  • The reserved URL characters must be escaped properly.

Metadata & Snapshots

We can store some amount of information against a container or blob as metadata. It is a name-value pair associated with the container or blob. Metadata names must adhere to the name rules for C# identifiers. For example - when we are developing any video streaming application with backend as Azure blob storage, then in that case, when the user uploads a video, we want to store the user information as metadata against that video. It is very useful once we start developing an application based on blob storage.
Blob Snapshots
Snapshot is a read-only version of the blob storage. We can use snapshots to create a backup or checkpoint of a blob. A snapshot blob name includes the base blob URL plus a date-time value that indicates the time when the snapshot was created. Again if we are developing a YouTube-like application and want to retain the previous version of the video, then we can take a snapshot of it and store it once the user updates the video. So, a user like SharePoint can see the previous version of the video and the current version of the video.
To access the snapshot, we have to add a query string at the end of the URL. And a snapshot with a similar date and time when the snapshot was created.

Azure Storage Account

An Azure Storage Account is a secure account, which provides you access to services in Azure Storage. The storage account is like an administrative container, and within that, we can have several services like blobs, files, queues, tables, disks, etc. And when we create a storage account in Azure, we will get the unique namespace for our storage resources. That unique namespace forms the part of the URL. The storage account name should be unique across all existing storage account name in Azure.
Types of Storage Accounts
Storage account typeSupported servicesSupported performance tiersSupported access tiersReplication optionsDeployment modelEncryption
General-purpose V2Blob, File, Queue, Table, and DiskStandard, PremiumHot, Cool, ArchiveLRS, ZRS, GRS, RA-GRSResource ManagerEncrypted
General-purpose V1Blob, File, Queue, Table, and DiskStandard, PremiumN/ALRS, GRS, RA-GRSResource Manager, ClassicEncrypted
Blob storageBlob (block blobs and append blobs only)StandardHot, Cool, ArchiveLRS, GRS, RA-GRSResource ManagerEncrypted

Note: If you want to use all storage services, we recommend you to go with general-purpose version-2, and in case if you need storage account for blobs only, then you can go with the blob storage account type.

Types of performance tiers
Standard performance: This tier is backed by magnetic drives and provides low cost/GB. They are best for applications that are best for bulk storage or infrequently accessed data.
Premium storage performance: This tier is backed by solid-state drives and offers consistency and low latency performance. They can only be used with Azure virtual machine disks, and are best for I/O intensive workload such as the database.
(So every virtual machine disk will be stored on a storage account. So, if we are associating a disk, then we will go for the premium storage. But if we are using storage account specifically to store blobs, then we will go for standard performance.)
Access Tiers
There are four types of access tiers available:
Premium Storage (preview): It provides high-performance hardware for data that is accessed frequently.
Hot storage: It is optimized for storing data that is accessed frequently.
Cool Storage: It is optimized for storing data that is infrequently accessed and stored for at least 30 days.
Archive Storage: It is optimized for storing files that are rarely accessed and stored for a minimum of 180 days with flexible latency needs (on the order of hours).
Advantage of Access Tiers:
When a user uploads the document into the storage, the document will initially be frequently accessed. During that time, we put the document in the hot Storage tier.
But after some time, once the work on the document is completed. Nobody generally accesses it. So it will become infrequently accessed document. Then we can move the document from Hot storage to Cool storage to save the cost because cool storage is built based on the number of times the document is accessed. Once the document is matured, i.e., once we stopped working on that document, the document becomes old. We rarely refer to that document. In that case, we put it in cool storage.
But for six months or one year, we don't want the document to be referred to in the future. In that case, we will move that document to archive storage.
So hot storage is costlier than cool storage in terms of storage. But cool storage is more expensive in terms of access. Archive storage is used for archiving the documents into storage, which is not accessed.
Azure Storage Replication
Azure Storage Replication is used for the durability of the data. It copies our data to stay protected from planned and unplanned events, ranging from transient hardware failure, network or power outages, and massive natural disasters to man-made vulnerabilities.
Azure creates some copies of our data and stores it at different places. Based on the replication strategy.
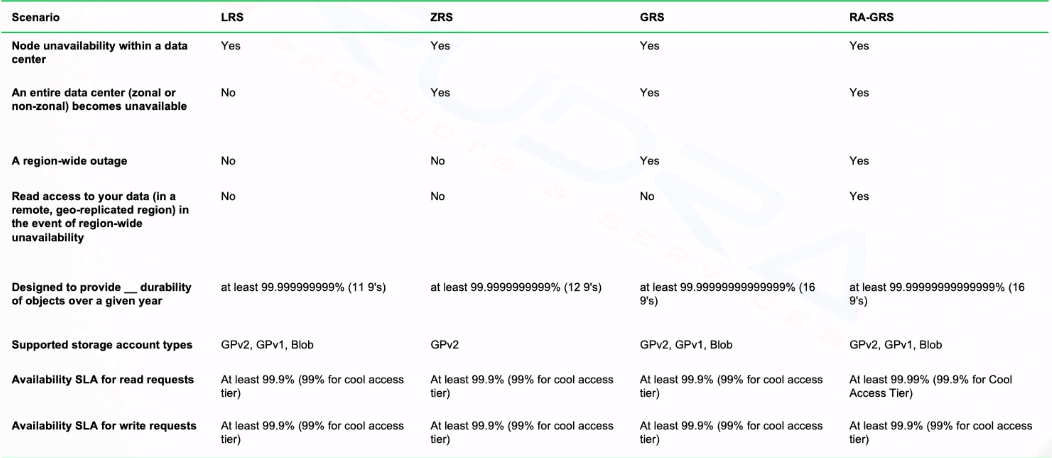
LRS (Local Redundant Storage): So, if we go with the local-redundant storage, the data will be stored within the data center. If the data center or the region goes down, the data will be lost.
ZRS (Zone-Redundant Storage): The data will be replicated across data centers but within the region. In that case, the data is always available within the data center, even if one node is not available. OR we can say that the data will be available also if the entire data center goes down because the data is already copied in another data center within the region. However, if the region itself is gone, then you will not get the data access.
GRS (global-redundant storage): To protect our data against region-wide failures. We can go for global-redundant storage. In this case, the data will be replicated in the paired region within the geography. And in case if we want to have read-only access to the data that is copied to another region, then, in that case, we can go for RA-GRS (Read Access global-redundant storage). We can get different things in terms of durability, as we can see in this table below.
Azure Storage Account
Storage account endpoints
Whenever we create a storage account, we will get an endpoint to access the data within the storage account. So each object that we stored in Azurestorage has an address, which includes your unique account name and the combination of an account name, and service endpoint, which forms the endpoint for your storage account.
For example, if your general-purpose account name is mystorageaccount then generally the default endpoints for different services looks like:
Azure Blob storage: http://mystorageaccount.blob.core.windows.net.
Azure Table storage: http://mystorageaccount.table.core.windows.net
Azure Queues storage: http://mystorageaccount.queue.core.windows.net
Azure files: http://mystorageaccount.file.core.windows.net
In case if we want to map our custom domain for these, we can still do that. We can use our custom domain in reference to these storage service endpoints.

Creating and configuring Azure Storage Account

Let's see how to create a storage account in Azure portal and discuss some of the important settings associated with the storage account:
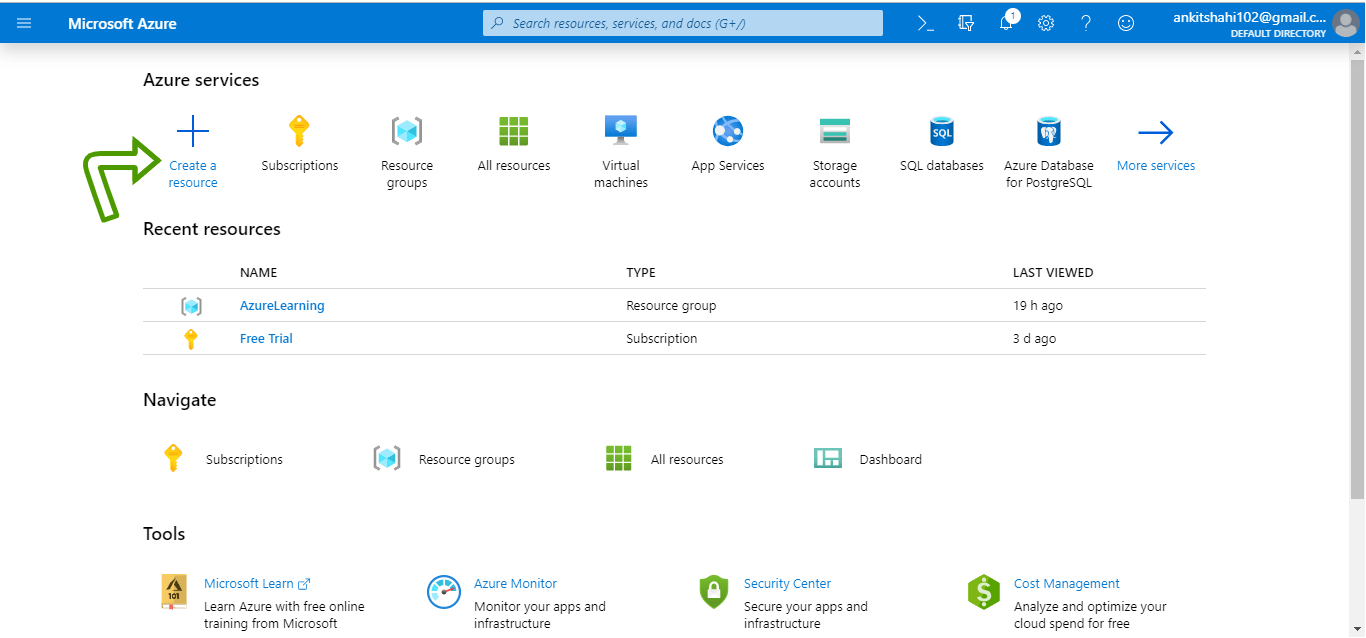
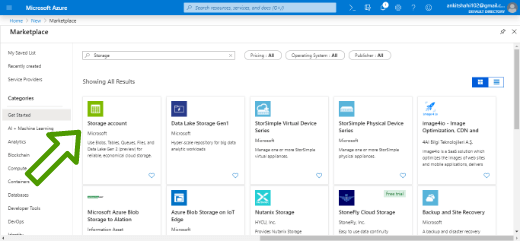
Step 1: Login to your Azure portal home screen and click on "Create a resource". Then type-in storage account in the search box and then click on "Storage account".
Azure Storage Account
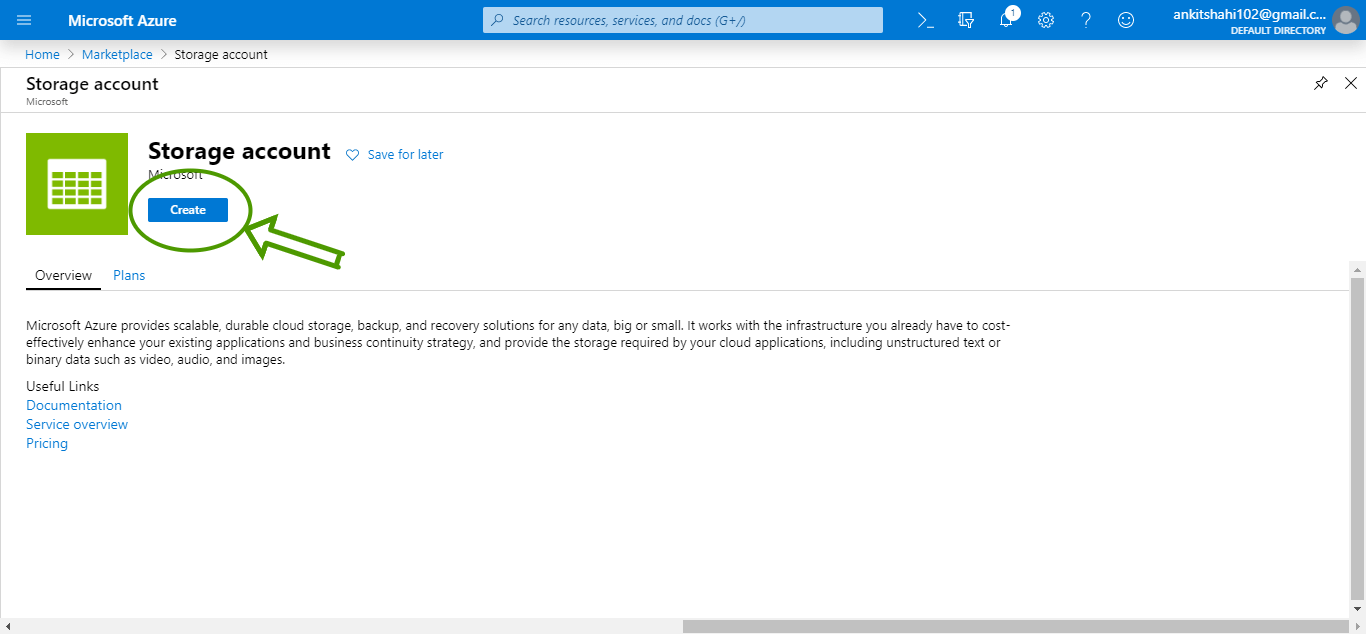
Step 2: Click on create, you will be redirected to Create a storage account window.
Azure Storage Account
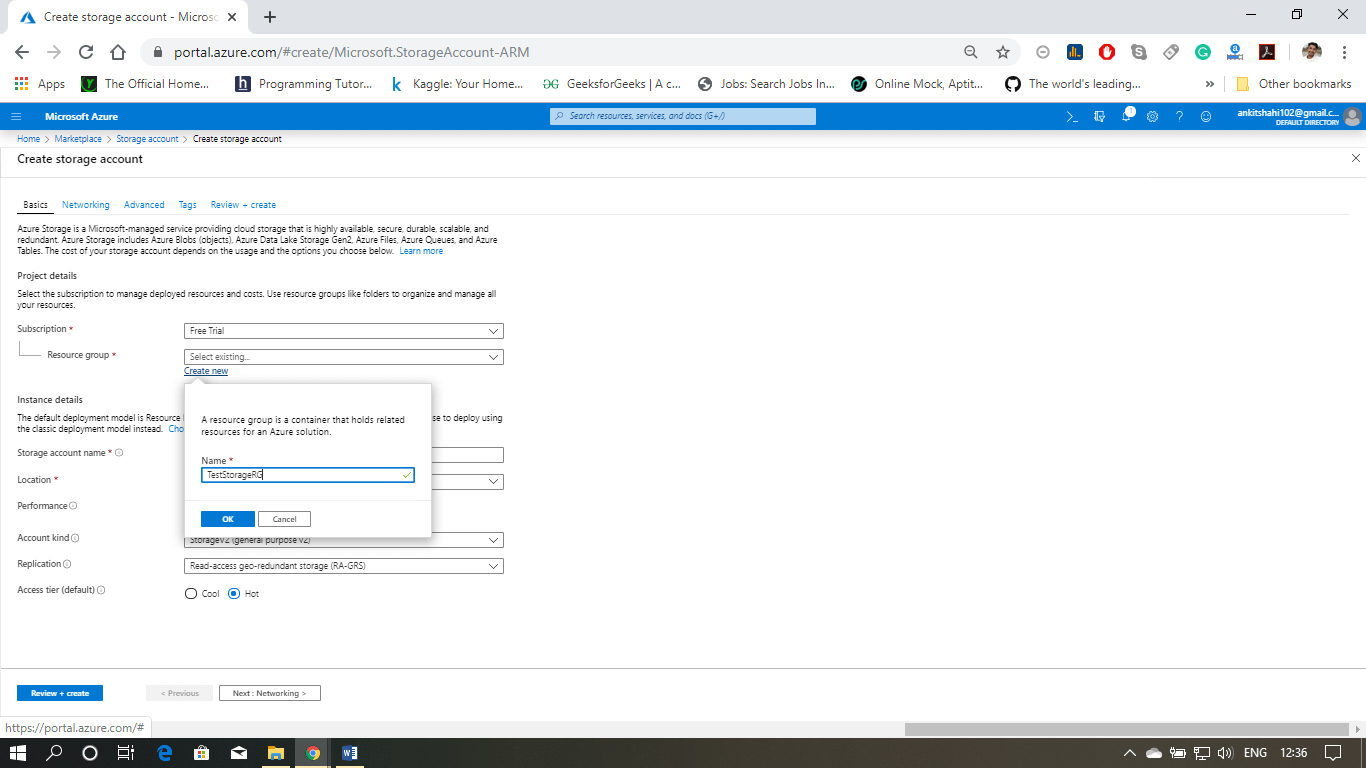
Step 3: First, you need to select the subscription whenever you are creating any resource in Azure, and secondly, you need to choose a Resource Group. In our case, the subscription is "Free Trail".
Use your existing resource group or create a new one. Here we are going to create a new resource group.
Azure Storage Account
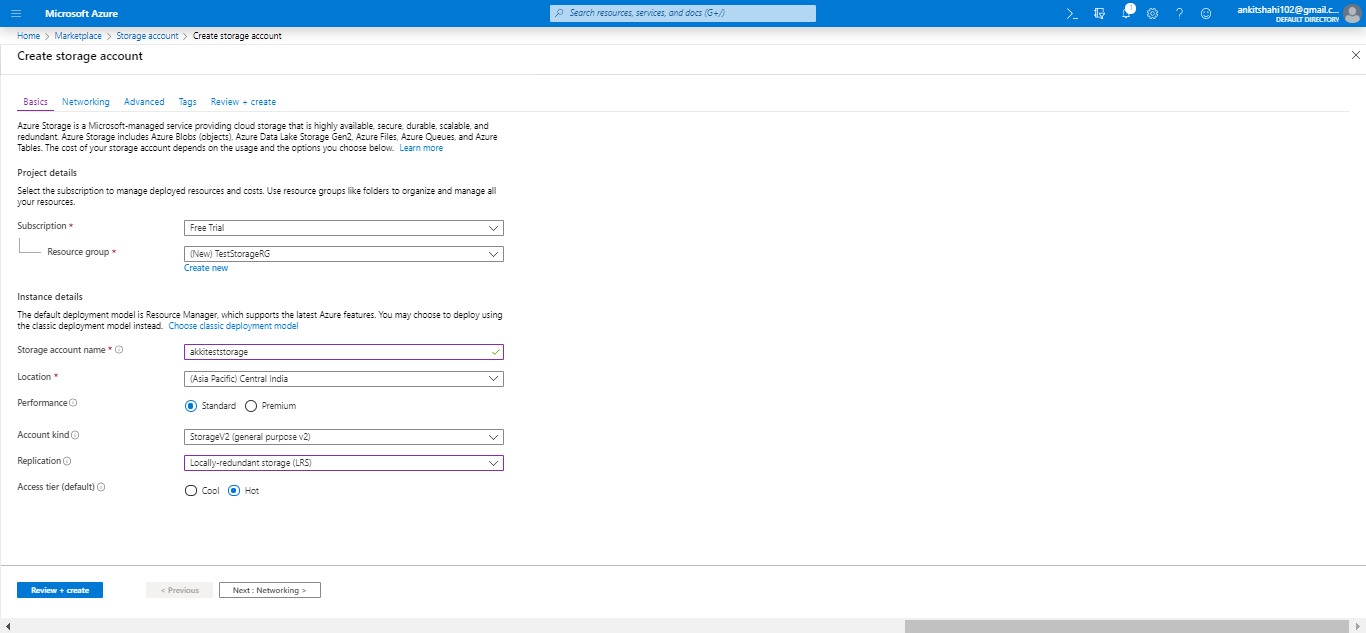
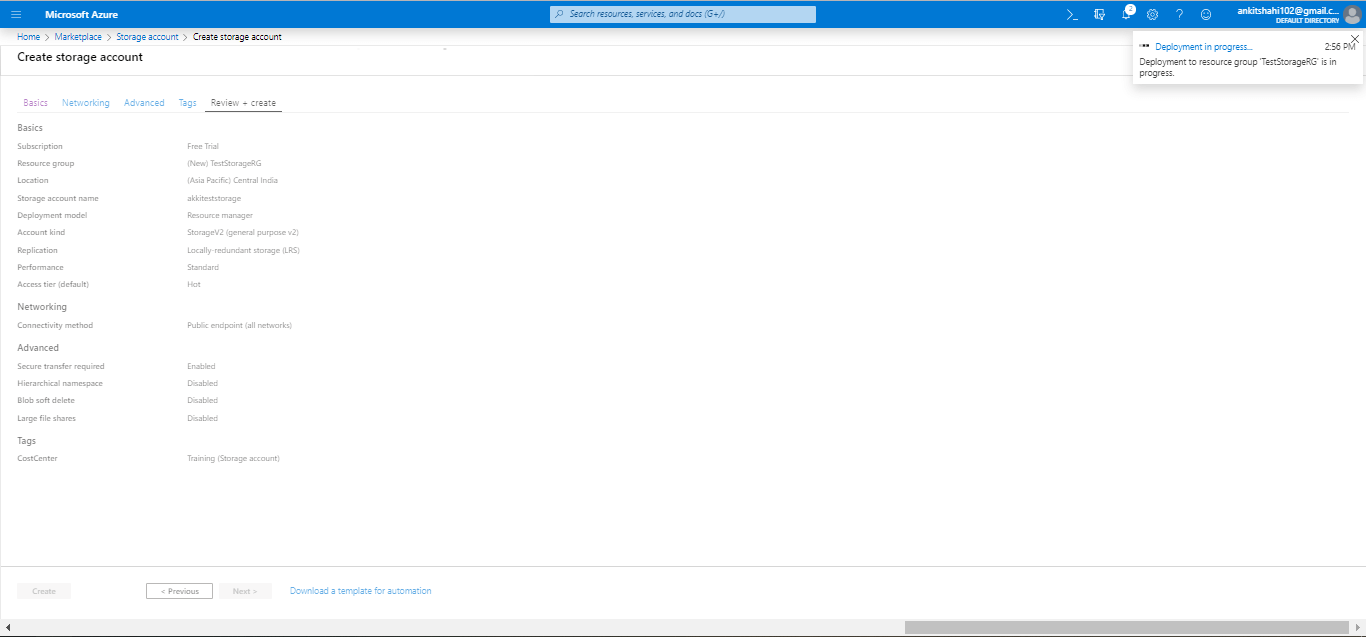
Step 4: Then, fill the storage account name, and it should be all lowercase and should be unique across all over Azure. Then select your location, performance tier, Account kind, Replication strategy, Access Tier, and then click on next.
Azure Storage Account
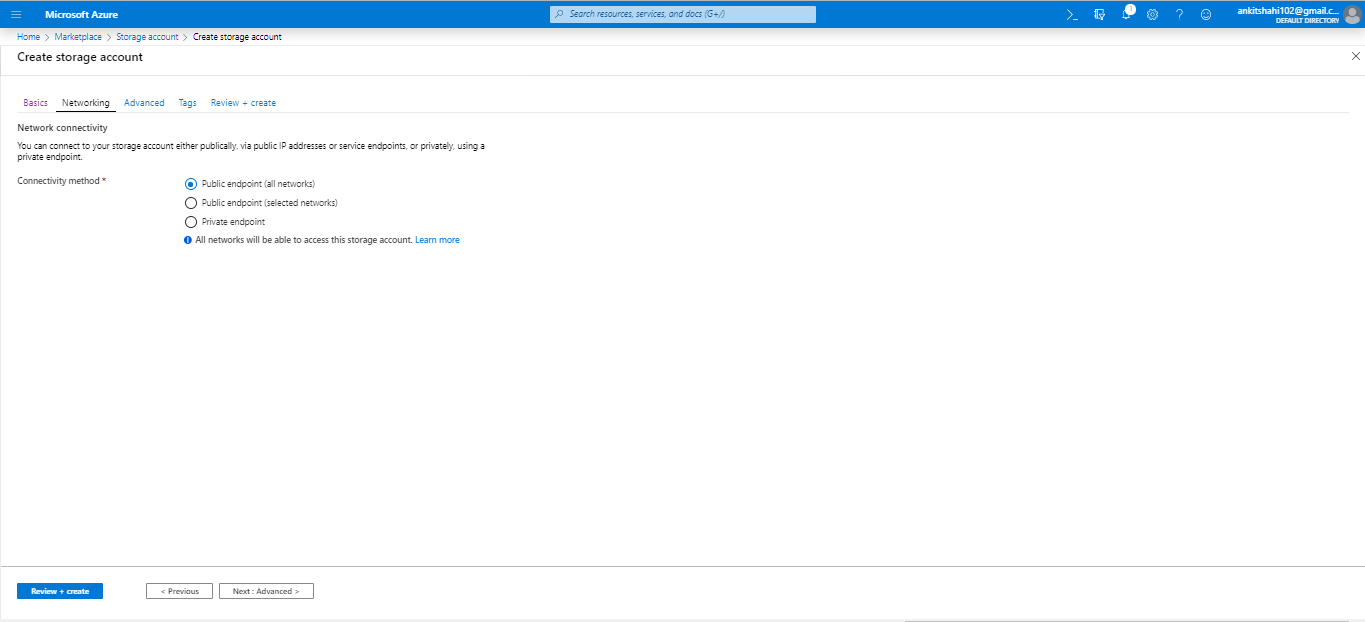
Step 5: You are now on the Networking window. Here, you need to select the connectivity method, then click next.
Azure Storage Account
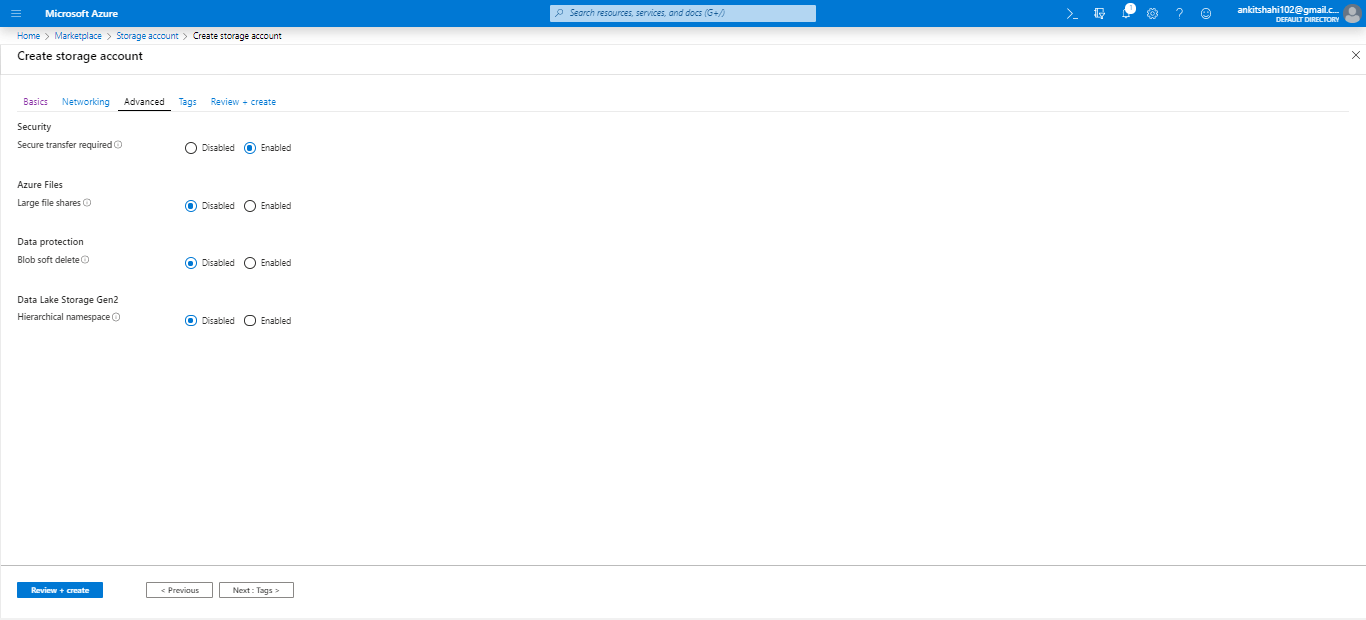
Step 6: You are now on the Advanced window were you need to enable or disable security, Azure files, Data Protection, Data lake Storage and then click next.
Azure Storage Account
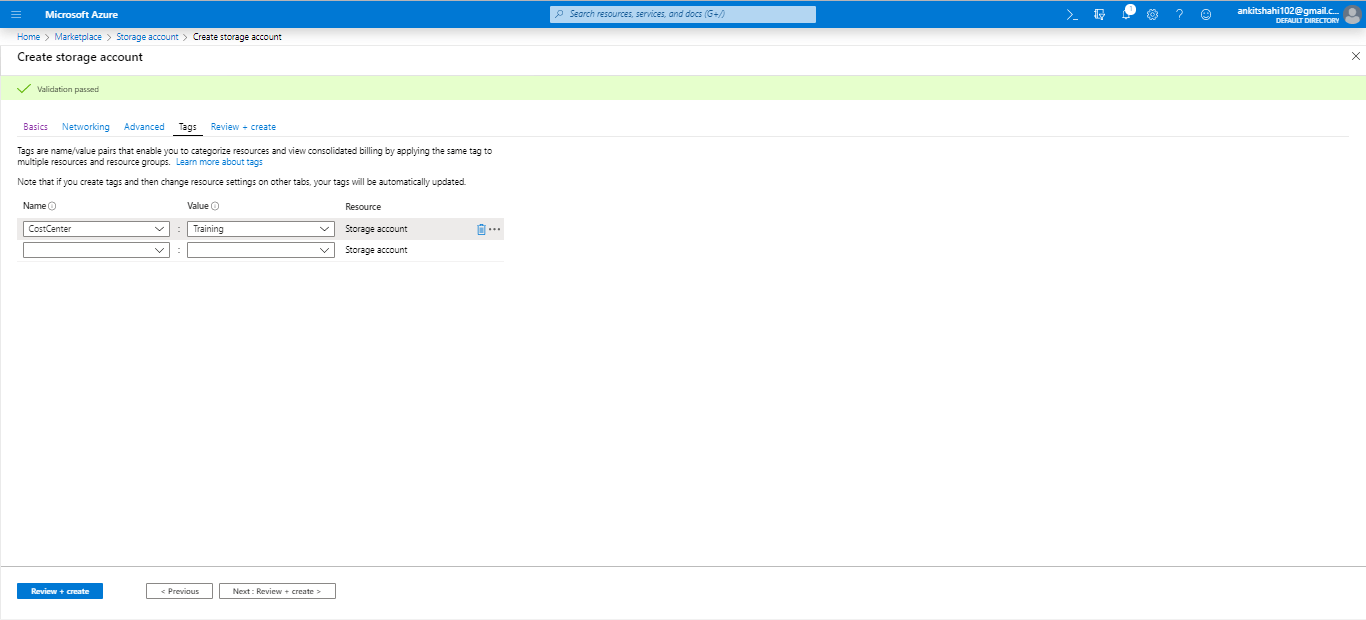
Step 7: Now, you are redirected to the Tags window, where you can provide tags to classify your resources into specific buckets. Put the name and value of the tag and click next.
Azure Storage Account
Step 8: This is the final step where the validation has been passed, and you can review all the elements that you have provided. Click on create finally.
Azure Storage Account
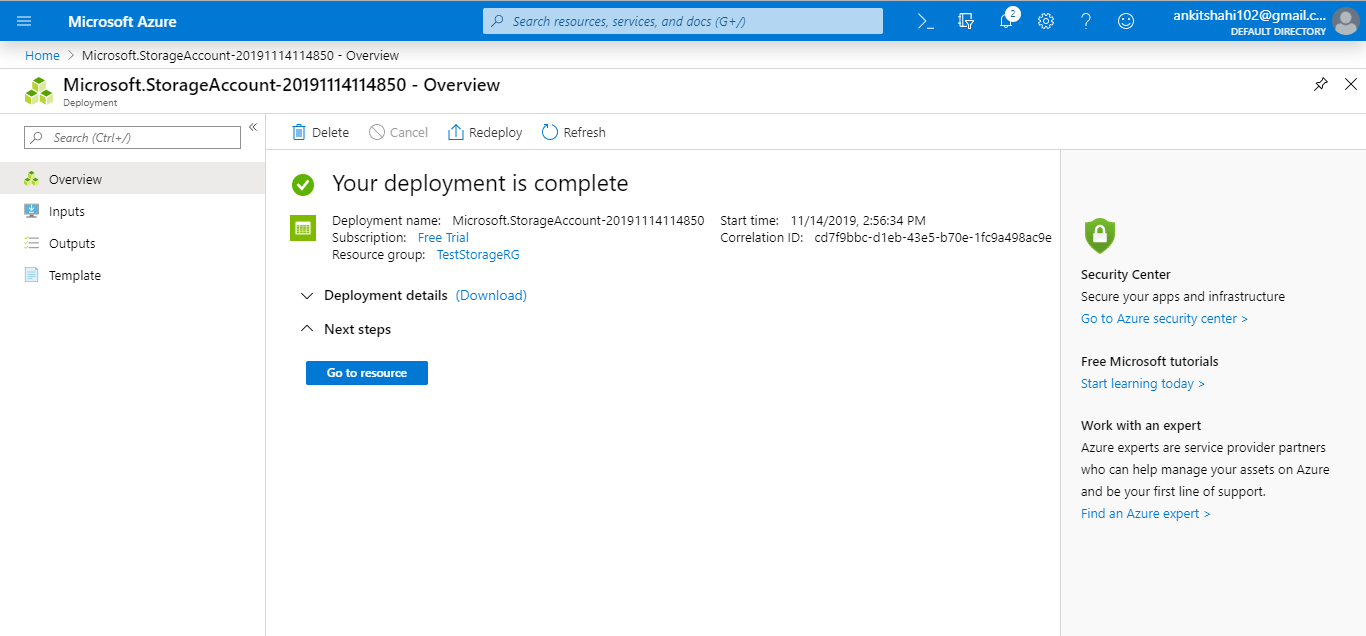
Now our storage account has been successfully created, and a window will appear with the message "Your deployment is complete".
Azure Storage Account
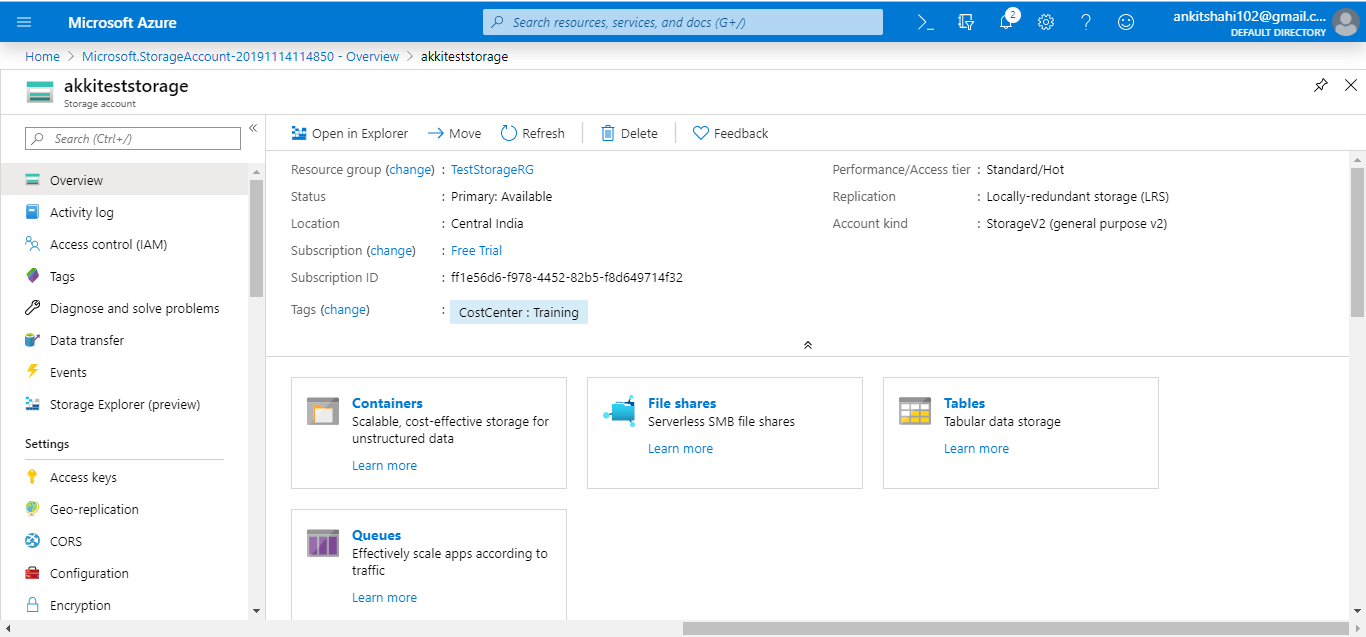
Click on "goto resource", then the following window will appear.
Azure Storage Account
You can see all the values that you have selected for different configuration setting when creating the storage account.
Let's see some key configuration settings and key functionality of the storage account
Activity Log: We can view an activity log for every resource in Azure. It provides the record of activities that have been carried out on that particular resource. It is common for all the resources in Azure.
Access Control: Here, we can delegate access for the storage account to different users.
Tags: We can assign new tags or modify the existing tags here. We can also diagnose and solve the problems in case if we have any problems.
Events: We can subscribe to some of the events that are happening within this storage account, it can be either logic app or function. For example, a blob is created in a storage account. That event will trigger a logic app with some metadata of that blob.
Storage explorer: This is where you can explore the data that is residing in your storage account in terms of blobs, files, queues, and tables. Again there is a desktop version of this storage Explorer which you can download and connect also, but this is more of a web version of it.
Access Keys: We can use it to develop applications that will access the data within the storage account. However, we might not want to give access to this access key directly. We may wish to create SAS keys. Here, we can generate specific SAS keys for a limited period, with limited access. Then provide that SAS signature to our developers. Another way is the access keys. Access key gives blanket access. So we recommend not to give access of the access keys to anyone other than the one who created that storage account.
CORS (Cross-Origin Resource Sharing): Here, we can mention the domain name and what operations are allowed.
Configuration: If we want to change any configuration values, then there are certain things that we can't change once the storage account is created - for example, performance type. But we can change the access tier, and secure transport required or not, the replication strategy, etc.
Encryption: Here, we can specify our own key if we want to encrypt the data within the storage account. We need to click on the check box, and we can select a key vault URI where the key is located.
(SAS) Shared access signature: Here, we can generate the SAS keys with the limited access and for the limited period, and provide that information to developers who are developing applications using the storage account. SAS is used to access data that is stored in the storage account.
Firewalls and Virtual network: Here, we can configure the network in such a way that the connections from certain virtual networks or certain IP address ranges are allowed to connect to this storage account.
And we can configure advanced threat protection and can make the storage account compatible to host a static website
Properties: Here we can see the properties related to the storage account
Locks: Here, we can apply locks on the services.
So these are the different settings we can configure, and the rest of the settings are related to different services within the storage account - for example, blob, file, table, and queue.

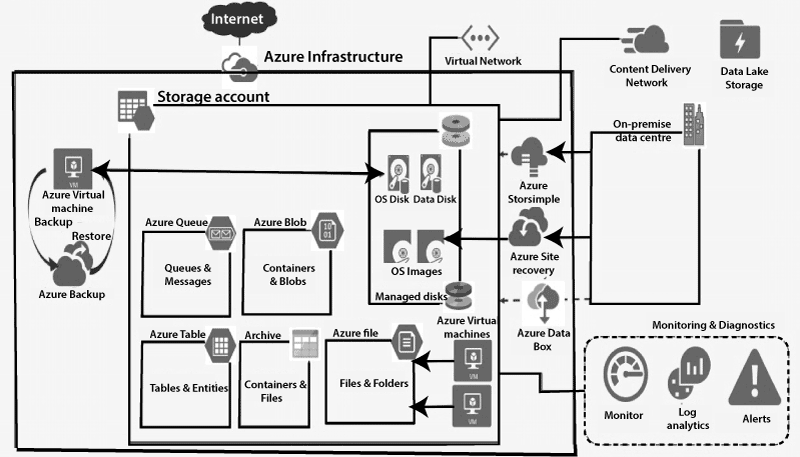
Azure Storage Building Blocks

The fundamental building block of Azure storage service is the Azure storage account. The Storage account is more like an administrative container for most of the Azure storage services. All the storage services are explained below.
  • Azure Blob: We can have Azure Blob storage within the storage account, which is used to store the unstructured data such as media files, documents, etc.
Azure Storage Building Blocks
  • Azure file: Azure file can be used in case if we want to share files between two virtual machines, then we can create an Azure file share and access it on both of the virtual machines. We can share the data between two or more VMs.
  • Archive: Archive is recently introduced, and it is in preview. We can use the archive for cost optimization. So, we can move any infrequently accessed blobs or files into the archive to optimize the cost. However, once you move the data into an archive, it will take some time for the recovery of that data.
  • Azure Queues: It can be used to store messages.
  • Azure Table: It can be used to store entities. The Azure Table is a bit different from the SQL table. This is a NoSQL datastore where the schema within the table is not enforced.
And apart from all these services, there is one other key service which is:
  • Azure Disk Storage: Any OS disk associated with the virtual machine in Azure will get stored in a disk storage account. And also, any OS image from which this OS disk is generated will get stored as a .vhd file within the disk storage.
  • Azure Storsimple: In a hybrid cloud storage solution, Azure offers Storsimple. Storsimple is a hybrid storage solution that works at a SAN(Storage Area Network) level. It was used to be a separate company, but Microsoft brought it with them and is now offering the same services as a part of Azure and from DR (Disaster Recovery) perspective.
  • Azure Site Recovery: In case if we want to use Azure as a DR data-center, then we can use Azure site recovery to replicate the workloads from our on-premises data-center into Azure. Replicated workloads will be stored as images within a storage account. Whenever our on-premises data-center is down, we can run some automated scripts which will consider that recent image and build a virtual machine.
  • Azure Data Box: If we have terabytes of data which we want to transfer from the on-premises data center into Azure and we don't want to choose a network as an option because transferring the data over the network in terms of terabytes is not feasible. So, in that case, we can use the Azure data box. By using Azure Data Box, we can load the data into the data box and give that data box to Microsoft. Microsoft will load that data into Azure
  • Azure Backup: We can use Azure backup to backup the disks of our virtual machine into a recovery service vault and restore the same using that image. We have to be aware that Azure backup doesn't utilize storage to store the disk image. They are stored in the recovery services vault.
  • Azure Monitor: It can be used for the monitoring of all these services. We can use Azure Monitor for simple monitoring, and we can use log analytics for advance monitoring and analysis. We can also use alerts in case if we want to get alerted on certain things, for example, if the file share capacity is reaching its limit, then we configure it in such a way that we will get alert about the same.
  • CDN (Content Delivery Network): It is used for the delivery of the contents stored in the storage account. We can use a content delivery network to reduce the latency of the delivery. We'll create a CDN endpoint near to the users to reduce the latency.
Finally, the storage account will be connected to Virtual Network. The storage account will have a storage firewall where we can configure that from which virtual network you want to accept connections. So we can specify a particular IP address from where we want to allow connections or a specific subnet within a virtual network.

Azure Media Service

It is an extensible cloud-based platform that enables developers to build scalable media management and delivery applications. For example - if we want to develop an app like DailyMotion, then we can do so by using Microsoft Azure media services.
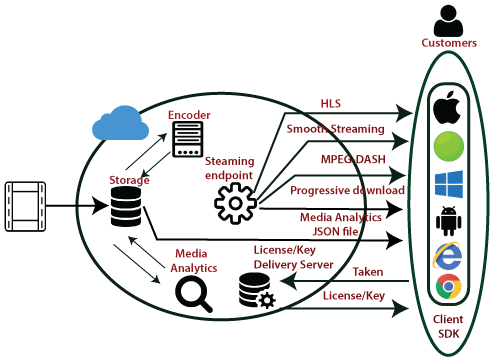
Azure media services are based on REST APIs that enable us to securely upload, store, encode, and wrap video or audio content for both on-demand and live stream delivery to various clients. Those clients can be TV, PC, and mobile devices also.

Media Services Concepts

  • Assets: An Asset contains digital files and the metadata about these files. These files can be audio, video or image, etc.
  • AssetFile: It contains metadata about the media file.
  • AccessPolicy: It defines the permission and duration of access to an asset.
  • Locators: It provides an entry point to access the files contained in an asset.
  • Job: It is used to process one audio/video presentation.
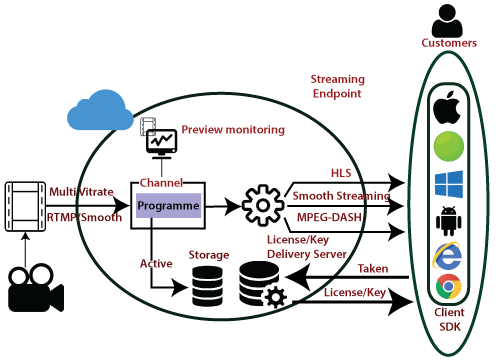
  • Channels: It is responsible for processing live streaming content. It provides an input endpoint that is provided to a live transcoder.
  • Program: It enables us to control the publishing and storage of segments in a live stream.
  • Streaming endpoint: It represents a streaming service that delivers content.

The architecture of Media Service

  • Delivering on-demand: In this case, first, we will upload a high-quality media file into an asset, and then we encode it to a set of adaptive bit that reads MP4 files. After that, we configure the asset delivery policy. Asset delivery policy tells Media services how we want our assets to be delivered using which protocol. Now, we will publish an asset by creating an on-demand locator and stream the published content.
Azure Media Service
  • Live-Streaming: We can broadcast live content using various live streaming protocols. We might go to encode our stream into an adoptive bit read stream. We can preview our live stream also. Finally, we can deliver the content through common streaming protocols such as Smooth, HLS, etc.
Azure Media Service

Azure Search

Azure Search is a cloud Search as a Service that enables us to add a robust search experience to our applications using a simple REST API or .NET SDK, without managing a search infrastructure.

Features of Azure Search

  • Powerful queries
  • Multi-language support
  • Search suggestions
  • Hit highlighting
  • Faceted Navigation
Above are the different features associated with Azure search. In case if we want to have a cloud-based search engine that we can embed in our web application. Azure offers a service called Azure Search.

Azure Content Delivery Network

Azure CDN caches web content at a strategically placed location to provide maximum throughput for delivering content to users. To better explain this, let?s take an example.
Azure Content Delivery Network
Let?s say we have a vast amount of video content located in Australia, but the primary users of that content are located in the US, and if any of the users from India will try to access the content from Australia. Then they will experience some latency because of the distance between Australia and India. In that scenario, we can use a content delivery network to reduce that latency.

CDN products

There are several types of products that are available by Azure, and there are two other third party providers that provide CDN products in partnership with Microsoft.
  • Azure CDN Standard from Microsoft (Preview)
  • Azure CDN Standard from Akamai
  • Azure CDN Standard from Verizon
  • Azure CDN Premium from Verizon

Features of Content Delivery Network (CDN)

Following are the fundamental features of Azure CDN:
  • Dynamic site acceleration: It is the capability to deliver dynamic web content with minimum latency. It is achieved by using different techniques such as route optimization to avoid congestion points, TCP optimization, etc.
  • HTTPS support: It provides us the HTTPS support of secure web content.
  • Query string caching: Based on query string caching, we can cache the content also within CDN location.
  • Geo-Filtering: We can apply some geo-filtering if we want certain content filtered for a particular geographical region.
  • Azure diagnostics logs: It provides the facility of records of diagnosis.

CDN configuration

  • When we start using CDN, the first thing we will create is the CDN profile. It is a collection of CDN endpoints, and by default, it can contain up to 10 CDN endpoints. When we are creating a CDN profile, we will specify the type of product that you want to use. For Example, CDN premium from Verizon or CDN standard for Microsoft, etc.
  • Secondly, we will create a CDN endpoint. When we are creating CDN endpoint, we will specify the name, and also origin type what exactly we?re trying to configure this CDN for. It can be Azure storage, cloud storage, web app, or a custom origin.
  • Finally, we will define the Origin path where these videos or web content is located and also the protocol of origin. Once we create a CDN endpoint, we?ll get an endpoint that will be whatever the name we have given ?example.net.?

Ways to control how files are cached

  • Caching rules
    • Global caching rules
    • Custom caching rules
  • Purged cached assets
  • Pre-load assets on an Azure CDN endpoint