Tuesday, 30 May 2023

Amazon Machine Image (AMI)

 An Amazon Machine Image is a special type of virtual appliance that is used to instantiate (create) a virtual machine within EC2. It serves as the basic unit of deployment for services delivered using EC2. Whenever you want to launch an instance, you need to specify AMI. To launch instances, you can also use different AMI’s. If you want to launch multiple instances from a single AMI,  then you need multiple instances of the same configuration.

An AMI has the following properties:-

  • A template for the root volume for the instance (for example, an operating system, an application server, and applications)    
  • Launch permissions that control which AWS accounts can use the AMI to launch instances  
  • A block device mapping that specifies the volumes to attach to the instance when it’s launched

When you want to use AMI, select the following characteristics:-  

  • Regions
  • Permissions for launching AMI 
  • Operating System 
  • Root device Storage   
  • Architecture 

Why do we need AMI ? 

Let us suppose that we want to launch 5 servers with the same configuration. One way of doing that would be to launch a new EC2 instance every time and install the required packages every time. While the other way of doing it would be to configure your EC2 instance once and then create an image of that instance. Using that image you can deploy 4 more EC2 servers.  

Creating your Own AMI

Prerequisites: AWS Account

Step 1: Click on the launch instance button on the AWS management console.

aws instance launch

Step 2: Now you will be asked to select an already available AMI. Select Free tier and then select the Amazon Linux 2 AMI.

amazon machine image

Step 3: Select t2.micro eligible for the free tier. Now click on next: configure Instance details.

aws instance type

Step 4: Here you can select the various configurations related to EC2 instance. Click on Next: Add storage.

aws instance configuration

Step 5: Select the amount of storage you want for the EC2 instance. Click on next: Add tags and then click next: configure security groups. 

aws add storage

Step 6: Here you can add the security groups to allow the desired traffic for your instance. Click on review and launch.

aws configure security

Step 7: Review all the configurations regarding the EC2 instance. Click on Launch.

aws instance launch

Step 8: Choose to create a new key pair option and write the key pair name. Download the key pair and then click on the launch instance.

launching configured instance in aws

Step 9: We can see that the instance is launched and running in a healthy state. Now It is required to create the Amazon Machine Image of this instance.

aws instance dashboard

Step 10: Click on actions. Go to the image and then click on create image.

instance to image in aws

Step 11: A prompt will open wherein you are required to write the name of the image. Click on create image.

aws image configuration

Step 12: The image creation request is received. Now the image will be created. Click on close. Now go to AMI services in AWS management console.

aws image creation sucess

Step 13: The AMI image of our instance is created successfully.

aws image

Changing the Elastic Block Store Encryption Key

 In this article, we will look into the process of changing the encryption key used by an Amazon Elastic Block Store(EBS) volume.  Before we begin, it is important to note that the encryption key for EBS volumes cannot be changed once generated. But there is a workaround for it. In this article, we will be discussing the same.

To do so follow the below steps:

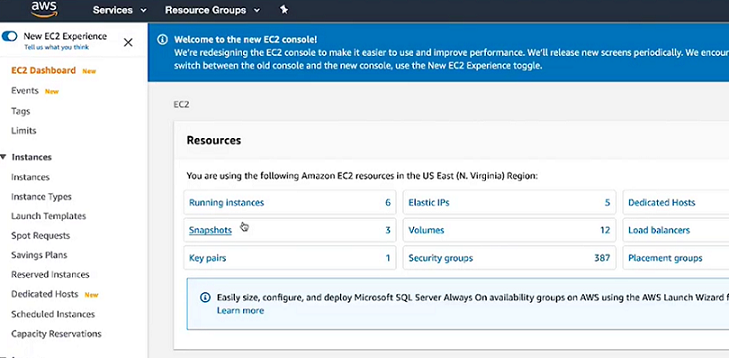
Step 1: First log into the AWS management console and navigate to the Amazon Elastic Compute Cloud console in the EC2 console. 

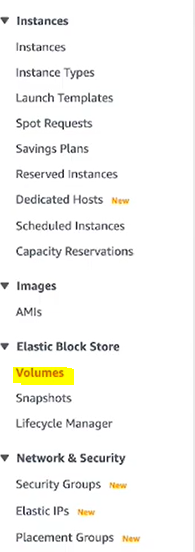
Step 2: Under elastic block store select volumes and then select the encrypted volume from the list with the encryption key that you want to change.

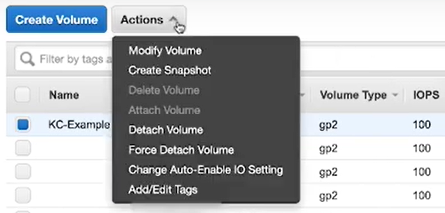
Step 3: Note the availability zone of your volume on this page and choose actions followed by create snapshot from the drop-down menu.

Step 4: You can now enter an optional description of the snapshot for your reference Here we’ll use a test snapshot as an example. After you do this, choose the create snapshot option.

Step 5: Now select close.

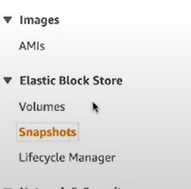
Step 6: On the left navigation pane under elastic block store select snapshots.

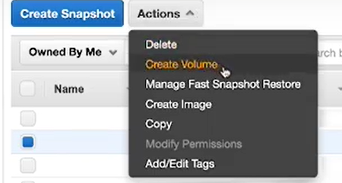
Step 7: Then select your newly created snapshot. Next, choose actions and then from the drop-down menu, choose to create volume.

Step 8: Here you can also enable fast snapshot restore, this enables you to create a volume from a snapshot that is fully initialized at creation doing so reduces the latency for accessing data for the first time.

If you don’t want to enable the fast snapshot restore feature then you can manually initialize your EBS volume after creation using the DD or FIO utilities. Be sure that you select the same availability zone of your current volume that you noted earlier.

Step 9: Next from the drop-down menu of the master keys choose your new encryption key. Finally, choose to create volume. 

And that’s it you have a new EBS volume that uses the new encryption key.

AWS EBS (Elastic Block Store) Snapshot

Data is the most important thing anywhere over the internet. Everyone wants to be more secure and save when it comes to their Data security. Data on your Amazon EBS volume can also be back up to Amazon S3 Bucket by taking the point-in-time Snapshot. Snapshots can be used to create a backup of critical workloads, such as a large database or a file system that spans across multiple EBS volumes.

EBS Snapshots are point-in-time image/copy of your EBS Volume. These are stored on S3 which can be accessed through EC2 APIs or AWS Console. While EBS volumes are availability zone (AZ’s) specific but, Snapshots are Region-specific.  Your Snapshot size must be either same or larger than the size of the original volume from which the snapshot is taken. As per the Amazon, each AWS account can have a maximum of up to 5000 EBS Volumes and up to 10,000 EBS Snapshots created. Snapshot when created shows a ‘pending ‘status which then converts into ‘complete’ once the snapshot creation is successful.

Creating an EBS Snapshot is as easy as an apple- pie. So, let’s dive in.

  • Step 1: To create a snapshot of a volume, simply select the AWS console’s Volumes container, right-click on the volume and choose the Create Snapshot option from the shortcut menu.

  • Step 2: After entering the description of the snapshot, click Create to create the snapshot.

  • Step 3: A popup will come stating the snapshot creation as started.

  • Step 4: You can view the snapshot’s status on the console’s Snapshots tab.

One can not only create a snapshot but also can copy the already created snapshot. This copied snapshot can be shared with other accounts. If you share a snapshot with another account, then that person cannot directly create volume out of the shared snapshots. For creating volume from such a snapshot that person first needs to copy the snapshot so that the snapshot is now owned by him and can then create a volume out of it. Both encrypted and un-encrypted snapshots can be shared within the different AWS accounts. But, if you try to copy an encrypted snapshot without having the permissions to the encryption key, the copy process will “fail silently”.

Some use cases for copying Snapshot are:

  • Geographic Expansion
  • Disaster Recovery
  • Migration of another Region
  • Encryption
  • Data Retention and Auditing

The deletion process of Snapshot is also very easy. To delete a snapshot using the console

  1. Open the Amazon EC2 console ..
  2. Choose Snapshots in the navigation pane.
  3. Select a snapshot and then choose Delete from the Actions list.
  4. Choose Yes, Delete.


Introduction to AWS Elastic Block Store(EBS)

 AWS Storage Services: AWS offers a wide range of storage services that can be provisioned depending on your project requirements and use case. AWS storage services have different provisions for highly confidential data, frequently accessed data, and the not so frequently accessed data. You can choose from various storage types namely, object storage, file storage, block storage services, backups,, and data migration options. All of which fall under the AWS Storage Services list.

Elastic Block Storage (EBS): From the aforementioned list, EBS is a block type durable and persistent storage that can be attached to EC2-instances for additional storage. Unlike EC-2 instance storage volumes which are suitable for holding temporary data EBS volumes are highly suitable for essential and long term data. EBS volumes are specific to availability zones and can only be attached to instances within the same availability zone. 

EBS can be created from the EC2 dashboard in the console as well as in Step 4 of the EC2 launch. Just note that when creating EBS with EC2, the EBS volumes are created in the same availability zone as EC2, however when provisioned independently users can choose the AZ in which EBS is required.

Features of EBS:

  • Scalability: EBS volume sizes and features can be scaled as per the needs of the system. This can be done in two ways:
    • Take a snapshot of the volume and create a new volume using the Snapshot with new updated features.
    • Updating the existing EBS volume from the console.
  • Backup: Users can create snapshots of EBS volumes that act as backups.
    • Snapshot can be created manually at any point in time or can be scheduled.
    • Snapshots are stored on AWS S3 and are charged according to the S3 storage charges.
    • Snapshots are incremental in nature.
    • New volumes across regions can be created from snapshots.
  • Encryption: Encryption can be a basic requirement when it comes to storage. This can be due to the government of regulatory compliance. EBS offers an AWS managed encryption feature.
    • Users can enable encryption when creating EBS volumes bu clicking on a checkbox.
    • Encryption Keys are managed by the Key Management Service (KMS) provided by AWS.
    • Encrypted volumes can only be attached to selected instance types.
    • Encryption uses the AES-256 algorithm.
    • Snapshots from encrypted volumes are encrypted and similarly, volumes created from snapshots are encrypted.
  • Charges: Unlike AWS S3, where you are charged for the storage you consume, AWS charges users for the storage you hold. For example if you use 1 GB storage in a 5 GB volume, you’d still be charged for a 5 GB EBS volume.
    • EBS charges vary from region to region.
  • EBS Volumes are independent of the EC@ they are attached to. The data in an EBS volume will remain unchanged even if the instance is rebooted or terminated.

Single EBS volume can only be attached to one EC2 instance at a time. However, one EC2 can have more than one EBS volumes attached to it.

  • EBS volumes are specific to availability zones and can only be attached to EC2 in the same availability zone. In case AWS’ availability zone is to go down, access to the EBS volume will be lost.
  • Can be used for rapidly changing data that needs good I/Ops.
  • As compared to EC-2 instance storage the control over data and flexibility offered by EBS is far greater.
  • To provide durability, EBS volumes are replicated in their availability zone but are limited to one availability zone.

Types of EBS Volumes:

SSD: This storage type is suitable for small chunks of data that requires fast I/Ops. SSDs can be used as root volumes for EC2 instances.

  • General Purpose SSD (GP2)
    • Offers a single-digit millisecond latency.
    • Can provide 3000 IOps burst.
    • IOps speed is limited from 3-10000 IOps.
    • The throughput of these volumes is 128MBPS up to 170GB. After which throughput increases 768KBPS per GB and peaks at 160MBPS.
  • Provisioned IOPS SSD (IO1)
    • These SSDs are IO intensive.
    • Users can specify IOPS requirement during creation.
    • Size limit is 4TB-16TB
    • According to AWS claims “These volumes, if attached to EBS optimized instances will deliver IOPS defined within 10% 99.9% times of the year”
    • Max IOPS speed is 20000.

HDD: This storage type is suitable for Big Data chunks and slower processing. These volumes cannot be used as root volumes for EC2. AWS claims that “These volumes provide expected throughput 99.9% times of the year”

  • Cold HDD (SC1)
    • SC1 is the cheapest of all EBS volume types. It is suitable for large, infrequently accessed data.
    • Max Burst speed offered is 250 Mbps
  • Throughput optimized HDD (ST)
    • Suitable for large, frequently accessed data.
    • Burst speed ranges from 250 MBPS to 500 MBPS.

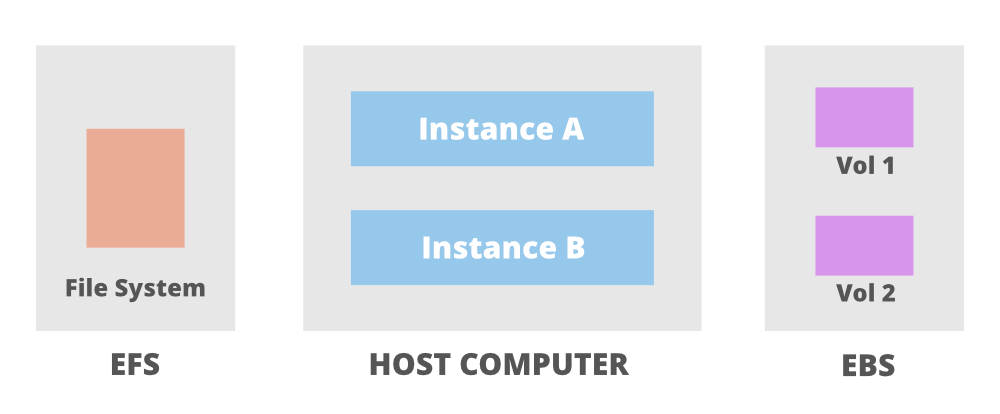
The above image shows single EBS volumes attached to their respective EC2 instances (Note that EBS cannot be shared between two volumes, however one EFS can be attached to multiple EC2 servers). These Volumes can have a multiple of use cases as discussed below:

  • Database storage: Given the low latency and scalability offered by EBS it is highly suitable for storing relational as well as NoSQL databases.
  • Business intensive applications: Given the scheduled backup offered by EBS as snapshots the recovery of data is quick and a refreshed system can be rebooted efficiently with minimal data loss.
  • Hard Disks for EC2 servers: EBS volumes can be used as hard drives to your EC2 servers. They are independent of your EC2 servers and hence your data in these volumes is safe even if EC2 servers fails/reboots/terminate
  • Hosting Large Applications: EBS provides an exceptionally low latency period amounting to a great computing power of the architecture. It can be used to hold big enterprise application software and data.
  • Root Volumes for EC2: EBS types GP2 and IO1 can be used as the root volumes for your EC2 server.

Use of EBS in database applications:

EBS can be used to store data for database applications in a number of ways. Some examples include:

  1. As a root volume for a database instance: An EBS volume can be used as the root volume for an Amazon EC2 instance running a database application, such as MySQL or PostgreSQL. This allows the database application to store its data on a persistent and highly available storage volume, rather than relying on the ephemeral storage of the EC2 instance.
  2. As a storage volume for a managed database service: AWS offers several managed database services, such as Amazon RDS and Amazon Aurora, that allow users to easily set up and manage a database without having to worry about the underlying infrastructure. These services allow users to create EBS volumes as the storage for their database, providing persistent and scalable storage for the database data.
  3. As a storage volume for containerized databases: EBS can also be used as the storage for containerized database applications, such as those deployed using Amazon ECS or Amazon EKS. This allows users to store their database data on a persistent and highly available storage volume, while still taking advantage of the benefits of running their database in a containerized environment.

Drawbacks:

  • EBS is not recommended as temporary storage.
  • They cannot be used as a multi-instance accessed storage as they cannot be shared between instances.
  • The durability offered by services like AWS S3 and AWS EFS is greater.

Launching an Application on AWS Beanstalk

 The AWS Elastic Beanstalk is a service provided by AWS that is used to deploy and scale web applications built on Java, Python, Go, Ruby, Node.js and Docker, etc.

In this article, we will look into how users can add their own security group to their AWS Elastic Beanstalk environment.

To do so follow the below steps:

Step 1: Login to the AWS management console and then navigate to the Amazon Elastic Compute Cloud console.

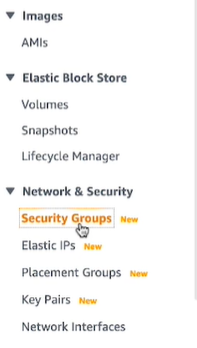
Step 2:  From the navigation pane on the left choose security groups.

Step 3: Now note the pre-existing security group that you want to add to your Elastic Beanstalk environment.

If the security group doesn’t exist create one. By default, Elastic Beanstalk creates a security group for your environment but you can also add your own security group to your environment. To do this we’ll use EB extensions.

Step 4: Now let’s open the application source bundle on your local system. The create a directory named .ebextensions in the root of the application source bundle if not already created.

cd Desktop/
cd eb-application/
cd .ebextensions/

Step 5: In the EB extensions directory create a file named securitygroup.config.

vi securitygroup.config

Note: If your instances are launched within a virtual private cloud make sure you specify security group ids instead of security group names. Your custom security group should belong to the same VPC where your EBS environment resides. 

Now let’s add the option settings.

Step 6:  Now compress the code and then deploy it using EBS console or the elastic beanstalk command line:

cd ..
eb deploy

After the deployment is successful the security group is attached to your EC2 instances. The environment is now successfully using your existing security group that you have attached through EB extensions in addition to the default security group.

Launching an Application on AWS Beanstalk

 AWS Beanstalk is an application that makes your task of hosting your web application and you do not have to create or configure any kind of webservers by yourself. All the in fractures like virtual machines, load balancer, etc all these things are provided by Elastic beanstalk and also provide the OS, language, frameworks, web, and application server. 

Languages supported by Elastic Beanstalk

  • Java
  • .NET
  • PHP
  • Node.js
  • Python
  • Ruby
  • Go

Servers provide by Elastic Beanstalk 

  • Apache
  • Nginx
  • Passenger
  • IIS

Steps to create Elastic Beanstalk Application

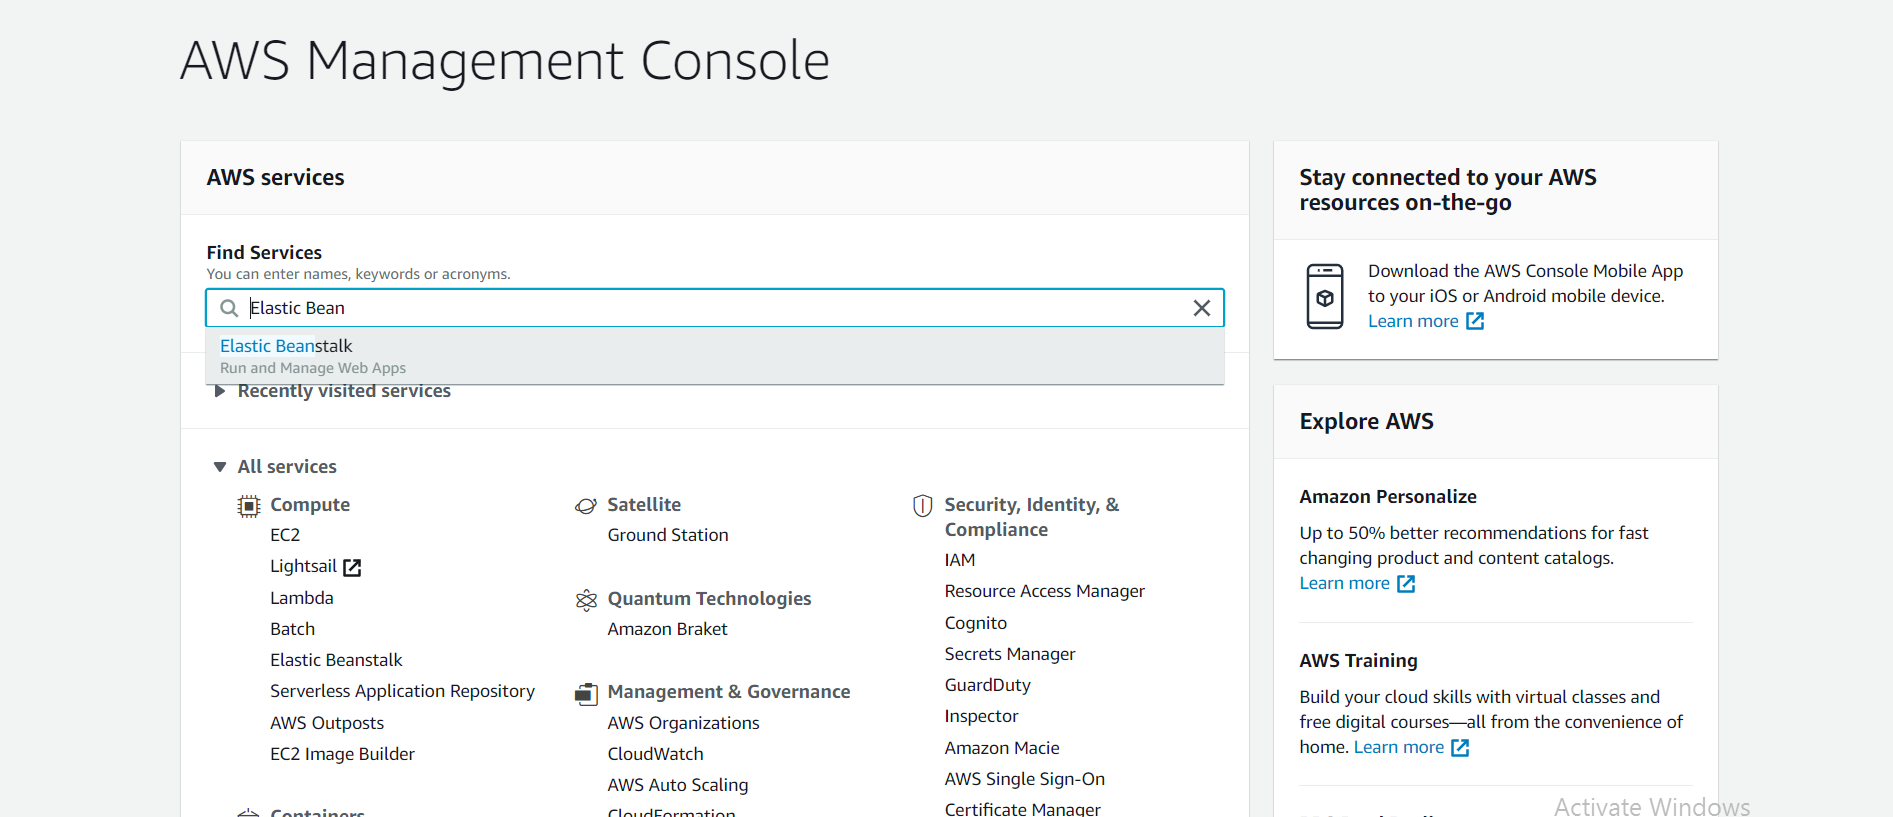
Step 1: Log in to your AWS account and search for Elastic beanstalk in the search bar.

AWS Console

Step 2: Now click on create a new environment in the top right corner.

environment

Step 3: Configure the environment

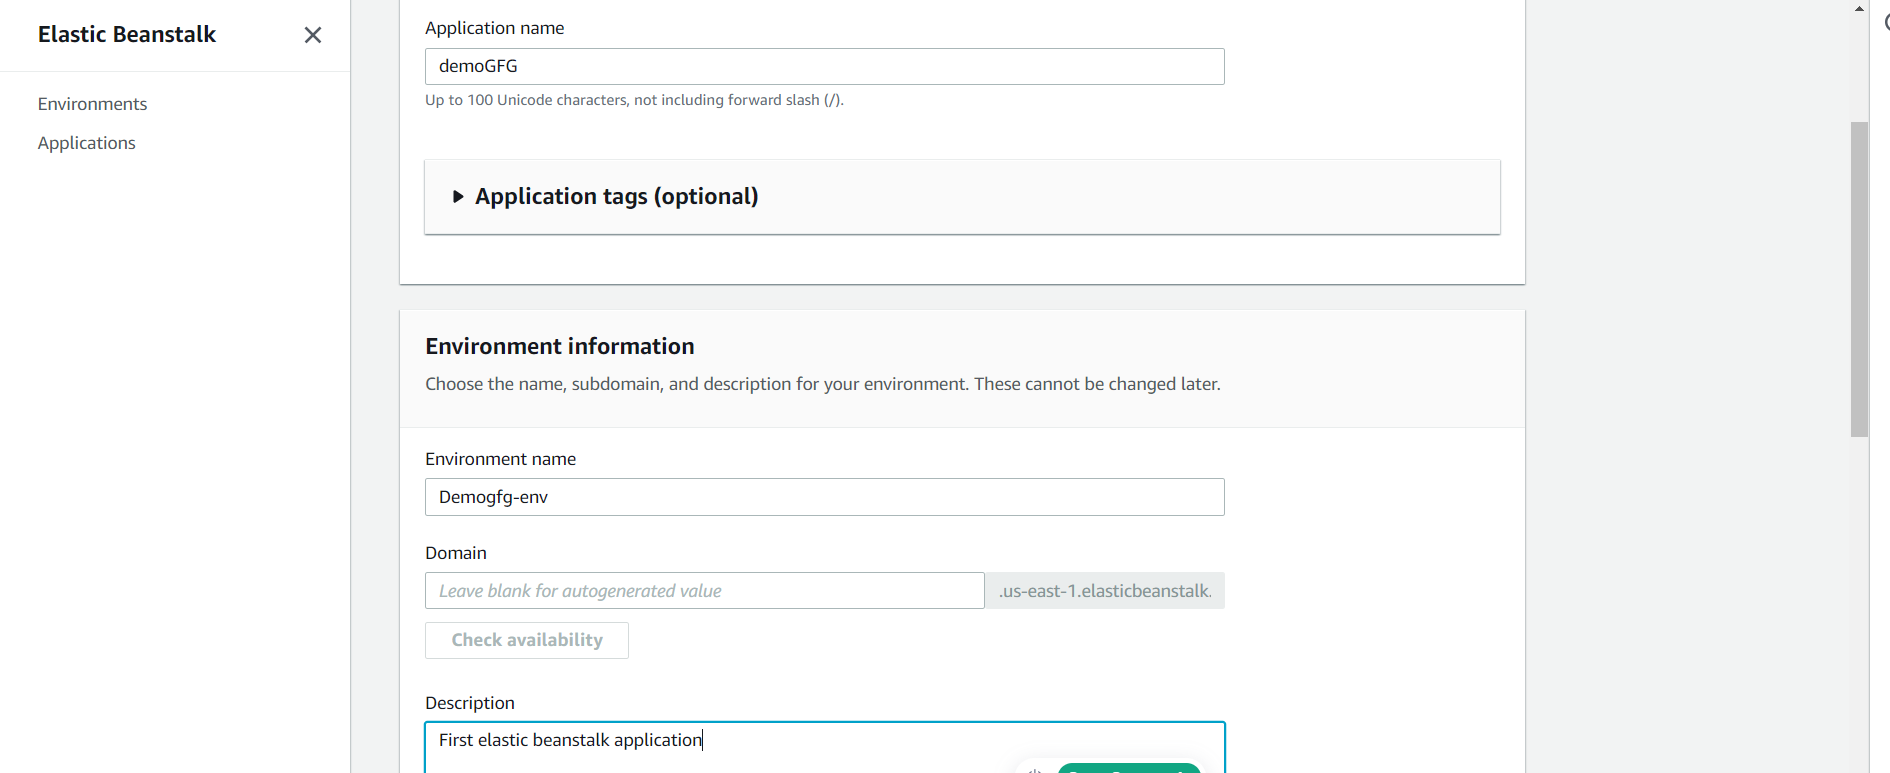
Give some name to your application, for example, deomoGFG will suggest the environment tag then give a unique domain and you can write any description by your choice.

environment information

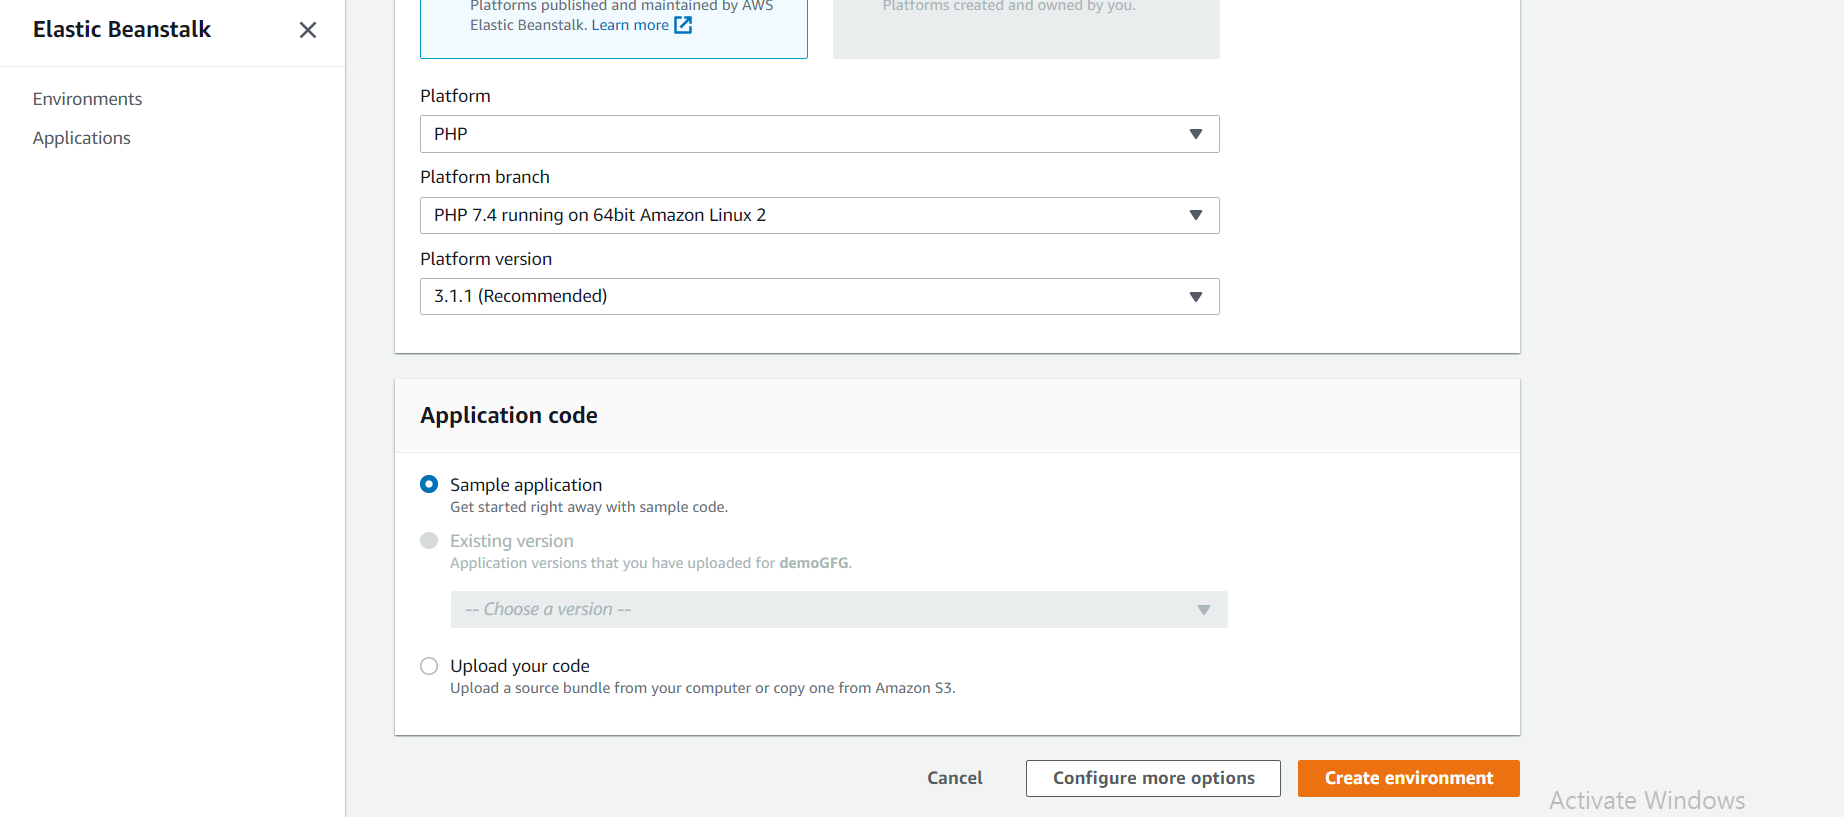
Now choose your respective environment.

choosing environment

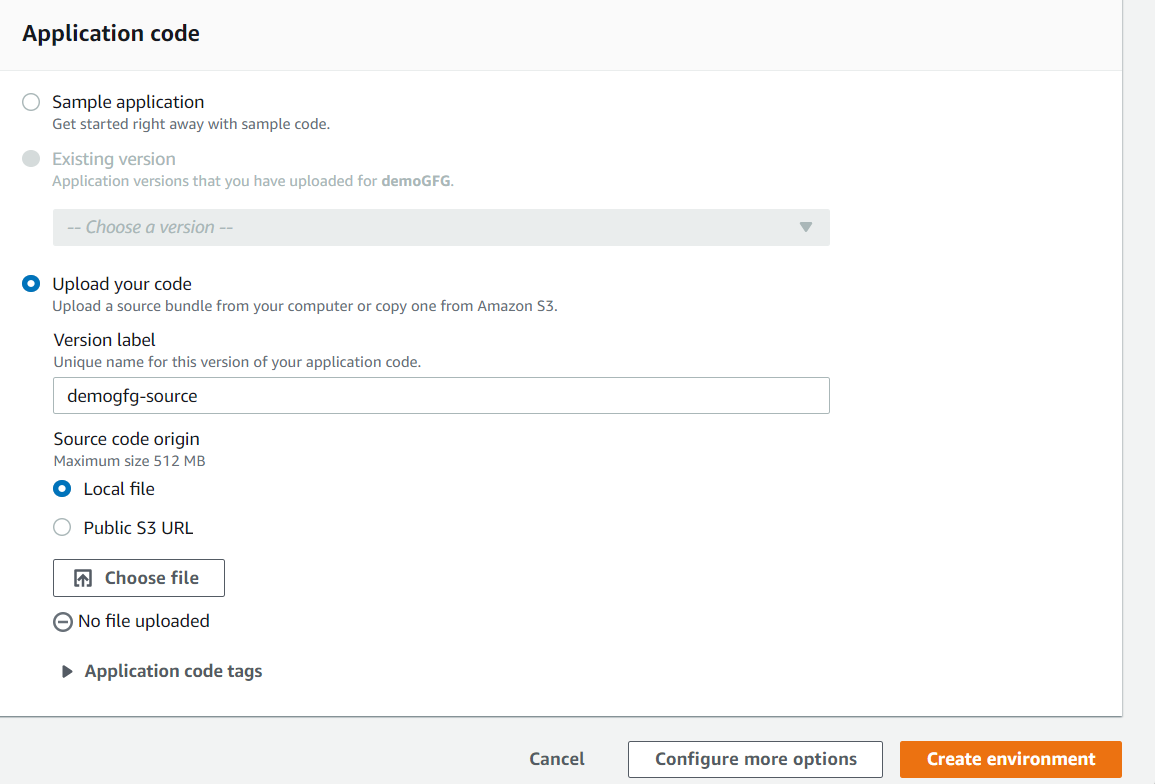
Now select the option upload your code select the file you want to host on the server.

Application code

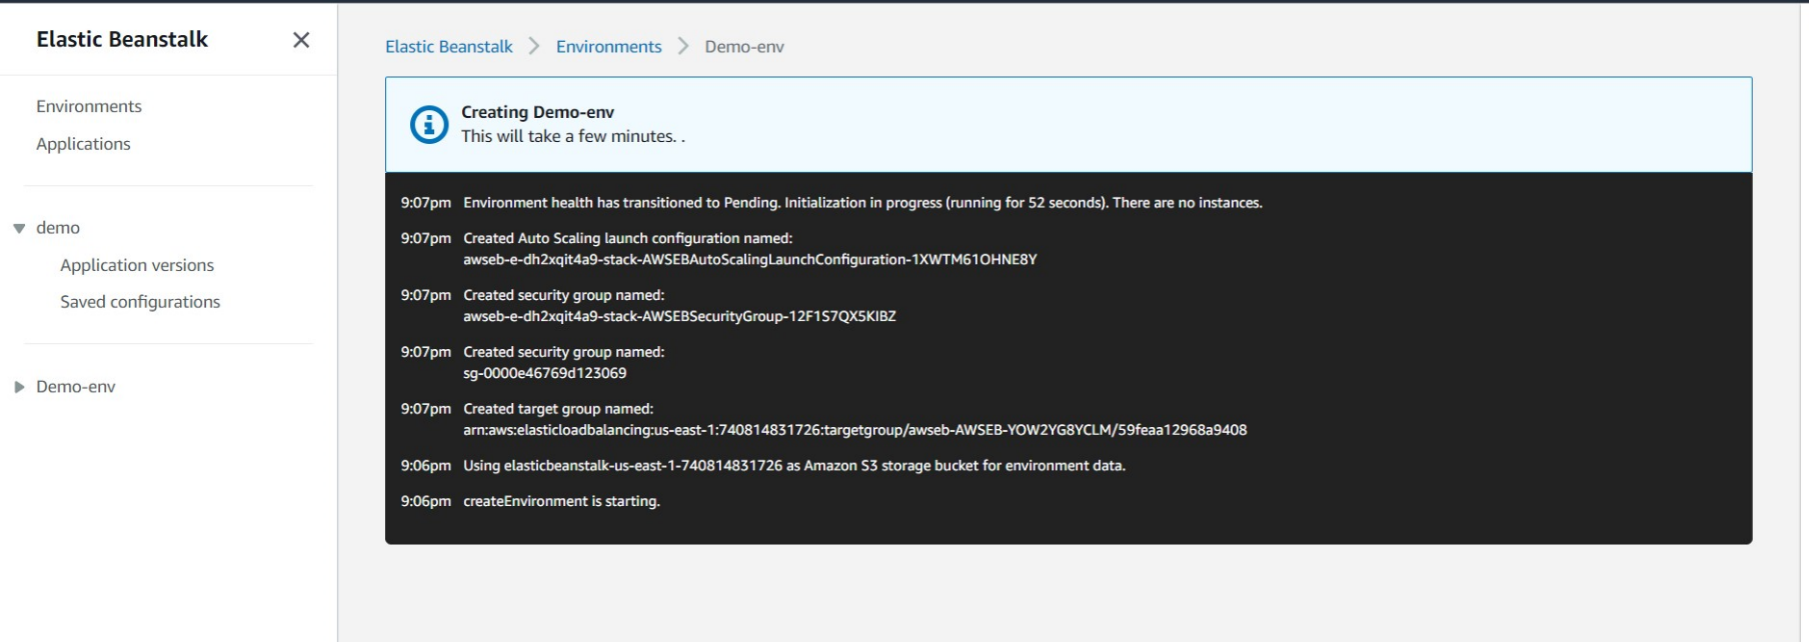
Now click on Create environment, this will take a few minutes to create the environment.

creating environment

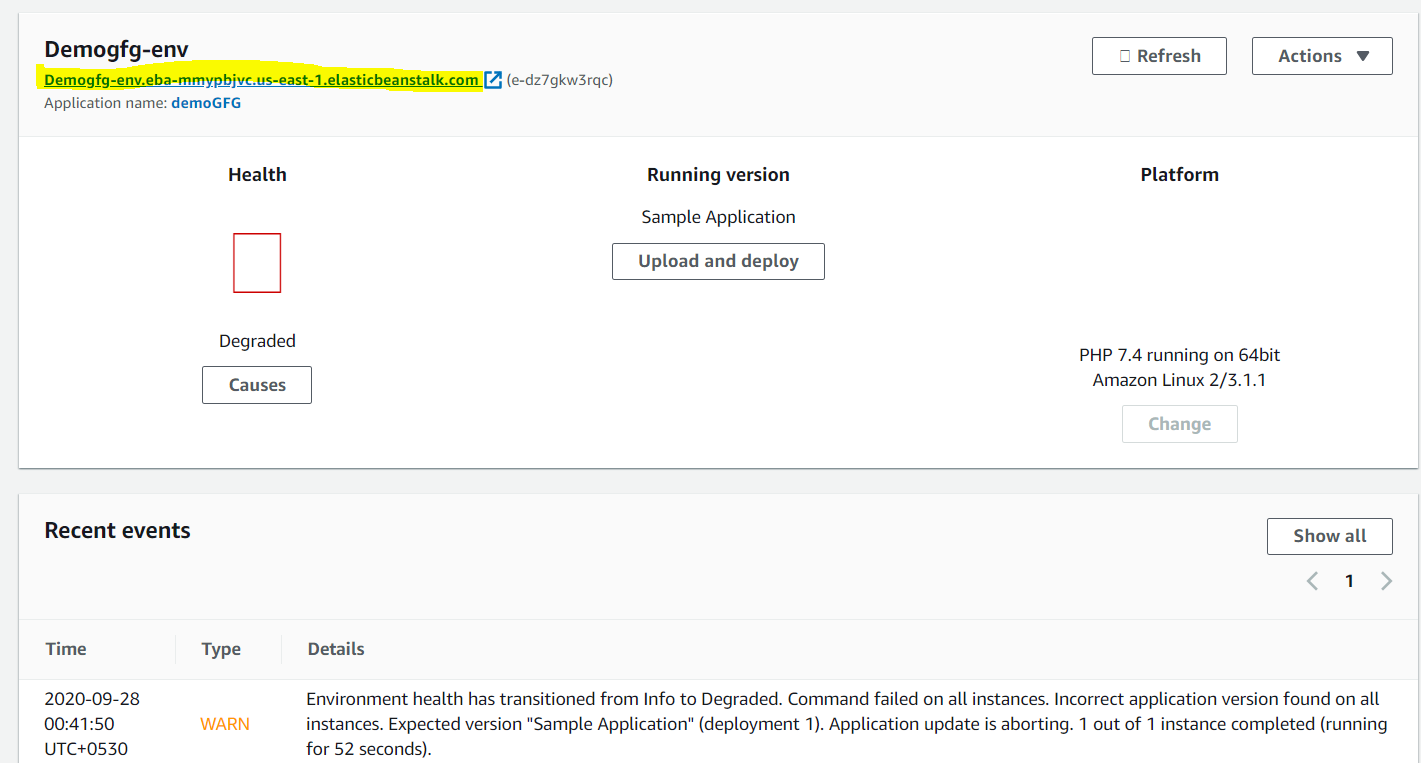
Step 4: Now go to environments select your environment on click on the URL at the top.

select environment

After clicking to the URL you will go to your respective web application which is up and running in the server provided by Elastic Beanstalk.


If you are doing these things for practice just remember to close all the services to avoid the charges.