Thursday, 5 January 2023

Steps to Configure Amazon SNS


Steps to Configure Amazon SNS

In these steps, we are going to configure Amazon SNS. For creating AWS Free Tier Account click here: AWS Free Tier Account

1) Search SNS in the search bar and click on it. Afterwards, click on the Topics on the top left side of the Console and then Click on Create Topic to create a new topic.

SNS Topic2) Select Standard type and Enter the Topic name. Scroll down and click on Create Topic.

3) Now, the Topic has been created successfully. Scroll down and click on Create Subscription.

4) Under Protocol choose the endpoint as Email and enter the Endpoint address, click on Create Subscription. Now, the subscription will be created and the status of the subscription is pending.


Email5) The email will be sent to the subscriber for confirmation of the subscription. The subscriber has to open the email and click on Confirm Subscription. After this subscription will be confirmed.


Confirmation

6) Now, the status of the subscription will be confirmed, and then click on the Topic name. After that click on Publish Message.

7) Enter the subject name and message body. Scroll down and click on Publish Message.

8) Now, the subscriber will receive the message on the mentioned email address.

AWS SNS Pricing

By default, AWS SNS comes with a generous free tier, and it’s also inexpensive. There is no need for a subscription, you simply pay for what you use at the type of endpoint you choose. Each month we will get 1 million free mobile push notifications. Afterwards, each delivered message is charged at $0.5 per million, it also depends upon the region of your recipient.

Wednesday, 4 January 2023

Deploy Web Application Using AWS CodePipeline


Steps To Deploy Web Application Using AWS CodePipeline

We will be performing 4 steps to deploy a web application

Step 1: Create an S3 bucket for your application

Note: If you don’t have an AWS account check our blog on how to create 

1) Open the Amazon S3 console and Choose Create bucket and In Bucket name, enter a name for your bucket, and also don’t forget to enable Versioning.

2) Next, download the sample code and save it into a folder or directory on your local computer.
Choose one of the following. Choose SampleApp_Windows.zip if you want to follow the steps in this tutorial for Windows Server instances. (Do not Unzip the file while Uploading)
–> If you want to deploy to Amazon Linux instances using CodeDeploy, download the sample application here: 
–> If you want to deploy to Windows Server instances using CodeDeploy, download the sample application here: 

3) In the S3 console, Upload code in the bucket you created.
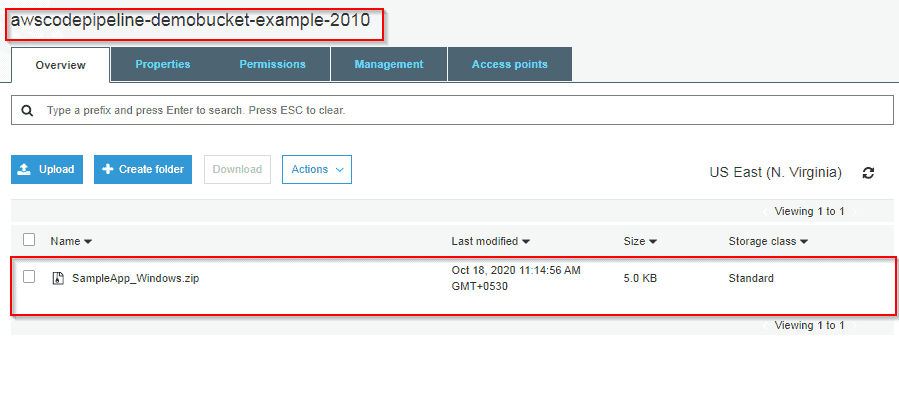
AWS S3 Bucket

Step 2: Create Amazon EC2 Windows instances and install the CodeDeploy agent

1) Create an IAM role that will be required to grant permission to EC2 instance. Select the policy named AmazonEC2RoleforAWSCodeDeploy to create.

Instance Role For EC2

2) Launch instance on which our code will be deployed.

3) Just remember to add the IAM role that we have created. and In Auto-assign Public IP, choose Enable. Expand Advanced Details, and in User data, As text selected, enter the following:
<powershell>
New-Item -Path c:\temp -ItemType “directory” -Force
powershell.exe -Command Read-S3Object -BucketName bucket-name/latest -Key codedeploy-agent.msi -File c:\temp\codedeploy-agent.msi
Start-Process -Wait -FilePath c:\temp\codedeploy-agent.msi -WindowStyle Hidden
</powershell>

4) On the Configure Security Group page, allow port 80 communication so you can access the public instance endpoint. Then follow the default configuration and launch the instance

Created EC2 instance

Step 3: Create an application in CodeDeploy

1) Initially create an application in CodeDeploy, and In Compute Platform, choose EC2/On-premises.Choose to Create application.

2) On the page that displays your application, choose to Create a deployment group. In service, role creates an IAM role under code deploy category. Under Deployment type, choose In-place.

3) Under Environment configuration, choose Amazon EC2 Instances.

4) Under Deployment configuration, choose CodeDeployDefault.OneAtaTime.

5) Under Load Balancer, clear Enable load balancing, leave the defaults then choose to Create a deployment group.
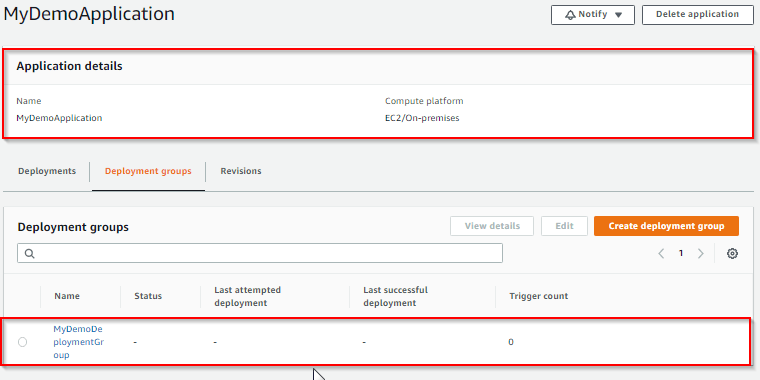
Application code deploy for CI/CD Services Offered By AWS

Step 4: Create your first pipeline in CodePipeline

1) Open the CodePipeline console. Choose pipeline settings, Enter your desired name and in Service role, Choose New service role to allow CodePipeline to create a new service role in IAM.  To know more about AWS IAM refer to our blog on IAM.

2) In the Add source stage, select Source provider, choose Amazon S3. Under the S3 object key, enter the object key with or without a file path, and remember to include the file extension.

3) In the Add build stage, choose to Skip build stage, and then accept the warning message by choosing Skip again. Choose Next.

4) In the Add deploy stage, in Deploy provider, choose AWS CodeDeploy.Then enter your application name or choose the application name from the list. In the Deployment group, enter MyDemoDeploymentGroup, or choose it from the list, and then choose Next.
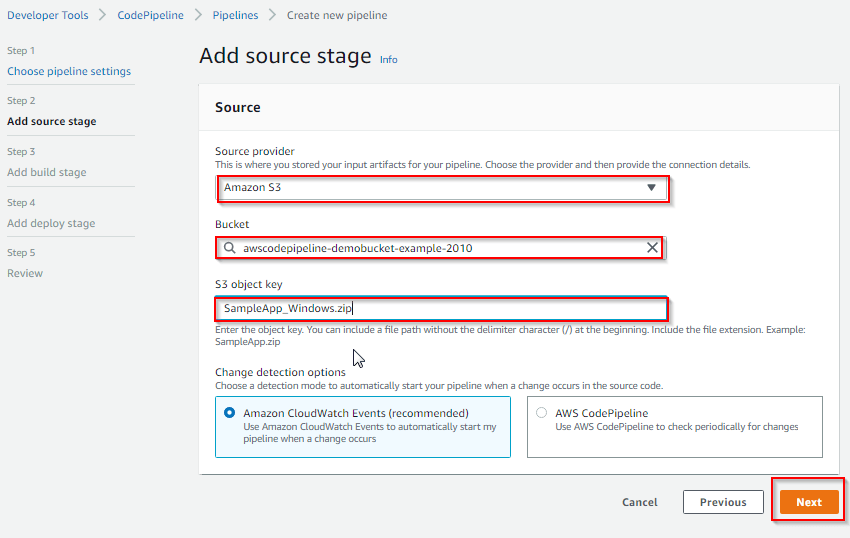
AWS Pipeline

Congratulations! You just created a simple pipeline in CodePipeline. you can verify that by coping EC2 Public DNS address and then past it into the address bar of your web browser

AWS Windows EC2 Instance


AWS Windows EC2 Instance

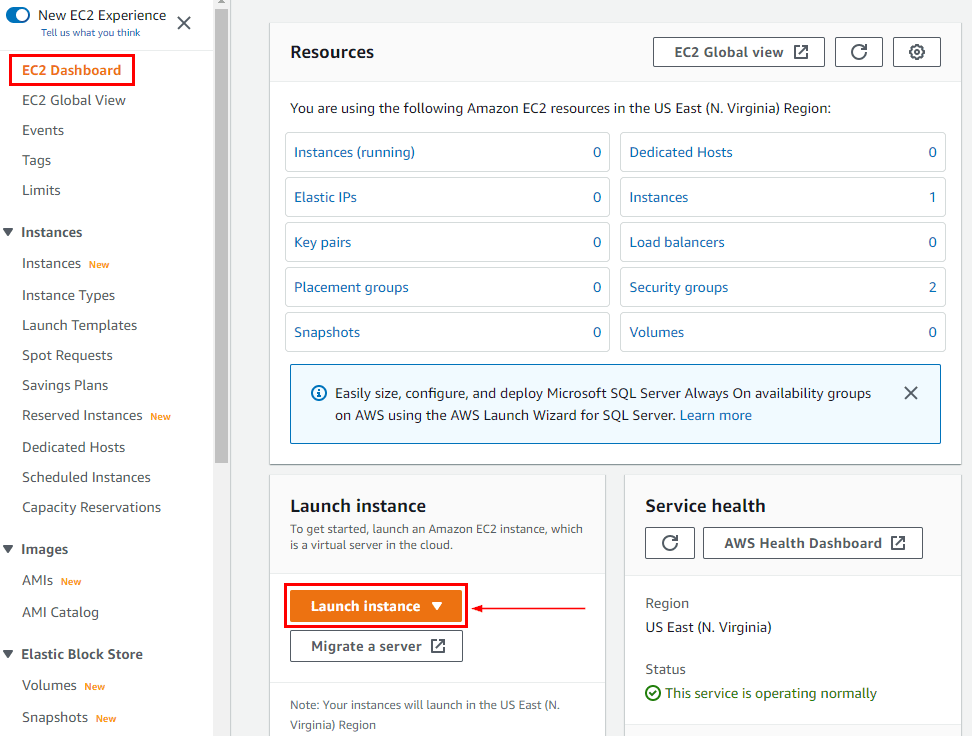
Step 1: Log in to your AWS account and go to the EC2 dashboard to launch a new instance.

Amazon EC2 Connect
Step 2: In the Name and Tags step you can add tags to an instance, here tags help you to enable categorizing AWS resources in different ways, for example, by owner, environment, or purpose. For example, you could define a set of tags for your account’s EC2 instances that help you track each instance’s owner and stack level.

EC2 Connect

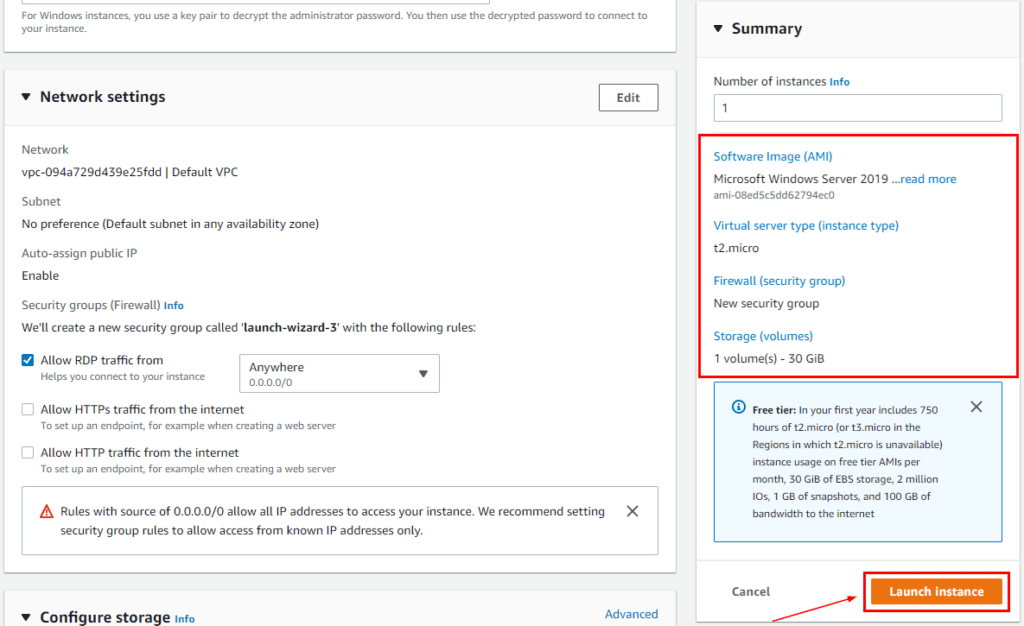
Step 3: Select Windows under QuickStart and Select Microsoft Windows Server 2019 Base AMI. You can also select other AMI as per your need but here we launching a Windows Server, so we have to select the Windows Server 2019 Base AMI.

Elastic Compute CloudStep 3: Select the t2.micro instance type, if you want you may select another instance type but they are chargeable so we choose the t2.micro instance type which is eligible for the free tier and limited resources.

Instance

Step 4: Select an existing key pair or create a new one, we will Create a new one, enter the name of the Key-pair as Windows-Key and Create the Key Pair.

EC2
How to Connect

Step 5: Now, keep everything default and click on Launch Instance.


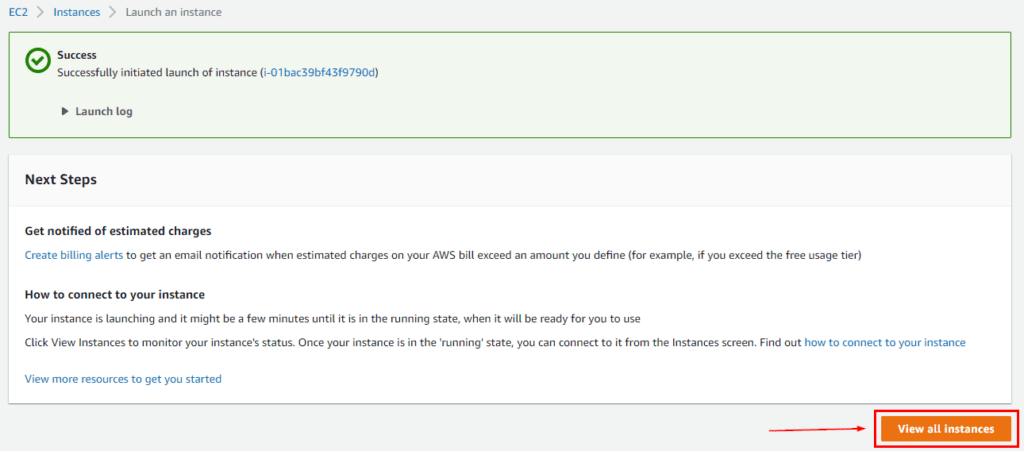
Step 6: Now Click on View all Instances.

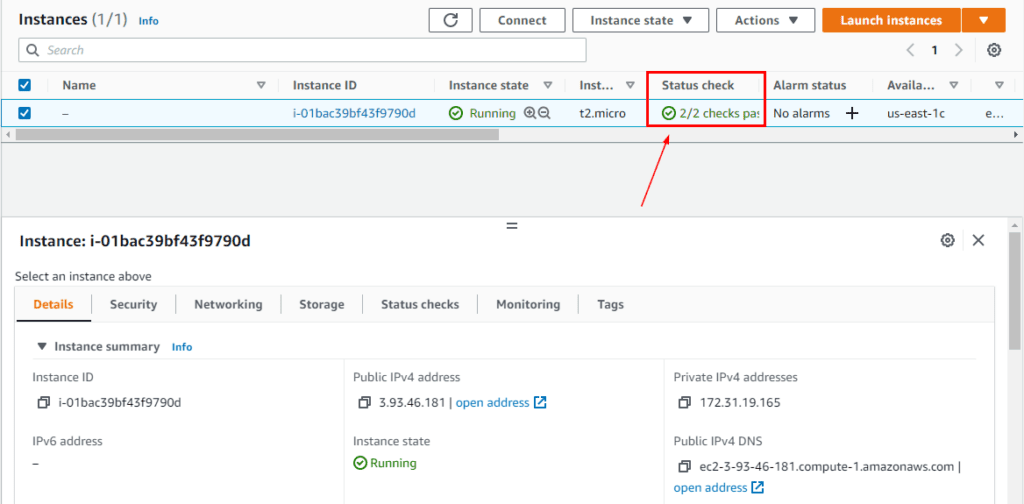
Step 7: Here, you shall see your instance is launching and the Status check is Initializing, wait for some time.


Step 8: Refresh and you shall see your instance is Up and Running, and the Status check has changed to 2/2 checks.

EC2 Status

10 Steps To Connect AWS Windows EC2 Instance

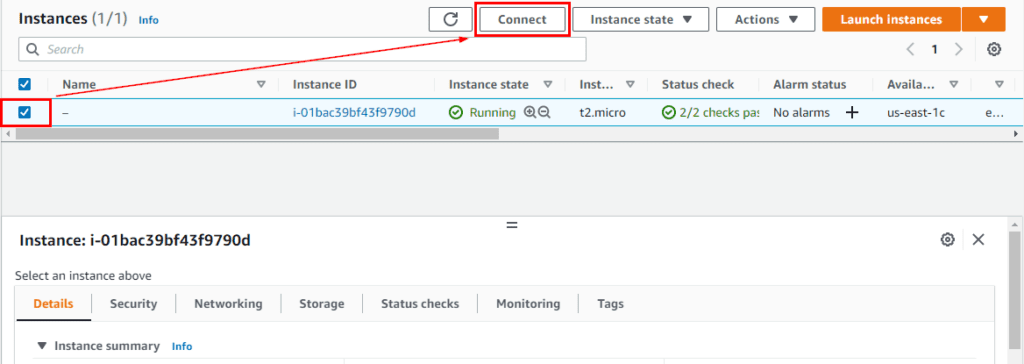
Step 1: Firstly we have to select the Windows instance From the Running Instance of the EC2 dashboard and click on Connect.

Step 2: Here we have to select the RDP (Remote desktop protocol) Client and then Download the RDP File and save it somewhere safe then, we need a password to access the RDP file, so click on Get Password.

RDP Client

Step 3: At this step of launching, we have to upload the Key-pair (the key which we have created in the earlier step). Click on Browse and then select the key and click on Decrypt Password. This provides us with a usable password.

Password

Step 4: After submitting the Key-pair here the Password is Generated, copy and save it somewhere safe.

Decrypt Password

Step 5: Now open the Remote Desktop File from downloads for launching the Windows instance. If your local computer is a Mac, you will need to download “Microsoft Remote Desktop” from the App Store to be able to open your RDP file.

RDP File

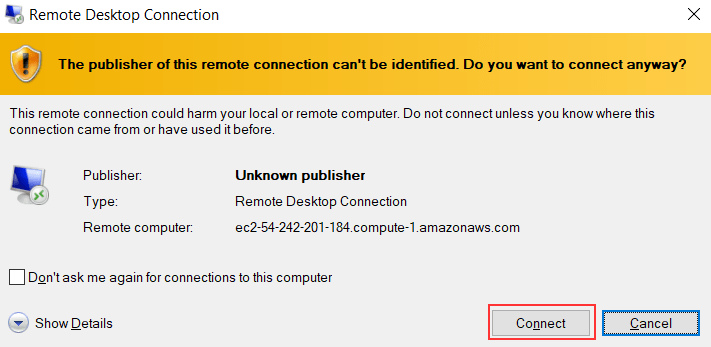
Step 6: After opening the RDP file click on Connect to launch the Window instance.

Note: Windows has the Remote Desktop Connection Application pre-installed; so for other OS like mac you need to download the Microsoft Remote Desktop app from the Mac App Store.

connect RDP

Step 7: Here we have to provide the credentials for accessing the Instance so we have to Enter the Password That we copied in step 4 and click on Ok.

Credentials

Step 9: Click on Yes.

Permissions

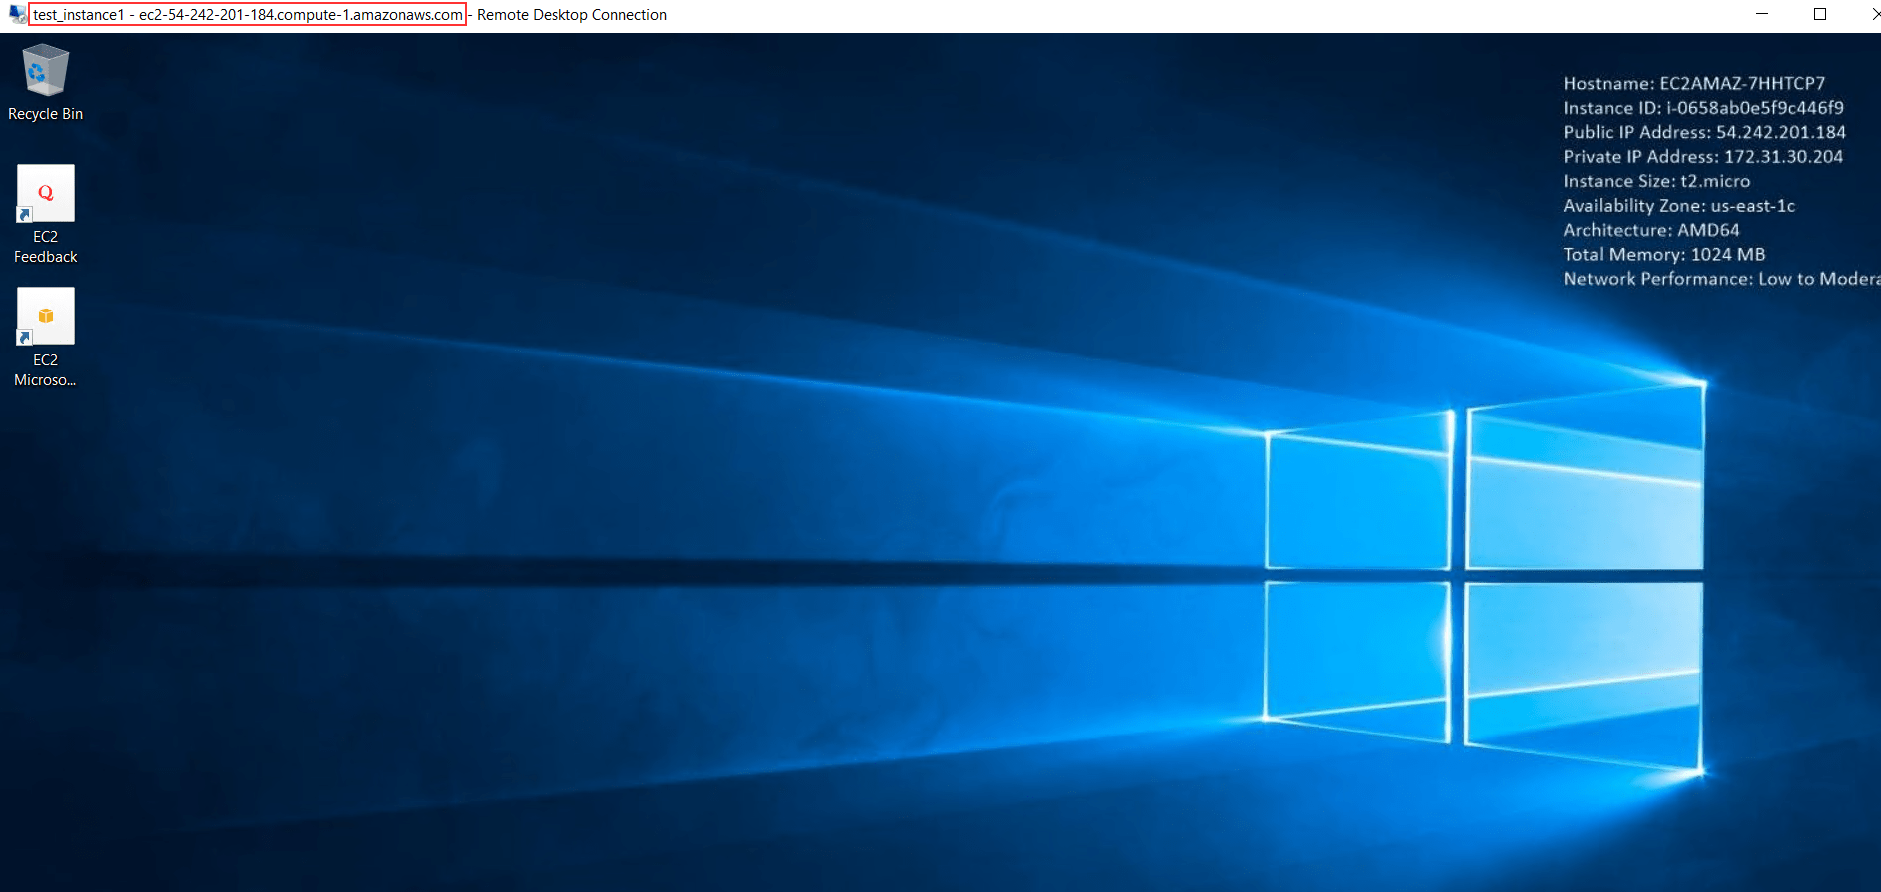
Step 10: So we have successfully connected to an Amazon Windows Instance, here we perform all our operations and task that we are performing on the normal windows operating system.

connected window instance
That’s all our Amazon Windows EC2 instance is up and running. To know more about AWS please check our references section.

Amazon Inspector


What is Amazon Inspector?

Amazon Inspector is an automated security assessment service and to test network accessibility of EC2 instance. It helps you to identify vulnerabilities within your EC2 instances and applications. And allows you to make security testing more regular occurrence as part of the development and IT operations.

Amazon Inspector provides a clear list of security and compliance findings assigned a priority by the severity level. Moreover, these findings can be analysed directly or as part of comprehensive assessment records available via the API or AWS Inspector console. AWS Inspector security assessments help you check for unintended network accessibility of EC2 instances and vulnerabilities on those EC2 instances.

Benefits of AWS Inspector

Amazon inspector is a safe and reliable service we can use for security purpose in our services, deployed applications etc. It’s an automated and managed service. Let’s see some key benefits of AWS Inspector.

  • Automated Service: AWS Inspector is a beneficial service for the application’s security in the AWS cloud.  It can fix automatically without the interaction of human resources.
  • Regular Security Monitoring:  Amazon Inspector helps to find security vulnerabilities in applications, as well as departures from security best practices, both before they’ve been deployed or running in production. This improves the overall security of your AWS-hosted applications.
  • Leverage Aws Security Expertise: AWS Inspector includes a knowledge base of numbers of rules charted to common security best practices and vulnerability definitions. It uses AWS’s Security Expertise, where AWS is constantly updating the security best practices and rules, so one gets the best of both worlds.
  • Integrate Security Into DevOps: AWS Inspector is an API-bound service that analyzes network configurations in your AWS account. Moreover, it uses an optional agent for visibility into EC2 instances. The agent makes it easy to build Inspector assessments right into your existing DevOps process and empowering both development and operations teams to make security assessments an essential part of the deployment process.

How Amazon Inspector Works?

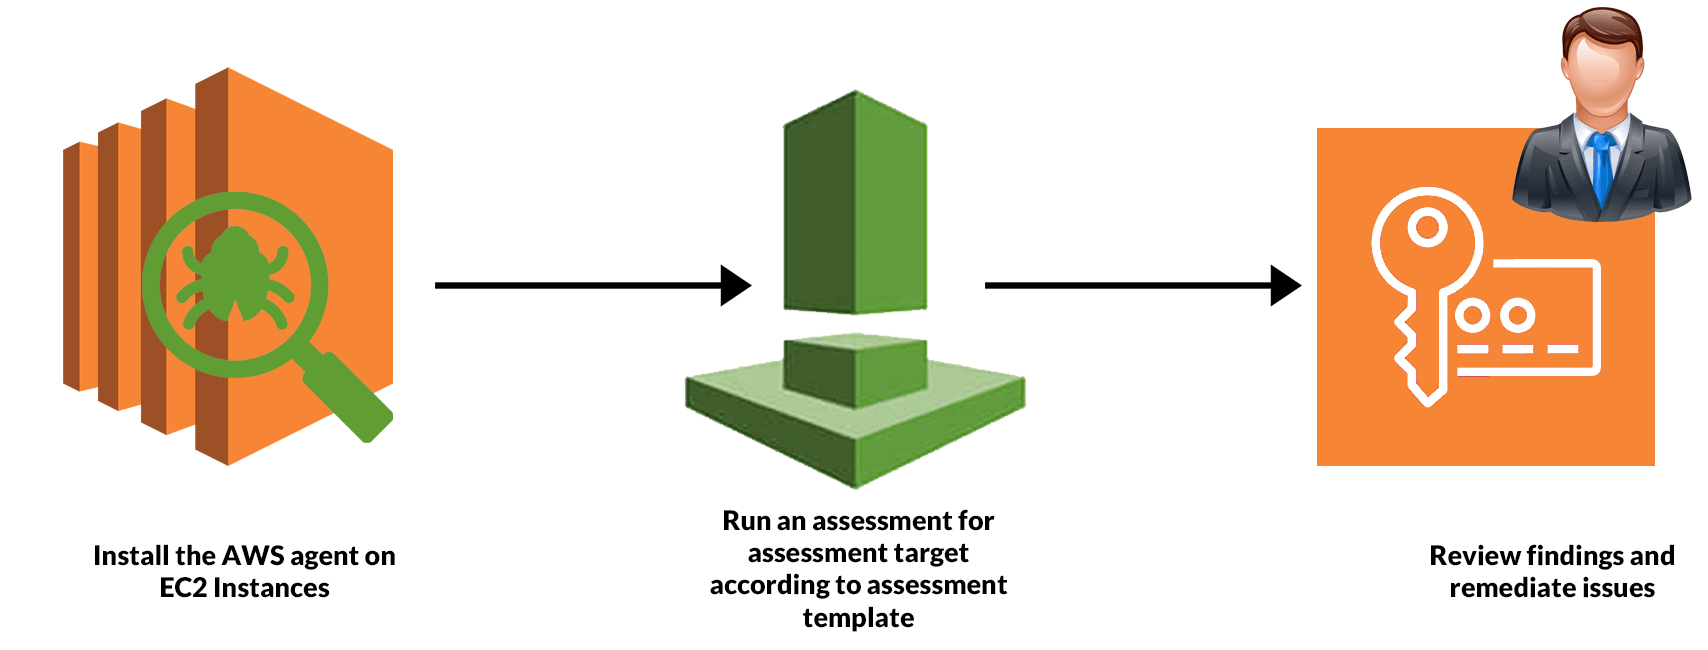
Amazon Inspector performs an automatic assessment and generates a findings report containing steps to keep the environment safe. To use this service, you need to define the collection of AWS all the resources that complete the application to proceed and tested. It is followed by adding and performing the security practices. You can also set the duration of that assessment which can vary from 15 Min to 12 Hrs or last for one day. 

How Amazon Inspector Works

An Inspector Agent runs on the EC2 machines hosting the application that monitors the network, file system, and process activity. After collecting all the required data, it is compared with the built-in security rules to identify security or compliance issues.

Getting Started With Amazon Inspector

AWS Inspector is a security service that helps to monitor and improve the security and compliance of web applications running inside AWS. So in this guide, we have a production EC2 instance for which we need to perform a network accessibility check.

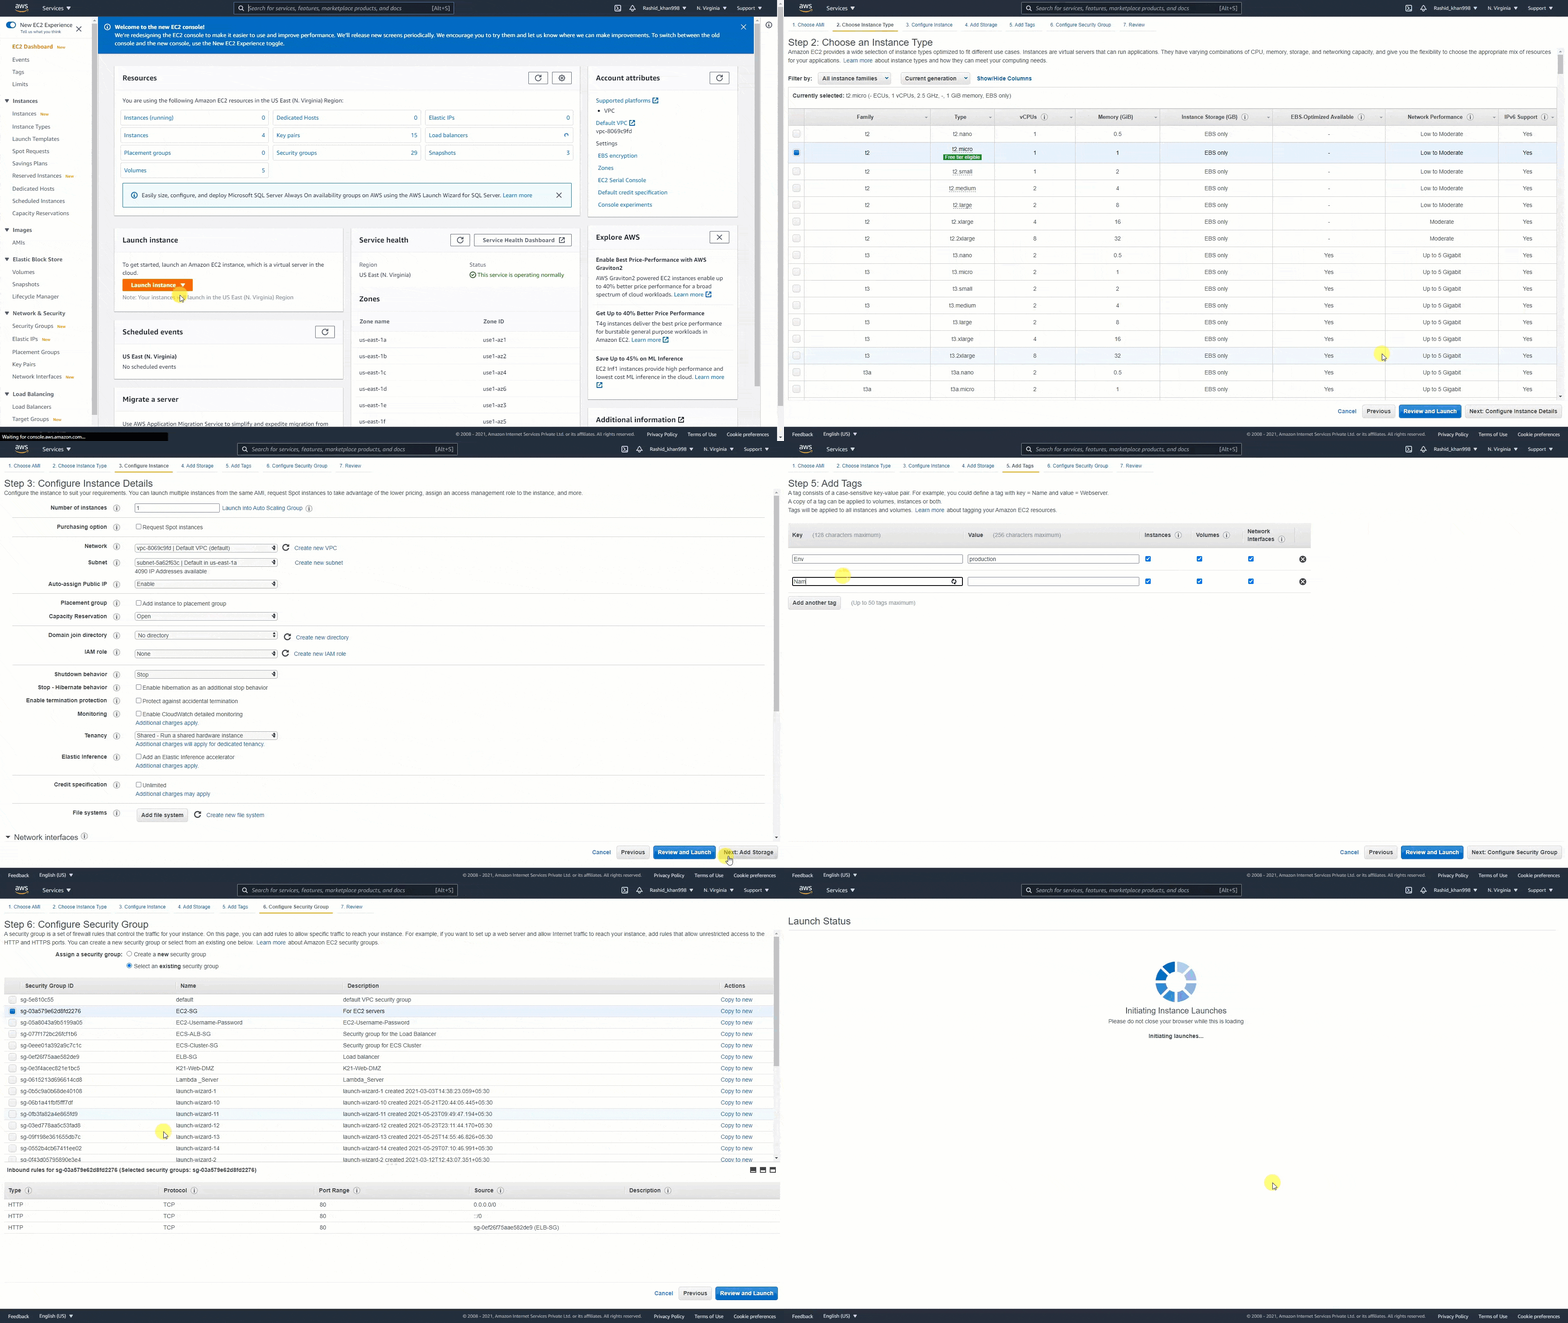
We will set up an EC2 instance to use with Amazon Inspector and induce a security thread, and we will open port 21 on EC2. Port 21 is generally not recommended to keep open on your instances. Follow the steps mentioned below.

  1. Click on Launch Instance.
  2. Select Amazon Linux AMI(HVM), SSD Volume Type.
  3. Select Subnet and Enable Auto-assign public IP
  4. Add a Tag to your EC2 instance.
  5. Configure Security Group and Select EC2-SG(existing security group)

Launch Ec2 Instance

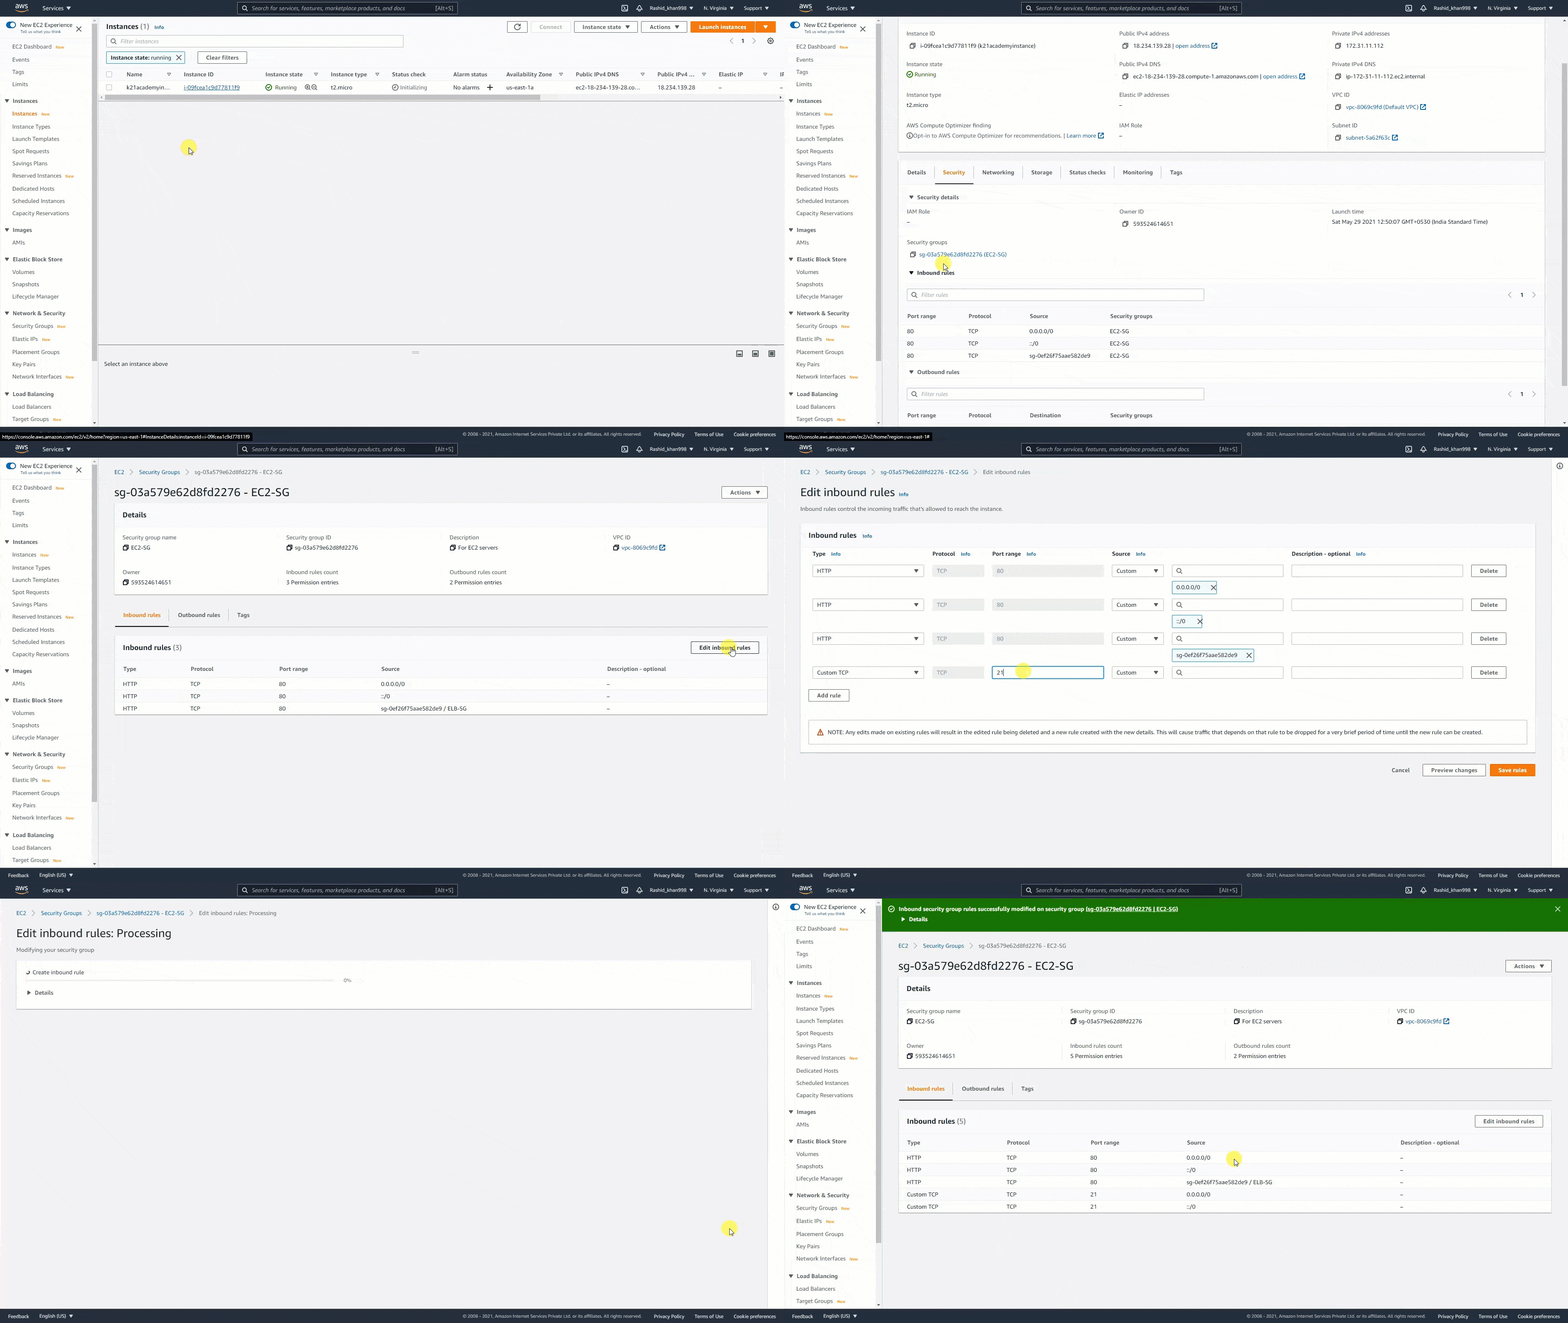
Step 2. Modify Security Group & Open Port 21: After launch the EC2 instance, we have to modify the security group inbound port 21 open.

Modify Security Group & Open Port 21

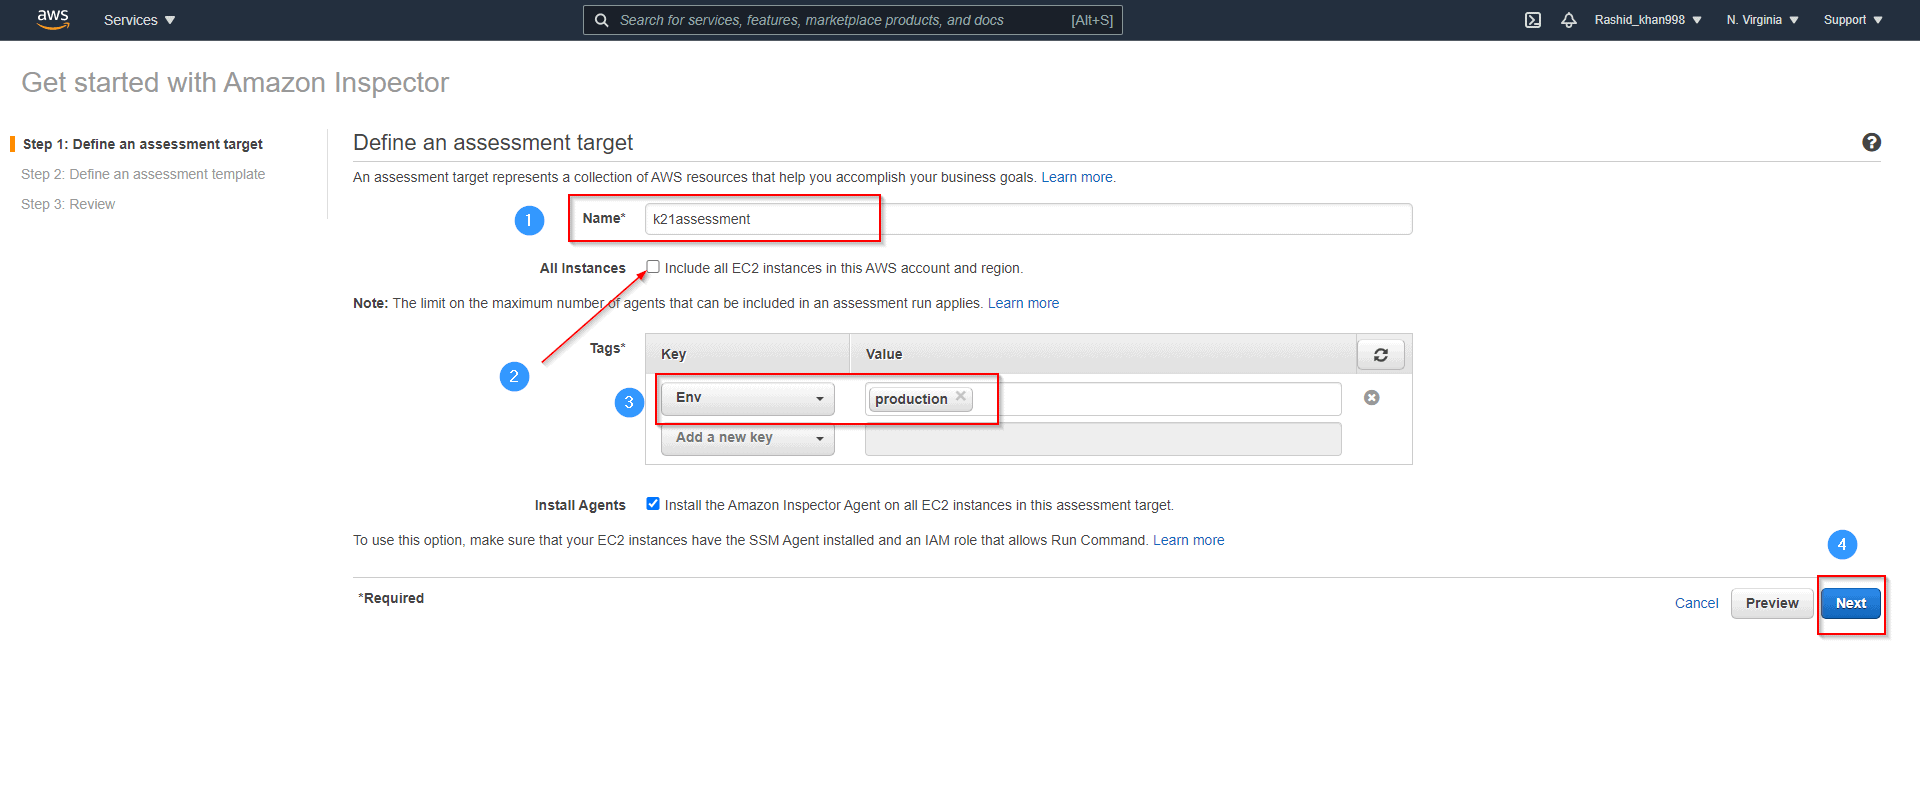
Step 3. Define An Assessment target: Now, select EC2 instance as the assessment target

  • Go to Services and choose Amazon inspector, click on Get Started.
  • Define an Assessment target and check Install Agent on EC2

define assessment target

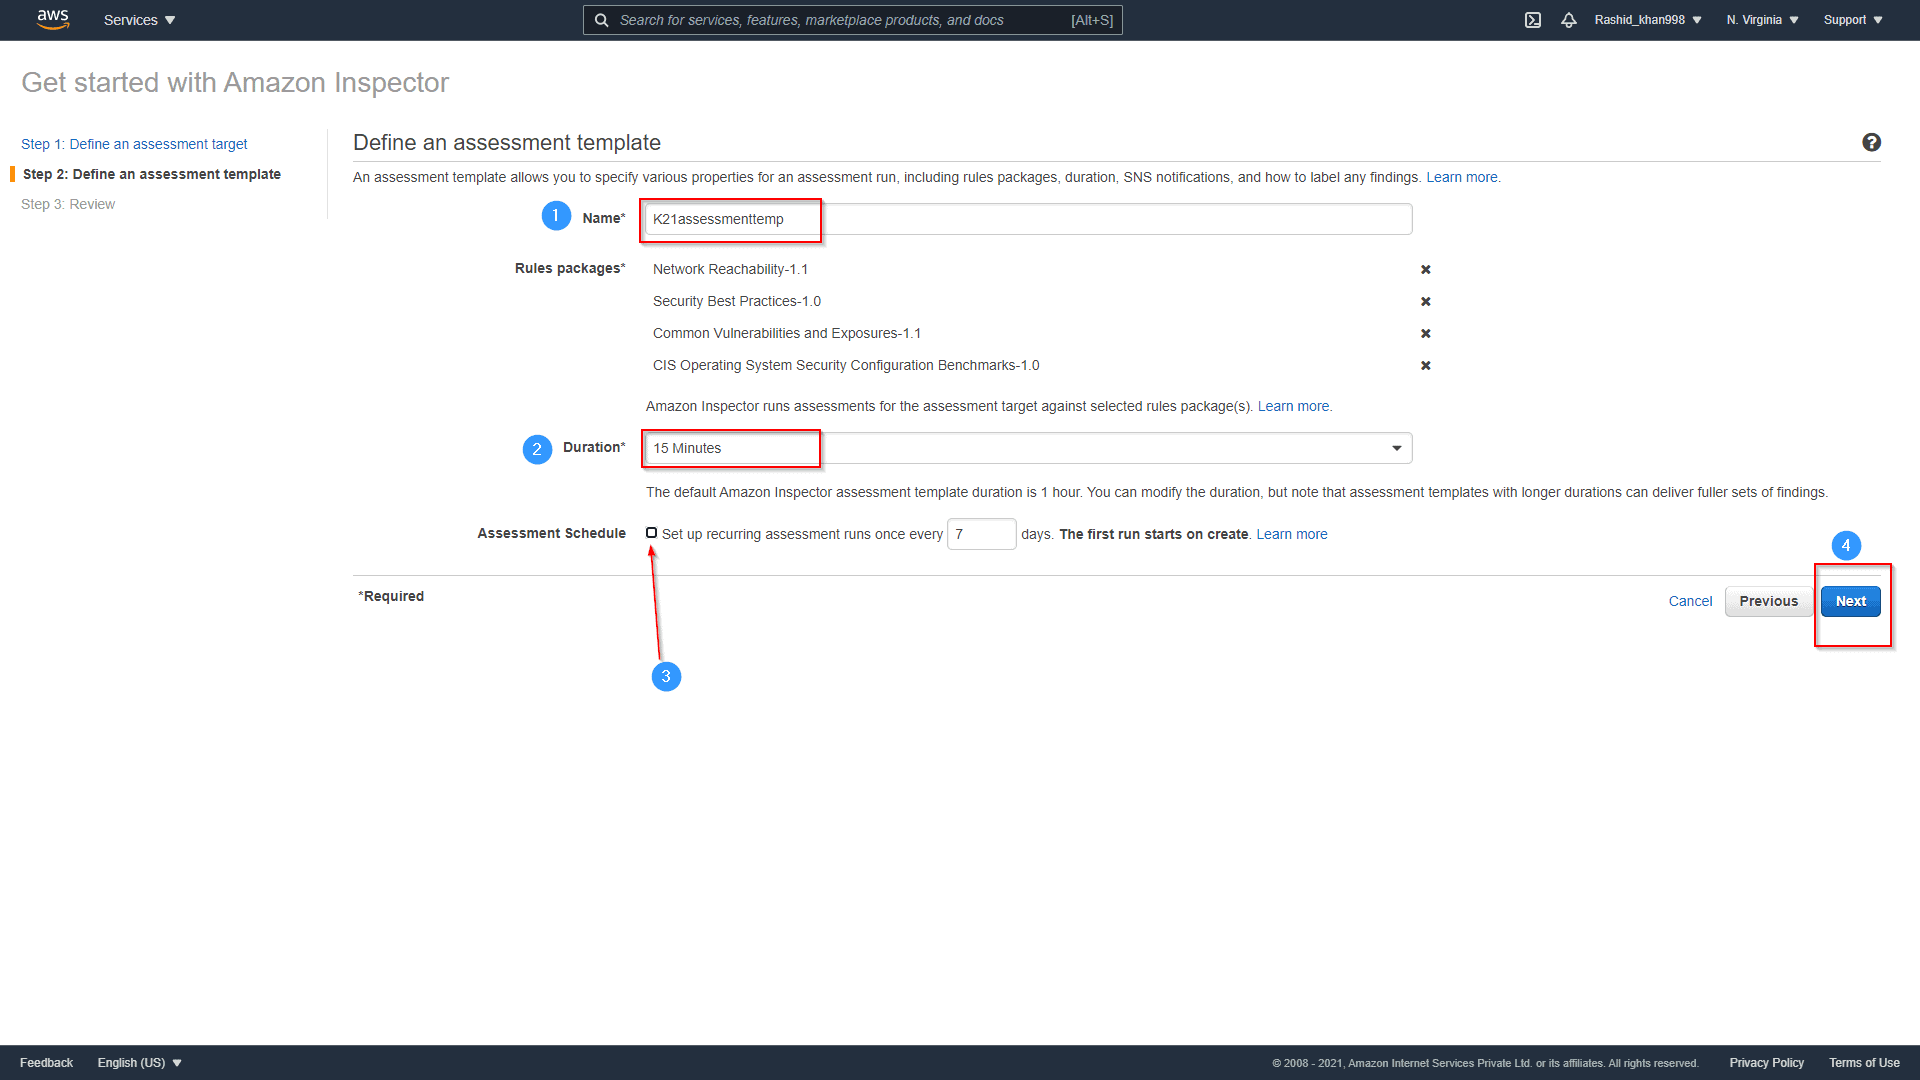
Step 3. Define An Assessment Template: After the assessment target, now define the assessment template.

  1. Please give it a name: K21assessmenttemp
  2. Set Duration to 15 Min ( as its demo)
  3. Uncheck Assessment Schedule and hit Next

Define An Assessment Template

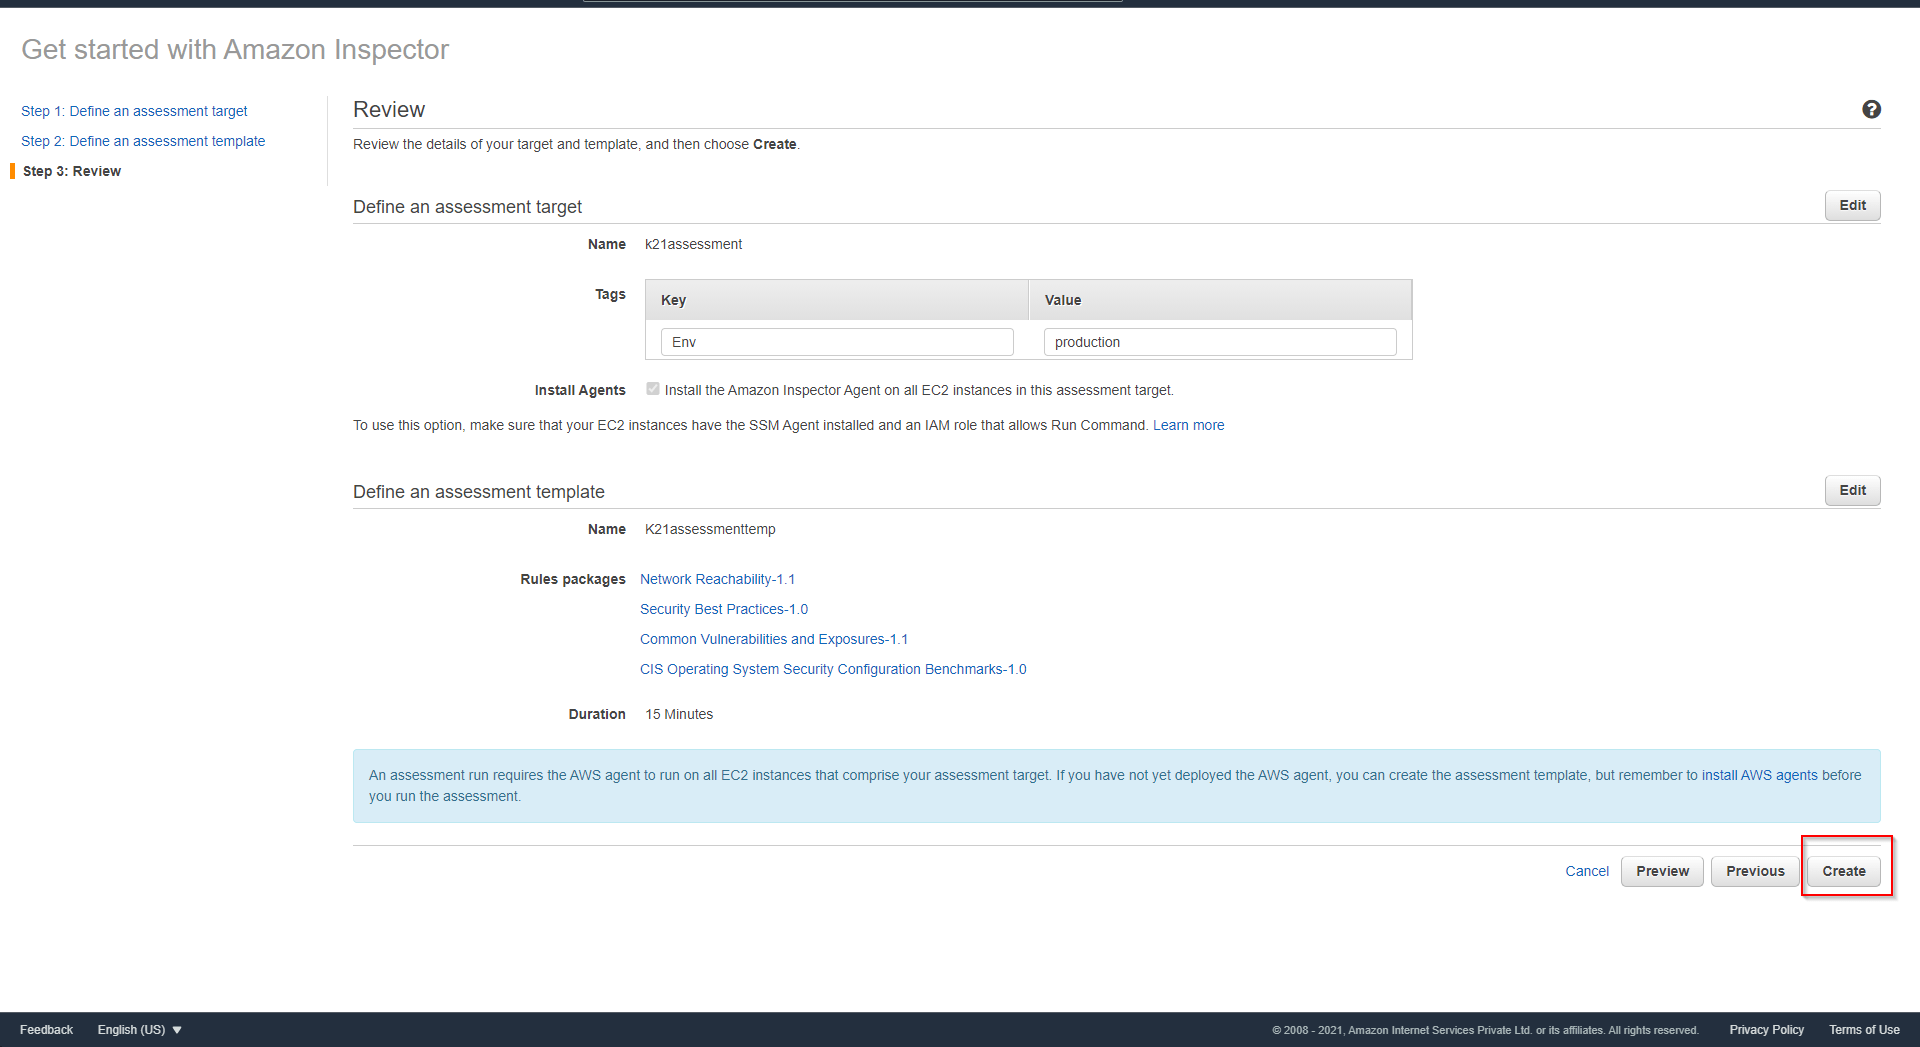
Now Review and click on Create 

review and click on create

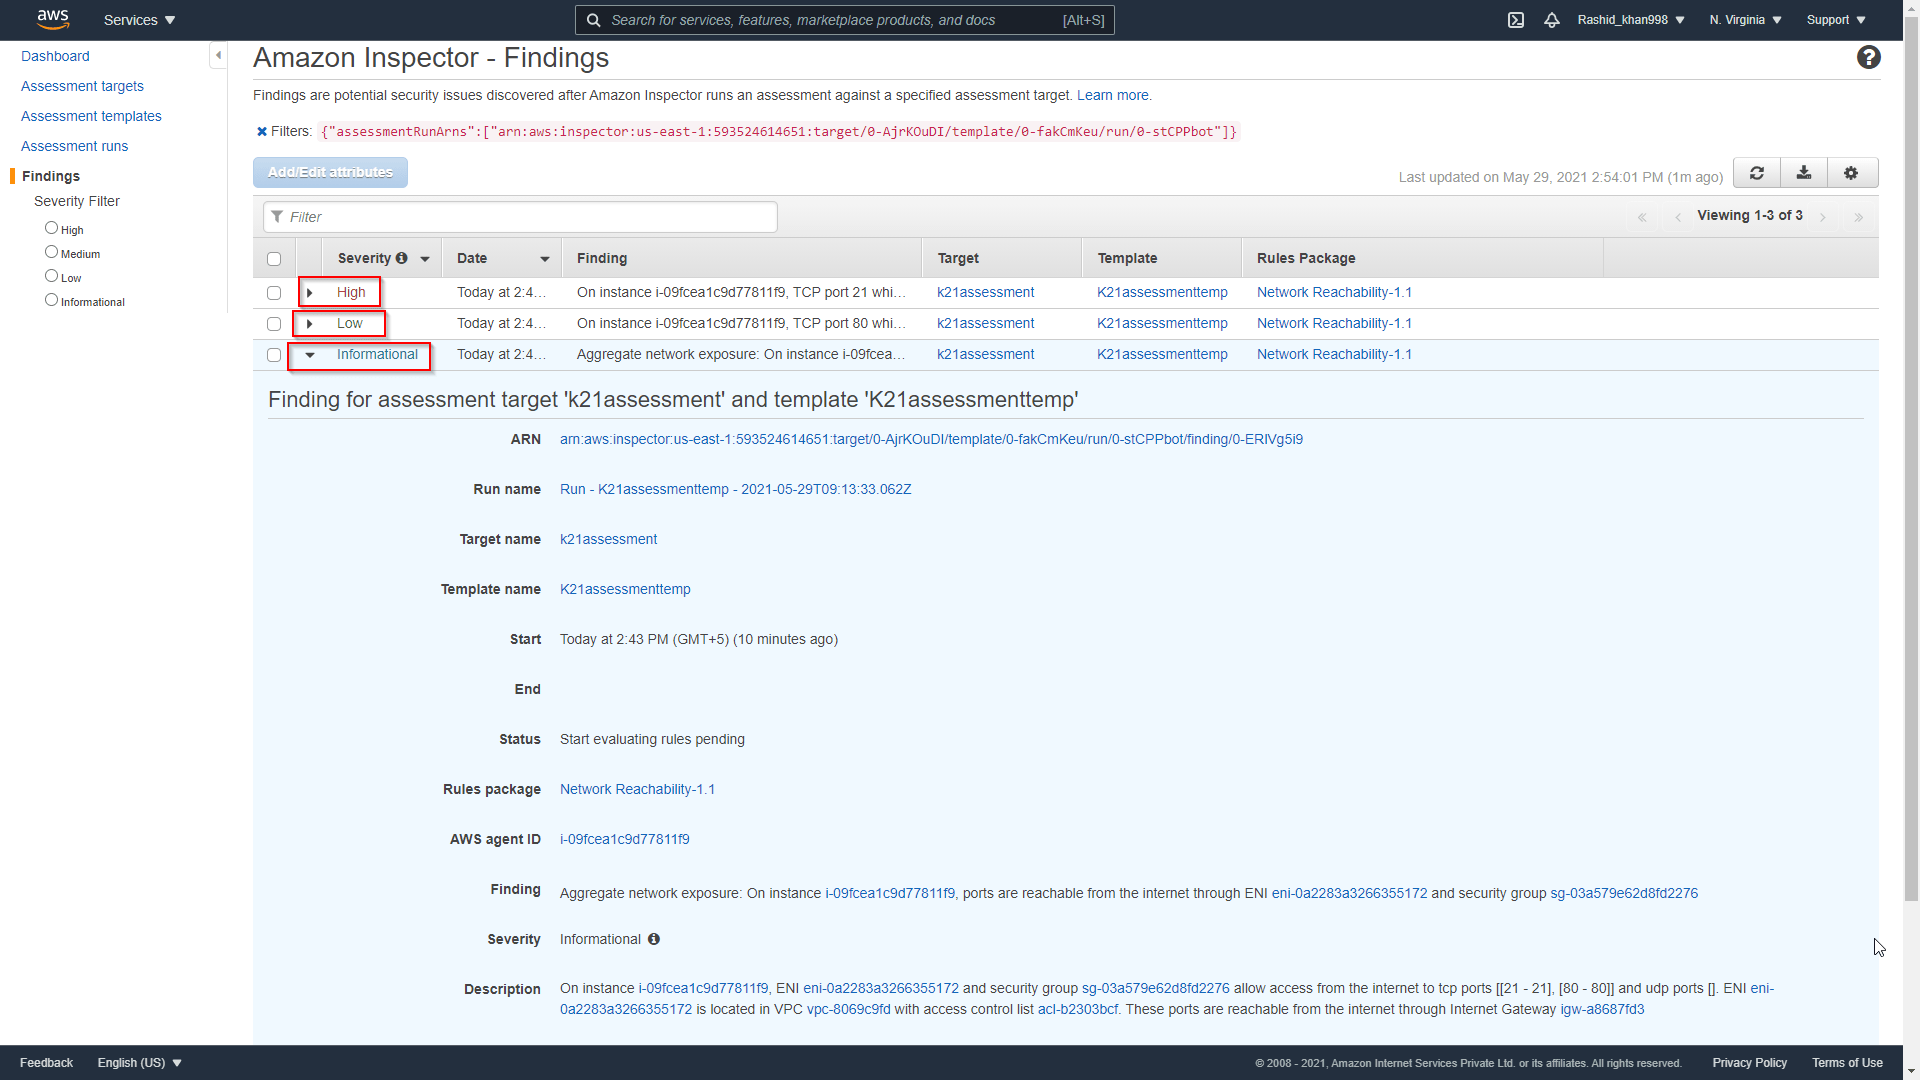
Step 4. Findings: Assessment Run will start automatically. Now, go to the findings and Review the risk.

Open port Risk

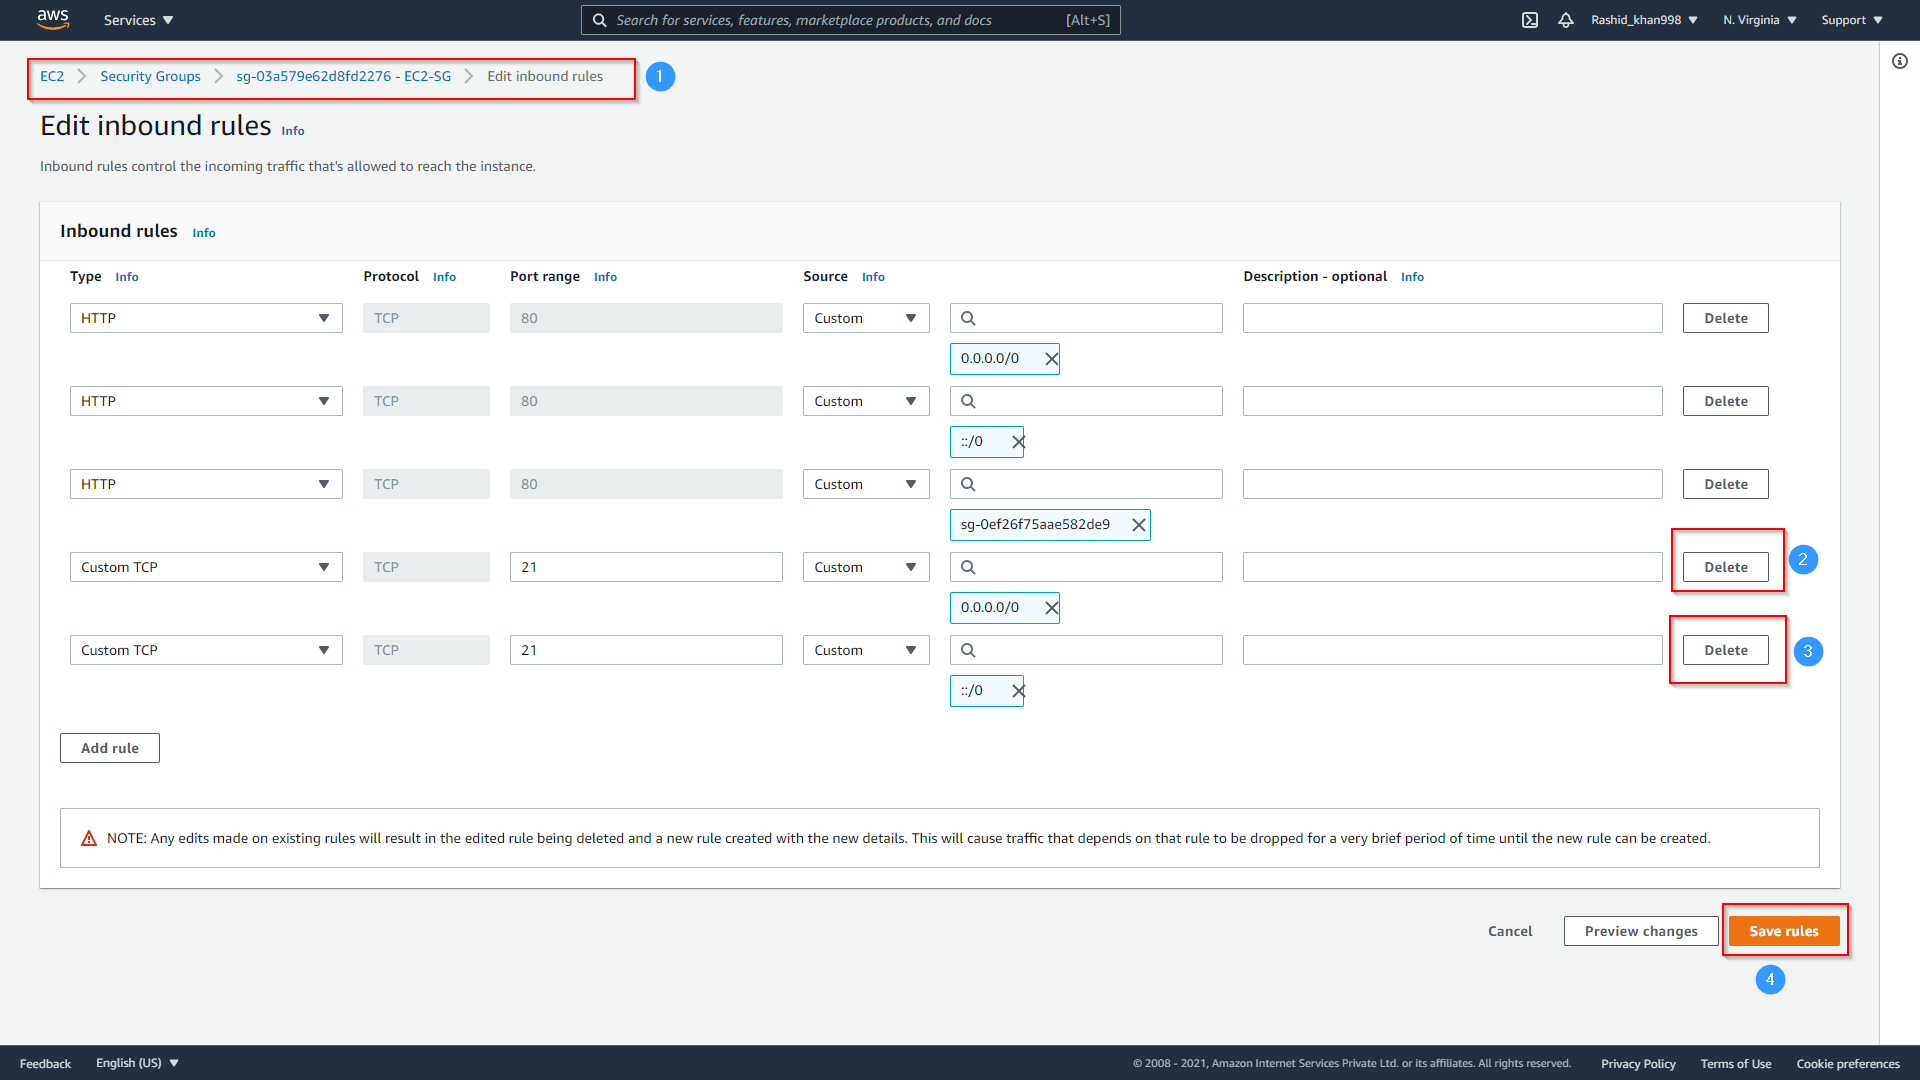
Step 5. Remove Open Port: Go back to EC2 and Delete open ports.

delete open port

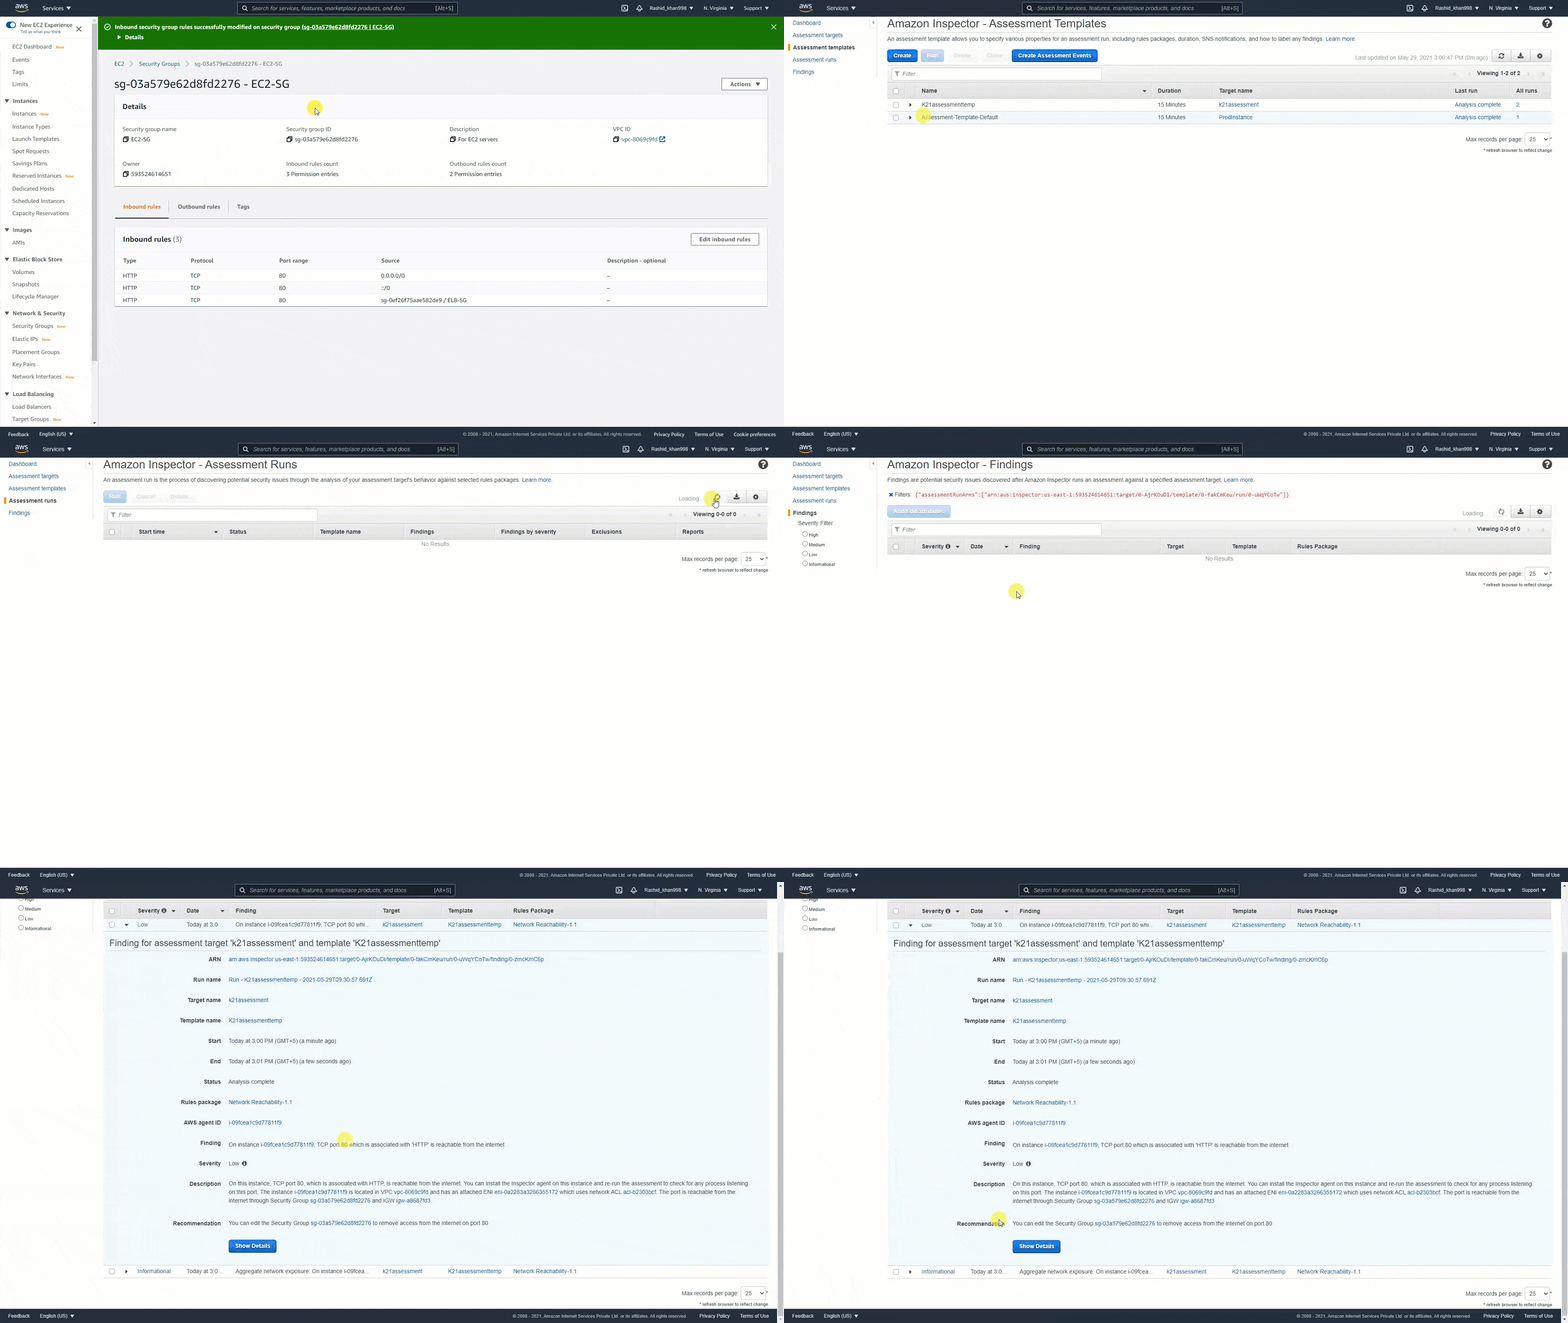
Step 6. Again Review Findings: After successfully deleting open ports, we will run the Assessment and review Finding; this time, there is no High-risk showing.

Again Review Findings

Hands-on: Creating an Elastic Beanstalk Application

 Hands-on: Creating an Elastic Beanstalk Application

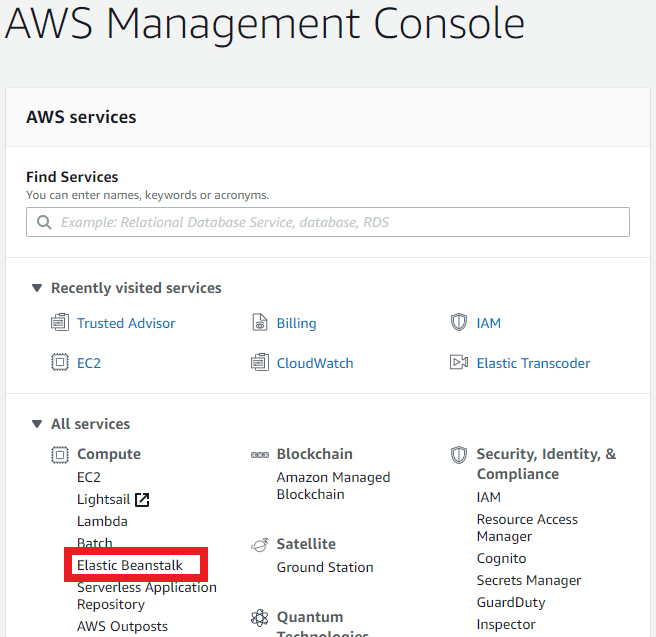
  1. From the Compute Section click on Elastic Beanstack.
    AWS Management Console
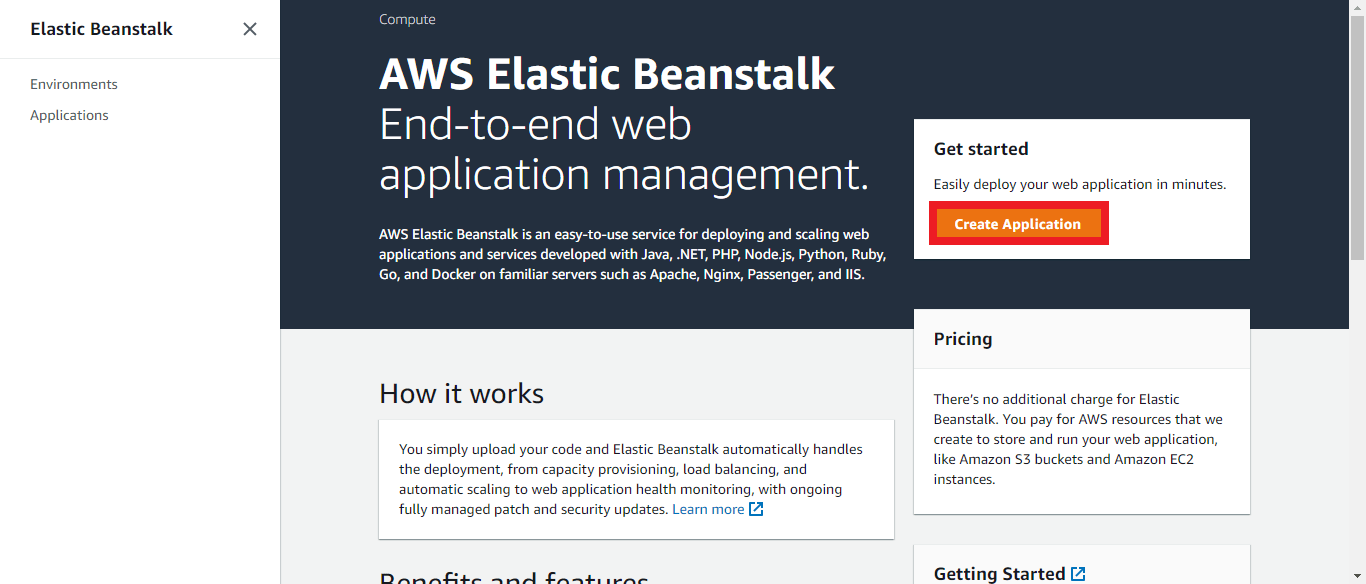
  2. Click on Create Application under Elastic Beanstalk.
    AWS Elastic Beanstalk Console
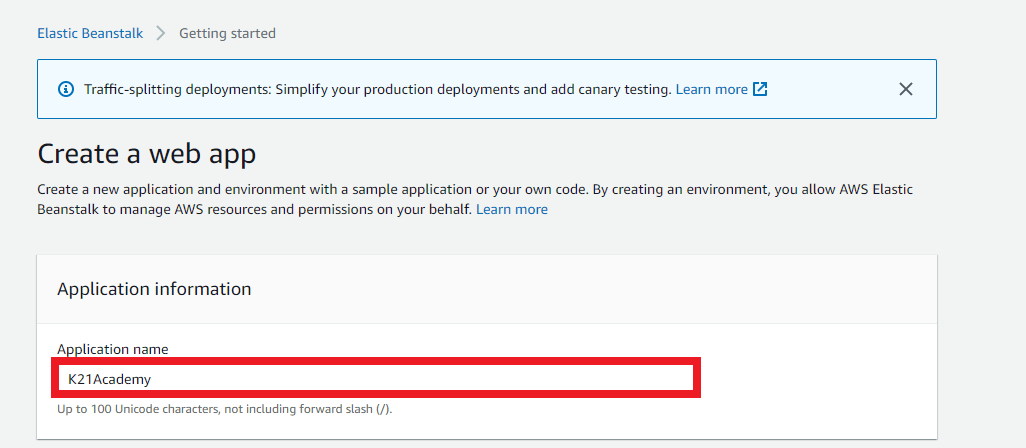
  3. Give your application a name.
    Elastic Beanstalk Application Name
  4. In the Application tags section you can tag your application by giving key-value pairs.
    Tag for Elastic Beanstalk Application
  5. In the platform section, you have to choose a platform, platform branch, platform version (In Platform  Select PHP as the web application environment, In Platform branch you have to select the instance type on which your environment will going to create. I am using Amazon Linux 2, In Platform, version select the recommended version.)
    Runtime platform for Elastic Beanstalk Application
  6. In the Application code section you have to choose a sample application and then click on Create application.
    Sample Application for Elastic Beanstalk
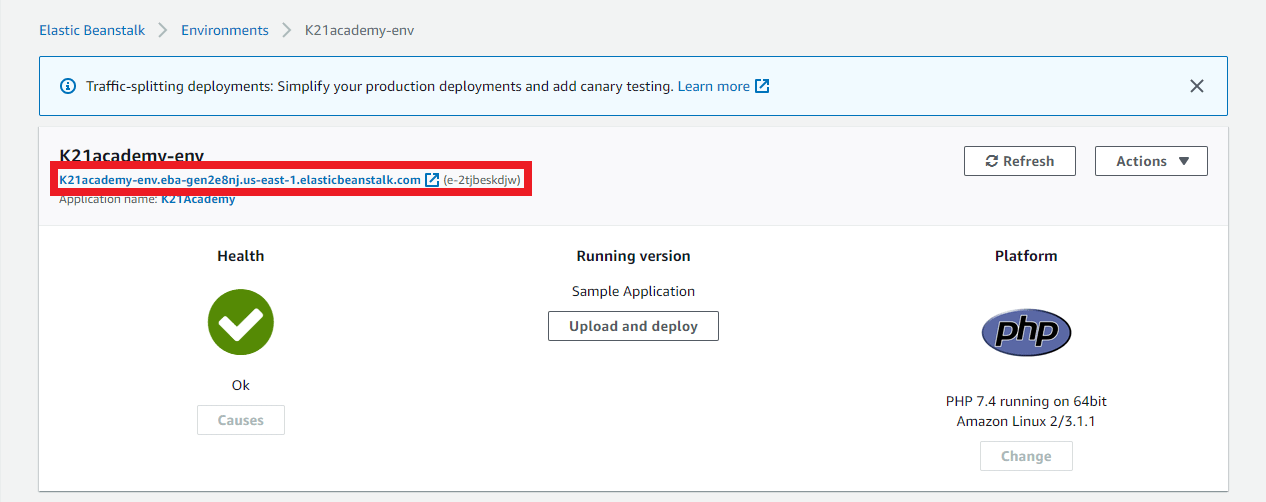
  7. Once all the backend services will create then you will see the following screen. Click on the link to see your sample application.
    PHP application Elastic Beanstalk
  8. After clicking on the link you will see your application on the new tab of your browser.
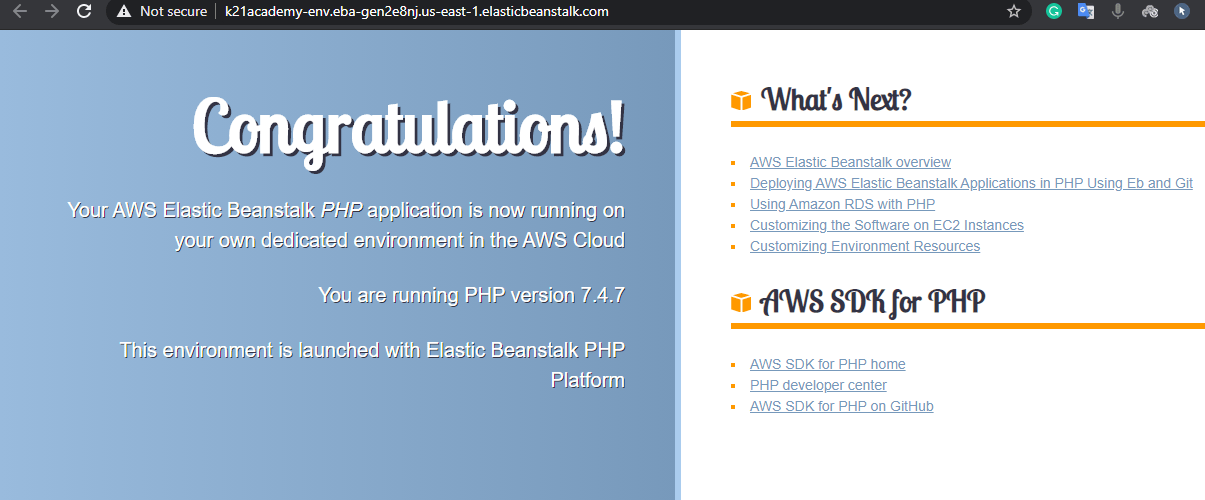
    Running application on Elastic Beanstalk
    Now we created a running sample PHP application using Elastic Beanstalk