Tuesday, 30 May 2023

Configure AWS Lambda

 AWS Lambda is a responsive cloud service that examines the steps followed within any application and responds to them by compiling the codes that have been defined by the users, also known as functions. The service automatically computes and manages the resources across multiple availability zones and functions through them whenever new actions are called. AWS Lambda supports languages like Java, Python, and Node.js for writing the codes, and the service can also launch its processes in languages that are supported by Amazon Linux (like Bash, Go & Ruby).

Some tips to keep in mind while using AWS Lambda:

  • The lambda code must be written in a stateless style.
  • No function variable must be declared outside the scope of the handler.
  • Users must always have a set of +rx permissions on their files in the uploaded ZIP files to ensure that Lambda can execute the code on the user’s behalf.
  • Always try to delete old Lambda functions when not required anymore.

Configuring AWS Lambda

In order to configure AWS Lambda for the first time follow the below steps:

Step 1: Sign In to your AWS Account.

Step 2: Select Lambda from the services section of the homepage.
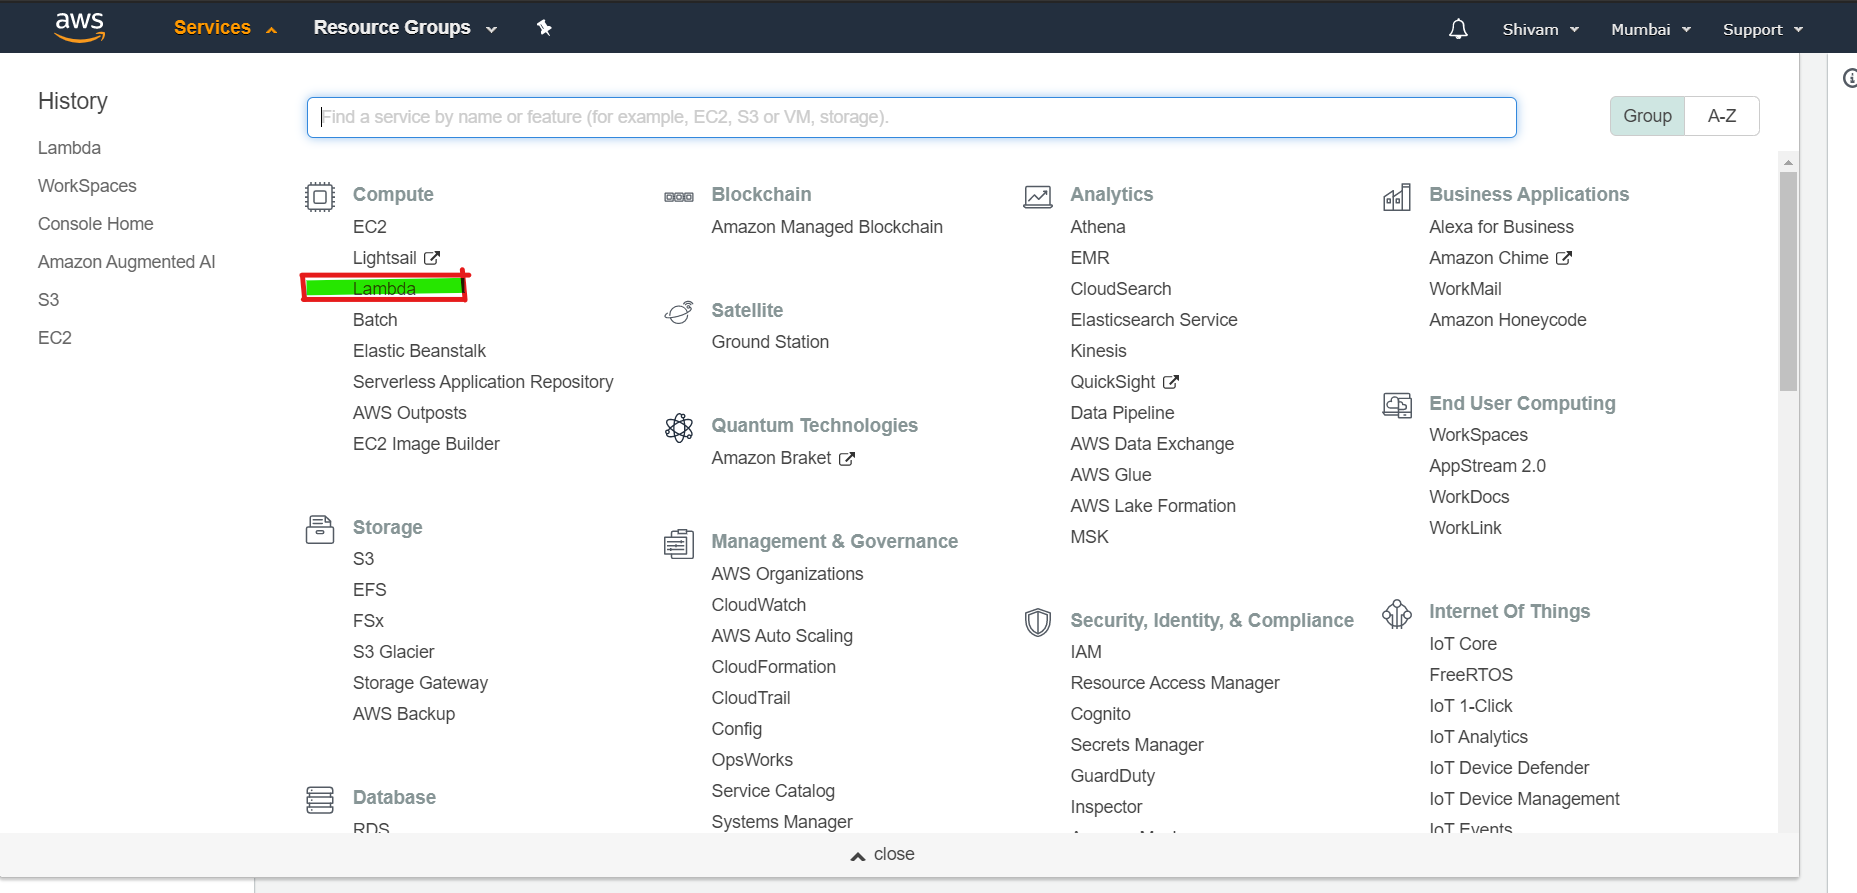
Configuring AWS Lambda - 1

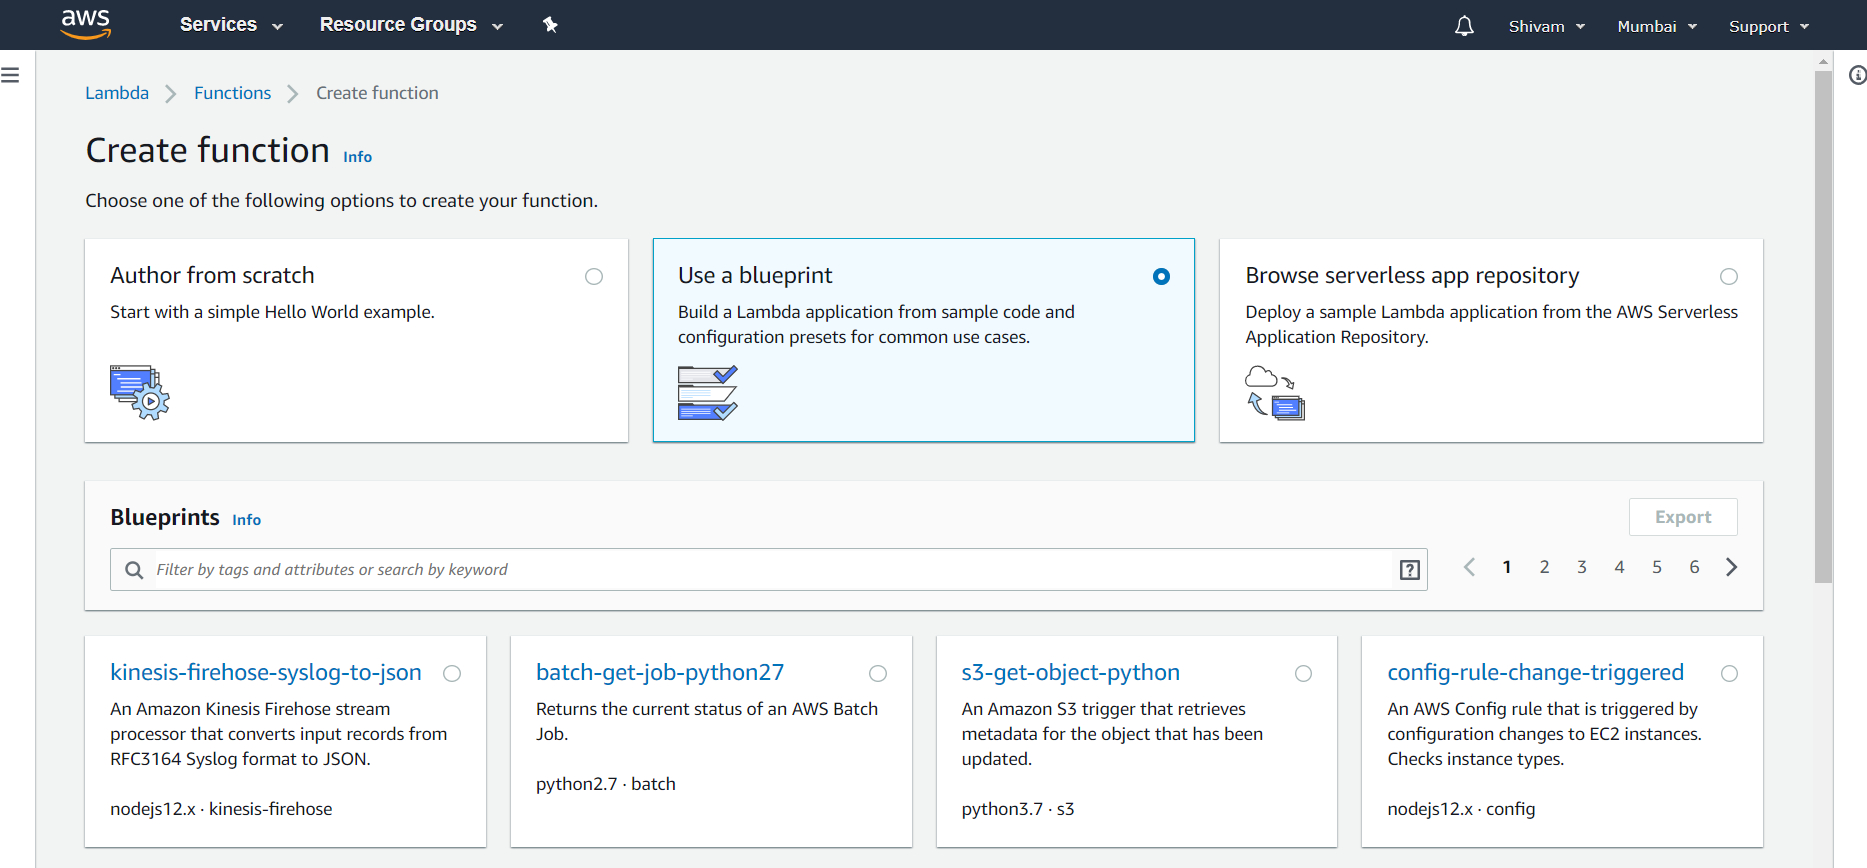
Step 3: Click on create a function and for the basic level choose to select a blueprint. A blueprint is simply a sample code for most commonly used cases that can be used directly.

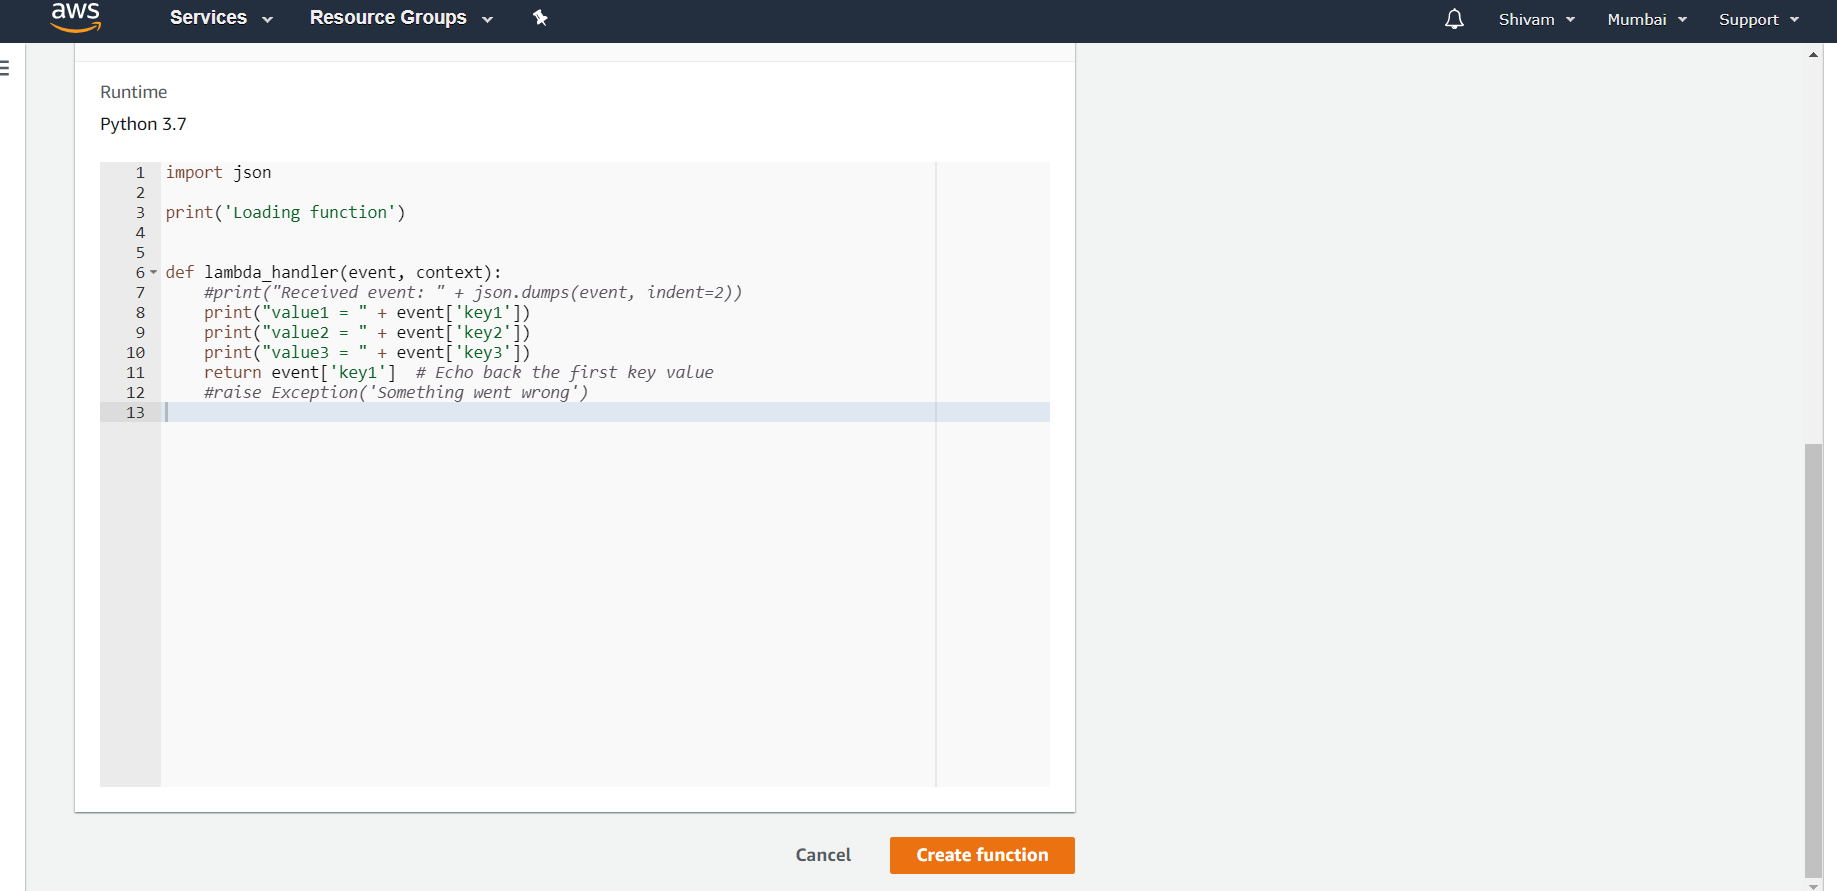
Step 4: For the basic level, just search for a blueprint named hello-world-python. Select it and fill the necessary details which is generally just the name. Hit the create function button and your Lambda function is ready to be used.

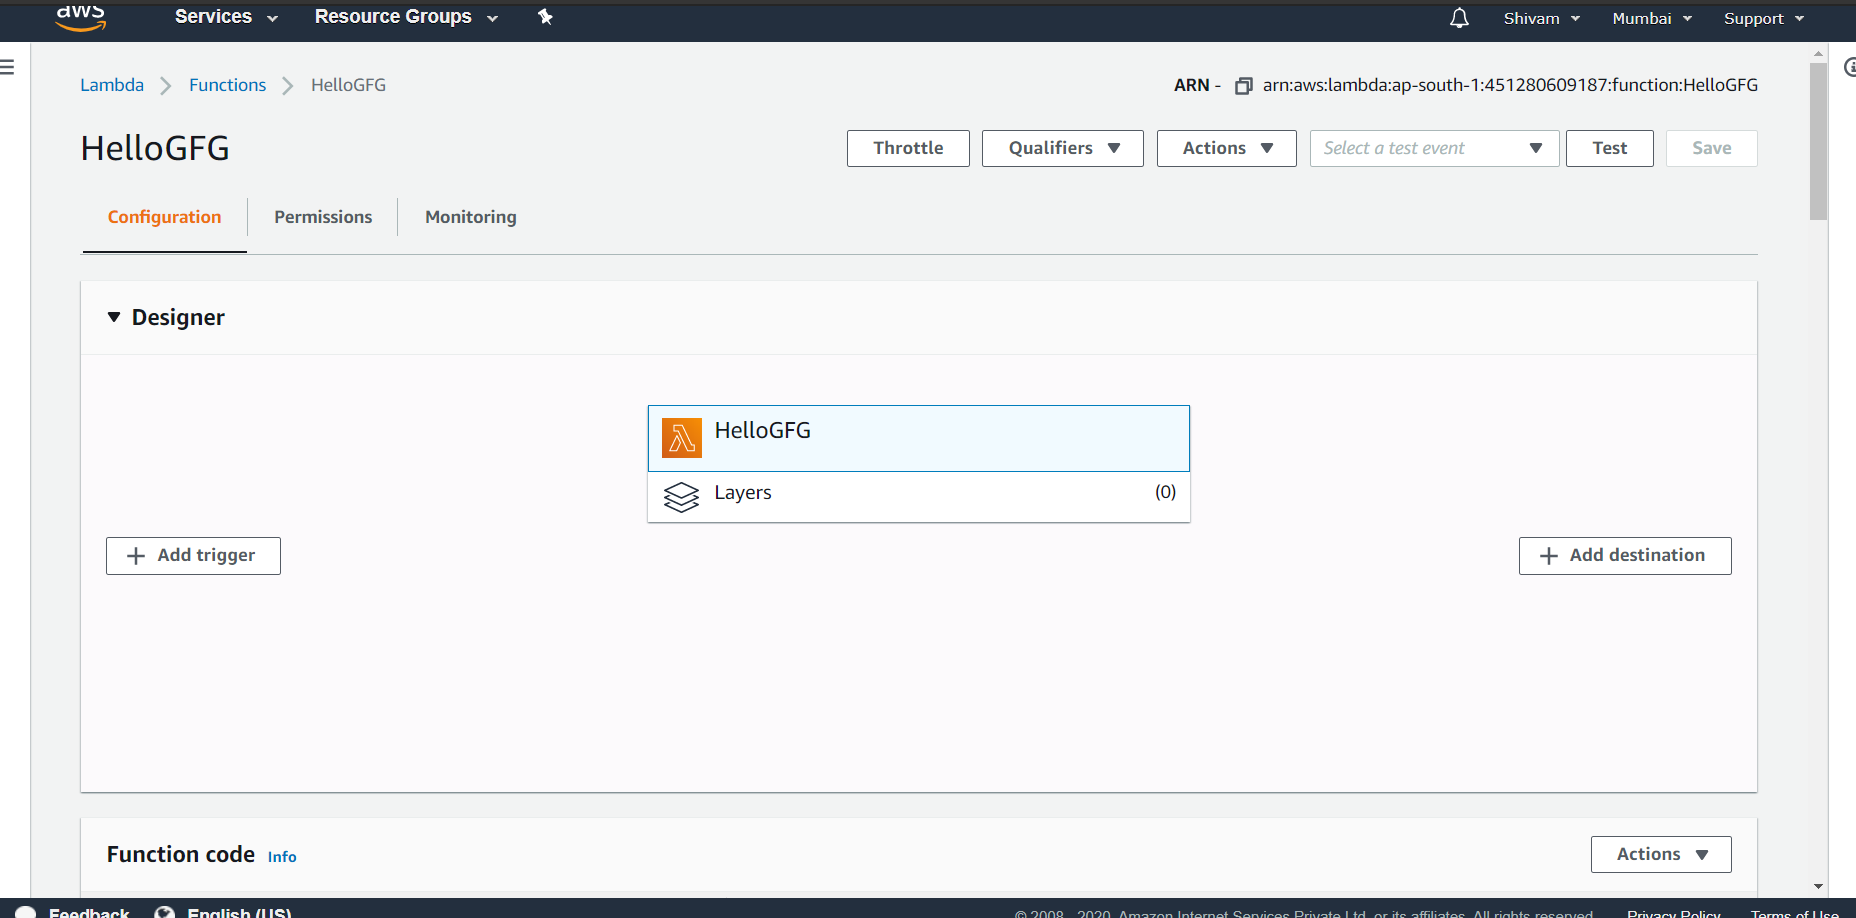
Step 5: The created function’s page looks like this:

Now add a trigger point that will run the function. The trigger can be any other service provided by AWS like Alexa Skills Kit OR DynamoDB or any other partner event sources. For example, add a dynamo DB Table to it. Now the function will work once new entries are made on the table or existing ones are modified or deleted.

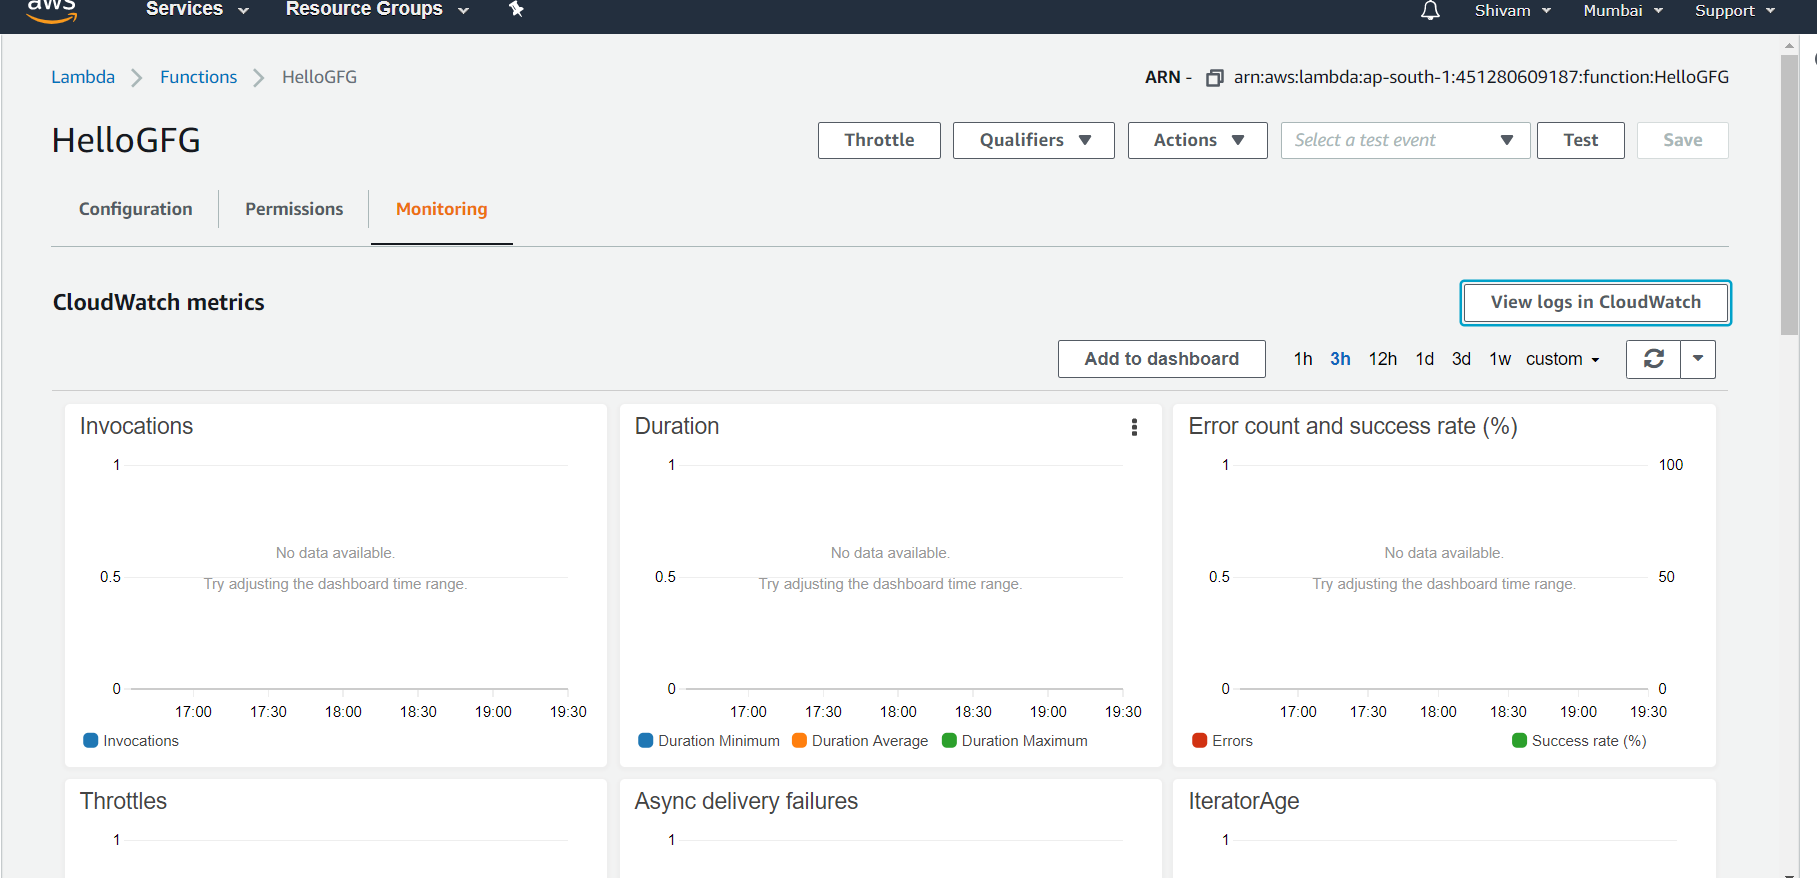
Step 6: To view the logs on the function select the monitoring tab from the lambda page. And then visit view logs in CloudWatch.

Benefits of AWS- Lambda:

  • No need to register lambda tasks like Amazon SWF activities.
  • Existing Lambda functions can be reused in workflows.
  • Lambda functions are called directly by Amazon SWF, there is no need to design a program to implement and execute them.
  • Lambda provides the metrics and logs for tracking function executions.

Limits in AWS- Lambda: There are three types of Lambda limits:

1. Resources Limit: 

Resource

Default Limit

Ephemeral disk capacity (“/tmp” space)512 MB
Number of file descriptors1024
Number of processes and threads (combined total) 1024
Maximum execution duration per request300 sec
Invoke request body payload size 6 MB
Invoke response body payload size6 MB

2. Service Limits:

ITEM

Default Limit

Lambda function deployment package size (.zip/.jar file) 50 MB
Size of code/dependencies that you can zip into a deployment package (uncompressed zip/jar size)250 MB
Total size of all the deployment packages that can be uploaded per region1.5 GB
Number of unique event sources of the Scheduled Event source type per account50
Number of unique Lambda functions you can connect to each Scheduled Event 5

3. Throttle Limit: The throttle limit is 100 concurrent Lambda function executions per account and is applied to the total concurrent executions across all the functions within the same region. The formula to calculate the number of concurrent executions for the below function:

function = (average duration of the function execution)
                              X (number of requests or events processed by AWS Lambda)

When the throttle limit is reached, it returns a throttling error having an error code 429. After a 15-30 minute user can start working again. The throttle limit can be increased by contacting the AWS support center.

Elastic Load Balancer in AWS

 In simplest terms, cloud computing means storing and accessing the data and programs on remote servers that are hosted on the internet instead of the computer’s hard drive or local server. It is also referred to as Internet-based computing.

Features of cloud 

  • No up-front investment
  • Lowering operating cost
  • Highly scalable and efficient
  • Easy access
  • Reducing business risks and maintenance expenses

Advantages of Elastic Load Balancer

  • ELB automatically distributes incoming application traffic across multiple targets, such as EC2 instances, containers, and IP addresses, to achieve high availability.
  • It can automatically scale to handle changes in traffic demand, allowing you to maintain consistent application performance.
  • It can monitor the health of its registered targets and route traffic only to the healthy targets.
  • It evenly distributes traffic across all availability zones in a region, improving fault tolerance.

Disadvantages of Elastic Load Balancer

  • ELB can add latency to your application, as traffic must pass through the load balancer before being routed to your targets.
  • It has limited customization options, so you may need to use additional tools and services to fully meet your application’s requirements.
  •  It can introduce additional complexity to your application architecture, requiring you to manage and maintain additional resources.
  • It can increase your overall AWS costs, especially if you have high traffic volumes or require multiple load balancers.

Amazon Web Services

Amazon Web Services is a subsidiary of Amazon.com that provides on-demand cloud computing platforms for individuals, companies, and governments, on a paid subscription basis , pay-as-you-go principle. Amazon Web Services offers a highly reliable, scalable, low-cost infrastructure platform in the cloud.

Elastic load balancer

Elastic load balancer is a service provided by Amazon in which the incoming traffic is efficiently automatically distributed across a group of backend servers in a manner that increases speed and performance. It helps to improve scalability of your application and secures your applications. Load Balancer allows you to configure health checks for the registered targets. In case any of registered target fails the health check, the load balancer will not route traffic to that unhealthy target. Thereby ensuring your application is highly available and fault tolerant.

Load balancer acting as single point of routing traffic

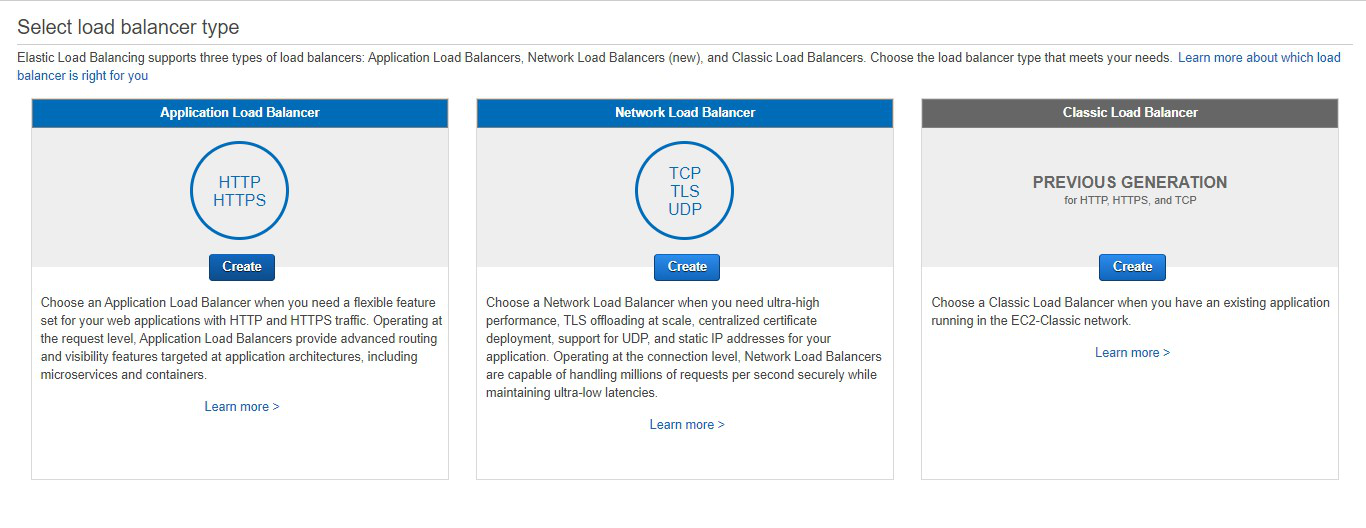
Types of load balancer

A. Classic Load Balancer: It is the traditional form of load balancer which was used initially. It distributes the traffic among the instances and is not intelligent enough to support host-based routing or path-based routing. It ends up reducing efficiency and performance in certain situations. It is operated on connection level as well as request level. Classic  Load Balancer is in between the transport layer (TCP/SSL) or the application layer (HTTP/HTTPS .

B. Application Load Balancer: This type of Load Balancer is used when decisions are to be made related to  HTTP and HTTPS traffic routing. It supports path-based routing and host-based routing. This load balancer works at the Application layer of the OSI Model. The load balancer also supports dynamic host port mapping.

C. Network Load Balancer: This type of load balancer works at the transport layer(TCP/SSL) of the OSI model. It’s capable of handling millions of requests per second.  It is mainly used for load balancing TCP traffic.

D. Gateway Load Balancer: Gateway Load Balancers provides you the facility to deploy, scale, and manage virtual appliances like firewall. Gateway Load Balancers combines a transparent network gateway and then distributes the traffic.

  Steps to configure an Application load balancer in AWS:

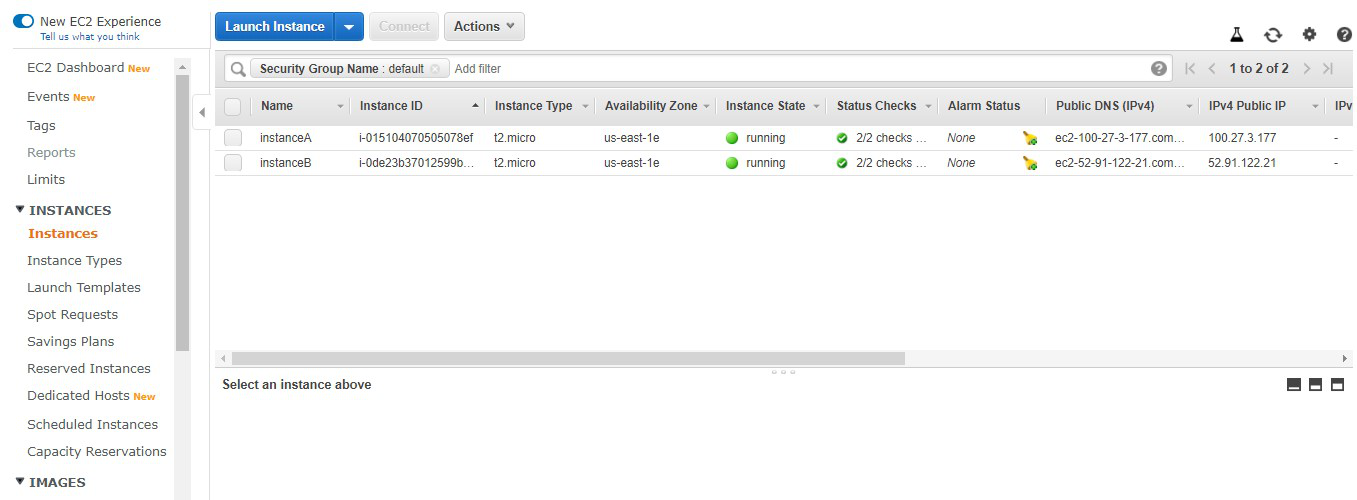
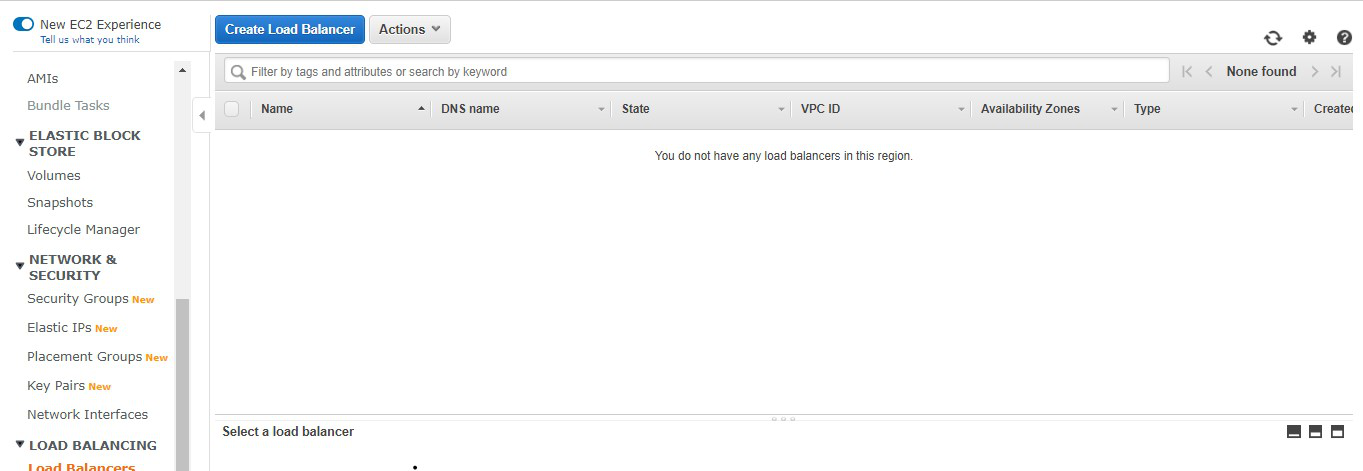
Step 1: Launch the two instances on the AWS management console named Instance A and Instance B. Go to services and select load balancer 

Step 2: Click on create load balancer.

Step 3: Select Application Load Balancer and click on create.

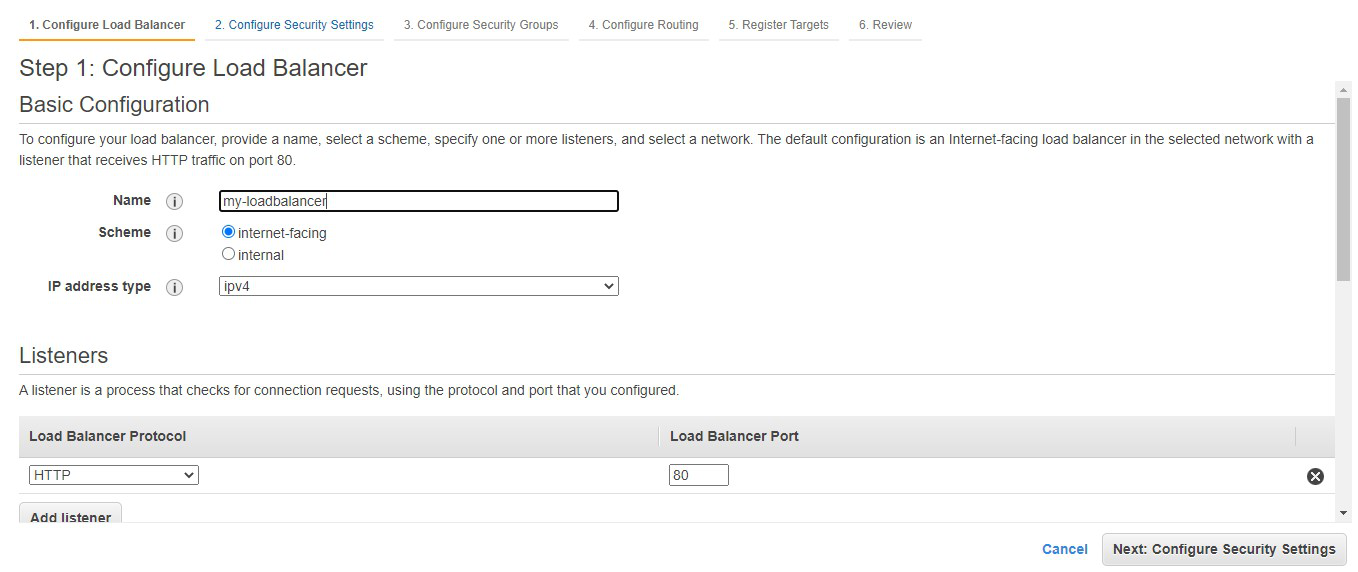
Step 4: Here you are required to configure the load balancer. Write the name of the load balancer. Choose the scheme as internet facing.

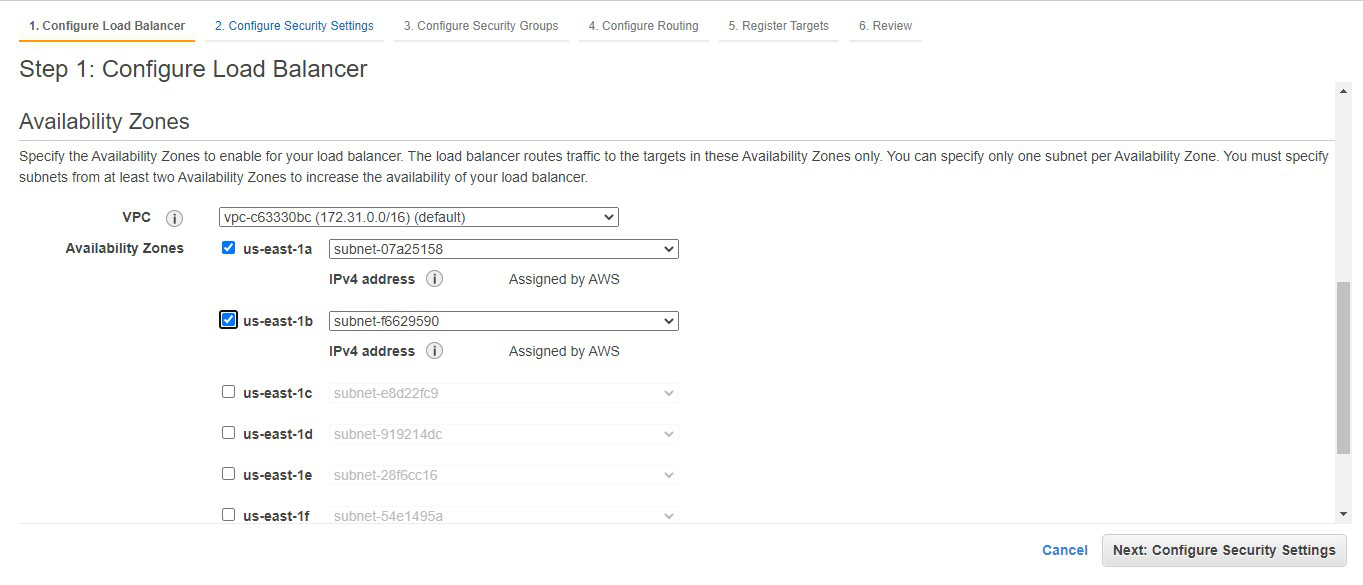
 Step 5: Add at least 2 availability zones. Select us-east-1a and us-east-1b

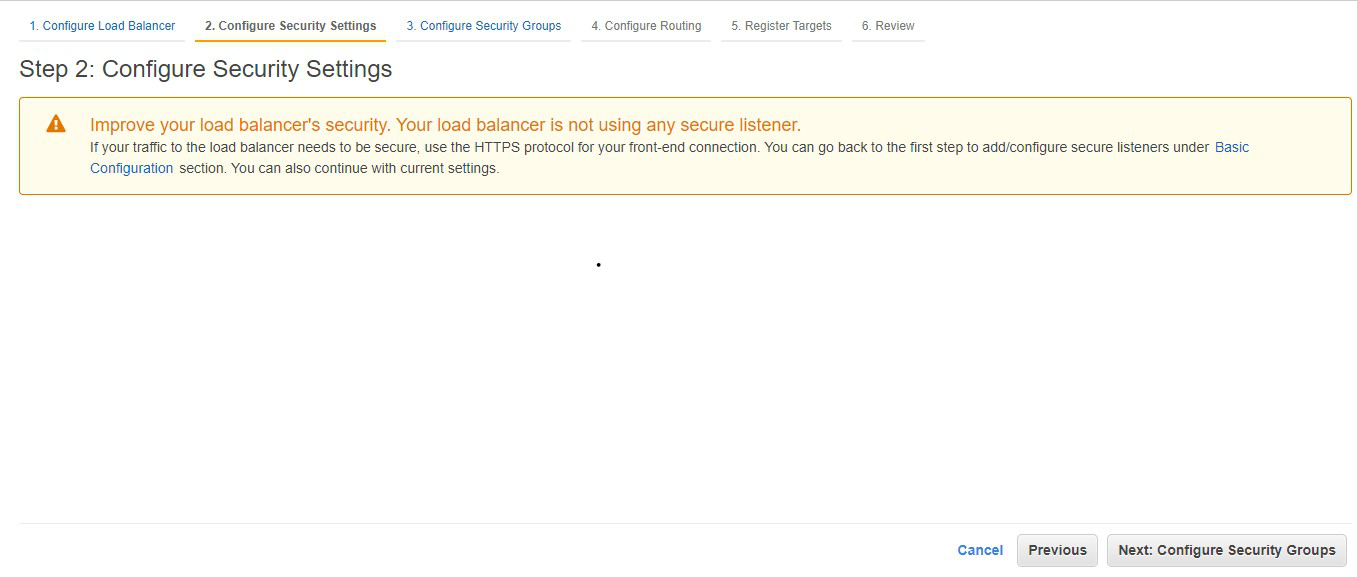
Step 6: We don’t need to do anything here. Click on Next: Configure Security Groups

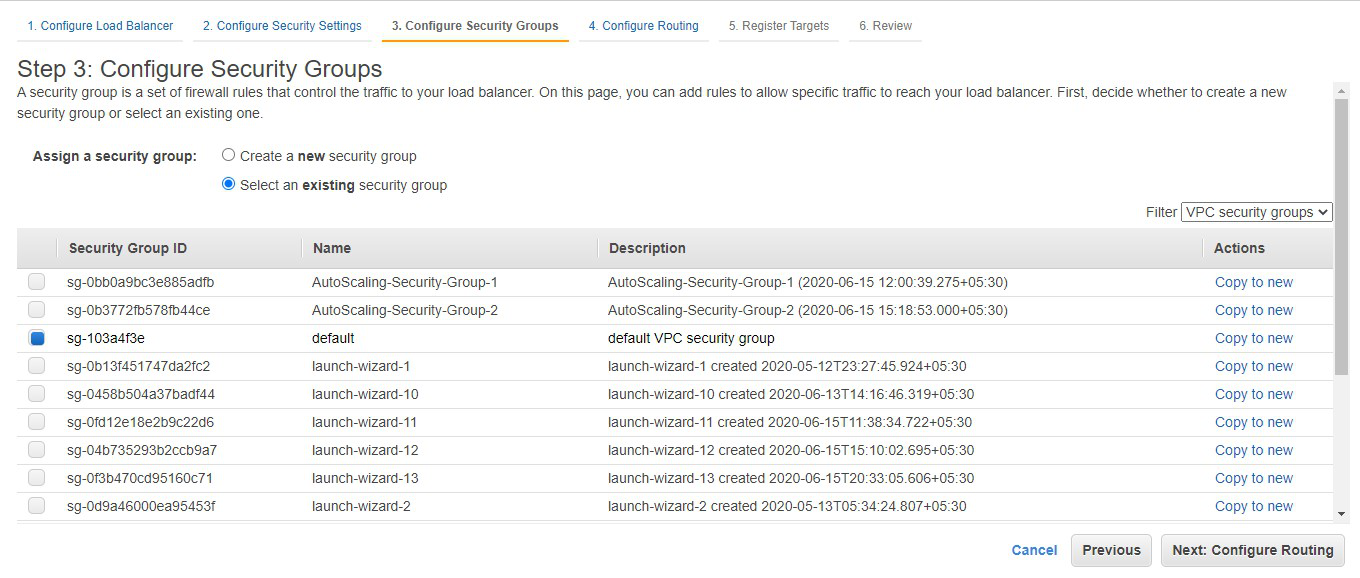
Step 7: Select the default security group. Click on Next: Configure Routing

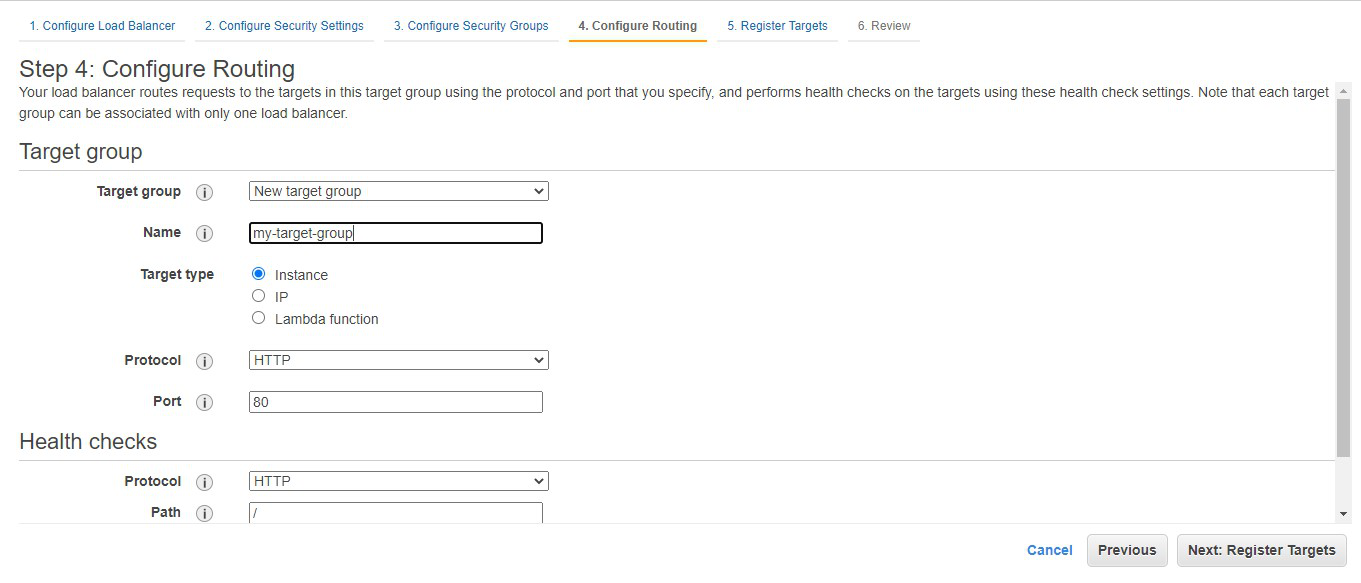
Step 8: Choose the name of the target group to be my-target-group. Click on Next: Register Targets.

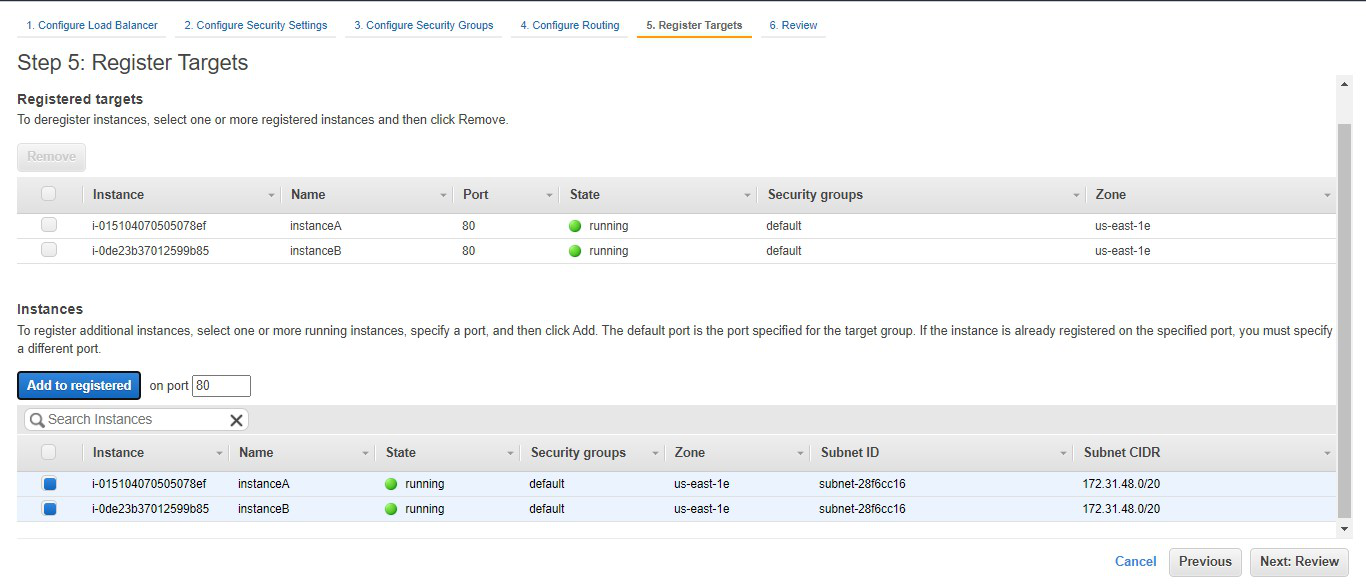
Step 9: Choose instance A and instance B and click on Add to registered. Click on Next: Review.

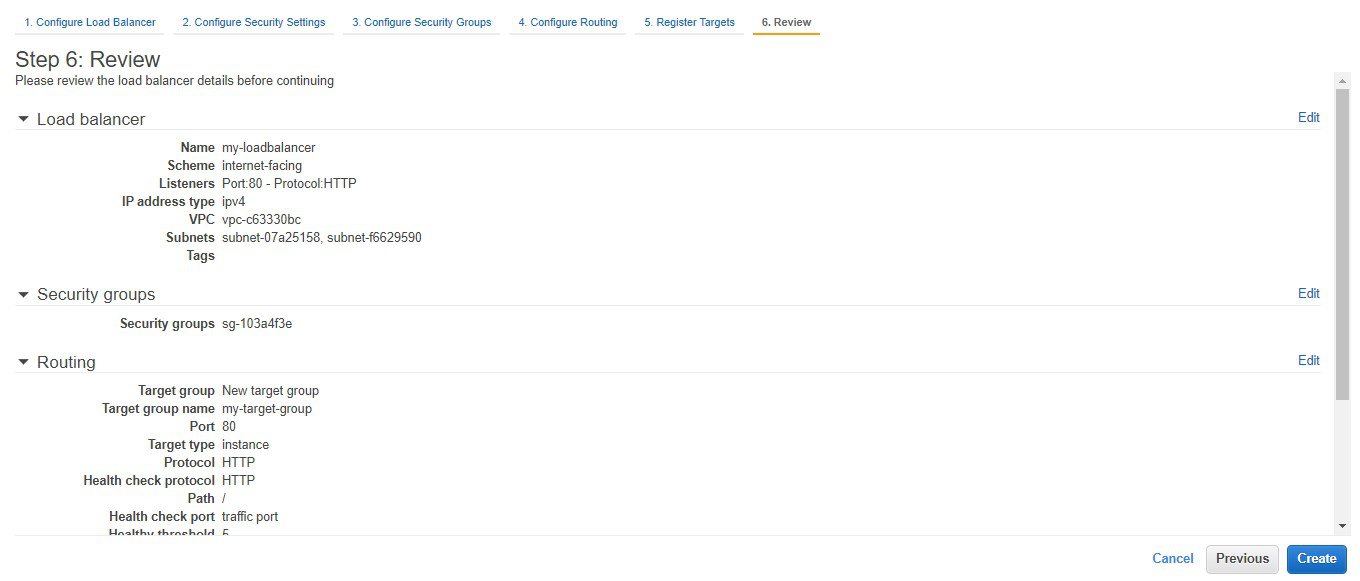
Step 10: Review all the configurations and click on create

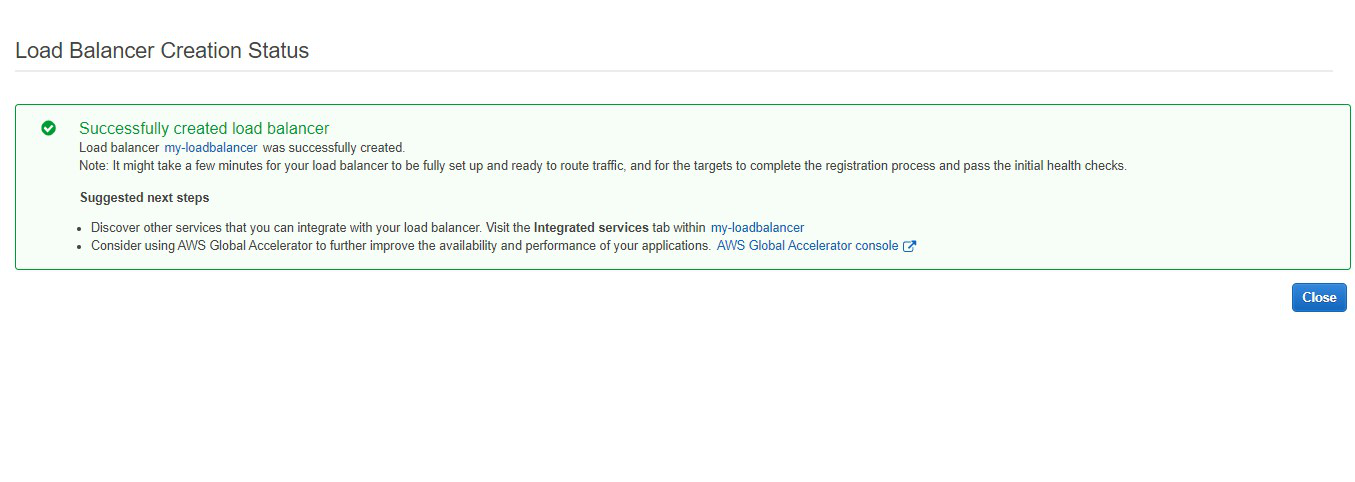
Step 11: Congratulations!! You have successfully created a load balancer. Click on close.

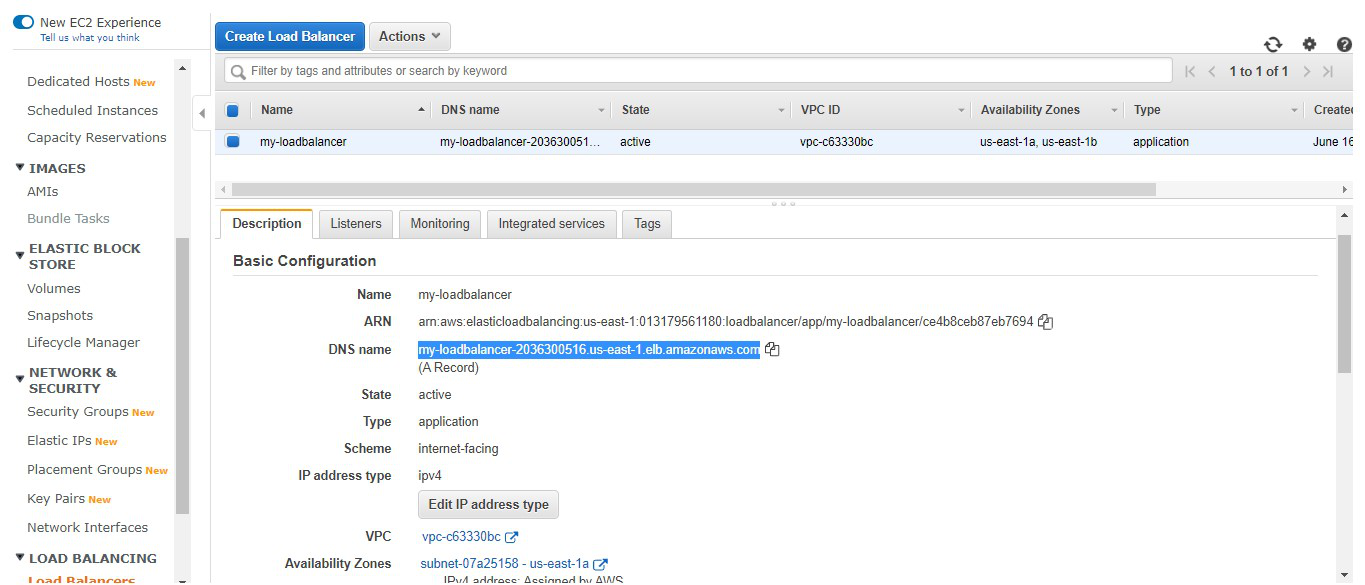
Step 12: This highlighted part is the DNS name which when copied in the URL will host the application and will distribute the incoming traffic efficiently between the two instances.

Step 13: This is the listener port 80 which listens to all the incoming requests

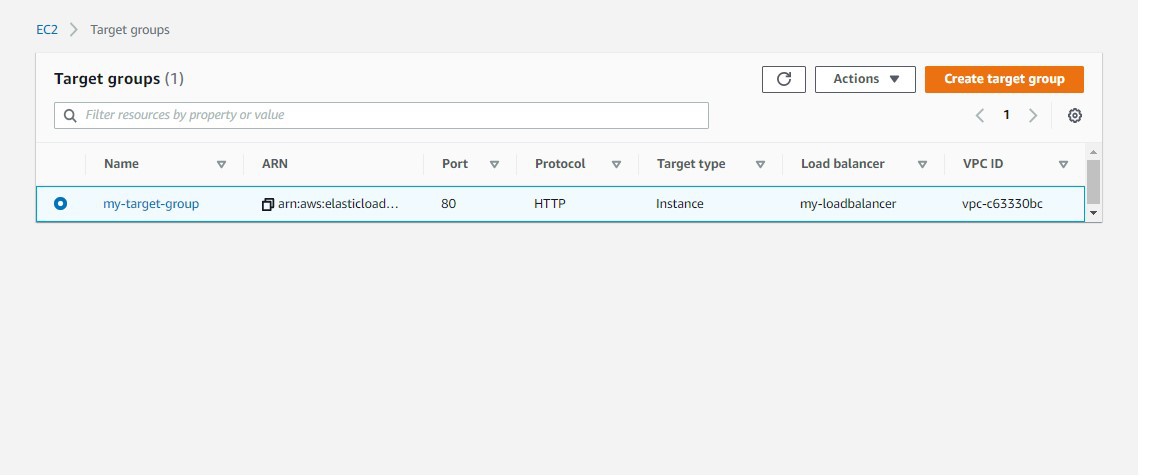
Step 14: This is the target group that we  have created

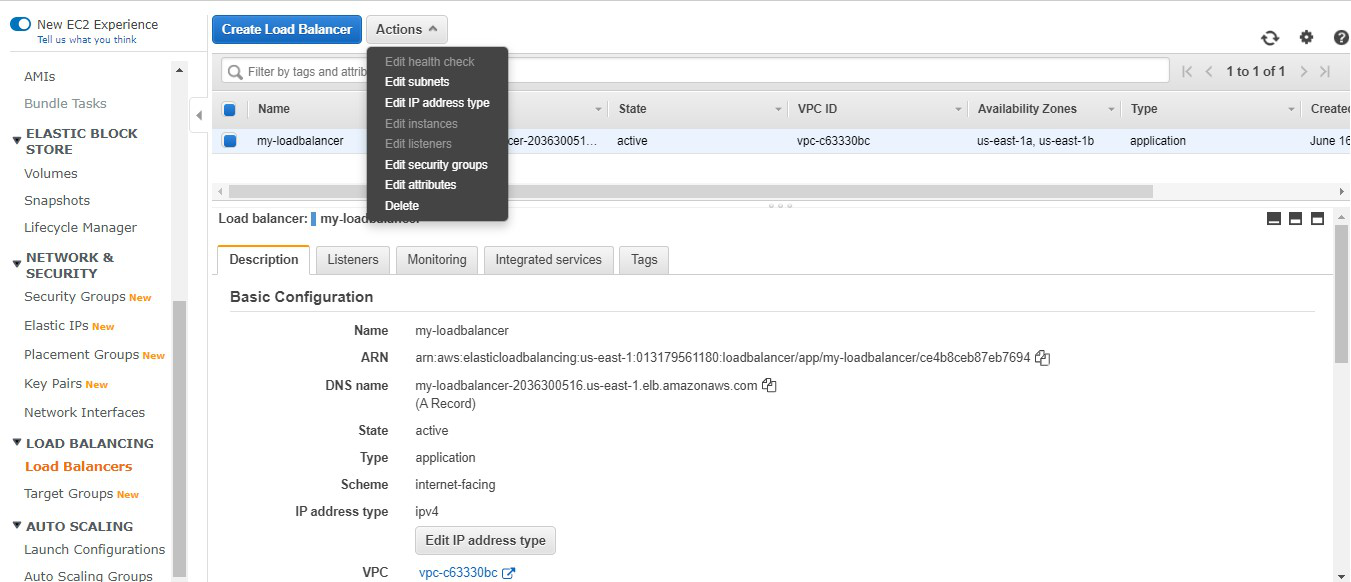
Step 15: Now we need to delete the instance. Go to Actions -> Click on Delete.

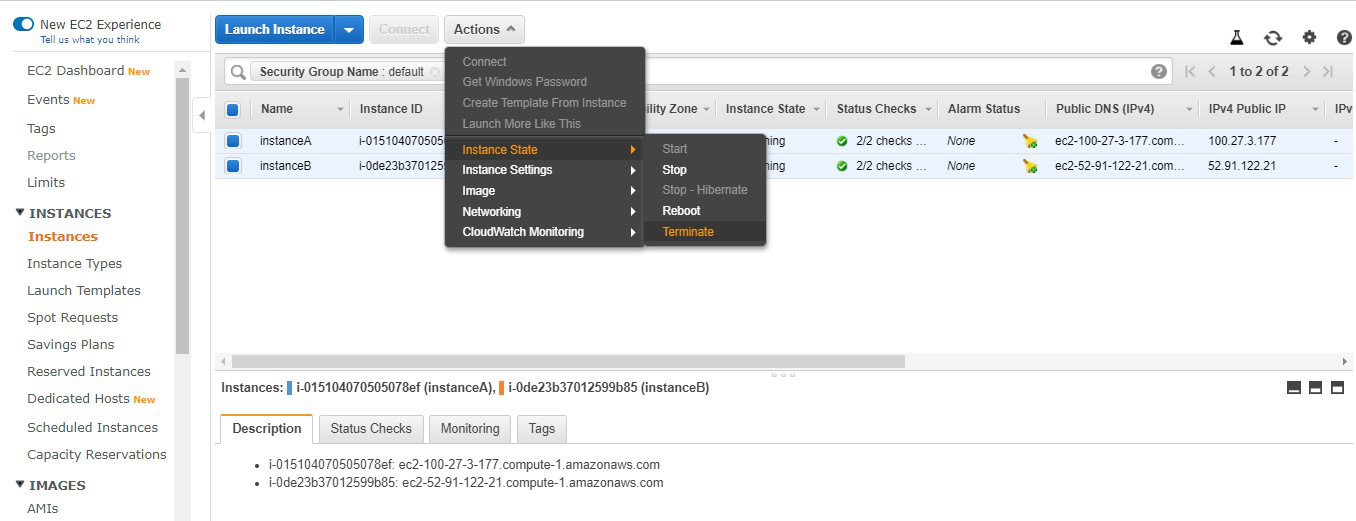
Step 16: Also don’t forget to terminate the instances.

Creating an Amazon Machine Image(AMI)

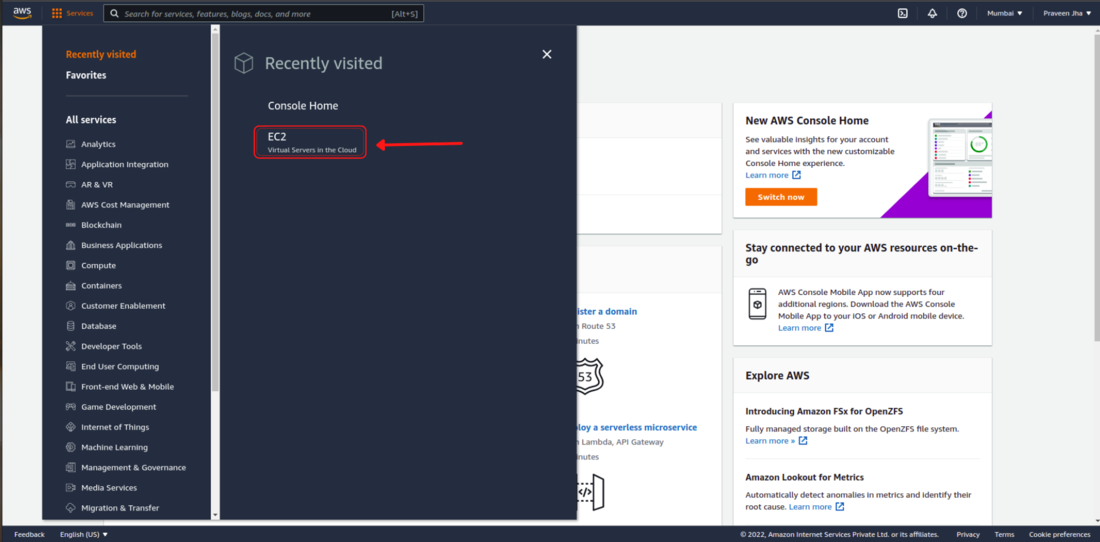
 In this article, we will look into the process of creating an Amazon Machine Image on AWS in detail. An Amazon Machine Image (AMI) is a type of virtual appliance that is used to create a virtual machine within the Amazon Elastic Compute Cloud (EC2). To create an Amazon Machine Image (AMI) first log in to AWS Account. Then go to Services Section and Click on EC2. Then click on Launch instances and complete the seven steps.

Follow the below steps to create an AMI on AWS:

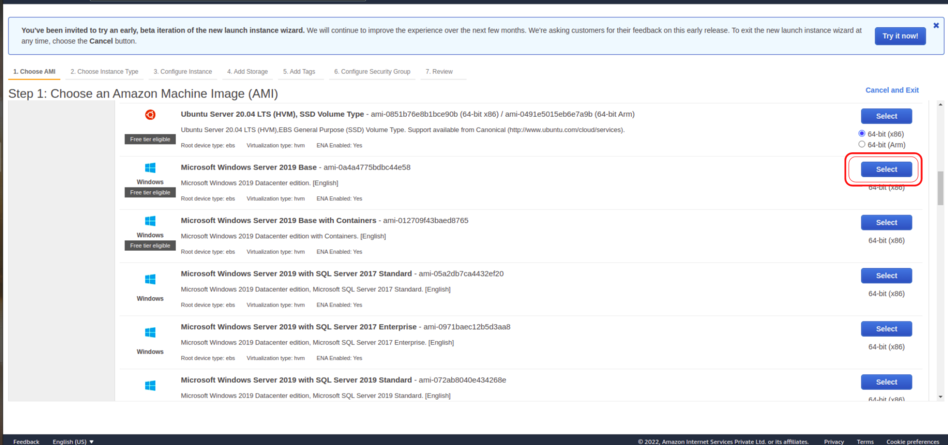
Step 1: Choose an Amazon Machine Image (AMI).

An Amazon Machine Image (AMI) is a template consisting of operating system, application server, application. When you create an Instance you have to select the Operating System which you want to use.

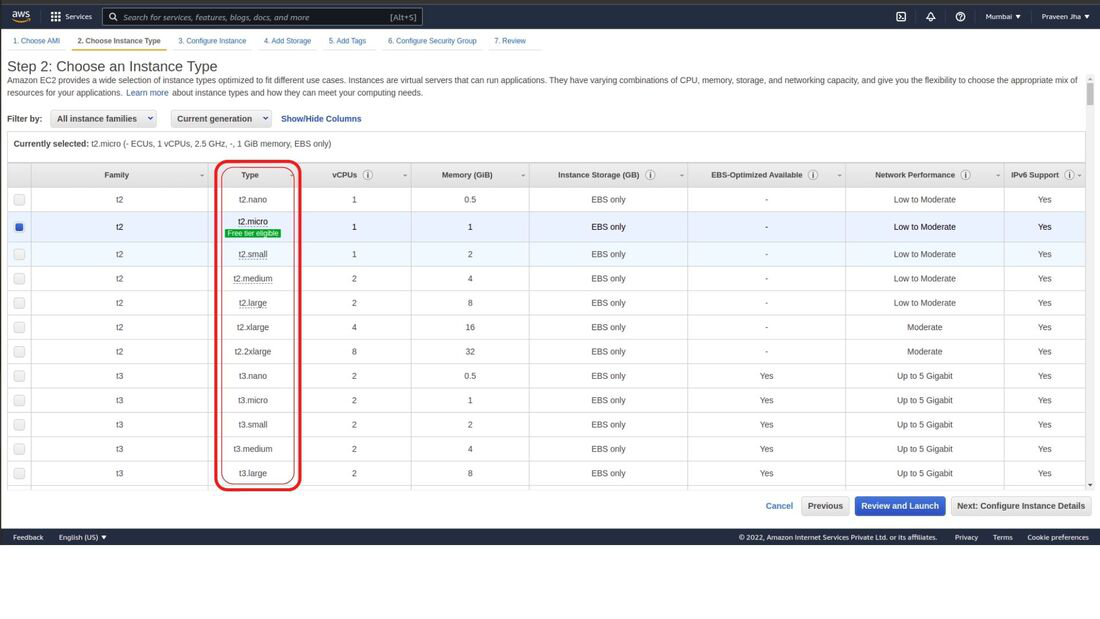
Step 2: Choose an Instance Type.

  • Instances are virtual servers that can run applications.
  • Instance Type is all about selecting the hardware Configuration of the machine which you are creating on AWS.

These are some Configurations you will get to select in Instance Type:

  • What will be the type of Instance?
  • How many Processors will be there?
  • How much RAM will be there?
  • what will be the type of Instance storage?
  • what will be the network performance?

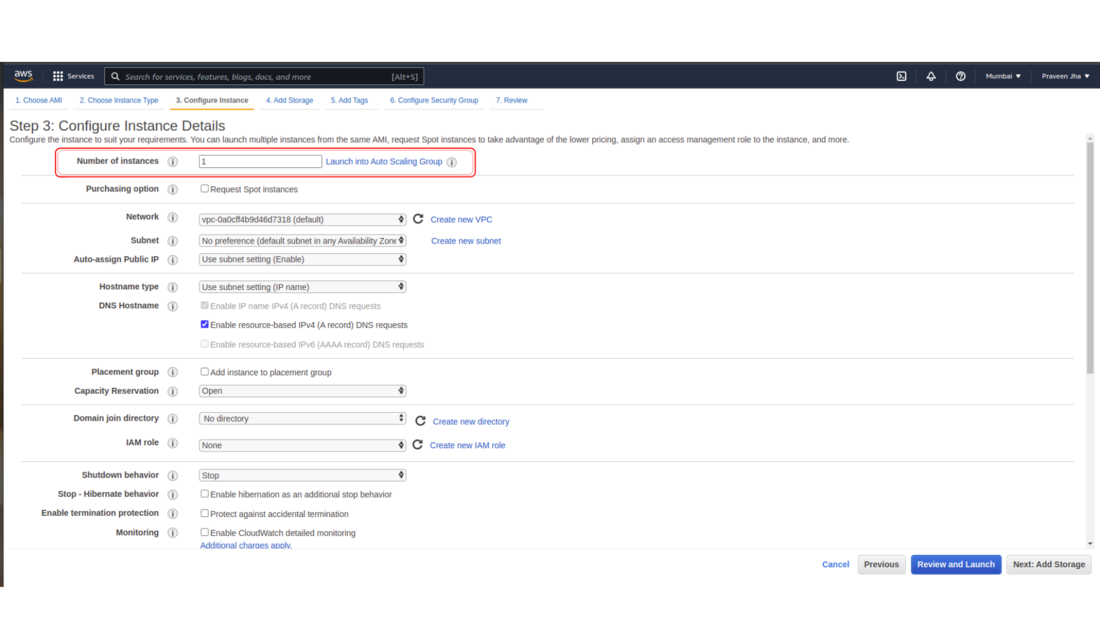
Step 3: Configure Instance Details

Configure the instance to suit your requirements. You can launch multiple instances from the same Amazon Machine Image (AMI) at a time.

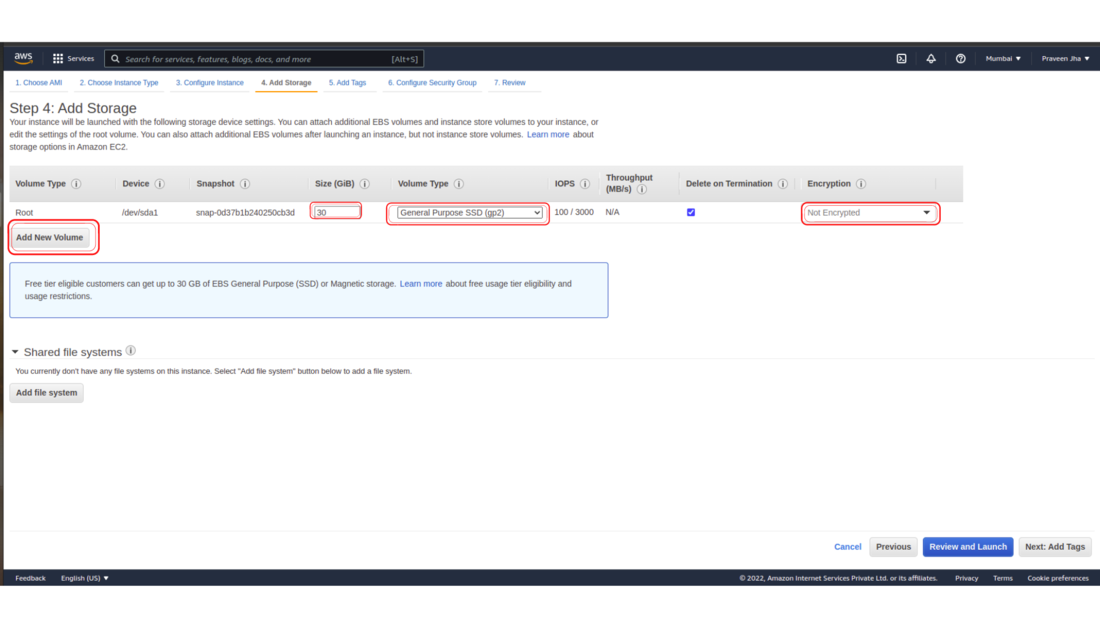
Step 4: Add Storage.

You can attach additional EBS volumes to your instance, edit the settings or increase the size of the root volume. You can also attach additional EBS volumes after launching an instance, but not instance store volumes. You can change the volume type and can add the Encryption.

Step 5: Add Tags.

Tags help you manage your instances, images, and other Amazon EC2 resources, you can assign your own metadata to each resource in the form of tags. Tags enable you to categorize your AWS resources in different ways.

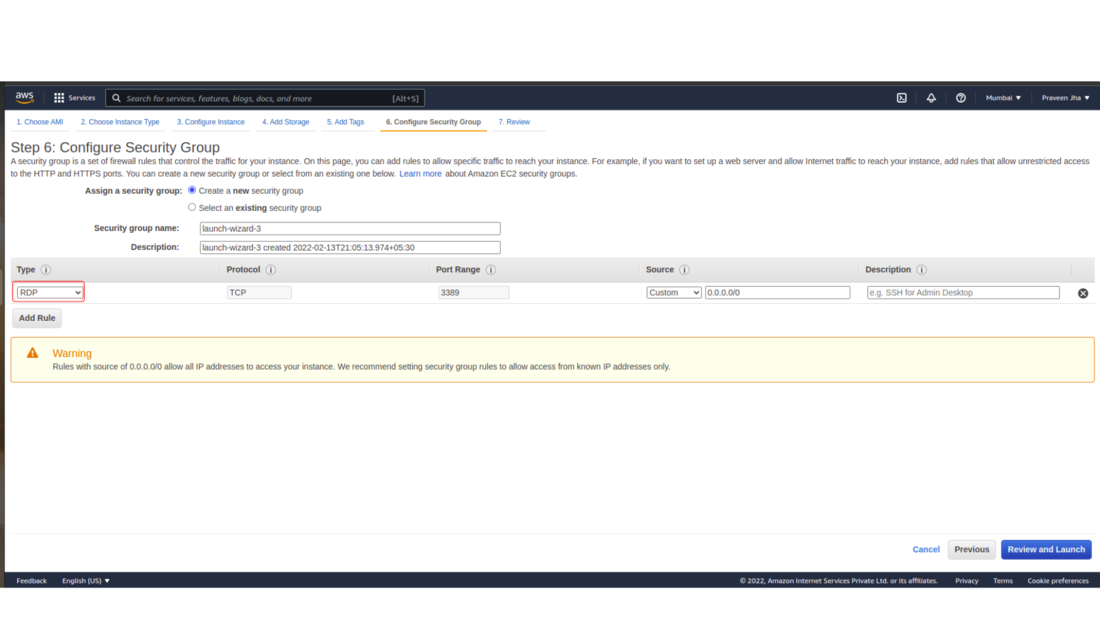
Step 6: Configure Security Group.

A security group is a set of firewall rules that control the traffic for your instance. On this page, you can add rules to allow specific traffic to reach your instance. Once an AWS machine is created, From your personal laptop/pc you should be able to connect and able to work with that instance. You can successfully connect to the windows machine only when the port is open.

Port: A port is nothing but a point to contact. For windows, you need to open the RDP port.

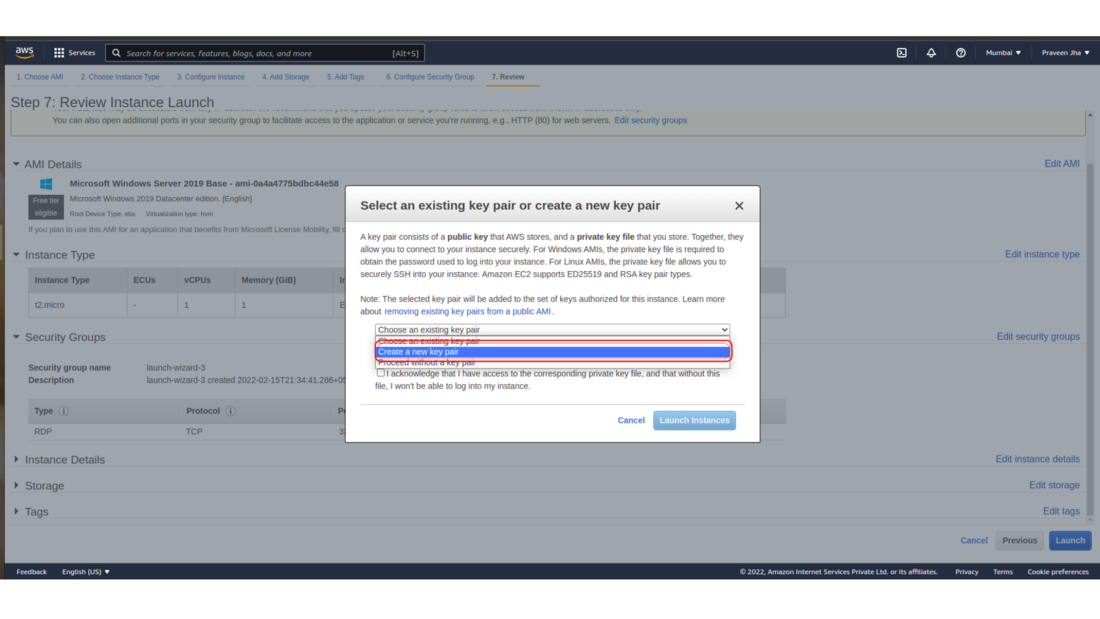
Step 7: Review Instance Launch.

  • Here you can review your instance launch details. You can go back to edit changes for each section.
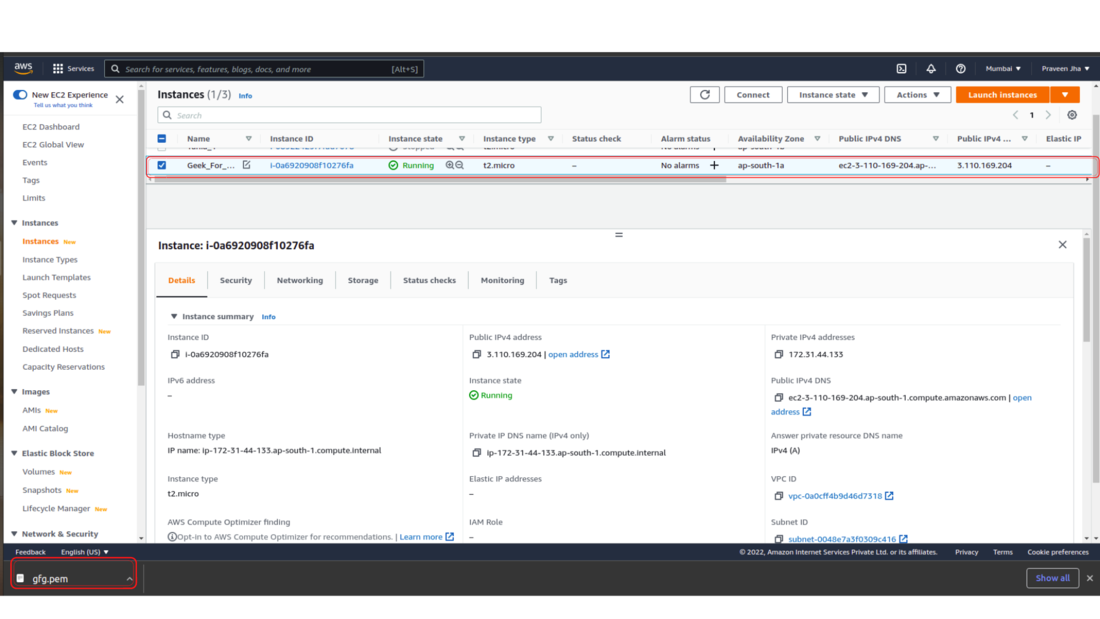
  • Once you clicked on the Launch button you need to select or download the key pair.

  • After clicking on the Launch Instance button your Instance will be in running status.

Now you have successfully Created an Instance on AWS.

Amazon Machine Image (AMI)

 An Amazon Machine Image is a special type of virtual appliance that is used to instantiate (create) a virtual machine within EC2. It serves as the basic unit of deployment for services delivered using EC2. Whenever you want to launch an instance, you need to specify AMI. To launch instances, you can also use different AMI’s. If you want to launch multiple instances from a single AMI,  then you need multiple instances of the same configuration.

An AMI has the following properties:-

  • A template for the root volume for the instance (for example, an operating system, an application server, and applications)    
  • Launch permissions that control which AWS accounts can use the AMI to launch instances  
  • A block device mapping that specifies the volumes to attach to the instance when it’s launched

When you want to use AMI, select the following characteristics:-  

  • Regions
  • Permissions for launching AMI 
  • Operating System 
  • Root device Storage   
  • Architecture 

Why do we need AMI ? 

Let us suppose that we want to launch 5 servers with the same configuration. One way of doing that would be to launch a new EC2 instance every time and install the required packages every time. While the other way of doing it would be to configure your EC2 instance once and then create an image of that instance. Using that image you can deploy 4 more EC2 servers.  

Creating your Own AMI

Prerequisites: AWS Account

Step 1: Click on the launch instance button on the AWS management console.

aws instance launch

Step 2: Now you will be asked to select an already available AMI. Select Free tier and then select the Amazon Linux 2 AMI.

amazon machine image

Step 3: Select t2.micro eligible for the free tier. Now click on next: configure Instance details.

aws instance type

Step 4: Here you can select the various configurations related to EC2 instance. Click on Next: Add storage.

aws instance configuration

Step 5: Select the amount of storage you want for the EC2 instance. Click on next: Add tags and then click next: configure security groups. 

aws add storage

Step 6: Here you can add the security groups to allow the desired traffic for your instance. Click on review and launch.

aws configure security

Step 7: Review all the configurations regarding the EC2 instance. Click on Launch.

aws instance launch

Step 8: Choose to create a new key pair option and write the key pair name. Download the key pair and then click on the launch instance.

launching configured instance in aws

Step 9: We can see that the instance is launched and running in a healthy state. Now It is required to create the Amazon Machine Image of this instance.

aws instance dashboard

Step 10: Click on actions. Go to the image and then click on create image.

instance to image in aws

Step 11: A prompt will open wherein you are required to write the name of the image. Click on create image.

aws image configuration

Step 12: The image creation request is received. Now the image will be created. Click on close. Now go to AMI services in AWS management console.

aws image creation sucess

Step 13: The AMI image of our instance is created successfully.

aws image