Monday 22 July 2024

Create an environment by using the Azure Developer CLI


Create an environment by using the Azure Developer CLI

Azure Developer CLI (AZD) is an open-source tool that accelerates the time it takes for you to get your application from local development environment to Azure. AZD provides best practice, developer-friendly commands that map to key stages in your workflow, whether you're working in the terminal, your editor or integrated development environment (IDE), or CI/CD (continuous integration/continuous deployment).

To learn how to set up AZD to work with Azure Deployment Environments, see Use Azure Developer CLI with Azure Deployment Environments.

Prerequisites

You should:

Prepare to work with AZD

When you work with AZD for the first time, there are some one-time setup tasks you need to complete. These tasks include installing the Azure Developer CLI, signing in to your Azure account, and enabling AZD support for Azure Deployment Environments.

Use the following instructions to Install the Azure Developer CLI.

Install the Azure Developer CLI extension for Visual Studio Code

When you install azd, the azd tools are installed within azd scope rather than globally, and are removed if azd is uninstalled. To use azd tools in Visual Studio Code, install the extension.

To enable Azure Developer CLI features in Visual Studio Code, install the Azure Developer CLI extension, version v0.8.3. Select the Extensions icon in the Activity bar, search for Azure Developer CLI, and then select Install.

Screenshot of Visual Studio Code, showing the Sign in command in the command palette.

Sign in with Azure Developer CLI

Access your Azure resources by logging in. When you initiate a log in, a browser window opens and prompts you to log in to Azure. After you sign in, the terminal displays a message that you're signed in to Azure.

Sign in to AZD using the command palette:

Screenshot of Visual Studio Code, showing the Extensions pane with the Azure Developer CLI and Install highlighted.

The output of commands issued from the command palette is displayed in an azd dev terminal like the following example:

Screenshot of the azd dev terminal, showing the press any key to close message.

Enable AZD support for ADE

You can configure AZD to provision and deploy resources to your deployment environments using standard commands such as azd up or azd provision. When platform.type is set to devcenter, all AZD remote environment state and provisioning uses dev center components. AZD uses one of the infrastructure templates defined in your dev center catalog for resource provisioning. In this configuration, the infra folder in your local templates isn't used.

Create an environment from existing code

Now you're ready to create an environment to work in. You can begin with code in a local folder, or you can clone an existing repository. In this example, you create an environment by using code in a local folder.

Initialize a new application

Initializing a new application creates the files and folders that are required for AZD to work with your application.

AZD uses an azure.yaml file to define the environment. The azure.yaml file defines and describes the apps and types of Azure resources that the application uses. To learn more about azure.yaml, see Azure Developer CLI's azure.yaml schema.

  1. In Visual Studio Code, open the folder that contains your application code.

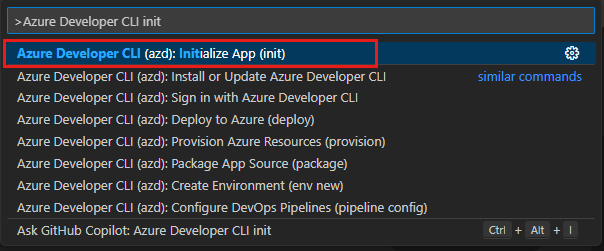
  2. Open the command palette, and enter Azure Developer CLI init, then from the list, select Azure Developer CLI (azd): init.

    Screenshot of the Visual Studio Code command palette with Azure Developer CLI (azd): init highlighted.

  3. In the list of templates, to continue without selecting a template, press ENTER twice.

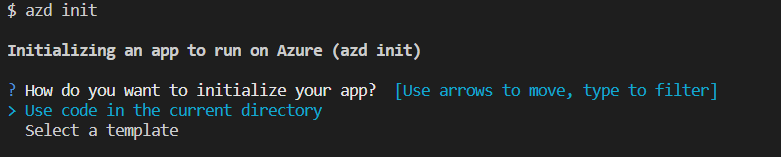
  4. In the AZD terminal, select Use code in the current directory.

    Screenshot of the AZD terminal in Visual Studio Code, showing the Use code in current directory prompt.

  5. azd init identifies the services defined in your app code and prompts you to confirm and continue, remove a service, or add a service. Select Confirm and continue initializing my app.

    Screenshot showing the AZD init prompt to confirm and continue, remove a service, or add a service.

  6. azd init continues to gather information to configure your app. For this example application, you're prompted for the name of your MongoDB database instance, and ports that the services listen on.

    Screenshot showing the azd init prompt for a database name.

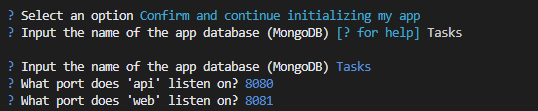
  7. Enter a name for your local AZD environment.

    Screenshot showing azd init prompt Enter a new environment name.

  8. azd init displays a list of the projects you have access to. Select the project for your environment

    Screenshot showing azd init prompt Select project.

  9. azd init displays a list of environment definitions in the project. Select an environment definition.

    Screenshot showing azd init prompt Select environment definitions.

    AZD creates the project resources, including an azure.yaml file in the root of your project.

Provision infrastructure to Azure Deployment Environment

When you're ready, you can provision your local environment to a remote Azure Deployment Environments environment in Azure. This process provisions the infrastructure and resources defined in the environment definition in your dev center catalog.

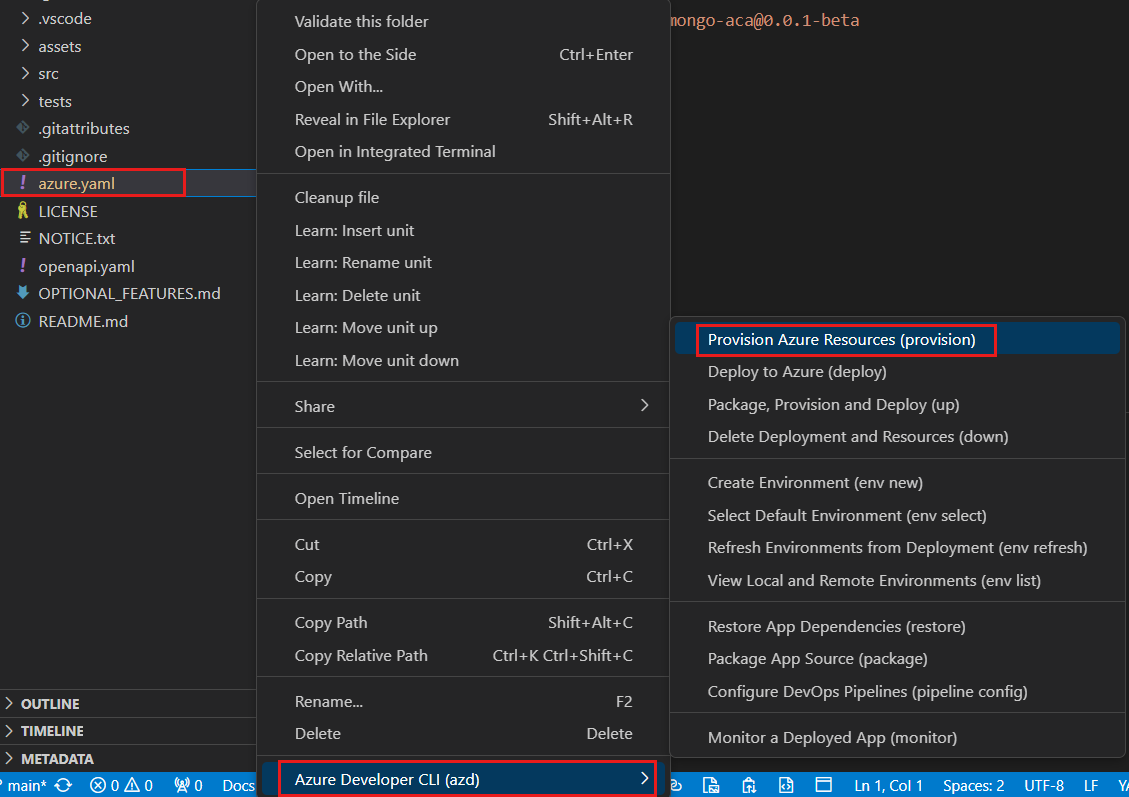
  1. In Explorer, right-click azure.yaml, and then select Azure Developer CLI (azd) > Provision Azure Resources (provision).

    Screenshot of Visual Studio Code with azure.yaml highlighted, and the AZD context menu with Azure Developer CLI and Provision environment highlighted.

  2. AZD scans Azure Deployment Environments for projects that you have access to. In the AZD terminal, select or enter the following information:

    1. Project
    2. Environment definition
    3. Environment type
    4. Location
  3. AZD instructs ADE to create a new environment based on the information you gave in the previous step.

  4. You can view the resources created in the Azure portal or in the developer portal.

List existing environments (optional)

Verify that your environment is created by listing the existing environments.

  1. In Explorer, right-click azure.yaml, and then select Azure Developer CLI (azd) > View Local and Remote Environments (env list).

    Screenshot of Visual Studio Code with azure.yaml highlighted, and the AZD context menu with Azure Developer CLI and View Local and Remote environments highlighted.

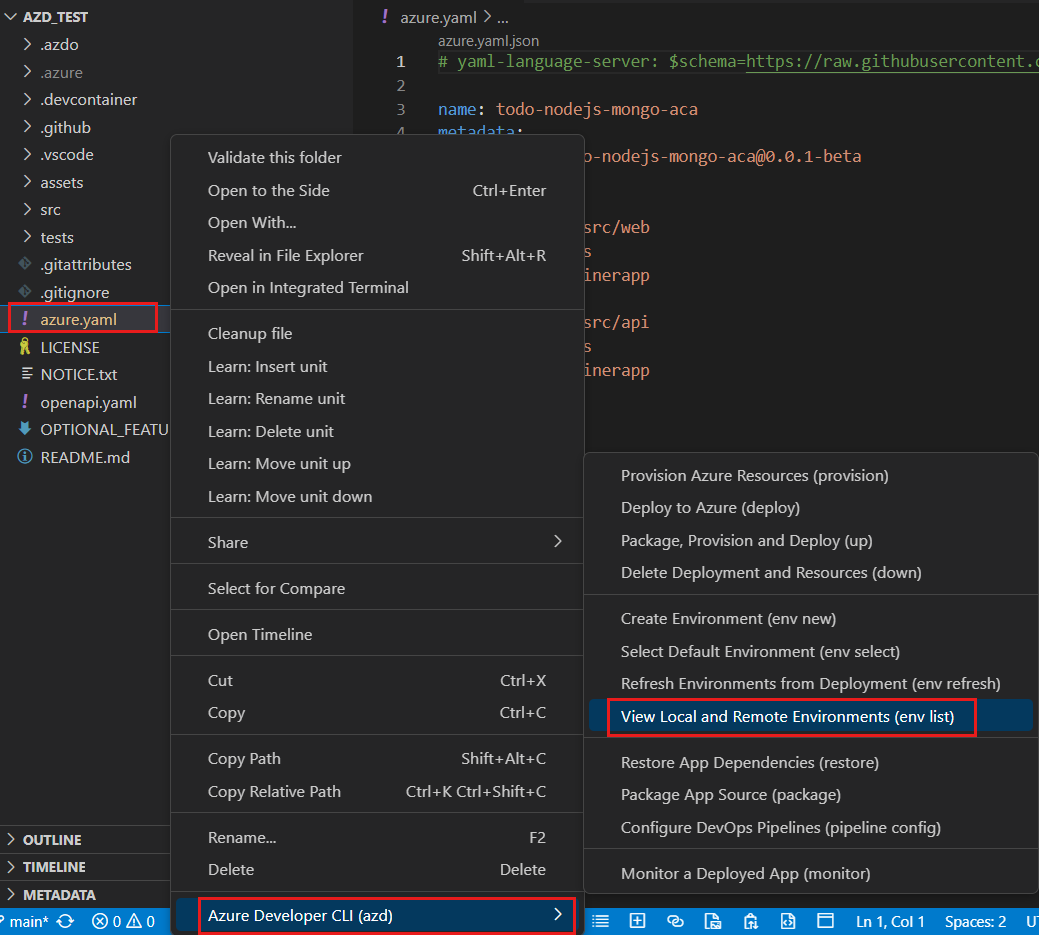
    You're prompted to select a project and an environment definition.

Deploy code to Azure Deployment Environments

When your environment is provisioned, you can deploy your code to the environment.

  1. In Explorer, right-click azure.yaml, and then select Azure Developer CLI (azd) > Deploy Azure Resources (deploy).

    Screenshot of Visual Studio Code with azure.yaml highlighted, and the AZD context menu with Azure Developer CLI and Deploy to Azure highlighted.

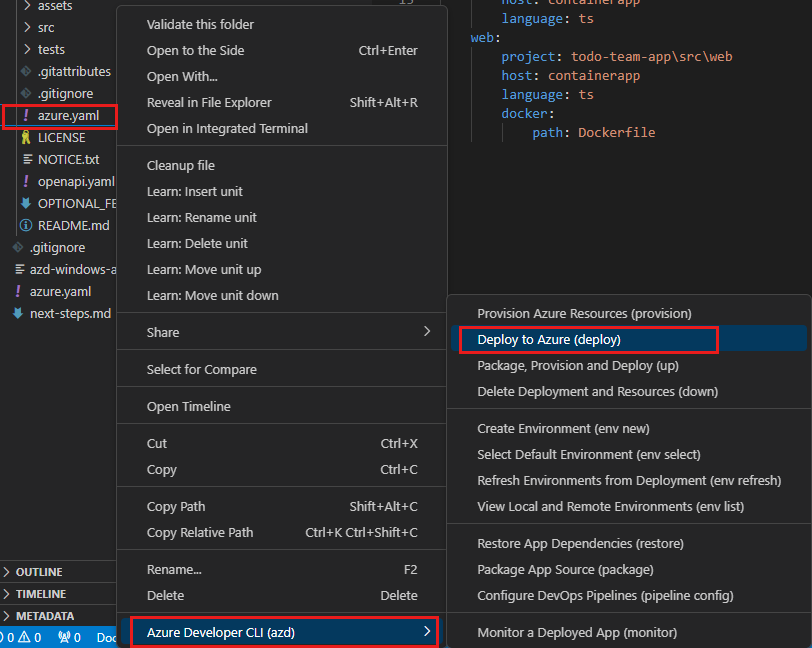
  2. You can verify that your code is deployed by selecting the end point URLs listed in the AZD terminal.

Clean up resources

When you're finished with your environment, you can delete the Azure resources.

In Explorer, right-click azure.yaml, and then select Azure Developer CLI (azd) > Delete Deployment and Resources (down).

Screenshot of Visual Studio Code with azure.yaml highlighted, and the AZD context menu with Azure Developer CLI and Delete Deployment and Resources (down) highlighted.

Confirm that you want to delete the environment by entering y when prompted.

Create and target environments


Create and target environments

An environment represents a logical target where your pipeline deploys software. Typical environment names are Dev, Test, QA, Staging, and Production.

Environments provide the following benefits:

  • Deployment history. Pipeline name and run details are recorded for deployments to an environment and its resources. In the context of multiple pipelines targeting the same environment or resource, you can use deployment history of an environment to identify the source of changes.

  • Traceability of commits and work items. You can view jobs within the pipeline run that target an environment. You can also view the commits and work items that were newly deployed to the environment. Traceability also lets you track whether a code change commit or feature/bug-fix work item reached an environment.

  • Diagnostic resource health. You can validate whether the application is functioning at its desired state.

  • Security. You can secure environments by specifying which users and pipelines are allowed to target an environment.

An environment is a grouping of resources where the resources themselves represent actual deployment targets. Azure Pipelines environments currently support the Kubernetes and virtual machine resource types.

If a YAML pipeline refers to an environment that doesn't exist:

  • When the user performing the operation is known and permissions can be assigned, Azure Pipelines automatically creates the environment.

  • When Azure Pipelines doesn't have information about the user performing the operation, for example in a YAML update from an external code editor, the pipeline fails.

Prerequisites

To add an environment, you need the following prerequisites:

Create an environment

To create your first environment:

  1. Sign in to your Azure DevOps organization at https://dev.azure.com/{yourorganization} and open your project.

  2. Select Pipelines > Environments > Create environment.

    Screenshot that shows Environments.

  3. Enter information for the environment, and then select Create. You can add resources to an existing environment later.

    Screenshot of creating a new environment.

 Tip

You can create an empty environment and reference it from deployment jobs so you can record deployment history against the environment.

You can use Azure Pipelines to deploy to environments. For more information, see Build and deploy to Azure Kubernetes Service with Azure Pipelines.

Target an environment from a deployment job

deployment job is a collection of steps that run sequentially. You can use a deployment job to target an entire environment group of resources, as shown in the following example YAML snippet. The pipeline runs on the myVM machine because that resource name is specified.

YAML
- stage: deploy
  jobs:
  - deployment: DeployWeb
    displayName: deploy Web App
    pool:
      vmImage: 'Ubuntu-latest'
    # creates an environment if it doesn't exist
    environment: 
      name: 'smarthotel-dev'
      resourceName: myVM
      resourceType: virtualMachine
    strategy:
      runOnce:
        deploy:
          steps:
          - script: echo Hello world

Target a specific environment resource from a deployment job

You can scope the deployment target to a particular resource within the environment, so you can record deployment history on the specific resource. The steps of the deployment job automatically inherit the service connection details from the resource the deployment job targets.

In the following example, the value for the kubernetesServiceConnection automatically passes down to the task from the environment.resource input.

YAML
environment: 
  name: 'smarthotel-dev.bookings'
strategy: 
 runOnce:
   deploy:
     steps:
     - task: KubernetesManifest@0
       displayName: Deploy to Kubernetes cluster
       inputs:
         action: deploy
         namespace: $(k8sNamespace)
         manifests: $(System.ArtifactsDirectory)/manifests/*
         imagePullSecrets: $(imagePullSecret)
         containers: $(containerRegistry)/$(imageRepository):$(tag)

Use manual approval checks

To control deployments to production environments, Azure Pipelines supports manual approval checks on environments. Approval checks are available to resource owners to control when a stage in a pipeline consumes the resource. Resource owners can define approvals and checks that must be satisfied before a stage consuming that resource can begin.

The environment CreatorAdministrator, and User roles, but not the Reader role, can manage approvals and checks. As an environment owner, you can manually control when a stage should run by using approval checks. For more information, see Define approvals and checks.

See environments in run details

Under the Environments tab of the pipeline run details, you can see all environments that were targeted by deployment jobs of a pipeline run.

Screenshot that shows Environments in run details.

 Note

If you're using an Azure Kubernetes Service (AKS) private cluster, the Environments tab isn't available.

View deployment history

You can select the Deployments tab in the Azure Pipelines Environments section to view deployment history.

  • View jobs from all pipelines that target a specific environment. For example, two microservices that each have their own pipeline can deploy to the same environment. The deployment history helps identify all pipelines that affect the environment, and also helps visualize the sequence of deployments by each pipeline.

    Screenshot that shows deployment history listing.

  • To drill down into the job details, select the Changes and Work items tabs on a deployment page. The tabs show lists of commits and work items that deployed to the environment. Each list item represents new items in that deployment.

    On the Changes tab, the first listing includes all the commits to that point, and the following listings include just the changes for that job. If multiple commits are tied to the same job, there are multiple results on the Changes tab.

    Screenshot of commits under deployment history.

  • If multiple work items are tied to the same job, there are multiple results on the Work items tab.

    Screenshot of work items under deployment history.

Security

You can secure your environments by setting user permissions and pipeline permissions.

Create and access an environment in Azure Deployment Environments


Create and access an environment in Azure Deployment Environments

As a developer, you can create environments associated with a project in Azure Deployment Environments. An environment has all Azure resource preconfigured for deploying your application.

Prerequisites

Create an environment

An environment in Azure Deployment Environments is a collection of Azure resources on which your application is deployed. You can create an environment from the developer portal.

 Note

Only users who have the Deployment Environments User role, the DevCenter Project Admin role, or a built-in role that has appropriate permissions can create an environment. Users who have the Deployment Environments Reader role can view their own environments, and environments created by others.

  1. Sign in to the developer portal.

  2. From the New menu at the top left, select New environment.

    Screenshot showing the new menu with new environment highlighted.

  3. In the Add an environment pane, select the following information:

    FieldValue
    NameEnter a descriptive name for your environment.
    ProjectSelect the project you want to create the environment in. If you have access to more than one project, you see a list of available projects.
    TypeSelect the environment type you want to create. If you have access to more than one environment type, you see a list of available types.
    Environment definitionsSelect the environment definition you want to use to create the environment. You see a list of the environment definitions available from the catalogs associated with your dev center.

    Screenshot showing add environment pane.

    If your environment is configured to accept parameters, you can enter them on a separate pane. In this example, you don't need to specify any parameters.

  4. Select Create. You see your environment in the developer portal immediately, with an indicator that shows creation in progress.

Access an environment

You can access and manage your environments in the Azure Deployment Environments developer portal.

  1. Sign in to the developer portal.

  2. You can view all of your existing environments. To access the specific resources created as part of an environment, select the Environment Resources link.

    Screenshot showing an environment card, with the environment resources link highlighted.

  3. You can view the resources in your environment listed in the Azure portal.

    Screenshot showing Azure portal list of environment resources.

    Creating an environment automatically creates a resource group that stores the environment's resources. The resource group name follows the pattern {projectName}-{environmentName}. You can view the resource group in the Azure portal.