Friday, 7 June 2024

Host your domain in Azure DNS


Host your domain in Azure DNS

You can use Azure DNS to host your DNS domain and manage your DNS records. By hosting your domains in Azure, you can manage your DNS records by using the same credentials, APIs, tools, and billing as your other Azure services.

Suppose you buy the domain contoso.com from a domain name registrar and then create a zone with the name contoso.com in Azure DNS. Since you're the owner of the domain, your registrar offers you the option to configure the name server (NS) records for your domain. The registrar stores the NS records in the .com parent zone. Internet users around the world are then directed to your domain in your Azure DNS zone when they try to resolve DNS records in contoso.com.

Overview

To host your domain in Azure:

  • Create the DNS zone.
  • Create resource records in the DNS zone.
  • Retrieve the list of Azure nameservers for your DNS zone.
  • Delegate the domain to Azure's nameservers at your registrar.

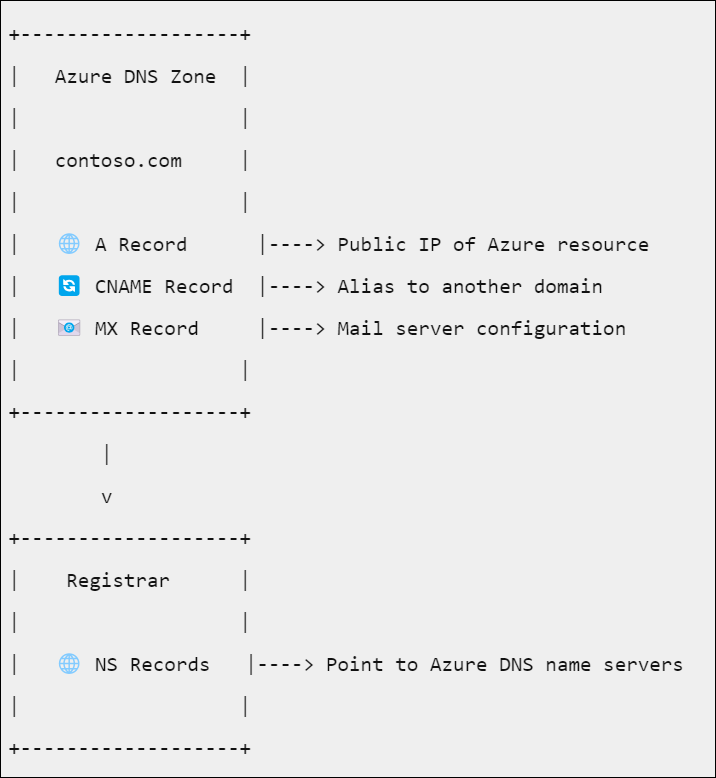
For example:

A simple diagram of a DNS zone hosted in Azure that is delegated at the registrar.

In this tutorial, you learn how to:

  • Create a DNS zone.
  • Retrieve a list of name servers.
  • Delegate the domain.
  • Verify the delegation is working.

If you don’t have an Azure subscription, create a free account before you begin.

Prerequisites

  • An Azure account with an active subscription.
  • A domain name that you can host in Azure DNS. You must have full control of this domain. Full control includes the ability to set the name server (NS) records for the domain.

 Note

In this tutorial, contoso.com is used as an example domain name. Replace contoso.com with your own domain name.

Sign in to Azure

Sign in to the Azure portal.

Create a DNS zone

  1. In the Azure portal, enter dns zone in the search box at the top of the portal, and then select DNS zones from the search results.

  2. In DNS zones, select + Create.

  3. In the Create DNS zone page, enter or select the following information in the Basics tab:

    SettingValue
    Project details
    SubscriptionSelect your Azure subscription.
    Resource groupSelect Create new
    In Name, enter myResourceGroup
    Select OK.
    Instance details
    This zone is a child of an existing zone already hosted in Azure DNSClear this checkbox since the DNS zone isn't a child zone.
    NameEnter your DNS zone name.
    Resource group locationSelect the resource group location.
    The resource group location doesn't affect your DNS zone service, which is global and not bound to a location.
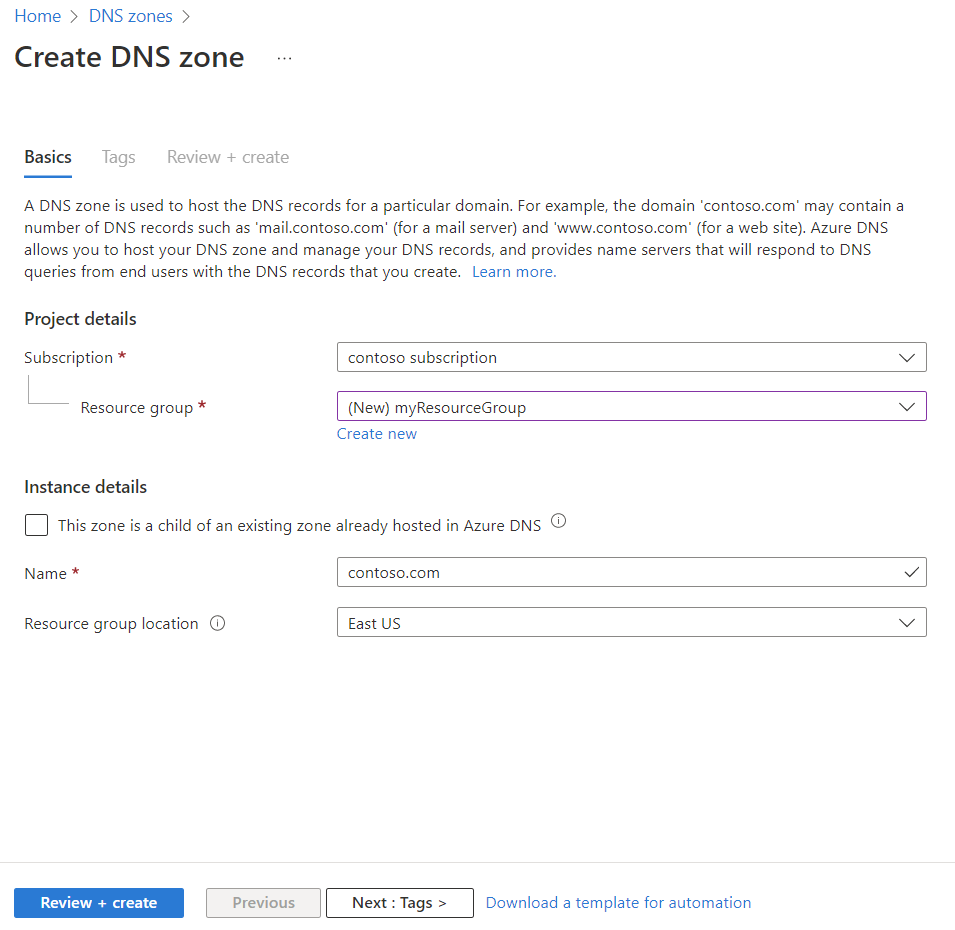
    Screenshot of Create D N S zone page showing the settings used in this tutorial to create a parent D N S zone.

  4. Select Review + create.

  5. Select Create.

     Note

    If the new zone that you are creating is a child zone (e.g. parent zone = contoso.com child zone = child.contoso.com), then please refer to Create a child DNS zone tutorial.

Retrieve name servers

Before you can delegate your DNS zone to Azure DNS, you need to know the name servers for your zone. Azure DNS gives name servers from a pool each time a zone is created.

  1. In the Azure portal, enter dns zone in the search box at the top of the portal, and then select DNS zones from the search results.

  2. In DNS zones, select contoso.com.

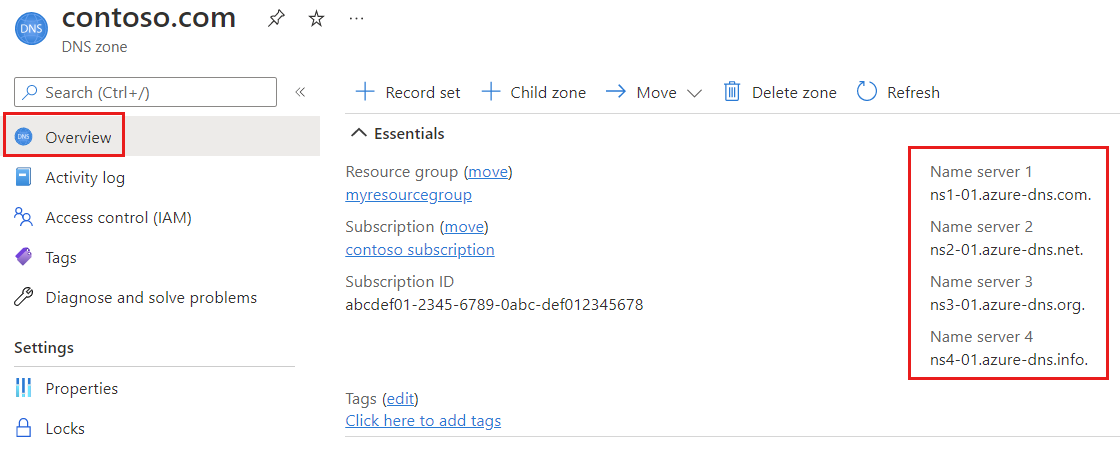
  3. In the Overview page, retrieve the name servers. In this example, the DNS zone contoso.com has been assigned name servers ns1-01.azure-dns.comns2-01.azure-dns.netns3-01.azure-dns.org, and ns4-01.azure-dns.info:

    Screenshot of D N S zone showing assigned Azure name servers

Azure DNS automatically creates authoritative NS records in your zone for the assigned name servers.

Delegate the domain

Once the DNS zone gets created and you have the name servers, you'll need to update the parent domain with the Azure DNS name servers. Each registrar has its own DNS management tools to change the name server records for a domain.

  1. In the registrar's DNS management page, edit the NS records and replace the NS records with the Azure DNS name servers.

  2. When you delegate a domain to Azure DNS, you must use the name servers that Azure DNS provides. Use all four name servers, regardless of the name of your domain. Domain delegation doesn't require a name server to use the same top-level domain as your domain.

 Important

When you copy each name server address, make sure you copy the trailing period at the end of the address. The trailing period indicates the end of a fully qualified domain name. Some registrars append the period if the NS name doesn't have it at the end. To be compliant with the DNS RFC, include the trailing period.

Delegations that use name servers in your own zone, sometimes called vanity name servers, aren't currently supported in Azure DNS.

Verify the delegation

After you complete the delegation, you can verify that it's working by using a tool such as nslookup to query the Start of Authority (SOA) record for your zone. The SOA record is automatically created when the zone is created. You may need to wait at least 10 minutes after you complete the delegation, before you can successfully verify that it's working. It can take a while for changes to propagate through the DNS system.

You don't have to specify the Azure DNS name servers. If the delegation is set up correctly, the normal DNS resolution process finds the name servers automatically.

  1. From a command prompt, enter a nslookup command similar to the following example:

    nslookup -type=SOA contoso.com
    
  2. Verify that your response looks similar to the following nslookup output:

    Server: ns1-04.azure-dns.com
    Address: 40.90.4.1
    
    contoso.com
            primary name server = ns1-04.azure-dns.com
            responsible mail addr = azuredns-hostmaster.microsoft.com
            serial = 1
            refresh = 3600 (1 hour)
            retry = 300 (5 mins)
            expire = 604800 (7 days)
            default TTL = 300 (5 mins)
    ns1-01.azure-dns.com    internet address = 40.90.4.1
    ns1-01.azure-dns.com    AAAA IPv6 address = 2603:1061::1

Create an Azure DNS zone and record using the Azure portal


Create an Azure DNS zone and record using the Azure portal

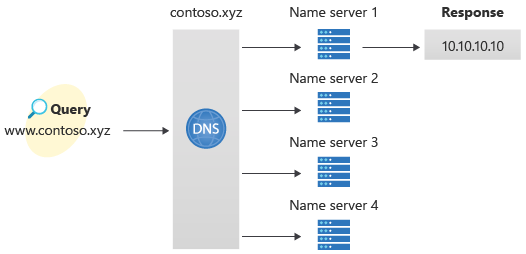
You can configure Azure DNS to resolve host names in your public domain. For example, if you purchased the contoso.xyz domain name from a domain name registrar, you can configure Azure DNS to host the contoso.xyz domain and resolve www.contoso.xyz to the IP address of your web server or web app.

In this quickstart, you create a test domain, and then create an address record to resolve www to the IP address 10.10.10.10.

Diagram of DNS deployment environment using the Azure portal.

 Important

The names and IP addresses in this quickstart are examples that do not represent real-world scenarios. The private IP address 10.10.10.10 is used here with a public DNS zone for testing purposes.

You can also perform these steps using Azure PowerShell or the cross-platform Azure CLI.

If you don't have an Azure subscription, create a free account before you begin.

For all portal steps, sign in to the Azure portal.

Prerequisites

An Azure account with an active subscription is required. Create an account for free.

Sign in to the Azure portal

Sign in to the Azure portal with your Azure account.

Create a DNS zone

A DNS zone contains the DNS entries for a domain. To start hosting your domain in Azure DNS, you create a DNS zone for that domain name.

To create the DNS zone:

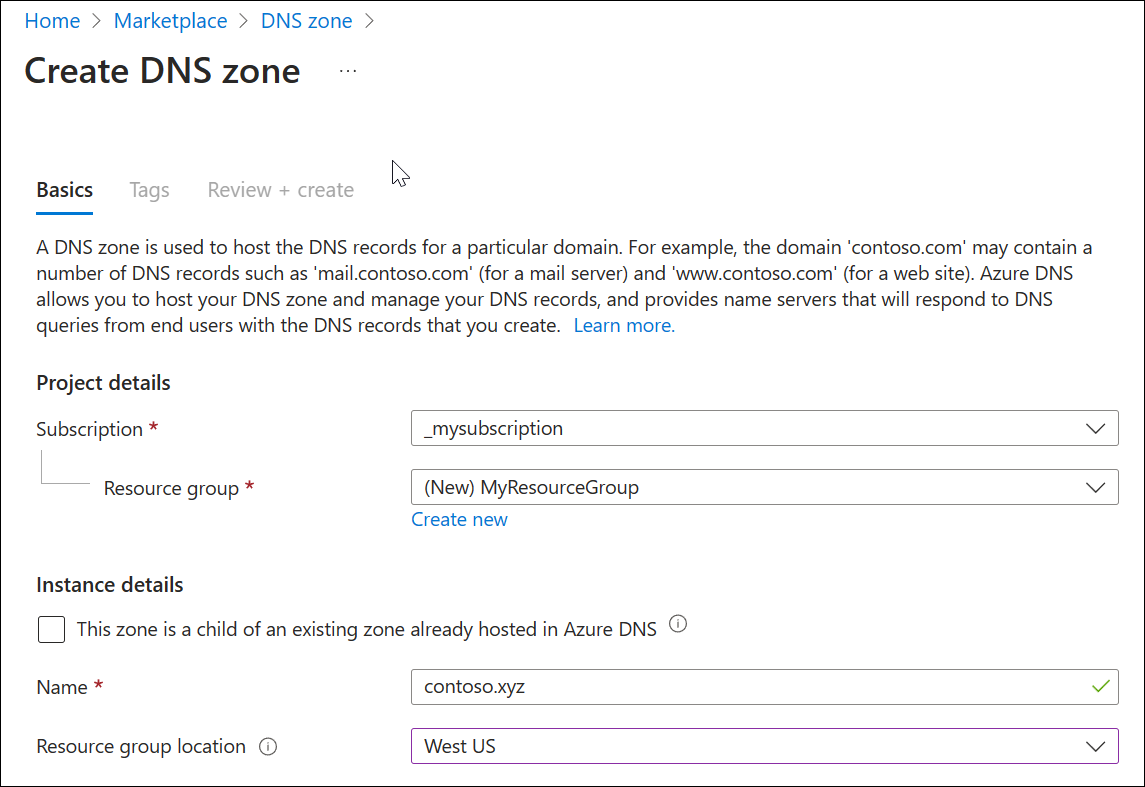
  1. At the upper left, select Create a resource, enter DNS zone into Search services and marketplace and then select DNS zone.

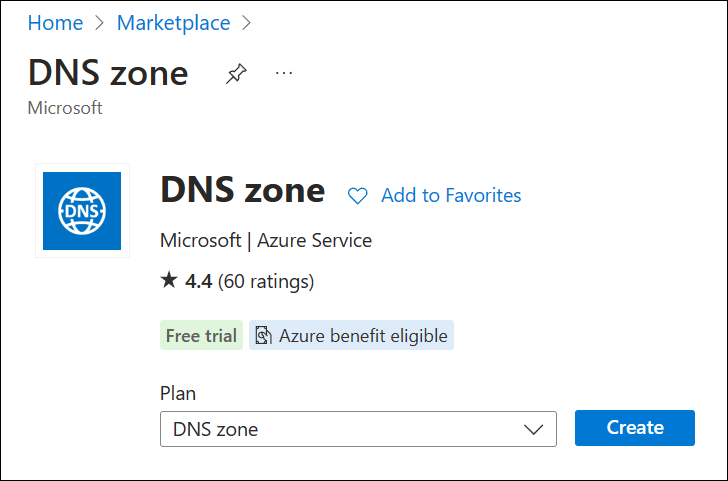
  2. On the DNS zone page, select Create.

    A screenshot of the DNS zone marketplace.

  3. On the Create DNS zone page, type or select the following values:

    • Resource group: Select Create new, enter MyResourceGroup, and select OK. The resource group name must be unique within the Azure subscription.
    • Name: Type contoso.xyz for this quickstart example. The DNS zone name can be any value that isn't already configured on the Azure DNS servers. A real-world value would be a domain that you bought from a domain name registrar.
    • Resource group location: Select a location for the new resource group. In this example, the location selected is West US.
  4. Select Review create and then select Create.

    A screenshot showing how to create a DNS zone.

It may take a few minutes to create the zone.

Create a DNS record

Next, DNS records are created for your domain inside the DNS zone. A new address record, known as an 'A' record, is created to resolve a host name to an IPv4 address.

To create an 'A' record:

  1. In the Azure portal, under All resources, open the contoso.xyz DNS zone in the MyResourceGroup resource group. You can enter contoso.xyz in the Filter by name box to find it more easily.

  2. At the top of the contoso.xyz DNS zone page, select + Record set.

  3. In the Add a record set window, enter or select the following values:

    • Name: Type www. This record name is the host name that you want to resolve to the specified IP address.
    • Type: Select A. 'A' records are the most common, but there are other record types for mail servers ('MX'), IP v6 addresses ('AAAA'), and so on.
    • TTL: Type 1Time-to-live of the DNS request specifies how long DNS servers and clients can cache a response.
    • TTL unit: Select Hours. The time unit for the TTL entry is specified here.
    • IP address: For this quickstart example, type 10.10.10.10. This value is the IP address that the record name resolves to. In a real-world scenario, you would enter the public IP address for your web server.
  4. Select OK to create the A record.

Since this quickstart is just for quick testing purposes, there's no need to configure the Azure DNS name servers at a domain name registrar. In a real production domain, you must enable users on the Internet to resolve the host name and connect to your web server or app. To accomplish this task, visit your domain name registrar and replace the name server records with the Azure DNS name servers. For more information, see Tutorial: Host your domain in Azure DNS.

Test the name resolution

Now that you have a test DNS zone with a test 'A' record, you can test the name resolution with a tool called nslookup.

To test DNS name resolution:

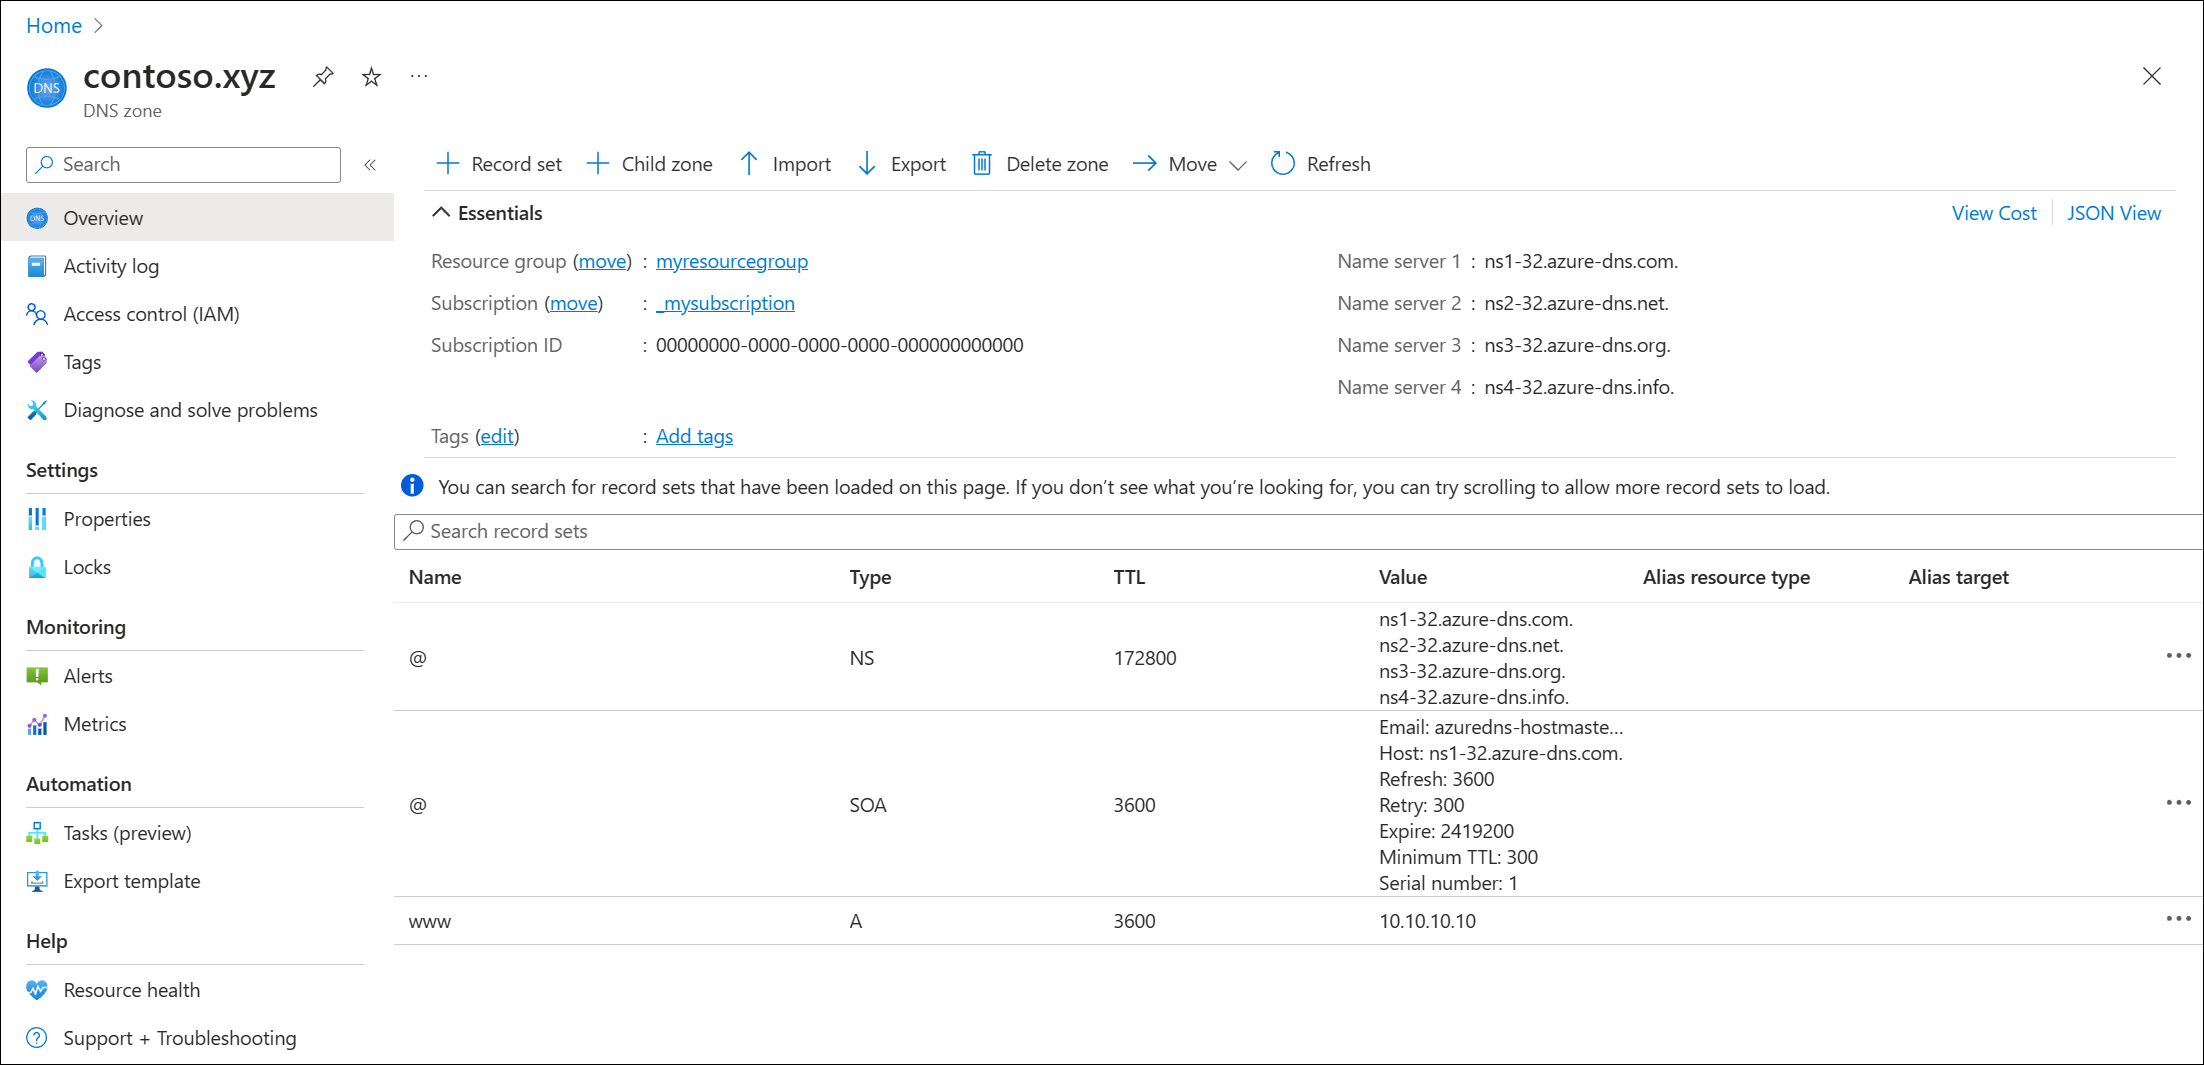
  1. On the contoso.xyz DNS zone page, copy one of the name server names from the name server list. For example: ns1-32.azure-dns.com.

    A screenshot of the DNS zone contents.

  2. Open a command prompt, and run the following command:

    nslookup www.contoso.xyz <name server name>
    

    For example:

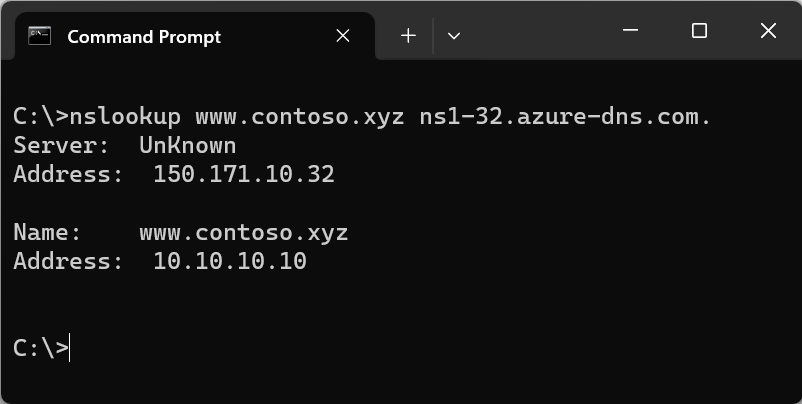
    nslookup www.contoso.xyz ns1-32.azure-dns.com.
    

    You should see something like the following screen:

    A screenshot of a command prompt window with an nslookup command and values for Server, Address, Name, and Address.

The host name www.contoso.xyz resolves to 10.10.10.10, just as you configured it. This result verifies that name resolution is working correctly.

A look at the Azure DNS


A look at the Azure DNS Private Resolver

 I’m going to cover the new Azure DNS Private Resolver feature that recently went into public preview. I’ve written extensively about Azure DNS in the past and I recommend reading through that series if you’re new to the platform. It has grown to be significantly important in Azure architectures due to its role in name resolution for Private Endpoints. A common pain point for customers using Private Endpoints from on-premises is the requirement to have a VM in Azure capable of acting as a DNS proxy. This is explained in detail in this post. The Azure DNS Private Resolver seeks to ease that pain by providing a managed DNS solution capable of acting as a DNS proxy and conditional forwarder facilitating hybrid DNS resolution (for those of you coming from AWS, this is Azure’s Route 53 Resolver). Alexis Plantin beat me to the punch and put together a great write-up on the basics of the feature so my focus instead be on some additional scenarios and a pattern that I tested and validated.

I’m a big fan of keeping infrastructure services such as DNS centralized and under the management of central IT. This is one reason I’m partial to a landing zone with a dedicated shared services virtual network attached to the transit virtual network as illustrated in the image below. In this shared services virtual network you put your DNS, patching/update infrastructure, and potentially identity services such as Windows Active Directory. The virtual network and its resources can then be dropped into a dedicated subscription and locked down to central IT. Additionally, as an added bonus, keeping the transit virtual network dedicated to firewalls and virtual network gateways makes the eventual migration to Azure Virtual WAN that must easier.

Common landing zone design

The design I had in mind would place the Private Resolver in the shared services virtual network and would funnel all traffic to and from the resolver and on-premises or another spoke through the firewall in the transit virtual network. This way I could control the conversation, inspect the traffic if needed, and centrally log it. The lab environment I built to test the design is pictured below.

Lab environment

The first question I had was whether or not the inbound endpoint would obey the user defined routes in the custom route table I associated with the inbound endpoint subnet. To test this theory I made a DNS query from the VM running in spoke 2 to resolve an A record in a Private DNS Zone. This Private DNS Zone was only linked to the virtual network where the Private Resolvers were. If the inbound endpoint wasn’t capable of obeying the custom routes, then the return traffic would be dropped and my query would fail.

Result of query from VM in another spoke

Success! The inbound endpoint is returning traffic back through the firewall. Logs on the firewall confirm the traffic flowing through.

Firewall logs showing DNS traffic from spoke

Next I wanted to see if traffic from the outbound endpoint would obey the custom routes. To test this, I configured a DNS forwarding rule (conditional forwarding component of the service) to send all DNS queries for jogcloud.com back to the domain controller running in my lab. I then performed a DNS query from the VM running in spoke 2.

Firewall logs showing DNS traffic to on-premises

Success again as the query was answered! The traffic from the outbound endpoint is seen traversing the firewall on its way to my domain controller on-premises. This confirmed that both the inbound and outbound endpoints obey custom routing making the design I presented above viable.

Beyond the above, I also confirmed the Private Resolver is capable of resolving reverse lookup zones (for PTR records). I was happy to see reverse zones weren’t forgotten.

One noticeable gap today is the Private Resolver does not yet offer DNS query logging. If that is important to you, you may want to retain your existing DNS Proxy. If you happen to be using Azure Firewall, you could make use of the DNS Proxy feature which allows for logging of DNS queries. Azure Firewall could then be configured to use the Private Resolver as its resolver providing that conditional forward capability Azure Firewall’s DNS Proxy feature lacks.

Deploy a Hybrid DNS infrastructure with DNS Private Resolver


Deploy a Hybrid DNS infrastructure with DNS Private Resolver

When you deploy a service in Microsoft Azure that requires to be reachable only with private IP address, you need a private endpoint. Most of the time, the IP address of this private endpoint must be resolvable through a private DNS.

A private DNS is a zone that is linked to a virtual network and only services that belong to this virtual network can resolve name through this private DNS zone. That means that On-Premises VMs cannot resolve name inside a private DNS zone. In addition, services in the virtual network that is linked to a private DNS zone cannot resolve On-Premises name.

To solve this issue, we can use a DNS Private Resolver. Thanks to DNS Private Resolver we can forward DNS request to another DNS server. DNS Private Resolver also provides an IP address that can be used by external DNS server to forward requests. So external On-Premises DNS servers will be able to resolve name located in a private DNS zone.

Private DNS zone configuration

I have the following private DNS zones. They come from the configuration of a storage account and Azure Virtual Desktop with private endpoint.

Private DNS zones

Each private DNS zone has two links:

  • Link-dns-hub: this is a link to a hub virtual network where is located the private resolver
  • Link-dns-xxx: this is a link to a spoke virtual network where are located my services that require to resolve name from the private dns zone.

Each private DNS zone has two links

DNS Private Resolver configuration: Inbound requests

After the DNS private resolver deployment, you should get something like that. DNS Private resolver requires at least two subnets:

  • A subnet for inbound endpoint: an IP is allocated to this subnet to allow DNS servers to forward request to DNS private resolver
  • A subnet for outbound endpoint: this subnet is used to forward requests to DNS servers and then provide the resolution to services that initiate the resolution.

DNS Private resolver requires at least two subnets

If you navigate to Inbound endpoints, you can create a private IP address. This IP address is used in DNS configuration for conditional forwarders.

Inbound endpoints

In my On-Premises domain controller, I have created a conditional forwarder for each private DNS zone. Then a specified the above IP address as master servers. So, each time someone will try to resolve the name in these DNS zone, the requests will be forwarded to DNS Private resolver in Azure.

N.B: In this kind of scenario, a connection to Azure is required (such as Express Route or Site-To-Site VPN).

Conditional Forwardes

Let’s try the DNS resolution from my domain controller:

DNS resolution from my domain controller

As you can see, the name is well resolved. From this point, my On-Premises VMs are able to resolve name located in private DNS zone. Now we have to configure DNS Private Resolver to allow services in Azure to resolve On-Premises name.

DNS Private Resolver configuration: Outbound requests

To allow services located in Azure to resolve On-Premises name we have to create an Outbound endpoint and then associate a ruleset to it. A ruleset is basically a conditional forwarding rule.

DNS Private Resolver configuration: Outbound requests

If I open my ruleset called OnPrem you can see that I forward request from the domain SeromIT.local to a DNS server that has the IP 10.10.100.8.

OnPrem. Rules

In Virtual Network Links, I also add each virtual network that requires to resolve On-Premises name.

Virtual Network Links

In the DNS servers configuration of the above virtual network, you have to configure this setting to Default (Azure-Provided).

DNS servers configuration

After this configuration, I connected to a VM located in Azure.

After this configuration, I connected to a VM located in Azure