Host your domain in Azure DNS
You can use Azure DNS to host your DNS domain and manage your DNS records. By hosting your domains in Azure, you can manage your DNS records by using the same credentials, APIs, tools, and billing as your other Azure services.
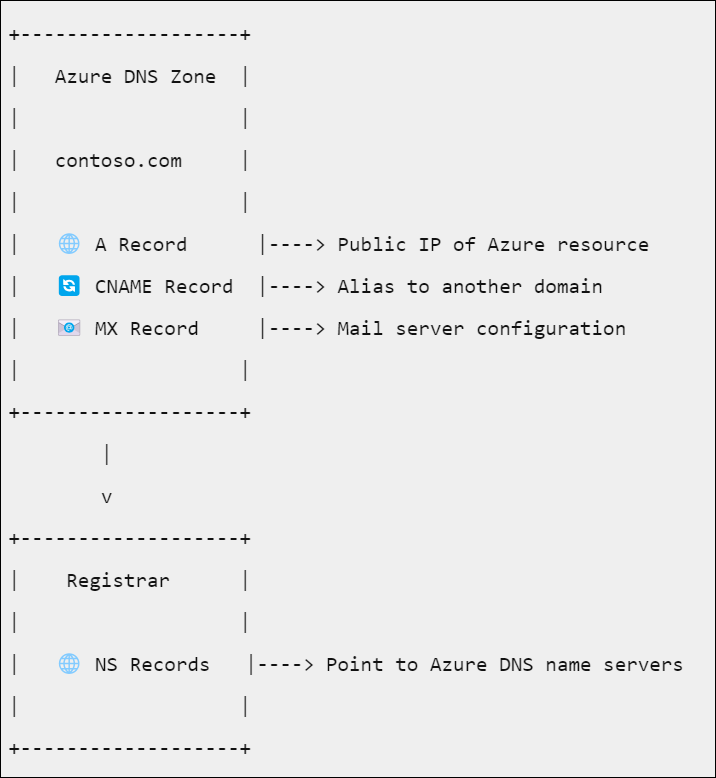
Suppose you buy the domain contoso.com from a domain name registrar and then create a zone with the name contoso.com in Azure DNS. Since you're the owner of the domain, your registrar offers you the option to configure the name server (NS) records for your domain. The registrar stores the NS records in the .com parent zone. Internet users around the world are then directed to your domain in your Azure DNS zone when they try to resolve DNS records in contoso.com.
Overview
To host your domain in Azure:
- Create the DNS zone.
- Create resource records in the DNS zone.
- Retrieve the list of Azure nameservers for your DNS zone.
- Delegate the domain to Azure's nameservers at your registrar.
For example:
In this tutorial, you learn how to:
- Create a DNS zone.
- Retrieve a list of name servers.
- Delegate the domain.
- Verify the delegation is working.
If you don’t have an Azure subscription, create a free account before you begin.
Prerequisites
- An Azure account with an active subscription.
- A domain name that you can host in Azure DNS. You must have full control of this domain. Full control includes the ability to set the name server (NS) records for the domain.
Note
In this tutorial, contoso.com is used as an example domain name. Replace contoso.com with your own domain name.
Sign in to Azure
Sign in to the Azure portal.
Create a DNS zone
In the Azure portal, enter dns zone in the search box at the top of the portal, and then select DNS zones from the search results.
In DNS zones, select + Create.
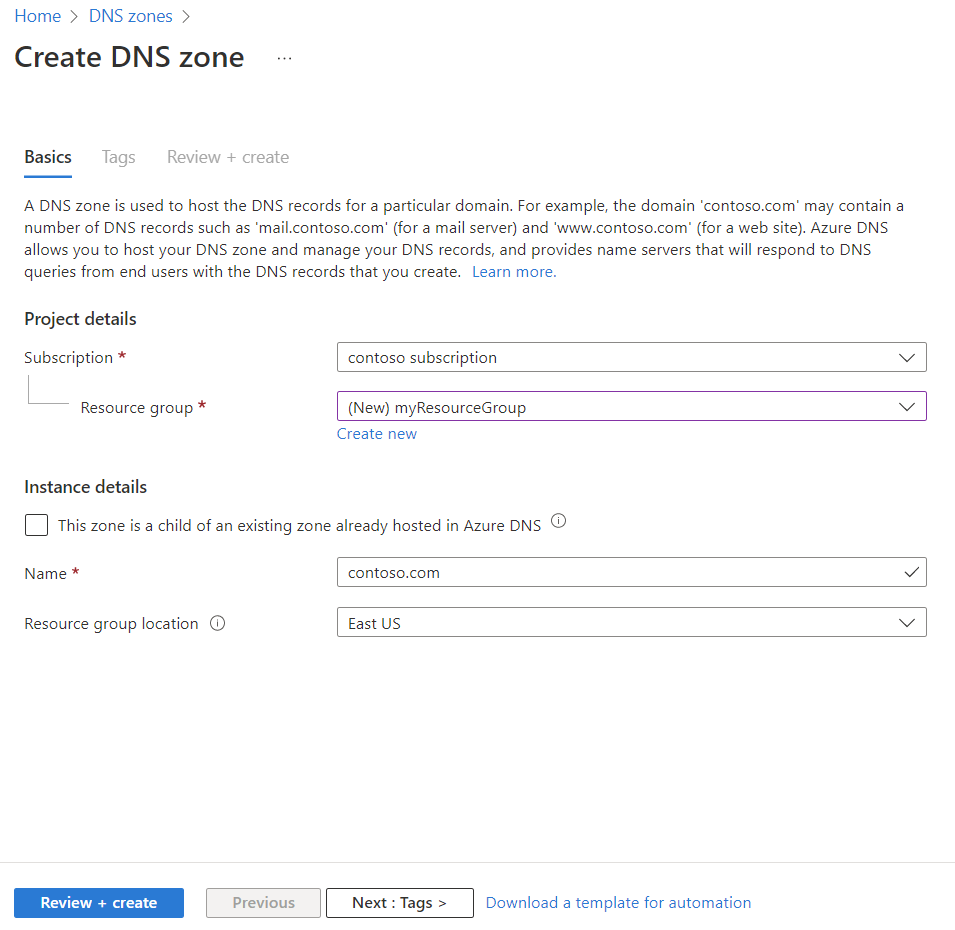
In the Create DNS zone page, enter or select the following information in the Basics tab:
Setting Value Project details Subscription Select your Azure subscription. Resource group Select Create new
In Name, enter myResourceGroup
Select OK.Instance details This zone is a child of an existing zone already hosted in Azure DNS Clear this checkbox since the DNS zone isn't a child zone. Name Enter your DNS zone name. Resource group location Select the resource group location.
The resource group location doesn't affect your DNS zone service, which is global and not bound to a location.
Select Review + create.
Select Create.
Note
If the new zone that you are creating is a child zone (e.g. parent zone =
contoso.comchild zone =child.contoso.com), then please refer to Create a child DNS zone tutorial.
Retrieve name servers
Before you can delegate your DNS zone to Azure DNS, you need to know the name servers for your zone. Azure DNS gives name servers from a pool each time a zone is created.
In the Azure portal, enter dns zone in the search box at the top of the portal, and then select DNS zones from the search results.
In DNS zones, select contoso.com.
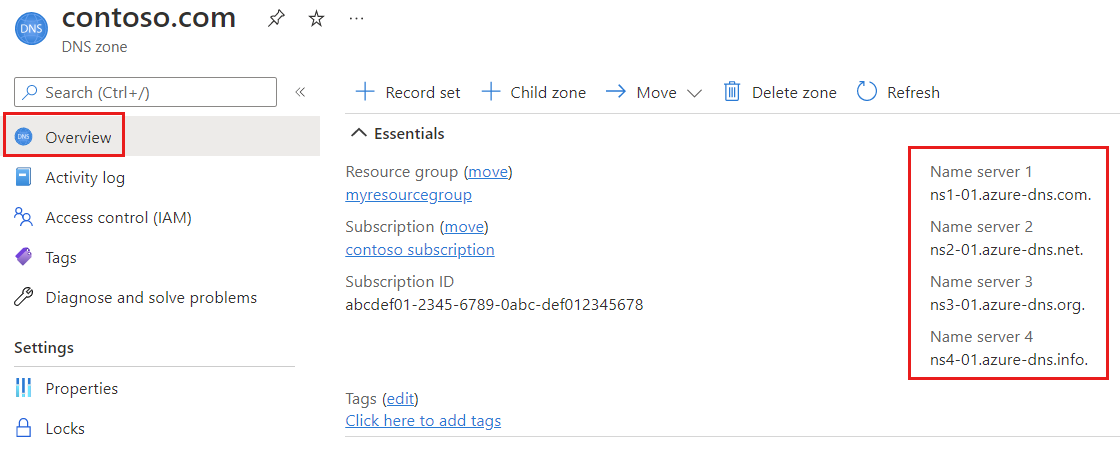
In the Overview page, retrieve the name servers. In this example, the DNS zone contoso.com has been assigned name servers
ns1-01.azure-dns.com,ns2-01.azure-dns.net,ns3-01.azure-dns.org, andns4-01.azure-dns.info:
Azure DNS automatically creates authoritative NS records in your zone for the assigned name servers.
Delegate the domain
Once the DNS zone gets created and you have the name servers, you'll need to update the parent domain with the Azure DNS name servers. Each registrar has its own DNS management tools to change the name server records for a domain.
In the registrar's DNS management page, edit the NS records and replace the NS records with the Azure DNS name servers.
When you delegate a domain to Azure DNS, you must use the name servers that Azure DNS provides. Use all four name servers, regardless of the name of your domain. Domain delegation doesn't require a name server to use the same top-level domain as your domain.
Important
When you copy each name server address, make sure you copy the trailing period at the end of the address. The trailing period indicates the end of a fully qualified domain name. Some registrars append the period if the NS name doesn't have it at the end. To be compliant with the DNS RFC, include the trailing period.
Delegations that use name servers in your own zone, sometimes called vanity name servers, aren't currently supported in Azure DNS.
Verify the delegation
After you complete the delegation, you can verify that it's working by using a tool such as nslookup to query the Start of Authority (SOA) record for your zone. The SOA record is automatically created when the zone is created. You may need to wait at least 10 minutes after you complete the delegation, before you can successfully verify that it's working. It can take a while for changes to propagate through the DNS system.
You don't have to specify the Azure DNS name servers. If the delegation is set up correctly, the normal DNS resolution process finds the name servers automatically.
From a command prompt, enter a nslookup command similar to the following example:
nslookup -type=SOA contoso.comVerify that your response looks similar to the following nslookup output:
Server: ns1-04.azure-dns.com
Address: 40.90.4.1

contoso.com
        primary name server = ns1-04.azure-dns.com
        responsible mail addr = azuredns-hostmaster.microsoft.com
        serial = 1
        refresh = 3600 (1 hour)
        retry = 300 (5 mins)
        expire = 604800 (7 days)
        default TTL = 300 (5 mins)
ns1-01.azure-dns.com    internet address = 40.90.4.1
ns1-01.azure-dns.com    AAAA IPv6 address = 2603:1061::1


No comments:
Post a Comment