Tuesday, 28 May 2024

What is Azure Container Instances?

What is Azure Container Instances?

Microsoft Azure provides many services, and Azure Container Instances (ACI) is one of them. This service helps to run and manage containers and applications without managing the virtual machines. Using ACI, containers can get started within a few seconds without deploying or managing virtual machines. For deploying images, we can use the provided images (Linux and Windows from Docker Hub), the Azure container registry, or another image registry. We can specify the CPU and memory required as per the use. This service uses a Pay-as-you-go pricing model.

Sign in to Azure

  • Access the Azure portal by signing in with your credentials.
  • If you’re new to Azure, sign up for a free account before proceeding with the steps.

Create a container instance | Step-By-Step Tutorial

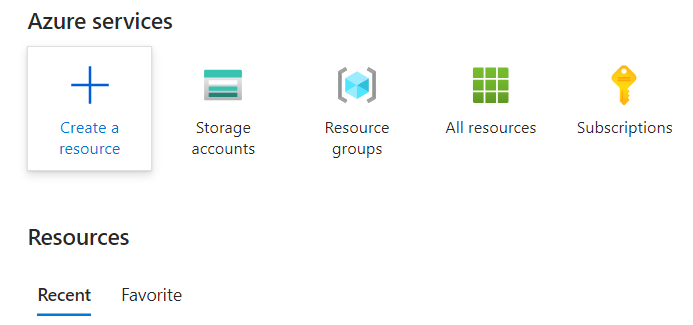
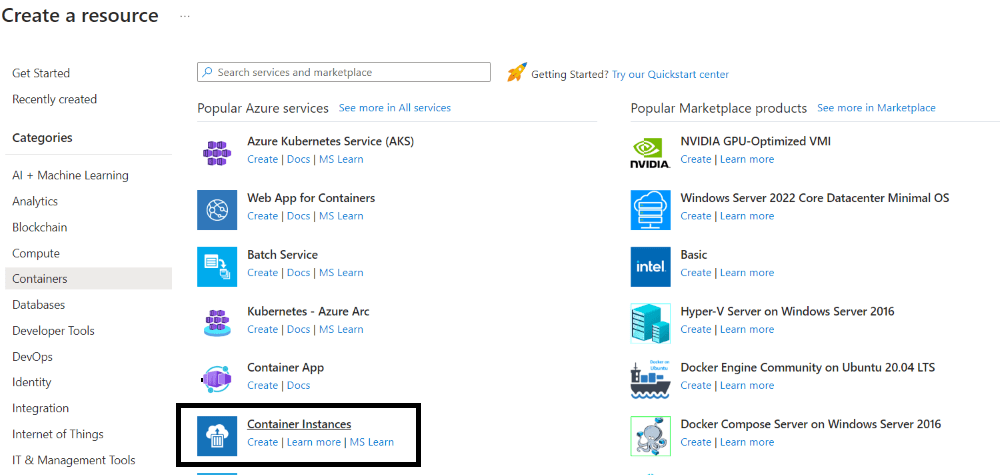
Step 1: Begin by logging in to your Azure portal. Then, navigate to the “Create Resource” option to initiate the resource creation process professionally.

Azure ResourcesStep 2: Next, from the left panel, select “Container” and then choose “Container Instance” to proceed with the deployment professionally..

Container Instance

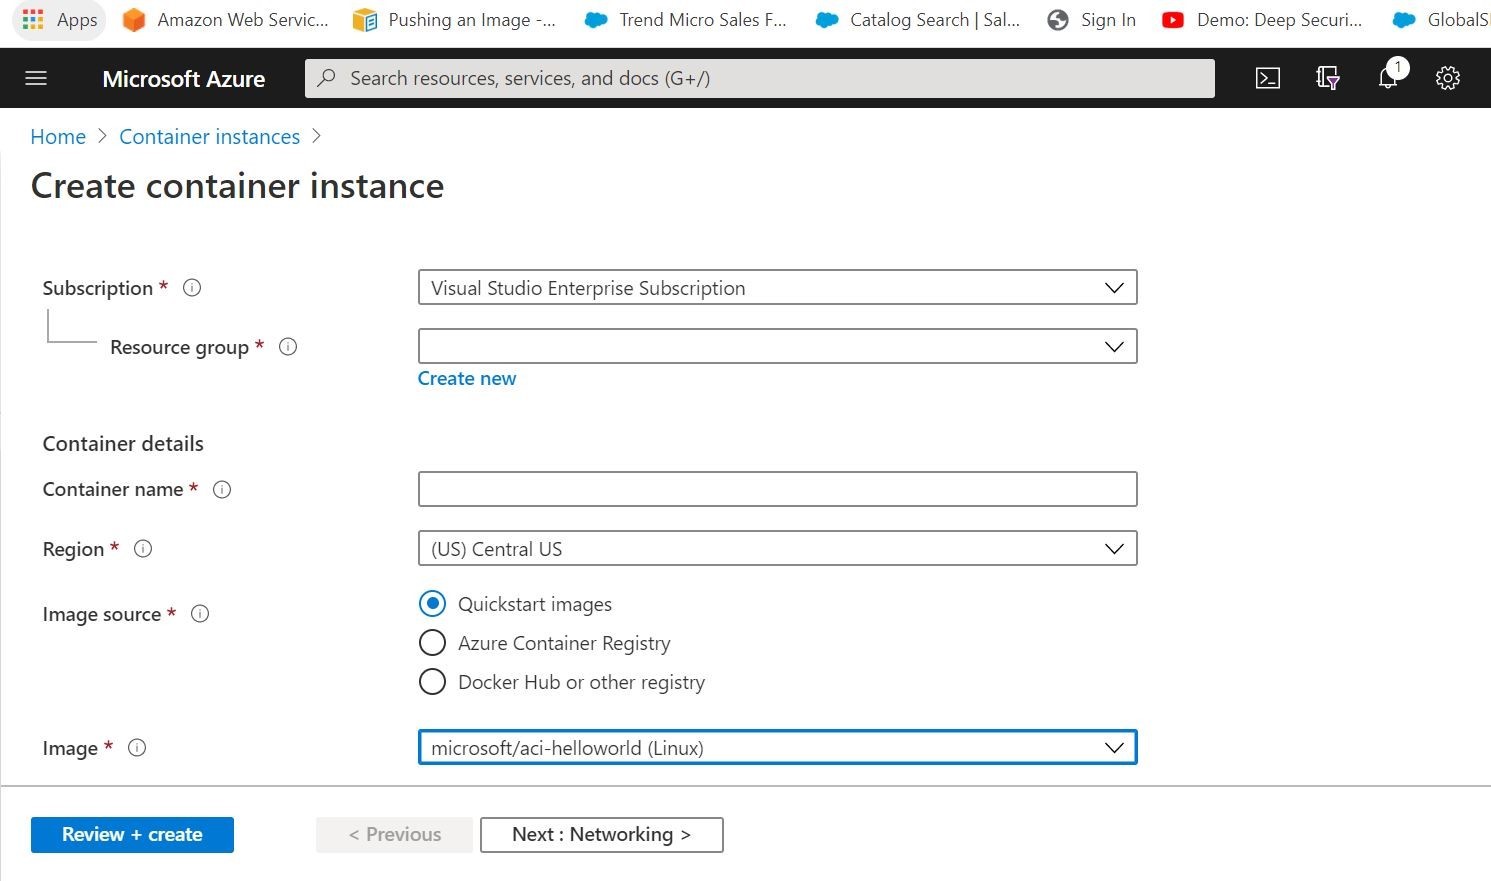
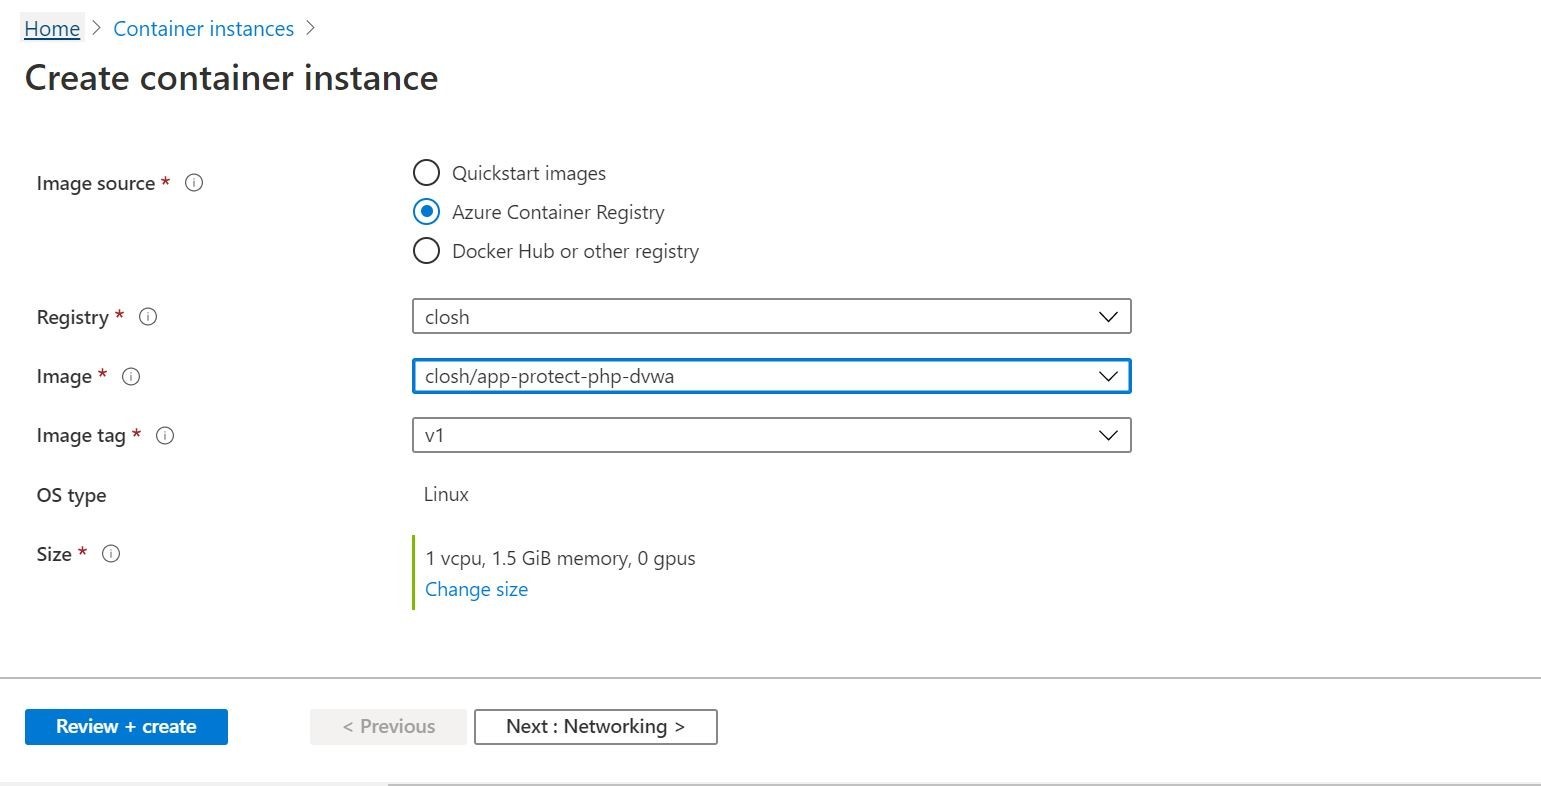
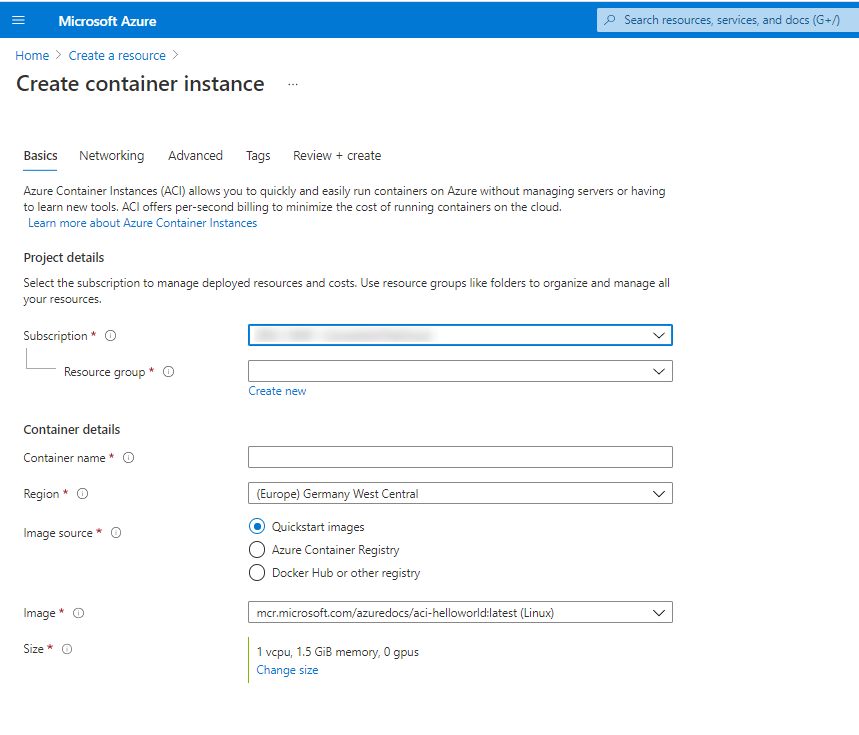
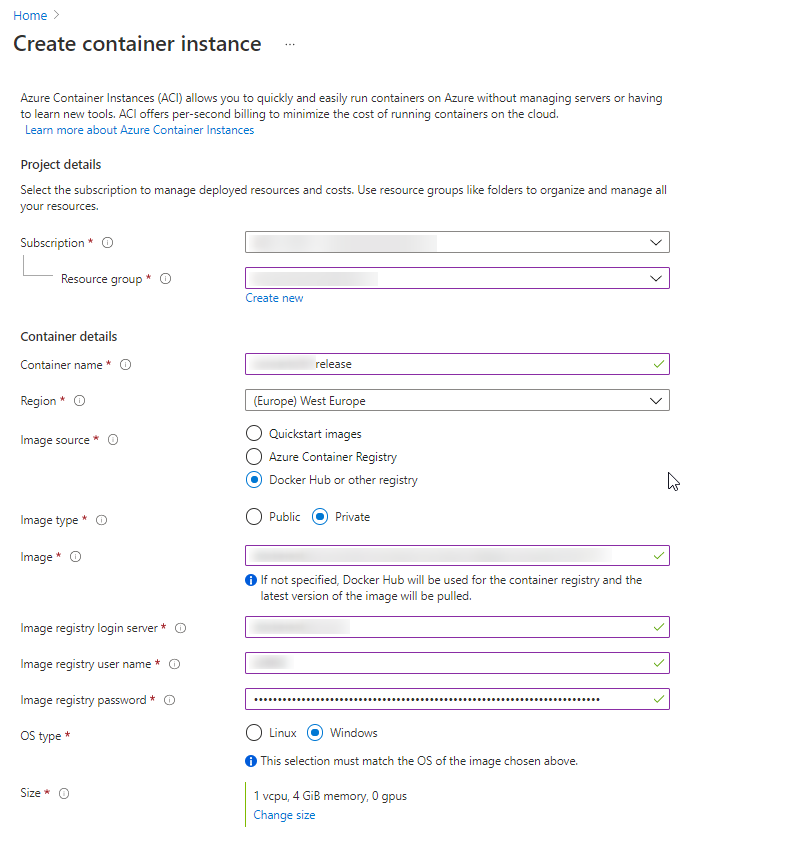
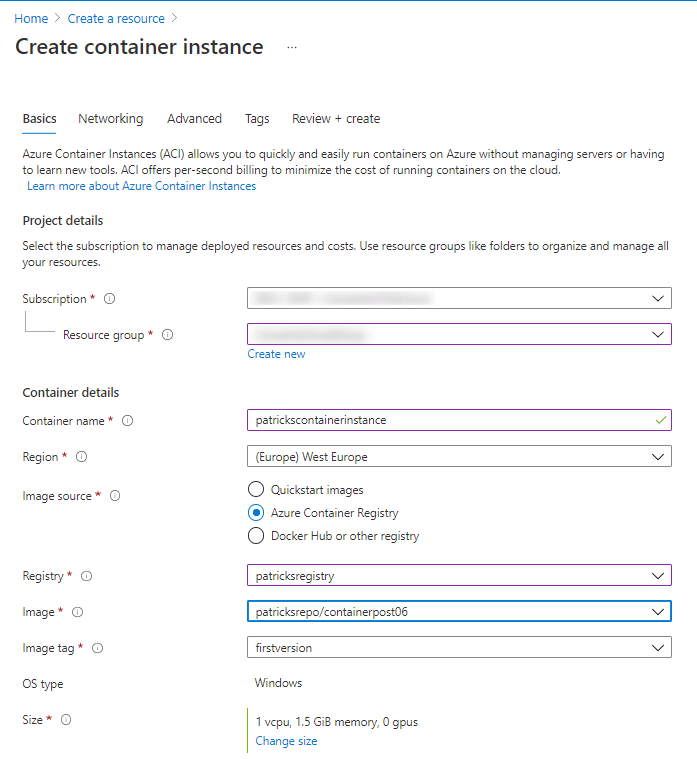
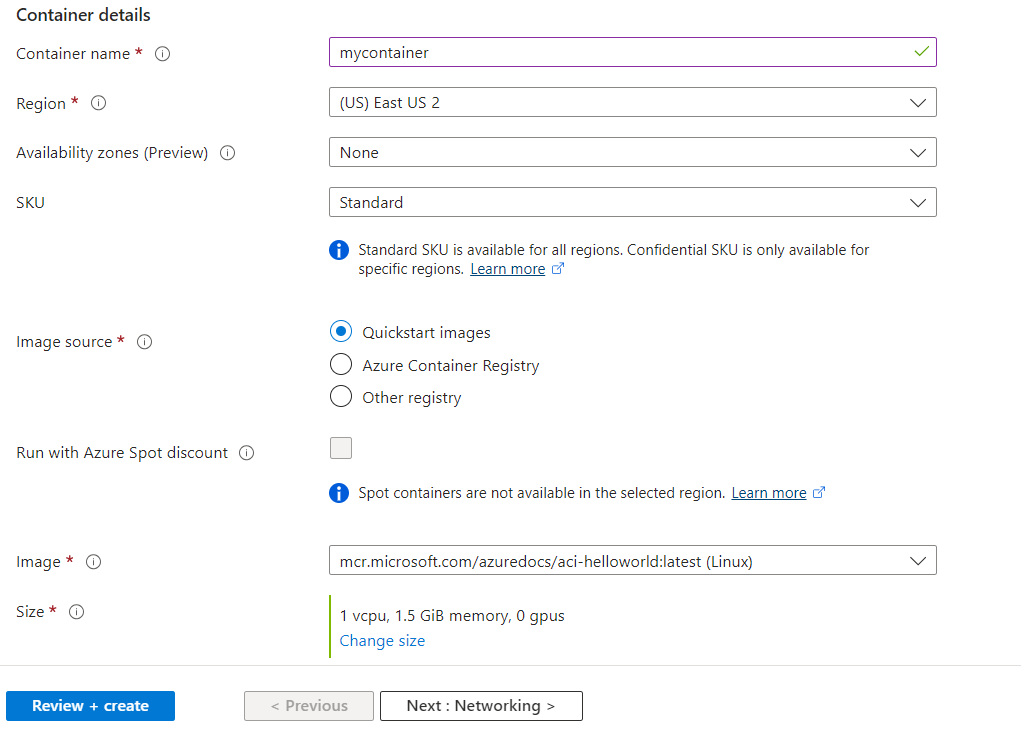
Step 3: Proceed by filling out the template with details such as your Subscription, Resource Group, and a Name for the instance. Select an image from Quickstart images or other repositories like Azure Container Registry. Choose the appropriate OS (Linux or Windows) and specify the desired size in terms of vCPU and memory. Then, navigate to the Networking section to continue with the configuration professionally.

Container Instance details

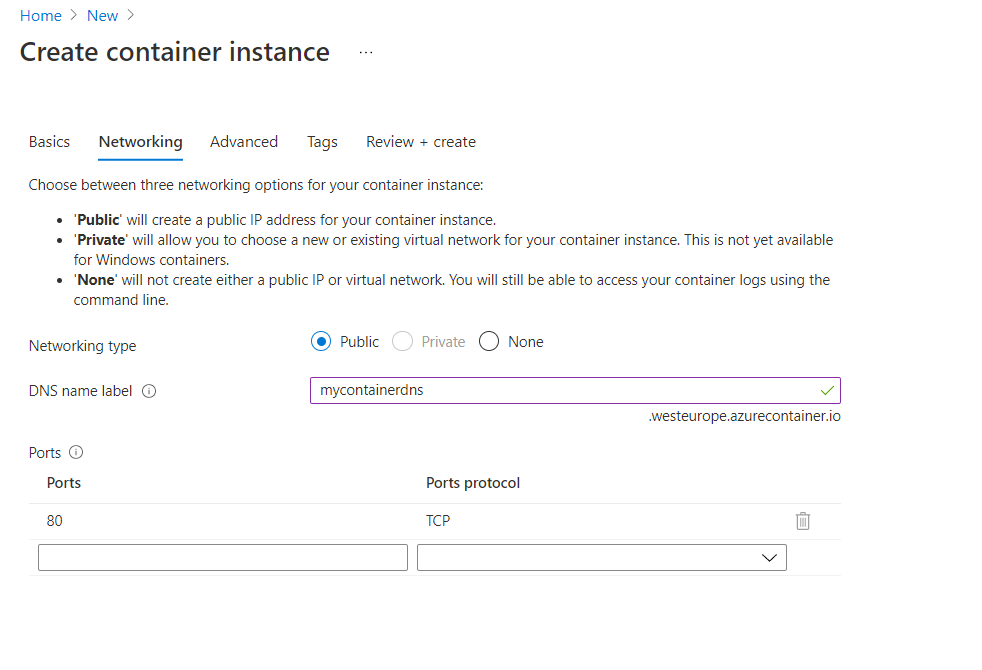
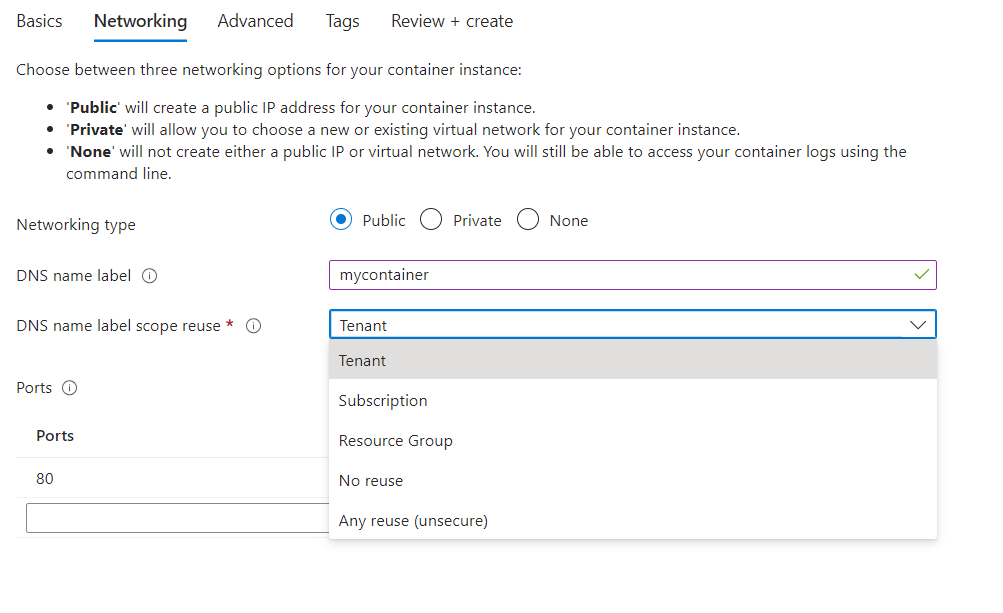
In the Networking section, select between Public or Private accessibility options. For demonstration purposes, we’ve chosen the public option. Assign a DNS name label and specify its Scope, in this case, we’ve set it as “Tenant.” The DNS name label, combined with auto-generated hashed values, forms a fully qualified domain name for accessibility. Proceed to the next step after configuring these settings professionally.

Container Instance details

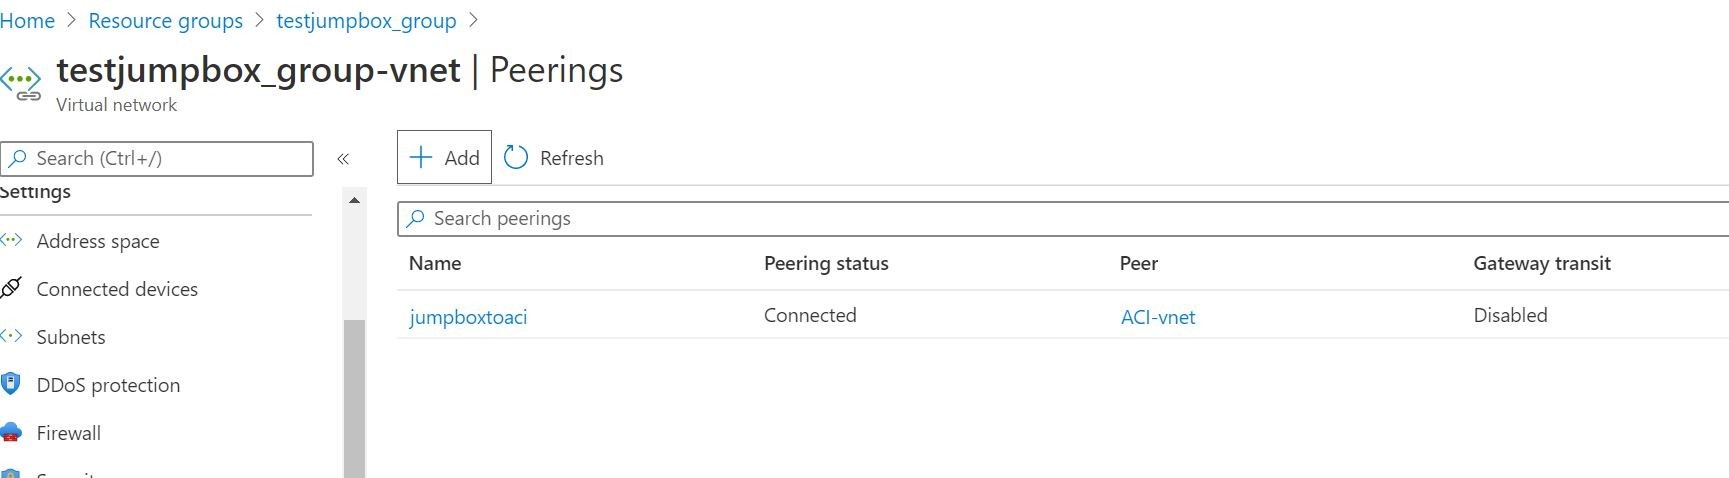
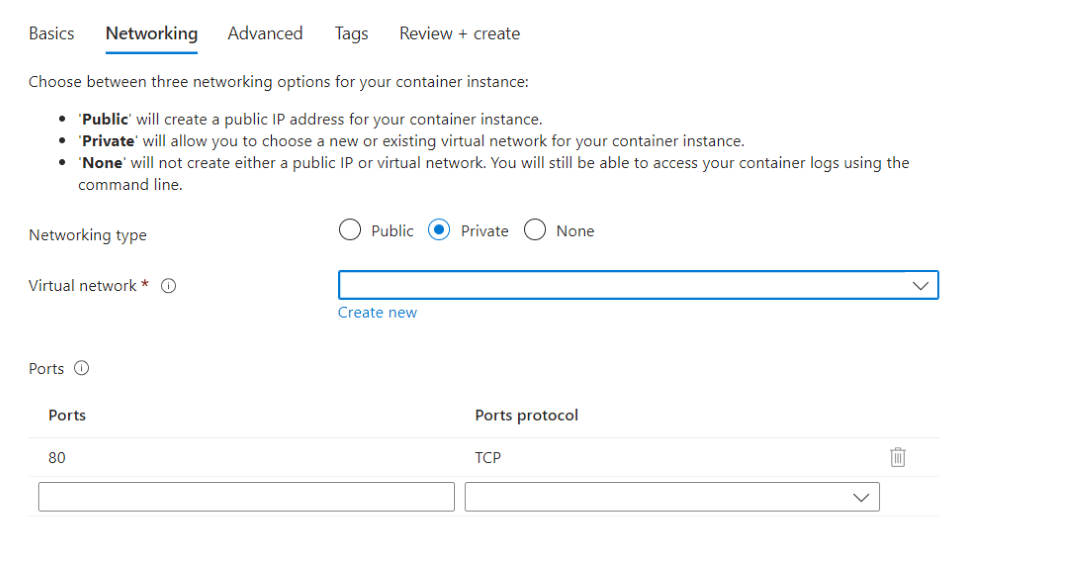
In this scenario, you’re responsible for configuring your own Virtual Network to ensure the private connectivity of your Container Instance within your network environment. This entails setting up the necessary subnets, network security groups, and other networking components to enable communication between your resources securely.

Networking

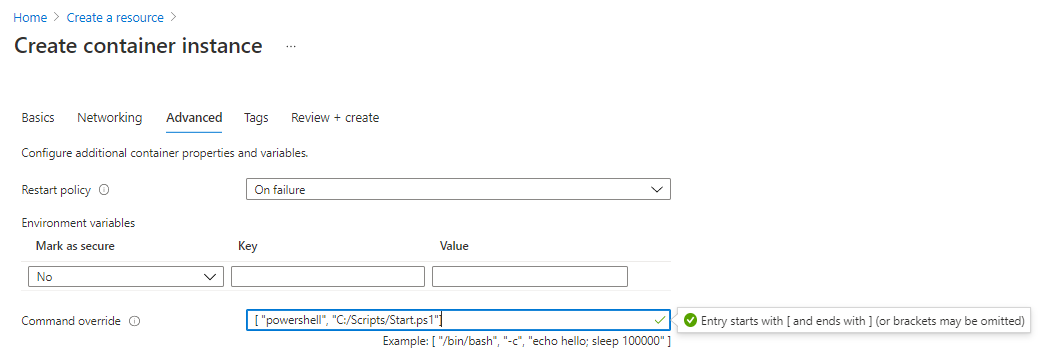
For advanced configurations, you can specify the Restart Policy according to your specific requirements. In this case, the “On failure” option has been selected, ensuring that the container automatically restarts only in the event of a failure, optimizing availability and reliability.

Advanced options

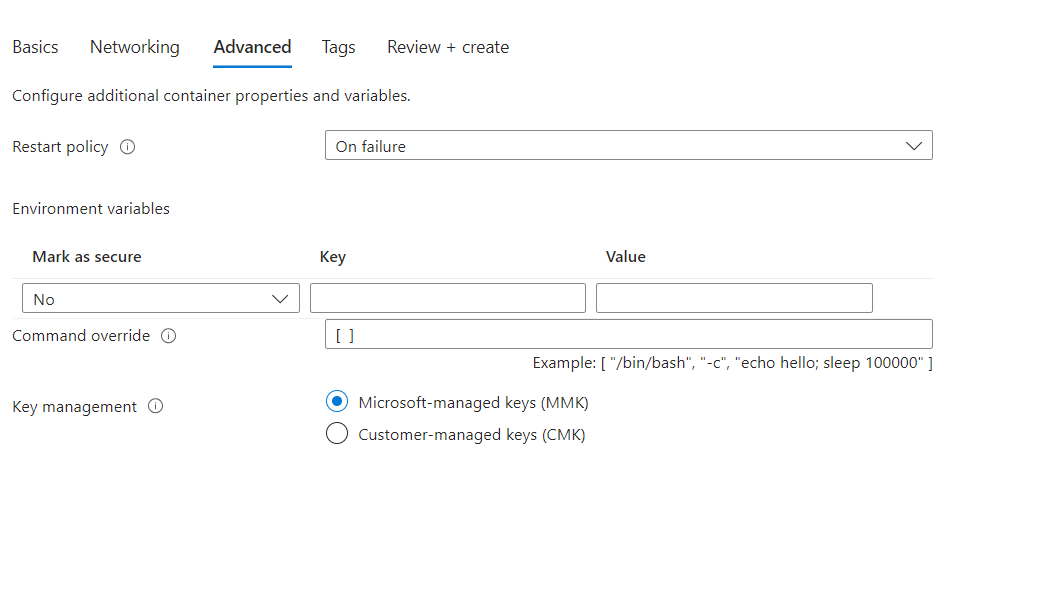
Please do not make any changes to the setups; leave them all as they are.

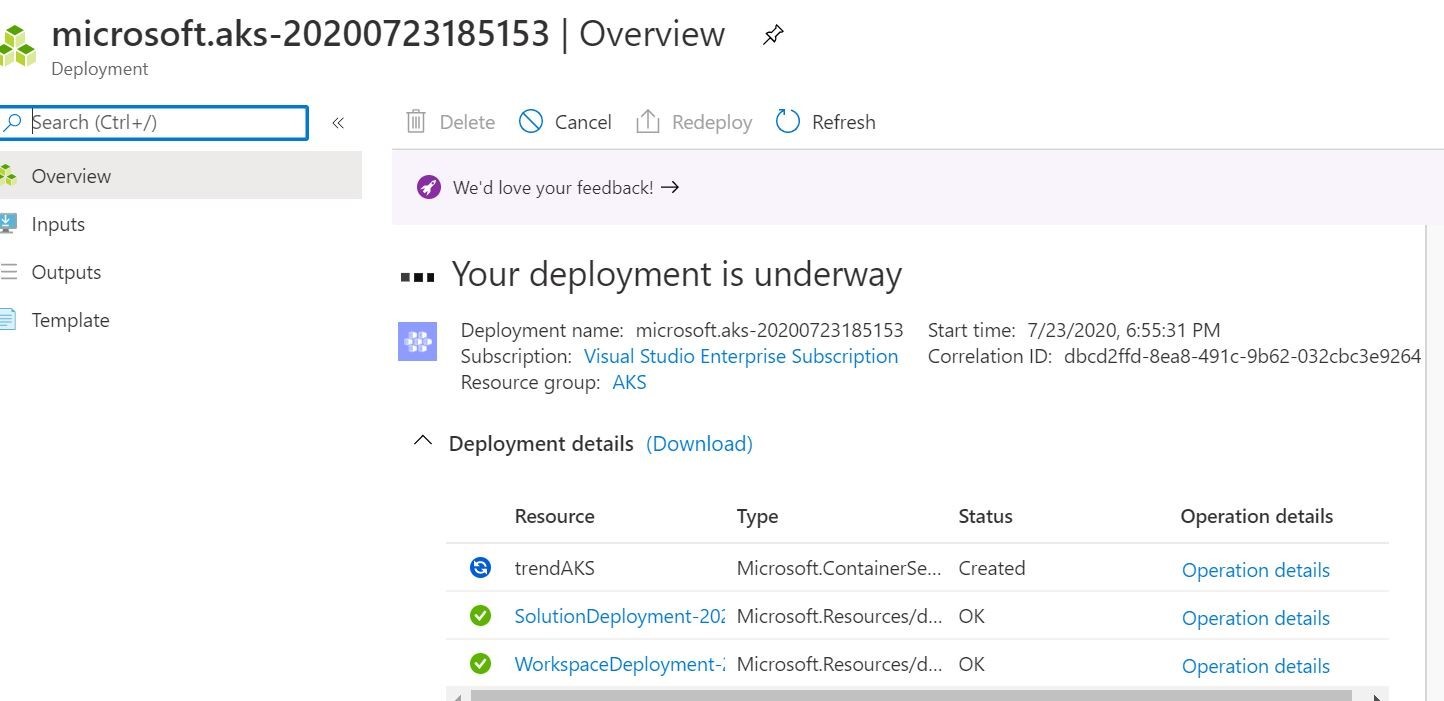
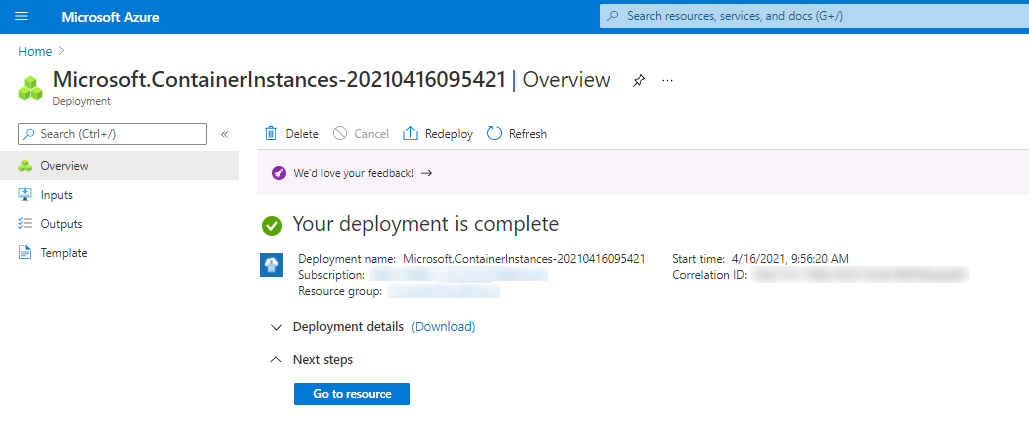
Step 4: After reviewing your settings, proceed to click on “Review + Create” and then select “Create” to initiate the deployment process.

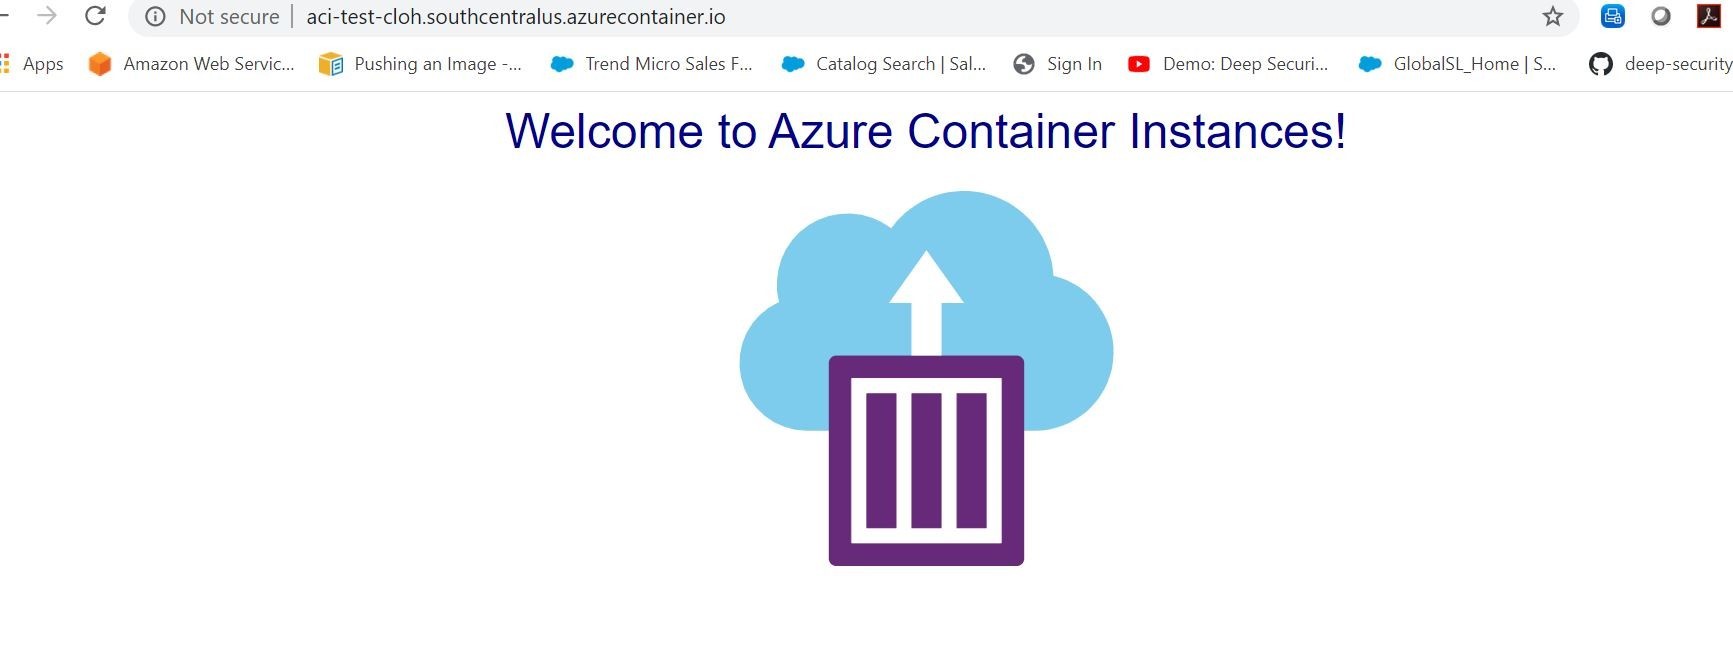
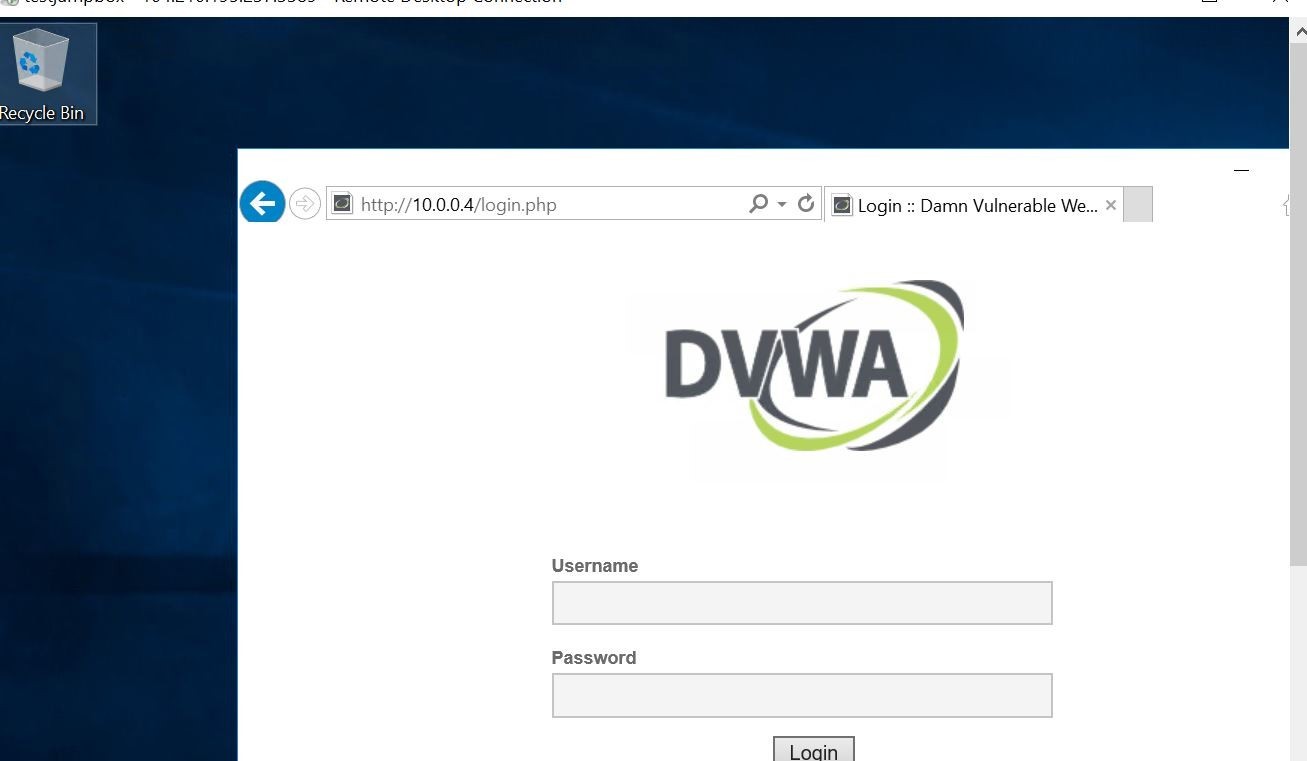
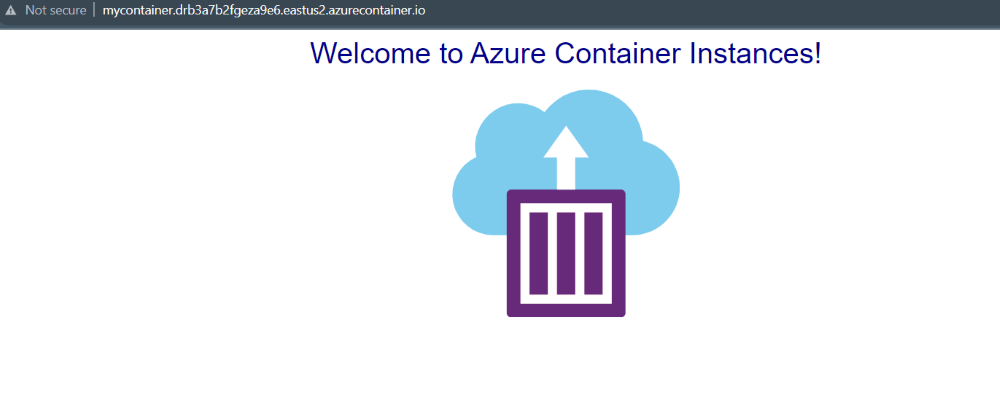
Step 5: Navigate to “Container” and select your container from the overview. Then, click on the Fully Qualified Domain Name (FQDN) link to access your deployed container.

Container overview

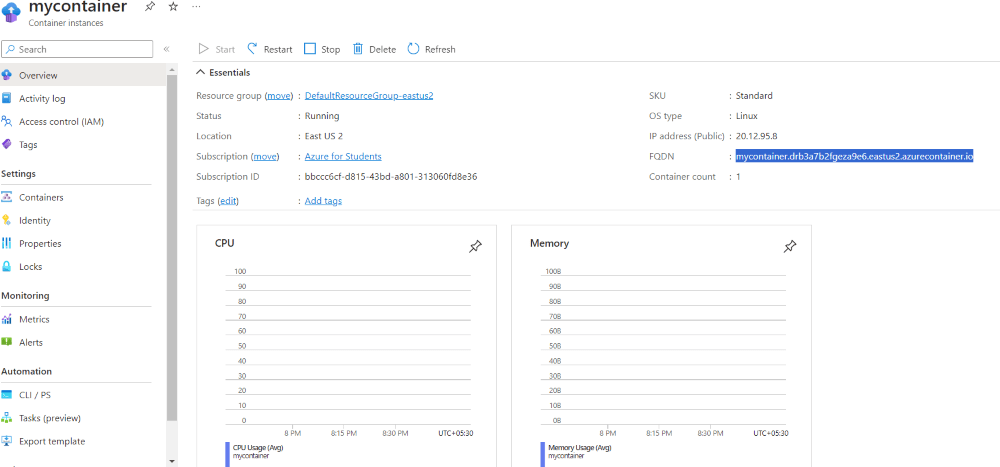
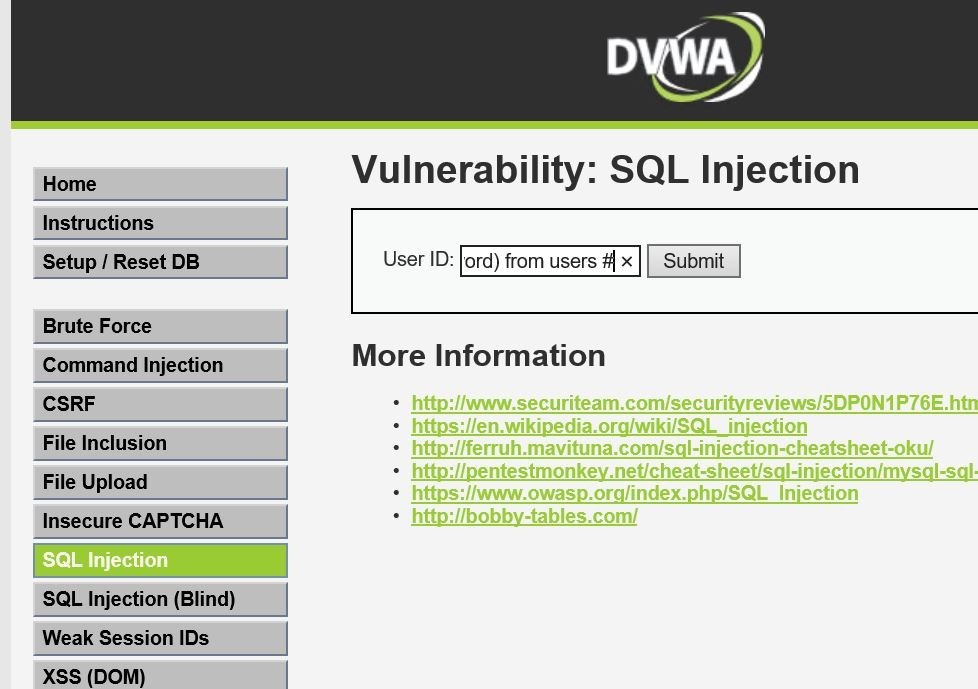
Upon accessing the web page, you can view the details and status of your container instance, allowing you to manage and monitor its performance effectively.

Accessing the Container

View container logs

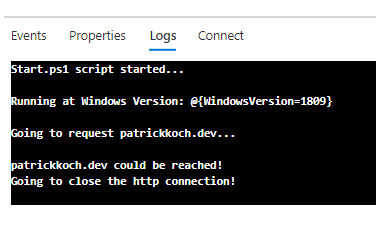
Examining the logs of a container instance proves invaluable for diagnosing potential issues with either the container itself or the application it hosts.

  • Navigate to the Settings section of your container instance configuration.
  • Select Containers and then Logs from the menu options.
  • Review the displayed logs to observe the HTTP GET request that was generated when accessing the application through your browser.

Clean up resources

To ensure proper cleanup and resource management, it’s important to delete container instances that are no longer needed. This helps free up resources and avoid unnecessary costs associated with running idle or unused instances.

  • Navigate to the Overview tab of the “mycontainer” container instance.
  • Click on the Delete button to remove the container instance.

Deploying Containers with Azure Container Instances: Real-World Use Cases

  • Web Applications: Host web applications in containers on ACI for easy deployment and scalability.
  • Microservices Architecture: Deploy microservices as individual containers on ACI to achieve better isolation and scalability.
  • CI/CD Pipelines: Use ACI to run containerized CI/CD pipelines, allowing for quick and efficient testing and deployment of applications.
  • Batch Processing: Run batch processing tasks in containers on ACI to handle periodic or one-time compute-intensive workloads.
  • Dev/Test Environments: Provision temporary development or testing environments by deploying containers on ACI, reducing setup time and resource usage.

Steps To Deploy a Container to Azure Container Instances Using Azure CLI

Follown the steps mentioned below to Deploy a Container to Azure Container Instances Using Azure CLI.

Prerequisites

  • Use the Bash environment in Azure Cloud Shell.
  • For installing azure cli on local refer following link to access the resoures using the azure-cli.

Step 1: Create a resource group

Container instances must be deployed into a resource group in a manner similar to other Azure resources. Resource groups can be used to manage and arrange related Azure resources.

az group create --name myResourceGroup --location eastus

Step 2: Create A Container

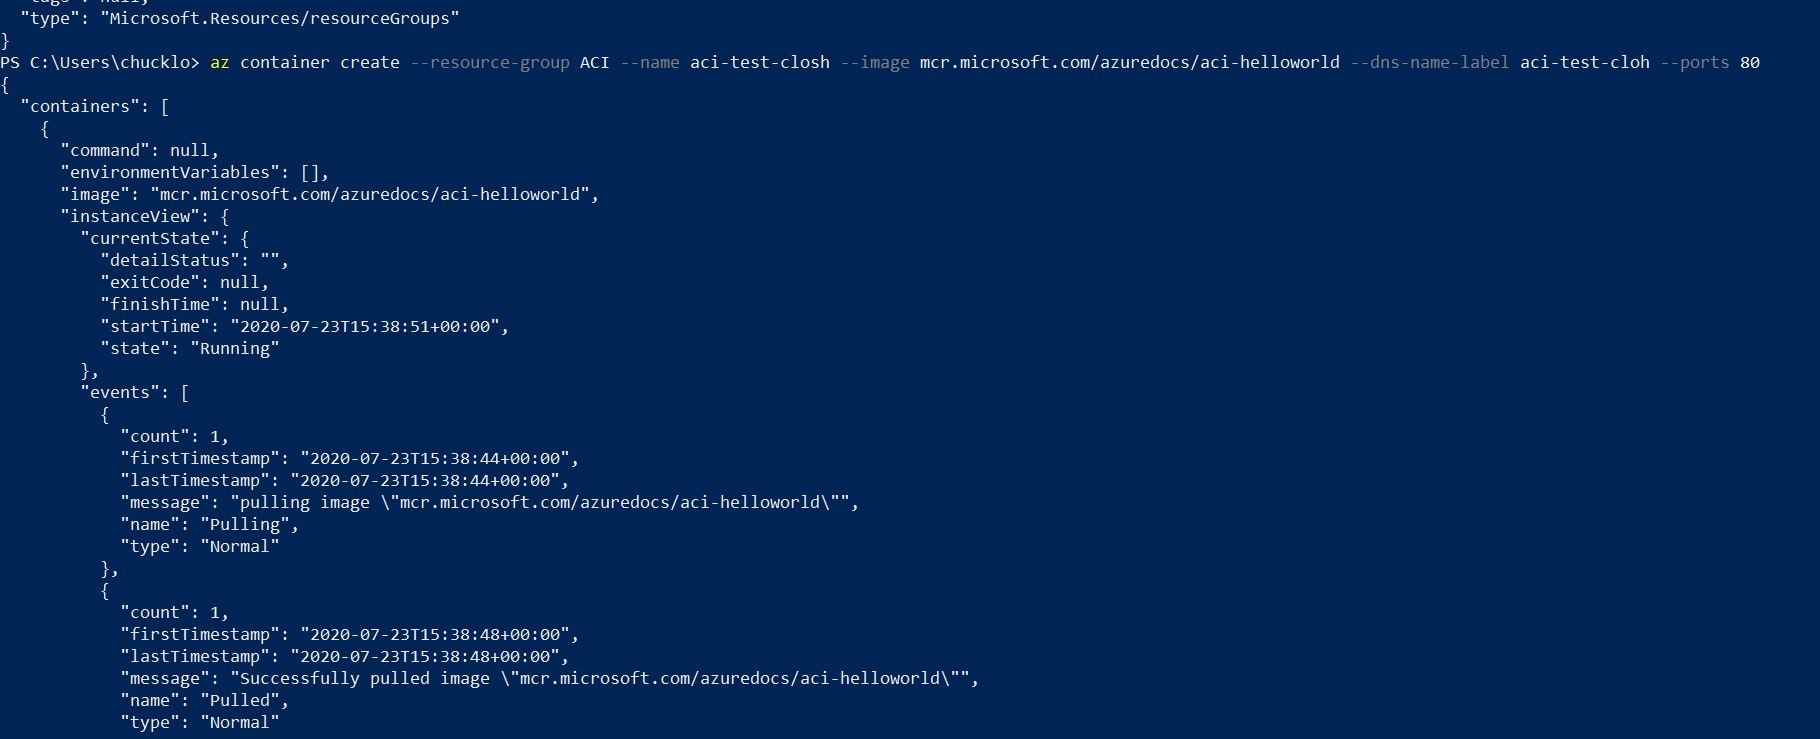
Using the Azure CLI command az container create, a container instance must be created in this stage. Using the Docker image “mcr.microsoft.com/azuredocs/aci-helloworld,” this command establishes a container with the name “mycontainer” in the designated Azure resource group (“myResourceGroup”). It also gives the container the DNS name label “aci-demo” and opens port 80 to network traffic.

az container create --resource-group myResourceGroup --name mycontainer 
--image mcr.microsoft.com/azuredocs/aci-helloworld --dns-name-label aci-demo --ports 80

To obtain information about a particular container instance, use the az container display command. Here, it obtains details about the “mycontainer” container, which is housed in the “myResourceGroup” resource group. The Fully Qualified Domain Name (FQDN) and Provisioning State are properties that are exhibited in a table format using the –out table option. The attributes to display are specified by the –query argument.

az container show --resource-group myResourceGroup --name mycontainer 
--query "{FQDN:ipAddress.fqdn,ProvisioningState:provisioningState}" --out table

Step 3: Pull The Container Logs

The command listed below can be used to get the logs for a particular container instance. Here, it obtains the logs from the “mycontainer” container, which is housed in the “myResourceGroup” resource group. When the containerized application is operating within the container instance, this command can be useful for monitoring and troubleshooting it.

az container logs --resource-group myResourceGroup --name mycontainer

Step 4: Attach output streams

Real-time communication with a container is possible by attaching its standard input, output, and error streams to the local terminal using the az container attach command. Here, it affixes to the “mycontainer” container inside the “myResourceGroup” resource group. The behavior of the containerized application operating within the container instance can be seen and debugged with the help of this command.

az container attach --resource-group myResourceGroup --name mycontainer

Step 5: Clean up resources

To remove a container instance, use the az container delete command. In this instance, it removes the “mycontainer” container instance from the resource group “myResourceGroup.” The container instance and its related resources are permanently removed from the Azure environment by using this command.

az container delete --resource-group myResourceGroup --name mycontainer 

How to Secure Your Azure Container Instances


How to Secure Your Azure Container Instances


 Protecting and securing Cloud Native Application Stacks is something DevOps Professionals must consider. Microsoft Azure Container Instances is a quick and easy way to get your container-based application running within minutes. All this can be accomplished without learning annoying container orchestration tools, and managing servers. Today, we are going to provision a container based application from a public container, and also a private container registry. We are also going to show you how you can secure the container-based application at runtime on Azure Container Instances with Trend Micro Cloud One Application Security. Also, we are going to show how we can secure your Container Registry pre-runtime with Trend Micro Cloud One Container Image Security.

Ok, to get started, we will want to create an Azure Container Instance. You can do this in the Azure Portal and also programmatically as well via the Azure CLI in Microsoft Powershell.

Image 2

Above, you can see that you can fill out your destination Azure Resource Group, name your container application, choose the region you want to deploy from, pick your image source and image that you want to deploy, and finally choose your instance size. Notice that you can pull images from Microsoft Quickstart images, your private Azure Container Registry, or Public Docker Hub/compatible Container Registry. Pretty cool! You can also setup the networking to be public/private. As an added bonus, you can add any associated environment variables and startup commands/scripts.

If you want to try your hand at the programmatic method, you can accomplish all that with a one liner. See the example that I did below with my Azure CLI in Powershell.

Image 3

az container create --resource-group ACI --name aci-test-closh --image mcr.microsoft.com/azuredocs/aci-helloworld --dns-name-label aci-test-cloh --ports 80

This first command will create the Azure Container Instance, and load the appropriate container image that you desired to serve.

Next, you are going to want to see if the actual deployment was successful. You can accomplish that with the following command.

az container show --resource-group ACI --name aci-test-closh --query "{FQDN:ipAddress.fqdn,ProvisioningState:provisioningState}" --out table

The output should be similar below with the FQDN / URL. You can visit that FQDN/URL to access your newly provisioned container based application.

FQDN                                             ProvisioningState
----------------------------------------------   -------------------
aci-test-cloh.southcentralus.azurecontainer.io   Succeeded

Huzzah! We have our container running! All managed for us by Microsoft Azure! Simple, no?

Image 4

You can also get logging information from the container by running this command.

az container logs --resource-group ACI --name aci-test-closh

Logs should output in your console as shown.

listening on port 80
- - [23/Jul/2020:15:49:15 +0000] "GET / HTTP/1.1" 200 1663 "http://40.124.105.38:80/left.html" "Mozilla/5.0 (X11; Ubuntu; Linux x86_64; rv:77.0) Gecko/20100101 Firefox/77.0"
- - [23/Jul/2020:15:54:13 +0000] "GET / HTTP/1.1" 200 1663 "-" "Mozilla/5.0 (X11; Ubuntu; Linux x86_64; rv:76.0) Gecko/20100101 Firefox/76.0"
- - [23/Jul/2020:16:02:19 +0000] "GET / HTTP/1.1" 200 1663 "-" "-"
- - [23/Jul/2020:16:17:35 +0000] "GET / HTTP/1.1" 200 1663 "-" "Mozilla/5.0 (Windows NT 10.0; Win64; x64) AppleWebKit/537.36 (KHTML, like Gecko) Chrome/84.0.4147.89 Safari/537.36"
- - [23/Jul/2020:16:17:35 +0000] "GET /favicon.ico HTTP/1.1" 404 150 "http://aci-test-cloh.southcentralus.azurecontainer.io/" "Mozilla/5.0 (Windows NT 10.0; Win64; x64) AppleWebKit/537.36 (KHTML, like Gecko) Chrome/84.0.4147.89 Safari/537.36"
- - [23/Jul/2020:16:22:41 +0000] "GET / HTTP/1.1" 200 1663 "-" "Mozilla/5.0 (Windows NT 6.1; Win64; x64) AppleWebKit/537.36 (KHTML, like Gecko) Chrome/72.0.3626.109 Safari/537.36"

When you want to no longer run the container instance anymore, you can go ahead run this command.

PS C:\Users\chucklo> az container delete --resource-group ACI --name aci-test-closh
Are you sure you want to perform this operation? (y/n): y
{ "containers": [

Well, that is some amazing stuff! Within minutes I can run a container image of my choosing with a few clicks on the Azure Portal, or a few Azure CLI commands.

Ok, so how do I protect my application? I cannot touch the underlying infrastructure from Microsoft to secure it! Well, the smart folks at Trend Micro have engineered two solutions that go together like PB&J, or maybe even chocolate and peanut butter, or....ok let's just talk about security!

This time I am going change things up a bit to run a new deployment and pull a container image out of my private Azure Container Registry. This is a purposely vulnerable php-based container that has something powerful under the hood. I have pre-installed the Trend Micro Cloud One Application Security libraries. By injecting the security libraries into the container image code, this will provide built in runtime level protection in the container image!

Image 5

So, lets go ahead and execute the deployment. This time we will do it through the Azure Portal shown below. We will see if everything works as intended. The end result is that the application calls home to our Trend Micro Cloud One Application Security dashboard for real time protection! Since this container is vulnerable, I am going to not make it publicly accessible. So, I will adjust the networking of the Azure Container Instance service and tie it into a private virtual network. All this is shown below in my Azure Portal for reference.

Image 6
Image 7
Image 8

Ok! This looks like the container instance is currently running. We can verify/see in my Azure CLI output below.

Image 9

Alrighty then! So, what I am going to do now is go ahead create an Azure Windows Virtual Machine as a Jumpbox. Then peer the Azure Container Instance Network with my Azure Virtual Machine Jumpbox network. Why you ask? Just so I can securely access the containerised application privately as a test. I don't want the containerised vulnerable app exposed to the net. I accomplish this via peerings and network security groups.

Image 10

Cool! That worked so now I can access the test web application by private IP address from my jumpbox specifically. It's nice when things work!

Image 11

Let's go ahead and logon to the container-based web application, and simulate some test attacks on the web application and see if our findings show up on our Trend Micro Cloud One Application Security Console. I will go ahead and start off with a SQL Injection based attack.

Image 12

Huzzah! The request was flat out denied 403/blocked and a threat detection was logged in my Cloud One Trend Micro Application Security dashboard in real-time shown below!

Image 13
Image 14

But wait there's more! We can also check the event details, and see where the triggered event came from. Because the security libraries are part of that container image, we can see what file was attacked/tried to be exploited, and the associated stack trace information!

Image 15
Image 16

Ok! this is great! We got a lot of things accomplished here. We found an easy way to deploy container based applications in mere minutes, we aren't worrying and losing sleep on the Microsoft Azure underlying infrastructure, and we are able to provide built in real-time security protection inside the container image itself!

Now, time to adjust our thinking. It's time to shift left and out of runtime level protection mode. We certainly checked the box there! In our second example, we pulled this container image from our private Azure Container Registry. What if we could check for vulnerabilities in this container registry on those associated images, and then alert your DevOps staff that they lurk in there to begin with? Ok, now we are talking! This is where you can deploy our Trend Micro Cloud One Container Image Security Solution. This solution you will need to deploy utilising Azure Kubernetes Service. If you are ready to jump into a larger world. Then read on my friends!

I am going to spin up a quick Azure Kubernetes Service and issue the deployment shown below.

Image 17

One thing you are going to want to do after successful deployment is go ahead and get the credentials of your cluster.

Go ahead and run this first to install the kubectl. This will allow you to connect and manage your AKS cluster.

az aks install-cli

You then will be able to get the credentials of your AKS cluster by running this command. This will add the associated credentials to your local kube config file.

Image 18

To make sure you are able to connect to your new AKS cluster, run the following command. Output should be pretty similar as below. Mileage may vary!

Image 19

Last, but not very least, you are going to want to install helm to be able to deploy into your kubernetes cluster what is called a helm chart. The easiest way to do this would be to use the chocolatey package manager, and run the following choco command.

choco install kubernetes-helm

You will know if helm is working if you type in helm in Microsoft Powershell and get a similar output.

Image 20

Ok, so let's go ahead and deploy Trend Micro Cloud One Container Image Security. Note: The overrides.yaml file referenced below will contain your trial license code from Trend Micro that you can request here. https://www.trendmicro.com/product_trials/download/index/us/168

helm install --values overrides.yaml deepsecurity-smartcheck https://github.com/deep-security/smartcheck-helm/archive/master.tar.gz

When you do that, you should get some similar output. This is going to list out the helm release deployed, and your decryption strings to decrypt the default credentials to logon to the web console.

Image 21

You are going to want to run the following kubectl command to get the public ip address of the Azure Loadbalancer that is/has been created by the helm chart deployment.

Image 22

Now, let's go ahead and visit the console and login. You will get prompted to change your credentials upon first logon.

Image 23

The first thing you will get prompted to add (drum roll.....) is your Azure Container Registry! What a surprise right?

Image 24

You can pull your logon creds out of your Azure Container Registry in the Microsoft Azure Portal under the ACR Service section ---> Access Keys.

Once your registry has been added go ahead and run a scan. You can see my active scans going on as an example below. Progress!

Image 25

Should take a few minutes to scan the images and we can see what we find! Oh, the suspense.......

Image 26

Golly Bob Howdy! That's a lot of vulnerabilities! Thank goodness we have that runtime level protection turned on folks! Let's take a quick gander what's going on here! Well, no malware that's a good thing to start! However, pretty cool that we can use Trend Micro's world renowned malware protection! Right? Content findings....what is that?

Image 27

Wow! Definitely do not want that in there. Look at that! It found a pem key file!

Let's take a look at vulnerabilities. Wow! Again! Look at all those PHP vulnerabilities! Looks like there are even links to the associated package fixes. If only I did some upgrading of those packages inside the container would clear a lot of those up! Upgrade for the win!

Image 28

Ok, cool with the linkage it takes me to the associated write-up and links to download the latest package.

Image 29

Well, isn't that special? This is all good information to have. I can either patch and fix these container images, or maybe I just yank it out of the registry altogether.

Azure - Container Instances


Azure - Container Instances


aci_conncet_container

Introduction

I’ve tried the service Azure Container Instances for the very first time at the starting point of an attempt to get Container, which are hosted on premise, to a running state within the Azure Cloud. Finally, for getting a successfull deployment of the ACI, I was facing some obstacles and the intention of this post is to summarize a best practice approach (at least it worked for me) of this service including all pitfalls I’ve faced.

Prerequisites

According to be well prepared, there is IMHO just a simple rule to consider: If you are capable of pulling your Container Image and getting your Container in a running state outside of your usual network or if you are able to push your Container Image to an Azure Container Registry, then nothing more can block your establishment of an Azure Container Instance deployment. Also be aware of any prerequistes, which you need to run your e.g.: application inside the Container, e.g.: License Server, Shares, etc…

Btw.: Taking into account that you’ve a proper Azure subscription available ;)

Choice of the Container Registry

You can dedicde whether you’d like to access your Container Image from a private or public Container Registry - in case of the private Registry ensure you get the proper credentials and that the necessary permissions (read/write) are set. Another option would be to choose the Container Registry of Azure - the Azure Container Registry

https://azure.microsoft.com/en-us/services/container-registry/

Private Container Registry vs. Azure Container Registry

Reasons for using a Private Container Registry

  • You don’t need to re-tag and push your new Container Image to the Azure Container Registry if you would like to create a new Container Instance refering to the new Container Image - you are ready as your Container Image is available at your already established Container Registry
  • There may exist some security related reasons, that the Container Image has to be managed within your private Registry, which is hosted/managed by yourself.
  • A different Container Registry, e.g.: the Azure Container Registry would be an additional service for which you’ve (probably) to pay

Reasons for using the Azure Container Registry

  • Container Images, which are already provided at the Azure Container Registry can be easily during the set up of an Azure Container Instance (will be explained in more detail)
  • Longer waiting period as the Container Image needs to be pulled to establish an Azure Container Instance deployment in contrast to the Azure Container Registry - during my attempts its faster to pull from the Azure Container Registry. During my different deployments, it took ~5 minutes more time to get the same Image pulled from my private Registry in contrast to the Azure Container Registry.

Azure Container Instances Deployment Step by Step

Example Container Image

I’ve prepared a self-made Container Image, which will be used for creating an Azure Container Instance. It is available at my own Container Registry “patricksregistry” (see picture below). The Container is Windows based and after running it, a simple http-request to this webside is done (can be observed at the logs).

The content of the Dockefile can be seen in the snippet below:

FROM mcr.microsoft.com/dotnet/framework/runtime:4.8-windowsservercore-ltsc2019

WORKDIR "C:/Scripts"

ADD "Scripts/Start.ps1" "C:/Scripts"

ENTRYPOINT powershell -File Start.ps1

The mentioned http-request in implemented within the “Start.ps1” Powershell script.

aci_acr

The corresponding Dockerfile can be downloaded at:

https://github.com/patkoch/blog-files/tree/master/post6

Basics

Let’s start to create a Container Instance within Azure, by using the simple Example Container Image.

After choosing the Container Instances from the Azure Portal:

aci_create

the Azure Portal already suggests to use some available Quickstart images (see picture below).

aci_create
  • Subscription: Your subscription should already be selected
  • Resource group: Choose a resource group of your choice or create a new one
  • Container name: Provide an arbitray name of your Container: just be aware of the naming convention
  • Region: Select a region, which is close to your location
  • Image source: As already mentioned: you’ve to decide whether you’d like to use a private/public registry (Docker Hub or other registry) or the Azure Container Registry
  • Image: If Azure Container Registry was choosen, then you can select already available images from the menu (if you’ve provided some). If Docker Hub or other registry was choosen, then you’ve to manually enter the image
  • OS type: Select Linux if your Container has a Linux Image as Base Image or Windows if it is a Windows based system.
  • Size: Provide proper resources concerning CPU and Memory so that your Container can achieve a running state after the ACI deployment

In addition if *Docker Hub or other registry" was selected: in that case you again have to distinguish whether the source of your Container Image is a public or a private registry. For the second choice, you’ve to provide the proper values for the login server and the corresponding user name and password, which can be seen below:

aci_create

Let’s insert the proper data related to my Example Container Image: I’m going to name the Container Instance “patrickscontainerinstance”, which is stored - of course - at my own mentioned Container Registry named “patricksregistry. The Image is named “patricksrepo/containerpost06”, the Image Tag is “firstversion”. As OS type, I’ve to choose “Windows”. As the Container Image is managed at an “Azure Container Registry”, I don’t have to provide some credentials.

aci_patrickscontainer

Networking

The next tab Networking provides a form to enter ports, which you’d like to reveal and whether your Container should get an IP address or not. I suggest to choose “public”, so that the Container gets an IP. If the Container needs to access e.g.: a File share, this won’t work without choosing “public” (“private” option does not work for Windows Container).

aci_networking

Advanced

At this section, you’ve to provide the proper Command override command string. According to my Example Container, it fits by providing following information:

  • Shell Environment: At my example, I’m using “Powershell” as Shell Environment
  • Full Path to the “Start.ps1” Script: Script, which is called at the Entrypoint of the Dockerfile

The documentaton for the Command override can be found here:

https://docs.microsoft.com/en-us/azure/container-instances/container-instances-start-command

aci_advanced

The working Command override string for my Container can be seen below:

[ "powershell", "C:/Scripts/Start.ps1" ]

Deployment

After applying the settings and waiting for a few minutes for getting the image pulled, the Azure Container Instance is ready.

aci_deployment_complete
aci_connect_container

You can access the Container by choosing “Connect” and entering “cmd” (for Windows Container), respectively by choosing “Logs” you’d see the related outputs, which are implemented within the Powershell Script File “Start.ps1”

aci_connect_container