Thursday, 15 June 2023

What is Amazon Glacier?

 AWS offers a wide range of storage services that can be provisioned depending on your project requirements and use case. AWS storage services have different provisions for highly confidential data, frequently accessed data, and the not so frequently accessed data. You can choose from various storage types namely, object storage, file storage, block storage services, backups, and data migration options. All of which fall under the AWS Storage Services list.

AWS Glacier: From the aforementioned list, AWS Glacier, is the backup and archival storage provided by AWS. It is an extremely low cost, long term, durable, secure storage service that is ideal for backups and archival needs. In a lot of its operation AWS Glacier is similar to S3, and, it interacts directly with S3, using S3-lifecycle policies. However, the main difference between AWS S3 and Glacier is the cost structure. The cost of storing the same amount of data in AWS Glacier is significantly less as compared to S3. Storage costs in Glacier can be as little as $1 for one petabyte of data per month.

AWS Glacier Terminology

1. Vaults: Vaults are virtual containers that are used to store data. Vaults in AWS Glacier are similar to buckets in S3.

  • Each Vault has its specific access policies(Vault lock/access policies). Thus providing you with more control over who has what kind of access to your data.
  • Vaults are region-specific.

2. Archives: Archives are the fundamental entity type stored in Vaults. Archives in AWS Glacier are similar to Objects in S3. Virtually you have unlimited storage capacity on AWS Glacier and hence, can store an unlimited number of archives in a vault.

3. Vault Access Policies: In addition to the basic IAM controls AWS Glacier offers Vault access policies that help managers and administrators have more granular control of their data.

  • Each vault has its own set of Vault Access Policies.
  • If either of Vault Access Policy or IAM control doesn’t pass for some user action. The user is not declared unauthorized.

4. Vault Lock Policies: Vault lock policies are exactly like Vault access policies but once set, they cannot be changed.

  • Specific to each bucket.
  • This helps you with data compliance controls. For example- Your business administrators might want some highly confidential data to be only accessible to the root user of the account, no matter what. Vault lock policy for such a use case can be written for the required vaults.

Features of AWS Glacier

  • Given the extremely cheap storage, provided by AWS Glacier, it doesn’t provide as many features as AWS S3. Access to data in AWS Glacier is an extremely slow process.
  • Just like S3, AWS Glacier can essentially store all kinds of data types and objects.
  • Durability: AWS Glacier, just like Amazon S3, claims to have a 99.9999999%  of durability (11 9’s). This means the possibility of losing your data stored in one of these services one in a billion. AWS Glacier replicates data across multiple Availability Zones for providing high durability.
  • Data Retrieval Time: Data retrieval from AWS Glacier can be as fast as 1-5 minutes (high-cost retrieval) to 5-12 hours(cheap data retrieval).
  • AWS Glacier Console: The AWS Glacier dashboard is not as intuitive and friendly as AWS S3. The Glacier console can only be used to create vaults. Data transfer to and from AWS Glacier can only be done via some kind of code. This functionality is provided via:
    • AWS Glacier API
    • AWS SDKs
  • Region-specific costs: The cost of storing data in AWS Glacier varies from region to region.
  • Security: 
    • AWS Glacier automatically encrypts your data using the AES-256 algorithm and manages its keys for you.
    • Apart from normal IAM controls AWS Glacier also has resource policies (vault access policies and vault lock policies) that can be used to manage access to your Glacier vaults.
  • Infinite Storage Capacity: Virtually AWS Glacier is supposed to have infinite storage capacity.

Data Transfer In Glacier

1. Data Upload: 

  • Data can be uploaded to AWS Glacier by creating a vault from the Glacier console and using one of the following methods:
    • Write code that uses AWS Glacier SDK to upload data.
    • Write code that uses AWS Glacier API to upload data.
    • S3 Lifecycle policies: S3 lifecycle policies can be set to upload S3 objects to AWS Glacier after some time. This can be used to backup old and infrequently access data stored in S3.

2. Data Transfer between regions:

AWS Glacier is a region-specific service. Data in one region can be transferred to another from the AWS console. This cost of suck a data transfer is $0.02.

3. Data Retrieval

As mentioned before, AWS Glacier is a backup and data archive service, given its low cost of storage, AWS Glacier data is not readily available for consumption. 

  • Data retrieval from Glacier can only be done via some sort of code, using AWS Glacier SDK or the Glacier API.
  • Data Retrieval in AWS Glacier is of three types:
    • Expedited:
      • This mode of data retrieval is only suggested for urgent requirements of data.
      • A single expedited retrieval request can only be used to retrieve 250MB of data at max.
      • This data is then provided to you within 1-5 minutes.
      • The cost of expedited retrieval is $0.03 per GB and 0.01 per request.
    • Standard:
      • This data retrieval mode can be used for any size of data, full or partial archive.
      • This data is then provided to you within 3-5 hours.
      • The cost of standard retrieval is  $0.01 per GB and $0.05 per 1000 requests.
    • Bulk:
      • This data retrieval is suggested for mass retrieval of data (petabytes of data).
      • It is the cheapest data retrieval option offered by AWS Glacier
      • This data is then provided to you within 5-12 hours.
      • The cost of bulk retrieval is 0.0025 per GB and 0.025 per 1000 requests

Amazon S3 – Cross Region Replication

 The AWS S3 – Cross-region replication (CRR) allows you to replicate or copy your data in two different regions. But why do you need to set up CRR? There are many possible scenarios where setting up cross-region replication will prove helpful. Some of them are enlisted below:

  1. Improving latency and enhancing availability: If you are running a big organization with customers all around the world then making objects available to them with low latency is of great importance. By setting up cross-region replication you can enable your customers to get objects from S3 buckets which are nearest to their geographic location.
  2. Disaster recovery: Having your data in more than one region will help you prepare and handle data loss due to some unprecedented circumstances.
  3. To meet compliance requirements: Sometimes just to meet compliance requirements you will need to have a copy of your data in more than one region and cross-region replication can help you achieve that.
  4. Owner override: With AWS S3 object replication in place you can maintain the same copy of data under different ownership. You can change the ownership to the owner of the AWS destination bucket even if the source bucket is owned by someone else.

Setting up CRR:

Follow the below steps to set up the CRR:

  • Go to the AWS s3 console and create two buckets.
  • Let’s name our source bucket as source190 and keep it in the Asia Pacific (Mumbai) ap-south 1 region. Do not forget to enable versioning. Also, note that the S3 bucket name needs to be globally unique and hence try adding random numbers after bucket name.

Source bucket: source190

  • Now following the same steps create a destination bucket: destination190 with versioning enabled but choose a different region this time.  

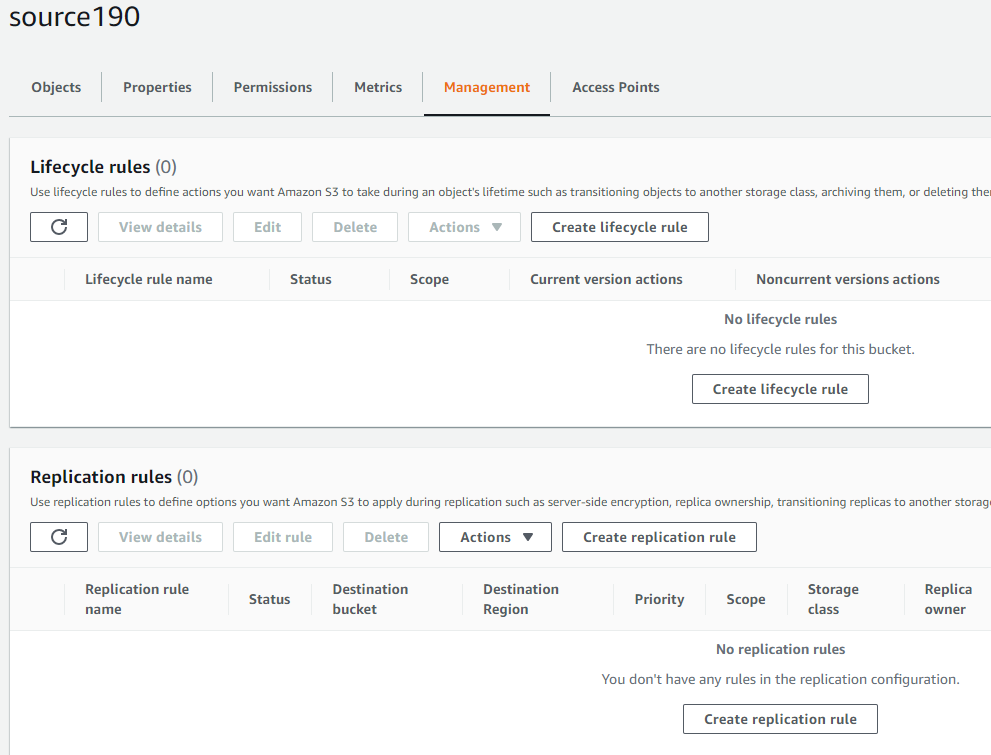
  • Now click on your source bucket and head over to the management tab:

  • Now, click on “Create a replication rule” and give your replication rule a name as “ replicate190”  

  • Choose the destination bucket as “destination190”. 

Set destination bucket

Notice that you have an option to choose a destination bucket in another account. 

  • In order to replicate objects from the source bucket to the destination bucket, you need to create an IAM role. So just create one by clicking on “create a new role”.  

Create IAM role

  • If you want your S3 objects to be replicated within 15 minutes you need to check the “Replication Time Control (RTC) box. But you will be charged for this. So we will move forward without enabling that for now and click on save.  

As soon as you click on save, a screen will pop up asking if you want to replicate existing objects in the S3 bucket. But that will incur charges so we will proceed without replicating existing objects and click on submit.  

  • After completing this setup you can see a screen saying “Replication configuration successfully updated”. 

It’s time to test! Now go to the source bucket: source190 and upload a file.  

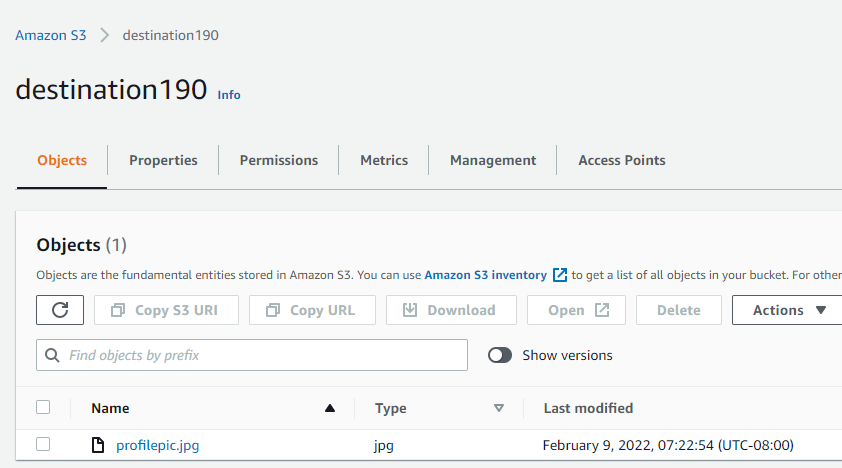
Now head over to our destination bucket: destination190 to check if the uploaded file is replicated to our destination bucket. You can see that our uploaded file is successfully copied to the destination bucket:

Note: Do not forget to empty your buckets and then delete them, if you do not have any further use. Also, you cannot delete a bucket if it is not empty.  

Some important points about CRR:

For cross-region replication you must have:

  • Source bucket and destination bucket in different regions (for the same region you can use the same region replication or SRR).
  • Versioning is enabled in both the source as well as destination bucket.

When objects are replicated to a different region then:

  • Object metadata, Access control list (ACL), and object tags are also replicated.
  • The objects which were already present in the source bucket before setting up replication will not be replicated or copied to the destination bucket by default but you can perform a one-time batch operations job but that will incur additional charges.
  • If your source bucket is acting as a destination bucket for another bucket or there are objects replicated in the source bucket from another bucket, then those objects will not be replicated to the destination bucket.

You can also enable bi-directional CRR by making the source bucket also the destination bucket for the destination bucket and vice versa.  

Lastly, it is not necessary to have a destination bucket in the same account. AWS Cross-Region Replication can also be implemented in cross accounts ( given that the owner of the source bucket have the permission to copy data in the destination bucket)  

Amazon S3 – Lifecycle Management

 An S3 Lifecycle Management in simple terms when in an S3 bucket some data is stored for a longer time in standard storage even when not needed. The need to shift this old data to cheaper storage or delete it after a span of time gives rise to life cycle management.

Why is it needed?

Assume a lot of data is updated in an S3 bucket regularly, and if all the data is maintained by standard storage it will cost you more(even if previous data is of no use after some time). So, to avoid extra expenses and to maintain data as per requirement only life cycle management is needed. 

There are 2 types of actions:

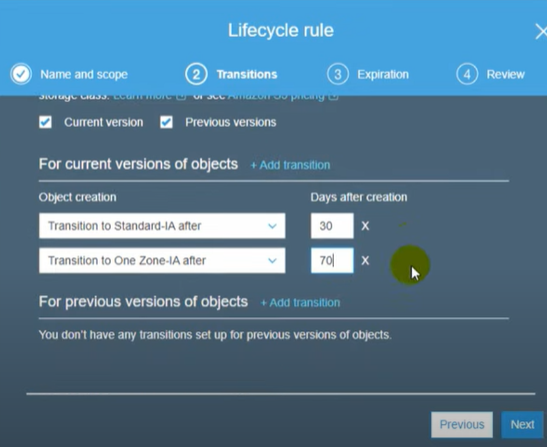
  1.  Transition actions: Moving objects from one storage class to another storage class. Each storage class has a different cost associated with it.
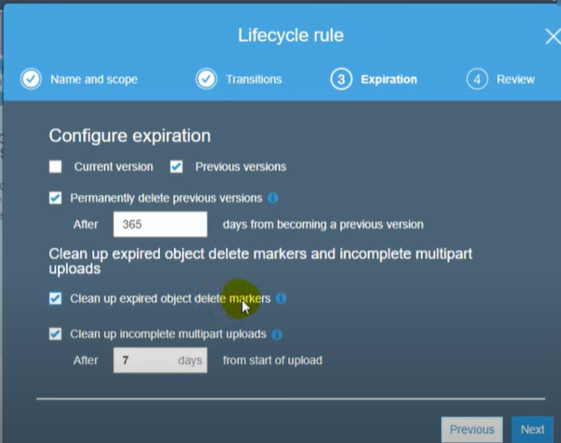
  2.  Expiration actions: When objects expire after a span of time (say 30 days,60 days, etc). Amazon S3 deletes expired objects on your behalf. 

Implementation:

Follow the below steps to implement the S3 life cycle management:

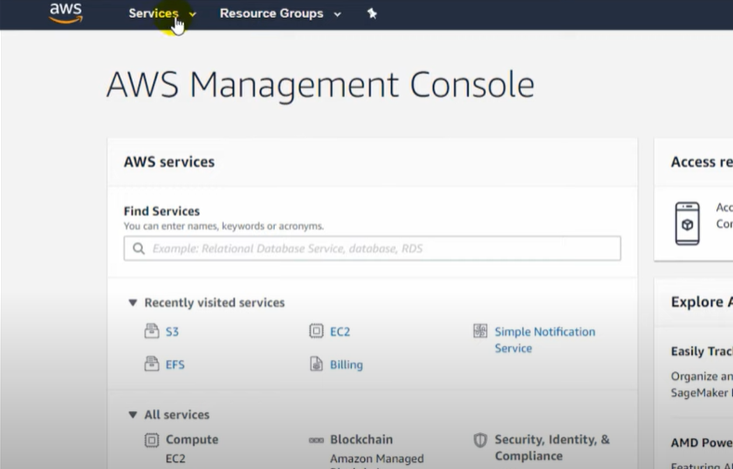
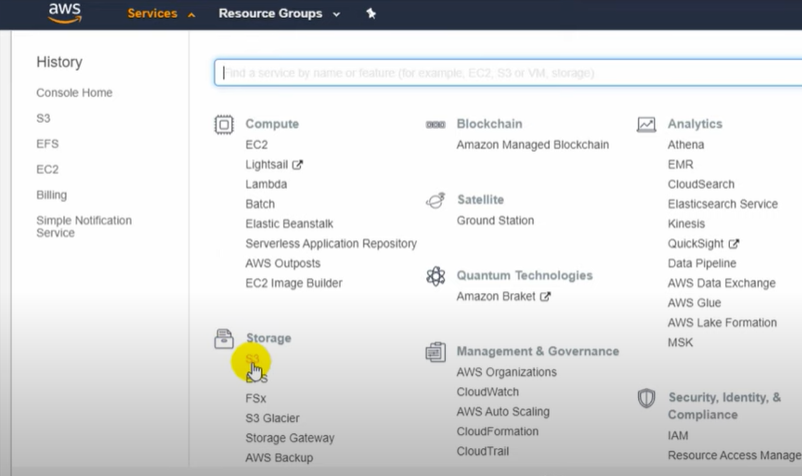
Step 1: Login to your AWS,  and go to services then under to S3.

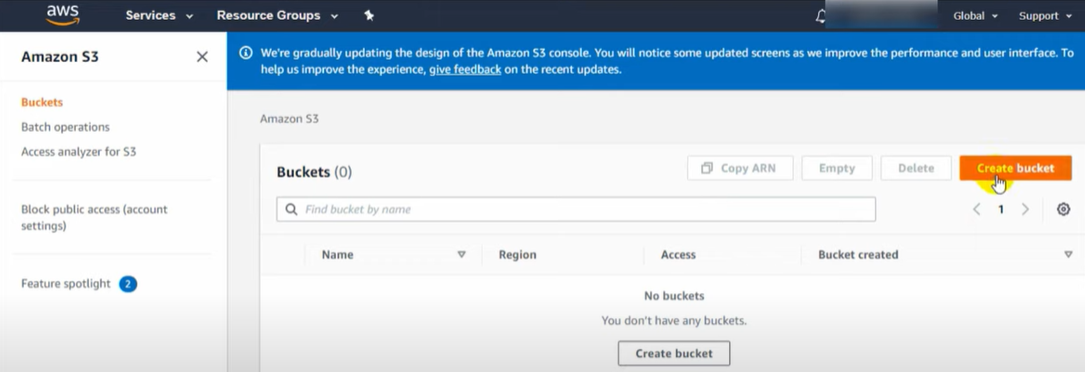
Step 2: Create a bucket, since applied to the bucket and not on a specific object or full storage.

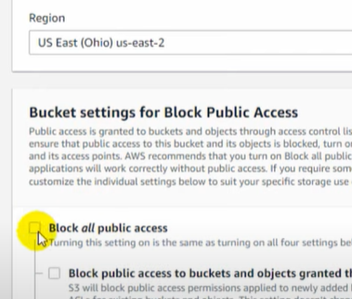
  • Give bucket name(Try to give it a unique name else it will give an error later), uncheck the Block all public access. option.

  • Then check the “I acknowledge …” checkbox and click on CREATE BUCKET.

Step 3: Upload data into the bucket. 

update following permission, click on next, and upload 

Step 4: Go back to your bucket, and go to “Management”

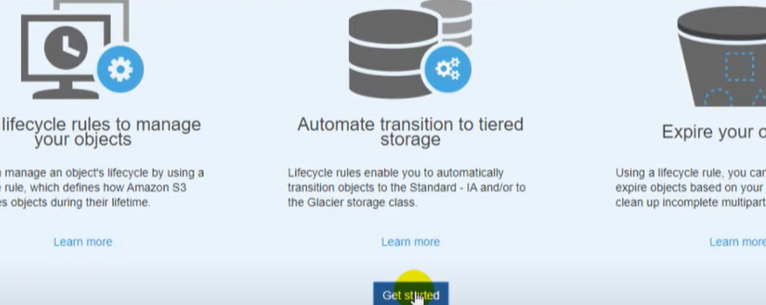
  • Click on “Get Started”.

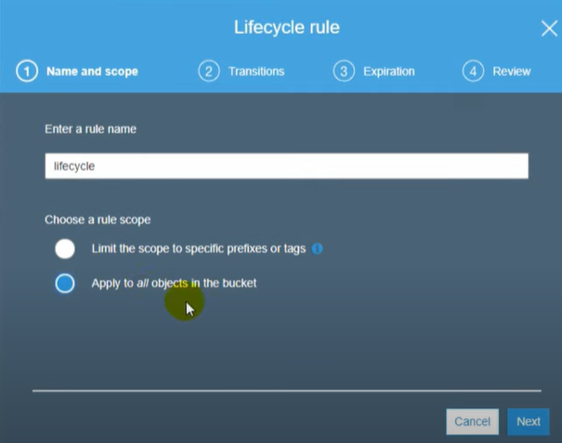
  • Give life cycle name(need not be unique) and update settings.

  • Add transitions(i.e. transferring data from standard storage to ones that cost less after a span of  when data is no more useful. )

  • Do expiration settings (days after which data needs to be cleared from storage) and Save.

Step 5: Finally, an S3 bucket with LIFE CYCLE MANAGEMENT is created and will apply to all the data uploaded in the future.

Difference between Amazon S3 and SecureSafe

 1. Amazon S3 : 

Amazon S3 stands for Amazon Simple Storage Service. It is a cloud storage service that is provided by Amazon Web Services. It provides object storage through a web service interface. It allows us to store any type of objects like data lakes for analytics, data archives, backup and recovery, disaster recovery, hybrid cloud storage and internet applications. It was launched by AWS in 2006. 

2. SecureSafe : 
SecureSafe is a file hosting service and cloud storage which is provided by DSwiss AG. It provides password safe, a document storage and digital spaces for online collaboration. It was developed on the basis of principles of security by design and privacy by design. It was launched by DSwiss AG in 2009. It offers 100 MB free storage space. It offers limited storage space for paid upto 100 GB. 

Difference between Amazon S3 and SecureSafe :

S.NOAMAZON S3SECURESAFE
1It is owned by Amazon.It is owned by DSwiss AG.
2It was launched in 2006.It was launched in 2009.
3It was launched by Amazon Web Services (AWS).It was developed by DSwiss AG.
4It offers 5 GB of free storage space.It offers Password manager for 50 passwords and 100MB file storage in Free plan, 1GB file storage with Password manager for unlimited passwords in Pro plan, 20GB file storage with Password manager for unlimited passwords in Silver plan, 100GB file storage with Password manager for unlimited passwords in Gold plan.
5It provides unlimited storage space for paid.It provides limited storage space for paid.
6It requires credit-card details for free trial.It does not require credit-card details for free trial.
7It has the unlimited maximum storage size.Maximum storage size is 100 GB here.
8It does not offer data inheritance.It offers data inheritance.
9It supports file versioning.It does not support file versioning.
10It has Amazon S3 limit as traffic or bandwidth limit.It has no traffic or bandwidth limit.
11Maximum file size is 5 TB here.Here maximum file size is 2 GB.

Difference between Amazon S3 and TitanFile

 1. Amazon S3 : 

Amazon S3 stands for Amazon Simple Storage Service. It is a cloud storage service which is provided by Amazon Web Services. It provides object storage through a web service interface. It allows to store any type of objects like data lakes for analytics, data archives, backup and recovery, disaster recovery, hybrid cloud storage and internet applications. It was launched by AWS in 2006. 

2. TitanFile : 
TitanFile is a file sharing service and cloud storage service which is provided by TitanFile Incorporation. It is one of the secure cloud computing services available. It is majorly used in Canada and United States. It provides a secure way for professionals to share files and communicate with their clients. It was launched by TitanFile Incorporation in 2011. It does not offer free storage space. 
 

Difference between Amazon S3 and TitanFile :

AMAZON S3TITANFILE
It is owned by Amazon.It is owned by TitanFile Incorporation.
It was launched in 2006.It was launched in 2011.
It was developed by Amazon Web Services (AWS).It was developed by TitanFile Inc.
It offers 5 GB of free storage space.It does not offer free storage space.
It provides unlimited maximum storage space for paid.It also provides unlimited maximum storage space for paid.
It is used across the world.While it is majorly used in Canada and United States.
It provides 5 GB for 12 month free trial.It provides 15 days free trial.
It has the unlimited maximum storage size.Maximum storage size is unlimited here also.
It requires credit-card details for free trial.It does not require credit-card details.
It has Amazon S3 limit as traffic or band-width limit.It has no traffic or band-width limit.
Maximum file size is 5 TB here.Here maximum file size is 5GB for Individual and Starter, 50GB for pro and 50+GB for Enterprise paid plan.

Difference between Amazon S3 and Box

 1. Amazon S3 : 

Amazon S3 stands for Amazon Simple Storage Service. It is a cloud storage service which is provided by Amazon Web Services. It provides object storage through a web service interface. It allows to store any type of objects like data lakes for analytics, data archives, backup and recovery, disaster recovery, hybrid cloud storage and internet applications. It was launched by AWS in 2006. 

2. Box : 
Box is a cloud storage and file hosting service provided by Box Incorporation. It was developed by Aaron Levie and Dylan Smith. It is basically a cloud content management and file sharing service for business. It offers 10 GB storage space. It was launched by Box Incorporation in 2005. It is available for Windows, macOS and other platforms. 

Difference between Amazon S3 and Box :

Amazon S3BOX
It is owned by Amazon.It is owned by Box Incorporation.
It was launched in 2006.It was launched in 2005.
It was developed by Amazon Web Services (AWS).It was developed by Aaron Levie and Dylan Smith.
It offers 5 GB free storage space.It offers 10 GB free storage space.
It has the unlimited maximum storage size.Maximum storage size is 100 GB for personal accounts and unlimited for business accounts.
It supports file versioning.It supports file versioning in premium accounts only
It does not support remote uploading.It supports remote uploading of 30 MB per file via IFTTT.
Maximum file size in Amazon S3 is 5 TB.Here maximum file is 250 MB for free, 150 GB for paid.
It requires credit-card details for free trial.It does not require credit-card detail for free services.

Amazon S3 – Creating a S3 Bucket

 Amazon Simple Storage Service (Amazon S3) or Amazon S3 is an object type, high-speed or with minimal latency, low-cost and scalable storage service provided by AWS. S3 also allows you to store as many objects as you’d like with an individual object size limit of five terabytes. It provides 99.999999999 (11 ‘9’s) percent durability and 99.99 percent availability of the objects which reside in it. In this article, you will create your first bucket in Amazon S3.

Follow these steps to create a bucket in your Amazon Simple Storage Service:

Step 1: Log on to your AWS Console. If you don’t have an account, you can create it absolutely free as Amazon provides a 1-year free tier to its new users.

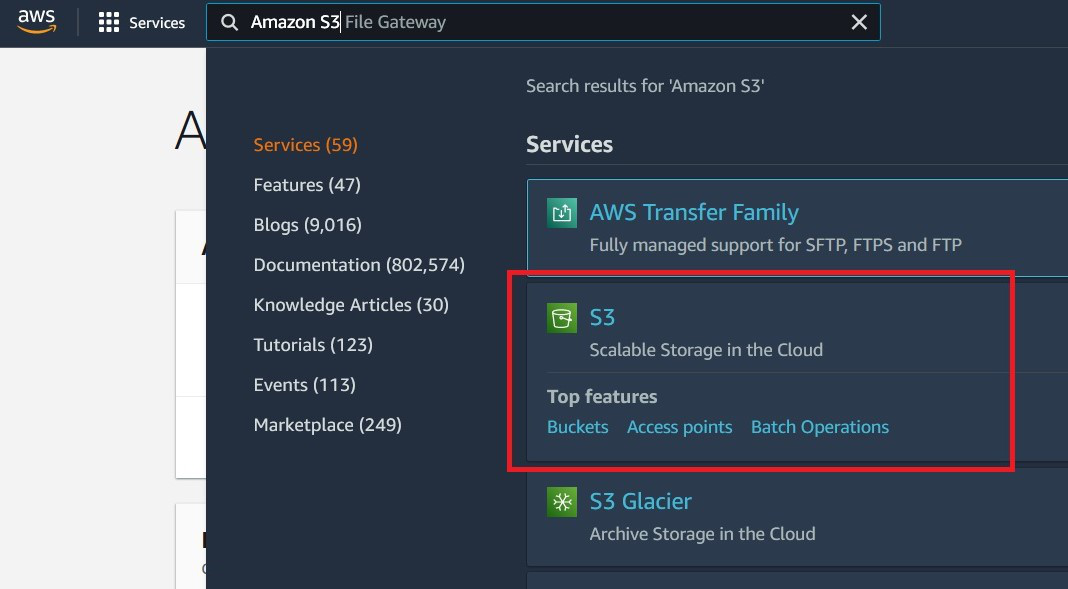
Step 2: In the search bar located at the top of your AWS Management Console, type “Amazon S3”. You will see something like this:

Step 3: Click on “S3 – Scalable Storage in the Cloud” and proceed further.

Step 4: Click on “Create Bucket”. A new pane will open up, where you have to enter the details and configure your bucket.

In the general configuration category:

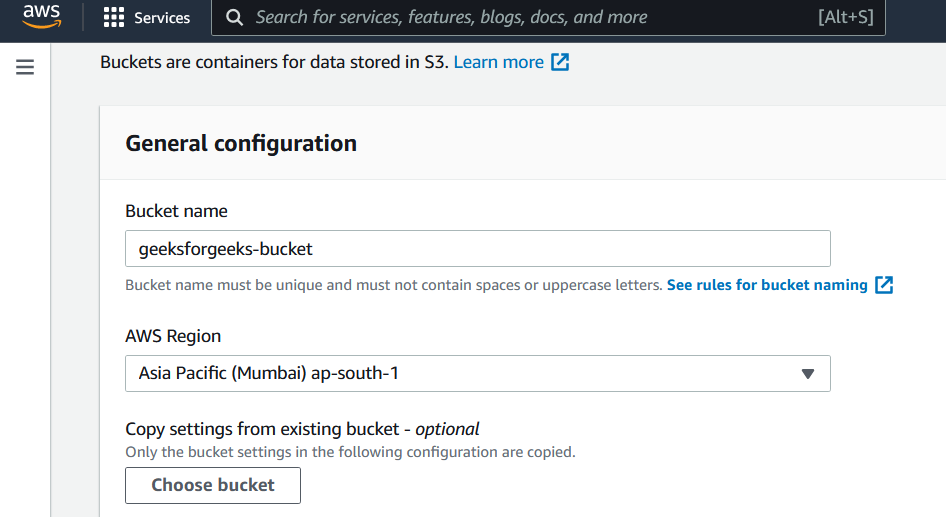
Step 5: Enter the name of your bucket (We are giving geeksforgeeks-bucket in our case). The following are some rules for naming a bucket in Amazon S3:

  • A bucket name should be unique across all Amazon S3 buckets.
  • Bucket names must be between 3 and 63 characters long.
  • Bucket names can consist only of lowercase letters, numbers, dots (.), and hyphens (-).
  • You cannot write a bucket name as an IP Address like 192.168.0.1.
  • Bucket names must begin and end with a letter or number.
  • Bucket names should not contain two adjacent dots (.).
  • Bucket names should not end with -s3alias.
  • Bucket names should not start with xn--.

Step 6: Next, choose an AWS region nearest to your location or where you want your data to reside. In our case, it is [Asia Pacific (Mumbai) ap-south-1].

Our configuration looks like this:

In the Object Ownership category, leave it as recommended. We use it for controlling the access of the files by specifying roles. If ACLs are disabled, the bucket owner automatically owns and has full control over every object in the bucket.

In Block Public Access settings for this bucket category, ensure that BLOCK ALL PUBLIC ACCESS has been checked. If you want to host your static website in this bucket, you can change the settings later.

In the Bucket Versioning category, choose Disabled. Bucket versioning is helpful when you want to track any changes in the file made, intentionally or unintentionally. You can see the previous versions of a file, retrieve it, restore it or preserve it.

Leave other advance settings as default.

Step 7: Click on Create Bucket.

If the bucket is created successfully, you will see a message like this on the top of the page:

Congratulations! You have successfully created your first bucket in Amazon Simple Storage Service (S3).