Monday, 26 December 2022

AWS CodeCommit overview


AWS CodeCommit Overview & It’s Benefits :

DevOps is a popular culture and AWS being a popular cloud provider and both are in demand. So how to implement DevOps on AWS?

AWS responded to this with a set of services that ensured one could carry out the process of continuous and integration and continuous deployment on the cloud and one of those services is AWS CodeCommit.

In this post, we will discuss AWS CodeCommit in detail. We will discuss:

  • Overview Of AWS CodeCommit
  • Benefits Of AWS CodeCommit 
  • Working Of AWS CodeCommit
  • Creating AWS CodeCommit Repository
  • Branches 
  • Benefits Of Branches
  • Pricing OF AWS CodeCommit

So let’s get started with AWS CodeCommit.

Overview Of AWS CodeCommit

AWS CodeCommit is a version control service hosted by Amazon  Web Services (AWS) that you can use to privately store and manage assets such as documents, source code, and binary files. It is an in-house repository or infrastructure that lets you host or hold repositories. AWS CodeCommit basically gives you an environment where you can actually go ahead commit your code, code push it, or pull it.

CodeCommit

AWS CodeCommit is a fully-managed source control service that hosts your secure Git-based repositories. It makes it easy for groups to collaborate on code in a secure and highly scalable ecosystem. CodeCommit eliminates the need to operate your source control system or worry about scaling its infrastructure. CodeCommit securely stores anything from source code to binaries, and it runs seamlessly with your existing Git tools.


Benefits Of AWS CodeCommit

  • Store any type of Code: AWS CodeCommit lets you store any type of code as there are very fewer restrictions on the type and the extensions of the code that you store.
  • Fully Managed:  AWS CodeCommit eliminates the need to host, maintain, back up, and scale your own source control servers. The service automatically scales to meet the growing needs of your project.
  • Highly Secure: Security is something which you don’t need to worry about with AWS Code Commit., like the code, you push or pull is encrypted. CodeCommit is integrated with AWS Identity and Access Management (IAM) allowing you to customize user-specific access to your repositories.
  • Ensures Collaborative Work: AWS CodeCommit helps you collaborate on code with teammates via pull requests, branching and merging, and you can give proper access to people who can access this piece of code, make changes to it and under different IAM users and under different security groups this process becomes very much engaging and collaborative.
  • Faster development lifecycle: AWS CodeCommit keeps your repositories close to your build, staging, and production environments in the AWS cloud. You can transfer incremental changes instead of the entire application. This allows you to increase the speed and frequency of your development lifecycle.
  • Scale Easily: When you talk about cloud platforms and any service, it ensures scalability so does the amount of code you push on this particular service.
  • Integrate with third-party tools: The best thing about AWS CodeCommit is that it places your code in such locations that it becomes very easy to integrate with your third-party tools. You can keep using your preferred development environment plugins, continuous integration/continuous delivery systems, and graphical clients with CodeCommit.
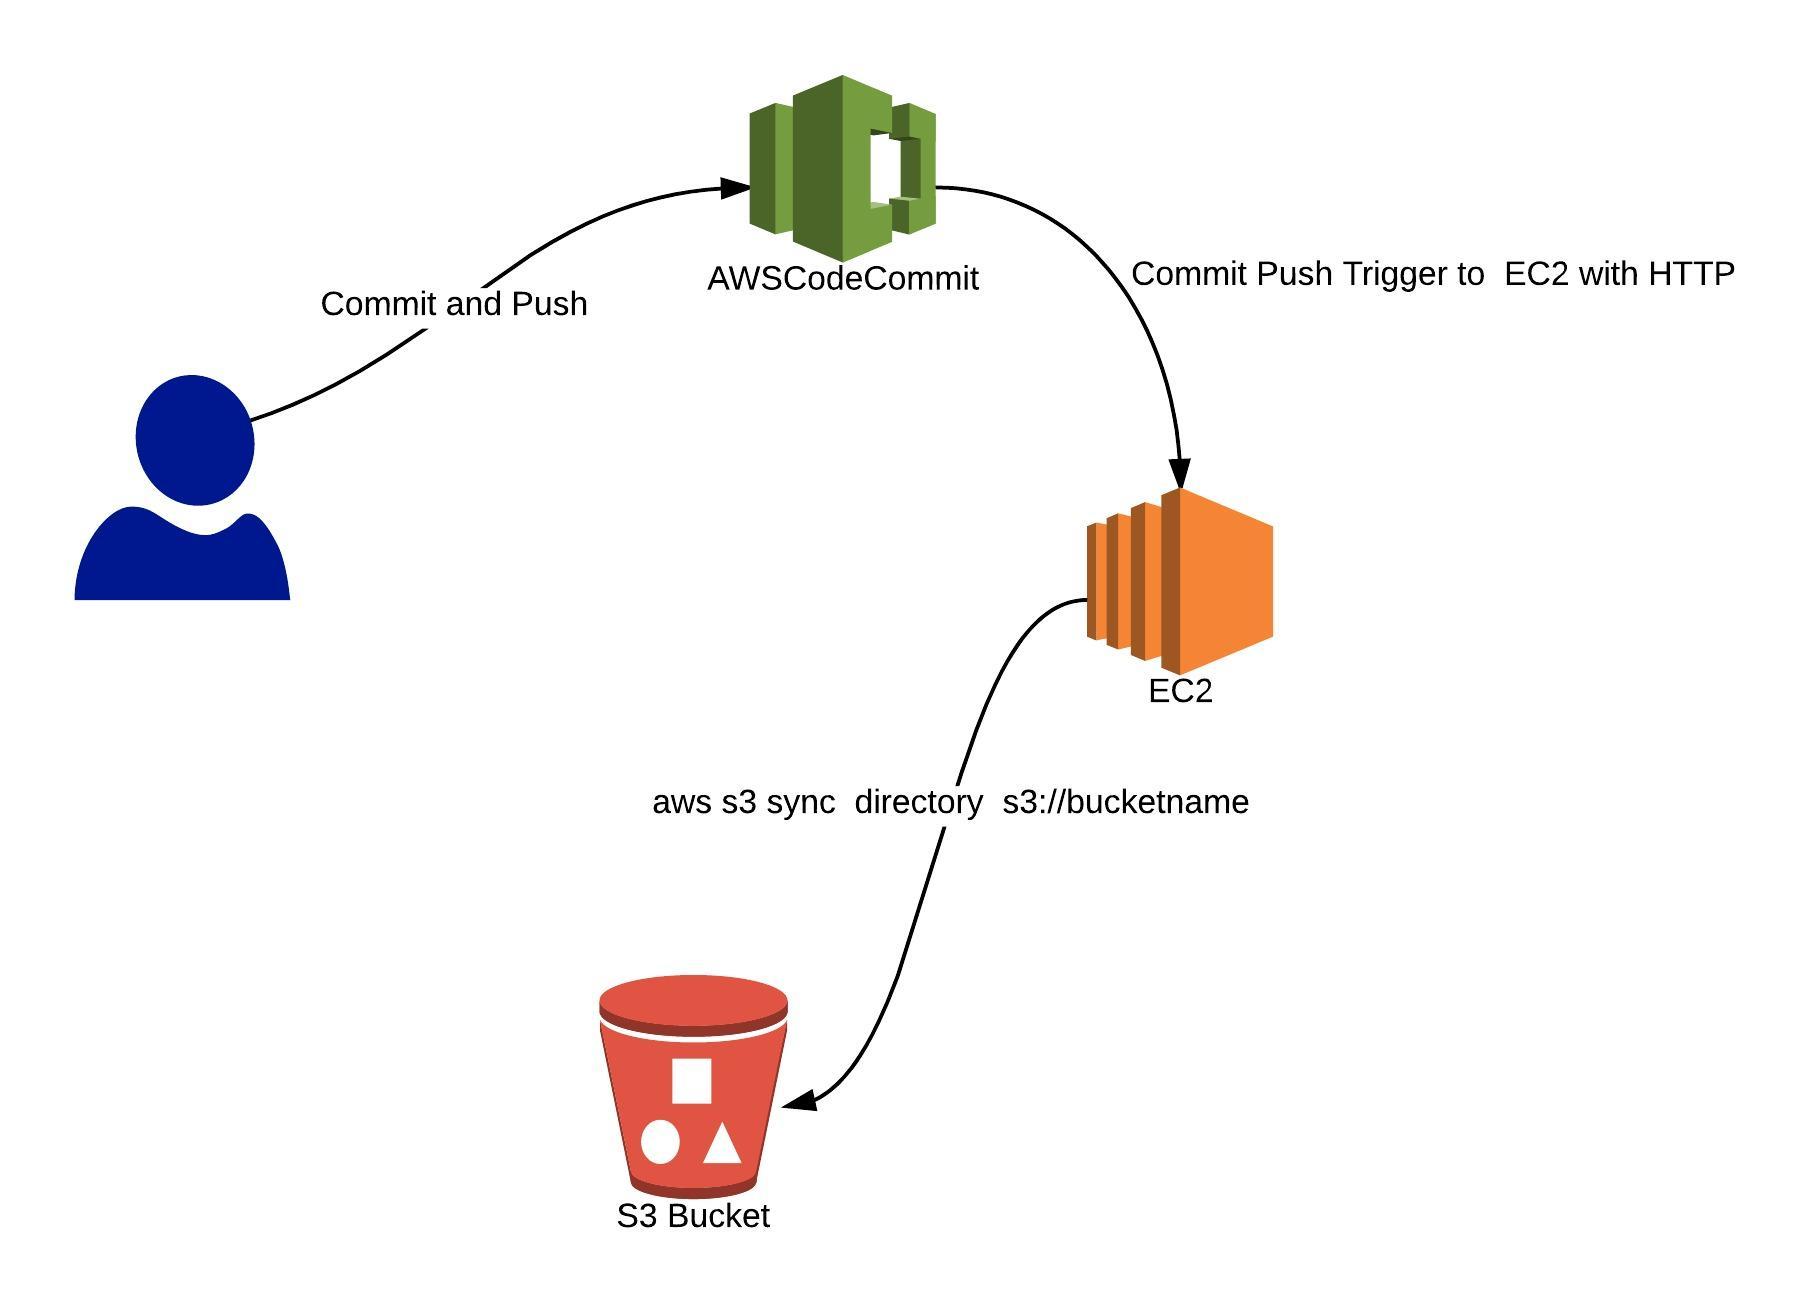
Benefits of AWS CodeCommit

Before creating an AWS CodeCommit Repository lets check its working first.


Working Of AWS Code Commit
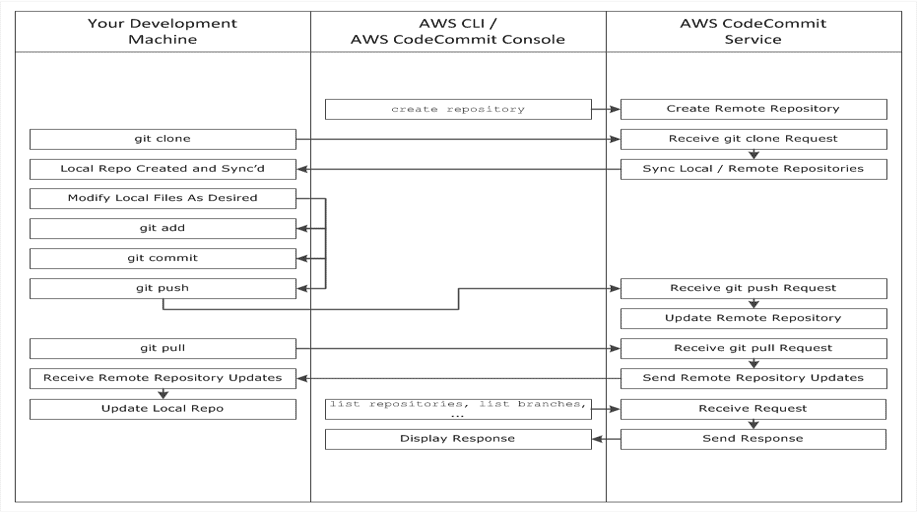
Working of CodeCommit

Creating AWS Code Commit Repository

1)Log in to your AWS account 

AWS Console

2) Search for CodeCommit and Open it.
CodeCommit

3) In the region selector, choose the AWS Region where you want to create the repository.

Region

US East (Ohio), US East (N. Virginia), US West (N. California), US West (Oregon), Europe (Ireland), Europe (London), Europe (Paris), Europe (Frankfurt), Europe (Stockholm), Europe (Milan), Asia Pacific (Tokyo), Asia Pacific (Singapore) Asia Pacific (Sydney), Asia Pacific (Seoul), Asia Pacific (Mumbai), Asia Pacific (Hong Kong), South America (São Paulo), Middle East (Bahrain), Canada (Central), China (Beijing), China (Ningxia), AWS GovCloud (US-West), AWS GovCloud (US-East)


4) Click on Create Repository.
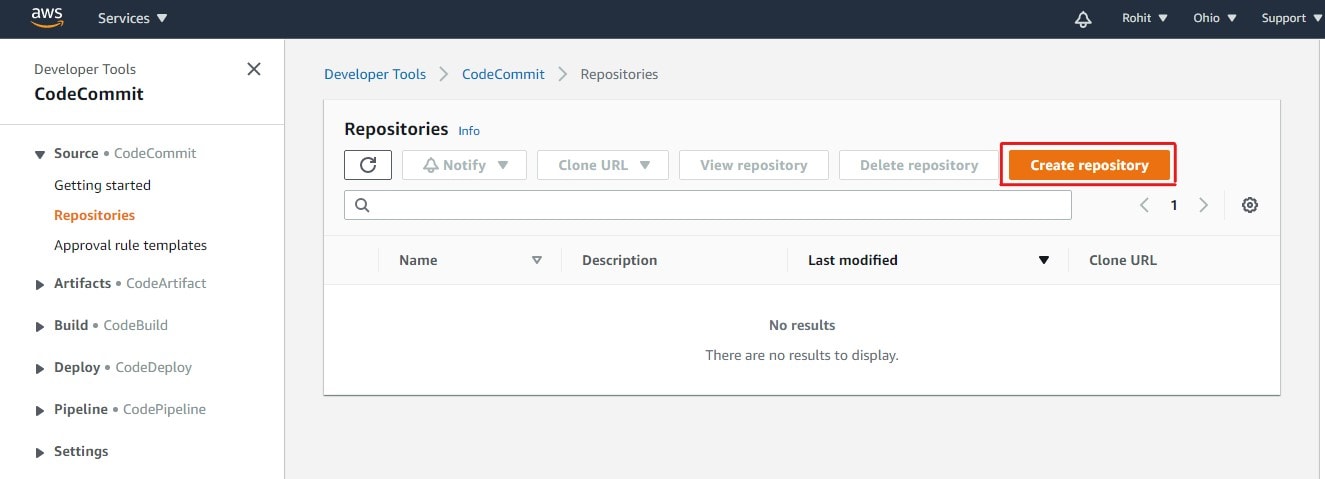
Repository

5) Give your repository a name and then click on Create

Name

6) CodeCommit Repository will be created.

Repository Created

What are the Branches?

Branches are simply pointers or references to a commit. In development, they’re a convenient way to organize your work. You can use branches to separate work on a new or different version of files without impacting work in other branches. You can use branches to develop new features, store a specific version of your project from a particular commit, and more.

Benefits Of Branches

  • A convenient way to organize your work by using branches to separate work impacting work in other branches
  • Used for developing new features, storing a specific version of the project from a particular commit
  • In CodeCommit, one can change the default branch for your repository.
  • The default branch is the one used as the base or default branch in local repositories when users clone the repository.
  • Creating, deleting, and viewing branch details is possible in Codecommit.

Pricing Of AWS CodeCommit

With an AWS account, anyone can get started with AWS CodeCommit for free. Your account gets 5 active users per month for free (within limits), after which you pay $1.00 per additional active user per month. There are no upfront fees or commitments.

This AWS free tier offer for AWS CodeCommit is available to both new and existing AWS customers indefinitely and does not expire at the end of the standard 12 months free tier term.

AWS CodeCommit Pricing

AWS Cloud Formation

Introduction to AWS CloudFormation:

A good example of how the DevOps principles are used in practice is AWS CloudFormation. CloudFormation provides a common language for you to design and provision AWS and third-party application resources in your cloud environment.

CloudFormation allows you to use programming languages or a simple text file to model and provision, in an automated and secure manner, all the resources needed for your applications across all regions and accounts. This gives you a single source of truth for your AWS and third-party resources. CloudFormation makes it easy to organize and deploy a collection of AWS resources and lets you describe any dependencies or pass in special parameters when the stack is configured.

What Is AWS CloudFormation?

  • Building Blocks: It is a language that gives you building blocks to describe the infrastructure you want to provision in AWS.
  • Text files: Containing the description that is formatted in JSON and YAML. In this, you can version it and track changes like any other piece of code.
  • Free: It is free you can only pay for the infrastructure that is created by it.

Benefits Of Using CloudFormation:

  1. Model Complete Infrastructure: CloudFormation enables you to model your entire infrastructure and application resources with either a text file or programming language. CloudFormation CLI and Registry make it easy to manage third party resources with CloudFormation. CloudFormation provides a single source of truth for all your resources and helps you to standardize infrastructure components used across your organization, enabling configuration compliance and faster troubleshooting.
  2. Automate & deploy: CloudFormation provisions your application resources in a safe, repeatable manner, allowing you to build and rebuild your applications and infrastructure, without having to perform manual actions or write custom scripts. CloudFormation takes administration of determining the right operations to perform when managing your stack, orchestrating them most efficiently, and rolls back changes automatically if errors are detected.
  3. CloudFormation at Core: CloudFormation is just code. Codifying your infrastructure enables you to treat your infrastructure as just code. You can write it with any code editor, check it into a version control system, and review the files with team members before deploying it into production.

Key Terminology Regarding AWS CloudFormation?

  • CloudFormation Stack: A collection of AWS resources that you manage as a single unit. The stack is created when you give the CloudFormation service your template.

CloudFormation role

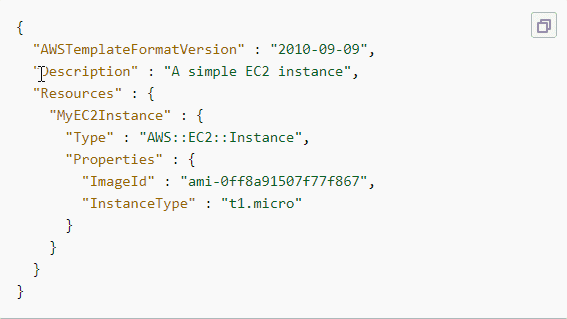
  • CloudFormation Template: The documents that describe how to act and what to create. It is the text that you write that CloudFormation uses to provision infrastructure. A template can be used to both create and update a stack.
    E.g of Template:
    Template for AWS CloudFormation

How AWS CloudFormation Works?

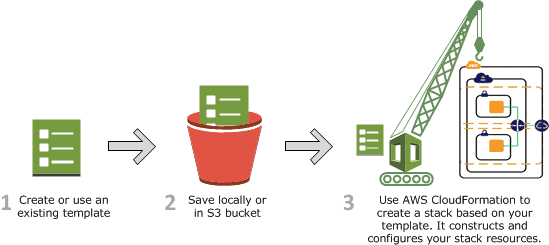
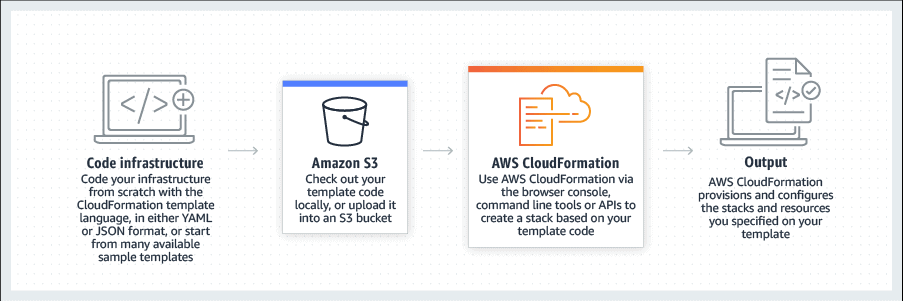
Core working of CloudFormation

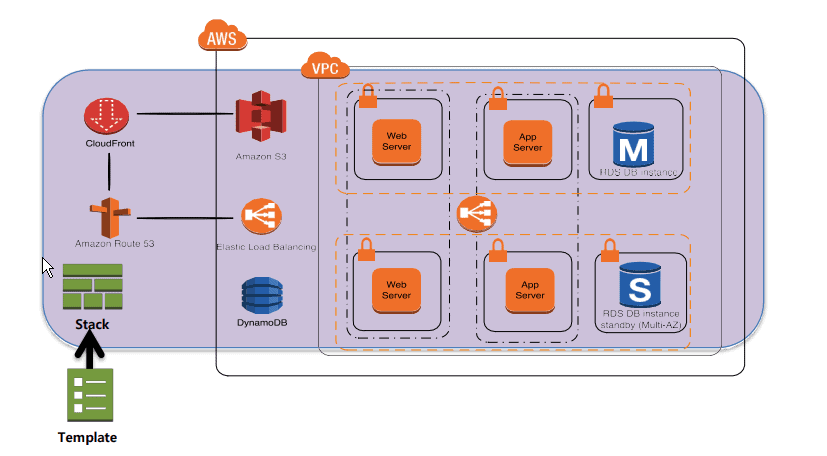
Example Of CloudFormation Architecture

By using CloudFormation templates, you can able to define and model AWS resources that can be created and updated. These templates are written in a JavaScript Object Notation (JSON). Each template requires a specific syntax and structure that depends on the types of resources being created and managed. By using templates, you can provision infrastructure in a repeatable and reliable way.

You can create custom CloudFormation templates or use sample templates that are available publicly. Once templates are deployed or updated into the AWS environment, the collection of resources under management is called a “stack.” You can able to manage stacks through the AWS Management Console, CloudFormation APIs, or AWS Command Line Interface. Common actions include create-stack, describe-stacks, list-stacks, and update-stack.

When you create or update a stack in the console, events are displayed showing the status of the configuration. If an error occurs, the stack is rolled back to its previous state. Amazon Simple Notification Service (Amazon SNS) helps you manage these events. For example, you can use Amazon SNS to track stack creation and deletion progress via email and integrate with other processes programmatically.

With templates, you can work with a broad set of AWS offerings, including Amazon Simple Storage Service (Amazon S3), Amazon Elastic Compute Cloud (EC2), Amazon ElastiCache, AWS Elastic Beanstalk, Auto Scaling, Amazon CloudFront, Amazon DynamoDB, Elastic Load Balancing, AWS OpsWorks, AWS Identity and Access Management, and Amazon Virtual Private Cloud.

Example of CloudFormation Architecture


When And Where To Use AWS CloudFormation?

  • When you have to deploy infrastructure rather than doing it manually.
  • To create a repeatable patterned environment, e.g. a WordPress blog and a database if you were running a web hosting business.
  • To run automated testing for CI/CD environments. Create a dedicated, clean environment, inject your code, run testing, produce results, then delete the test environment, all with no human input.
  • To define an environment all at once, and have it deployed to any region in the AWS Cloud without reconfiguration.
  • To manage infrastructure configuration using software development style versioning and code repositories such as git.


Azure container Apps

CONTAINER APPS :

Containerization services in Azure

  • Azure Container Instances (ACI): This service is useful when you need to execute a single container in an isolated environment. ACI supports both Windows and Linux containers and can start in a matter of seconds. Use cases include running a build server or bursting in the context of an AKS cluster.
  • Azure Kubernetes Service (AKS): ACI provides no scaling nor load balancing functionalities. If you need these, then AKS is likely to better suit your needs. With AKS, you get a managed Kubernetes cluster in Azure, and you can access it and control it through the standard Kubernetes CLI commands.
  • Azure Container Registry (ACR): this service gives you the ability to create a private registry for your container images and only give access to select users and groups (within your organization, for example). ACR also has a feature called “tasks” which can be leveraged in the context of image scanning and hardening.
  • Azure Service Fabric: somewhat similar to AKS but the underlying orchestrator is proprietary.

Benefits of Azure Container Apps

Since ACA is a serverless offering, it will scale your applications automatically to meet the demand. Scaling can go from zero up to the maximum of replicas defined during the creation of the ACA instance. If no events (i.e., HTTP requests, messages in a Service Bus queue, …) are sent to our ACA instance then no pod is running which means that no cost is incurred.

The second benefit of ACA is the ability to execute multiple revisions (i.e., versions) of the same container in parallel. It can be useful for canary testing scenarios, and you can even redirect traffic between revisions.

A third benefit is that the load is automatically balanced across available replicas.

A fourth benefit is an availability, out-of-the-box, of the Dapr runtime, since Dapr is becoming more and more popular when it comes to building microservices applications.

There are also other benefits provided by ACA, such as the ability to manage application secrets from the application, the ability to monitor application logs centrally from Azure Log Analytics (which seems trivial but is very interesting especially in a microservices architecture where all microservices logs are aggregated into the same Log Analytics instance which greatly simplifies monitoring and debugging). There’s also the ability to execute containers from any registry (Docker Hub, ACR, …).

Limitations of Azure Container Apps

One limitation that we noticed, and that is worth mentioning here, is that ACA doesn’t allow you to manage the cluster using Kubernetes CLI commands (or any commands at all). Since ACA is a serverless offering, it makes total sense that you don’t have access to the underlying infrastructure and hence you can’t manage it yourself (that’s what serverless offerings are all about, right?). It makes sense but it is worth mentioning. Thus, if managing the Kubernetes cluster is what you need, then ACA is not the right service for you. You should instead consider AKS.

Azure Workspace

 WORKSPACES :

Create a workspace

There are multiple ways to create a workspace:

  • Use Azure Machine Learning studio to quickly create a workspace with default settings.
  • Use the Azure portal for a point-and-click interface with more options.
  • Use the Azure Machine Learning SDK for Python to create a workspace on the fly from Python scripts or Jupyter notebooks.
  • Use an Azure Resource Manager template or the Azure Machine Learning CLI when you need to automate or customize the creation with corporate security standards.
  • If you work in Visual Studio Code, use the VS Code extension.

If you’re currently using Azure Log Analytics to monitor your environments for availability and performance, we’re rolling out new enhancements and changes for Log Analytics that you should be aware of. Including the new and improved query language, so that you can take appropriate action, if necessary. To take advantage of these enhancements, you’ll need to upgrade your workspaces. The upgrade is currently available in these regions: WCUS, EUS, SEAU, SEA, WEU, EJP, SUK, CID and CCAN.

The upgrade process converts all saved searches, alerts, and views to the new query language. ​About 50 percent of all Azure Log Analytics workspaces have been upgraded by now, and thousands of customers are enjoying the simple yet powerful query language.

Upgrading your workspace

This upgrade introduces an improved search experience, powered by a highly scalable platform. The new experience includes an interactive and expressive query language, machine learning constructs and a portal for advanced analytics, offering a multiline query editor, full schema view and rich visualizations to help you get deeper insights from your data. Learn more about the new query language.

To take advantage of the following language benefits and more, you’ll need to upgrade your Log Analytics workspace:

  • Simple yet powerful. Easier to understand and similar to SQL with constructs like a natural language.
  • Full piping language. Extensive piping capabilities where any output can be piped to another command to create complex queries that were possible previously.
  • Search-time field extractions. Calculated fields at runtime lets you use complex calculations for extended fields and then use them for additional commands including joins and aggregations.
  • Advanced joins. Ability to join tables on multiple fields, using inner and outer joins, and join on extended fields.
  • Date/time functions. Advanced date/time functions that gives you greater flexibility.
  • Smart Analytics. Advanced algorithms to evaluate patterns in datasets and compare different sets of data.
  • See more information in “Why the new language?”.


Experience changes after you upgrade

Some experiences work differently after the workspace upgrade. We made an effort to make these changes clear to let you make the necessary actions, if needed. You can find more details on these in known issues and FAQs page.

  • My dashboard is being deprecated, in favor of View Designer and Azure Dashboards – Existing tiles become read-only. ​
  • Power BI integration is replaced with a new process. Any existing schedules will be disabled. ​
  • ARM templates can be used to create and configure Log Analytics workspaces. The versions of the upgraded API and examples of tasks you can perform are available here.
  • ​Alert actions using webhooks and runbooks will need to be updated to conform to a different response format. You can see sample payload in Alert actions article.
  • Deprecation of Log Search API and PowerShell Cmdlet (December 31, 2017). Any use of Log Search API and Get-AzureRmOperationalInsightsSearchResults Cmdlet should be migrated to Azure Log Analytics REST API and Invoke-LogAnalyticsQuery PowerShell Cmdlet using the new query language.

Upgrade rollout schedule

The new Log Analytics language change and deprecation of the old language, requires that all workspaces are upgraded. We are rolling out the upgrade to workspaces that were not upgraded yet according to this schedule:

  • New workspace creation (week of October 16, 2017). New workspaces are created with the new Log Analytics language. You cannot create legacy workspaces using the legacy language.
  • Automatic workspace upgrade (start on the week of October 30, 2017). We will start rolling out automatic workspace upgrades, all workspaces that haven’t been upgraded will be automatically upgraded to the new Log Analytics language. This process will be gradual per region and carried out in this order:

image

Sunday, 25 December 2022

Azure maintenance configuration

 MAINTENANCE CONFIGURATION :

Creating a Maintenance Configurations lets you decide when to apply platform updates to various Azure resources. This topic covers the Azure PowerShell options for Dedicated Hosts and Isolated VMs. For more about benefits of using Maintenance Configurations, its limitations, and other management options, see Managing platform updates with Maintenance Configurations.

If you are looking for information about Maintenance Configurations for scale sets, see Maintenance Control for Virtual Machine Scale Sets.

Maintenance Configurations gives you the ability to control and manage updates for many Azure virtual machine resources since Azure frequently updates its infrastructure to improve reliability, performance, security or launch new features. Most updates are transparent to users, but some sensitive workloads, like gaming, media streaming, and financial transactions, can't tolerate even few seconds of a VM freezing or disconnecting for maintenance. Maintenance Configurations is integrated with Azure Resource Graph (ARG) for low latency and high scale customer experience.

Create a Maintenance Configuration

  1. Sign in to the Azure portal.

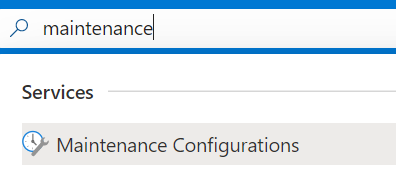
  2. Search for Maintenance Configurations.

    Screenshot showing how to open Maintenance Configurations

  3. Click Create.

    Screenshot showing how to add a maintenance configuration

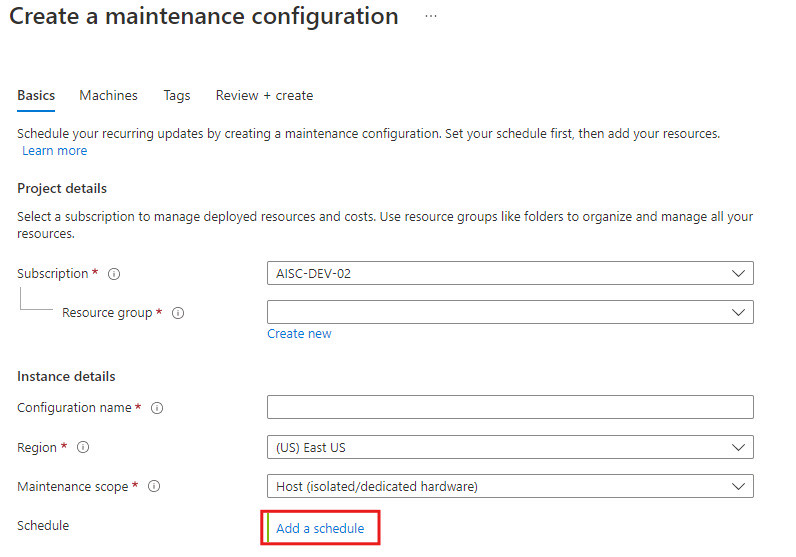
  4. In the Basics tab, choose a subscription and resource group, provide a name for the configuration, choose a region, and select one of the scopes we offer which you wish to apply updates for. Click Add a schedule to add or modify the schedule for your configuration.

     Important

    Certain virtual machine types and schedules will require a specific kind of scope. Check out maintenance configuration scopes to find the right one for your virtual machine.

    Screenshot showing Maintenance Configuration basics

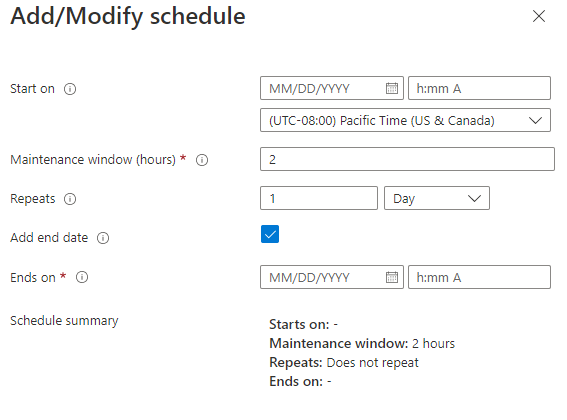
  5. In the Schedule tab, declare a scheduled window when Azure will apply the updates on your resources. Set a start date, maintenance window, and recurrence if your resource requires it. Once you create a scheduled window you no longer have to apply the updates manually. Click Next.

     Important

    Maintenance window duration must be 2 hours or longer.

    Screenshot showing Maintenance Configuration schedule

  6. In the Machines tab, assign resources now or skip this step and assign resources later after maintenance configuration deployment. Click Next.

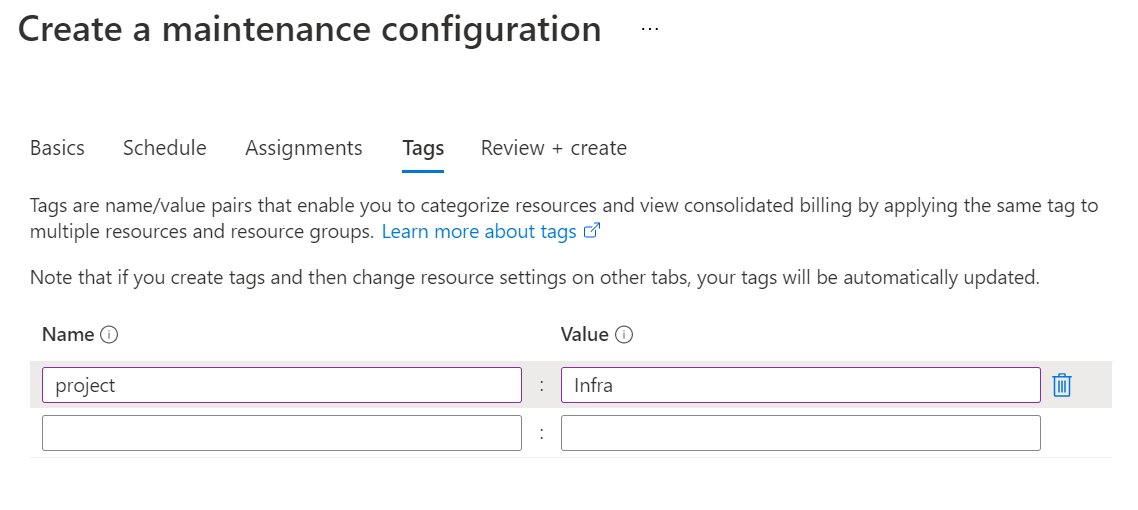
  7. Add tags and values. Click Next.

    Screenshot showing how to add tags to a maintenance configuration

  8. Review the summary. Click Create.

  9. After the deployment is complete, click Go to resource.

Assign the configuration

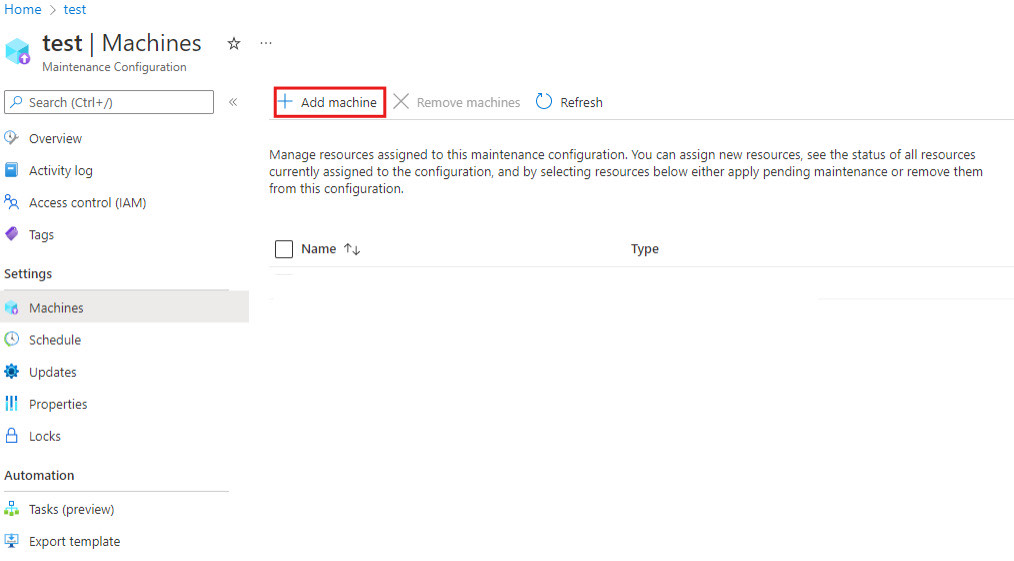
On the details page of the maintenance configuration, click Machines and then click Add Machine.

Screenshot showing how to assign a resource

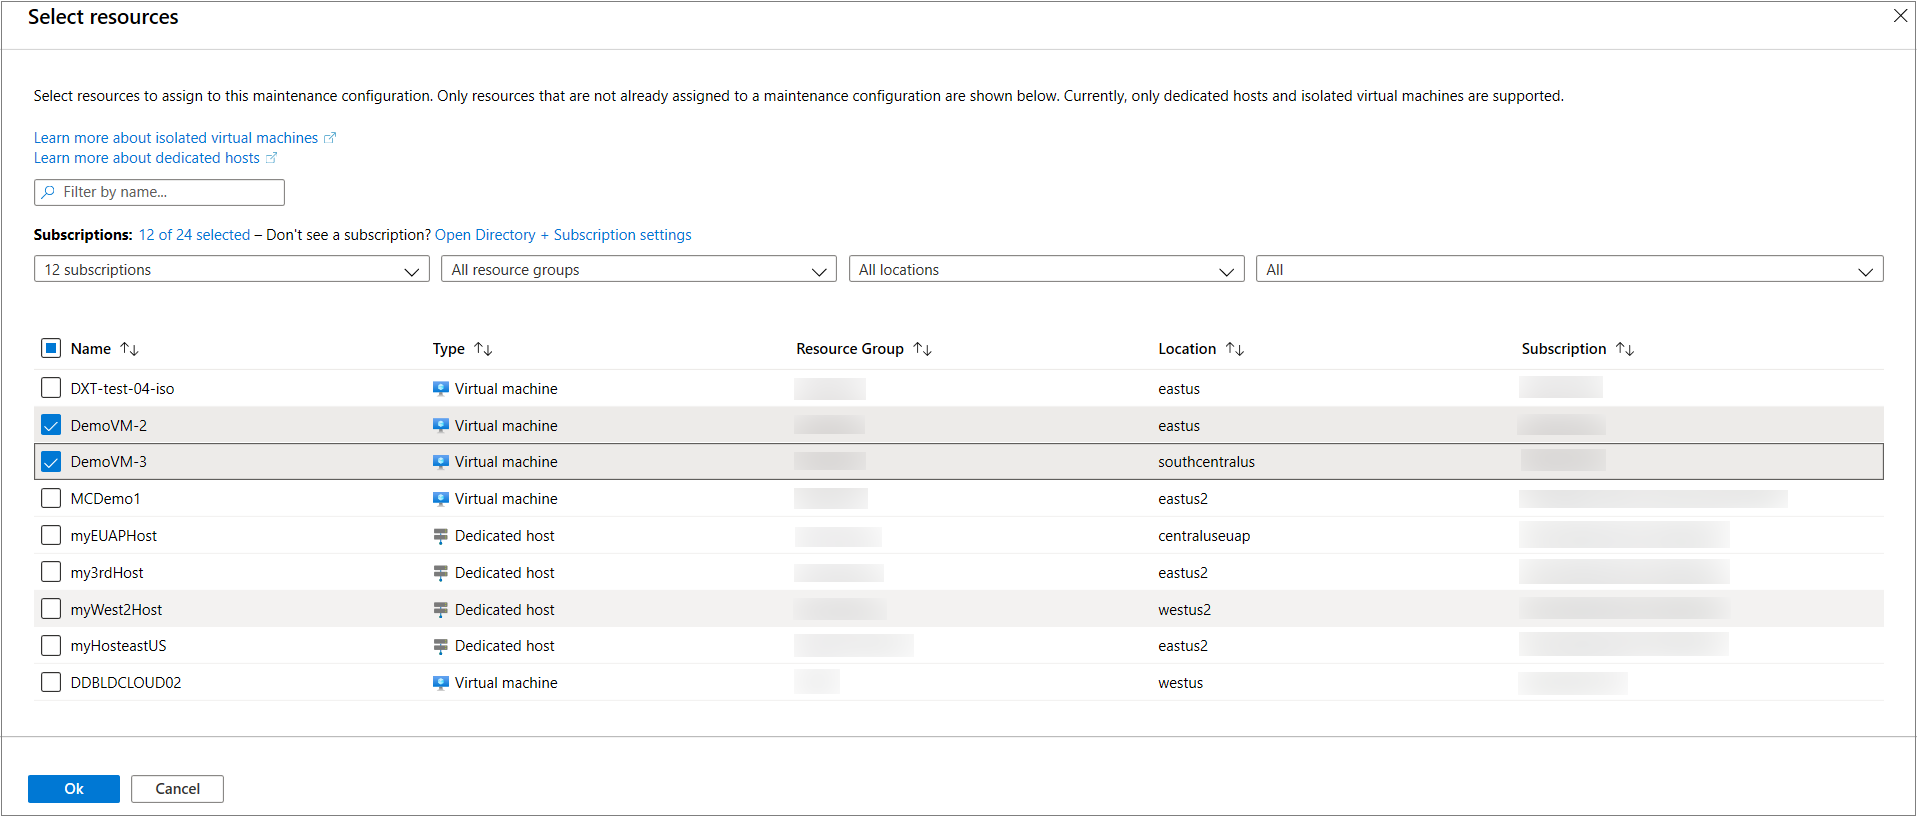
Select the resources that you want the maintenance configuration assigned to and click Ok. The VM needs to be running to assign the configuration. An error occurs if you try to assign a configuration to a VM that is stopped.

Screenshot showing how to select a resource

Check configuration

You can verify that the configuration was applied correctly or check to see any maintenance configuration that is currently assigned to a machine by going to the Maintenance Configurations and checking under the Machines tab. You should see any machine you have assigned the configuration in this tab.

Screenshot showing how to check a maintenance configuration

Check for pending updates

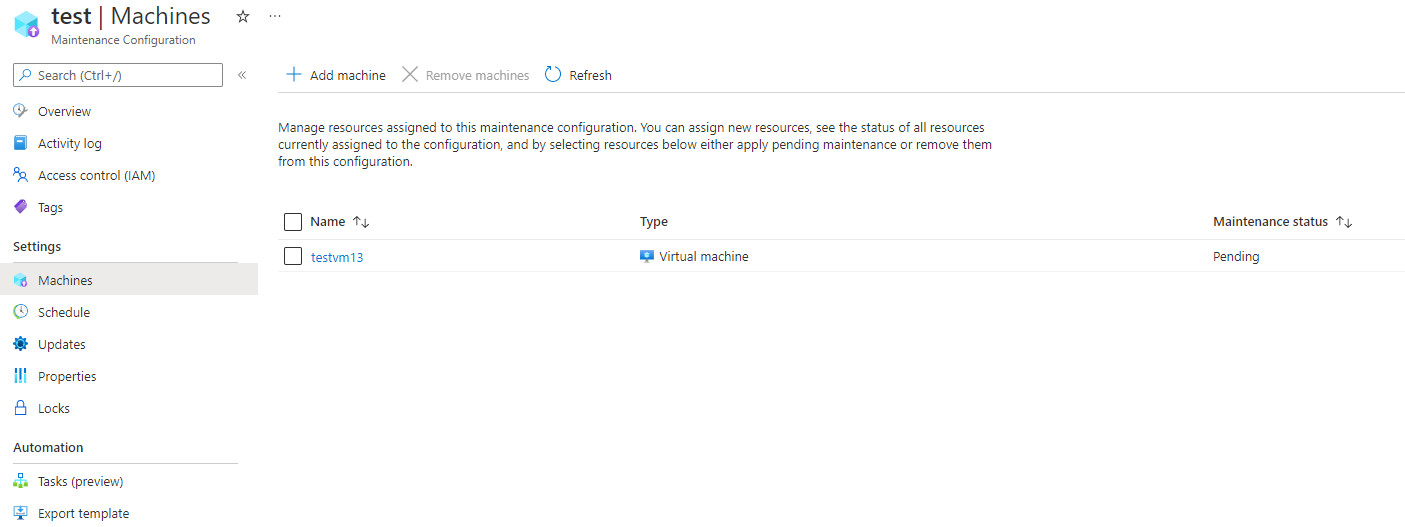
You can check if there are any updates pending for a maintenance configuration. In Maintenance Configurations, on the details for the configuration, click Machines and check Maintenance status.

Screenshot showing how to check pending updates

Delete a maintenance configuration

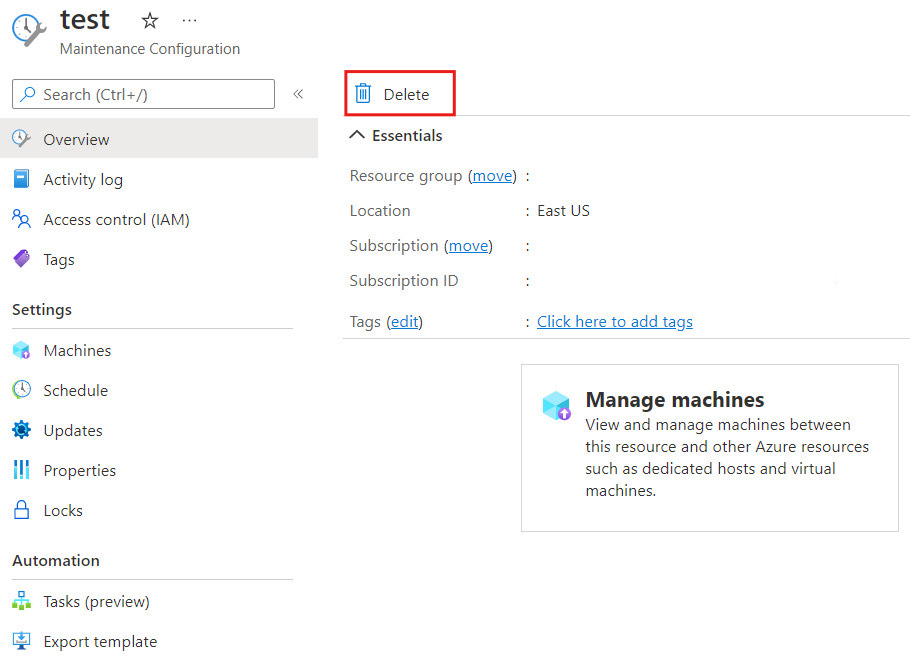
To delete a configuration, open the configuration details and click Delete.

Screenshot that shows how to delete a configuration.


Azure Application group

 APPLICATION GROUPS :

Create a RemoteApp group

If you've already created a host pool and session host VMs using the Azure portal or PowerShell, you can add application groups from the Azure portal with the following process:

  1. Sign in to the Azure portal.

    Search for and select Azure Virtual Desktop.

  2. You can add an application group directly or you can add it from an existing host pool. Choose an option below:

    • Select Application groups in the menu on the left side of the page, then select + Add.

    • Select Host pools in the menu on the left side of the screen, select the name of the host pool, select Application groups from the menu on the left side, then select + Add. In this case, the host pool will already be selected on the Basics tab.

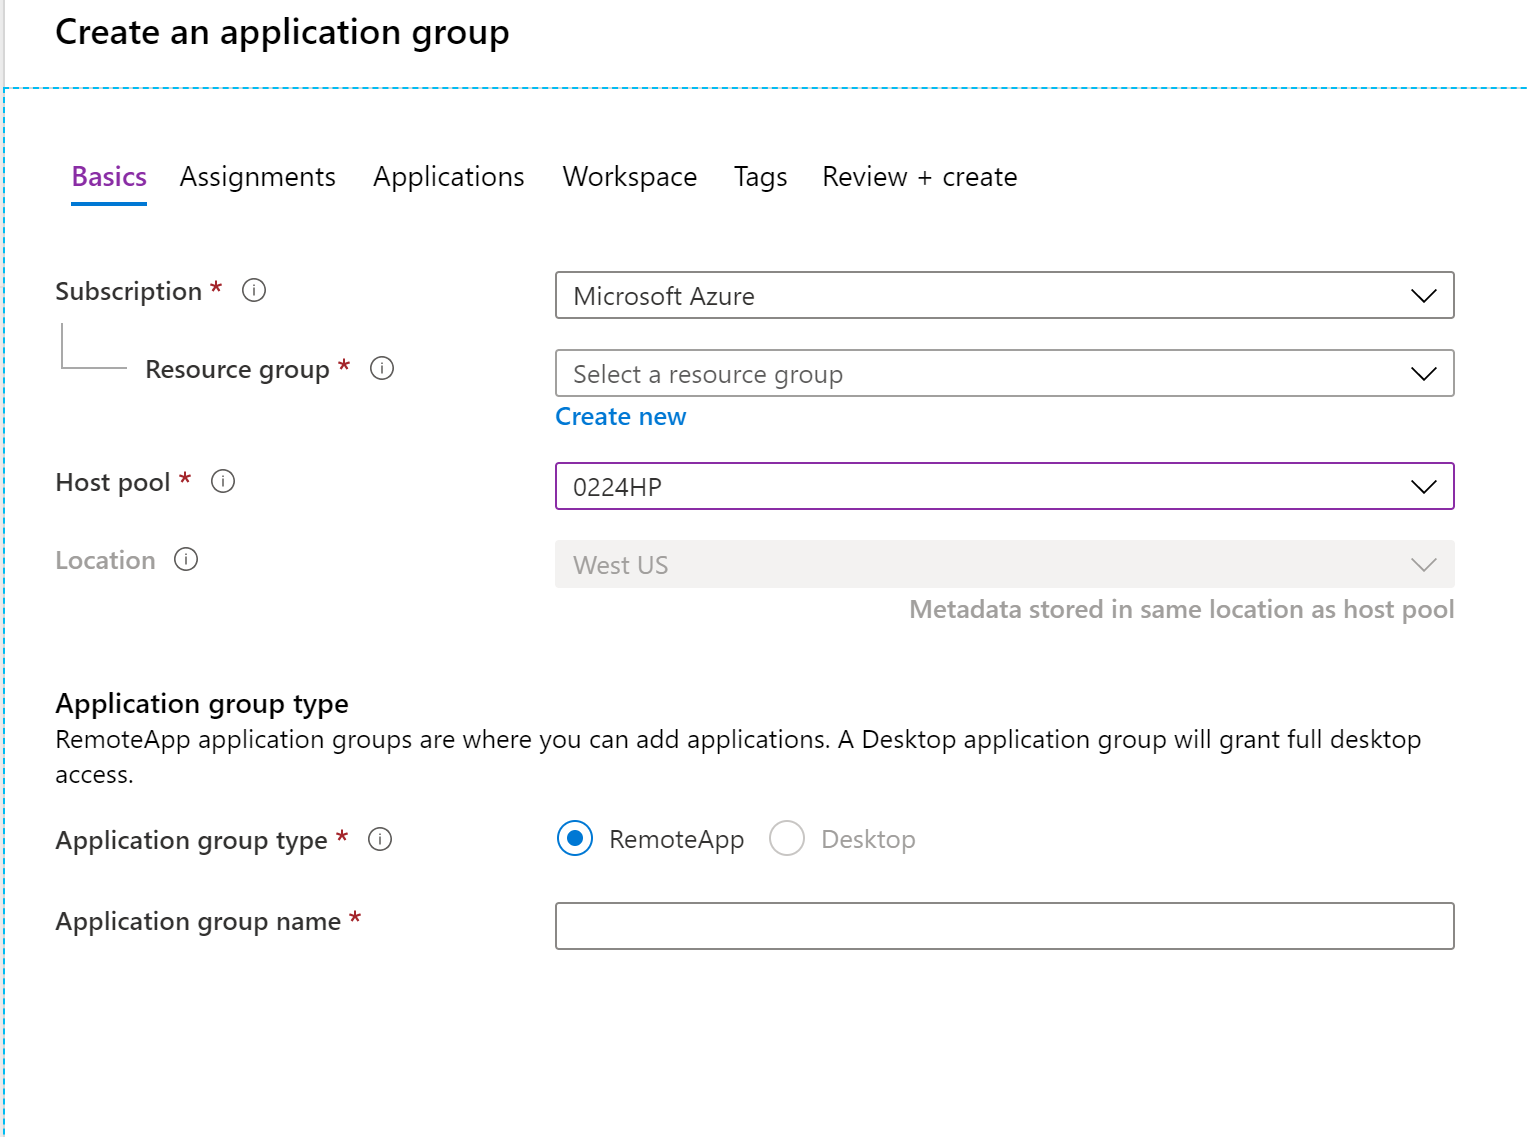
  3. On the Basics tab, select the Subscription and Resource group you want to create the app group for. You can also choose to create a new resource group instead of selecting an existing one.

  4. Select the Host pool that will be associated with the application group from the drop-down menu.


    A screenshot of the Basics tab in the Azure portal.

  5. Select RemoteApp under Application group type, then enter a name for your RemoteApp.

    A screenshot of the Application group type fields. "RemoteApp" is highlighted.

  6. Select Next: Assignments > tab.

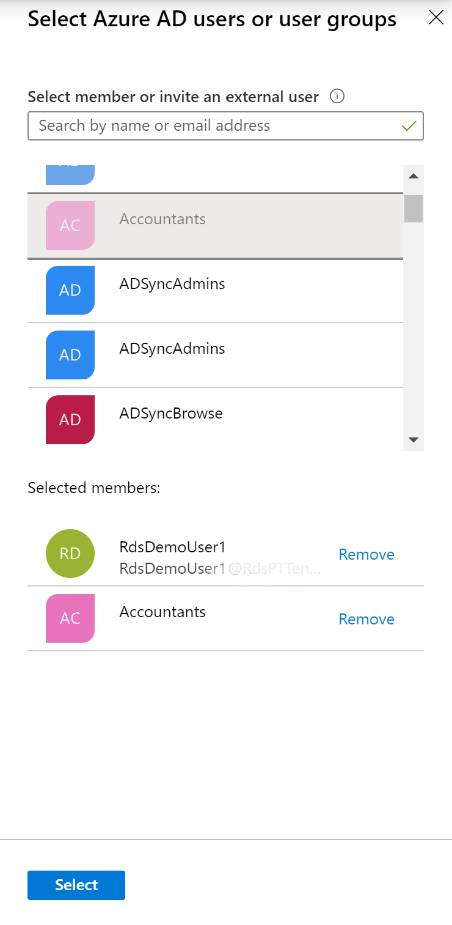
  7. To assign individual users or user groups to the app group, select +Add Azure AD users or user groups.

  8. Select the users you want to have access to the apps. You can select single or multiple users and user groups.

    A screenshot of the user selection menu.

  9. Select Select.

  10. Select Next: Applications >, then select +Add applications.

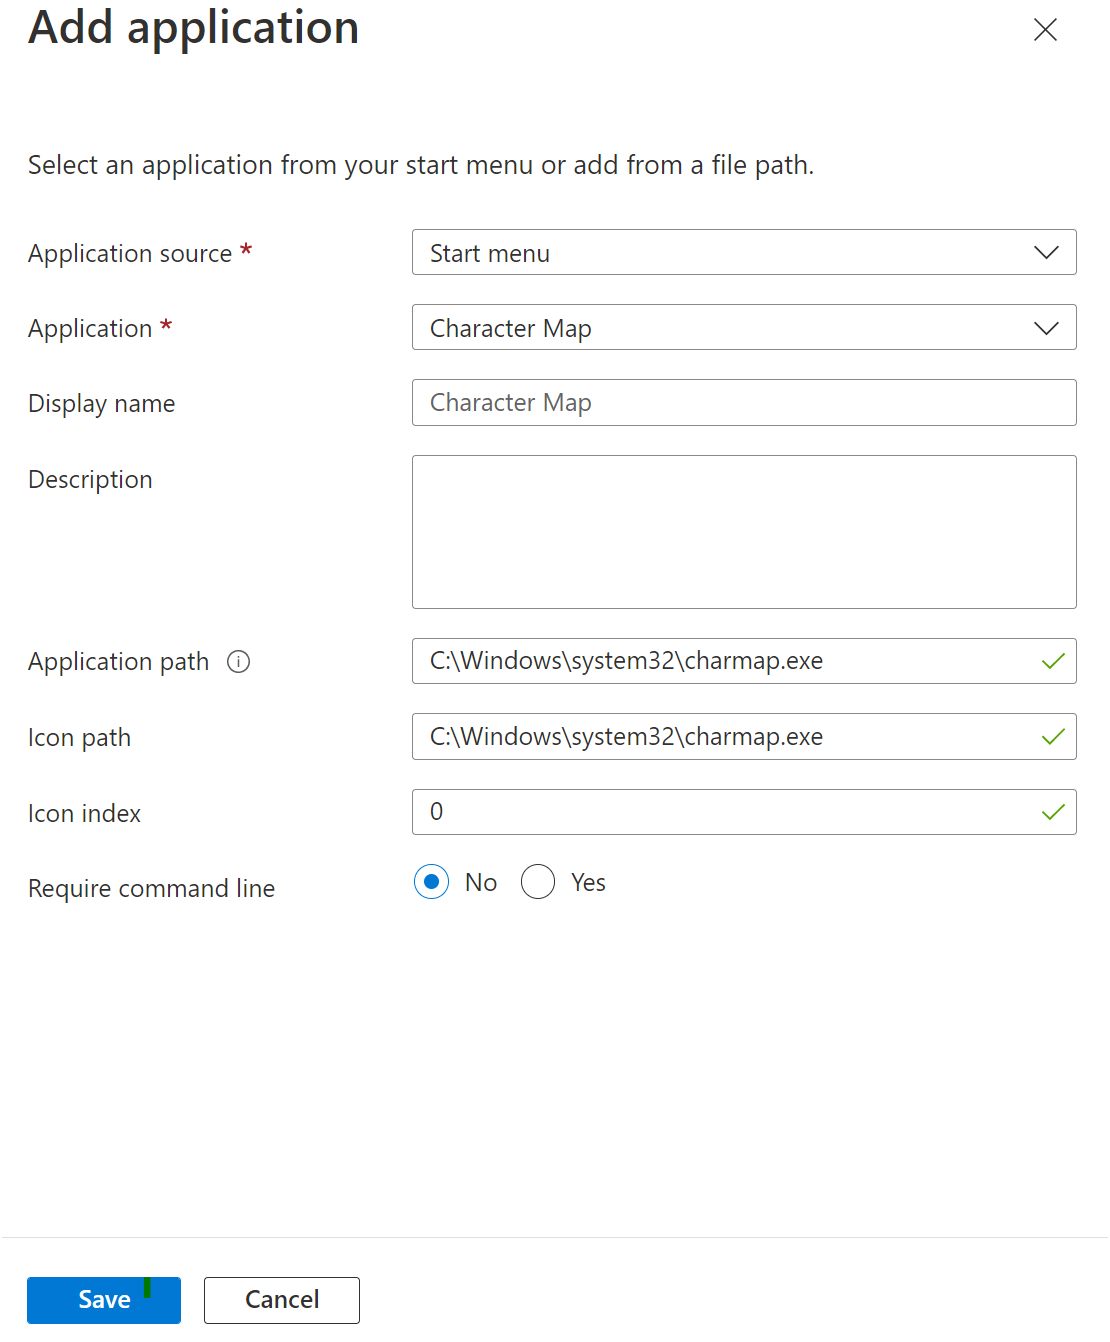
  11. To add an application from the start menu:

    • Under Application source, select Start menu from the drop-down menu. Next, under Application, choose the application from the drop-down menu.

    A screenshot of the add application screen. The user has selected the Character Map as the application source and entered Character Map in the display name field.

    • In Display name, enter the name for the application that will be shown to the user on their client.

    • Leave the other options as-is and select Save.

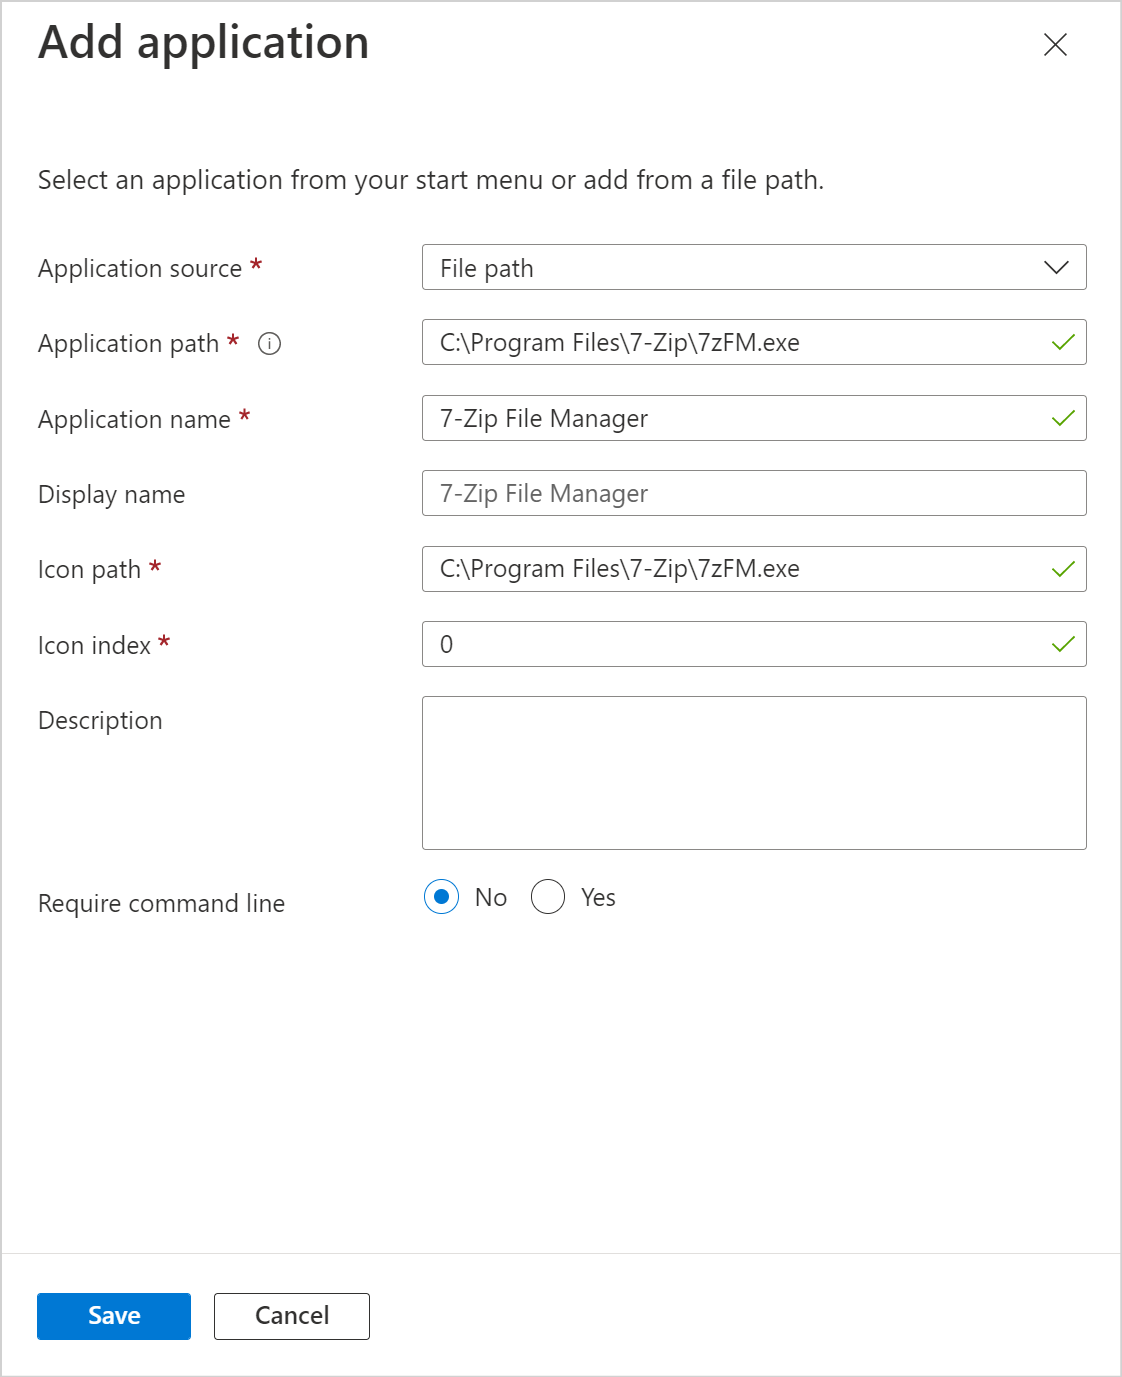
  12. To add an application from a specific file path:

    • Under Application source, select File path from the drop-down menu.

    • In Application path, enter the path to the application on the session host registered with the associated host pool.

    • Enter the application's details in the Application nameDisplay nameIcon path, and Icon index fields.

    • Select Save.

    A screenshot of the add application page. The user has entered the file path to the 7-Zip File Manager app.

  13. Repeat this process for every application you want to add to the application group.

  14. Next, select Next: Workspace >.

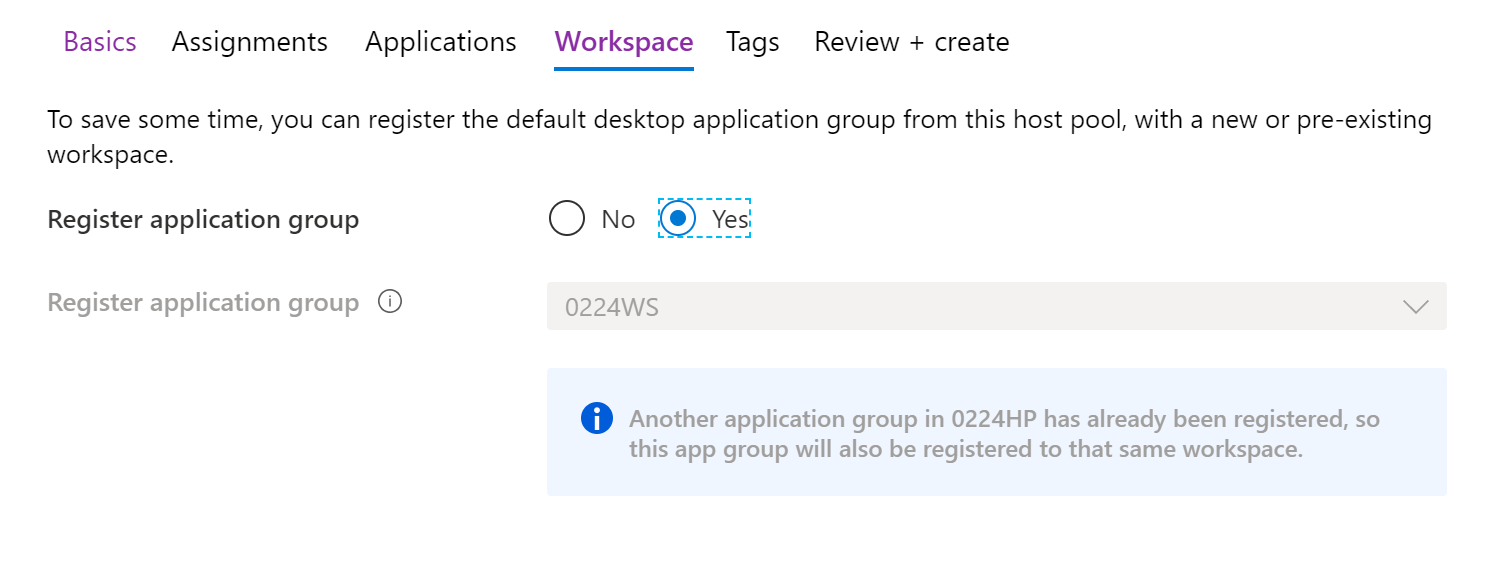
  15. If you want to register the app group to a workspace, select Yes for Register application group. If you'd rather register the app group at a later time, select No.

  16. If you select Yes, you can select an existing workspace to register your app group to.

     Note

    You can only register the app group to workspaces created in the same location as the host pool. Also. if you've previously registered another app group from the same host pool as your new app group to a workspace, it will be selected and you can't edit it. All app groups from a host pool must be registered to the same workspace.

    A screenshot of the register application group page for an already existing workspace. The host pool is preselected.

  17. Optionally, if you want to create tags to make your workspace easy to organize, select Next: Tags > and enter your tag names.

  18. When you're done, select Review + create.

  19. Wait a bit for the validation process to complete. When it's done, select Create to deploy your app group.

The deployment process will do the following things for you:

  • Create the RemoteApp app group.
  • Add your selected apps to the app group.
  • Publish the app group published to users and user groups you selected.
  • Register the app group, if you chose to do so.
  • Create a link to an Azure Resource Manager template based on your configuration that you can download and save for later.

 Important

You can only create 500 application groups for each Azure Active Directory tenant. We added this limit because of service limitations for retrieving feeds for our users. This limit doesn't apply to app groups created in Azure Virtual Desktop (classic).

Edit or remove an app

To edit or remove an app from an app group:

  1. Sign in to the Azure portal.


  2. Search for and select Azure Virtual Desktop.

  3. You can either add an application group directly or from an existing host pool by choosing one of the following options:

    • To add a new application group directly, select Application groups in the menu on the left side of the page, then select the app group you want to edit.
    • To edit an app group in an existing host pool, select Host pools in the menu on the left side of the screen, select the name of the host pool, then select Application groups in the menu that appears on the left side of the screen, and then select the app group you want to edit.
  4. Select Applications in the menu on the left side of the page.

  5. If you want to remove an application, select the check box next to the application, then select Remove from the menu on the top of the page.

  6. If you want to edit the details of an application, select the application name. This will open up the editing menu.

  7. When you're done making changes, select Save.