Sunday, 15 March 2020

Azure Network Service

Azure Network Service

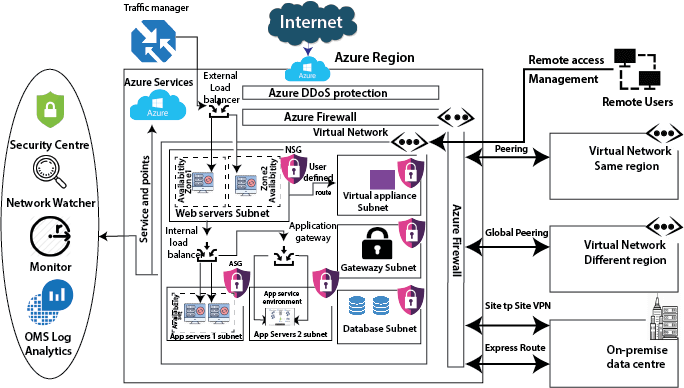
The most fundamental building block of Azure network services is the virtual network. Using a virtual network, we can deploy our isolated network on Azure. And we can divide the virtual network into multiple parts using subnets. For example - webserver subnet, App servers1 subnet, App servers2 subnet, Database subnet, Gateway subnet, Virtual Appliance subnet, etc. These are the typical examples, but we can create different kinds of subnets based on our requirements.
And once we create subnets, we can deploy different types of Azure services into these subnets. We can deploy a virtual machine into these subnets. But in addition to virtual machines, we can also deploy some specialized environments. i.e., some PaaS environments that are capable of being implemented into a virtual network. For example - in an app service environment, we can able to deploy in its own subnet. Similarly, there is something called managed SQL instance and also managed integration environment, all these kinds of environments we can able to deploy within a virtual network.
Azure Network Service
We can deploy different kinds of the appliance in a virtual appliance subnet like a firewall.
Service Protection: After the deployment of all these services, we need to protect these services. Azure provides several protection strategies.
DDoS Protection: The DDoS protection will protect our workload in the virtual network from DDoS attacks. There is a two-tier available in DDoS protection. One is the basic, which is free and enabled automatically. If we need the advance capability, then we can go for the DDoS standard tier.
Firewall: When we need network security, we use a firewall. Azure provides a firewall service which you can centrally manage inbound and outbound firewall rules. We can able to create network firewall rules, application firewall rules, inbound SNAT rules, outbound DNAT rules, etc.
Network Security Groups: If you think the firewall is too costly for you, then we can use Network security groups. We can filer the inbound and outbound traffic using network security groups. We can attach the network security group at two levels, one at the subnet level and other we can attach to a virtual machine.
Application Security Groups: Microsoft introduces the application security group to put all the server related to one application in one application security group and use that application security group in network security group inbound and outbound rules. The primary purpose of the Application Security Group is to simplify the rule creation in NSG's.

Service Availability

We have to make sure that our application is highly available and resilient to regional failures, data center failure, and rack failures. Azure provides some services to make our application highly available; these are:
Traffic Manager: Microsoft Azure traffic manager controls the distribution of user traffic for service endpoints in different regions. Service endpoints supported by Traffic Manager include Azure VMs, Web Apps, Cloud services, etc. It uses DNS to direct the client request to the right endpoint based on a traffic-routing method and the health of endpoints.
Load Balancer: Load balancer is used to distribute the traffic evenly between a pool of web servers or application servers. There are two types of the load balancer, one is external load balancer which sits outside the virtual network and the second one is an internal load balancer that sits inside the virtual network.
Application Gateway: Using the application gateway, we can achieve URL path-based routing, Multi-site hosting, etc.
Availability Zones: By deploying our virtual machines into different availability zones, we can route our application traffic to virtual machines that are located in different availability zone in case of failure of datacenter within any region.

Communication

The basic idea behind creating a virtual network is to enable communication between workloads using default system routes. These system routes will be deployed by Azure automatically. But we can also override these system routes and configure our user-defined routes; then, we can do that too.
Peering: To enable communication between two virtual networks, we can establish peering. We can do this peering with virtual networks within the same region. If we have an Azure virtual network in another region, then we can use global peering. And for the on-premises data center, we have two options, and one is the site to site VPN, which will get established over the Internet. But for private connectivity, we have to use the express route.
Monitoring: Once we deployed all the services from the networking perspective, we need to start monitoring them. Azure provides some services to monitor traffic.
Security Center: It is a central security monitoring tool using which we can view the Security score of your overall deployment, and any recommendation generated by Azure based on the security policies we have applied. Both from networking and also the service deployed on that virtual network.

Azure Storage Resource Tool

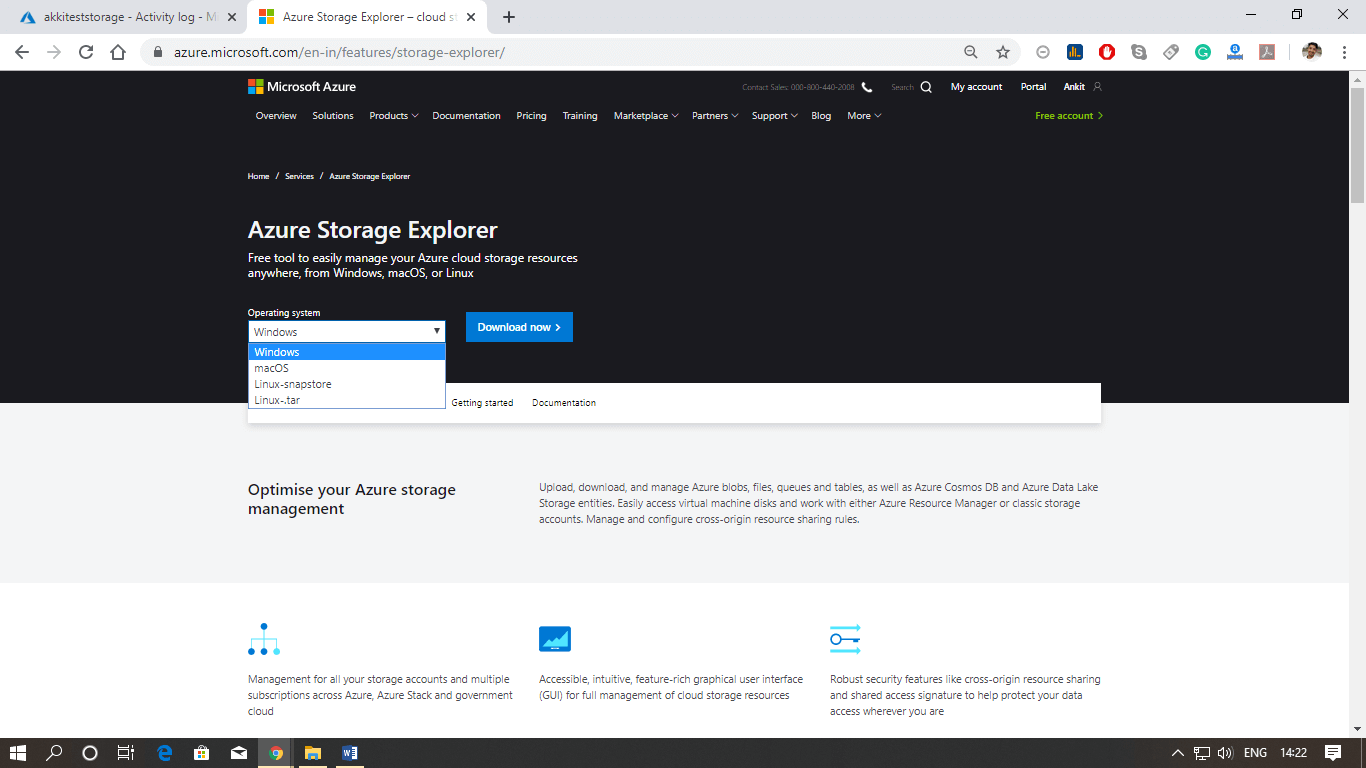
Azure Storage Explorer: It is a standalone application that enables us to efficiently work with Azure Storage data on Windows, MacOS, and Linux. It provides several ways to connect to storage accounts. For example -
  • We can connect to storage accounts associated with our azure subscriptions.
  • We can connect to storage accounts and services that are shared from other Azure subscription
  • We can connect and manage local storage by using the Azure Storage Emulator.
We can also connect to other services.
  • Cosmos DB
  • Data Lake store
Microsoft Azure Storage Emulator: It provides a local environment that emulates the Azure Blob, Queue, and Table services for development purposes. Using the storage emulator, we can test our application against the storage services locally, without creating an Azure subscription or incurring any costs. It is available as part of the Microsoft Azure SDK. We can also install the storage emulator by using the standalone installer.
It uses a local Microsoft SQL Server instance and the local file system to emulate Azure storage services. By default, the storage emulator uses a database in Microsoft SQL Server 2012 Express LocalDB.
Visual studio cloud & server explorer
Server explorer:
  • The Azure Storage node in Server Explorer shows data in your local storage emulator account and your other Azure storage accounts.
  • To see the storage emulator account's resources, expand the Development node.
  • To view the resource in a storage account, expand the storage account's node in Server Explorer where you see Blobs, Queues, and Tables nodes.
Cloud explorer:
  • Cloud Explorer enables us to view our Azure resources and resource groups. We can Inspect their properties, and perform key developer diagnostics actions from within Visual Studio.
To develop some solutions or applications based on Azure Storage resources, we can use Azure storage client library.
  • We can use connection strings to connect to an Azure Storage account, then use the client libraries' classes and methods to work with blob, table, file, or queue storage.
  • Install the NuGet package Windows Azure storage before start developing.
Management API's
  • Create and manage Azure Storage accounts and connection keys with the management API.
  • Install the NuGet package Microsoft.Azure.Management.Storage.Fluent.
Following are the steps to manage Azure storage resources using storage explorer.
Step 1: You have to download and install the storage explorer suitable for your OS.
Azure Storage Resource Tool
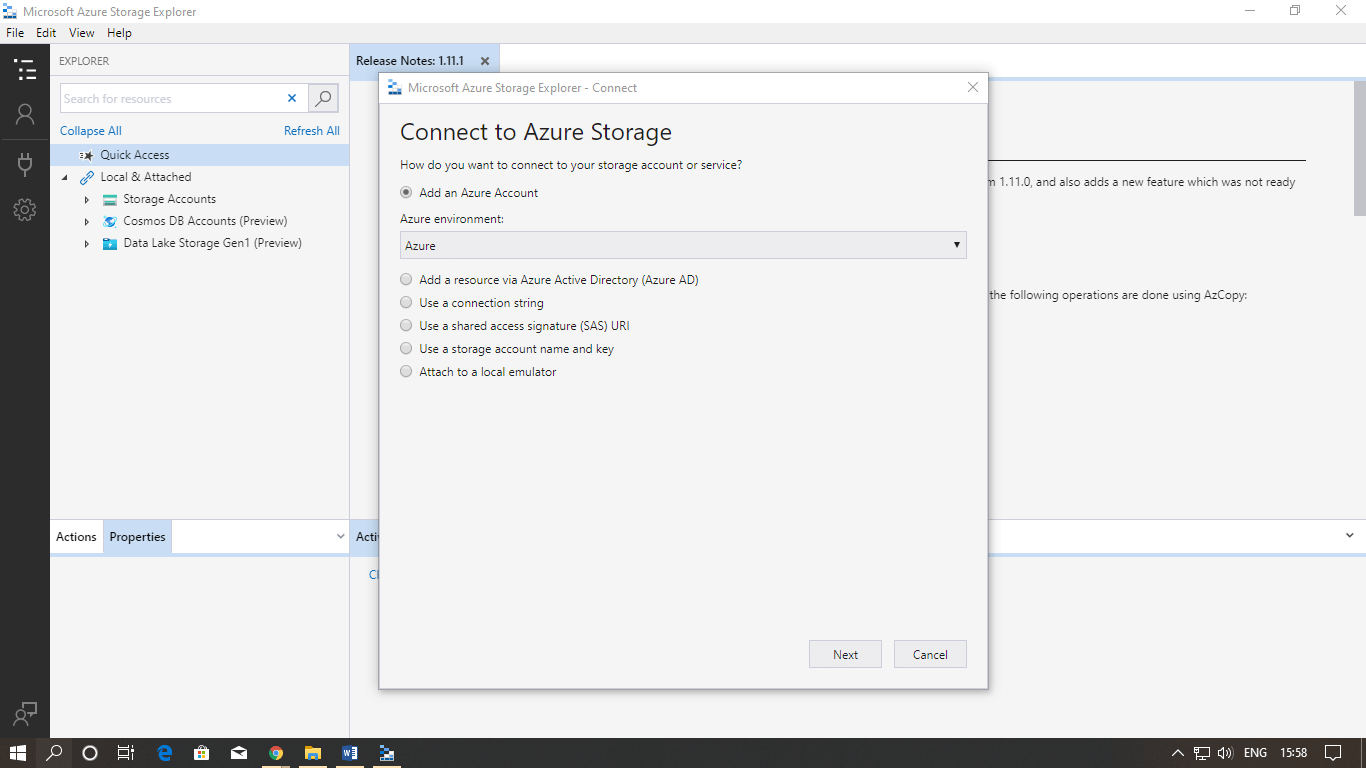
Step 2: When you install and open the storage explorer for the first time, the following screen will appear. Click next to continue.
Azure Storage Resource Tool
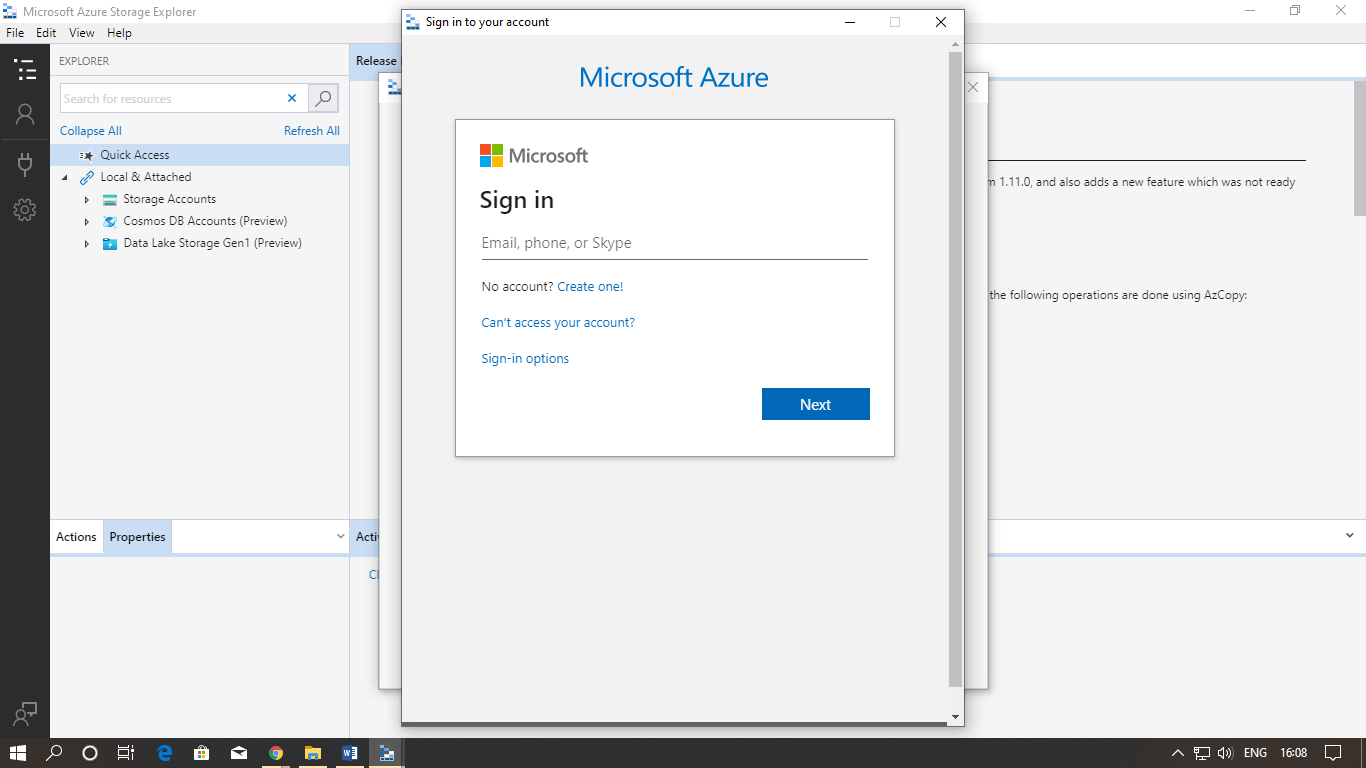
Step 3: Enter your login credentials to connect your Azure account with storage explorer.
Azure Storage Resource Tool
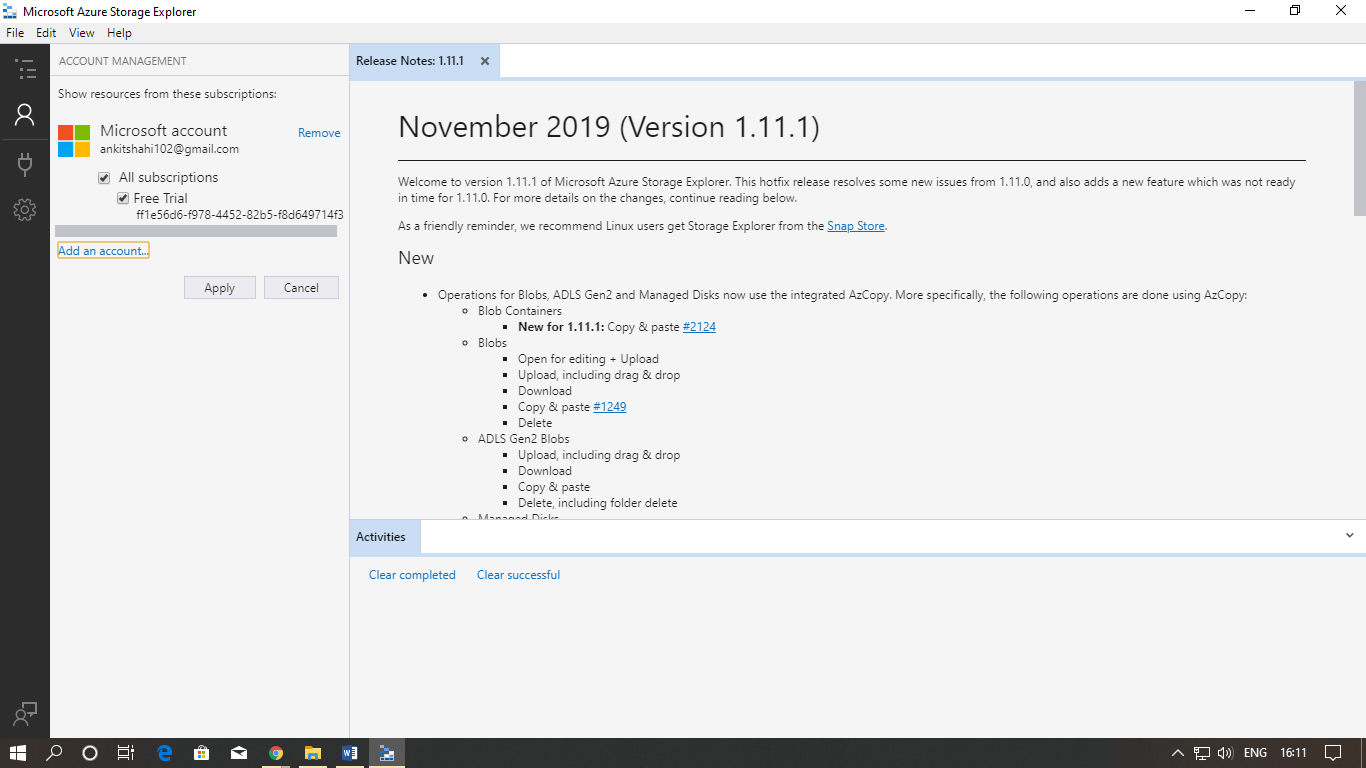
Step 4: Once you added the Azure account, you can select from which subscription you would like to view storage accounts. Then click on apply.
Azure Storage Resource Tool
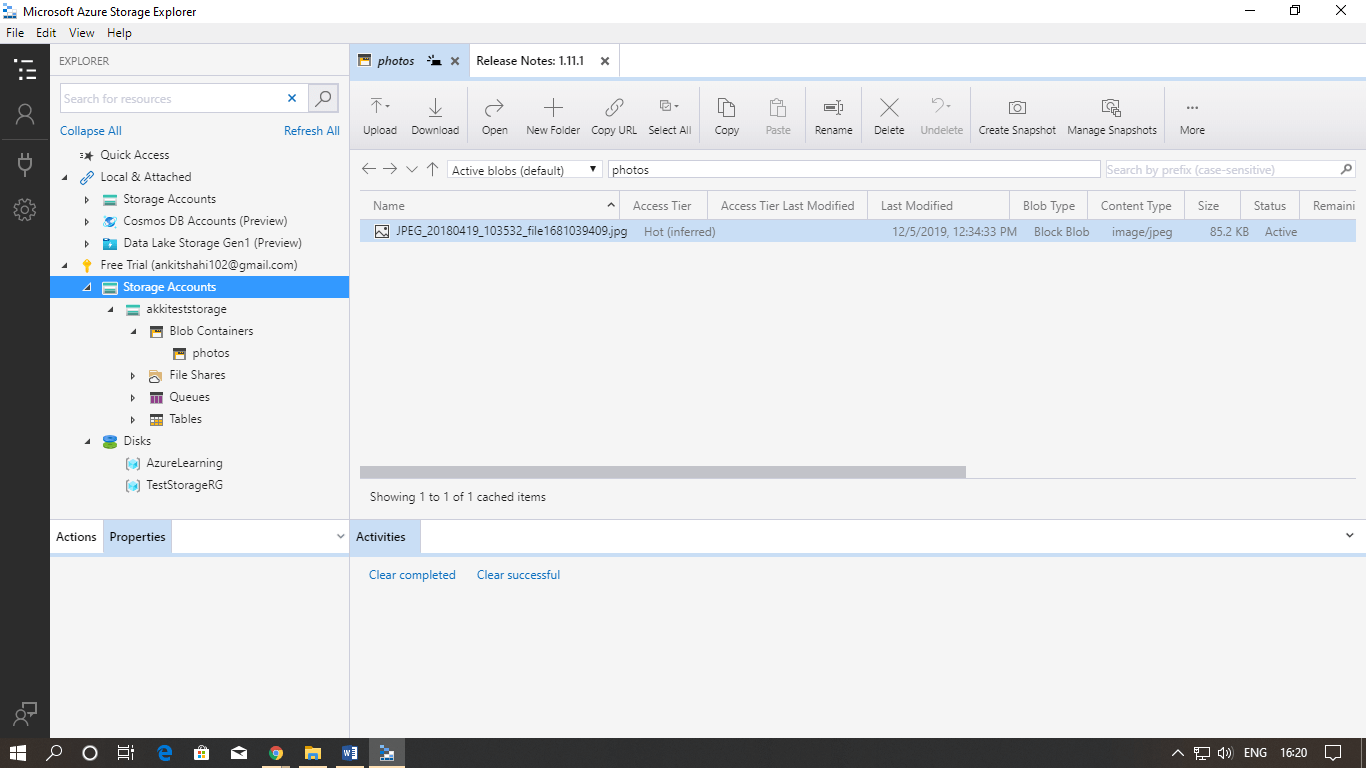
Step 5: You can see two nodes here, Local and attached, and the other is the selected storage account. You can see the containers, blobs, etc. here.
Azure Storage Resource Tool
If you want to take some action, you can take steps to copy block containers, managed shared policies, set public access levels, acquire a lease, etc.

Azure Storage Monitoring

Azure Storage Monitoring

Two capabilities are available in Azure for storage monitoring.
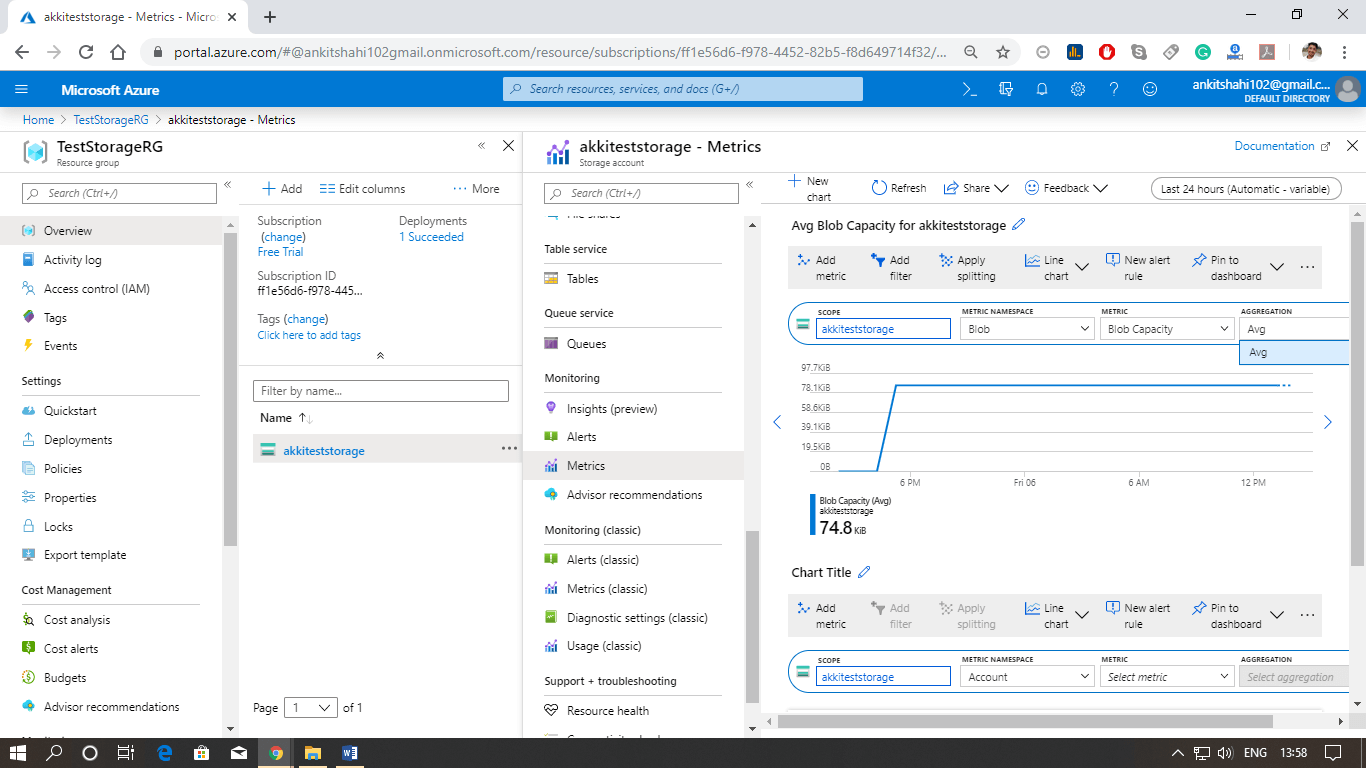
Continuous monitoring: Azure provides different metrics that are available both at the storage account level and individual service level also. These metrics are collected on an hourly basis, and we can define charts based on those metrics and pin those charts to the dashboard. We will see how to do that below.
Logging: We can enable client-side logging using Azure storage client library. And we can allow network logging, and server logging using Azure storage analytics. All these logging can be used to monitor an individual's transactions for continuous monitoring. These metrics are aggregated data, so we can't view an individual's transaction. But by enabling logging, we can investigate by going into the individual's transaction.
The essential tools that we use to monitor storage are audio storage analytics, which is explained below:
  • Azure Storage Analytics performs logging and provides data quickly for the storage account. We can use this data to trace requests, analyze usages trends, and diagnose issues with our storage account.
  • Metrics are enabled by default when we create a storage account. We can allow logging using the Azure portal, Rest APIs, or Client library. Metric uses the Get Blob Service properties, Get Queue Service Properties, Get Table Service Properties, and Get File Service Properties operations to enable Storage Analytics for all the services.
  • The combined data is stored in a well-known blob (for logging) and in well-known tables (for metrics), which may use respective APIs service.
  • Storage Analytics has a 20 TB limit on the amount of stored data that is independent of the total limit for your storage account.

Storage analytics logging:

Storage analytics records detailed information about successful and failed requests to a storage service. The data can be used to monitor individual requests and to diagnose issues with a storage service. Both authenticated and anonymous requests will be logged but at different levels. All logs are stored in block blobs inside a container named as $logs, which is automatically created when Storage Analytics is allowed for a storage account. The container ($logs) is located in the blob namespace of the storage account.
The logs are written in the following format
  1. <service-name>/YYYY/MM/DD/hhmm/<counter>.log  

Storage analytics metrics

Storage Analytics stores metrics, which include combined transaction statistics and capacity data about the request to a storage service. There are two types of storage analytics metrics.
Transaction metrics
  • Transaction aggregated data recorded at hourly or minute like reading, write, update, etc.
  • Data is recorded at the service level and API operation level
Capacity metrics
  • Capacity data is recorded daily for a storage account's Blob service, which includes Capacity container count, object count, etc.
All the metrics data for each of the storage service is stored in three tables reserved for that service.
Azure Storage Monitoring

Azure Disk Storage

Azure Disk Storage

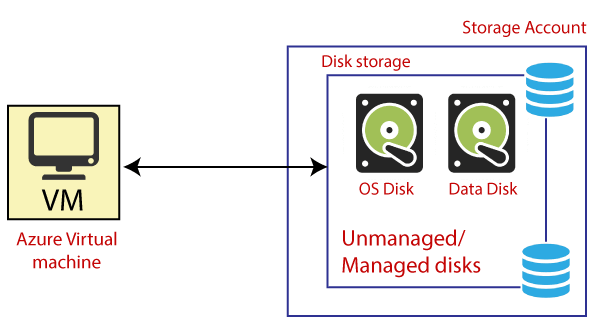
VM uses disks as a place to store an operating system, applications, and data in Azure. All virtual machines have at least two disks- a Windows operating system disk and a temporary disk. Both the operating system disk and the image are virtual hard disks (VHDs) stored in an Azure storage account. The VHDs used in Azure is .vhd files stored as page blobs in a standard or premium storage account in Azure. Virtual machines can also have one or more data disks that are also stored as VHDs.
Azure Disk Storage
Temporary Disk: It is associated with the virtual machine that will be located in the underlying hardware from where the server is provisioned. So, the temporary disk will not be stored in a storage account. It will be stored in the underlying hardware from where this server is located.

Types of Disk

Different kinds of disks that are offered by Azure:
Unmanaged disks: It is a traditional type of disk that has been used by VMs. With these disks, we can create our storage account and specify that storage account when we create the disk. We must not put too many disks in the same storage account, resulting in the VMs being throttled.
Managed disks: It handles the storage account creation/management in the background for us and ensures that we do not have to worry about the scalability limits of the storage account. We specify the disk size and the performance tier (standard/premium), and Azure creates and manages the disk for us.
  • Standard HDD disks: It delivers cost-effective storage. It can be replicated locally in one data-center, or be geo-redundant with primary and secondary data centers.
  • Standard SDD disks: It is designed to address the same kind of workloads as standard HDD disks, but offer more consistent performance and reliability than HDD. It is suitable for applications like web servers that do not need high IOPS on disks.
  • Premium SSD disks: It is backed by SSDs, and delivers high-performance, low-latency disk support for VMs running I/O-intensive workloads. The premium SSD disks are mainly used for production and database servers. So if we are hosting a database in a particular server, then the premium SSD will be a good option.
Microsoft recommends that we should use managed disks for all new VMs and convert our previous unmanaged to managed disks.

Disks backup

When we have this OS disk or data disk associated with Virtual Machine, we need to take the backup of the same regularly so that in case of data risk scenario, we can recover the data.
Azure Disk Storage
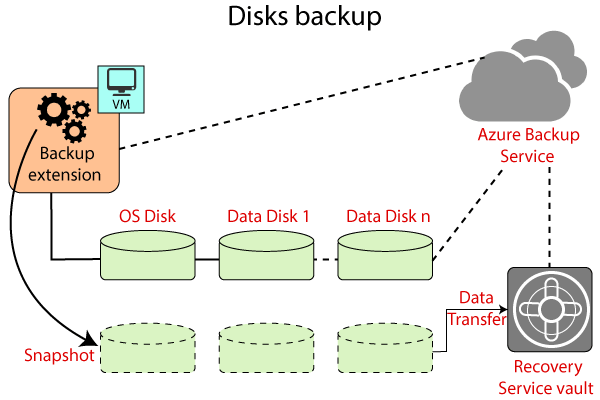
Azure provides the Azure backup service, which you can install as a backup extension on a particular VM and the extension based on the frequency you specified will take the snapshot off OS disk, and the data disk. And also, at different levels, so we can bring application-consistent snapshots, file consistent snapshots, and these snapshots will be moved into recovery service vault. That's where these snapshots will be stored. In case if something goes wrong with our VM or any particular data center is gone. We can still recover the virtual machine using these snapshots, and if we want to have a geo-redundant ability, then we can have this recovery services vault located in another region.
So for example, if our VM is located in northern Europe, then we can have a recovery service vault located in West Europe. In that way, we can protect our workloads against regional failure also.

Azure Table and Queue Storage

Azure Table storage is used for storing a large amount of structured data. This service is a NoSQL data storage, which accepts authenticated calls from inside and outside of the Azure cloud. It is ideal for storing structured and non-relational data.
In case if you want to store relational data, then you should not use the Azure database. Unlike a relational database where the table has a fixed number of columns, and every row in the table should have those columns in the Azure table, which is a NoSQL data store. Each table can have entities, and each entity can have different properties. So generally, the schema will not be enforced on the objects that belong to a table.
Typical uses of Table storage include:
  • Table storage is used for storing TBs of structured data capable of serving web-scale applications.
  • It is used for storing datasets that don't require complex joins, foreign keys, or stored procedures and can be denormalized for fast access.
  • It is used for quickly querying data using a clustered index.
  • There are two ways of accessing data, one is using the OData protocol, and the other is LINQ queries with WCF Data Services with .NET Libraries.

Azure Table Structure

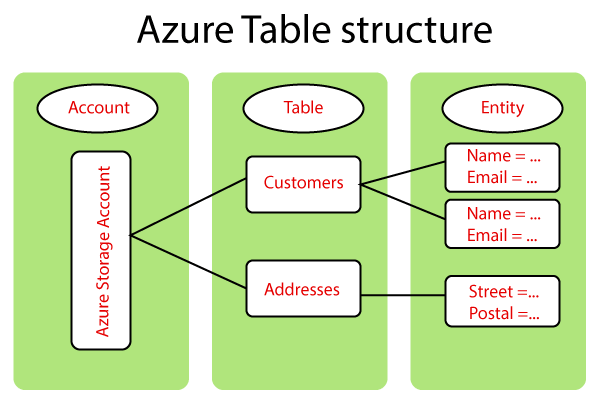
We need to create a storage account first because Azure table storage is offered under storage account, and then you have tables within that storage account. E.g., you can create employee table, address table, and each table will contain entities and entities will further include key-value pair like name email within an employee table.
However, one key difference here to the Azure table is the NoSQL data store and relational databases. These entities can have different schemas, so the first entity can have the name, email, and the second entity can have a name, email, and phone number also.
Azure Table and Queue Storage

Azure table storage concepts

  • Accounts: Every access to Azure storage service is done through a storage account, and all access to Azure Cosmos DB is done through a Table API account. So there are two types of tables Storage services available in Azure. The first one is Azure table storage, and the second one is a premium version, which is under Cosmos's DB. So if you are looking for a brilliant performance with low latency, then go for Cosmos's DB, particularly when you are dealing with mission-critical applications. In case if you can compromise on performance, but if you want to optimize the cost, then go for table storage.
  • Table: It is a collection of entities. As we know, tables don't put a schema on entities that mean a single table can contain entities with different properties set.
  • Entity: It is a set of properties, a similarly as database row. Azure Storage can be of 1MB in the size of the entity. But if we are using the premium version, which is Azure Cosmos DB, it can be of 2MB in size.
  • Properties: It is a name-value pair where each entity can include up to 252 properties to store the data, and in addition to user properties, that means whatever the features you add. There are some system properties also that specify a partition key, a row key, and a timestamp. So every entity will have these three properties as a default. And when we are querying the data, we can carry the data based on the partition key and row key, and under the single partition, this row key should be unique. So when we query the data, we query the data with a partition key and row key. Generally, when we are fetching the entity from a single partition, it will be rapid because all the objects belong to a separate partition will be stored in one server in the background within Azure.
When you find a query, it needs to go to one server only to fetch the data, but if your query includes data that exists in 2-3 partitions, then the question used to go to multiple servers in the background, thereby the performance of the query will be impacted. So we need to keep that in mind when we are designing this table storage.
There are two access points
  • Azure table storage: If we use Azure table storage then we can have http://<storageaccount>.table.core.windows.net/<table>
  • Azure Cosmos DB Table API: If we use the premium version then we need to use http://<storageaccount>.table.cosmosdb.Azure.com/<table>

Table Storage queries

Queries retrieve the data from tables because a table only has one index. Query performance is usually related to the PartitionKey and RowKey properties.
Here is a sample query to retrieve data from the server:
<account>.windows.core.net/registrations(PartitionKey="2011 NewYork City Marathon_Full", RowKey="1234_Ankit_M_55")

Azure Queue Storage Service

It is a queue service, but there is a more advanced version of the queue service that is available in Azure, which is a service bus queue.
  • It is a service for storing a large number of messages in the cloud that can be accessed from anywhere in the world using HTTP and HTTPS.
  • A queue contains a set of message. Queue name must be all lowercase.
  • A single queue message can be up to 64KB in size. A message can remain in the queue for a maximum time of 7 days
  • URL format is http://<storage account>.queue.core.windows.net/<queue>
  • When the message is retrieved from the queue, it stays invisible for 30 seconds. A message needs to be explicitly deleted from the queue to avoid getting picked up by another application.

Azure File Storage Service

Azure File Storage Service

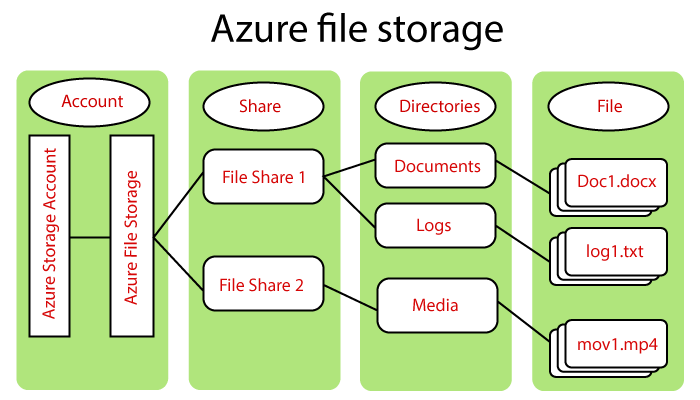
Azure file storage mainly can be used if we want to have a shared drive between two servers or across users. In that case, we will go for Azure file storage. In the Azure file storage structure, the first thing we need to have is an Azure storage account. Azure file storage is offered under the umbrella of the Azure storage account. And once we have created an Azure storage account, we'll create a file share.
We can create an unlimited number of file shares within a storage account. Once we create a file share, then we can create directories, just like folders, and then we can upload files into it. Once we create a file share, we can mount that on any virtual machine, whether it is in Azure or outside.
Azure File Storage Service
Some of the concepts related to Azure file storage:
  • Storage Account: All access to Azure Storage service is done through a storage account. We need to keep in mind scalability and performance targets when we might have Azure fie storage, blob storage, tables, and queues. All of them might be sharing the same performance targets under the storage account, so the same limitations of storage account will be shared-by across all services.
  • Share: A file storage Share is an SMB file share in Azure. The directories and files must be created in a parent's Share, so we can't create a directory directly in a storage account. We need file storage share, first created, and then we can create directories to upload. An account may contain an unlimited number of shares, and a Share can store an unlimited number of files, up to 5 TB total capacity of the file share. But, in case we need more than the full capacity, then we can create another file share.
  • Directory: It is an optional hierarchy of directories.
  • File: A file in the share. A file may be up to 1 TB in size.
  • URL format: For a request to an Azure file share made with the file REST protocol

File Storage Data Access methods

Azure files offer two, built-in, convenient data access methods that you can use separately, or in combination with each other, to access your data:
  • Direct Cloud Access: Windows, MacOS, or Linux can mount any Azure file share with the industry-standard Server Message Block (SMB) protocol or via the File REST API. But if we use the SMB protocol, then we need to take care of two things. First, if we are mounting the file share on a VM in Azure, then the SMB client in the OS must support at least SMB 2.1. Secondly, if we want to mount file share on an on-premises system such as a user's workstation, then the SMB client supported by workstation must be at least SMB 3.0 with encryption enabled. And if we are mounting Azure file share within our on-premises data center, then it should be 3.0 minimum version of SMB client, but if we are installing VM in Azure, it can be 2.1.
  • Azure File Sync: With Azure File Sync, Shares can be replicated to on-premises or Azure Windows Servers. Our users can access the file share through the Windows Server, such as SMB or NFS share. Synchronization of any frequently accessed files will be kept in the server endpoint, and any infrequently accessed data will be moved to Azure file share. In that way, we can get the speed of the delivery of the data to your users and, at the same time, save the storage.

Data transfer method

When we create an Azure file share, and we have a large file share already inside our on-premises data center. Then with the help of the option below, we can transfer those files.
  • Azure file sync: As a part of the first sync between an Azure file share (a "cloud Endpoint") and a windows directory namespace (a "Server Endpoint"), Azure File Sync will replicate all data from the existing file share to Azure Files.
  • Azure Import/export: If we have terabytes of data, which we need to transfer into Azure files. And if we start moving data using Azure file sync, it might consume all the bandwidth, or it might be a slow process that may take months. In that case, you can use Azure import/export. Microsoft will provide a hard disk to you to move all the data in the hard drive and ship that hard drive back to Microsoft, and Microsoft will load the data from the hard-disk and into an Azure data center.
  • Robocopy: Robocopy is a well-known copy tool that ships with windows and windows Server. We can use it to transfer the data into Azure files by mounting the locally shared files and then using the mounting location as a destination in the robocopy command.
  • AzCopy: It is a command-line utility tool, which we can use for copying the data to and from Azure files. It can be used for blob storage also, and you can use Azcopy with simple commands. It provides excellent performance and is available for Windows and Linux.

Creating a File Storage in Azure

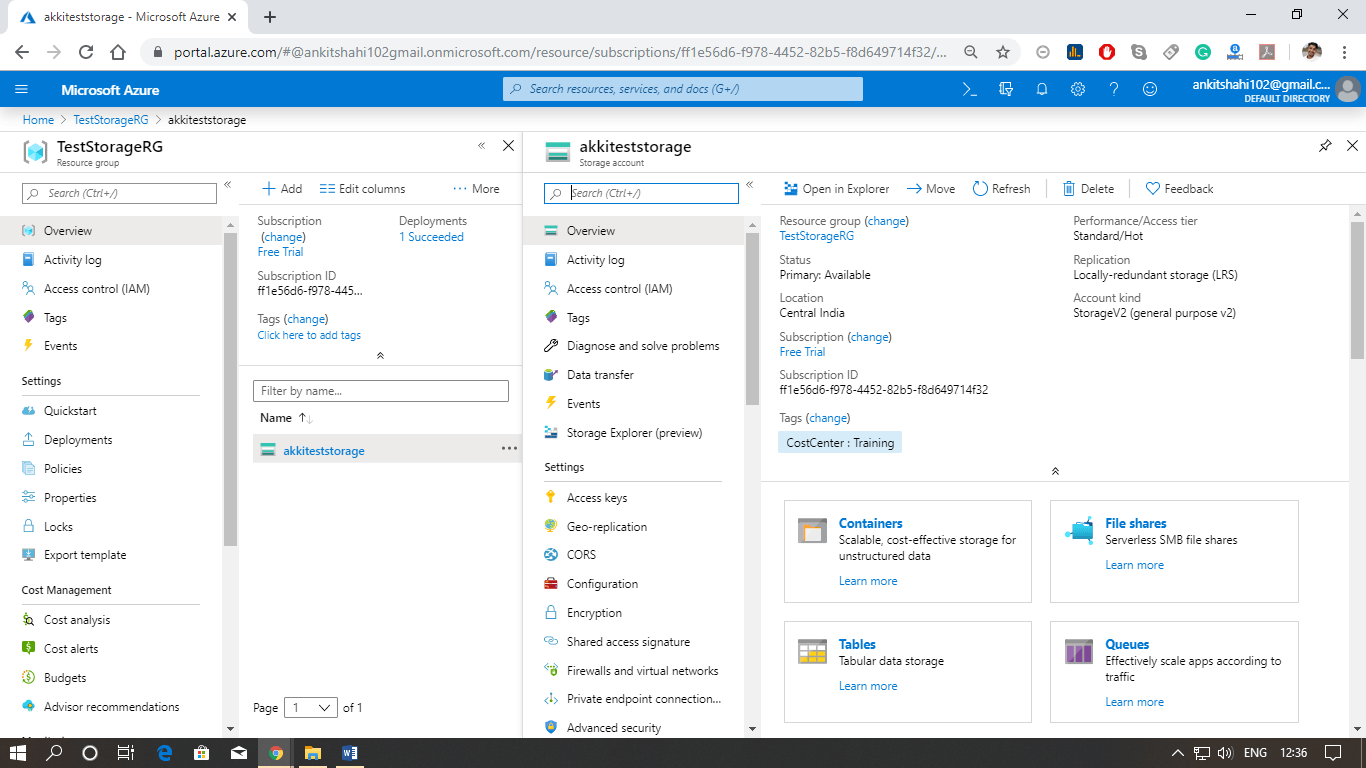
Step 1: Let's go into Azure storage Account, then scroll down and click on Files.
Azure File Storage Service
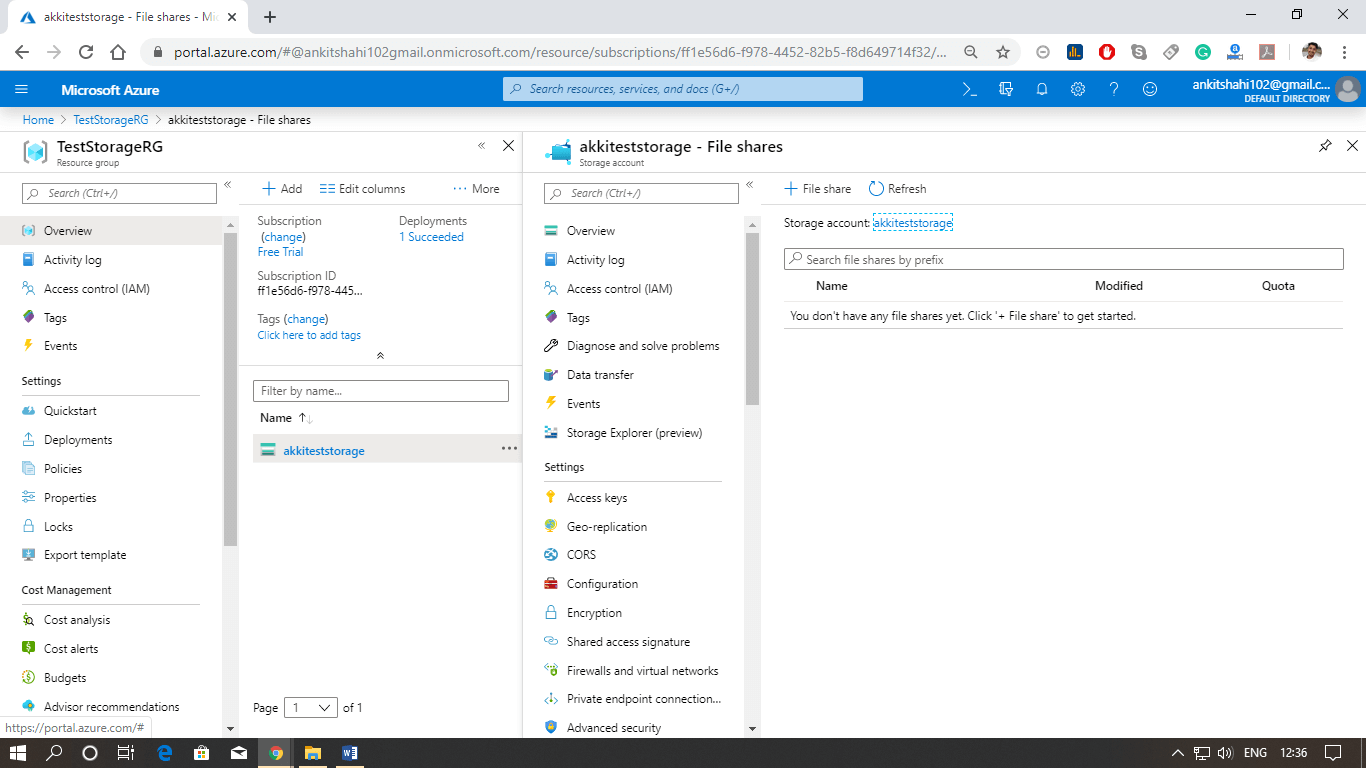
Step 2: Click on +File Share.
Azure File Storage Service
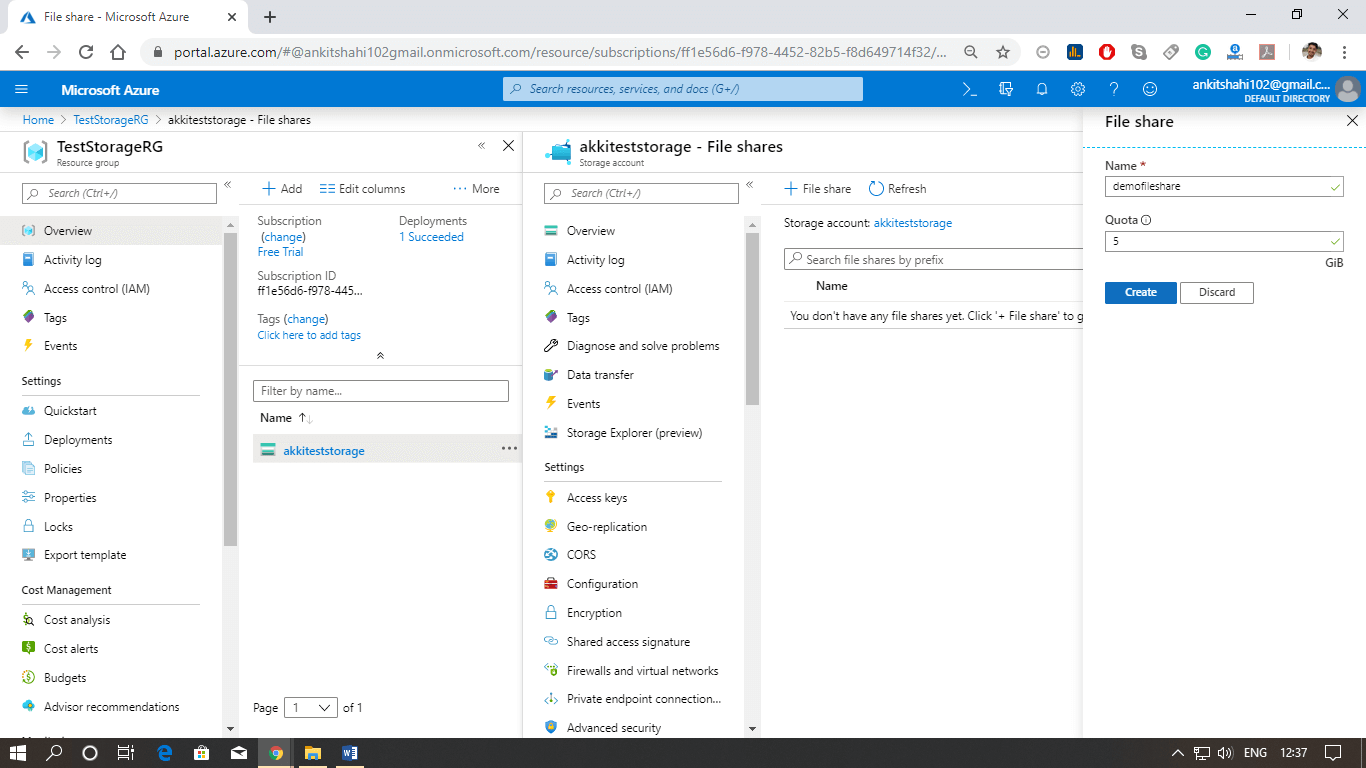
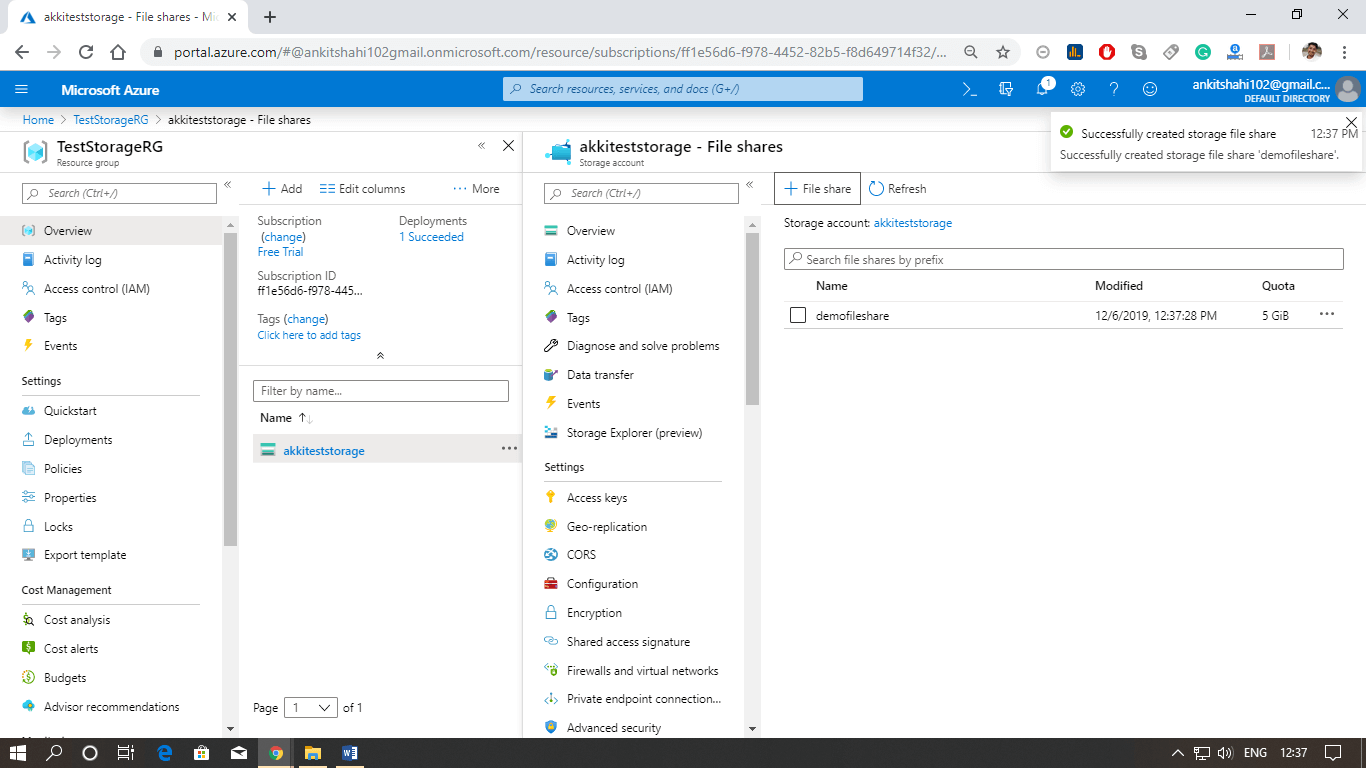
Step 3: Provide the name and Quota of the file share, then you will get a notification of the successful creation of File share.
Azure File Storage Service
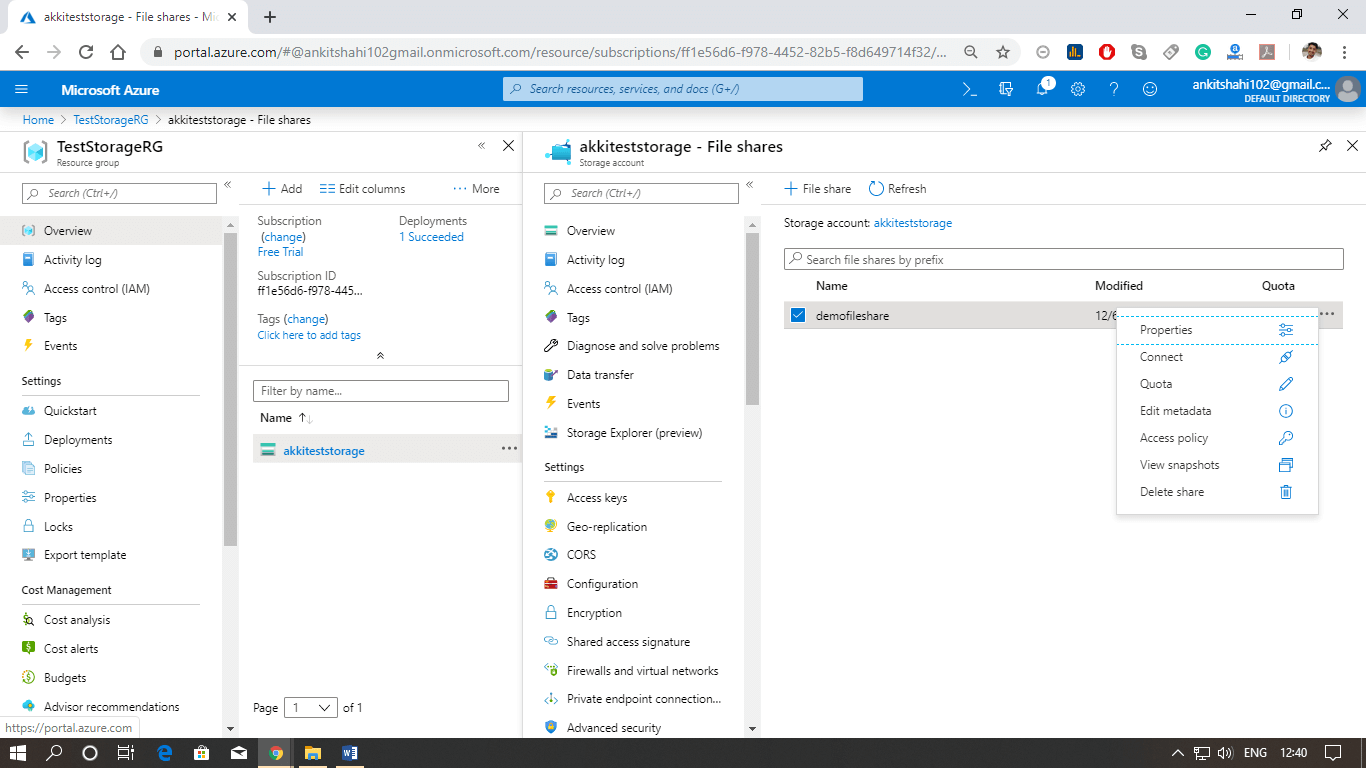
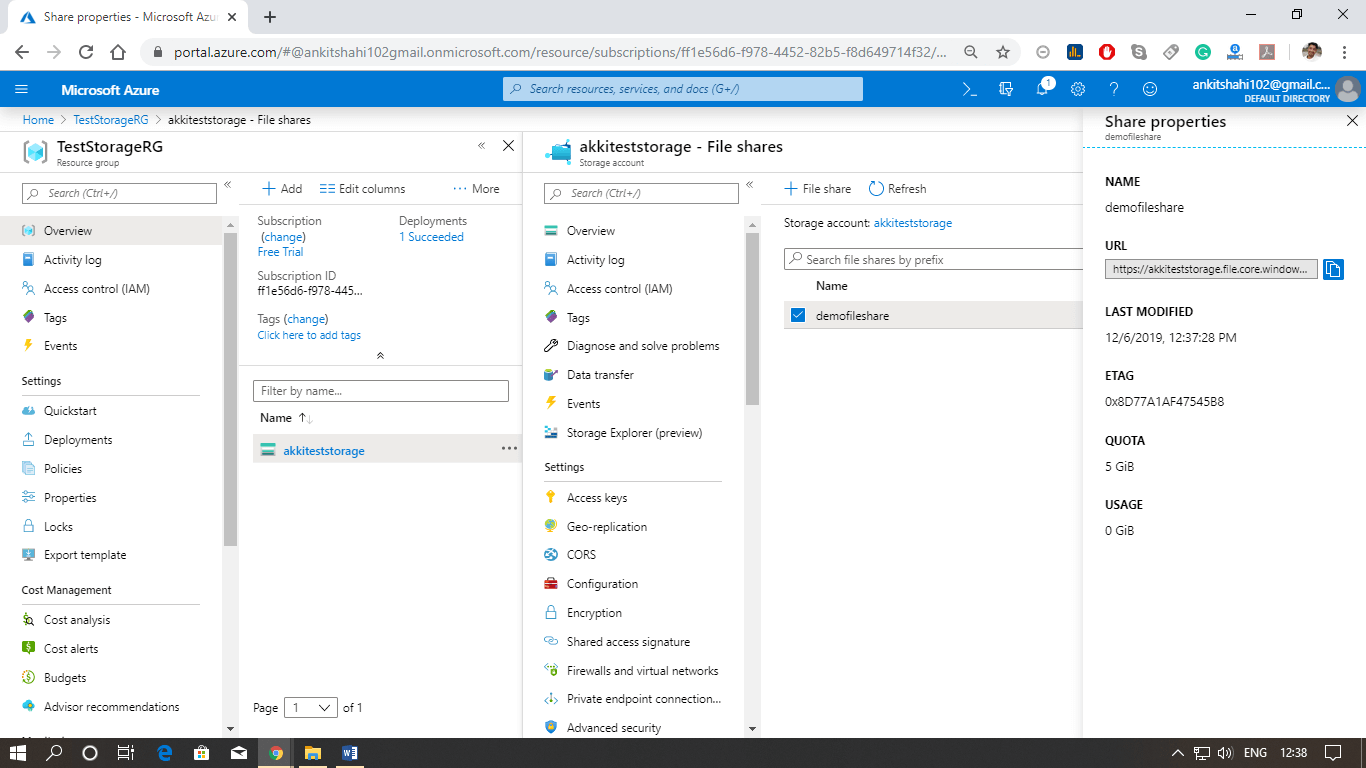
Step 4: Click on the File share property where you can see the URL and also the quota you assigned and how much it is used.
Azure File Storage Service
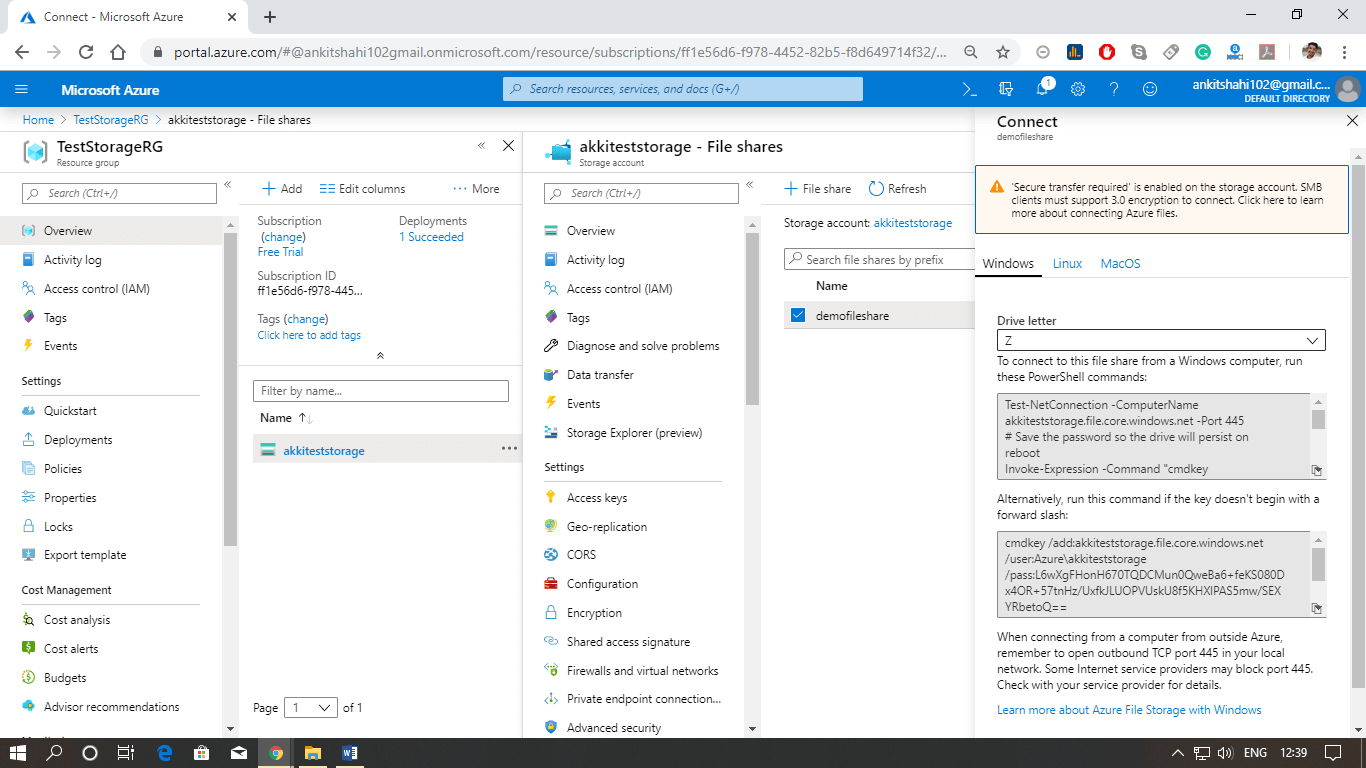
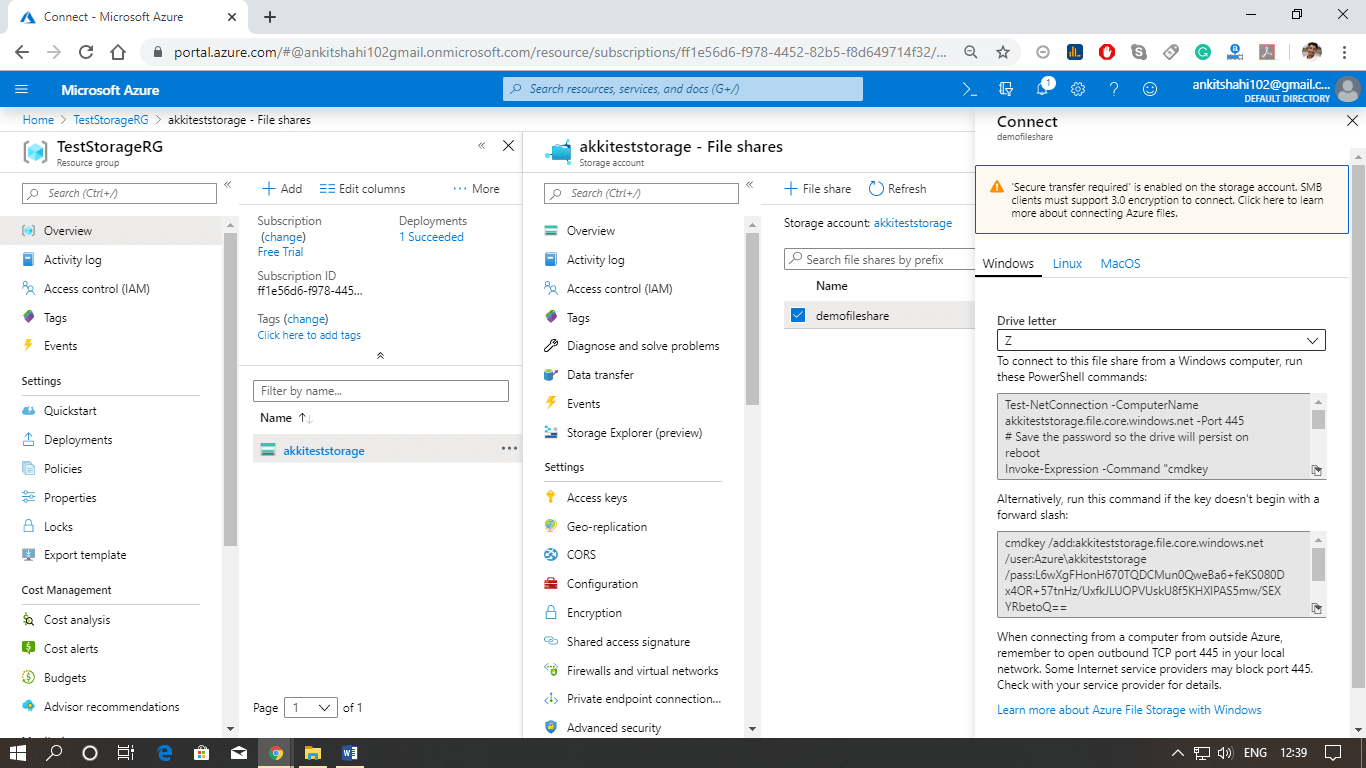
Step 5: And the second option is to connect, here you can see the PowerShell command and normal command to connect this File Share on a Windows computer.
Azure File Storage Service
There are other options also given in the following figures.
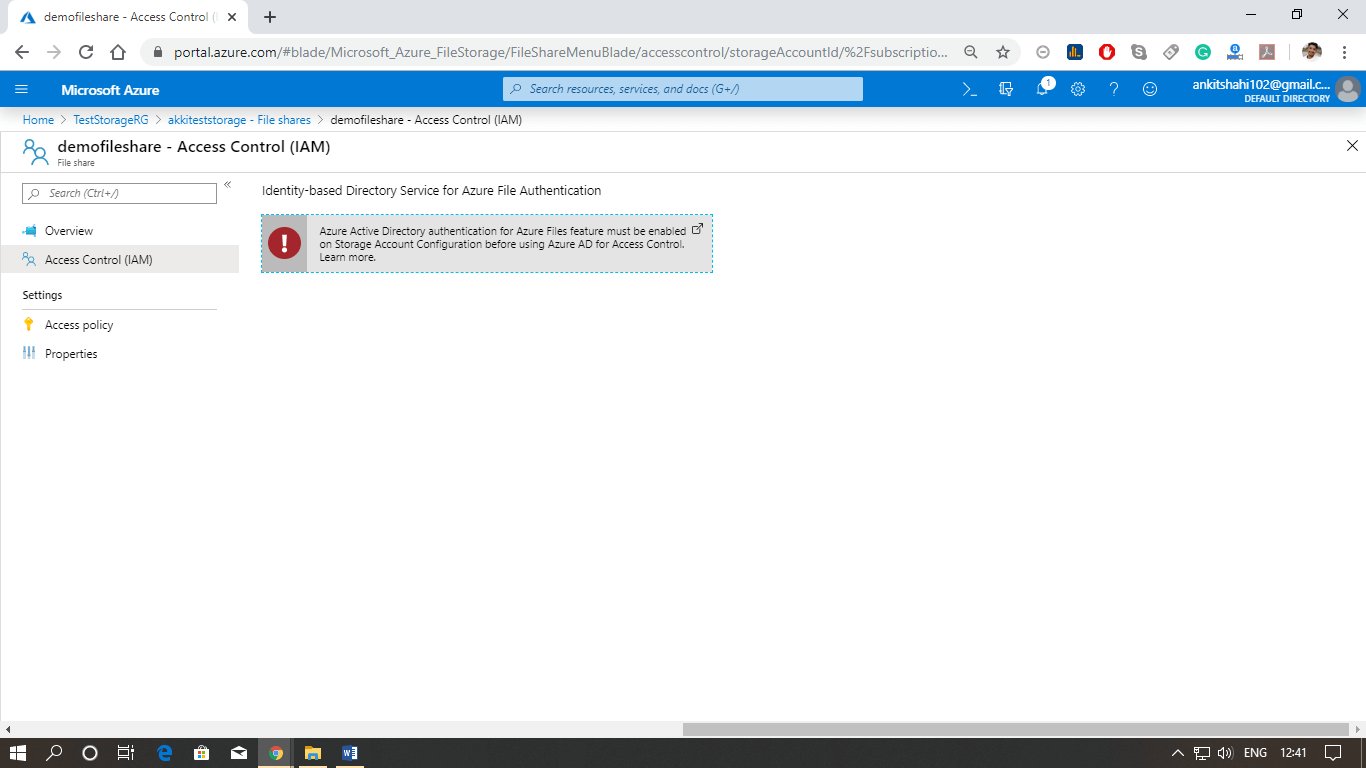
Step 6: Click on File share and open it, where you can see the Access Control tab. You can use the Active Directory to control access to Azure file share. It is currently in preview.
Azure File Storage Service
Step 7: To mount this file share with windows virtual machine Click on Connect.
Azure File Storage Service
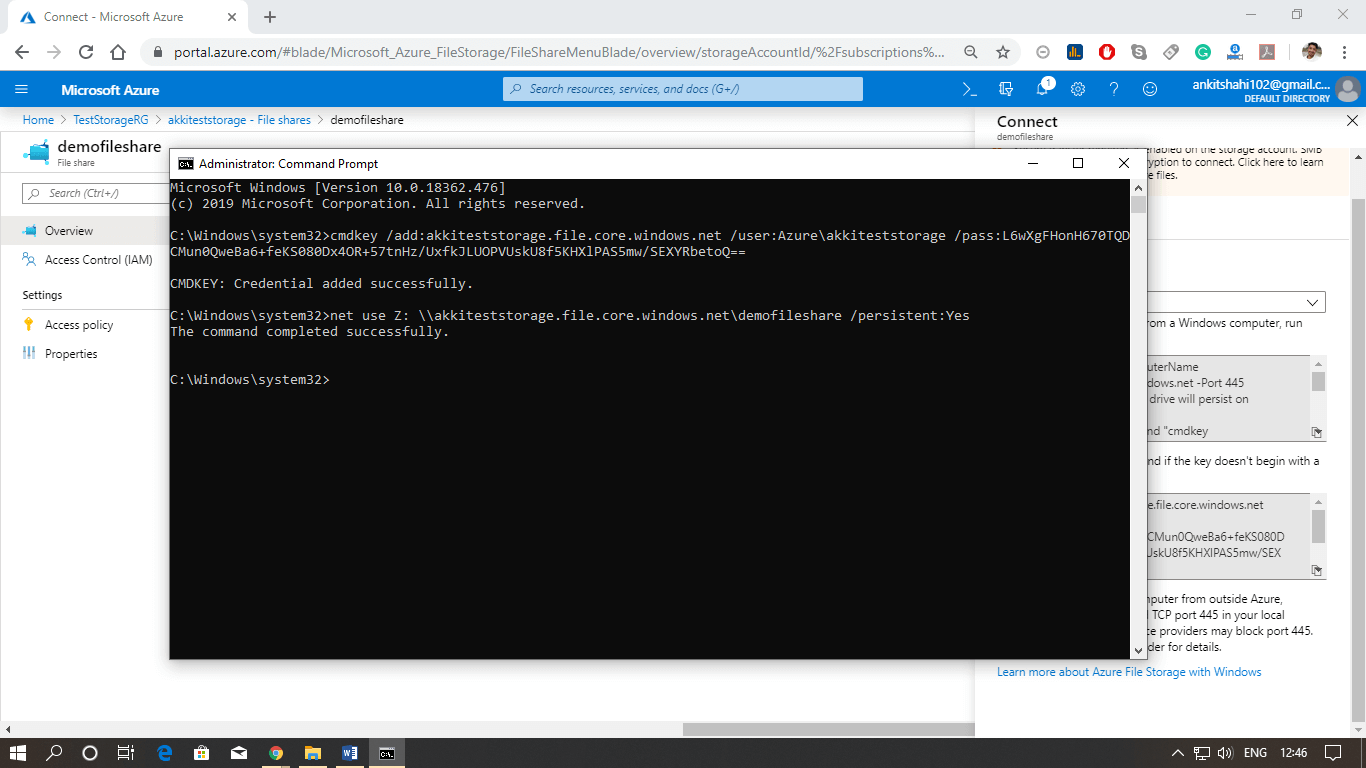
Step 8: Open the command line and copy the command given in the Connect window. If the command is executed successfully, your file share would be mounted with a virtual machine.
Azure File Storage Service

Azure Storage Security

Azure storage security is divided into five major areas.

Management plane security

The management plane refers to the operation that affects the storage account itself. The way we control access to the services that affect the storage account is by using Azure active directory.
Azure Storage Security
Role-based access control
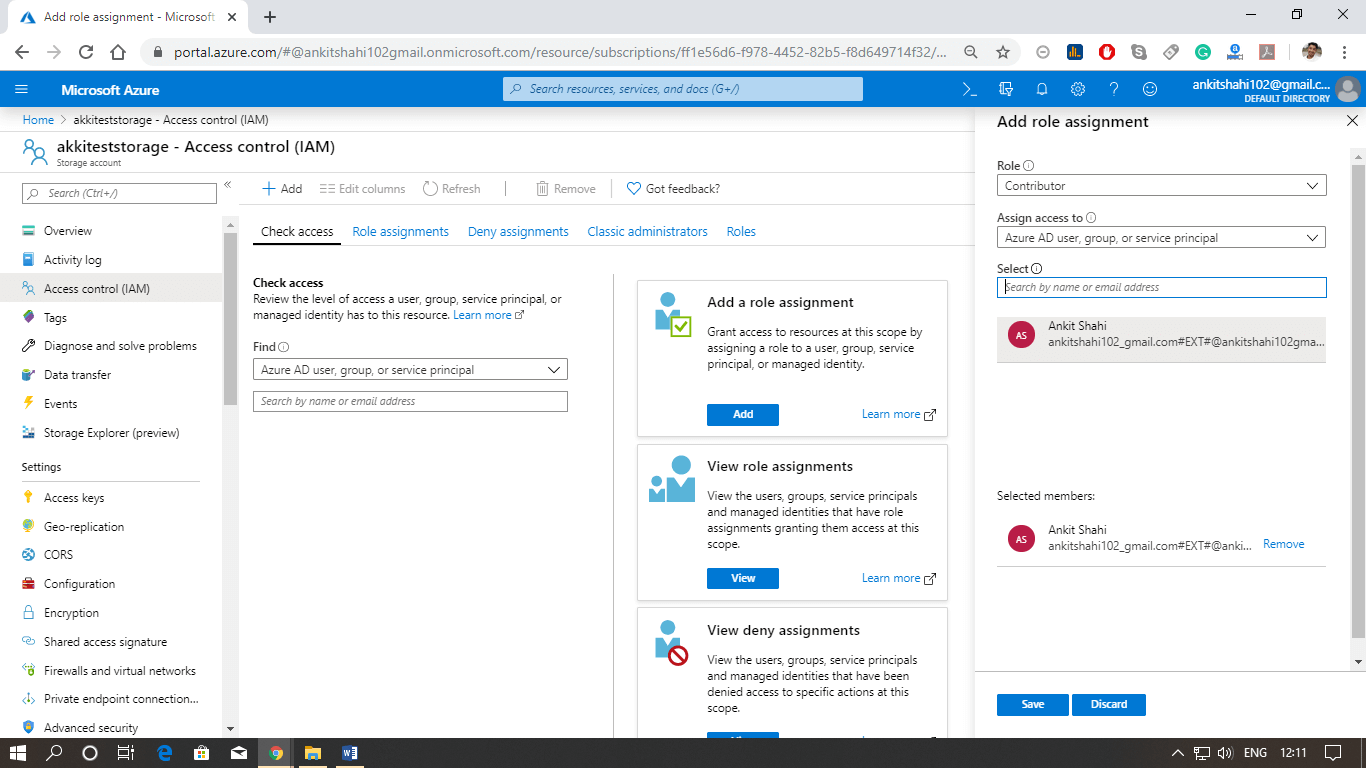
  • As we are aware that every Azure subscription has an associated Azure active directory. The Azure active directory contains users, groups, and applications. To them, we can provide access to manage resources within the Azure subscription. That resource can be a storage account, and the way we control the level of access to storage accounts is by assigning an appropriate role to the user. So we can have an owner role or contributor role or reader role that we can define.
Key Points to remember:
  • When we are assigning a role, we can control access to the operations used to manage the storage account but not data objects in the account.
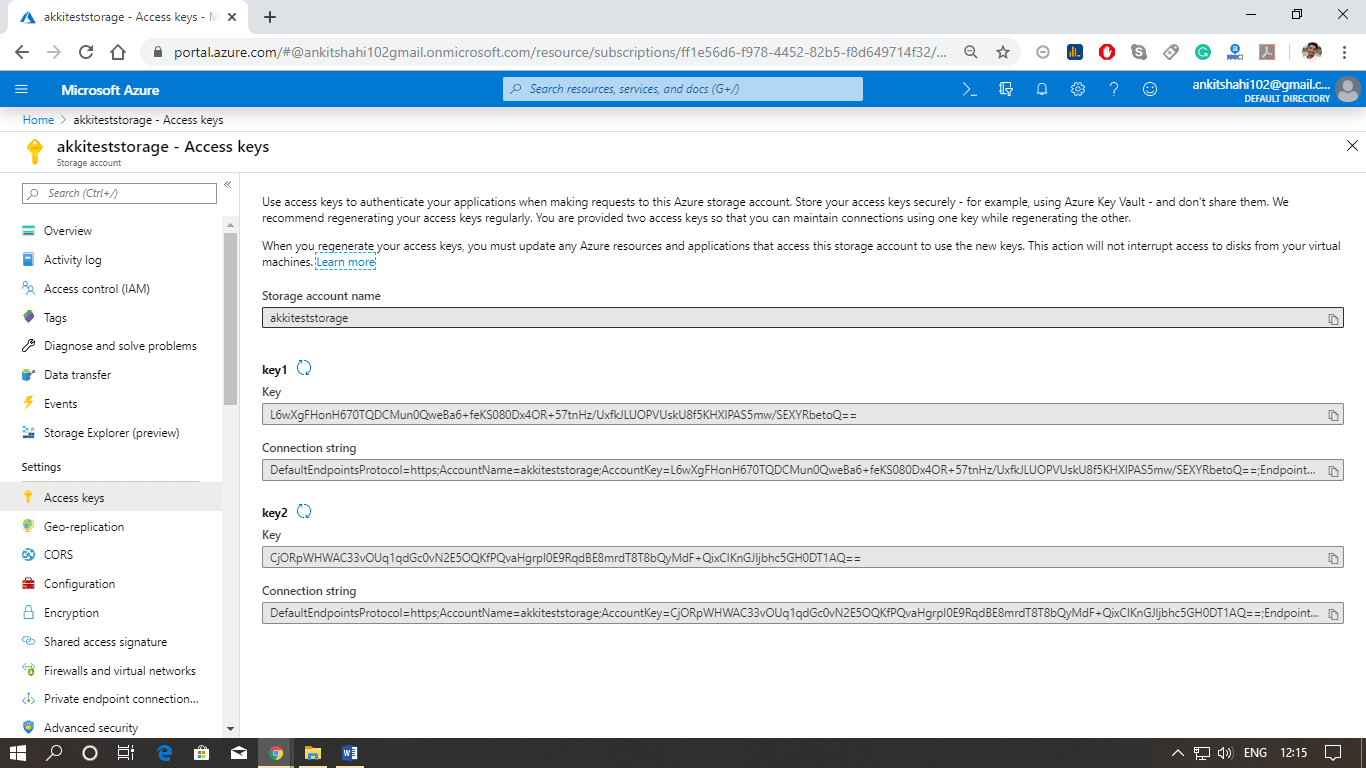
  • However, we can give access to data objects by providing permission to read storage account keys because storage account keys enable the users to have access to data objects.
  • Each role has a list of actions.
  • There are some standard roles available, e.g., Owner, Reader, Contributor, etc.
  • We can define a new custom role by selecting a set of actions from the list of available actions.

Data Plane security

It refers to the methods used to secure data objects (blobs, queues, tables, and files) within the storage account.
Azure Storage Security
There are three ways that you can control access to the data within the storage account
  • Azure active directory authorizes access to containers and queues. Azure Active Directory provides advantages over other approaches to authorization, including removing the need to store secrets in your code.
  • Storage account keys provide blanket access to all data objects within the storage account.
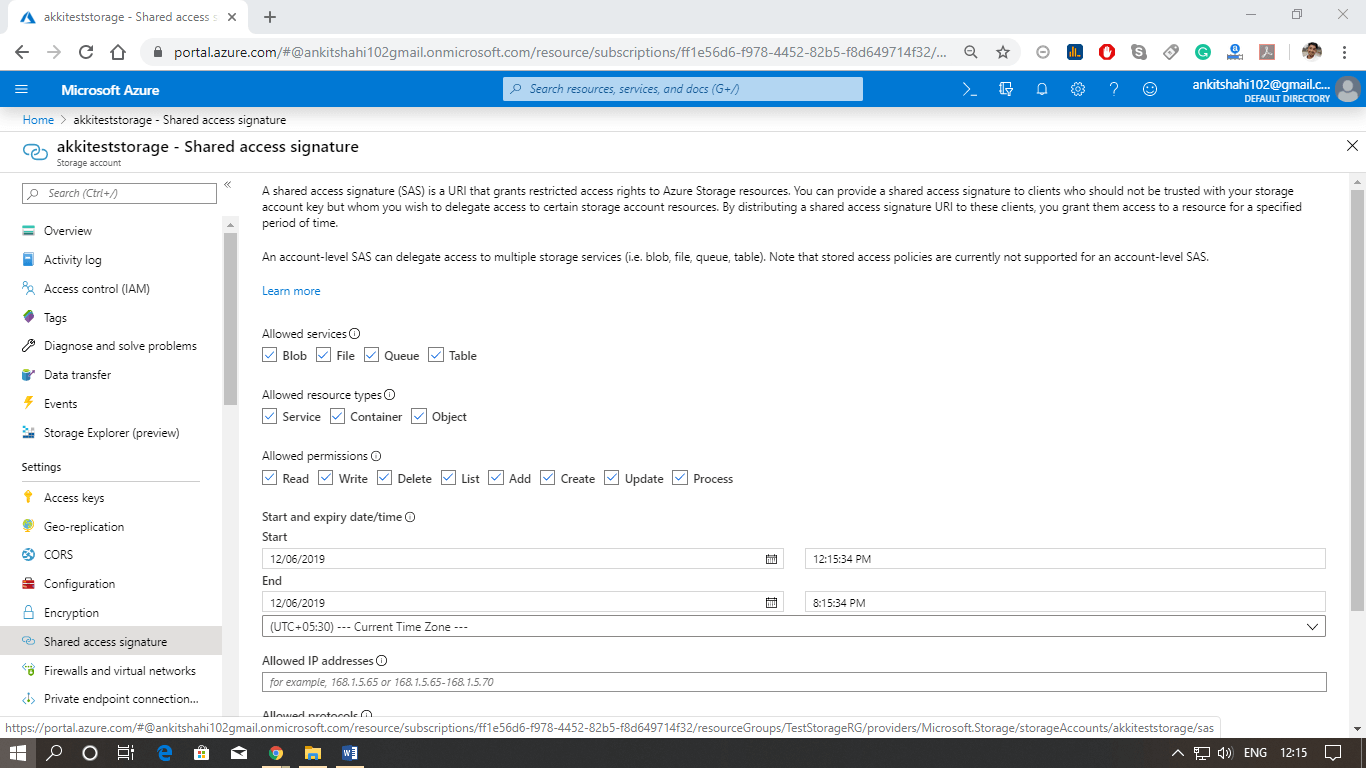
  • Shared Access Signatures, in case, if we want to provide access to certain services, for example - only to blobs, only to queues, or a combination of them. And also, if we want to control the level of access, for example - read-only, update, delete in that way, and also we wish to provide time-limited access. So we want to give access to only one year, and after that one year, we generate another SAS and present it to them for security reasons. In that case, we use shared access signatures.
Azure Storage Security
We can allow public access to our blobs by setting the access level for the container that holds the blob accordingly.

Encryption in transit

Transport level Encryption using HTTPS
  • Always use HTTPS when using REST APIs or accessing the object in storage.
  • If we are using SAS, we can specify that only HTTPS should be applied.
Using encryption in transit for Azure file shares
  • 1 does not support encryption, so connections are only allowed within the same region.
  • 0 supports encryption, and cross-region access is allowed.
Client-side encryption
  • Encrypt the data before being transferred to Azure storage
  • When retrieving the data form Azure, data is decrypted after it is received on the client-side.
Azure Storage Security

Encryption at rest

Client-side encryption
  • Encrypt the data before being transferred to Azure storage.
  • When retrieving the data form Azure, data is decrypted after it is received on the client-side.
Storage Service Encryption (SSE)
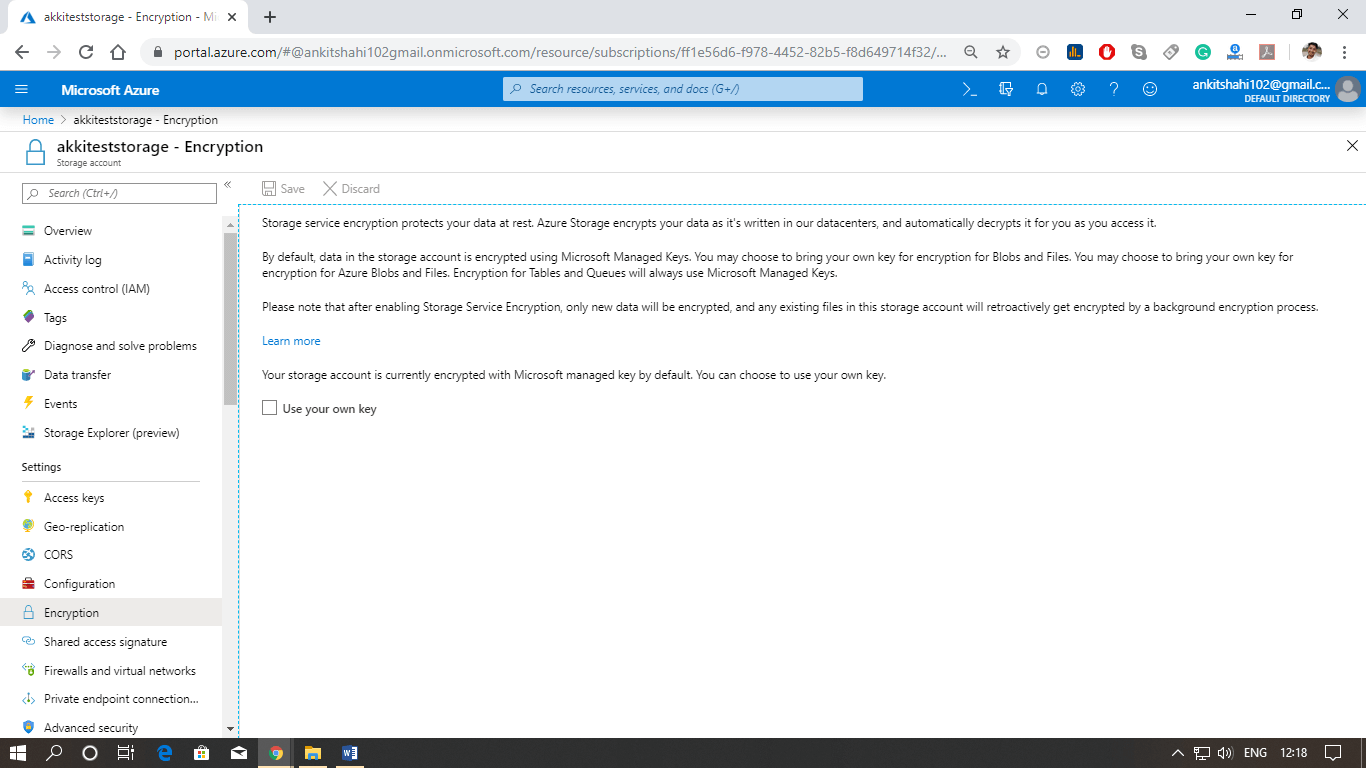
This is what we generally use to encrypt the data at REST is Azure storage
  • It is enabled for all storage accounts and cannot be disabled.
  • It automatically encrypts data in all performance tiers (Standard and premium), all deployment models (Azure Resource Manager and Classic), and all of the Azure Storage services (Blob, Queue, Table, and File). So it is blanket encryption across all Azure storage.
  • We can use either Microsoft-managed keys or your custom keys to encrypt the data.
Azure Disk Encryption
This is a recommended approach from Microsoft to encrypt the disks particularly with Azure disk
  • Encrypt the OS & data disks used by IaaS Virtual Machine
  • You can enable encryption on existing IaaS VMs
  • You can use customer-provided encryption keys

CORS (Cross-Origin Resource Sharing)

  • When a web browser makes an HTTP request for a resource from a different domain, this is called a cross-origin HTTP request.
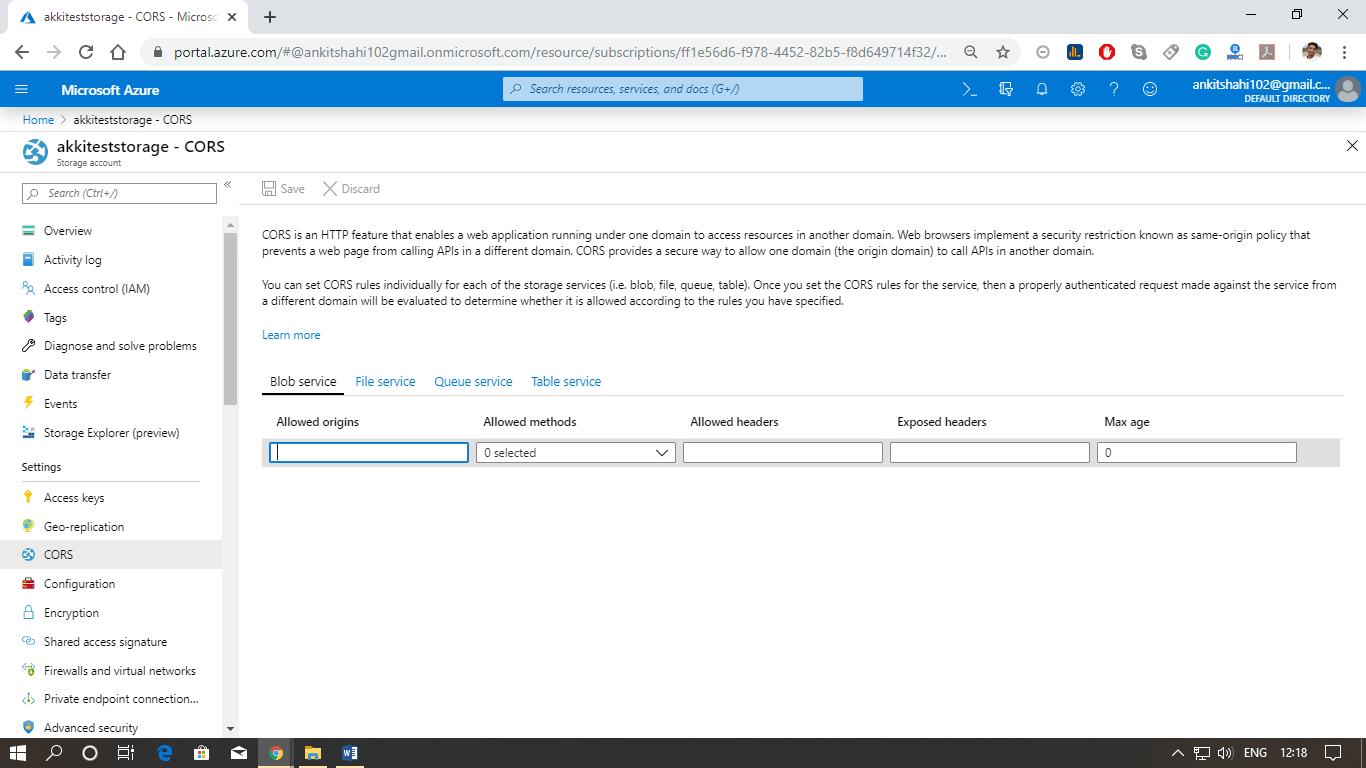
  • Azure Storage allows us to enable CORS. For each storage account, we can specify domains that can access the resources in that storage account. For example, enable CORS on the mystorage.blob.core.windows.net storage account and configure it to allow access to mywebsite.com.
  • CORS allows access but does not provide authentication, which means we still need to use SAS keys to access non-public storage resources.
  • CORS is disabled on all services by default. We can enable it using the Azure portal or Power Shell, and we can specify the domains from where the request will come to access the data in your storage account.
Azure Storage Security