Sunday, 15 March 2020

Azure App Service Monitoring

Microsoft provides different features to monitor our App service.

Quotas

Application hosted in App Service is subject to certain limits on the resources they can use. The boundaries are defined by the App Service plan associated with the app. When we create an app service plan, we generally select a pricing tier and also size. Based on the size and pricing tier, we'll be allocated with a certain amount of CPU and a certain amount of memory. Quotas for Free or Shared apps are as follows.
  • CPU(Short)
  • CPU(Day)
  • Memory
  • Bandwidth
  • Filesystem- Applicable for Basic, Standard, and Premium plans
The only quota applicable to apps hosted on Basic, Standard, and Premium plans is Filesystem, based on the number of App service plans that we have created in our subscription.

Metrics

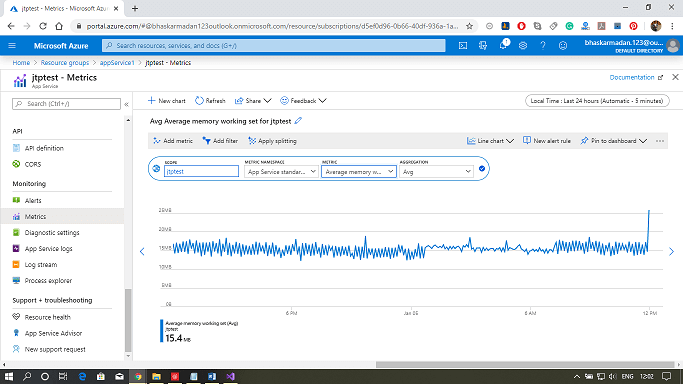
Metrics provide information about the app or App Service plan's behaviour. So Metrics are provided at two levels.
Azure App Service Monitoring
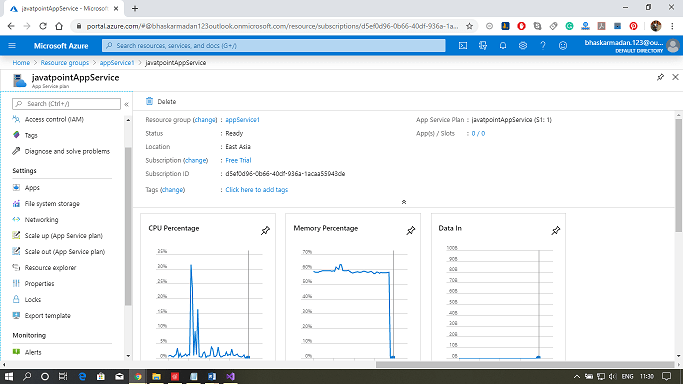
  • One is at the App service plan level, which will include CPU and Memory percentage, Data in and out, Disc queue length, and HTTP queue length.
  • The second level of metrics provided at an application level, which includes average response time, average memory working set, CPU time, Data in and out, etc. All of these metrics are essential. There are a lot more metrics available when we go for application insight, which is an advanced monitoring tool using which we can monitor web apps.
Granularity and retention
  • Minute granularity: These metrics are retained for 30 hours.
  • Hour granularity: These metrics are retained for 30 days.
  • Day granularity: These metrics are retained for 30 days.
However, if we use the application insights, then this retention will increase drastically.

Diagnostics

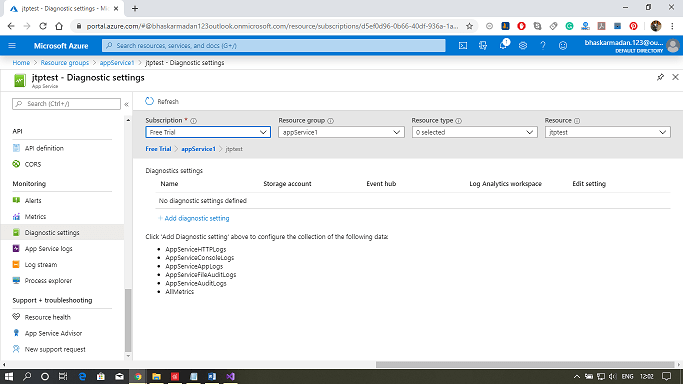
App service web apps provide diagnostic functionality for logging information from both the web server and the web application. These are logically separated into web server diagnostics and application diagnostics.
Azure App Service Monitoring
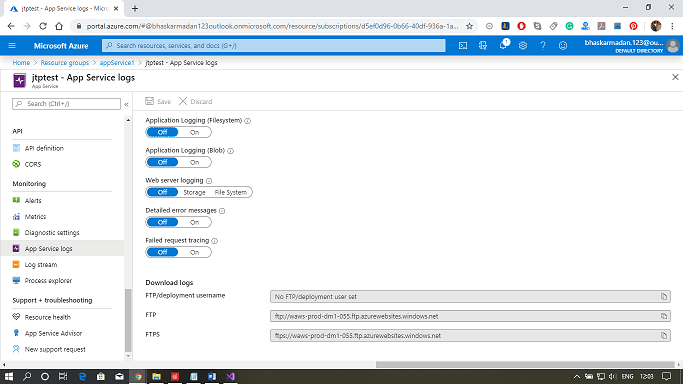
Web server Diagnostics: In this, we can have a detailed error logging, which is any Http 400, and the above error will get logged. We can also view the logs. And the second thing is failed request tracking, which basically contains the trace of IIS components that are used to process our request. And the third one is web server logging. These are the overall metrics on how many Http requests we received, and from a particular IP address.
Application Diagnostics: It allows us to capture the information produced by the web application. So if we're using system diagnostic trace, all the information will be provided by application diagnostics.
Diagnostic information can be stored in file system or Azure storage.

Stream logs

During the development of an application, it is often useful to see logging information in near-real-time. We can steam logging information to our development environment using either Azure PowerShell or the azure Command-line interface.
Azure App Service Monitoring
These are the basic commands that we need to use to stream the log files.
  • Streaming with Azure PowerShell
    • Get-AzureWebSiteLog - Name webappname -Tail
    • Get-AzureWebSitelog - Name webappname -Tail -Message Error
  • Streaming with Azure Command-Line Interface
    • az webapp log tail - name webappname -resource-group myResourceGroup
    • az webapp log tail -name webappname -resource-group myResourceGroup -filter Error

Azure App Service Security

Authentication and Authorization: Every App service comes with an Authentication and Authorization module that handles several things for our app.
  • It will authenticate the user with a specified provider such as Facebook, Google, Twitter, Azure Active Directory, etc.
  • It will store, validate, and refreshes tokens.
  • It also manages the authenticated session.
  • It injects identity formation into request headers.

How Authentication and Authorization works

First, the request from the client browser will come to the App service front-end. From that, the request will be forwarded to the Authentication and Authorization module. And that Authentication module will include all the Authorization and Authentication logic, which includes token management and also session management, etc., and it sits outside the web app code. That is the reason we don't need to change code between our web application to enable Authentication and Authorization for our app in Azure. We can able to slightly influence this Authentication and Authorization logic using the environment variable in terms of tracing.
Authentication and Authorization module handles several things for our app:
  • Authenticates users with the specified provider
  • Validate, store, and refreshes tokens
  • Manages the authenticated session
  • Injects identity information into request headers
  • Logging & tracing

Other security areas

There are additional security areas that we need to be aware of for App service, which we can take advantage of them.
  • ISO, SOC, and PCI complaint: If we are processing credit card information, the underlying environment is PCI compliant, but at the same time, you have to go for PCI compliance from the application layer perspective. But, from the environment perspective, Microsoft Azure App Service is PCI compliant
  • IP Address whitelisting: In case if we want to limit the trigger to our App services form a specific trusted IP Address, then we can white list the same within the Azure portal for our app services.
  • SSL communication: To encrypt the data at transit, we can enable SSL communication.

Managed Service Identity

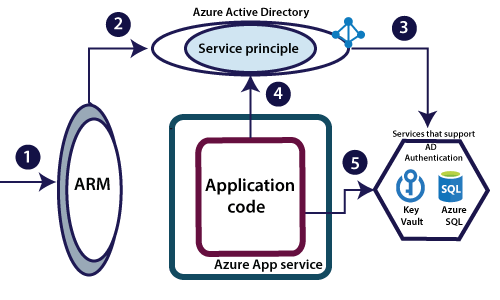
This service is recently added to Azure. What we are going to do here is creating an identity for our app, and providing access to different services to that identity. By doing this, we don't need to store any userID-password to access certain Azure services. What we generally do is we go to the Azure portal and tell to ARM to create managed service identity for your Azure App Service. And when we trigger that, a service principle gets created in Azure active directory.
Azure App Service Security
Example - if we want to Access a secret from Azure key vault. By submitting that token and having a proper access policy defined within Azure key vault, our application code will be able to retrieve the secret at run time and use that secret to access an on-premises resource.

App Service Environments security

If we are using App service environments, then we will get additional benefits in terms of security.
  • Network security groups: We can associate with network security groups and control the traffic coming into our App service using network security groups.
  • Web Application Firewall: It is a feature of application Gateway that provides centralized protection of your web applications from common exploits and vulnerabilities. The web application firewall is based on rules from the OWASP core rule sets 3.0 or 2.2.9

Enabling authentication with Azure active directory for Web App

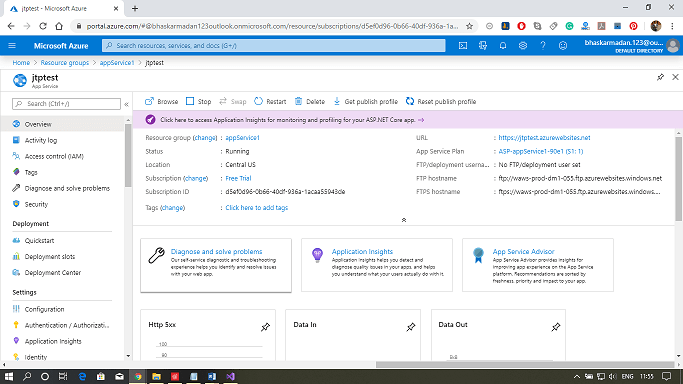
Step 1: Open your API App and click on Authentication/Authorization.
Azure App Service Security
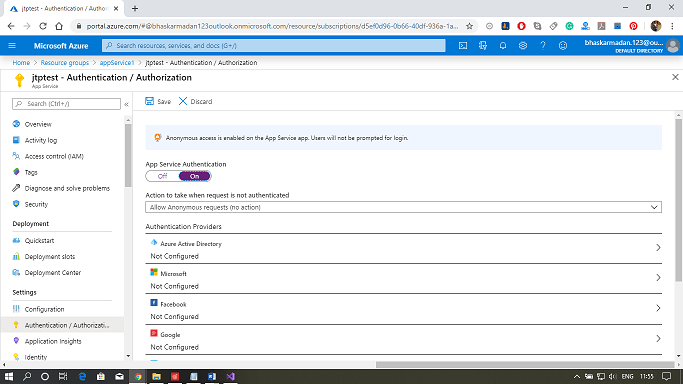
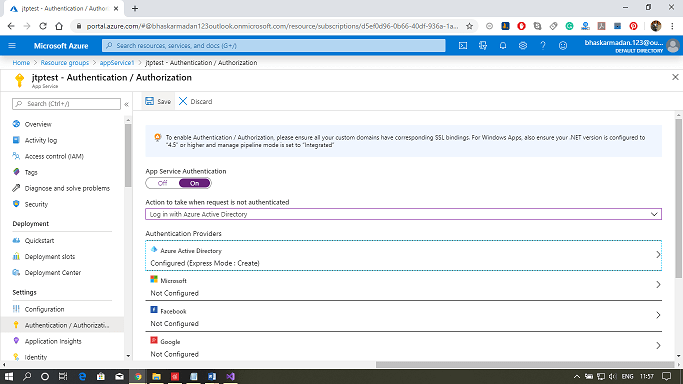
Step 2: Click on the toggle button showing switch on/off. Switch it on.
Azure App Service Security
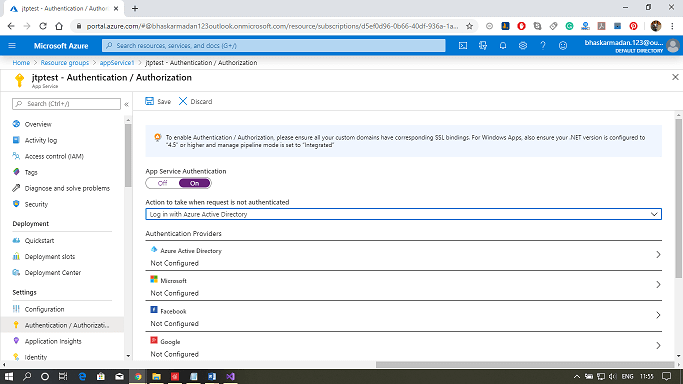
Step 3: Now select the Action to take when the request is not authenticated as "Login with Azure Active Directory."
Azure App Service Security
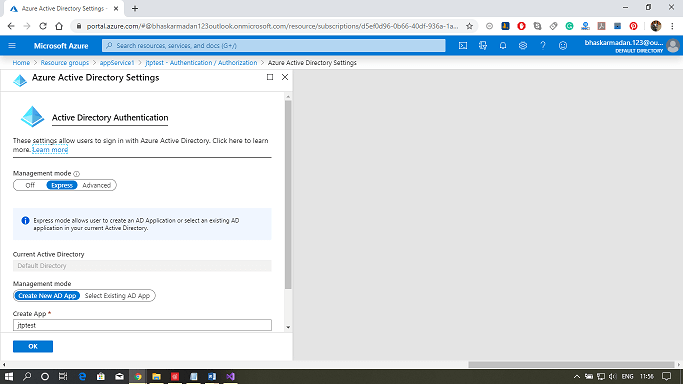
Step 4: Now, configure the Azure Active Directory with the express mode. After that, click on create and then click on save.
Azure App Service Security

Azure App Service Backup

The App service backup and scaling is much simpler than virtual machine backup and scaling. The backup and restore in-app feature service let us quickly create app backups. This backup of app service will contain app configuration also, the file content, and optionally the database connected to our app. We can take backup along with the app service. The App service will have the following backup information:
  • App configuration
  • File content
  • Database connected to our app
There are several ways we can take backup:
  • Manually
  • Automation based on scheduling
  • Partial backup
The backup will be stored in a storage account. And in terms of restoration, we can restore an app with its linked database on-demand to its previous state, using the backup, or we can create all-together a new app using that app backup. Both backup and its restoration are only available for apps running in standard and premium tiers.

Scaling

There are two ways we can scale the app services.
Scale-up: It means we can get more CPU, memory, disc space, and also an extra feature like dedicated virtual machines, custom domains, certificates, staging slots, auto-scaling, and many other features based on the pricing tier we select when we are scaling up our app service plan.
Scale-out: It means we will increase the number of VM instances that run our app so we can scale out to any number of instances based on the pricing tier. But, if we go for app service environments in an isolated tier, then we can scale out to a hundred instances.
Apart from this, another important thing that we need to remember about scaling is Auto Scaling. There are many ways that we can scale our app services.
  • Automatically
  • Manually
  • Pre-set Matric
  • Scheduled

Scaling the App Service using Azure Portal

Step 1: Open your already created app service or create a new one.
Azure App Service Backup
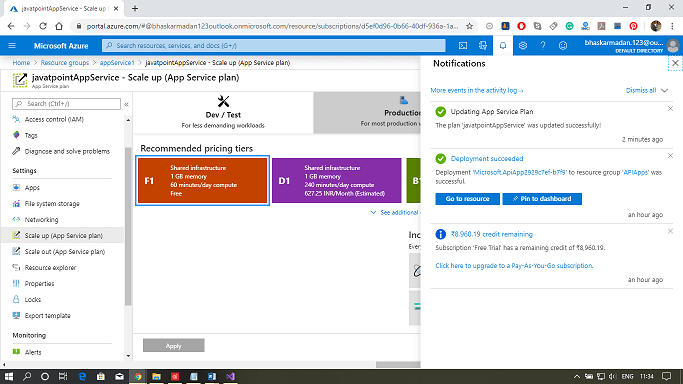
Step 2: Now, click on scale-up on the left toolbar.
Azure App Service Backup
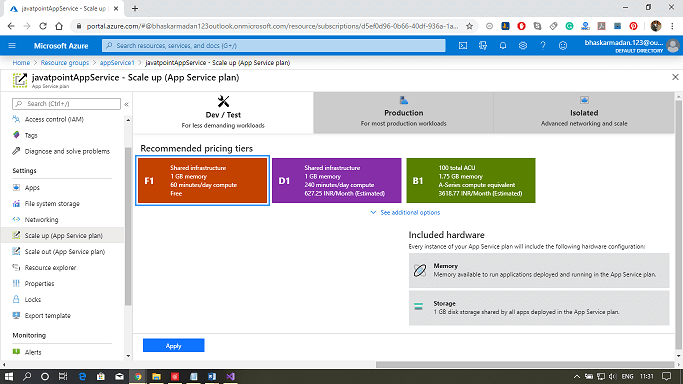
Step 3: Select the pricing tier then click on apply.
Azure App Service Backup
Step 4: It is successfully deployed, and similarly, you can scale out and set up it for auto-scaling based on some predefined conditions.

Azure API Apps and API Management

The API apps features make it easy to develop, host, and consume APIs in the cloud and on-premises. The advantage of hosting APIs in Azure API apps is that we will get enterprise-grade security and simple access control, automatic SDK generation, and seamless integration with Logic Apps. Logic Apps are system workflows that you can build within Azure. And as a part of the workflow, each activity needs to interact with the functionality exposed by a different system. By having those interfaces hosted in Azure, it makes it easy to integrate with the logic apps also.

Features of API apps

  • Bring our own existing API as-is: API can be developed in any language framework supported by App Service such as C#, Java, PHP, Node.js, etc.
  • Easy Consumption: There is integrated support for Swagger API. By enabling swagger, we are making it easy for others to consume our APIs, and also we will provide excellent visibility of APIs to developers.
  • Simple access control: Protect an API app from unauthenticated access with no changes to your code.
  • Visual Studio Integration
  • Integration with Logic apps

API Management

  • API Management is all about managing APIs. We can put an API Management frontend on an API to monitor and throttle usage, manipulate input and output, consolidate several APIs into one endpoint, and so forth. The APIs being managed will be hosted anywhere.
  • API Apps is about hosting APIs, whereas API management is about managing APIs. Let?s see how API management works.
Azure API Apps and API Management
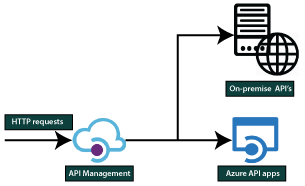
At a very high level, firstly, when http or https request comes. It will come to API management and the API management based on the location of the API. Then it will forward that request to either Azure API apps or on-premises apps. But when it is forwarding that request it can throttle, it can also monitor and manipulate the inputs and outputs.

API Management portals

  • The API management portal is where developers can learn about APIs, view and call operations, and subscribe to products.
  • Content within the developer portal is modified via the publisher portal, which is accessible from the Azure portal. To reach there, click on the Publisher portal from the service toolbar of our API Management instance.
  • The dashboard of the developer portal can be customized by adding custom content, customizing styles, and adding our branding.

API management concepts

The API management concept is the crucial thing that we need to remember.
  • APIs and operations: Each API represents a set of actions available (might be CRUD operation) to developers.
  • Products: This is how APIs are surfaced to developers. Each product can contain multiple APIs.
  • Groups: It is used to manage the visibility of APIs so we can have three types of groups.
    • An administrator group member can manage API management service instances, creating the APIs, operations, and products that are used by developers.
    • Developers? group members are authenticated customers that build applications using APIs.
    • Guests are the unauthenticated developer portal users. Guests are our prospective customers who will come and consume/trail. They will view the APIs and see whether it fits into their requirements or not.
  • Policies: It is a very powerful capability of API management that allows the publisher to change the behavior of the API through configuration, such as throughput.

Creating an API using Azure Portal

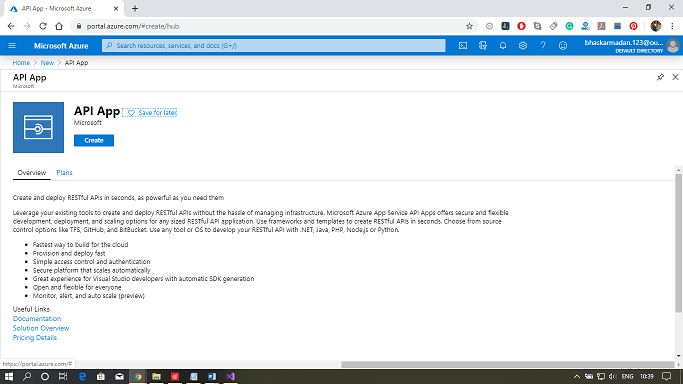
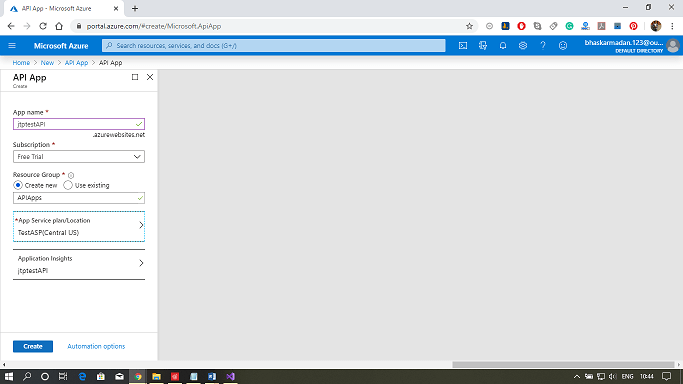
Step 1: Click on create a resource. After that type in API apps and click on create.
Azure API Apps and API Management
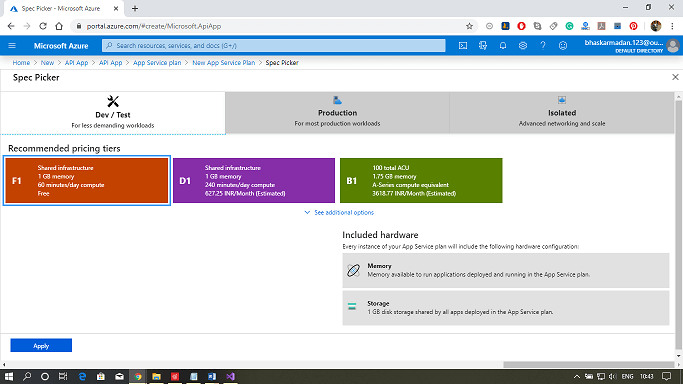
Step 2: Now, assign a name to your API app and select the resource group. After that, select the service architecture according to your requirements.
Azure API Apps and API Management
Step 3: Finally, click on create.
Azure API Apps and API Management
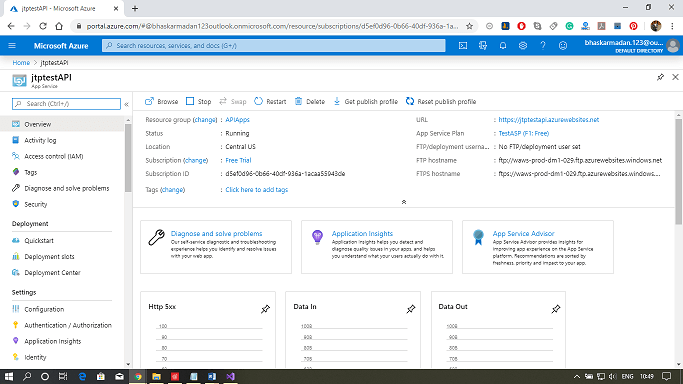
Step 4: Your API app will be successfully created.
Azure API Apps and API Management

Publishing an API using Visual Studio

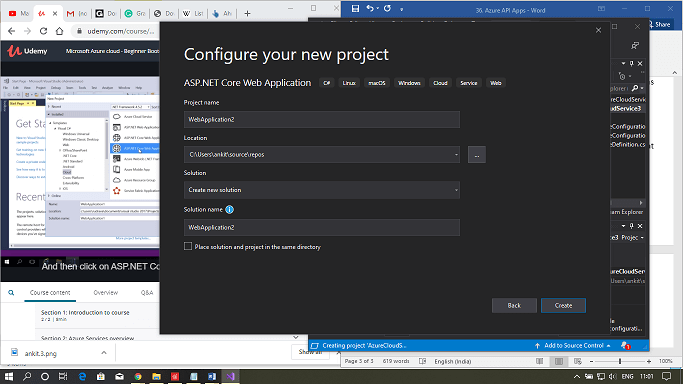
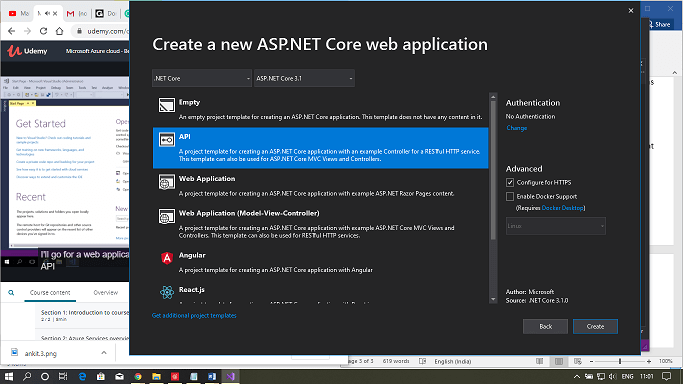
Step 1: Create a new web app project in Visual Studio. As shown in the following figure.
Azure API Apps and API Management
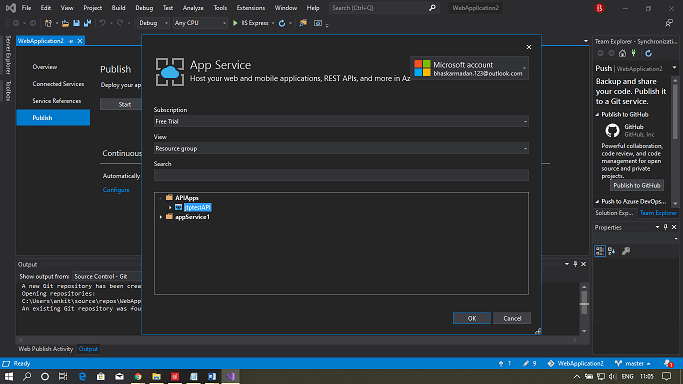
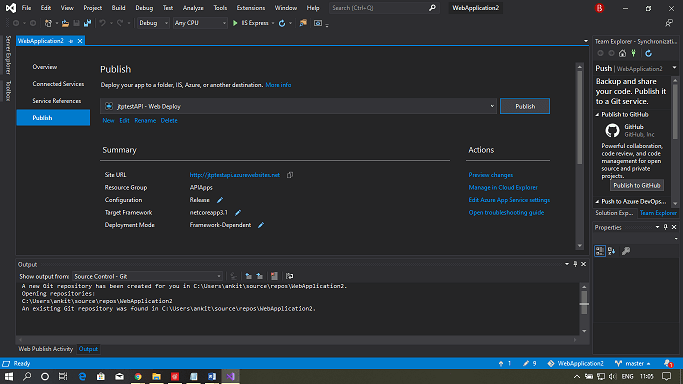
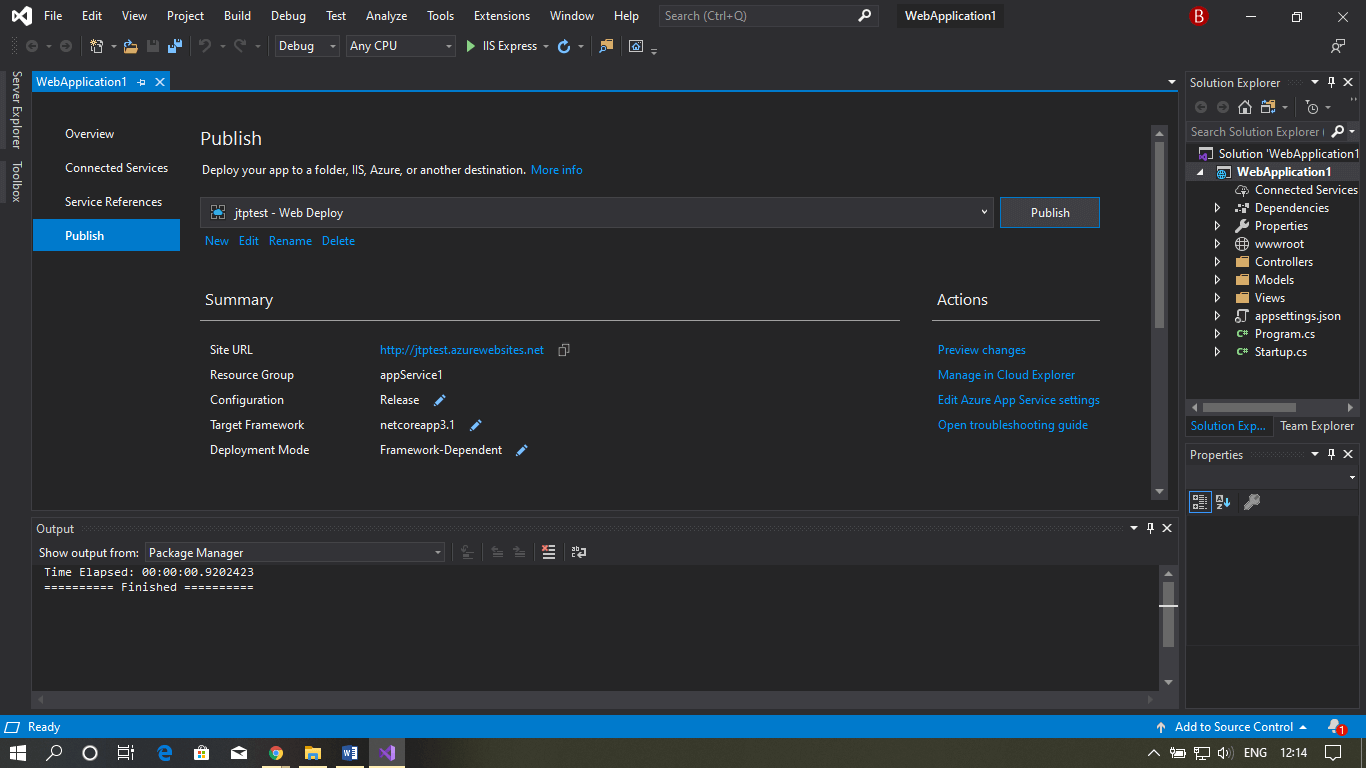
Step 2: Click on publish, then click on select existing. After that, click on the publish.
Azure API Apps and API Management
Step 3: Your web app is successfully posted to the Azure portal.
Azure API Apps and API Management

Azure Notification Hub & Mobile Engagement

Azure Notification Hub & Mobile Engagement

Azure notification hub provides an easy-to-use, multiplatform, scaled-out push infrastructure that enables us to send mobile push notification requirements in which you want to send notifications to the users. Using the Azure notification hub, we can achieve the same with minimum code and minimum configuration. With a single API call, we can target individual users or entire audience segments containing millions of users across all the devices.
Azure notification hub implements all the functionality of push infrastructure. The only thing we need to do is to write a mobile app in such a way that the mobile app will register the PNS handle with Azure Notification, and our mobile backend will be responsible for sending platform-independent messages to all users and interest groups.

Advantages of Azure Notification Hub

Multiplatform: We can use Azure Notification Hub to send push notifications to IOS devices, Android devices, and Windows devices. And it works with any backend that is developed in any language.
Scalability: We don?t need to worry about scaling. Azure notification hub will take care of that for us. We can scale up to millions without changing anything.
Delivery pattern: We have a vibrant set of delivery patterns. We can broadcast, unicast, or multicast user segmentations. So we can divide all our users into segments, and we can target a specific part of users to send notifications using Azure Notification Hub.

Working of Azure Notification Hubs

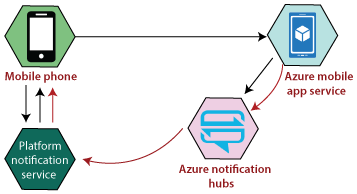
Let?s understand the working of Azure Notification Hubs using a simple diagram.
Azure Notification Hub & Mobile Engagement
Firstly we need to do is to retrieve the PNS handle from the platform notification service so that our mobile client will retrieve the PNS handle and pass on that handle to Azure Notification Hub via our Azure mobile app backend service. It can be anything. And from that point onwards, our mobile backend service can interact with Azure notification hub to send notifications.

Mobile Engagement

Azure Mobile Engagement is a software as a service user Engagement platform that provides data-driven insights into app usage, real-time user segmentation. And the key thing is it enables contextually-aware push notifications and in-app messaging.
For example, ? We have an e-commerce website, and some of the users are showing more interest in sports-related equipment. In that case, using Mobile engagement, we can identify those users that are visiting the sports product more frequently. And whether we want to offer discounts or any new sports product that came into the market, then we can send a notification to only those users that are showing interest in sports products.
Another thing that we can do using Azure Mobile Engagement is data-driven insights into app usage. You can see which screen of your app get more engagement from the users using which we can improve our app. We can do all real-time user segmentation based on the user data and also based on the pages they visit, the type of data they search, etc.
The Azure Mobile Engagement can be used with Azure mobile apps, which makes in total a compelling platform for the development of your mobile apps.

Azure Mobile App

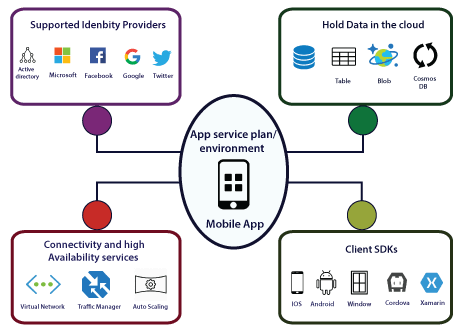
We can deploy our mobile backend services on Azure using Azure Mobile apps. By implementing our mobile backend service on Azure, our mobile backend will be able to communicate with different Azure services. We can able to take advantage of various features that are provided by Azure Mobile Apps.
Azure Mobile App

Features and services

Data Storage: Our mobile backend can be able to store the data or access the data of Azure SQL database Azure table storage, Azure Blob storage, and Cosmos DB. And also, we can add offline sync features to our mobile app.
Client-Side development: Once we host our mobile backend services on Azure, there must be a way to consume those services. For that purpose, Microsoft provided several client SDK's depending upon the platform.
Authentication and Authorization: We can integrate our mobile app with different authentication providers. So we can integrate with Azure active directory, Microsoft, Facebook, Google, and Twitter. We can integrate this service without any code.
Connectivity: In terms of connectivity to apps that are hosted in a virtual network. Our mobile app will be able to connect to a virtual network either using point to site VPN or by hosting our mobile app backend service into an app service environment, which will automatically get connected to the virtual network.
Availability Service: We can use the traffic manager to provide higher resilience even during the data center failures. We can also use auto-scaling to scale our mobile backend services as more number of users are about to start using our app.
Notification Hub: Using the notification hub, we can enable push notifications to different platforms, and also we can use mobile engagement using which we can understand what exactly the user is doing with our app.
How to create Mobile apps backend development
Step 1: Log in to the Azure portal and create a new Azure mobile app backend.
Step 2: Configure the mobile app backend.
Step 3: Define a table controller.
Step 4: Create the Data Transfer Object (DTO) class.
Step 5: Configure a table reference in the Mobile DbContext class.
Step 6: Create a table controller.
Step 7: Define a custom API controller.
Mobile Client-side development
Step 1: Based on mobile OS, download the client-side SDK.
Step 2: Reference the MicrosoftAzureMobile (IOS) in your client code.
Step 3: Create MSClient (IOS) reference and start accessing data from tables.
Step 4: For Custom API's, use MSClient.invokeAPI to call custom API.

Mobile offline data sync

Mobile offline data sync is a client and server SDK feature of Azure Mobile Apps that makes it possible to create apps that work without a network connection.
Sync Table
  • To access the "/tables" endpoint, Azure Mobile client SDKs provide an interface such as MSTable. However, this will fail if the client devices do not have a network connection.
  • To support offline use, our app should instead use the sync table APIs such as MSSyncTable. All the CRUD operations will happen at a local store.
The local store is the data persistence layer on the client device (Windows, Xamarin, and Android). It is based on SQLite, whereas on iOS, it is based on core data. In offline synchronization, the sync can be a push, pull, implicit pushes, or Incremental sync.

Azure Web App

Azure Web App

Azure Web App service lets us quickly build, deploy, and scale enterprise-grade web, mobile, and API apps running on any platform. It helps us to meet rigorous performance, scalability, security, and compliance requirements while using a fully managed platform to perform infrastructure maintenance.
Creating a Web App and deploying an application into Azure web App from visual studio
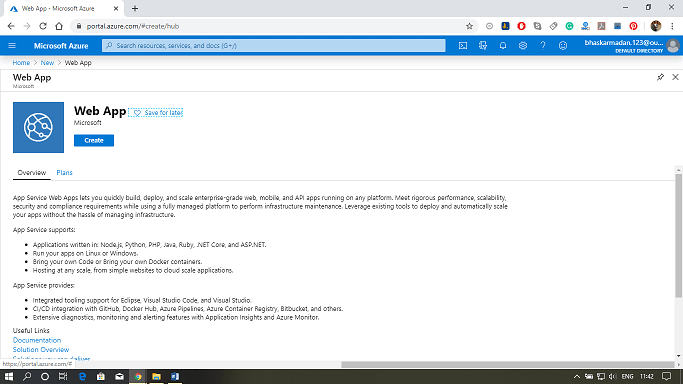
Step 1: Click on create a resource and type in the web app. After that, click on the web app and then click on Create.
Azure Web App
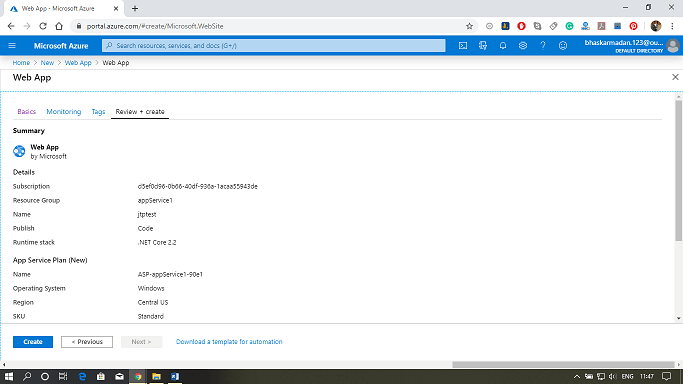
Step 2: You are now on the Web App creation page. Fill-in, all the required details, then click on review+create.
Azure Web App
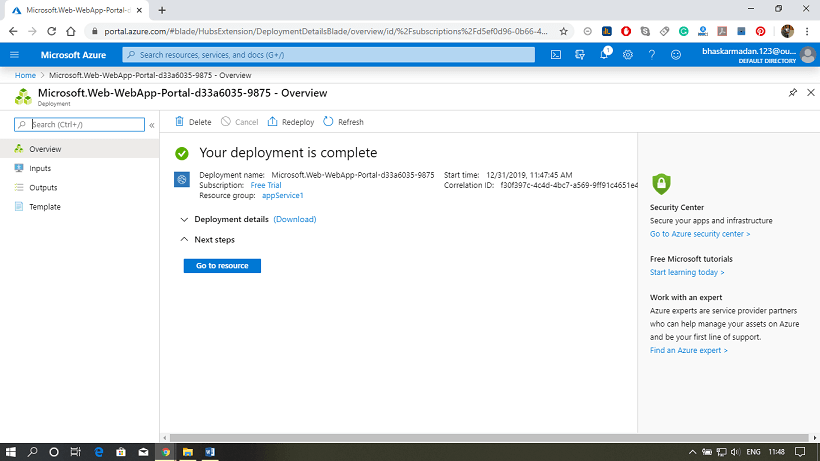
Step 3: Click on create, then you will be redirected to the following page.
Azure Web App
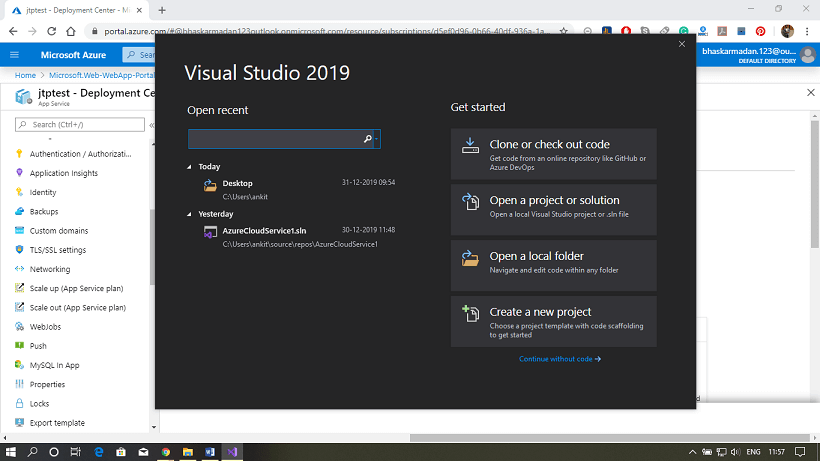
Step 4: Open Visual Studio, then click on Create a new project.
Azure Web App
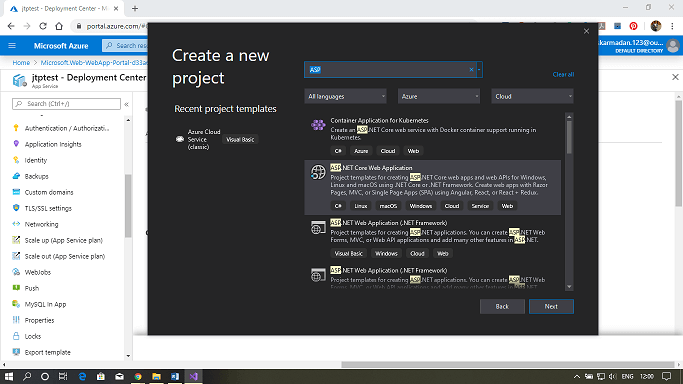
Step 5: Search for ASP.net web application and click on it.
Azure Web App
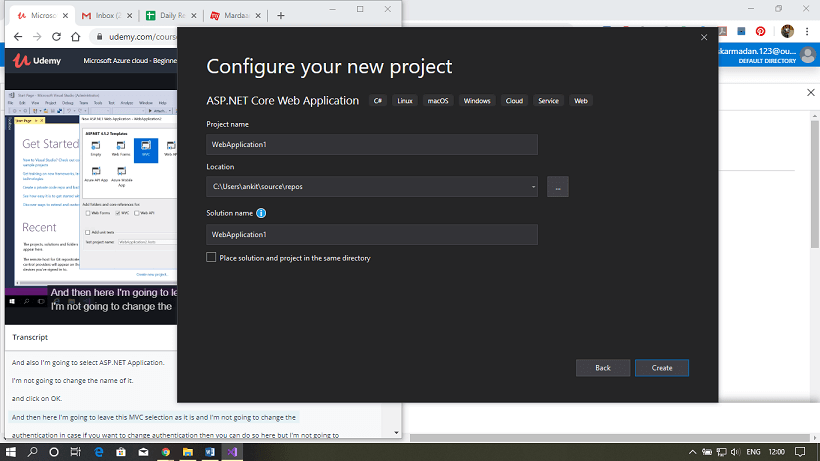
Step 6: Now, configure your project and click on create.
Azure Web App
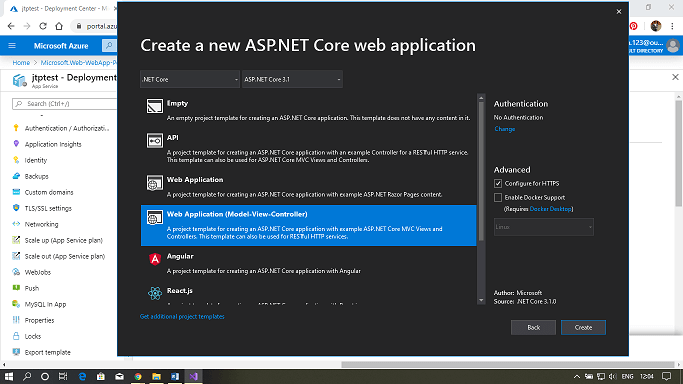
Step 7: Now select the Web application (Model View Controller) option from available templates. Then Click on create.
Azure Web App
Azure Web App
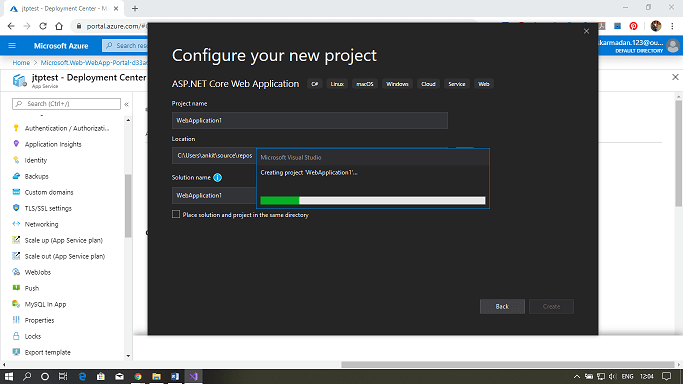
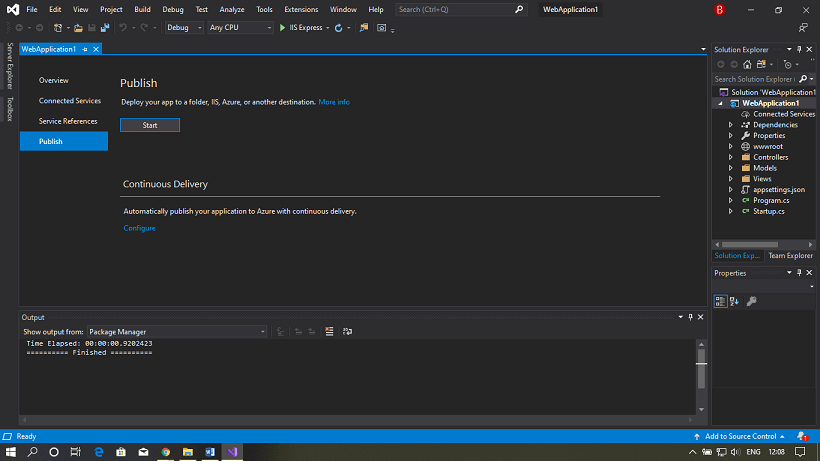
Step 8: Your project will be created, Now click on publish to configure it with the Azure portal.
Azure Web App
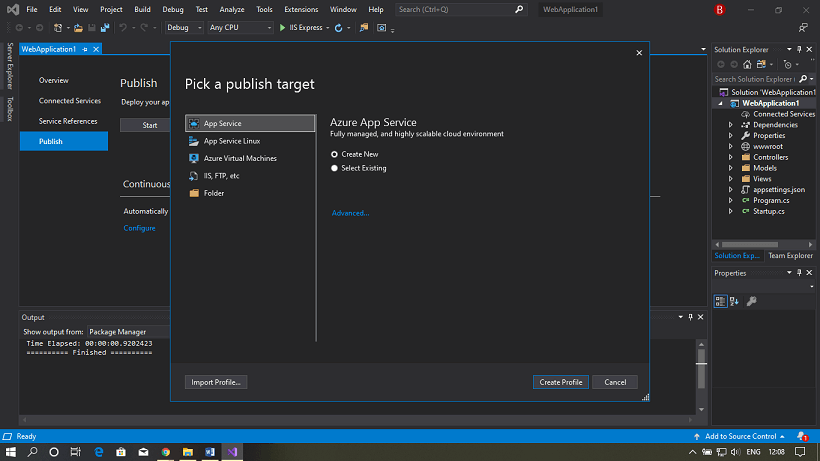
Step 9: Here, either you can create a new service plan, or you can use an existing one.
Azure Web App
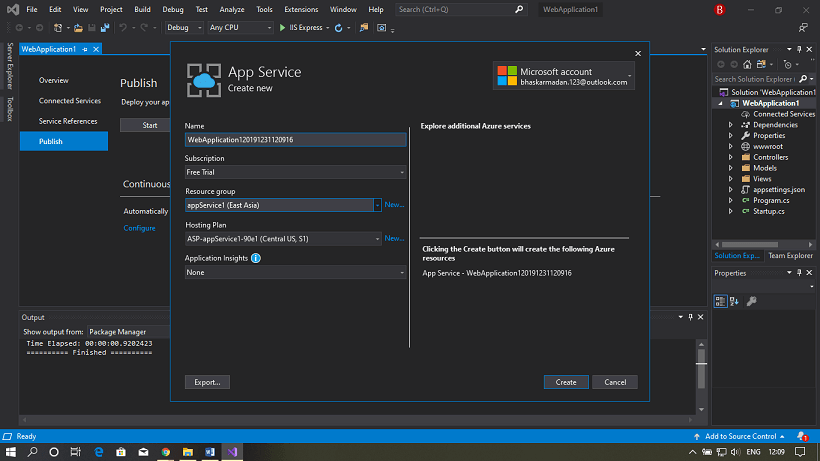
Step 10: Let's see how to create a new one, click on Create new. Fill all the details and click on create a profile.
Azure Web App
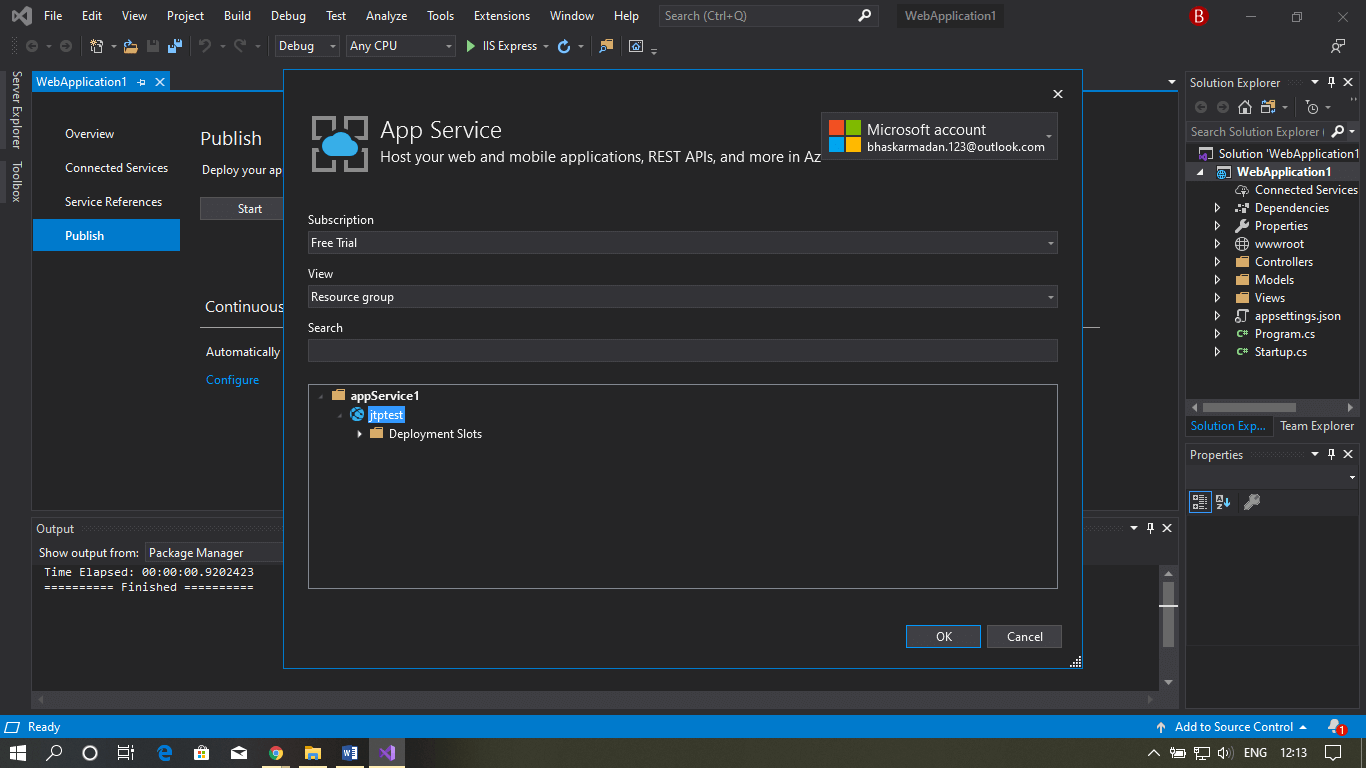
Step 11: As we have already created an App service previously, so we are using that one here. Go back and click on Select existing.
Azure Web App
Step 12: Now, click on the file name and then click on, Ok.
Azure Web App
Step 13: Now go to the Azure portal and click on the storage account.
Azure Web App
Step 14: Click on the app section, here you can view the web app that you have created.
Azure Web App
Step 15: Click on the browse button above to see that your Web app is working or not.
Azure Web App
Azure Web App