Exploring AWS Data Exchange for sharing datasets across AWS accounts
INTRODUCTION
Welcome to the gateway of boundless data possibilities — AWS Data Exchange. In the era of information abundance, AWS Data Exchange emerges as a pivotal platform, seamlessly connecting data providers with consumers, facilitating the exchange of high-quality, curated data sets. Whether you’re a data scientist seeking to enrich your analytics, a business leader aiming to fuel strategic decisions, or a developer looking to enhance your applications, AWS Data Exchange offers a diverse array of data products, coupled with the reliability, scalability, and security synonymous with Amazon Web Services.
AWS Data Exchange offers a plethora of advantages for both data providers and consumers, making it a premier platform for data exchange:
- Diverse Data Selection: Access a wide range of high-quality, third-party data sets from various industries, including financial services, healthcare, retail, and more. This breadth of data options allows consumers to find precisely the data they need to drive insights and innovation.
- Data Curation and Quality Assurance: Data listed on AWS Data Exchange undergoes rigorous curation and quality assurance processes, ensuring accuracy, reliability, and compliance with industry standards. This assurance mitigates risks associated with using unreliable or unverified data sources.
- Streamlined Data Acquisition: Simplify the process of acquiring external data by leveraging AWS Data Exchange’s intuitive platform. With standardized data delivery mechanisms and easy integration with AWS services, consumers can quickly access and ingest data into their analytics pipelines or applications.
- Flexible Subscription Models: Choose from various subscription models, including free, one-time purchase, or subscription-based pricing, depending on individual data consumption needs and budget constraints. This flexibility enables consumers to align their data access costs with their usage patterns effectively.
- Secure Data Exchange: Benefit from the robust security measures inherent in the AWS ecosystem, including encryption, access controls, and compliance certifications. AWS Data Exchange prioritizes data privacy and security, ensuring that sensitive information remains protected throughout the exchange process.
- Scalability and Performance: Leverage the scalability and performance capabilities of AWS infrastructure to handle large volumes of data efficiently. Whether processing real-time streaming data or performing complex analytics on massive datasets, AWS Data Exchange delivers the performance needed to meet evolving business requirements.
- Integration with AWS Services: Seamlessly integrate AWS Data Exchange with other AWS services, such as Amazon S3, Amazon Redshift, and AWS Lambda, to leverage additional capabilities for data processing, storage, and analysis. This integration simplifies workflows and enables consumers to derive maximum value from their data assets.
Let’s get our hand’s dirty on the AWS console itself by creating a Data Exchange to share data across datasets
Step 1: Create a Data Exchange Dataset
Go to the AWS Data Exchange home page and navigate to the Owned datasets and then click on the Create data set, to create a new Dataset for the data exchange
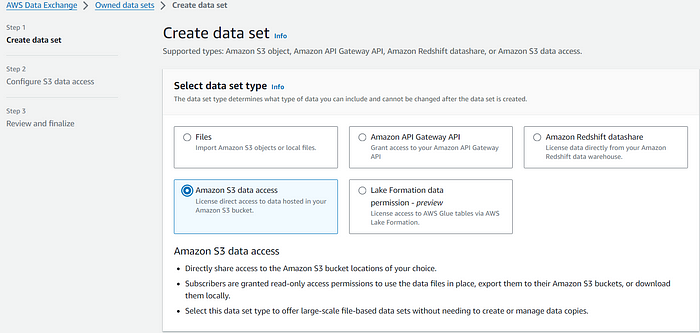
Here you will get multiple options to select data set type, for our demo purpose lets stick to Amazon S3 data access and provide a name to the dataset s3-covid-data and then click on Next
Next, we need to configure the S3 data access, for that lets click on Choose Amazon S3 Location where you can browse to the s3 location and select a particular location which will be used by the dataset. When you scroll down you see a bucket policy — which you need to copy and add it to the specific S3 bucket as a bucket policy. This policy will ensure that the S3 access is allowed to the Data Exchange jobs. Keep the remaining configurations default and then click on Next
At this stage it will create a backend job to import the data into the dataset. once your job is completed, the click on create data set and this will complete the process of creating a dataset
Step 2: Create a Data Grant for the Dataset
Data Grant is where we can grant access to our previously created dataset to different AWS accounts. For this lest navigate to the Sent Data Grants subsection and then lets create a data grant
On the first section, we need to select the dataset which we own and have create din the previous step.
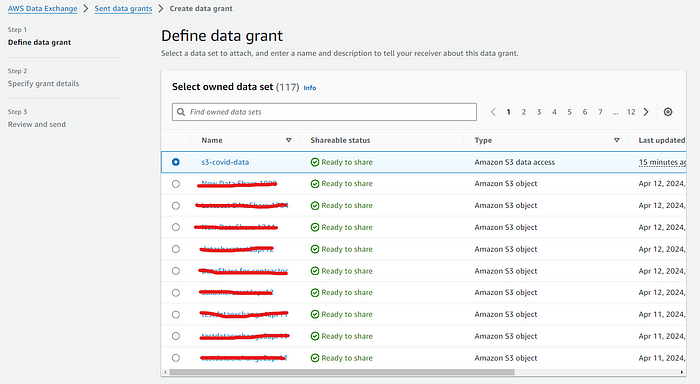
In the next step add a Grant name and some description to the grant and then click on next button. In the next page we need to define the time period for which the grant will be valid by the receiver account. You need add the receiver AWS accounts Account ID information first

Once you add the receiver’s AWS account ID, then we need to define the Access end date for our data grant. In this there are two options to select.
- No End Date — Here there wont be any specific end date for the data grant to be expired automatically and the receiver account will be able to access the dataset which is shared without any time period boundaries
- Specific End Date — Here you can define a specific end date for the Data grant till the point it will be accessible by the receiver’s AWS account.

On the last page, you can review the entire grant and option and then click on Create and Sent data grant
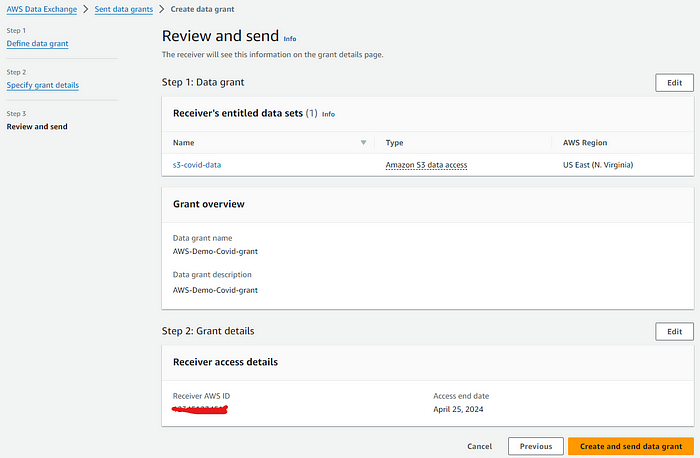
Once you click on Create Data Grant — it will execute a process in the backend , which you can see the status of it. Once the data grant status is Completed then you can proceed with the next step
Step 3: Accept the Data Grant for the Receiver’s AWS Account
Up to this step — the sender AWS account has already done its work of creating a Dataset and sending a Data grant to the receiver’s account. Now, the receiver’s AWS account need to accept the Grant which has been received. For our demo, purpose, let’s now login and to the receiver’s AWS account and check the Data grant
For this, you need to open the AWS Data Exchange service console and then navigate to the Received data grants section. On this screen — you will see the Pending data grants which you need to accept.

Let’s now click on the data grant request that is received and then proceed with the acceptance. Once you click — you will be able to see all the details of the data grant received. Once you have reviewed all the details then you can click on Accept data grant button
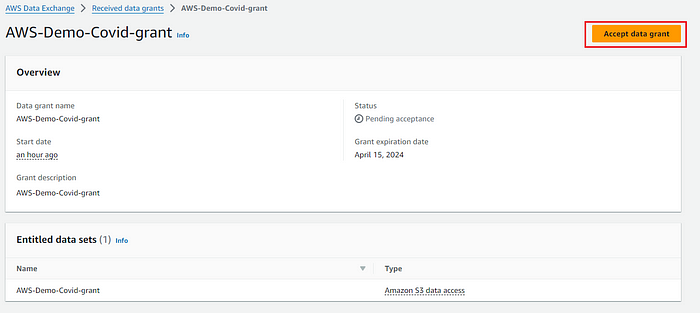
Once you can click — on Accept, it will take some time of 5 minutes to complete the granting process. Once the process is completed, then you can click on it and browse the S3 location by clicking on the Browse shared s3 location
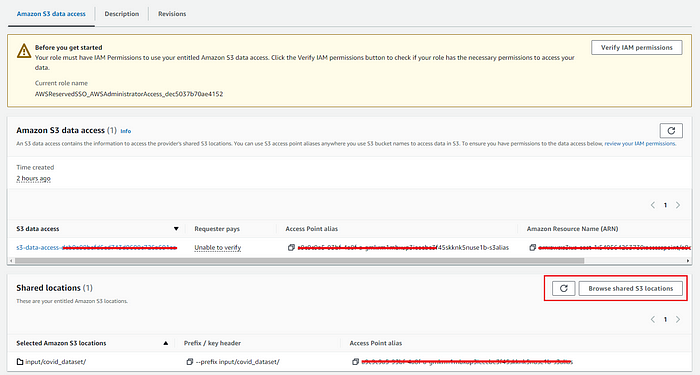
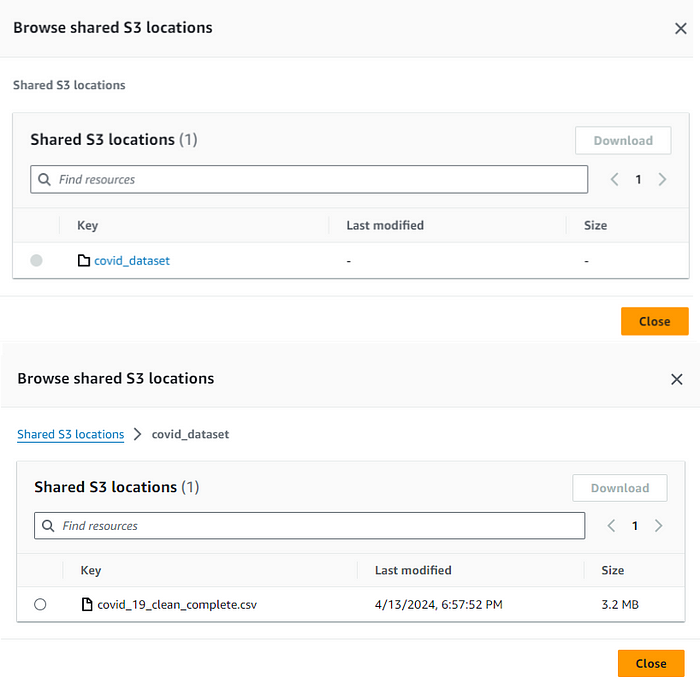
Once you can click on the browse S3 location, you will be able to see the s3 paths and files which can be browsed from the console itself and download as well the files
CONCLUSION
AWS Data Exchange stands as a cornerstone of modern data ecosystems, offering unparalleled advantages for both data providers and consumers alike. By providing access to a diverse array of high-quality, curated data sets from various industries, AWS Data Exchange empowers organizations to unlock insights, drive innovation, and make informed decisions with confidence. Through streamlined data acquisition processes, flexible subscription models, and robust security measures, AWS Data Exchange ensures that data exchange is efficient, cost-effective, and secure.

No comments:
Post a Comment