Filter network traffic with a network security group using the Azure portal
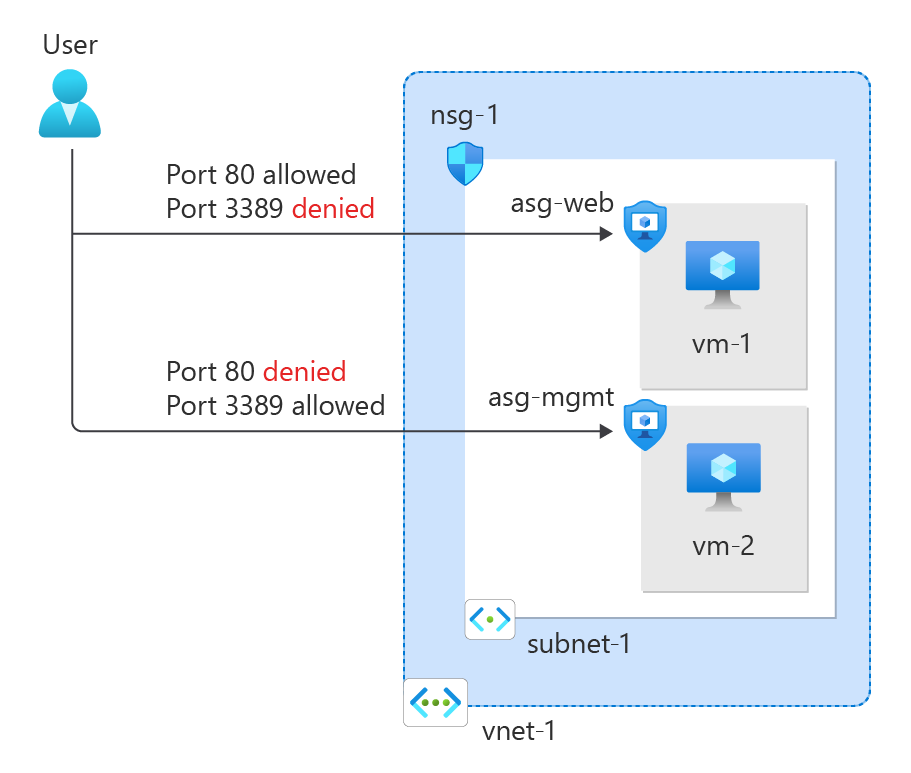
You can use a network security group to filter inbound and outbound network traffic to and from Azure resources in an Azure virtual network.
Network security groups contain security rules that filter network traffic by IP address, port, and protocol. When a network security group is associated with a subnet, security rules are applied to resources deployed in that subnet.
In this tutorial, you learn how to:
- Create a network security group and security rules
- Create application security groups
- Create a virtual network and associate a network security group to a subnet
- Deploy virtual machines and associate their network interfaces to the application security groups
Prerequisites
- An Azure account with an active subscription. You can create an account for free.
Sign in to Azure
Sign in to the Azure portal.
Create a virtual network
The following procedure creates a virtual network with a resource subnet.
In the portal, search for and select Virtual networks.
On the Virtual networks page, select + Create.
On the Basics tab of Create virtual network, enter or select the following information:
Setting Value Project details Subscription Select your subscription. Resource group Select Create new.
Enter test-rg in Name.
Select OK.Instance details Name Enter vnet-1. Region Select East US 2. Select Next to proceed to the Security tab.
Select Next to proceed to the IP Addresses tab.
In the address space box in Subnets, select the default subnet.
In Edit subnet, enter or select the following information:
Setting Value Subnet details Subnet template Leave the default Default. Name Enter subnet-1. Starting address Leave the default of 10.0.0.0. Subnet size Leave the default of /24(256 addresses). 
Select Save.
Select Review + create at the bottom of the screen, and when validation passes, select Create.
Create application security groups
An application security group (ASGs) enables you to group together servers with similar functions, such as web servers.
In the search box at the top of the portal, enter Application security group. Select Application security groups in the search results.
Select + Create.
On the Basics tab of Create an application security group, enter or select this information:
Setting Value Project details Subscription Select your subscription. Resource group Select test-rg. Instance details Name Enter asg-web. Region Select East US 2. Select Review + create.
Select + Create.
Repeat the previous steps, specifying the following values:
Setting Value Project details Subscription Select your subscription. Resource group Select test-rg. Instance details Name Enter asg-mgmt. Region Select East US 2. Select Review + create.
Select Create.
Create a network security group
A network security group (NSG) secures network traffic in your virtual network.
In the search box at the top of the portal, enter Network security group. Select Network security groups in the search results.
Note
In the search results for Network security groups, you may see Network security groups (classic). Select Network security groups.
Select + Create.
On the Basics tab of Create network security group, enter or select this information:
Setting Value Project details Subscription Select your subscription. Resource group Select test-rg. Instance details Name Enter nsg-1. Location Select East US 2. Select Review + create.
Select Create.
Associate network security group to subnet
In this section, you associate the network security group with the subnet of the virtual network you created earlier.
In the search box at the top of the portal, enter Network security group. Select Network security groups in the search results.
Select nsg-1.
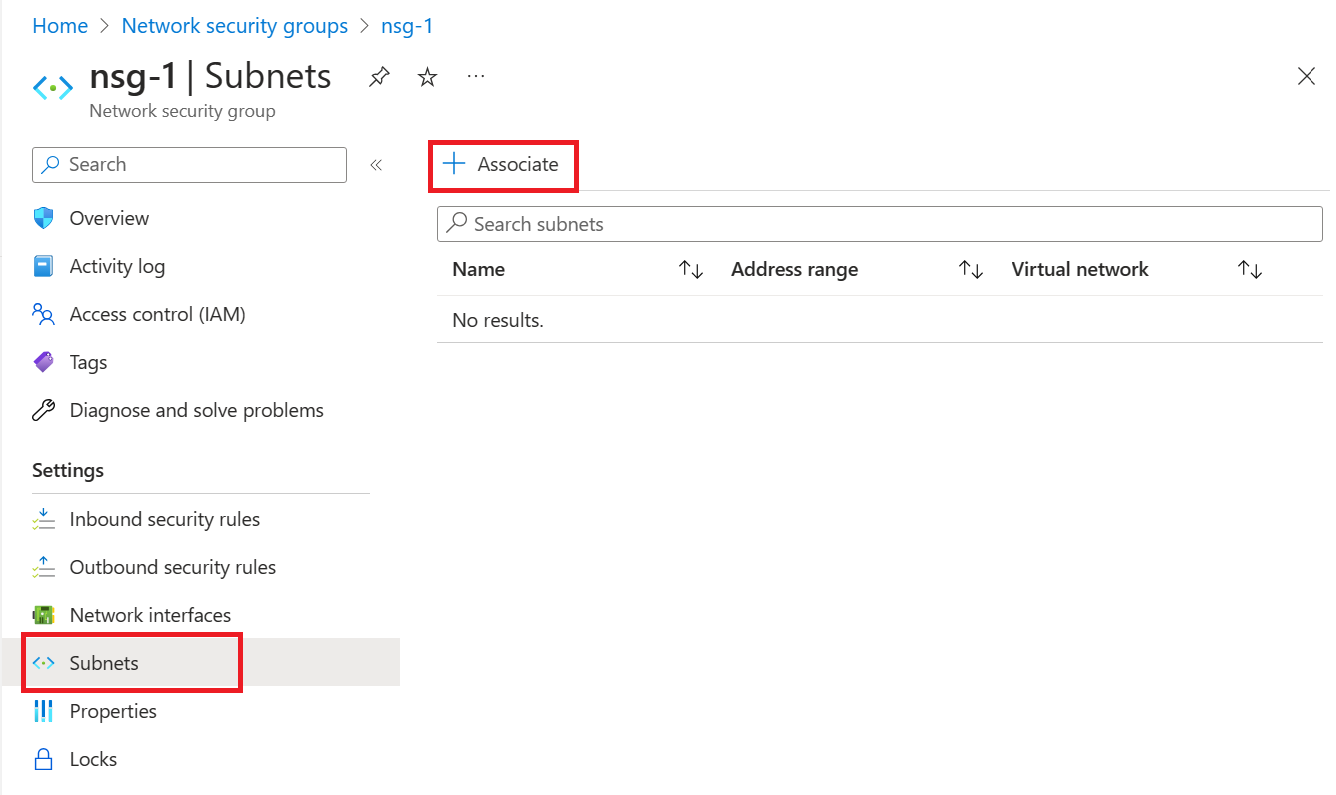
Select Subnets from the Settings section of nsg-1.
In the Subnets page, select + Associate:
Under Associate subnet, select vnet-1 (test-rg) for Virtual network.
Select subnet-1 for Subnet, and then select OK.
Create security rules
Select Inbound security rules from the Settings section of nsg-1.
In Inbound security rules page, select + Add.
Create a security rule that allows ports 80 and 443 to the asg-web application security group. In Add inbound security rule page, enter or select the following information:
Setting Value Source Leave the default of Any. Source port ranges Leave the default of (*). Destination Select Application security group. Destination application security groups Select asg-web. Service Leave the default of Custom. Destination port ranges Enter 80,443. Protocol Select TCP. Action Leave the default of Allow. Priority Leave the default of 100. Name Enter allow-web-all. Select Add.
Complete the previous steps with the following information:
Setting Value Source Leave the default of Any. Source port ranges Leave the default of (*). Destination Select Application security group. Destination application security group Select asg-mgmt. Service Select RDP. Action Leave the default of Allow. Priority Leave the default of 110. Name Enter allow-rdp-all. Select Add.
Caution
In this article, RDP (port 3389) is exposed to the internet for the VM that is assigned to the asg-mgmt application security group.
For production environments, instead of exposing port 3389 to the internet, it's recommended that you connect to Azure resources that you want to manage using a VPN, private network connection, or Azure Bastion.
For more information on Azure Bastion, see What is Azure Bastion?.
Create virtual machines
Create two virtual machines (VMs) in the virtual network.
In the portal, search for and select Virtual machines.
In Virtual machines, select + Create, then Azure virtual machine.
In Create a virtual machine, enter or select this information in the Basics tab:
Setting Value Project details Subscription Select your subscription. Resource group Select test-rg. Instance details Virtual machine name Enter vm-1. Region Select (US) East US 2. Availability options Leave the default of No infrastructure redundancy required. Security type Select Standard. Image Select Windows Server 2022 Datacenter - x64 Gen2. Azure Spot instance Leave the default of unchecked. Size Select a size. Administrator account Username Enter a username. Password Enter a password. Confirm password Reenter password. Inbound port rules Select inbound ports Select None. Select Next: Disks then Next: Networking.
In the Networking tab, enter or select the following information:
Setting Value Network interface Virtual network Select vnet-1. Subnet Select subnet-1 (10.0.0.0/24). Public IP Leave the default of a new public IP. NIC network security group Select None. Select the Review + create tab, or select the blue Review + create button at the bottom of the page.
Select Create. The VM may take a few minutes to deploy.
Repeat the previous steps to create a second virtual machine named vm-2.
Associate network interfaces to an ASG
When you created the VMs, Azure created a network interface for each VM, and attached it to the VM.
Add the network interface of each VM to one of the application security groups you created previously:
In the search box at the top of the portal, enter Virtual machine. Select Virtual machines in the search results, then select vm-1.
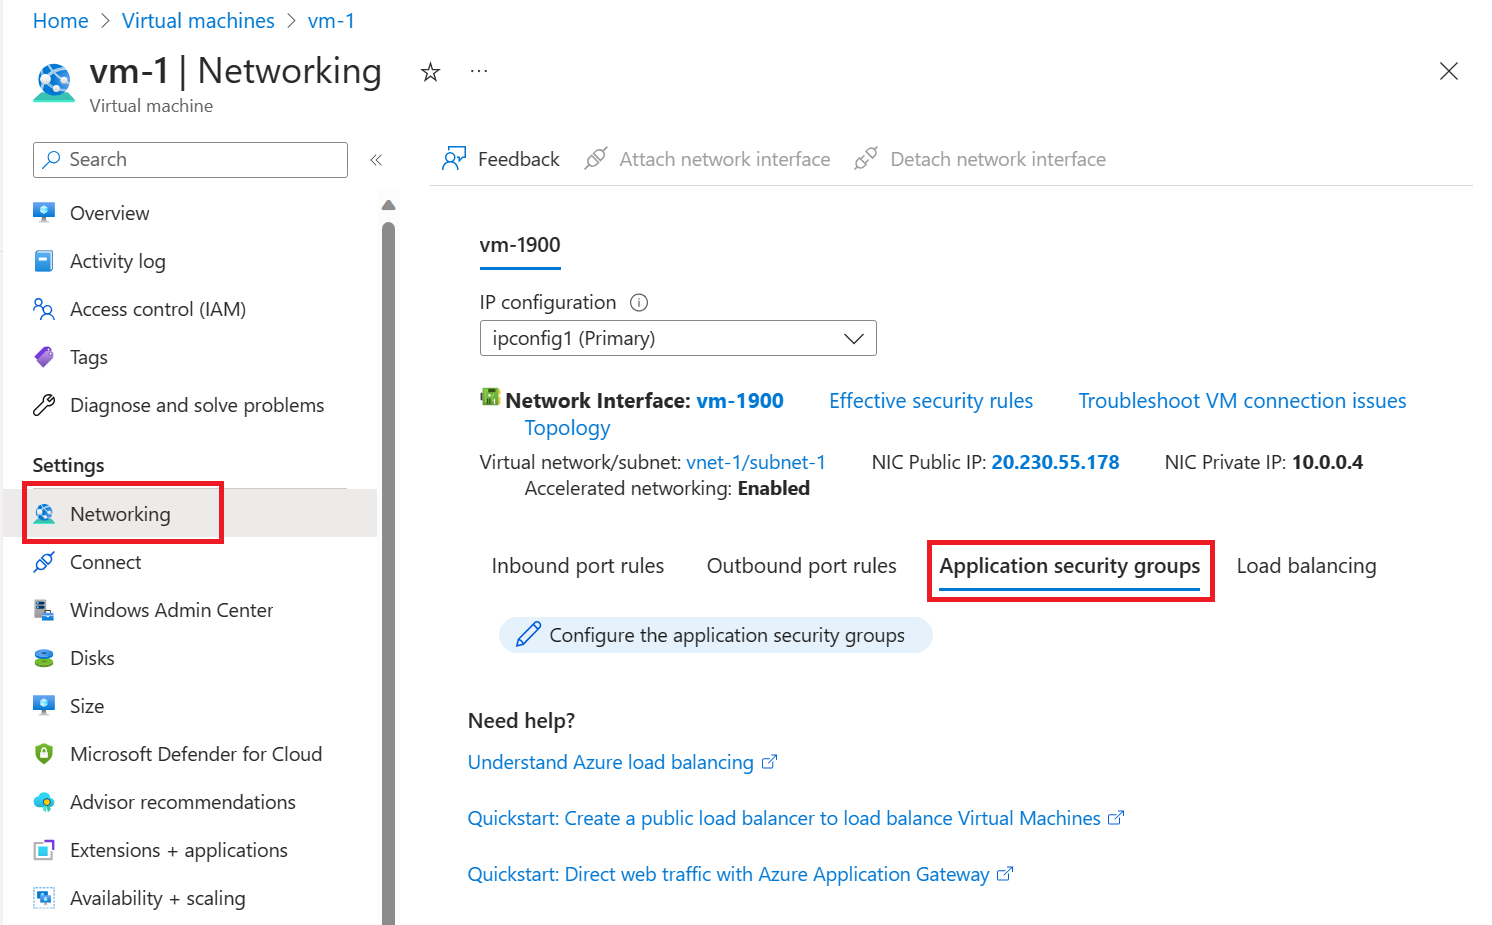
Select Application security groups from the Networking section of vm-1.
Select Add application security groups, then in the Add application security groups tab, select asg-web. Finally, select Add.
Repeat the previous steps for vm-2, selecting asg-mgmt in the Add application security groups tab.
Test traffic filters
In the search box at the top of the portal, enter Virtual machine. Select Virtual machines in the search results.
Select vm-2.
On the Overview page, select the Connect button and then select Native RDP.
Select Download RDP file.
Open the downloaded rdp file and select Connect. Enter the username and password you specified when creating the VM.
Select OK.
You may receive a certificate warning during the connection process. If you receive the warning, select Yes or Continue, to continue with the connection.
The connection succeeds, because inbound traffic from the internet to the asg-mgmt application security group is allowed through port 3389.
The network interface for vm-2 is associated with the asg-mgmt application security group and allows the connection.
Open a PowerShell session on vm-2. Connect to vm-1 using the following:
PowerShellmstsc /v:vm-1The RDP connection from vm-2 to vm-1 succeeds because virtual machines in the same network can communicate with each other over any port by default.
You can't create an RDP connection to the vm-1 virtual machine from the internet. The security rule for the asg-web prevents connections to port 3389 inbound from the internet. Inbound traffic from the Internet is denied to all resources by default.
To install Microsoft IIS on the vm-1 virtual machine, enter the following command from a PowerShell session on the vm-1 virtual machine:
PowerShellInstall-WindowsFeature -name Web-Server -IncludeManagementToolsAfter the IIS installation is complete, disconnect from the vm-1 virtual machine, which leaves you in the vm-2 virtual machine remote desktop connection.
Disconnect from the vm-2 VM.
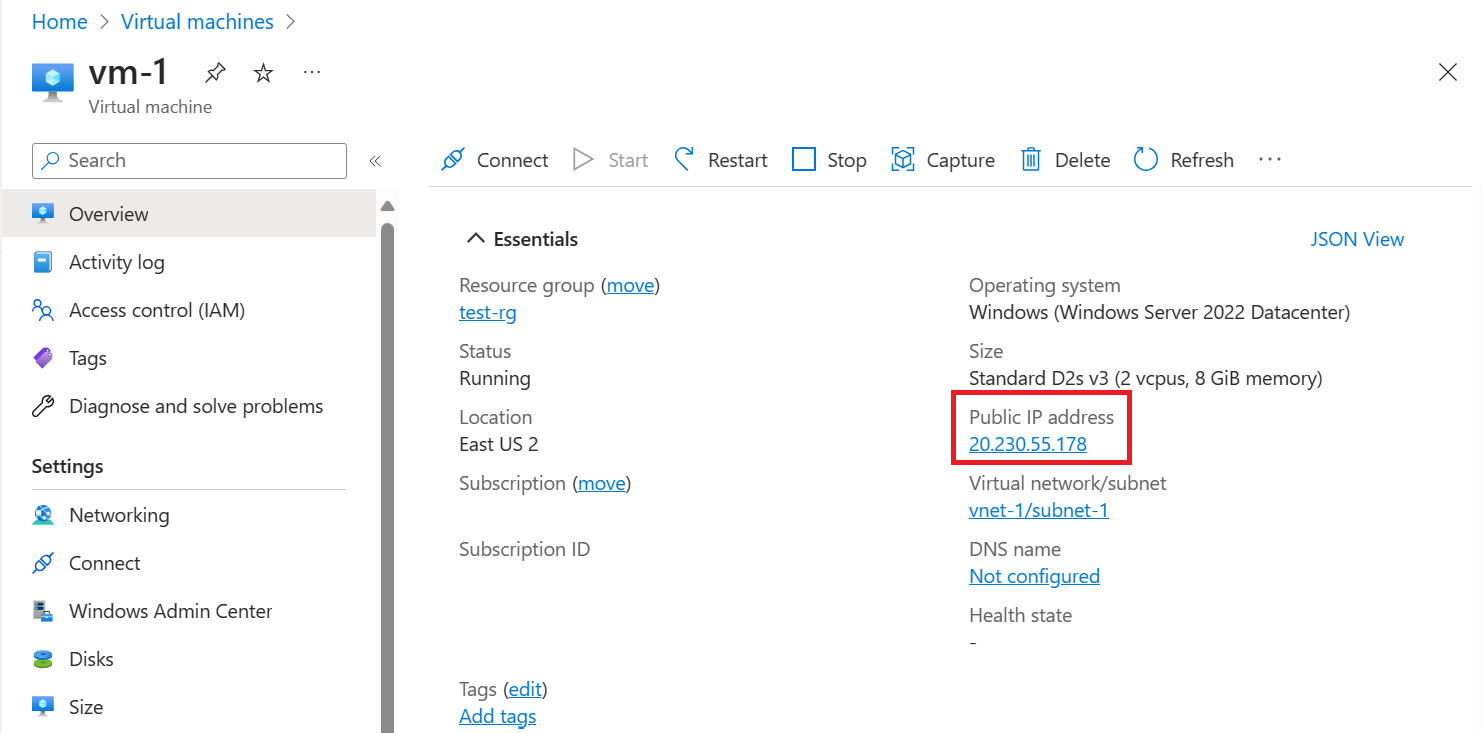
Search for vm-1 in the portal search box.
On the Overview page of vm-1, note the Public IP address for your VM. The address shown in the following example is 20.230.55.178, your address is different:
To confirm that you can access the vm-1 web server from the internet, open an internet browser on your computer and browse to
http://<public-ip-address-from-previous-step>.


No comments:
Post a Comment