Connect virtual networks with virtual network peering using the Azure portal

In this tutorial, you learn how to:
- Create virtual networks
- Connect two virtual networks with a virtual network peering
- Deploy a virtual machine (VM) into each virtual network
- Communicate between VMs
Prerequisites
- An Azure account with an active subscription. You can create an account for free.
Sign in to Azure
Sign in to the Azure portal.
Create a virtual network and an Azure Bastion host
The following procedure creates a virtual network with a resource subnet, an Azure Bastion subnet, and a Bastion host:
In the portal, search for and select Virtual networks.
On the Virtual networks page, select + Create.
On the Basics tab of Create virtual network, enter, or select the following information:
Setting Value Project details Subscription Select your subscription. Resource group Select Create new.
Enter test-rg for the name.
Select OK.Instance details Name Enter vnet-1. Region Select East US 2. 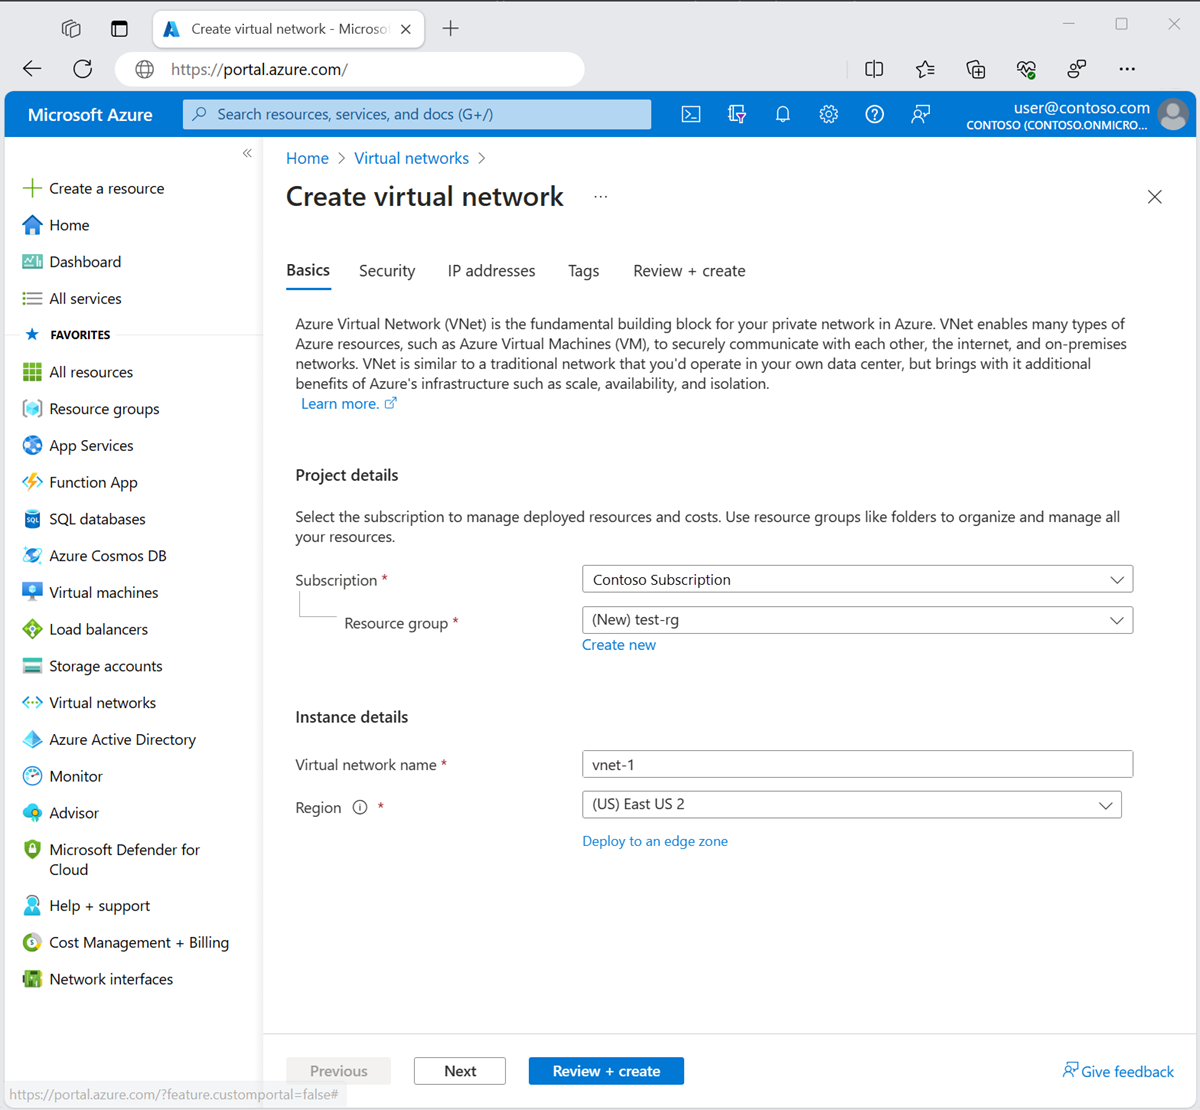
Select Next to proceed to the Security tab.
In the Azure Bastion section, select Enable Bastion.
Bastion uses your browser to connect to VMs in your virtual network over Secure Shell (SSH) or Remote Desktop Protocol (RDP) by using their private IP addresses. The VMs don't need public IP addresses, client software, or special configuration. For more information, see What is Azure Bastion?.
In Azure Bastion, enter or select the following information:
Setting Value Azure Bastion host name Enter bastion. Azure Bastion public IP address Select Create a public IP address.
Enter public-ip-bastion in Name.
Select OK.
Select Next to proceed to the IP Addresses tab.
In the address space box in Subnets, select the default subnet.
In Edit subnet, enter or select the following information:
Setting Value Subnet purpose Leave the default of Default. Name Enter subnet-1. IPv4 IPv4 address range Leave the default of 10.0.0.0/16. Starting address Leave the default of 10.0.0.0. Size Leave the default of /24 (256 addresses). 
Select Save.
Select Review + create at the bottom of the window. When validation passes, select Create.

Repeat the previous steps to create a second virtual network with the following values:
| Setting | Value |
|---|---|
| Name | vnet-2 |
| Address space | 10.1.0.0/16 |
| Resource group | test-rg |
| Subnet name | subnet-1 |
| Subnet address range | 10.1.0.0/24 |
Create virtual network peer
Use the following steps to create a two way network peer between vnet1 and vnet2.
In the search box at the top of the portal, enter Virtual network. Select Virtual networks in the search results.
Select vnet-1.
In Settings select Peerings.
Select + Add.
Enter or select the following information in Add peering:
Setting Value Remote virtual network summary Peering link name Enter vnet-2-to-vnet-1. Virtual network deployment model Leave the default of Resource Manager. Subscription Select your subscription. Virtual network Select vnet-2. Remote virtual network peering settings Allow 'vnet-2' to access 'vnet-1' Leave the default of selected. Allow 'vnet-2' to receive forwarded traffic from 'vnet-1' Select the checkbox. Allow gateway or route server in 'vnet-2' to forward traffic to 'vnet-1' Leave the default of cleared. Enable 'vnet-2' to use 'vnet-1's' remote gateway or route server Leave the default of cleared. Local virtual network peering summary Peering link name Enter vnet-1-to-vnet-2. Local virtual network peering settings Allow 'vnet-1' to access 'vnet-2' Leave the default of selected. Allow 'vnet-1' to receive forwarded traffic from 'vnet-2' Select the checkbox. Allow gateway or route server in 'vnet-1' to forward traffic to 'vnet-2' Leave the default of cleared. Enable 'vnet-1' to use 'vnet-2's' remote gateway or route server Leave the default of cleared. 
No comments:
Post a Comment