Create an Azure DNS Private Resolver using the Azure portal
This quickstart walks you through the steps to create an Azure DNS Private Resolver using the Azure portal. If you prefer, you can complete this quickstart using Azure PowerShell.
Azure DNS Private Resolver enables you to query Azure DNS private zones from an on-premises environment, and vice versa, without deploying VM based DNS servers. You no longer need to provision IaaS based solutions on your virtual networks to resolve names registered on Azure private DNS zones. You can configure conditional forwarding of domains back to on-premises, multicloud and public DNS servers. For more information, including benefits, capabilities, and regional availability, see What is Azure DNS Private Resolver.
In this article:
- Two VNets are created: myvnet and myvnet2.
- An Azure DNS Private Resolver is created in the first VNet with an inbound endpoint at 10.10.0.4.
- A DNS forwarding ruleset is created for the private resolver.
- The DNS forwarding ruleset is linked to the second VNet.
- Example rules are added to the DNS forwarding ruleset.
This article doesn't demonstrate DNS forwarding to an on-premises network. For more information, see Resolve Azure and on-premises domains.
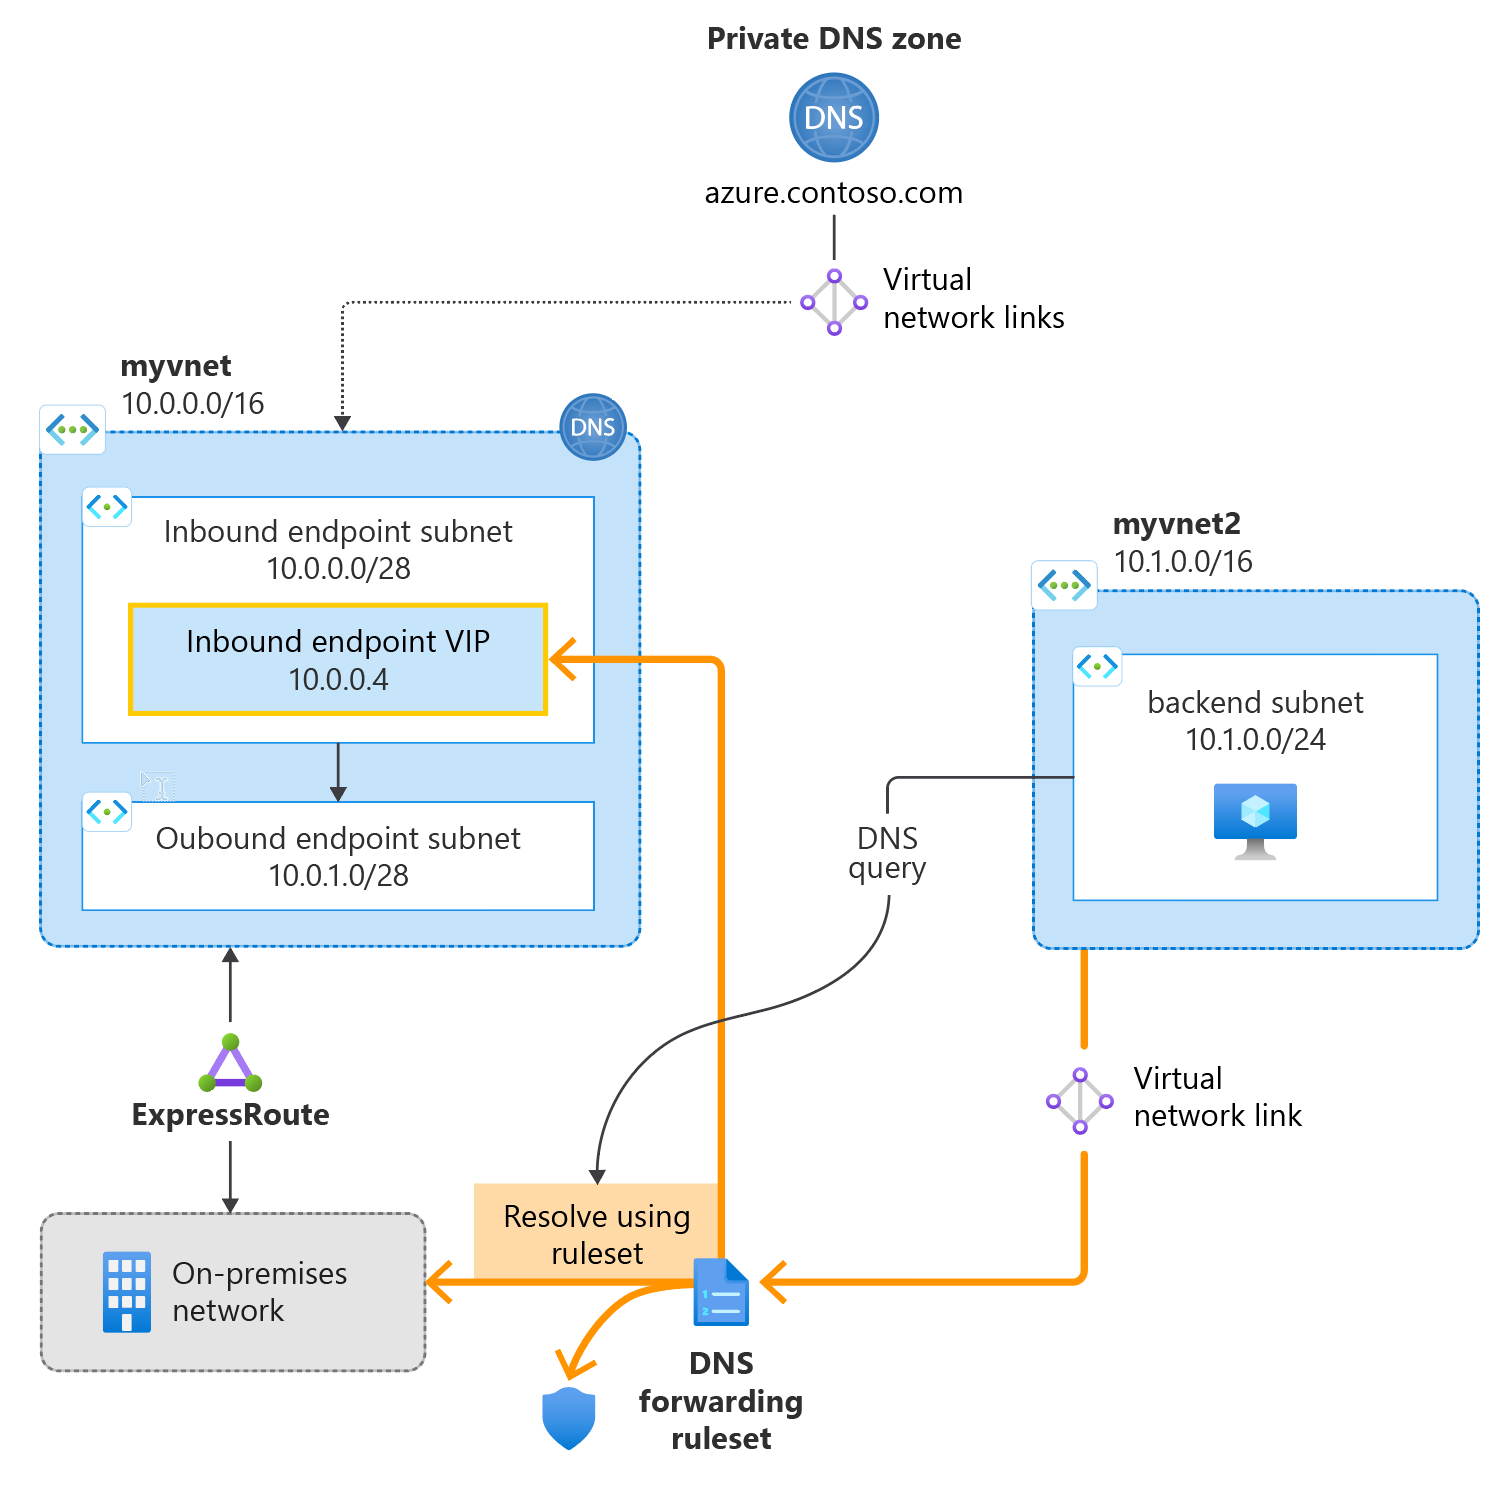
The following figure summarizes the setup used in this article:
Prerequisites
An Azure subscription is required.
- If you don't already have an Azure subscription, you can create a free account.
Register the Microsoft.Network provider namespace
Before you can use Microsoft.Network services with your Azure subscription, you must register the Microsoft.Network namespace:
- Select the Subscription blade in the Azure portal, and then choose your subscription.
- Under Settings select Resource Providers.
- Select Microsoft.Network and then select Register.
Create a resource group
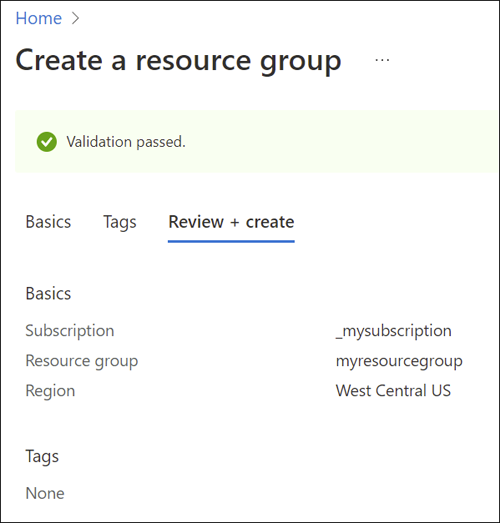
First, create or choose an existing resource group to host the resources for your DNS resolver. The resource group must be in a supported region. In this example, the location is West Central US. To create a new resource group:
Select Create a resource group.
Select your subscription name, enter a name for the resource group, and choose a supported region.
Select Review + create, and then select Create.
Create a virtual network
Next, add a virtual network to the resource group that you created, and configure subnets.
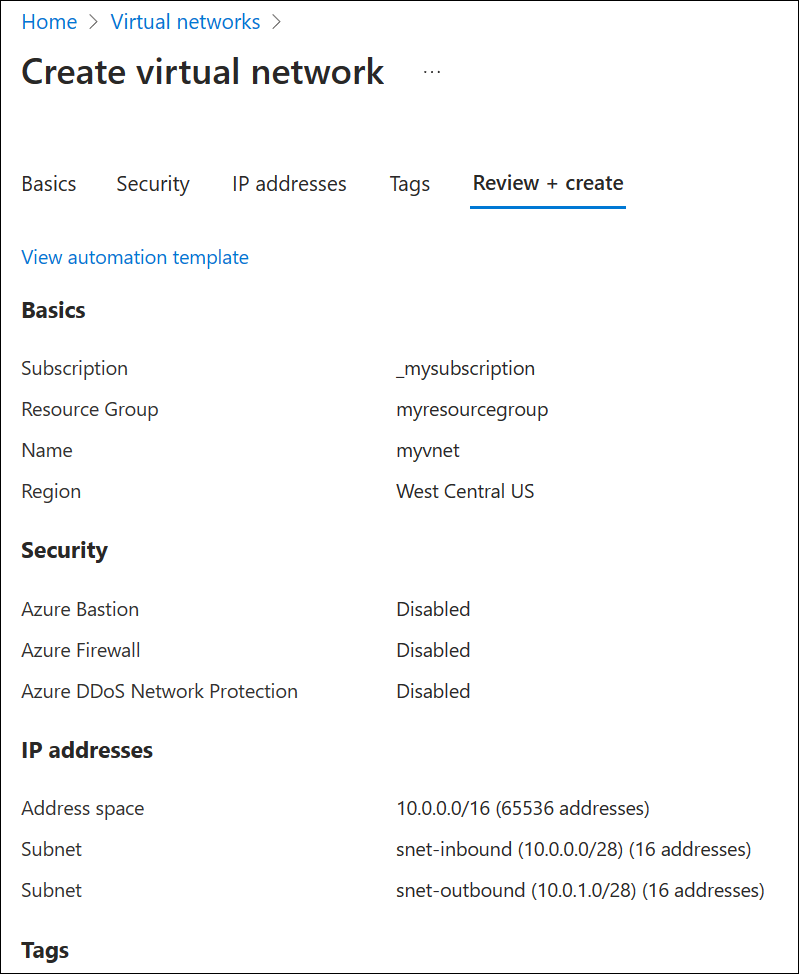
Select the resource group you created, select Create, select Networking from the list of categories, and then next to Virtual network, select Create.
On the Basics tab, enter a name for the new virtual network and select the Region that is the same as your resource group.
On the IP Addresses tab, modify the IPv4 address space to be 10.0.0.0/8.
Select Add subnet and enter the subnet name and address range:
- Subnet name: snet-inbound
- Subnet address range: 10.0.0.0/28
- Select Add to add the new subnet.
Select Add subnet and configure the outbound endpoint subnet:
- Subnet name: snet-outbound
- Subnet address range: 10.1.1.0/28
- Select Add to add this subnet.
Select Review + create and then select Create.
Create a DNS resolver inside the virtual network
Open the Azure portal and search for DNS Private Resolvers.
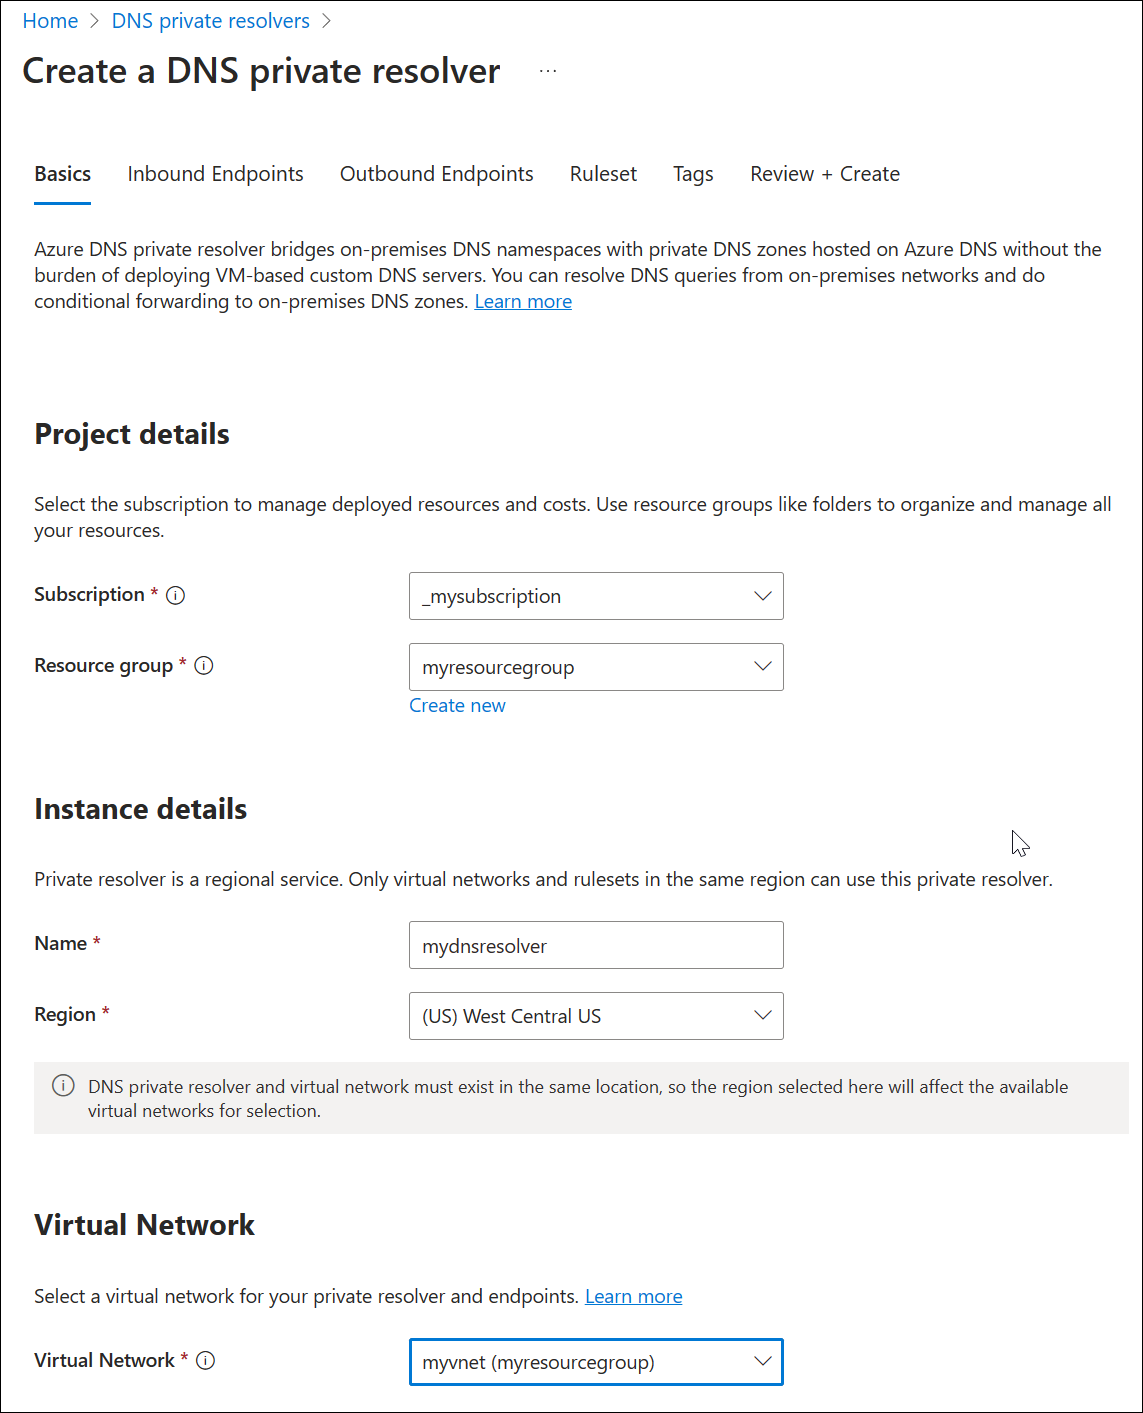
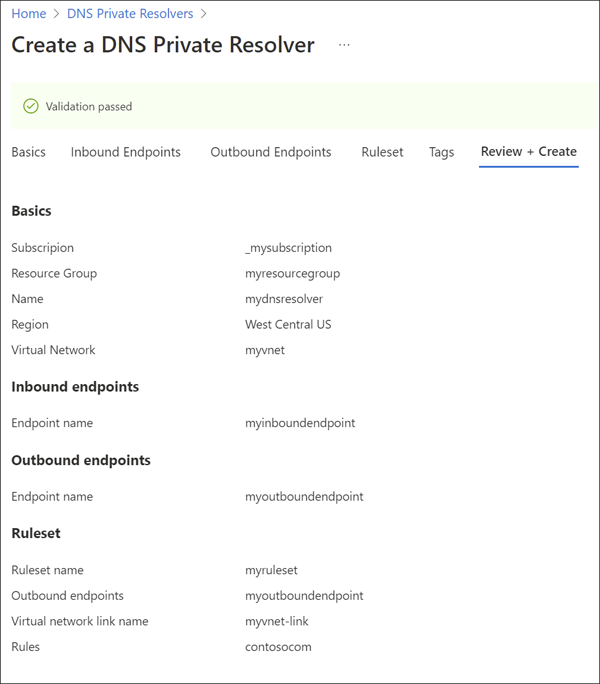
Select DNS Private Resolvers, select Create, and then on the Basics tab for Create a DNS Private Resolver enter the following:
- Subscription: Choose the subscription name you're using.
- Resource group: Choose the name of the resource group that you created.
- Name: Enter a name for your DNS resolver (ex: mydnsresolver).
- Region: Choose the region you used for the virtual network.
- Virtual Network: Select the virtual network that you created.
Don't create the DNS resolver yet.
Select the Inbound Endpoints tab, select Add an endpoint, and then enter a name next to Endpoint name (ex: myinboundendpoint).
Next to Subnet, select the inbound endpoint subnet you created (ex: snet-inbound, 10.0.0.0/28) and then select Save.
Select the Outbound Endpoints tab, select Add an endpoint, and then enter a name next to Endpoint name (ex: myoutboundendpoint).
Next to Subnet, select the outbound endpoint subnet you created (ex: snet-outbound, 10.1.1.0/28) and then select Save.
Select the Ruleset tab, select Add a ruleset, and enter the following:
- Ruleset name: Enter a name for your ruleset (ex: myruleset).
- Endpoints: Select the outbound endpoint that you created (ex: myoutboundendpoint).
Under Rules, select Add and enter your conditional DNS forwarding rules. For example:
- Rule name: Enter a rule name (ex: contosocom).
- Domain Name: Enter a domain name with a trailing dot (ex: contoso.com.).
- Rule State: Choose Enabled or Disabled. The default is enabled.
- Select Add a destination and enter a desired destination IPv4 address (ex: 11.0.1.4).
- If desired, select Add a destination again to add another destination IPv4 address (ex: 11.0.1.5).
- When you're finished adding destination IP addresses, select Add.
Select Review and Create, and then select Create.
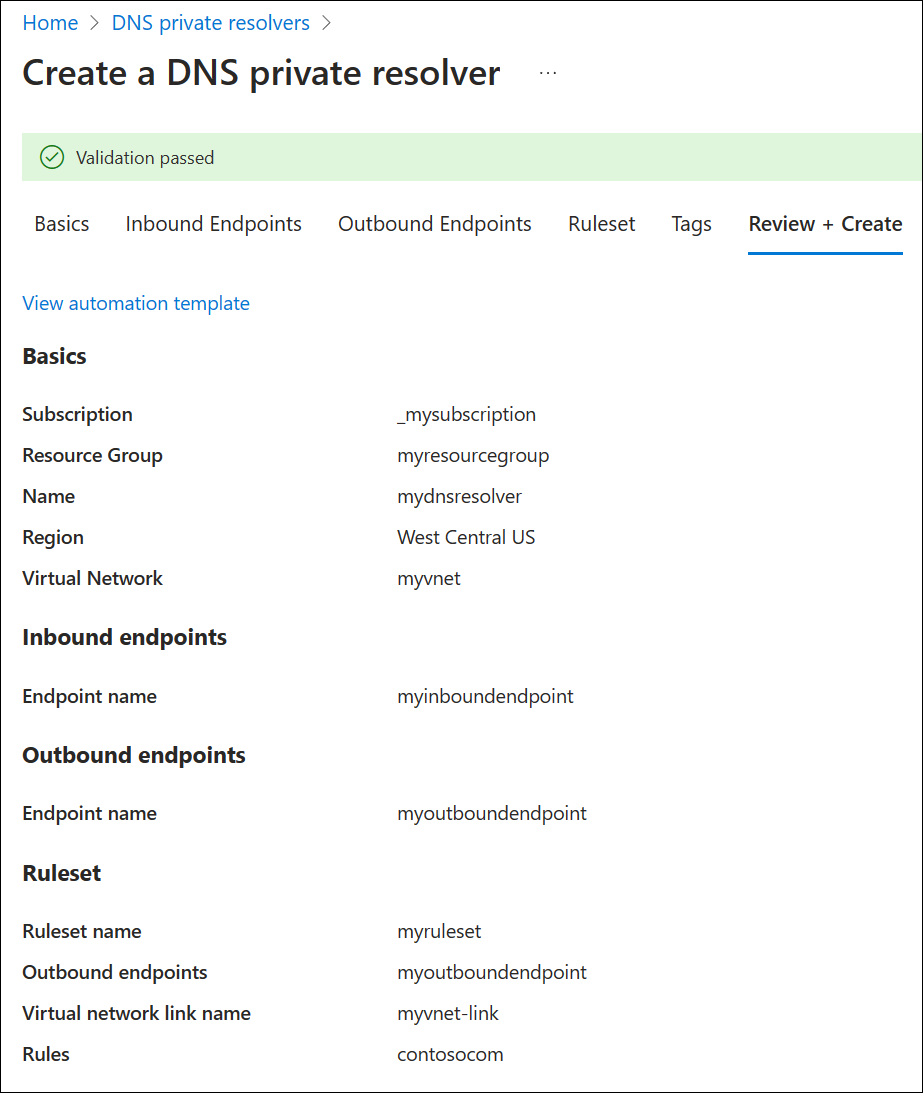
This example has only one conditional forwarding rule, but you can create many. Edit the rules to enable or disable them as needed.
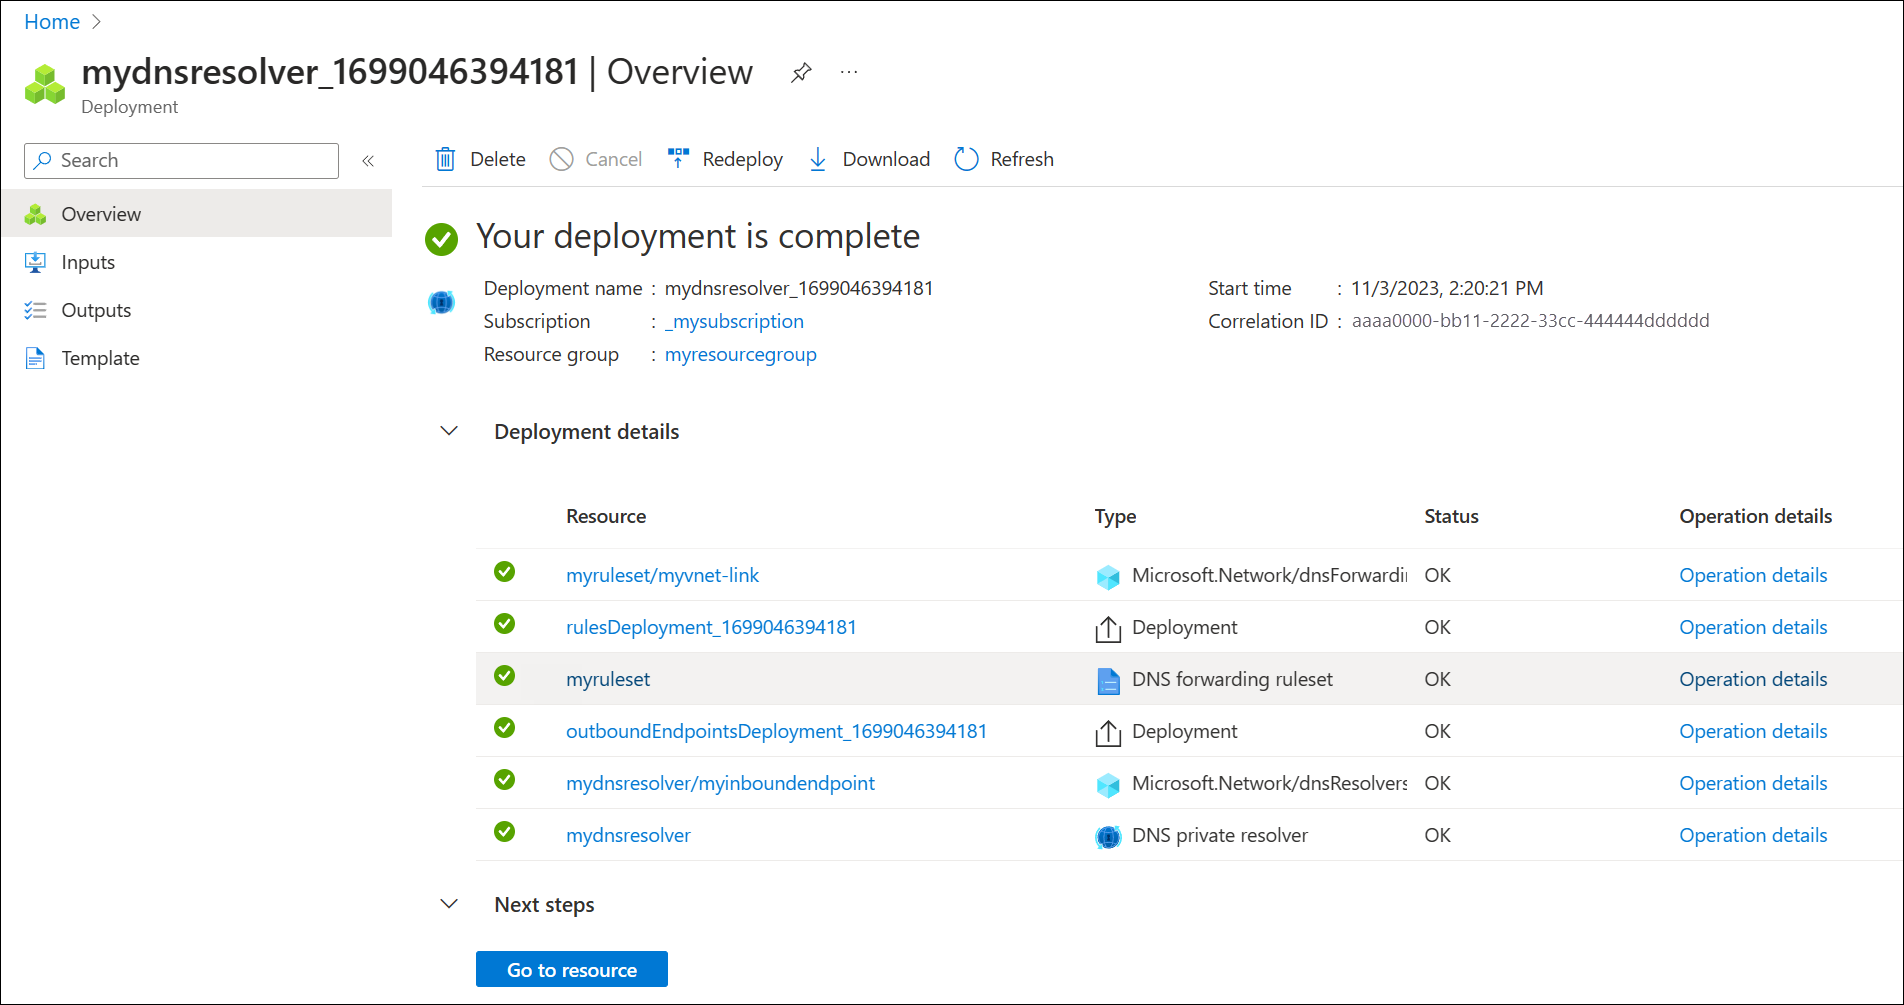
After selecting Create, the new DNS resolver will begin deployment. This process might take a minute or two. The status of each component is displayed during deployment.
Create a second virtual network
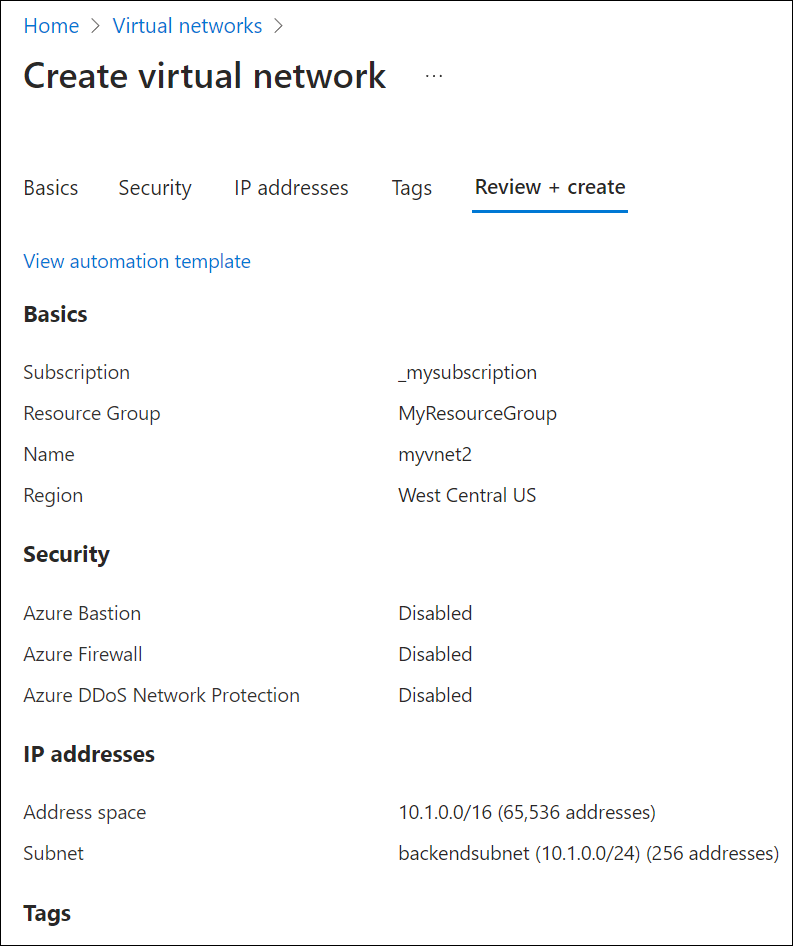
Create a second virtual network to simulate an on-premises or other environment. To create a second virtual network:
Select Virtual Networks from the Azure services list, or search for Virtual Networks and then select Virtual Networks.
Select Create, and then on the Basics tab select your subscription and choose the same resource group that you have been using in this guide (ex: myresourcegroup).
Next to Name, enter a name for the new virtual network (ex: myvnet2).
Verify that the Region selected is the same region used previously in this guide (ex: West Central US).
Select the IP Addresses tab and edit the default IP address space. Replace the address space with a simulated on-premises address space (ex: 12.0.0.0/8).
Select Add subnet and enter the following:
- Subnet name: backendsubnet
- Subnet address range: 12.2.0.0/24
Select Add, select Review + create, and then select Create.
Link your forwarding ruleset to the second virtual network
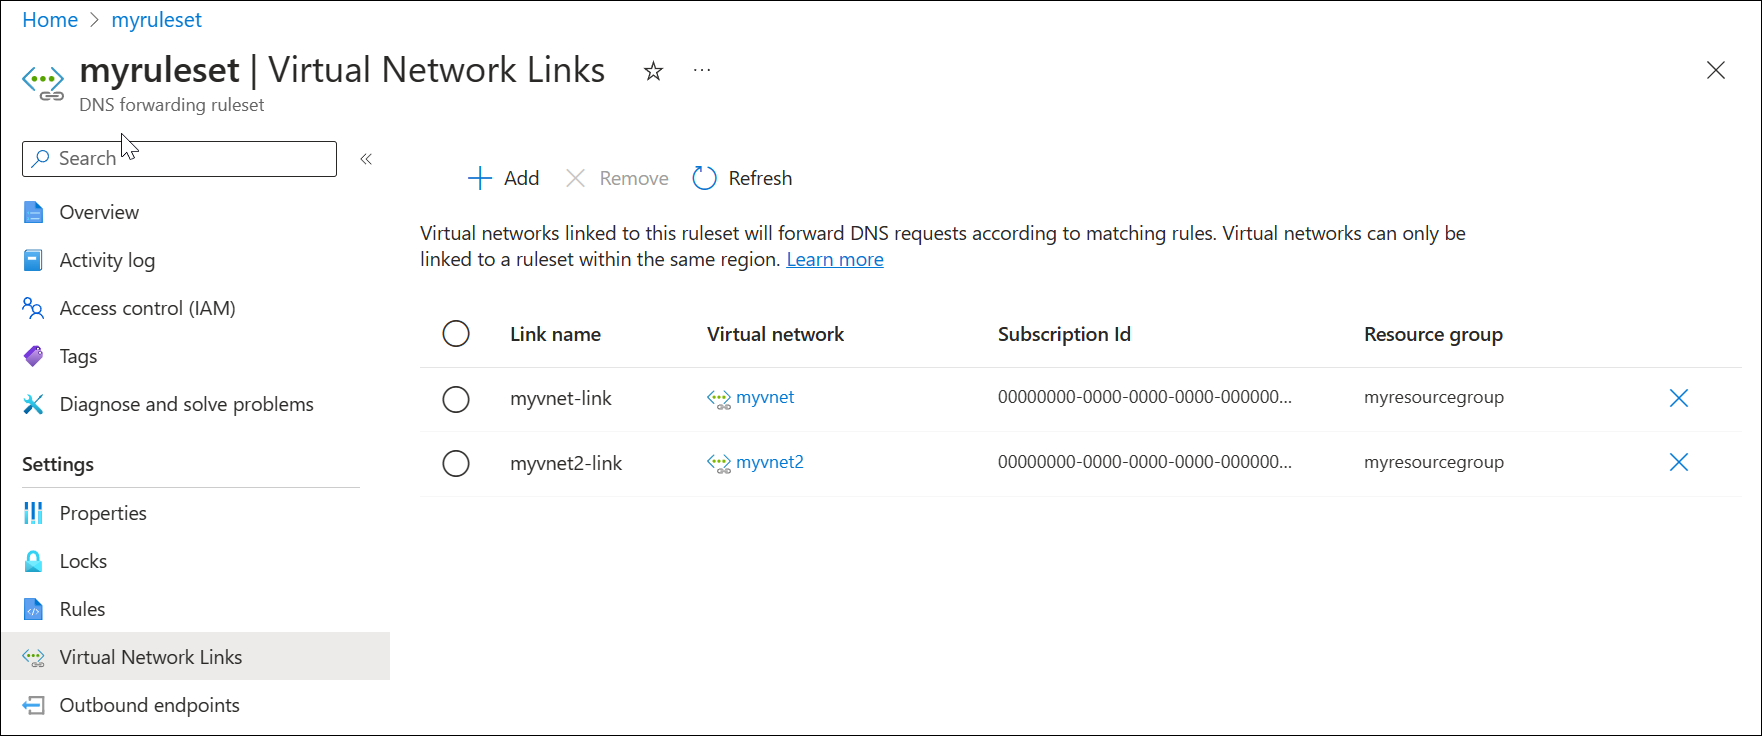
To apply your forwarding ruleset to the second virtual network, you must create a virtual link.
Search for DNS forwarding rulesets in the Azure services list and select your ruleset (ex: myruleset).
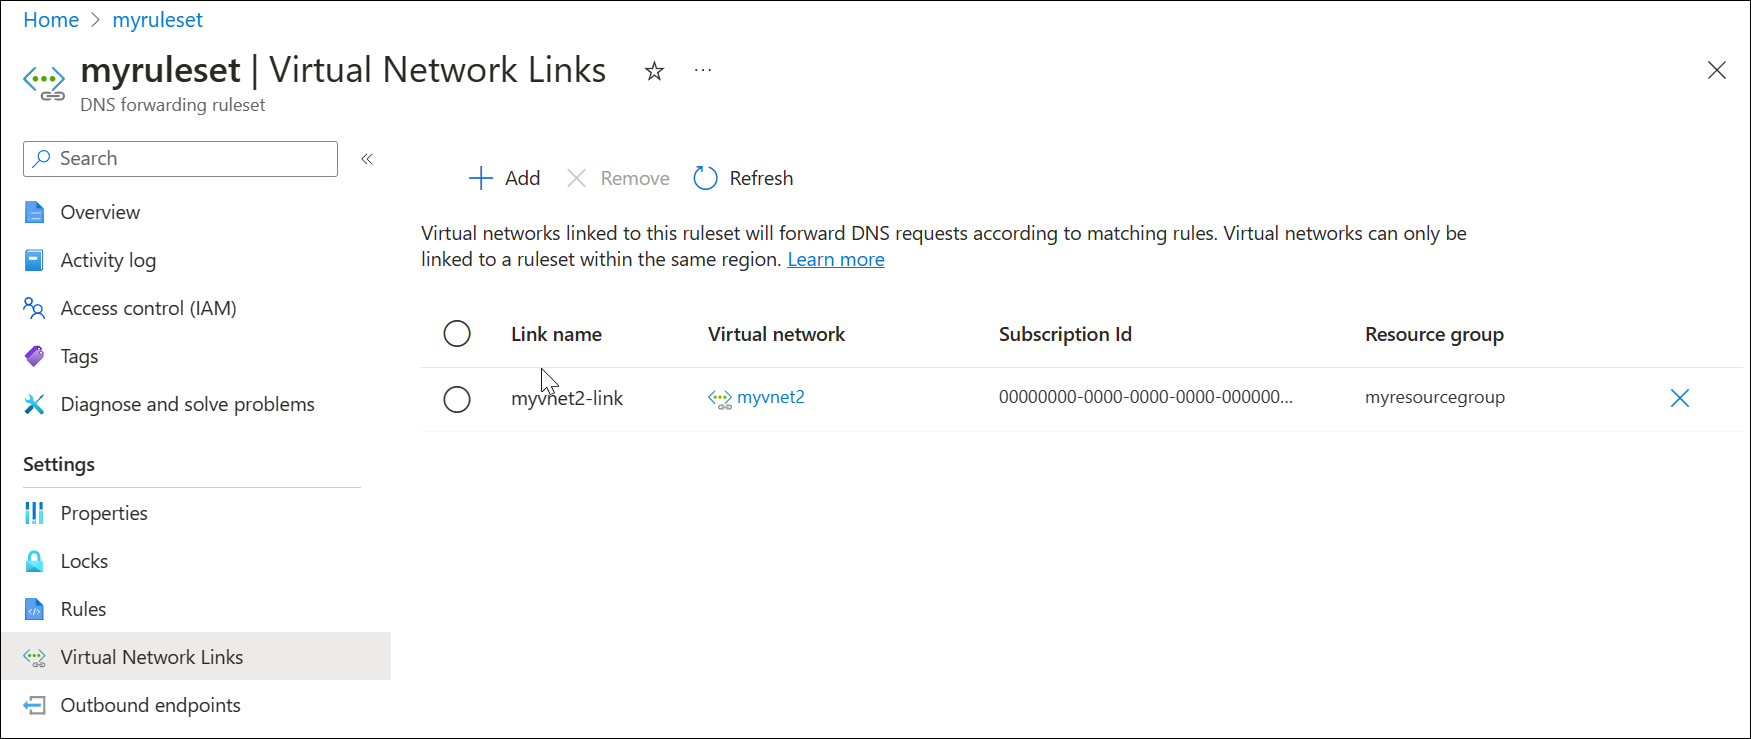
Select Virtual Network Links, select Add, choose myvnet2 and use the default Link Name myvnet2-link.
Select Add and verify that the link was added successfully. You might need to refresh the page.
Delete a virtual network link
Later in this article a rule is created using the private resolver inbound endpoint as a destination. This configuration can cause a DNS resolution loop if the VNet where the resolver is provisioned is also linked to the ruleset. To fix this issue, remove the link to myvnet.
Search for DNS forwarding rulesets in the Azure services list and select your ruleset (ex: myruleset).
Select Virtual Network Links, choose myvnet-link, select Remove and select OK.
Configure a DNS forwarding ruleset
Add or remove specific rules your DNS forwarding ruleset as desired, such as:
- A rule to resolve an Azure Private DNS zone linked to your virtual network: azure.contoso.com.
- A rule to resolve an on-premises zone: internal.contoso.com.
- A wildcard rule to forward unmatched DNS queries to a protective DNS service.
Important
The rules shown in this quickstart are examples of rules that can be used for specific scenarios. None of the fowarding rules described in this article are required. Be careful to test your forwarding rules and ensure that the rules don't cause DNS resolution issues.
If you include a wildcard rule in your ruleset, ensure that the target DNS service can resolve public DNS names. Some Azure services have dependencies on public name resolution.
Delete a rule from the forwarding ruleset
Individual rules can be deleted or disabled. In this example, a rule is deleted.
- Search for Dns Forwarding Rulesets in the Azure Services list and select it.
- Select the ruleset you previously configured (ex: myruleset) and then select Rules.
- Select the contosocom sample rule that you previously configured, select Delete, and then select OK.
Add rules to the forwarding ruleset
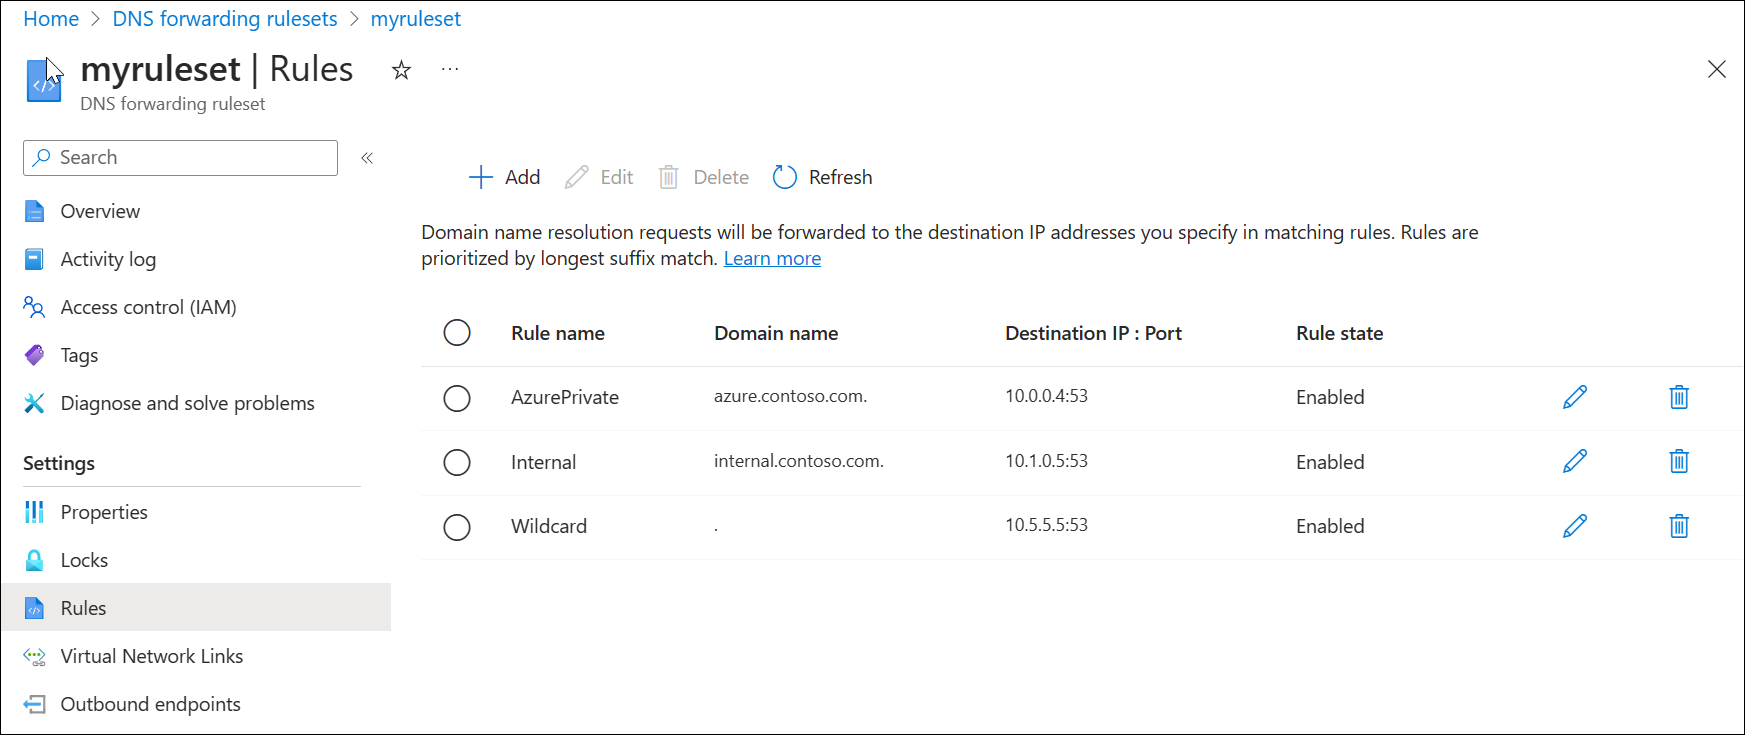
Add three new conditional forwarding rules to the ruleset.
On the myruleset | Rules page, select Add, and enter the following rule data:
- Rule Name: AzurePrivate
- Domain Name: azure.contoso.com.
- Rule State: Enabled
Under Destination IP address enter 10.0.0.4, and then select Add.
On the myruleset | Rules page, select Add, and enter the following rule data:
- Rule Name: Internal
- Domain Name: internal.contoso.com.
- Rule State: Enabled
Under Destination IP address enter 192.168.1.2, and then select Add.
On the myruleset | Rules page, select Add, and enter the following rule data:
- Rule Name: Wildcard
- Domain Name: . (enter only a dot)
- Rule State: Enabled
Under Destination IP address enter 10.5.5.5, and then select Add.

No comments:
Post a Comment