Azure Private Link traffic filters
Traffic filtering, to allow only Azure Private Link connections, is one of the security layers available in Elasticsearch Service. It allows you to limit how your deployments can be accessed.
Read more about Traffic Filtering for the general concepts behind traffic filtering in Elasticsearch Service.
Azure Private Link establishes a secure connection between two Azure VNets. The VNets can belong to separate accounts, for example a service provider and their service consumers. Azure routes the Private Link traffic within the Azure data centers and never exposes it to the public internet. In such a configuration, Elastic Cloud is the third-party service provider and the customers are service consumers.
Private Link is a connection between an Azure Private Endpoint and a Azure Private Link Service.
Azure Private Link Service aliases
Private Link Services are set up by Elastic in all supported Azure regions under the following aliases:
Azure Public Regions
The process of setting up the Private link connection to your clusters is split between Azure (e.g. by using Azure portal), Elastic Cloud Support, and Elastic Cloud UI. These are the high-level steps:
| Azure portal | Elastic Cloud UI |
|---|---|
1. Create a private endpoint using Elastic Cloud service alias. | |
2. Create a DNS record pointing to the private endpoint. | |
3. Create an Azure Private Link rule set with the private endpoint Name and ID. | |
4. Associate the Azure Private Link rule set with your deployments. | |
5. Interact with your deployments over Private Link. |
Create your private endpoint and DNS entries in Azure
Create a private endpoint in your VNet using the alias for your region.
Follow the Azure instructions for details on creating a private endpoint to an endpoint service.
Use the service aliases for your region. Select the "Connect to an Azure resource by resource ID or alias" option. For example for the region
eastus2the service alias iseastus2-prod-002-privatelink-service.64359fdd-7893-4215-9929-ece3287e1371.eastus2.azure.privatelinkserviceCreate a DNS record.
- Create a Private DNS Zone. Get the private hosted zone domain name in Azure Private Link Service Alias for the name of the zone. For example, in eastus2 use
privatelink.*eastus2*.azure.elastic-cloud.comas the zone domain name. Using this zone domain name is required to ensure certificate names match. - After creating the Private DNS Zone, associate the zone with your VNet by creating a virtual network link.
Then create a DNS A record pointing to the private endpoint. Use
*as the record name,Aas the type, and put the private endpoint IP address as the record value.Follow the Azure instructions for details on creating an A record which points to your private endpoint IP address
- Create a Private DNS Zone. Get the private hosted zone domain name in Azure Private Link Service Alias for the name of the zone. For example, in eastus2 use
Add the Private Link rules to your deployments
Follow these high-level steps to add Private Link rules to your deployments.
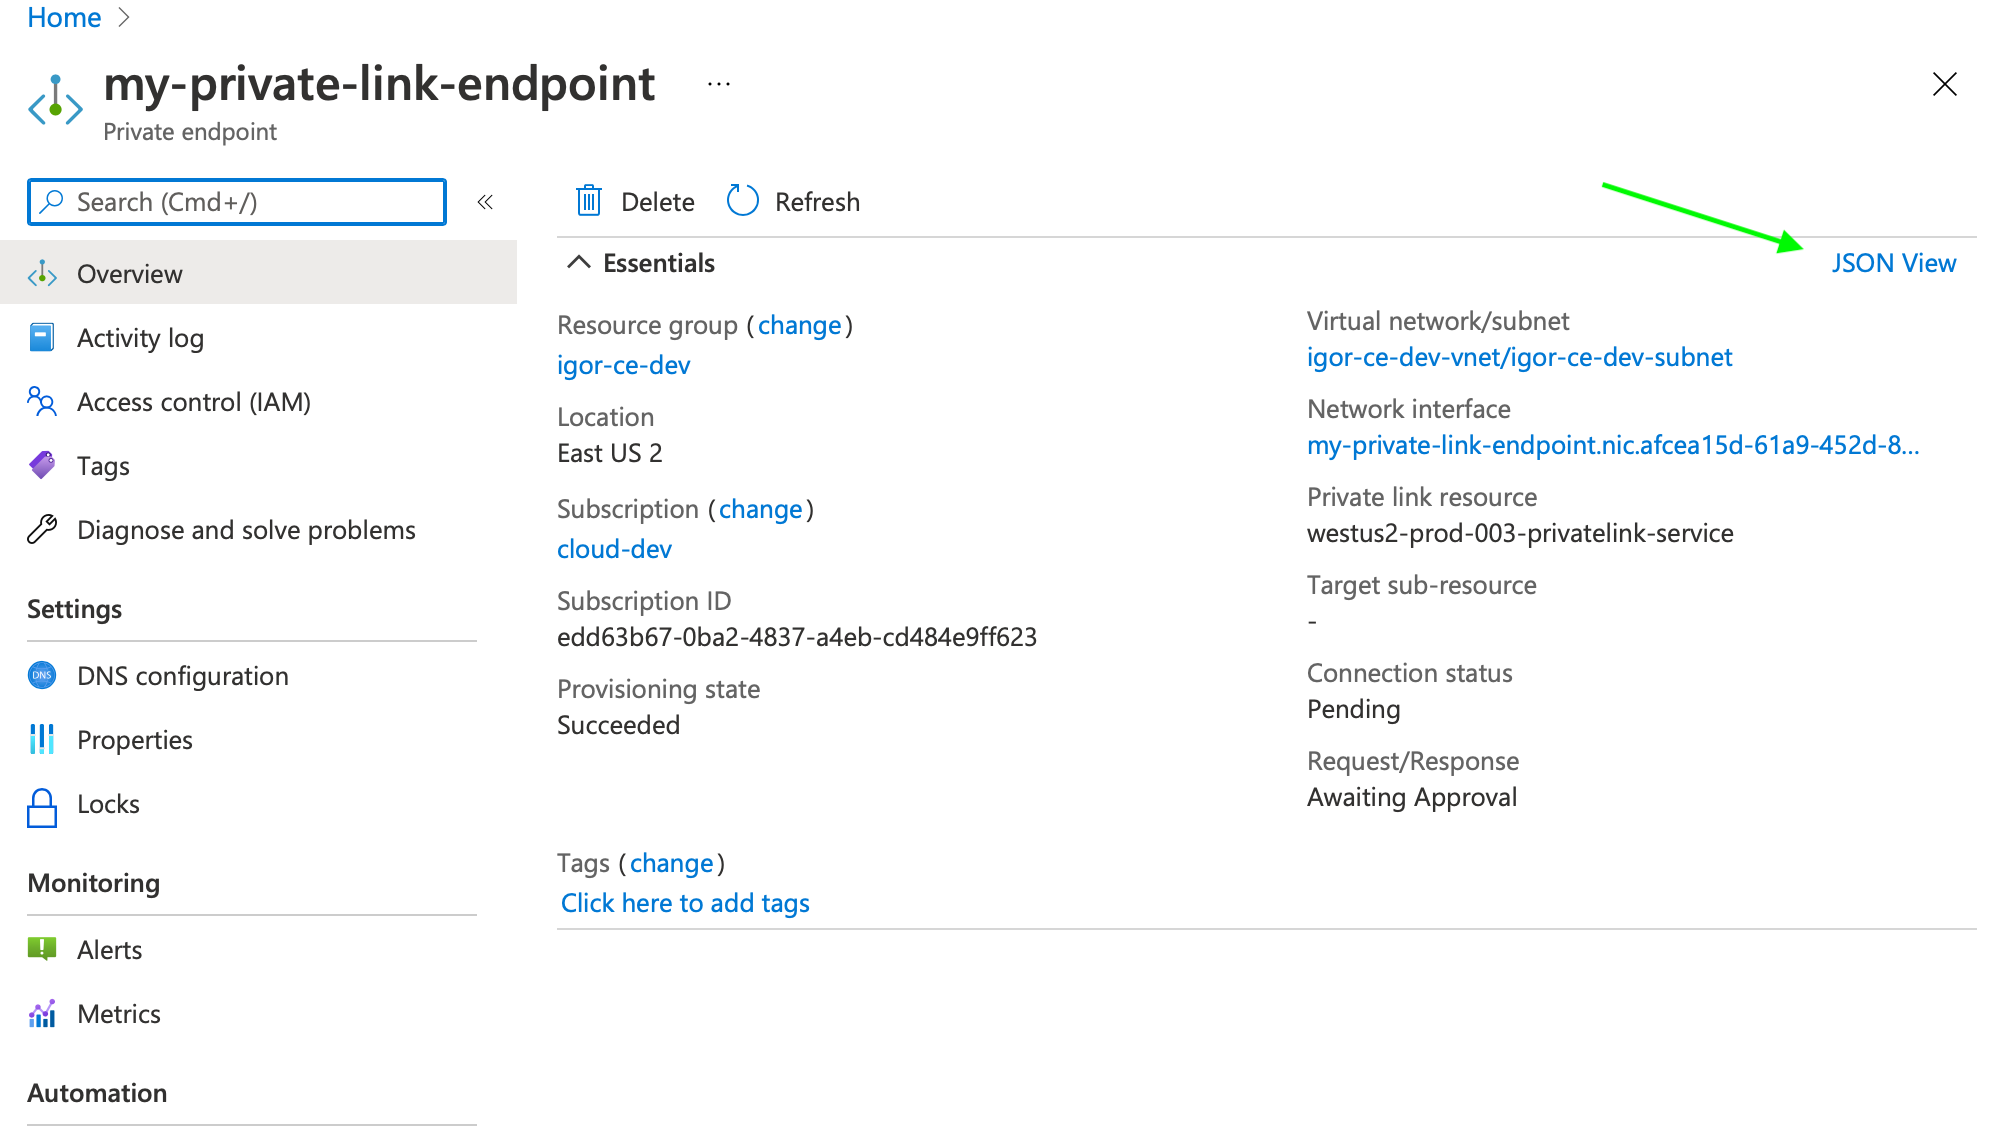
Find your private endpoint resource name
- Go to your Private Link Endpoint in the Azure Portal.
- Select JSON View.
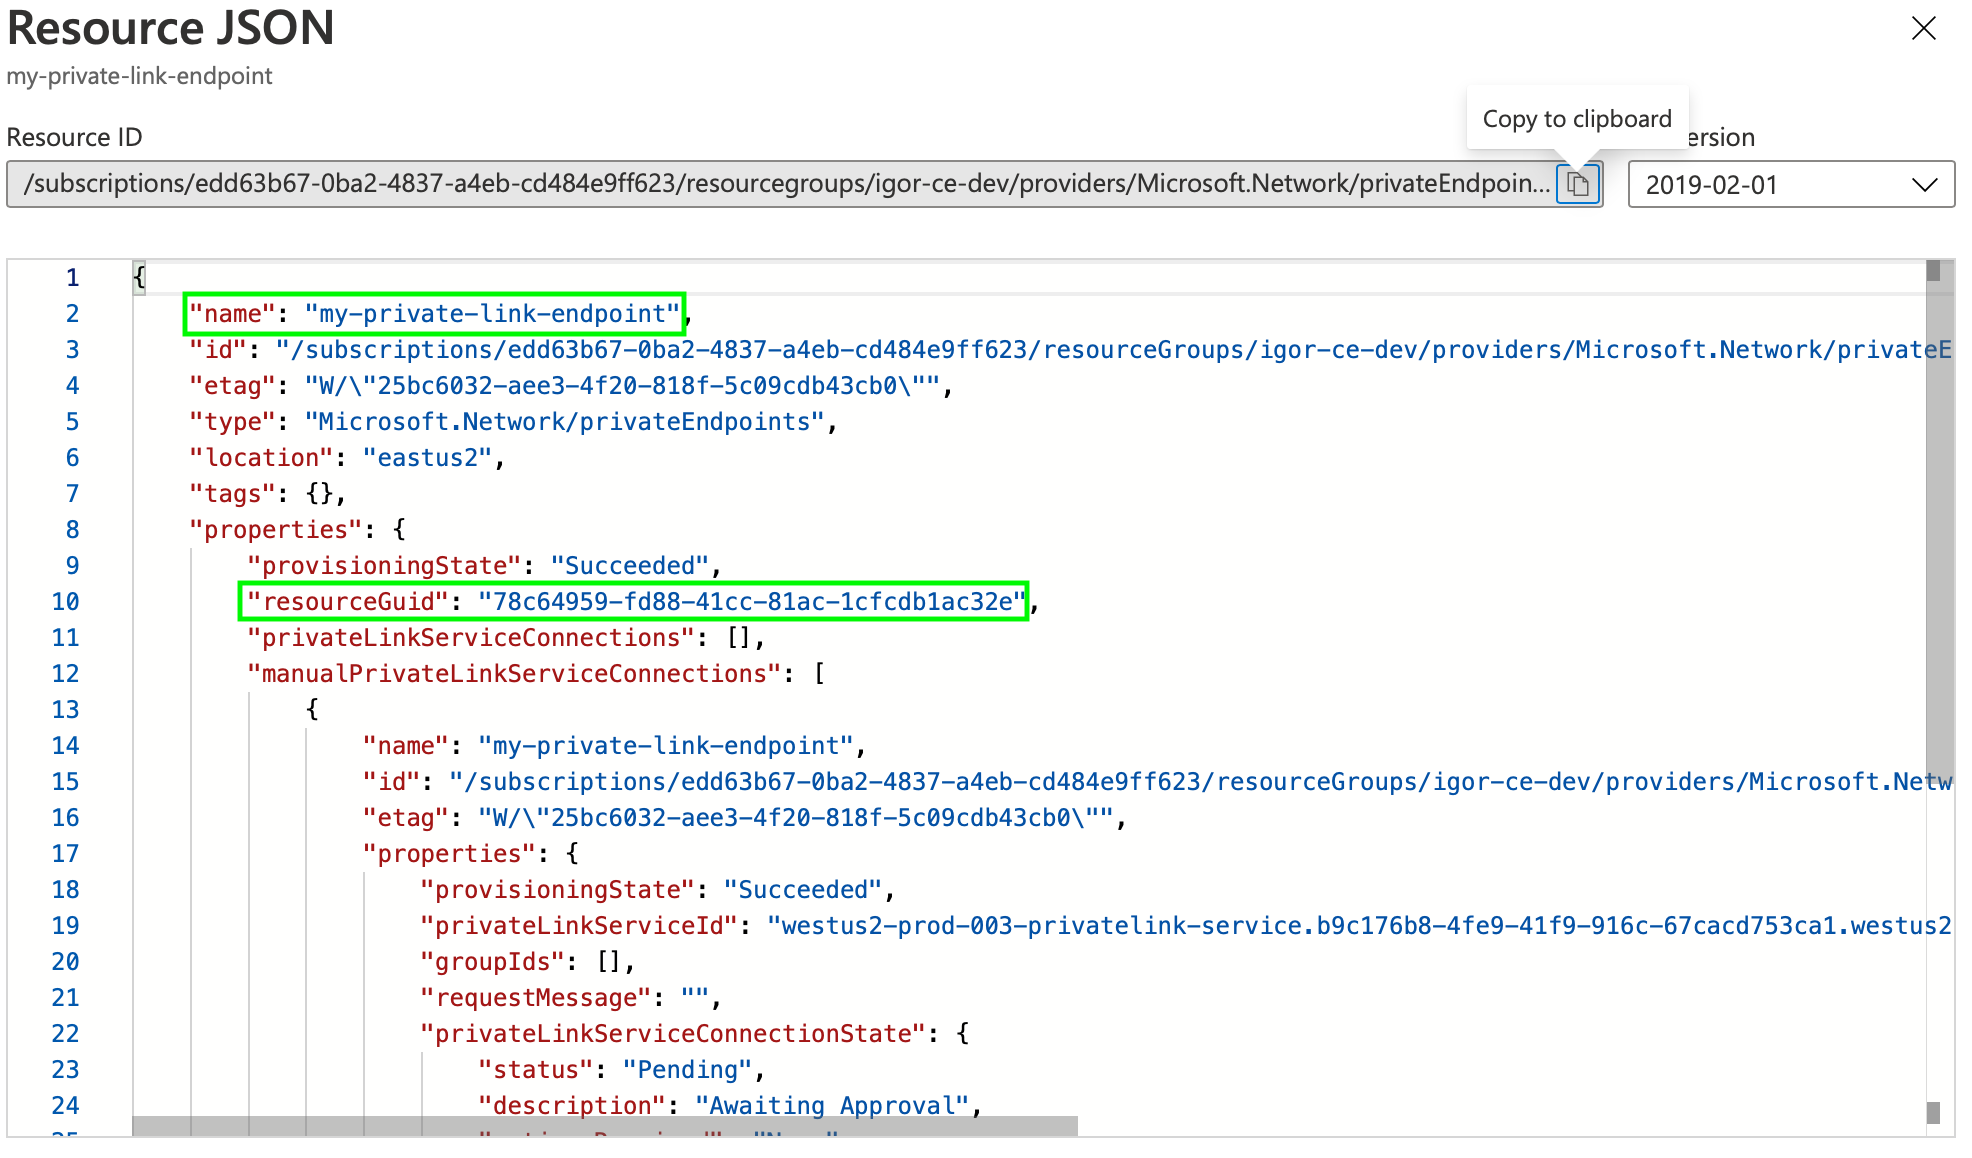
- Copy the value of the top level name property.
Find your private endpoint resource ID
- Go to your Private Link Endpoint in the Azure Portal.
- Select JSON View.
- Copy the value of the properties.resourceGUID property.
Create rules using the Private Link Endpoint Resource Name and Resource ID
When you have your private endpoint name and ID, you can create a Private Link traffic filter rule set.
- From the Account menu, select Traffic filters.
- Select Create filter.
- Select Private link endpoint.
- Create your rule set, providing a meaningful name and description.
- Select the region for the rule set.
- Enter your Private Endpoint Resource Name and Resource ID.
Select if this rule set should be automatically attached to new deployments.
- (Optional) You can claim your Private Endpoint Resource Name and Resource ID, so that no other organization is able to use it in a traffic filter ruleset.
Creating the filter approves the Private Link connection.
Let’s test the connection:
Find out the Elasticsearch cluster ID of your deployment. You can do that by selecting Copy cluster id in the Cloud UI. It looks something like
9c794b7c08fa494b9990fa3f6f74c2f8.To access your Elasticsearch cluster over Private Link:
If you have a custom endpoint alias configured, you can use the custom endpoint URL to connect.
https://{alias}.{product}.{private_hosted_zone_domain_name}For example:
https://my-deployment-d53192.es.privatelink.eastus2.azure.elastic-cloud.comAlternatively, use the following URL structure:
https://{elasticsearch_cluster_ID}.{private_hosted_zone_domain_name}:9243For example:
https://6b111580caaa4a9e84b18ec7c600155e.privatelink.eastus2.azure.elastic-cloud.com:9243
You can test the Azure portal part of the setup with the following command (substitute the region and Elasticsearch ID with your cluster).
The output should look like this:
$ curl -v https://6b111580caaa4a9e84b18ec7c600155e.privatelink.eastus2.azure.elastic-cloud.com:9243
* Rebuilt URL to: https://6b111580caaa4a9e84b18ec7c600155e.privatelink.eastus2.azure.elastic-cloud.com:9243/
*   Trying 192.168.46.5...         # <== note this IP address
..
* SSL connection using TLS1.2 / ECDHE_RSA_AES_256_GCM_SHA384
* 	 server certificate verification OK
* 	 common name: *.privatelink.elastic-cloud.com (matched)
..
< HTTP/1.1 403 Forbidden
{"ok":false,"message":"Forbidden"}
Check the IP address
192.168.46.5it should be the same as the IP address of your private endpoint.The connection is established, and a valid certificate is presented to the client. The
403 Forbiddenis expected, you haven’t associate the rule set with any deployment yet.In the event that the Private Link connection is not approved by Elastic Cloud, you’ll get an error message like the following. Double check that the filter you’ve created in the previous step uses the right resource name and GUID.
$ curl -v https://6b111580caaa4a9e84b18ec7c600155e.privatelink.eastus2.azure.elastic-cloud.com:9243
* Rebuilt URL to: https://6b111580caaa4a9e84b18ec7c600155e.privatelink.eastus2.azure.elastic-cloud.com:9243/
*   Trying 192.168.46.5...
* connect to 192.168.46.5 port 9243 failed: No route to host
* Failed to connect to 6b111580caaa4a9e84b18ec7c600155e.privatelink.eastus2.azure.elastic-cloud.com port 9243: No route to host
* Closing connection 0
curl: (7) Failed to connect to 6b111580caaa4a9e84b18ec7c600155e.privatelink.eastus2.azure.elastic-cloud.com port 9243: No route to host
The next step is to associate the rule set with your deployments.
Associate a Private Link rule set with your deployment
To associate a Private Link rule set with your deployment:
- Go to the deployment.
- On the Security page, under Traffic filters select Apply filter.
- Choose the filter you want to apply and select Apply filter.
Access the deployment over a Private Link
For traffic to connect with the deployment over Azure Private Link, the client making the request needs to be located within the VNet where you’ve created the private endpoint. You can also setup network traffic to flow through the originating VNet from somewhere else, such as another VNet or a VPN from your corporate network. This assumes that the private endpoint and the DNS record are also available within that context. Check your service provider documentation for setup instructions.
For example, if your Elasticsearch ID is 6b111580caaa4a9e84b18ec7c600155e and it is located in eastus2 region you can access it under https://6b111580caaa4a9e84b18ec7c600155e.privatelink.eastus2.azure.elastic-cloud.com:9243.
$ curl -u 'username:password'  -v https://6b111580caaa4a9e84b18ec7c600155e.privatelink.eastus2.azure.elastic-cloud.com:9243
..
< HTTP/1.1 200 OK
..
Edit a Private Link connection
You can edit a rule set name or to change the VPC endpoint ID.
- From the Account menu, select Traffic filters.
- Find the rule set you want to edit.
- Select the Edit icon.
Delete a Private Link rule set
If you need to remove a rule set, you must first remove any associations with deployments.
To delete a rule set with all its rules:
- Remove any deployment associations.
- From the Account menu, select Traffic filters.
- Find the rule set you want to edit.
- Select the Remove icon. The icon is inactive if there are deployments assigned to the rule set.
Remove a Private Link rule set association from your deployment
To remove an association through the UI:
- Go to the deployment.
- On the Security page, under Traffic filters select Remove.
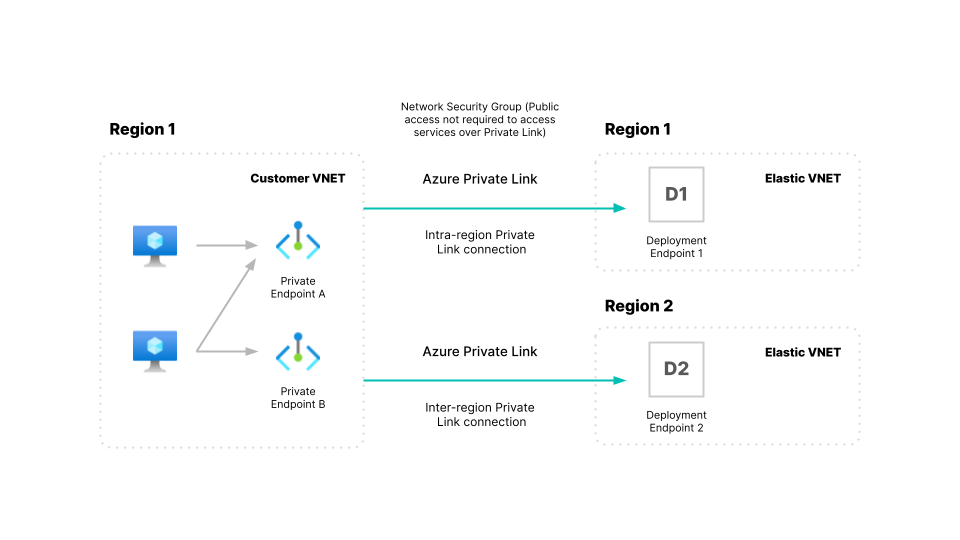
Setting up an inter-region Private Link connection
Azure supports inter-region Private Link as described in the Azure documentation. "The Private Link resource can be deployed in a different region than the virtual network and private endpoint."
This means your deployment on Elastic Cloud can be in a different region than the Private Link endpoints or the clients that consume the deployment endpoints.
Set up Private Link Endpoint in region 1 for a deployment hosted in region 2.
- Create your Private Endpoint using the service alias for region 2 in the region 1 VNET (let’s call this VNET1).
- Create a Private Hosted Zone for region 2, and associate it with VNET1 similar to the step Create a Private Link endpoint and DNS. Note that you are creating these resources in region 1, VNET1.
- Create a traffic filter rule set and Associate the rule set through the Elasticsearch Service Console, just as you would for any deployment.
No comments:
Post a Comment