Thursday 15 June 2023

AWS DynamoDB – Working with Tables

 In this article, we will work on DynamoDB tables. DynamoDB is a NoSQL database that stores document data or key-value pairs. A Dynamodb table consists of items and each item is made up of attributes. Different items can have different attributes. See the below example:

Example 1:
{
  "MovieID": 123,
  "Name": "Godfather",
  "Rating": 9.1,
  "Year": 1972
}

Example 2:
{
  "Director": "Quentin Tarantino",
  "MovieID": 200,
  "Name": "Pulp Fiction",
  "Year": 1994
}

Each table has a partition key which acts as a primary key in items. The following operations will be performed in this article:

  1. Create a Table
  2. Describe a Table
  3. Update a Table
  4. Delete a Table
  5. List tables in DynamoDB

Creation of DynamoDB Table:

Login to your amazon console and open DynamoDB. Click on Create table button. Provide table name say, geeksforgeeks, and primary key as UserID. Leave the rest of the settings as default and click on Create. See the below image:

We see that table has been created. 

Describe a Table:

To get details of the table, click on the table name. In the Overview tab of the table, go to the table details section. There you can find the details of the table. See the below image:

Table Details

Update a Table:

There are many operations that can be performed under updation. The operations are as below:

  • Modify table’s throughput provisioned settings.
  • Change table’s read or write capacity mode.
  • Manipulate global secondary indexes on the table.
  • Enable or disable DynamoDB Streams on the table

We will change the table’s read or write capacity mode. There are two modes, first, provisioned, second, on-demand. By default, for the free tier, it will be set to provisioned. In the above image, Table Details, we can see that Read/Write capacity mode is set to provisioned. To update the table, it will be changed to On-Demand. See the below image:

Update Table

We see that the Read/write capacity mode is set to On-Demand. Thus, the table got updated.

Delete a Table:

To delete a table, navigate to the tables tab, select table, and click on Delete Table. A prompt will appear, with two options:

  1. Delete all the CloudWatch alarms for this table
  2. Create a backup before deleting this table.

In this example, the first option is selected and the second is not. To confirm deletion type delete and click the Delete button.

List Tables:

To get the list of all the tables in DynamoDB, click on the tables tab in DynamoDB. It will list all the tables created in Dynamodb. See the below image:

 We see that two tables are present in DynamoDB.

DynamoDB – Introduction

 DynamoDB allows users to create databases capable of storing and retrieving any amount of data and comes in handy while serving any amount of traffic. It dynamically manages each customer’s requests and provides high performance by automatically distributing data and traffic over servers. It is a fully managed NoSQL database service that is fast, predictable in terms of performance, and seamlessly scalable. It relieves the user from the administrative burdens of operating and scaling a distributed database as the user doesn’t have to worry about hardware provisioning, patching Softwares, or cluster scaling. It also eliminates the operational burden and complexity involved in protecting sensitive data by providing encryption at REST. 

DynamoDB Vs RDBMS

The below table provides us with core differences between a conventional relational database management system and AWS DynamoDB: 

OperationsDynamoDBRDBMS
Source connectionIt uses HTTP requests and API operations.It uses a persistent connection and SQL commands.
Create TableIt mainly requires the Primary key and no schema on the creation and can have various data sources.It requires a well-defined table for its operations.
Getting Table InformationOnly Primary keys are revealed.All data inside the table is accessible.
Loading Table DataIn tables, it uses items made of attributes.It uses rows made of columns.
Reading Table DataIt uses GetItem, Query, and ScanIt uses SELECT statements and filtering statements.
Managing IndexesIt uses a secondary index to achieve the same function. It requires specifications (partition key and sort key).Standard Indexes created by SQL is used.
Modifying Table DataIt uses a UpdateItem operation.It uses an UPDATE statement.
Deleting Table DataIt uses a DeleteItem operation.It uses a DELETE statement.
Deleting TableIt uses a DeleteTable operation.It uses a DROP TABLE statement.

Advantage of DynamoDB:

The main advantages of opting for Dynamodb are listed below: 

  • It has fast and predictable performance.
  • It is highly scalable.
  • It offloads the administrative burden operation and scaling.
  • It offers encryption at REST for data protection.
  • Its scalability is highly flexible.
  • AWS Management Console can be used to monitor resource utilization and performance metrics.
  • It provides on-demand backups.
  • It enables point-in-time recovery for your Amazon DynamoDB tables. Point-in-time recovery helps protect your tables from accidental write or delete operations. With point-in-time recovery, you can restore that table to any point in time during the last 35 days.
  • It can be highly automated. 
     

Limitations of DynamoDB –

The below list provides us with the limitations of Amazon DynamoDB: 

  • It has a low read capacity unit of 4kB per second and a write capacity unit of 1KB per second.
  • All tables and global secondary indexes must have a minimum of one read and one write capacity unit.
  • Table sizes have no limits, but accounts have a 256 table limit unless you request a higher cap.
  • Only Five local and twenty global secondary (default quota) indexes per table are permitted.
  • DynamoDB does not prevent the use of reserved words as names.
  • Partition key length and value minimum length sits at 1 byte, and maximum at 2048 bytes, however, DynamoDB places no limit on values.

Difference between Relational database and NoSQL

 1. Relational Database : 

RDBMS stands for Relational Database Management Systems. It is most popular database. In it, data is store in the form of row that is in the form of tuple. It contain numbers of table and data can be easily accessed because data is store in the table. This Model was proposed by E.F. Codd. 

2. NoSQL : 
NoSQL Database stands for a non-SQL database. NoSQL database doesn’t use table to store the data like relational database. It is used for storing and fetching the data in database and generally used to store the large amount of data. It supports query language and provides better performance.

Difference between Relational database and NoSQL : 

Relational DatabaseNoSQL
It is used to handle data coming in low velocity.It is used to handle data coming in high velocity.
It gives only read scalability.It gives both read and write scalability.
It manages structured data.It manages all type of data.
Data arrives from one or few locations.Data arrives from many locations.
It supports complex transactions.It supports simple transactions.
It has single point of failure.No single point of failure.
It handles data in less volume.It handles data in high volume.
Transactions written in one location.Transactions written in many locations.
support ACID properties compliancedoesn’t support ACID properties
Its difficult to make changes in database once it is definedEnables easy and frequent changes to database
schema  is mandatory to store the dataschema design is not required
Deployed in vertical fashion.Deployed in Horizontal fashion.

Amazon Web Service – Introduction to API Gateway

 Firstly, API stands for Application Program Interface. An API Gateway is a management tool that acts as an interface between users and microservices. The Amazon API Gateway is an AWS service that allows users to create, publish, secure, maintain and monitor APIs at any scale. You can create APIs in your own client application and can also make them available to third-party developers. It is serverless. It supports HTTP, WebSocket, and REST APIs. API Gateway is a type of server that provides the service of API which is used to customize each client. 

The Netflix API Gateway is the most popular example of API Gateway. Many e‑commerce site uses an API gateway so as to provide the endpoint for retrieving the details of all products from mobile clients with only single request. So, This invokes many different services like the proper information of product, product reviews and then combines the results.

 Key Terminologies:

Following are some keywords that you need to be familiar with to get a better understanding of the article:

  • HTTP (HyperText Transfer Protocol) API is an application layer protocol that helps to communicate over the World Wide Web to get the data.
  • REST (Representational State Transfer ) API takes the HTTP standards to perform operations of GETPOSTPUTPATCH, and DELETE on the data.
  • WebSocket is a device communication protocol that provides point-to-point system communication channels over a single TCP. It enables stateful, full-duplex communication between client and server.

The API Gateway handles the following aspect of development:

  1. Traffic Management
  2. CORS support
  3. Authorization, authentication and Access Control
  4. Request routing, shaping and Management
  5. Throttling (The process of limiting the number of API requests a user can make in a certain period)
  6. API health Monitoring
  7. API version Management
  8. Load balancing
  9. Caching
  10. Static response handling
  11. Protocol translation
  12. Composition

Cost of AWS API Gateways

You pay for use only, i.e you pay for the API calls you receive and the amount of data transfer. There is an optional data caching charged at an hourly rate that varies based on the cache size you select.

Amazon also provides free tier services for up to 12 months, which includes:

  • 1 million HTTP API calls
  • 1 million REST API calls
  • 1 million messages
  • 750,000 connection minutes per month      

Take a look at the below table for standard pricing of Amazon API Gateway or visit this page:

                                              Pricing for the API Calls                                 
         APIs     No. of requests per month Price(per million)             
HTTPFirst 300 million  $1.00
 300+ million  $0.90
RESTFirst 333 million  $3.50
 Next 667 million  $2.80
 Next 19 billion  $2.38
 Over 20 billion  $1.51
WebSocketFirst 1 billion  $1.00
 Over 1 billion  $0.80


Architecture of API Gateway

The below diagram shows how the APIs built-in Amazon API Gateway provides customers with an integrated and consistent developer experience for building AWS serverless applications. It acts as a gateway for applications to access data from your backend services such as code running on Amazon Elastic Compute Cloud (Amazon EC2),  AWS Lambda, any web applications, etc.

Architecture of API Gateway


The entire architecture of AWS API Gateway consists of the below key components:

  1. Amazon API Gateway: It is used to create, publish, secure, maintain and monitor APIs.
  2. API Gateway Cache: Users can enable API caching to cache their endpoint responses,  which can reduce the number of calls made to the endpoint and also improve the latency of API requests.
  3. Amazon Cloud Watch: It is a monitoring and observability service. It collects monitoring and operational data and visualizes it using automated dashboards, which allows users to visually monitor calls to their services.

Working with Amazon API Gateway:

The Amazon API Gateway can be accessed through the following:

  1. AWS Management Console
  2. AWS SDKs, API Gateway V1, and V2 APIs
  3. AWS Command Line Interface
  4. AWS Tools for Windows PowerShell

For example,  if you want to create an HTTP API, first, you have to create a lambda function and for creating a lambda function, you have to use the lambda service of AWS, then you have to create HTTP API using API Gateways followed by testing the API.

Let us look at AWS  API Gateways on the AWS management console. Login to your AWS account. Once you are redirected to the AWS management console. Click on “Services”. Search on the search bar for API Gateways. Refer to the given image:


Advantages of Using API Gateways:

Following are the advantages of using the API Gateway:

  • It helps in efficient API development. Users can run multiple versions of the same API simultaneously with API Gateway, allowing users to quickly iterate, test, and release new versions.
  • It provides the lowest latency possible latency (time taken by data to pass one point in the network to another)  for API requests and responses.
  • Users can easily monitor performance and information using the API Gateway dashboard.
  • It is cost-saving at scale i.e user can decrease their costs as their API usage increases per region across their AWS accounts.
  • It gives flexible security control by providing access to APIs with AWS Identity, Access Management (IAM), and Amazon Cognito.
  • With API gateways, the coding efforts reduces which makes the application more efficient. Also, there is less chances of errors all at the same time.
  • The API Gateway helps to encapsulates the internal structure of many application.
  • In API Gateway, the client directly talks rather than invoking the specific service.
  • Handling multiple API’s handling is much easy with API gateway.

Disadvantages of API Gateways:-

Following are the disadvantages of using the API Gateway:

  • Not much Secure. Many a times, it is very difficult to implement  the security practices in every API call. From which leads to difficulty in tracking their performance.
  • API gateway is tough to consider as reliable.
  • It is very difficult to maintain API gateway updates regularly with the inclusion of every microservice.  So, when a single application turns into the services of millions of microservices then this becomes very hectic to handle.
  • API gateway requires the routing rules. so, there are much more possibility of failure from a single point. 
  • In API Gateway, there are all the API rules in one place. So, there is Risk of complexity.

Amazon Web Services – Introduction to Elastic Transcoder Service

 Amazon Elastic Transcoder is a cloud-based media transcoding service. It is intended to be a highly scalable, simple-to-use, and cost-effective way for developers and organizations to convert their media files from their original format into versions that can be played on devices such as smartphones, tablets, and Computers.

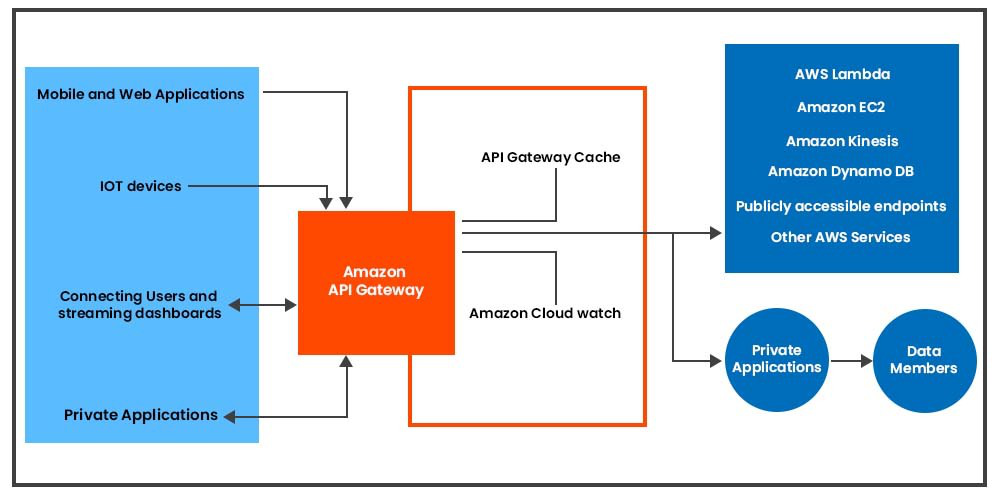
To be able to use the service you can start by login into AWS Management Console. The system’s transcoding Presets make it easier to get transcoding parameters right the first time. Aside from that, transcoding pipelines allow you to perform several transcodes at the same time. Amazon Elastic Transcoder makes use of other Amazon Web Services such as Amazon S3, Amazon EC2, Amazon DynamoDB, Amazon Simple Workflow (SWF), and Amazon Simple Notification Service to ensure scalability and stability (SNS).

Another advantage that consumers can make use of is Amazon Elastic Transcoder’s free tier. It includes up to 20 minutes per month of transcoding.  

Let’s go through the structure of the Amazon Elastic transcoder and how we may use it by following a few basic steps.

Structure of Amazon Elastic Transcoder

  1. Jobs are in charge of transcoding. Each job translates a single file into up to 30 different formats. As an example, if you wish to convert a media file into several distinct formats, you can do so by creating a single job.
  2. Pipelines are queues used to handle transcoding jobs. When you create a job, you select which pipeline the job should be added to. Elastic Transcoder begins processing jobs in a pipeline in the order in which they were added. Elastic will transcode a work into more than one format if you set it to do so.  
  3. Presets are templates that provide the majority of the settings for converting multimedia content from one format to the other. Elastic Transcoder comes with some default presets for common formats. You can also make your own presets for formats that aren’t covered by the defaults. When you create a job, you indicate which preset you wish to utilize.
  4. Notifications enable you to arrange Elastic Transcoder and Amazon Simple Notification Service to keep you updated on the status of a job, such as when Elastic Transcoder starts processing the job, or when it finishes processing, and also if it might have encountered any warnings or issues during processing.

Using Amazon Elastic Transcode Services

Starting with Amazon Elastic Transcoder, the first step, to begin with, is signing up for an AWS account, After that, set up an Amazon S3 bucket and upload a media file to be transcoded. You then create a pipeline to handle your jobs, as well as a job to convert a specific file to a particular format. You can construct a custom preset if you need to transcode to a format for which we do not have a preset.

To start with Amazon Elastic Transcoder services, follow the procedures outlined below:

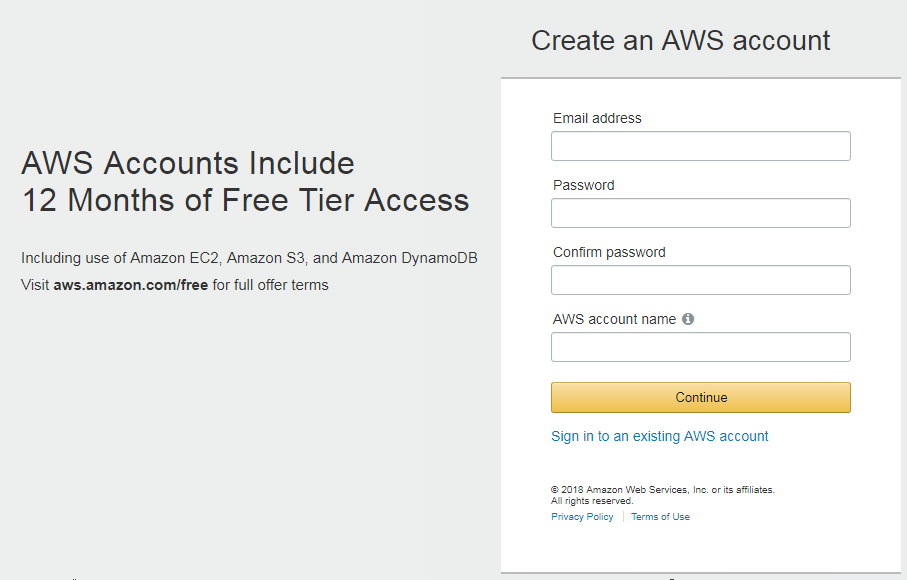
Step 1: Create an account on AWS.

To get started with Amazon Elastic Transcoder, the first thing you will need is an AWS account. When you join up, you will be required to create an account.  


Step 2: Create one or more Amazon S3 buckets and upload a media file.

  • Log in to the AWS Management Console and navigate to the Amazon S3 console.
  • In the Amazon S3 console, select the Create Bucket option.
  • In the Create Bucket dialogue box, type a name for your bucket. Give the bucket an appropriate name if you wish to create different input and output buckets.
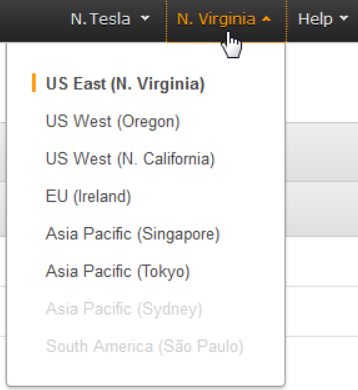
  • Choose a location for your bucket. Amazon S3 generates buckets in the US Standard region by default. It is recommended to select a region close to you to optimize latency, save expenses, or meet regulatory requirements.  
  • Select Create.
  • Repeat Steps 2–5 if you wish to create different buckets for the files you’re transcoding and the files Elastic Transcoder has finished transcoding.
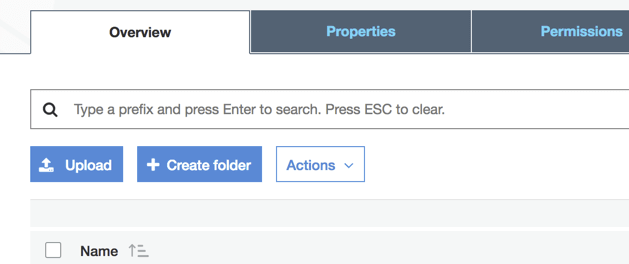
  • Click the name of your input bucket in the Buckets pane.
  • Select Actions and then Upload.
  • On the Upload – Select Files tab, click Add Files, and then select a media file to transcode.


  • Press the Start Upload button.

Step 3: Creating a Pipeline.

  • Go to this link to access the Elastic Transcoder console.
  • Select the region in which you want to create the pipeline from the Elastic Transcoder console’s navigation bar.


  • In the console’s left pane, select Pipelines.
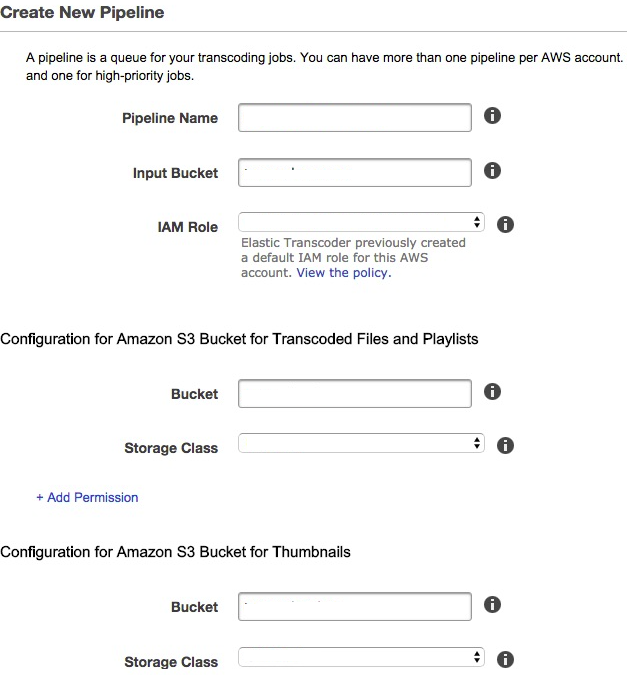
  • Click Create New Pipeline on the Pipelines page.
  • Fill in the blanks with the corresponding values.
  • Click the Create Pipeline button.


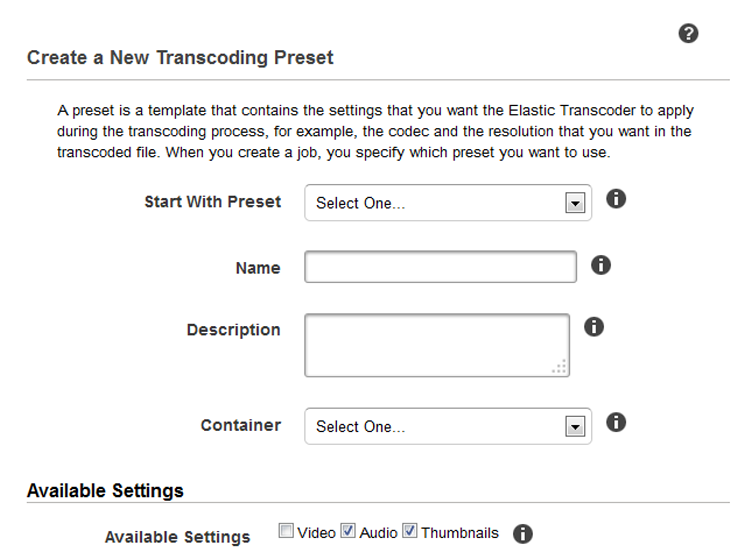
Step 4: Creating a Preset(optional). Well, this step is an optional one. A preset refers to a template that contains the settings that Elastic Transcoder should use throughout the transcoding process, such as the codec and resolution that you desire in the transcoded file. When you create a job, you choose the preset to utilize. AWS sets up system presets that can build media files that may be played on different devices, as well as targeted specific devices.  


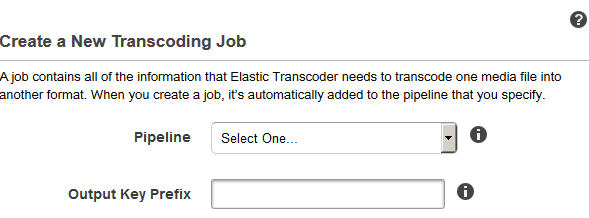
Step 5: Establish a Job

  • Go to this link to access the Elastic Transcoder console.
  • Select the region in which you want to create the pipeline from the Elastic Transcoder console’s navigation bar.
  • In the console’s left pane, select Pipelines.
  • Click Create New Job on the Pipelines page.
  • Fill in the blanks with the measured data. For further information on each field, see Settings that You Specify When Creating an Elastic Transcoder Job..
  • Select the Create Job option.


Step 6: Track the Progress of Your Job

  • While constructing a pipeline, you might configure notifications so that Elastic Transcoder sends a message to an Amazon Simple Notification Service (Amazon SNS) topic when it starts and finishes processing a task. You can track the progress of your work if you configured notifications and subscribe to the relevant Amazon SNS topic.

Well, here we have discussed in brief the Amazon Elastic Transcoder and its use in the AWS management console. And how we can use these services for our requirements by following some simple steps.

Elastic Transcoder Benefits:

  • Scalability: Elastic Transcoder is designed to scale automatically to handle large-scale media transcoding jobs.
  • Ease of use: Elastic Transcoder is easy to use, and you can create a transcoding job with just a few clicks in the AWS Management Console.
  • Cost-effective: Elastic Transcoder is a pay-as-you-go service, so you only pay for the transcoding jobs that you run.
  • Compatibility: Elastic Transcoder is designed to work with a wide range of media formats, and it can convert your files into a wide range of output formats.
  • Integration: Elastic Transcoder integrates with other AWS services like Amazon S3 and Amazon CloudFront, making it easy to get your media files to and from the transcoding service.

Elastic Transcoder has some limitations to consider. For example, it has a maximum output resolution of 1080p, so it may not be suitable for transcoding high-resolution video files. Additionally, it does not support transcoding of some specialized formats such as closed captioning or subtitles.