Linux Training in Coimbatore & Best Linux Server Administration Training Institute NUX SOFTWARE SOLUTIONS FREE DEMO CLASSES AVAILABLE Call us 096263 53489
Best MCSA Windows Server 2016Training Institute in Coimbatore
Best MCSA Windows Server 2016 courses classes deliver by Nux software solutions in coimbatore. Nux software solutions in coimbatore has excellent and advanced training programs that will give you better performance & hands on experience. Our industry’s expert trainers offer a wide range of skills and experience in their graded areas. The Training center environment is too good for professional, individual, corporate, live project training and industrial training. Labs infrastructure is advanced, well managed and you can access LAB 24X7 from anywhere. Training center has international expert trainers and they have excellent knowledge, real time industry experience. Our Training programs combine with several innovative learning methods and delivery models. We understand your requirement and it will give you 100 percent growth for your career and provide the cost effective training programs and also work with flexibility for the trainees.
Best Microsoft Technology Associate(MTA) Training Institute in Coimbatore
Best Microsoft Technology Associate(MTA) courses classes deliver by Nux software solutions in coimbatore. Nux software solutions in coimbatore has excellent and advanced training programs that will give you better performance & hands on experience. Our industry’s expert trainers offer a wide range of skills and experience in their graded areas. The Training center environment is too good for professional, individual, corporate, live project training and industrial training. Labs infrastructure is advanced, well managed and you can access LAB 24X7 from anywhere. Training center has international expert trainers and they have excellent knowledge, real time industry experience. Our Training programs combine with several innovative learning methods and delivery models. We understand your requirement and it will give you 100 percent growth for your career and provide the cost effective training programs and also work with flexibility for the trainees.
I will run this deployment on a Virtual Machine Hosted by a public cloud provider. As it is with many public cloud services, many generally maintain a public and private IP scheme for their Virtual Machines.
Testing Environment
Master Node - Public IP: 104.197.170.99 and Private IP: 10.128.15.195
Worker Node 1 - Public IP: 34.67.149.37 and Private IP: 10.128.15.196
Worker Node 2 - Public IP: 35.232.161.178 and Private IP: 10.128.15.197
Deploying NGINX on a Kubernetes Cluster
We will run this deployment from the master-node.
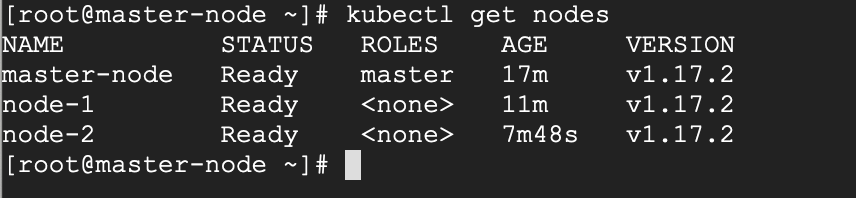
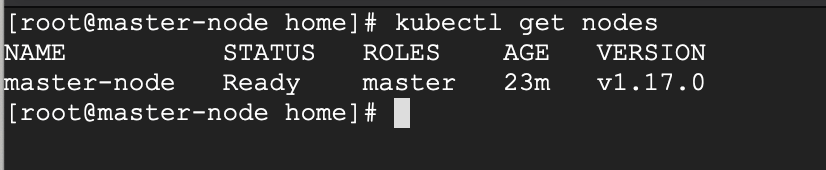
Let’s begin by checking the status of the cluster. All your nodes should be in a READY state.
# kubectl get nodes
Check Kubernetes Cluster Status
We create a deployment of NGINX using the NGINX image.
# kubectl create deployment nginx --image=nginx
Deploying Nginx on Kubernetes
You can now see the state of your deployment.
# kubectl get deployments
Check Deployment of Nginx on Kubernetes
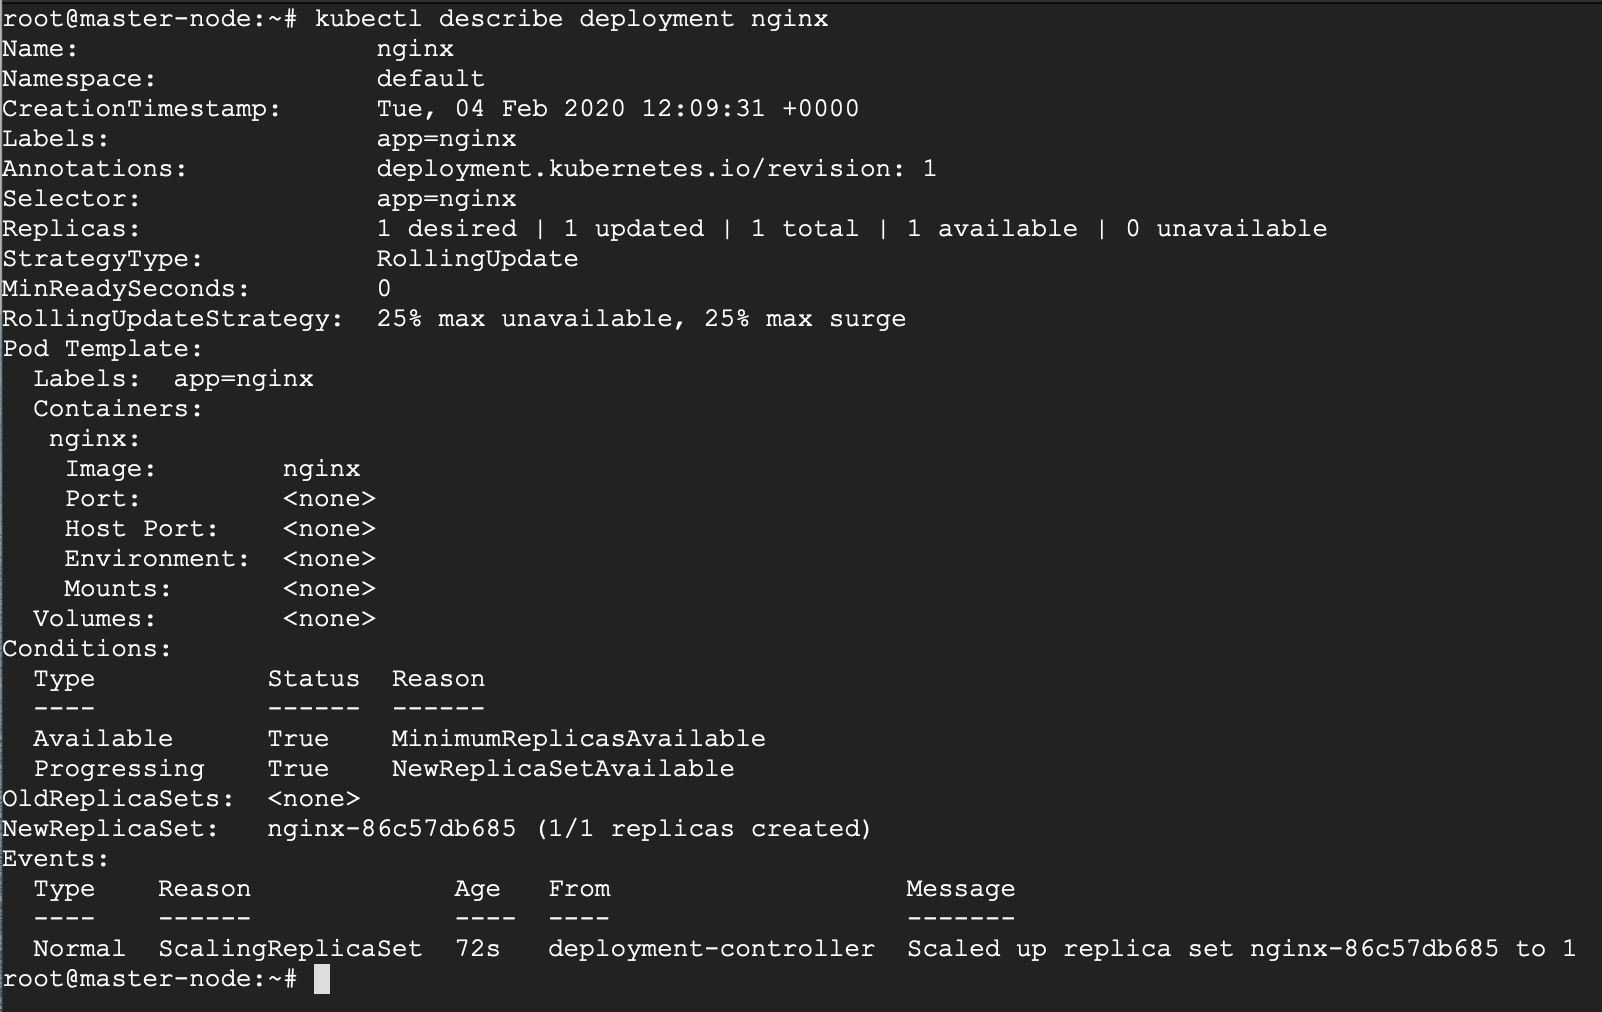
If you’d like to see more detail about your deployment, you can run the describe command. For example, it is possible to determine how many replicas of the deployment are running. In our case, we expect to see a replica of 1 running (i.e 1/1 replicas).
# kubectl describe deployment nginx
Check Nginx Deployment Details
Now your Nginx deployment is active, you may want to expose the NGINX service to a public IP reachable on the internet.
Exposing Your Nginx Service to Public Network
Kubernetes offers several options when exposing your service based on a feature called Kubernetes Service-types and they are:
ClusterIP – This Service-type generally exposes the service on an internal IP, reachable only within the cluster, and possibly only within the cluster-nodes.
NodePort – This is the most basic option of exposing your service to be accessible outside of your cluster, on a specific port (called the NodePort) on every node in the cluster. We will illustrate this option shortly.
LoadBalancer – This option leverages on external Load-Balancing services offered by various providers to allow access to your service. This is a more reliable option when thinking about high availability for your service, and has more feature beyond default access.
ExternalName – This service does traffic redirect to services outside of the cluster. As such the service is thus mapped to a DNS name that could be hosted out of your cluster. It is important to note that this does not use proxying.
The default Service-type is ClusterIP.
In our scenario, we want to use the NodePort Service-type because we have both a public and private IP address and we do not need an external load balancer for now. With this service-type, Kubernetes will assign this service on ports on the 30000+ range.
# kubectl create service nodeport nginx --tcp=80:80
Create NodePort Service to Expose Nginx
Run the get svc command to see a summary of the service and the ports exposed.
# kubectl get svc
Check Nginx Service and Port
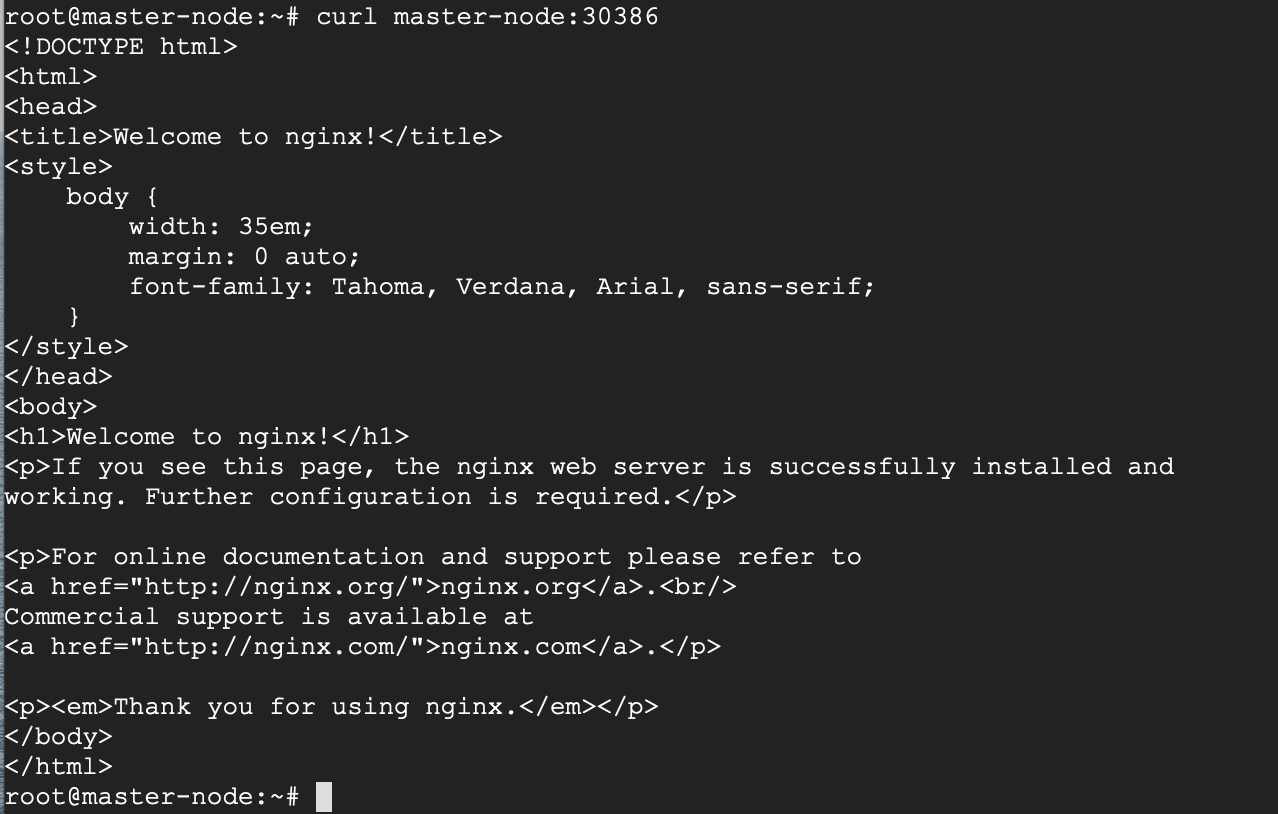
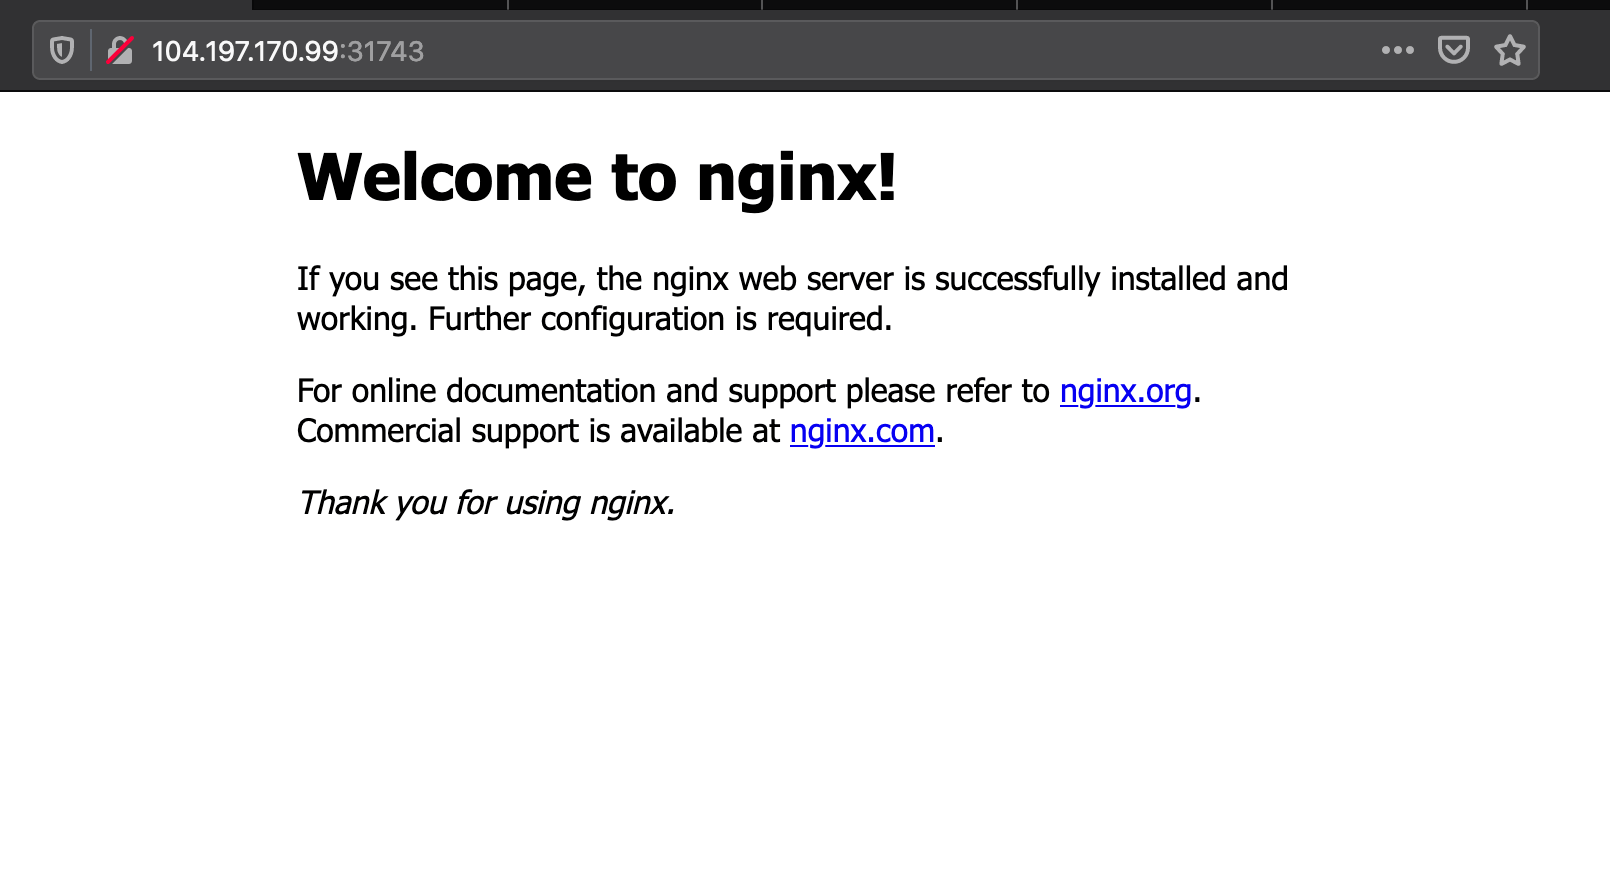
Now you can verify that the Nginx page is reachable on all nodes using the curl command.
As you can see, the “WELCOME TO NGINX!” page can be reached.
Reaching Ephemeral PUBLIC IP Addresses
As you may have noticed, Kubernetes reports that I have no active Public IP registered, or rather no EXTERNAL-IP registered.
# kubectl get svc
Check Nginx Service and Port
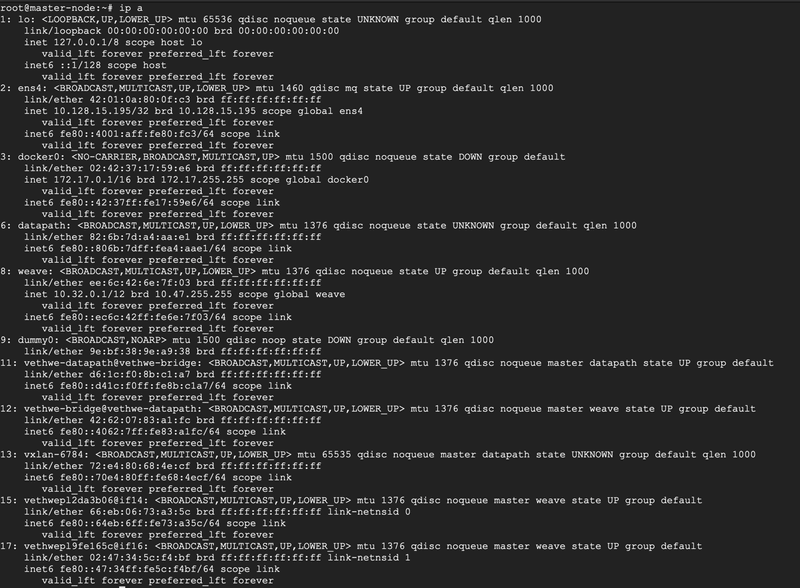
Let’s verify if it is indeed true, that I have no EXTERNAL IP attached to my interfaces using IP command.
# ip a
Check IP Addresses
No public IP as you can see.
As mentioned earlier, I am currently running this deployment on a Virtual Machine offered by a public cloud provider. So, while there’s no particular interface assigned a public IP, the VM provider has issued an Ephemeral external IP address.
An ephemeral external IP address is a temporary IP address that remains attached to the VM until the virtual instance is stopped. When the virtual instance is restarted, a new external IP is assigned. Basically put, it’s a simple way for service providers to leverage on idle public IPs.
The challenge here, other than the fact that your public IP is not static, is that the Ephemeral Public IP is simply an extension (or proxy) of the Private IP, and for that reason, the service will only be accessed on port 30386. That means that the service will be accessed on the URL <PublicIP:InternalPort>, that is 104.197.170.99:30386, which if you check your browser, you should be able to see the welcome page.
Check Nginx Page Deployed on Kubernetes
With that, we have successfully deployed NGINX on our 3-node Kubernetes cluster.
The process of installing a Kubernetes Cluster on CentOS 8 is almost similar to that of CentOS 7 (which you can go through here), but the process here has a few changes. These changes, mostly revolve around the installation of Docker.
Starting from CentOS 8 (and by extension RHEL 8), docker has now natively been replaced by podman and buildah which are tools from Redhat. As a matter of fact, the docker package has now been removed from the default package repository.
With this move, the Redhat team aims to simplify the process of creating and using containers, without needing special permissions, while at the same time, maintaining compatibility with docker images and operating them without needing a daemon. Podman promises to offer more flexibility when running on Kubernetes environments, but the jury remains out there.
For this article, we will run through the process of installing Kubernetes on a CentOS 8 platform, running on Docker-CE (Community Edition). In a later article, we will also run through a similar installation, using podman for our containers.
It is recommended that your nodes should have at least 2 CPUs with 2GB RAM or more per machine. This is not a strict requirement but is largely driven by the needs of the application you intend to run.
Internet connectivity on all your nodes. We will be fetching Kubernetes and docker packages from the repository. Equally, you will need to make sure that the DNF package manager is installed by default and can fetch packages remotely.
All your nodes should also be able to connect to one another, either on a private or public network, whichever is available.
You will also need access to an account with sudo or root privileges. In this tutorial, I will be using my root account.
Precaution
Most nodes generally come with unique MAC addresses, however, in some unique cases, some Virtual Machines may have identical MAC addresses. It is therefore recommended that you confirm that the Product_UUID and the MAC address are not identical in any of the nodes.
Kubernetes uses these values to uniquely identify the nodes in the cluster. If these values are not unique to each node, the installation process may fail.
To check the MAC address of the network interface and compare it.
# ip link
To check the product_uuid and compare, run the following command.
# cat /sys/class/dmi/id/product_uuid
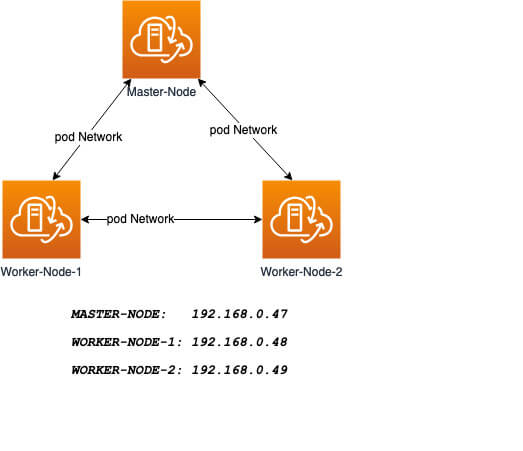
Logical Architecture
Our installation is designed to have the Master-Node controlling the Worker Nodes. At the end of this installation, our logical architecture will look something like this.
Master Node – This machine generally acts as the control plane and runs the cluster database and the API server (which the kubectl CLI communicates with).
Our 3-node Kubernetes Cluster will look something like this:
Kubernetes Cluster Diagram
Installation of Kubernetes Cluster on Master-Node
For Kubernetes to work, you will need a containerization engine. As mentioned, we will be using Docker-CE.
The following institutions will be performed on CentOS 8 Master-Node.
Step 1: Prepare Hostname, Firewall, and SELinux
On your CentOS 8 Master-Node, set the system hostname and update DNS in your /etc/hosts file.
Next, ping your worker-node-1 and worker-node-2 to check if your updated host file is working correctly using the ping command.
# ping 192.168.0.48
# ping 192.168.0.49
Next, disable Selinux, as this is required to allow containers to access the host filesystem, which is needed by pod networks and other services.
# setenforce 0
Setting setenforce to 0 effectively sets SELinux to permissive, which effectively disables SELinux until the next reboot. To completely disable it, use the below command and reboot.
# sed -i --follow-symlinks 's/SELINUX=enforcing/SELINUX=disabled/g' /etc/sysconfig/selinux
# reboot
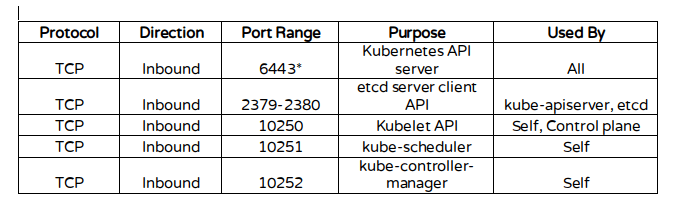
Kubernetes makes use of various ports for communication and access and these ports need to be accessible to Kubernetes and not limited by the firewall.
Also install containerd.io package which is available as a daemon that manages the complete container lifecycle of its host system, from image transfer and storage to container execution and supervision to low-level storage to network attachments and beyond.
Kubeadm helps you bootstrap a minimum viable Kubernetes cluster that conforms to best practices. With kubeadm, your cluster should pass the Kubernetes Conformance tests.
Kubeadm also supports other cluster lifecycle functions, such as upgrades, downgrade, and managing bootstrap tokens. Kubeadm is also integration-friendly with other orchestration tools like Ansible and Terraform.
With the package repo now ready, you can go ahead and install kubeadm package.
# dnf install kubeadm -y
When the installation completes successfully, enable and start the service.
Step 4: Create a control-plane Master with kubeadm
The Kubernetes master which acts as the control plane for the cluster runs a few critical services necessary for the cluster. As such, the initialization process will do a series of prechecks to ensure that the machine is ready to run Kubernetes. These prechecks expose warnings and exit on errors. kubeadm init then downloads and installs the cluster control plane components.
Now it’s time to initialize Kubernetes master, but before that, you must disable swap in order to run “kubeadm init“ command.
# swapoff -a
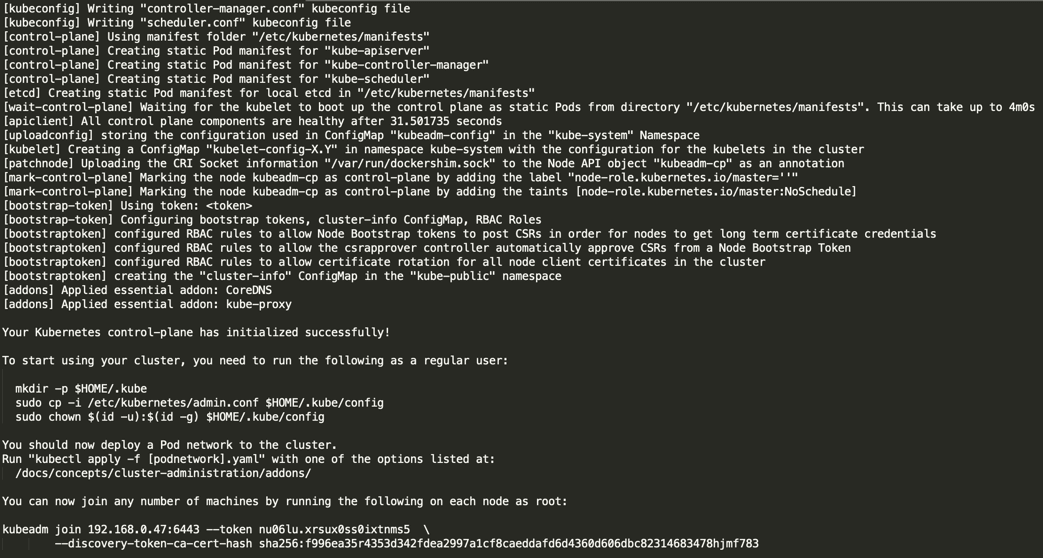
Initializing Kubernetes master is a completely automated process that is controlled by the “kubeadm init“ command as shown.
# kubeadm init
Initialize Kubernetes Master
Next, copy the following command and store it somewhere, as we required to run this command on the worker nodes later.
Tip: Sometimes the above command might throw errors about the arguments passed, so to avoid errors, you need to remove the ‘\’ character and your final command will look like this.
Once Kubernetes initialized successfully, you must enable your user to start using the cluster. In our scenario, we will be using the root user. You can also start the cluster using sudo user as shown.
Now confirm that the kubectl command is activated.
# kubectl get nodes
Check Status of Nodes
At this moment, you will see the status of the master-node is ‘NotReady’. This is because we are yet to deploy the pod network to the cluster.
The pod Network is the overlay network for the cluster, that is deployed on top of the present node network. It is designed to allow connectivity across the pod.
Step 5: Setup Your Pod Network
Deploying the network cluster is a highly flexible process depending on your needs and there are many options available. Since we want to keep our installation as simple as possible, we will use Weavenet plugin which does not require any configuration or extra code and it provides one IP address per pod which is great for us. If you want to see more options, please check here.
These commands will be important to get the pod network setup.
Step 4: Join the Worker Node to the Kubernetes Cluster
We now require the token that kubeadm init generated, to join the cluster. You can copy and paste it to your node-1 and node-2 if you had copied it somewhere.
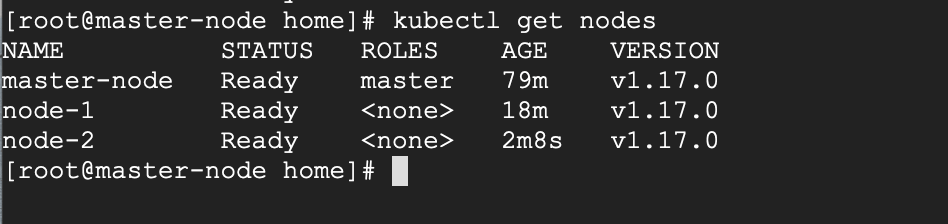
As suggested on the last line, go back to your master-node and verify if worker node-1 and worker node-2 have joined the cluster using the following command.
# kubectl get nodes
Check All Nodes Status in Kubernetes Cluster
If all the steps run successfully, then, you should see node-1 and node-2 in ready status on the master-node. At this point, you have now successfully deployed a Kubernetes cluster on CentOS 8.