Tuesday, 13 August 2024

Virtual Edition Without AWS Marketplace Access


Virtual Edition Without AWS Marketplace Access 

If you are in a region that does not have a marketplace, you can download a F5 BIG-IP Virtual Edition (VE) image and use it to create an AWS machine image (AMI) of BIG-IP VE. You can do the following manual process or to help automate the image creation process, use the F5 BIG-IP Image Generator tool to create BIG-IP images for AWS cloud using a Docker container.

Create a staging Linux instance, copy a tar file to the default volume, and unzip the files to the secondary volume. Then you will attach that volume to a second Linux instance, where it will be used as the boot volume. You create an AMI from this second instance.
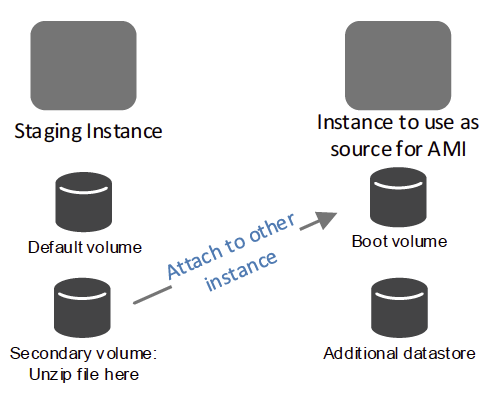
../_images/aws-download.png

This process includes the following steps:

Step 1: Create a Linux instance and copy the tar file to the default volume

  1. Download the AWS BIG-IP VE tar file, which can be as many as 5 GB compressed. The tar file includes the version number as part of the name, for example: AWS-F5_Networks-BIGIP-VERSION-Best-size_126GB.tar.gz

  2. Log in to the AWS Management Console and launch a new Linux instance (for example, the Amazon Linux AMI https://aws.amazon.com/amazon-linux-ami):

    • The instance’s storage must have enough free space to contain the downloaded BIG-IP image. An i3.xlarge or larger is recommended.
    • To get the best performance, during configuration, choose Size: 32 GiB, Volume Type: Provisioned IOPS SSD (1), and IOPS: 1600.
  3. In SSH, modify the connection to prevent timeouts. Some of the following steps are run in SSH sessions and will need a long time to complete.
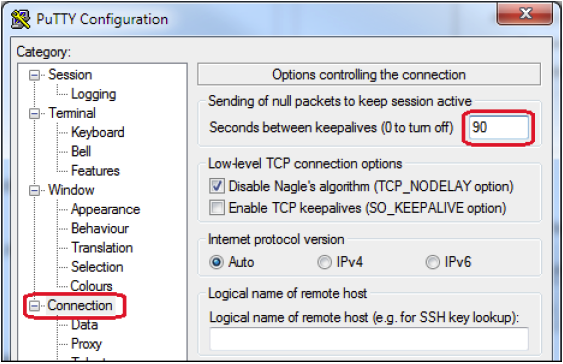
    ../_images/aws-download2.png
  4. Use SSH to connect to the Linux instance. If you are using the Amazon Linux AMI, the username is ec2-user.

  5. Use the ssh secure copy (SCP) command to copy the tar file to the default volume. For example: scp -i <path_to_instance_ssh_key> <path_to_bigip_tar_file> ec2-user@staging_instance_ip:/tmp.

    Note: You may want to use the GNU Screen utility so you can resume your SSH connection if it disconnects.

  6. When the command finishes, in the AWS Console, stop the instance.

    Important! Do NOT stop the instance from SSH. STOP the instance from the AWS Management Console.

Step 2: Create an empty volume, attach it to the Linux instance

  1. In the AWS Console, create a volume that is large enough to store the content. Note the following:

    • The better performance the storage has (provisioned IOPs, for example), the quicker the image deployment process. Consider using Volume Type: Provisioned IOPS SSD (1) and setting the IOPS value as high as possible.
    • Sizes are gibibytes (GiB), not gigabytes (GB). You may need to convert these units to size your storage properly. For example:
    VersionSKUBoot Size (GiB)
    13.1.0.2GOOD39
    13.1.0.2BETTER & BEST129
    12.1.2GOOD42
    12.1.2BETTER & BEST142
    12.1.1GOOD37
    12.1.1BETTER & BEST126
    12.1.0GOOD37
    12.1.0BETTER & BEST139
    12.0.0GOOD37
    12.0.0BETTER & BEST139
    11.6.0GOOD35
    11.6.0BETTER & BEST125
  2. Attach the empty volume to the Linux instance as /dev/xvdc.
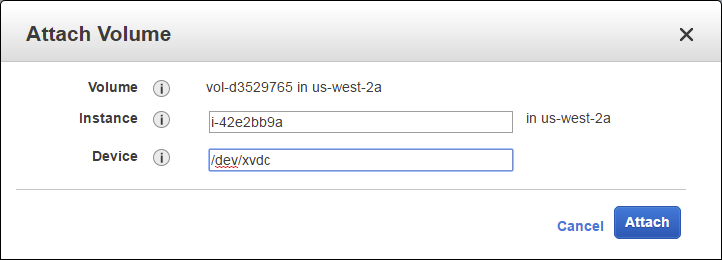
    ../_images/aws-download3.png
  3. Start the instance.

  4. Use SSH to connect and run this bash command to copy the files to the new volume:

    • If you have the pv utility installed: tar -zxOf AWS-Big-IP-ami-af8945c2.tar.gz | pv -bt | sudo dd bs=1M of=/dev/xvdc
    • If you do not have the pv utility installed: tar -zxOf AWS-Big-IP-ami-af8945c2.tar.gz | sudo dd bs=1M of=/dev/xvdc

    Note: This process can take several minutes.

  5. When the command finishes, in the AWS Console, stop the instance using the AWS Management Console.

    Important! Do NOT stop the instance from SSH. STOP the instance from the AWS Management Console.

  6. Detach the volume and terminate the instance.

    Important! Terminate the instance to avoid unexpected costs.

Step 3: Create a Linux instance and attach the volume

  1. In AWS, launch a new Linux instance (HVM) with at least 4 vCPUs and 8 GiB of RAM.

  2. When the instance is ready, stop the instance.

  3. Detach the root volume from the instance. This removes the OS boot volume; the instance should have no volumes available. To verify, click the Storage tab:
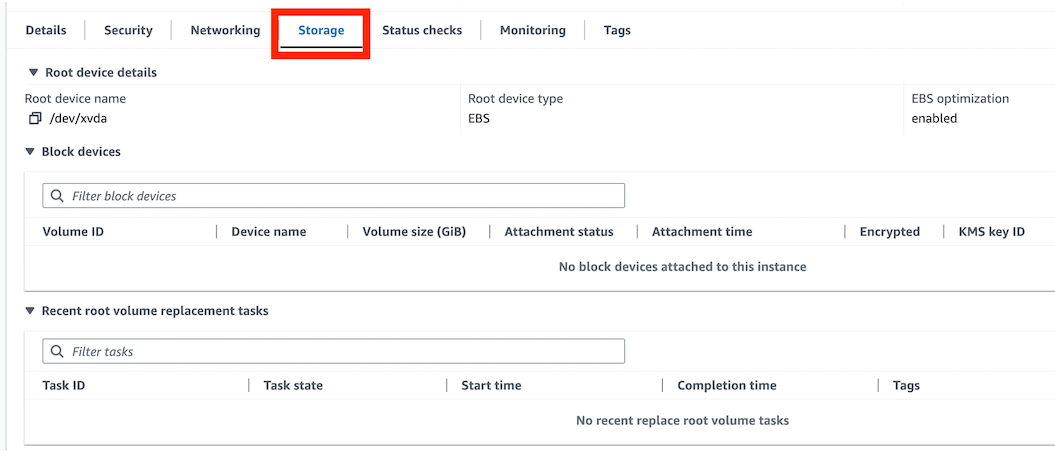
    ../_images/aws-download4.png
  4. Attach the secondary volume of the staging instances as /dev/xvda to the new linux instance.
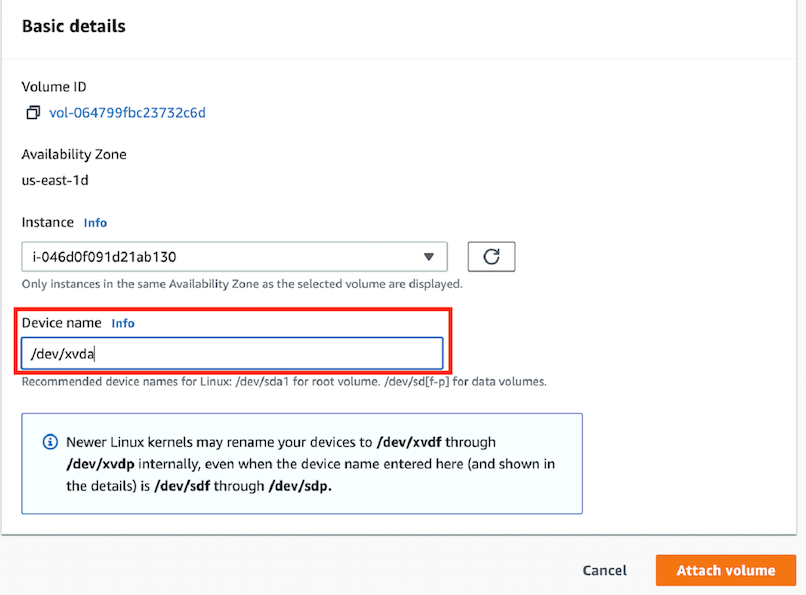
    ../_images/aws-download5.png

Step 4: Create a secondary volume as an additional datastore

  1. For BETTER and BEST, create a 20 GiB secondary volume for the BIG-IP VE instance.

  2. Attach the volume to the BIG-IP VE instance as /dev/xvdb.

    Important! DO NOT START THE INSTANCE.

Step 5: Create the Amazon Machine Image (AMI) and deploy

  1. In the AWS Console, create an image. (Under the Instances section, right-click the instance and choose Image -> Create Image.)

  2. Change the Volume Type to General Purpose SSD (GP2) for ALL volumes. This will set the default volume type to GP2 for future instances launched from the AMI.

    This process can take 2-3 hours to complete.

  3. To avoid unexpected costs, terminate the instance and delete all previously-created volumes, including the volume created for step 2.

  4. You can now deploy instances from the image. To log in to BIG-IP VE:

    • For versions 11.6.0 and later, use admin.
    • For earlier versions, use root.

Database Lab tutorial for Amazon RDS


Database Lab tutorial for Amazon RDS


Database Lab Engine (DLE) is used to boost software development and testing processes by enabling ultra-fast provisioning of databases of any size. In this tutorial, we will install Database Lab Engine from the AWS Marketplace. If you are an AWS user, this is the fastest way to have powerful database branching for any database, including RDS and RDS Aurora. But not only RDS: any Postgres and Postgres-compatible database can be a source for DLE.

Compared to traditional RDS clones, Database Lab clones are instant. RDS cloning takes several minutes, and, depending on the database size, additional dozens of minutes or even hours may be needed to "warm up" the database (see "Lazy load"). Obtaining a new DLE clone takes as low as a few seconds, and it does not increase storage and instance bill at all.

A single DLE instance can be used by dozens of engineers or CI/CD pipelines – all of them can work with dozens of thin clones located on a single instance and single storage volume. RDS Aurora clones are also "thin" by nature, which could be great for development and testing. However, each Aurora clone requires a provisioned instance, increasing the "compute" part of the bill; IO-related charges can be significant as well. This makes Aurora clones less attractive for the use in non-production environments. The use of DLE clones doesn't affect the bill anyhow – both "compute" and "storage" costs remain constant regardles of the number clones provisioned at any time.

Typical "pilot" setup

Timeline:

  • Create and configure DLE instance - ~10 minutes
  • Wait for the initial data provisioning (full refresh) - ~30 minutes (for a 100 GiB database; DLE is running on a very small EC2 instance, r5.xlarge)
  • Try out cloning - ~20 minutes
  • Show the DLE off to your colleagues - one more hour

Outcome:

  • Total time spent: 2 hours
  • Total money spent (r5.xlarge, 200 GiB disk space for EBS volume + DLE Standard subscription): less than $2
  • The maximum number of clones running in parallel with default configuration (shared_buffers = 1GB for each clone): ~30 clones
  • Monthly budget to keep this DLE instance: $360 per month – same as for a single traditional RDS clone

Prerequisites

  • AWS cloud account
  • SSH client (available by default on Linux and MacOS; Windows users: consider using PuTTY)
  • A key pair already generated for the AWS region that we are going to use during the installation; if you need to generate a new key pair, read the AWS docs: "Create key pairs".

Steps

  1. Install DLE from the AWS Marketplace
  2. Configure and launch the Database Lab Engine
  3. Start using DLE UI, API and client CLI to clone Postgres database in seconds

Step 1. Install DLE from the AWS Marketplace

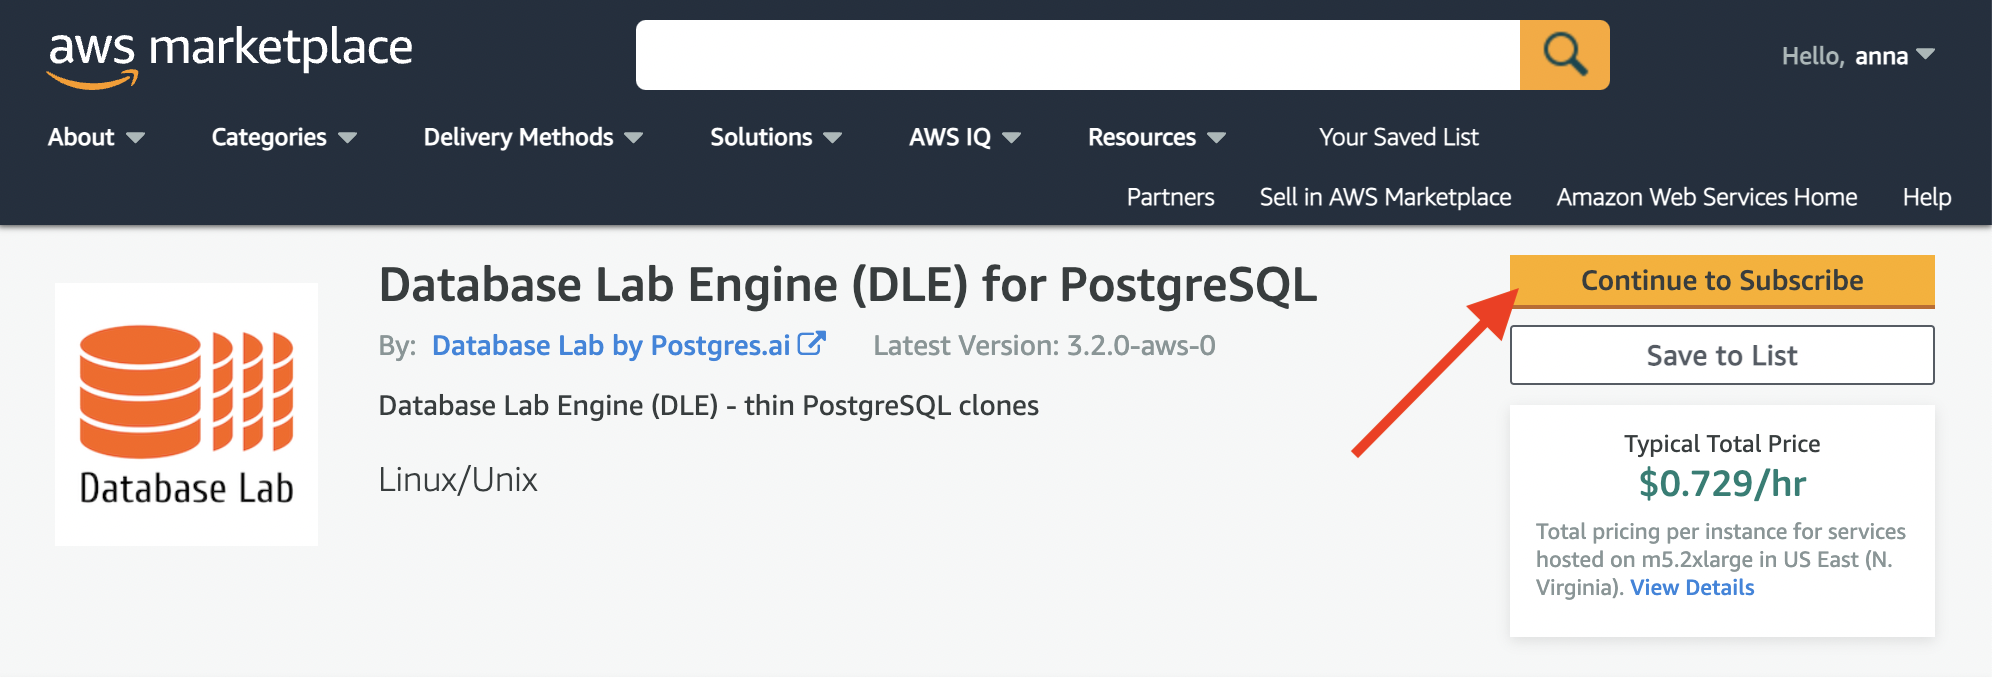
First steps to install DLE from the AWS Marketplace are trivial:

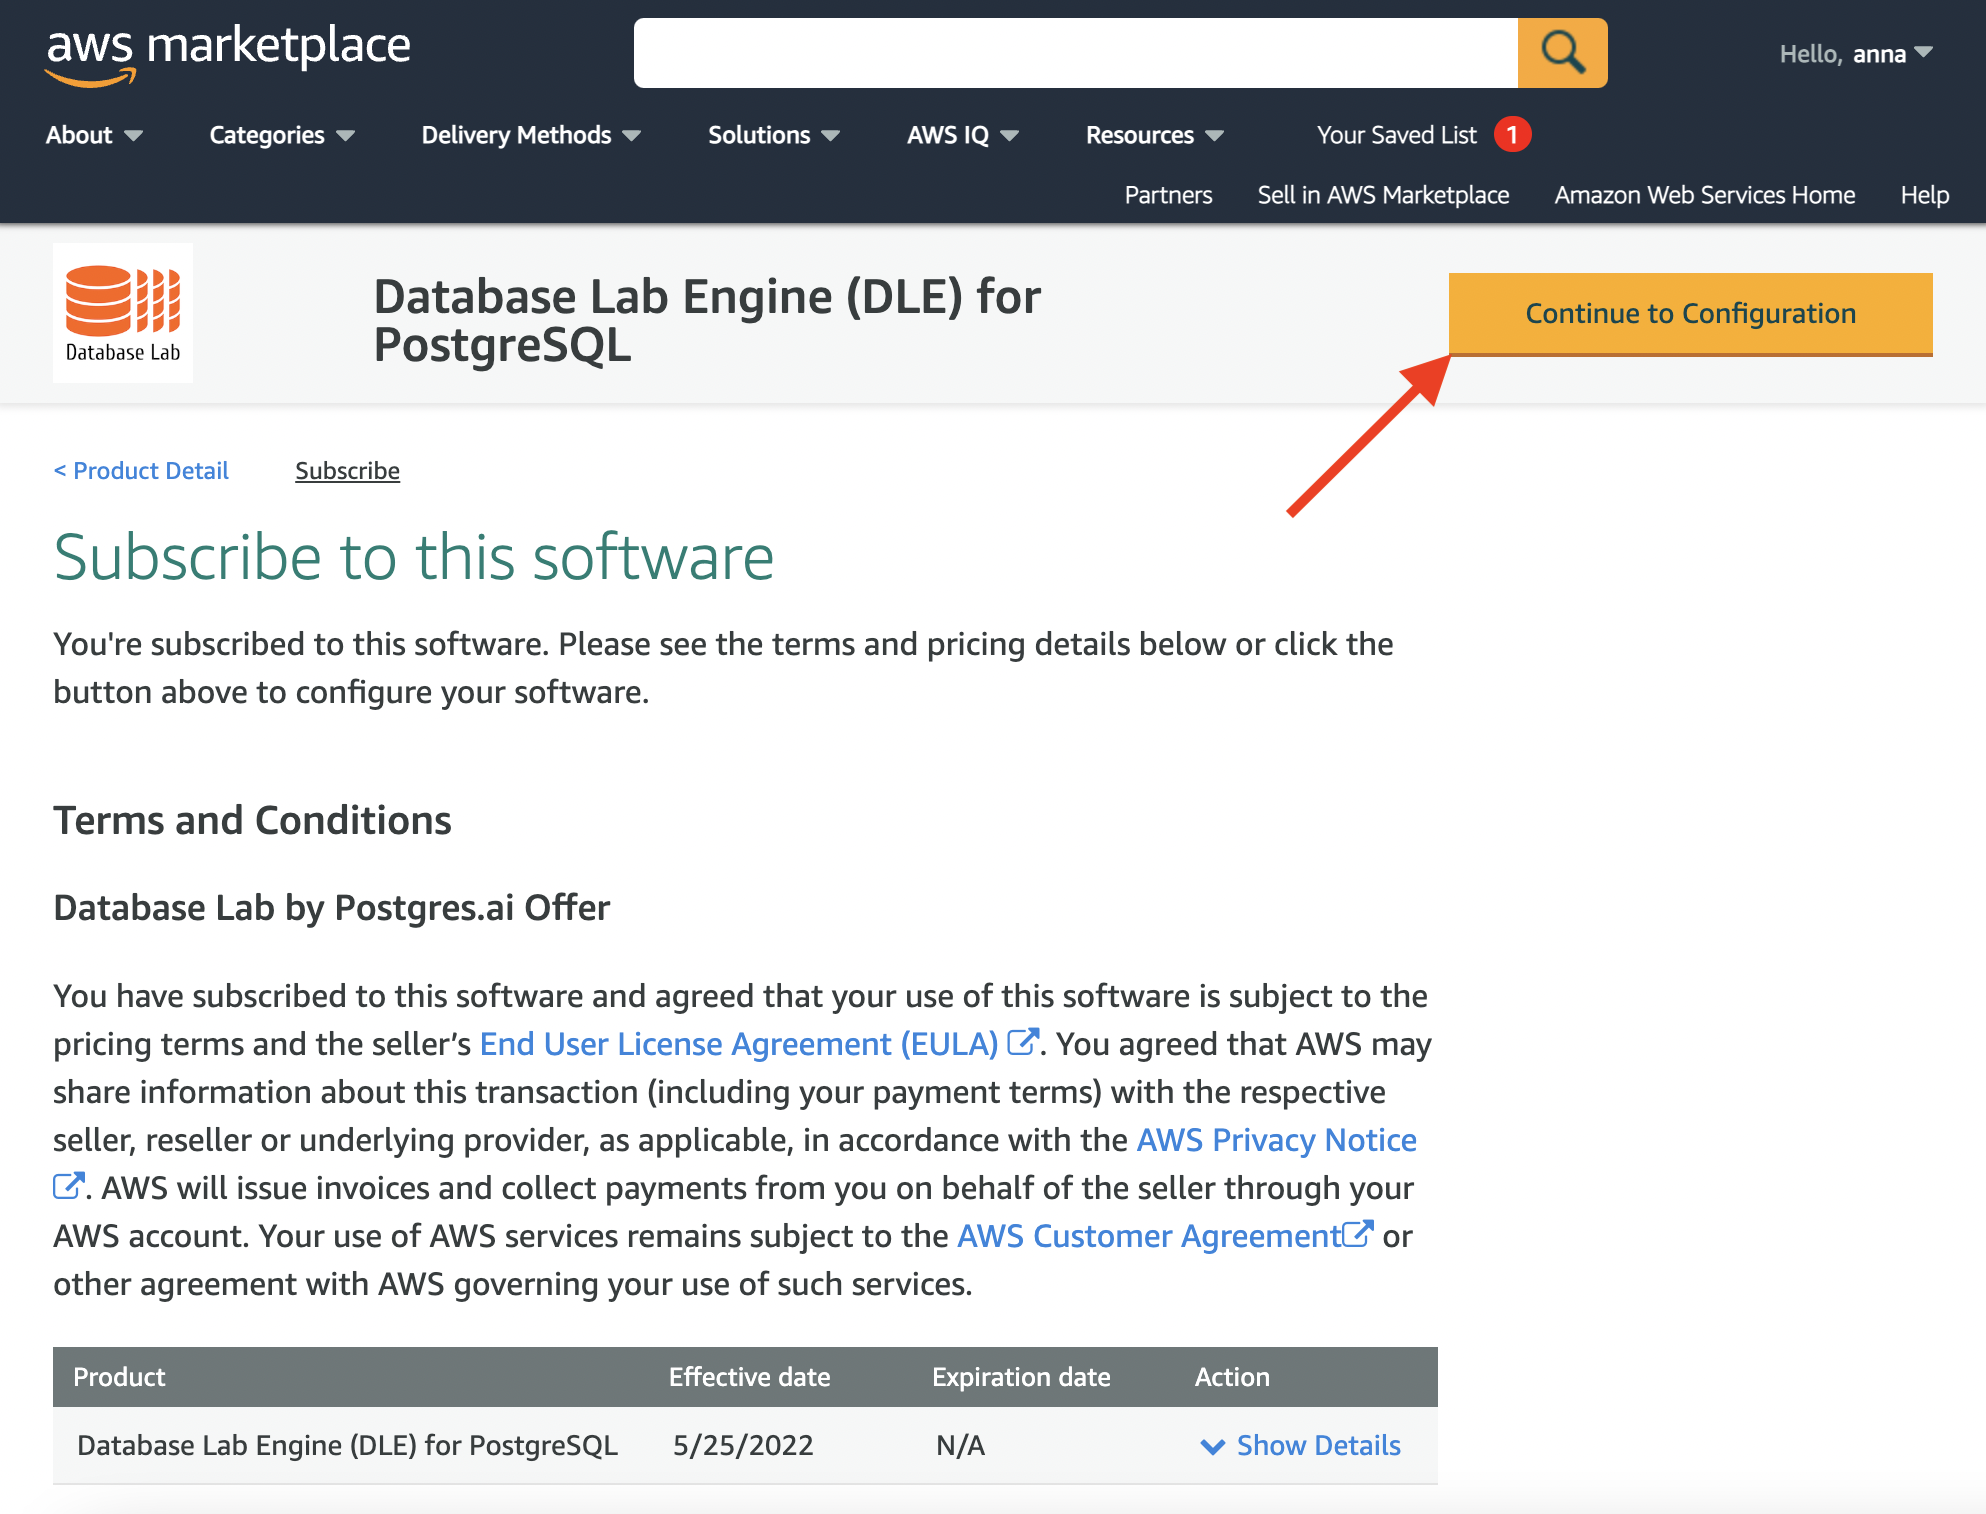
And then press the "Continue..." buttons a couple of times:

Database Lab Engine in AWS Marketplace: step 1
Database Lab Engine in AWS Marketplace: step 2

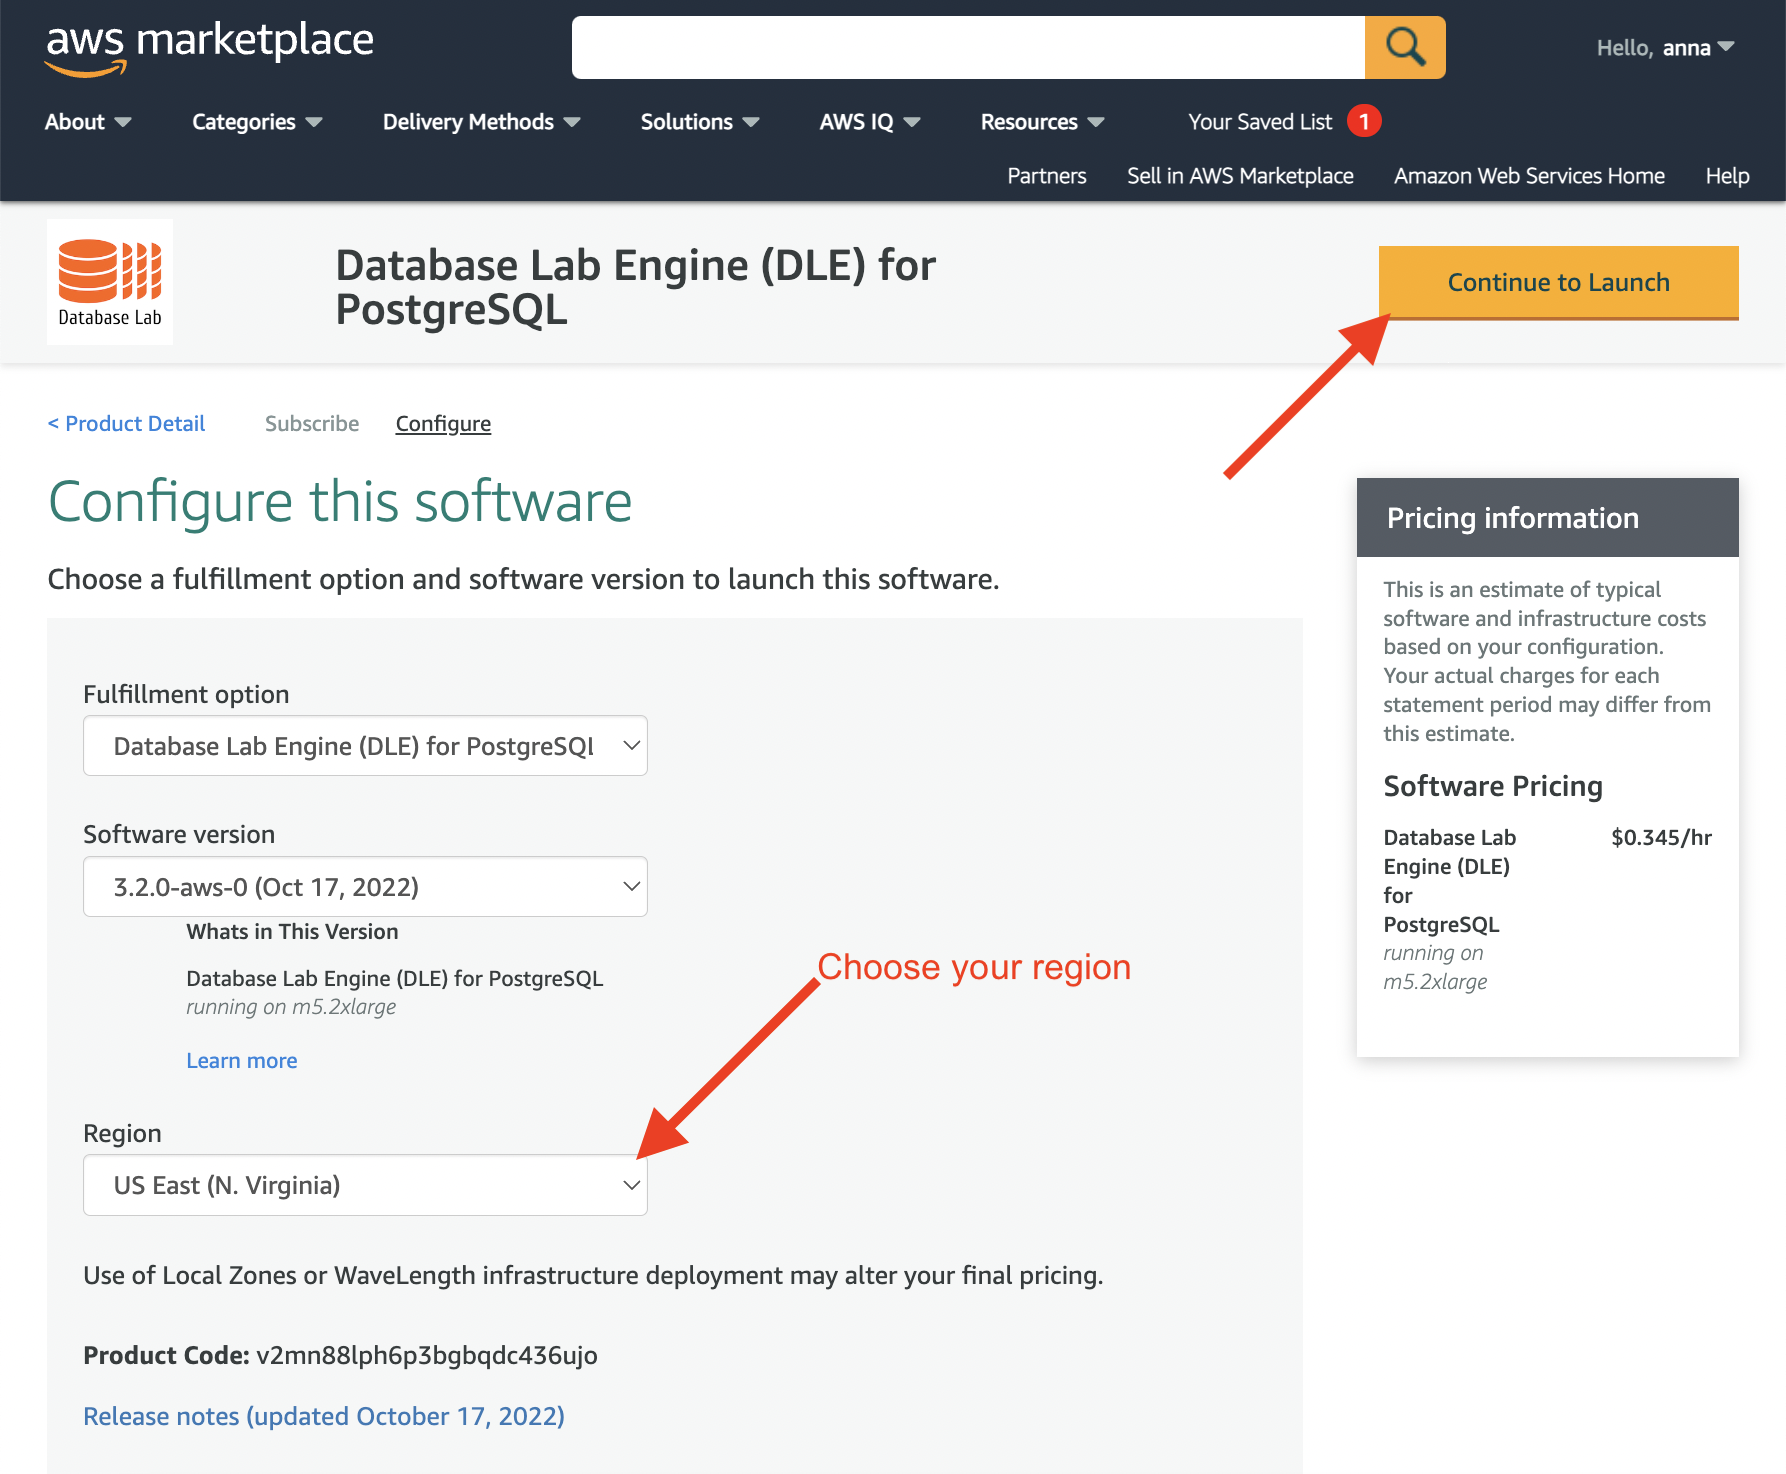
Now check that the DLE version (the latest should be the best) and the AWS region are both chosen correctly, and press "Continue to Launch":

Database Lab Engine in AWS Marketplace: step 3

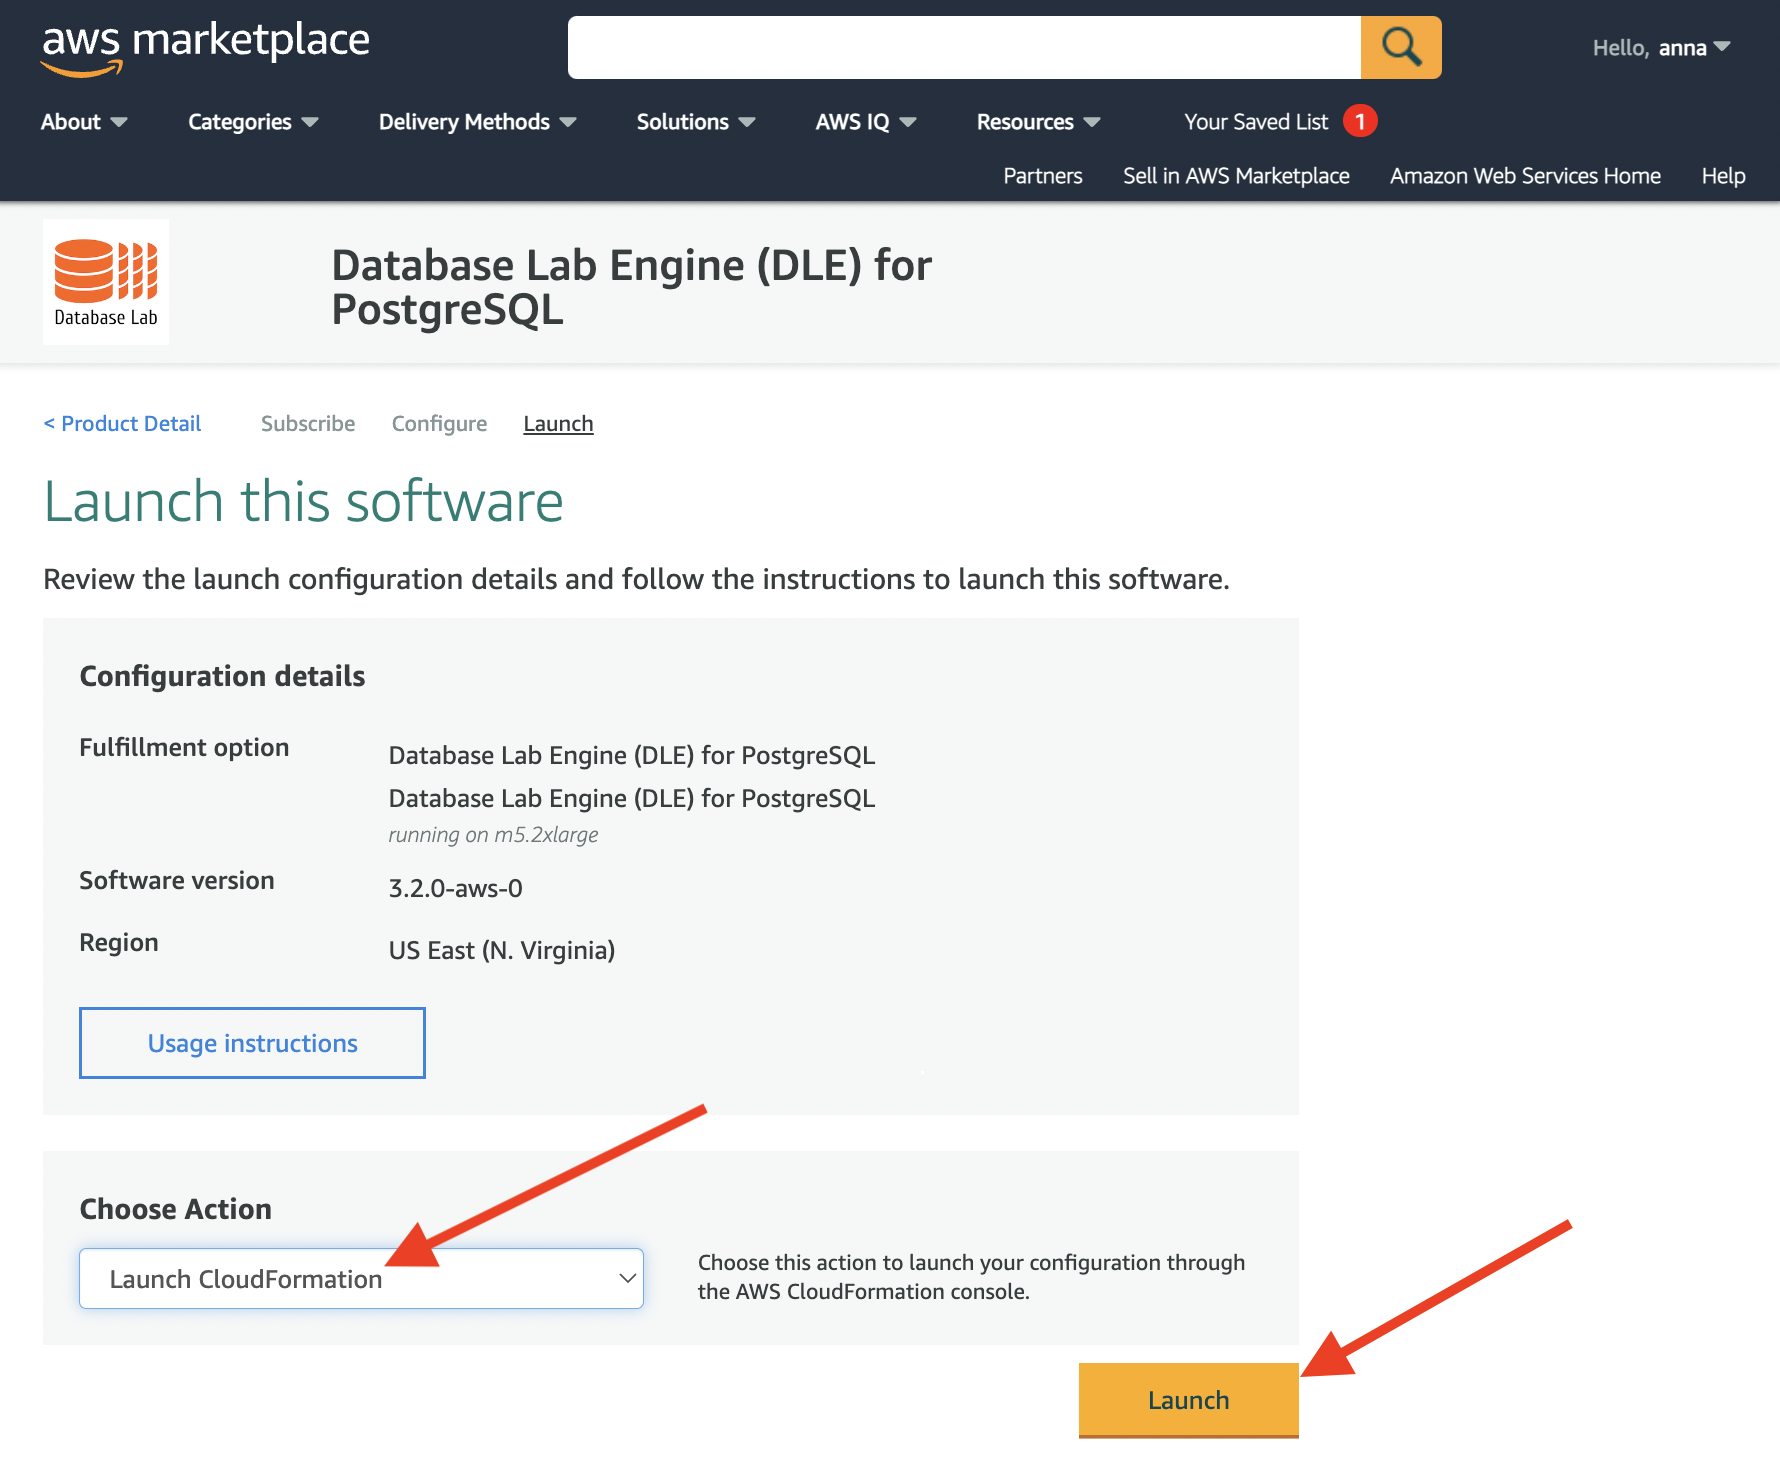
On this page, you need to choose "Launch CloudFormation" and press "Launch":

Database Lab Engine in AWS Marketplace: step 4

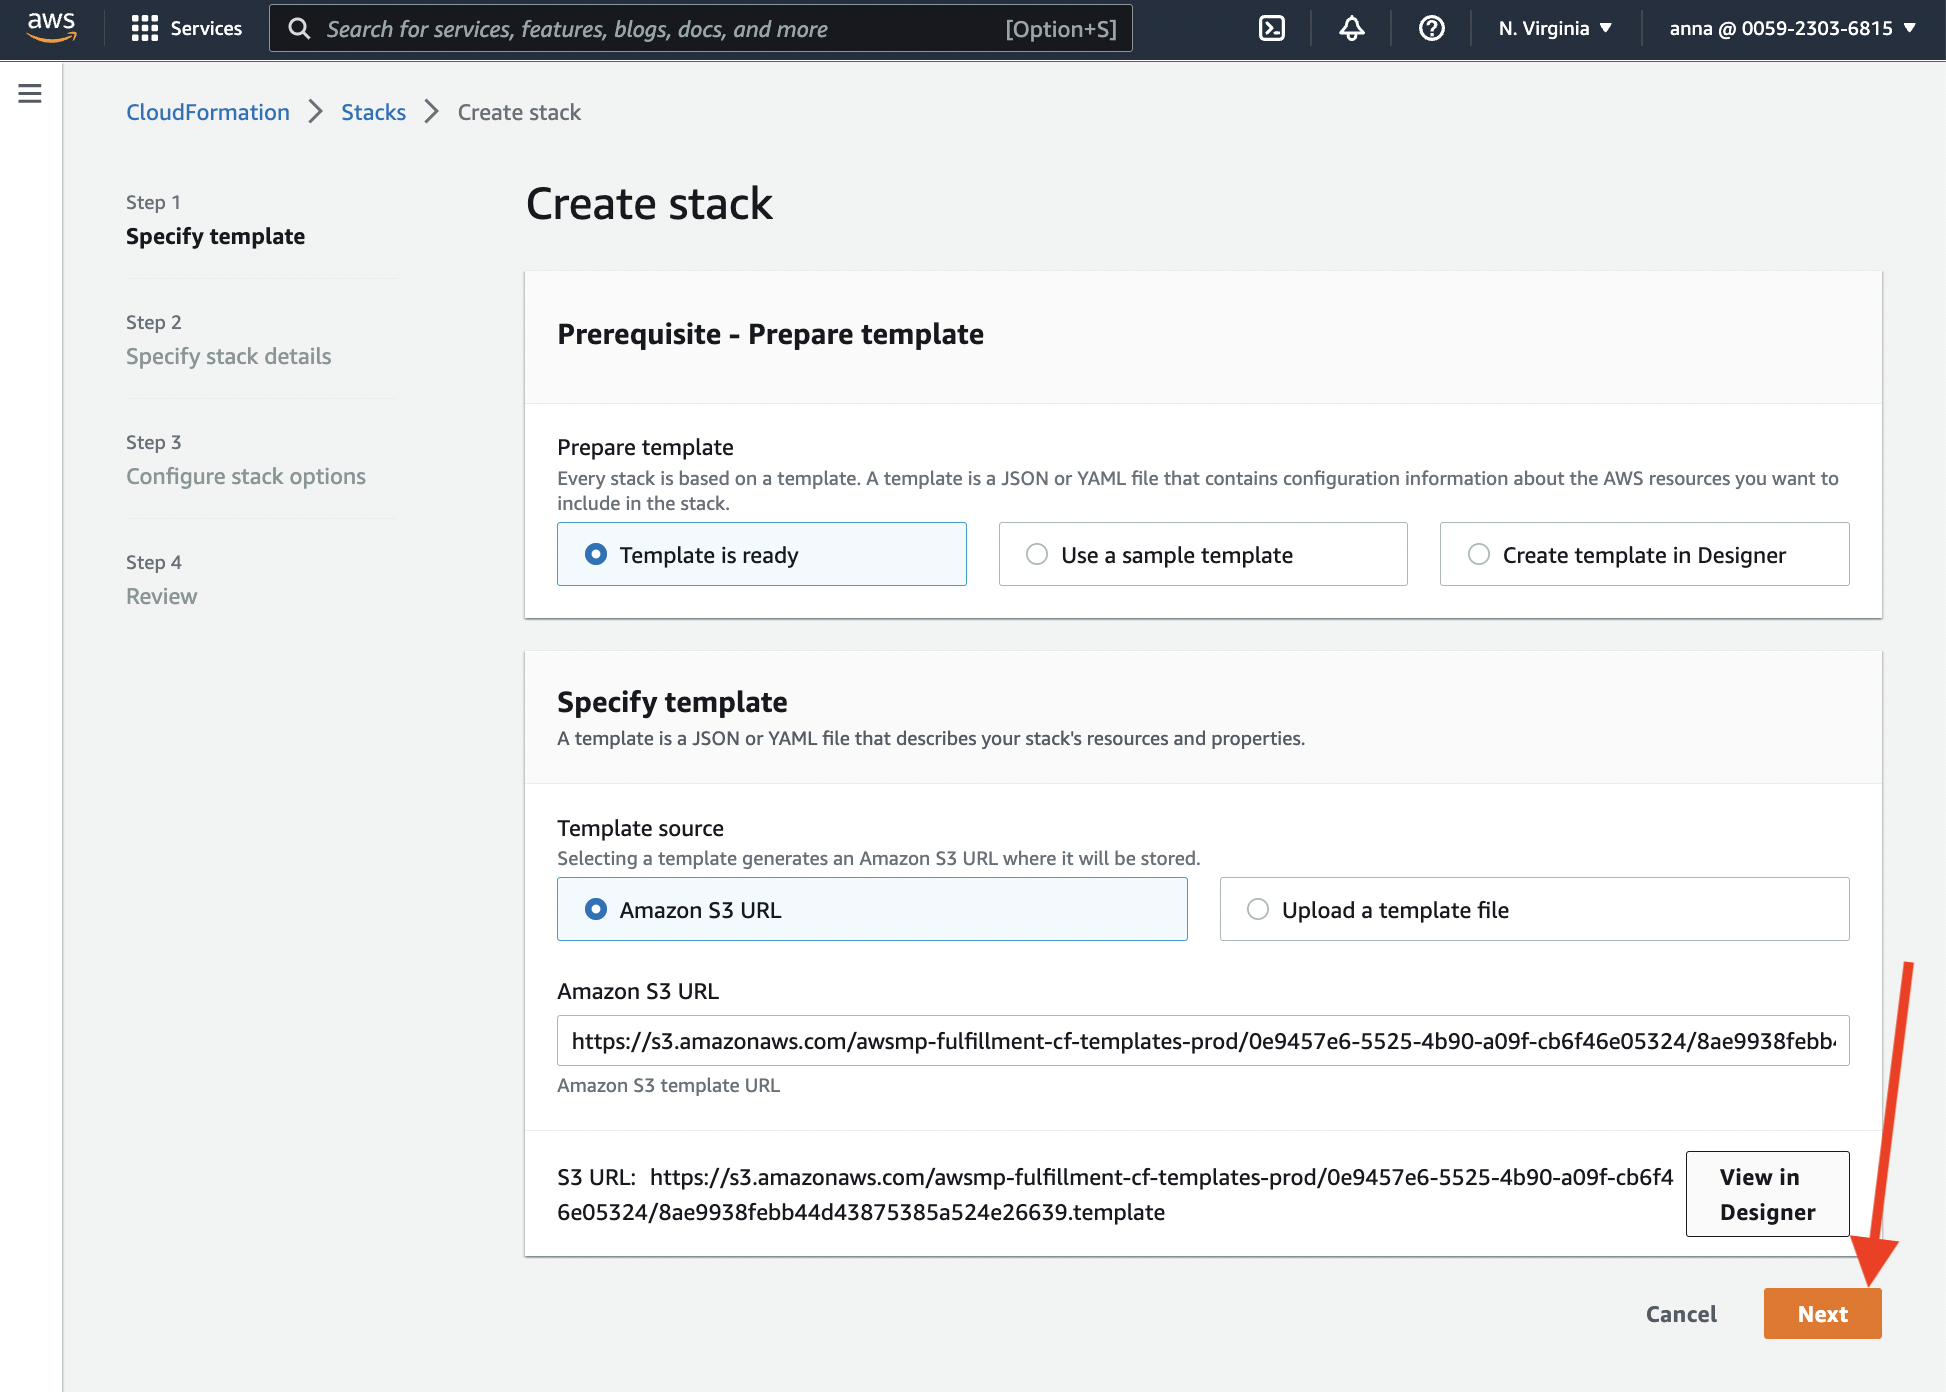
This page should be left unmodified, just press the "Next" button:

Database Lab Engine in AWS Marketplace: step 5

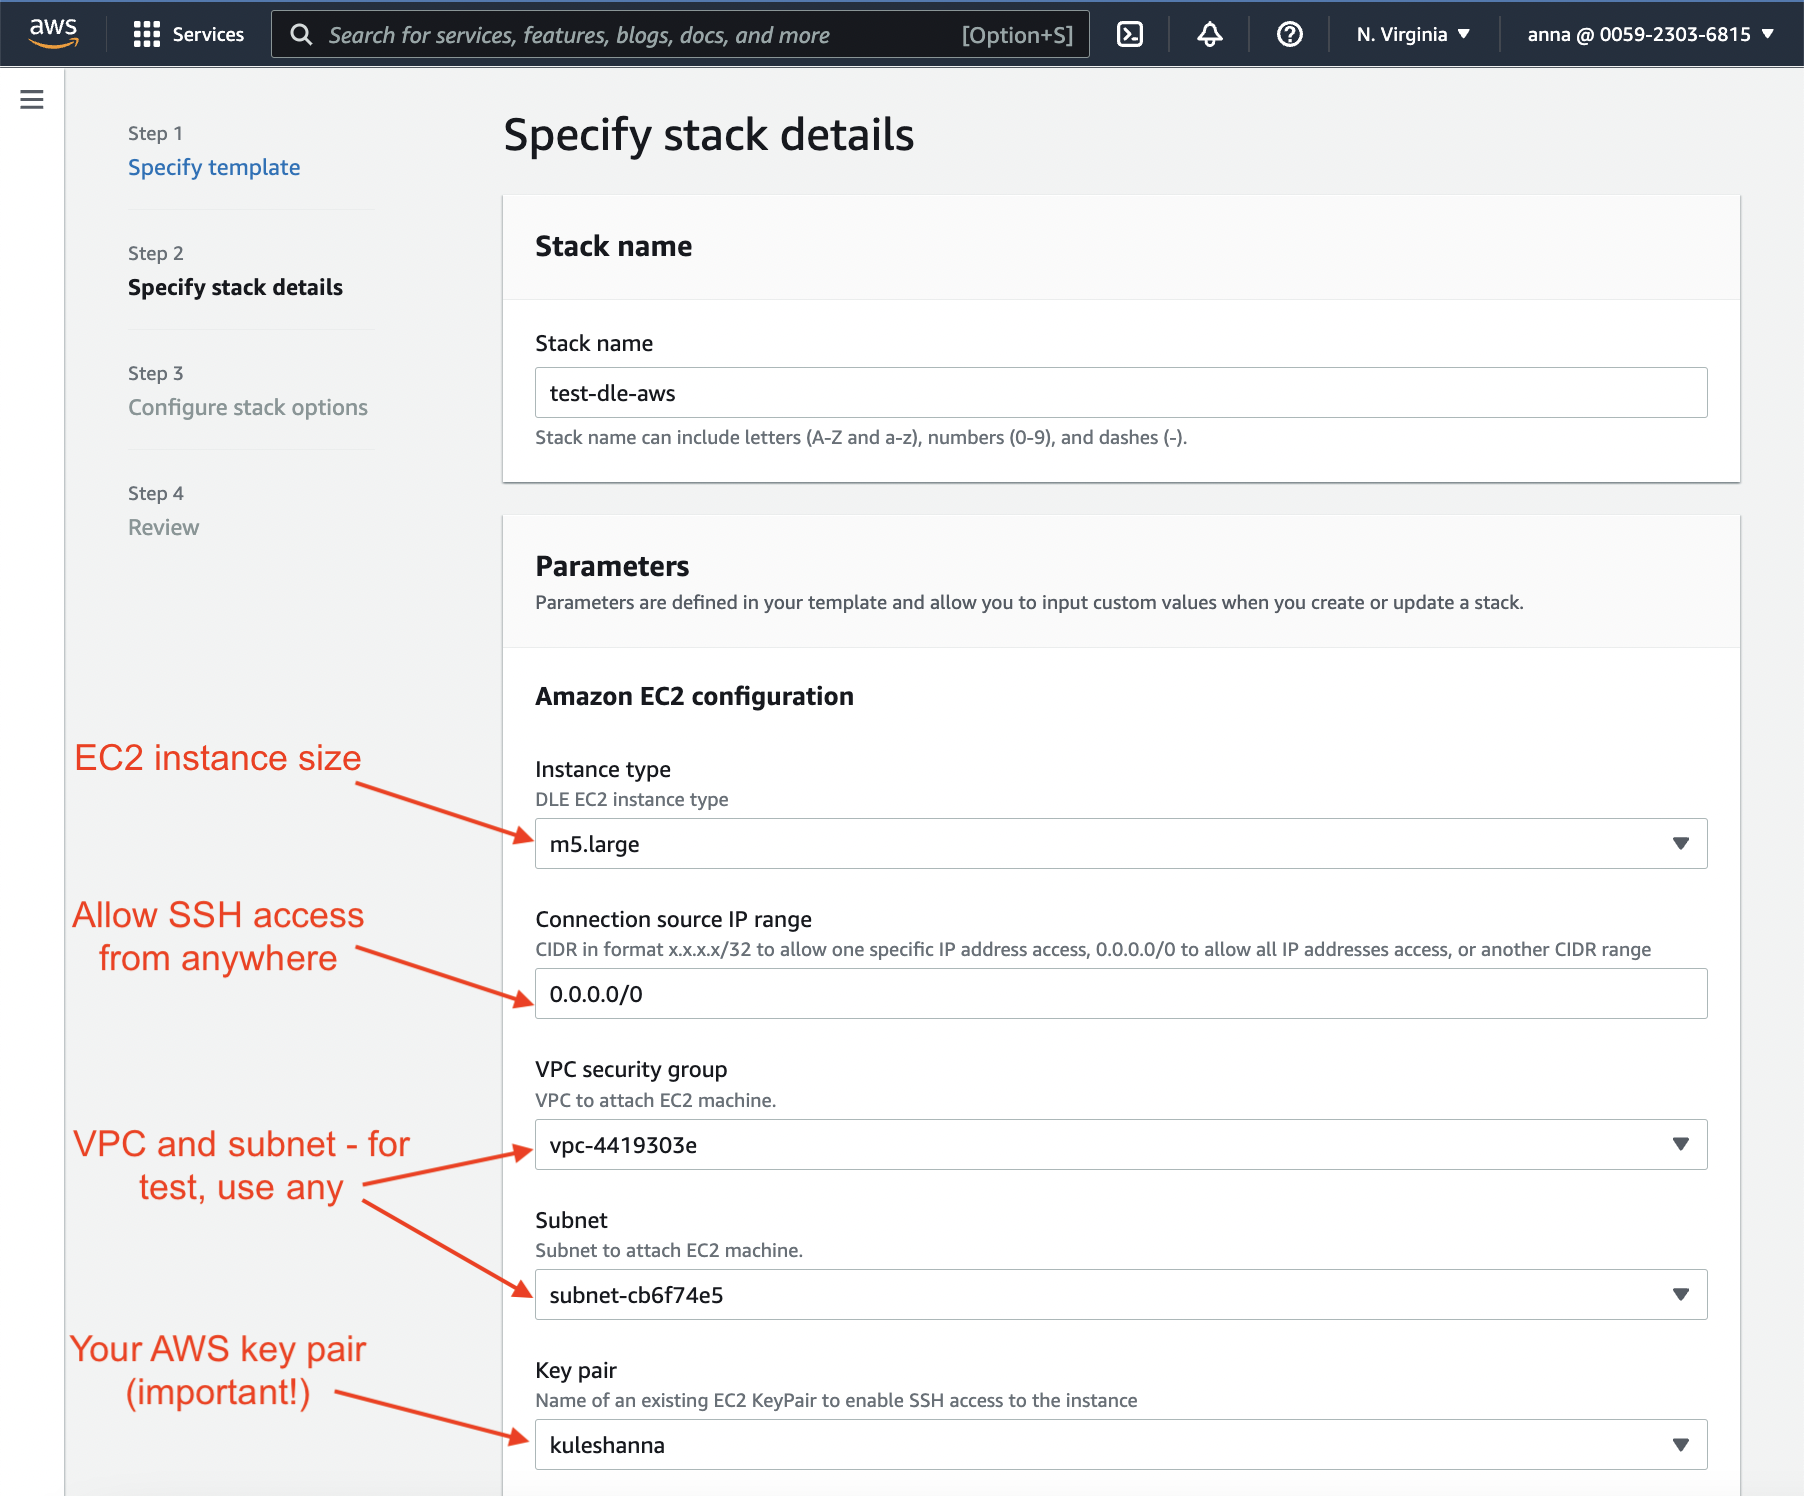
Now it is time to fill the form that defines the AWS resources that we need:

  • EC2 instance type and size – it defines the hourly price for "compute" (see the full price list);
  • subnet mask to restrict connections (for testing, you can use 0.0.0.0/0; for production use, restrict connections wisely);
  • VPC and subnet – you can choose any of them if you're testing DLE for some database which is publicly available (the only thing to remember: subnet belongs to a VPC, so make sure they match); for production database, you need to choose those options that will allow DLE to connect to the source for the successful data retrieval process;
  • choose your AWS key pair (has to be created already).

    Database Lab Engine in AWS Marketplace: step 6

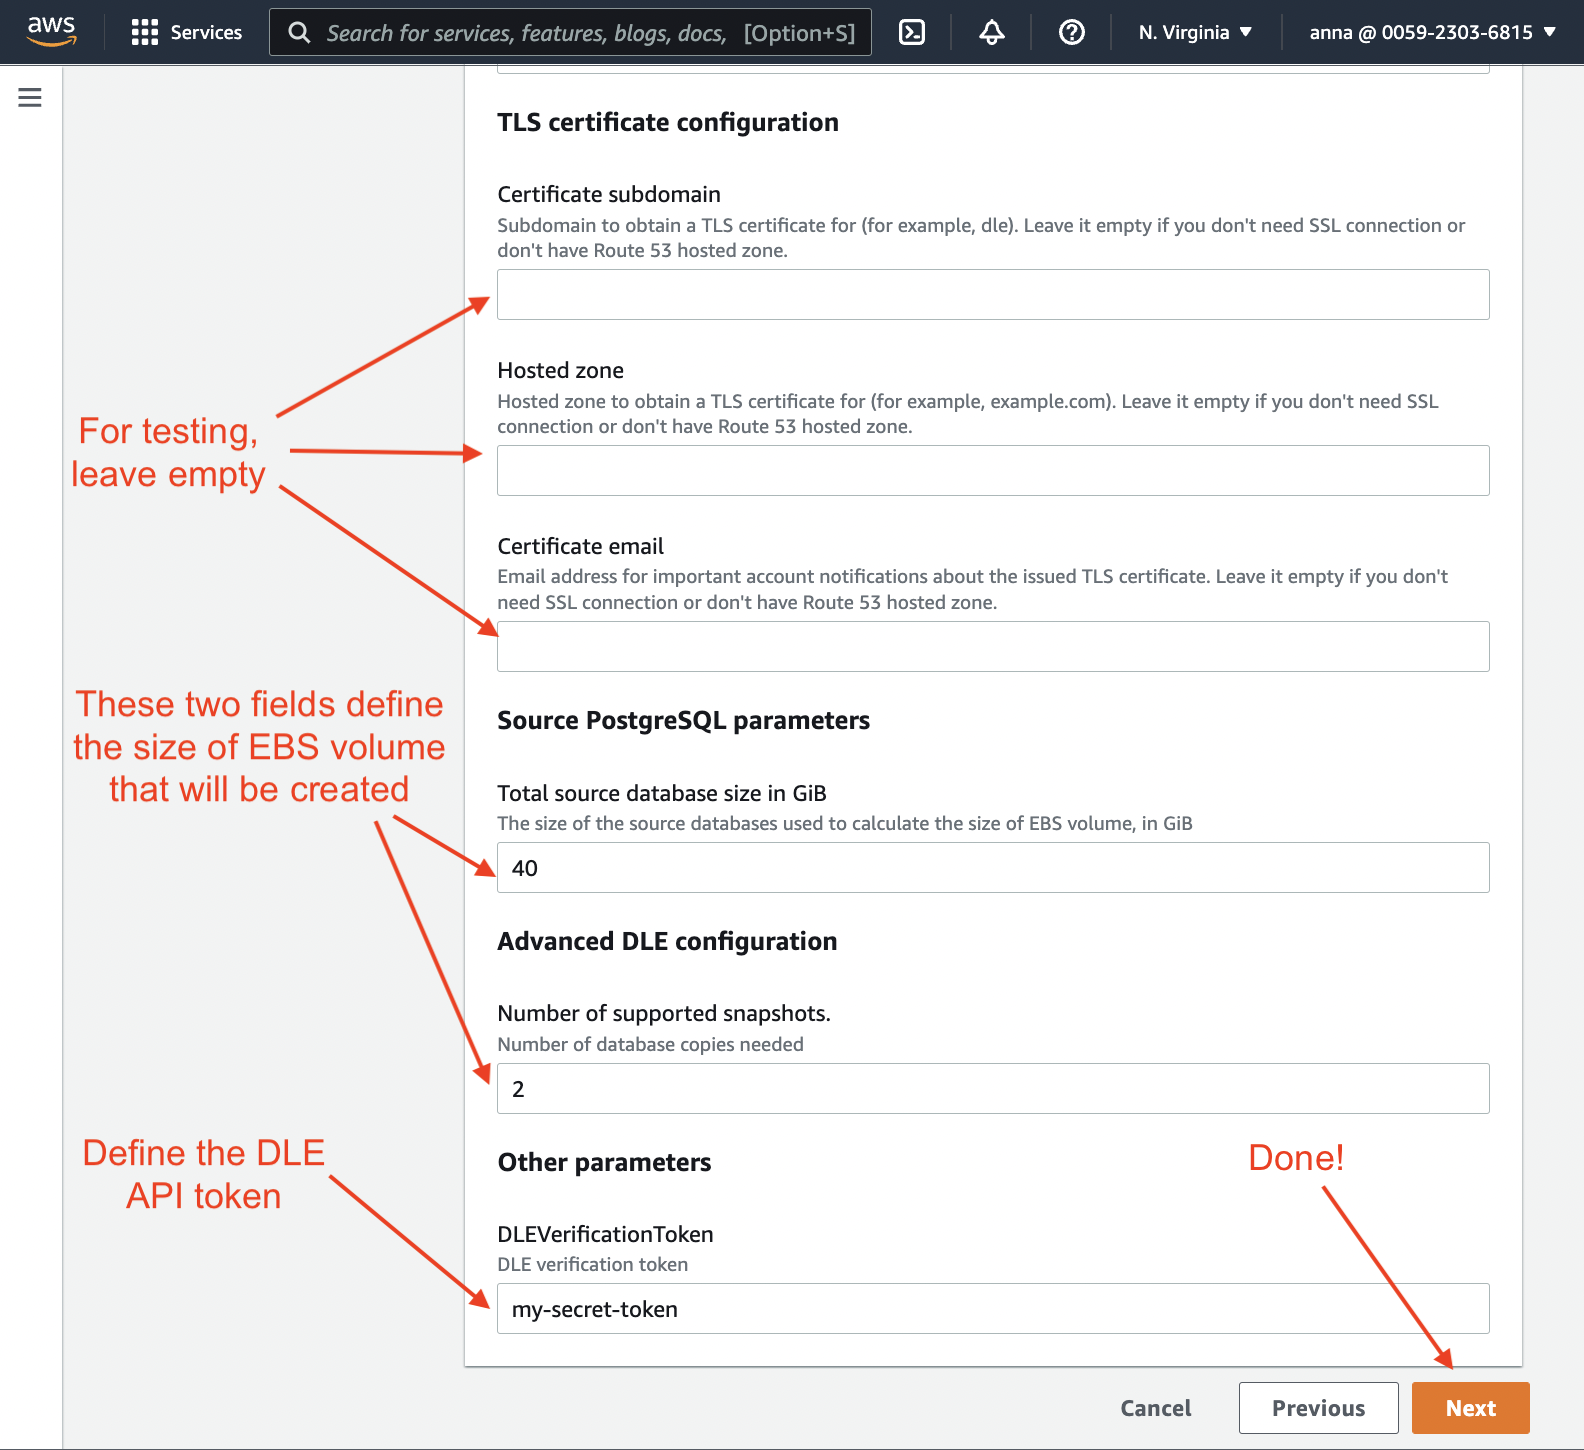
Next, on the same page:

  • define the size of EBS volume that will be created (you can find pricing calculator here: "Amazon EBS pricing"):
    • put as many GiB as roughtly your database has (it is always possible to add more space without downtime),
    • define how many snapshots you'll be needed (minumym 2);
  • define secret token (at least 9 characters are required!) – it will be used to communicate with DLE API, CLI, and UI.

Then press "Next":

Database Lab Engine in AWS Marketplace: step 7

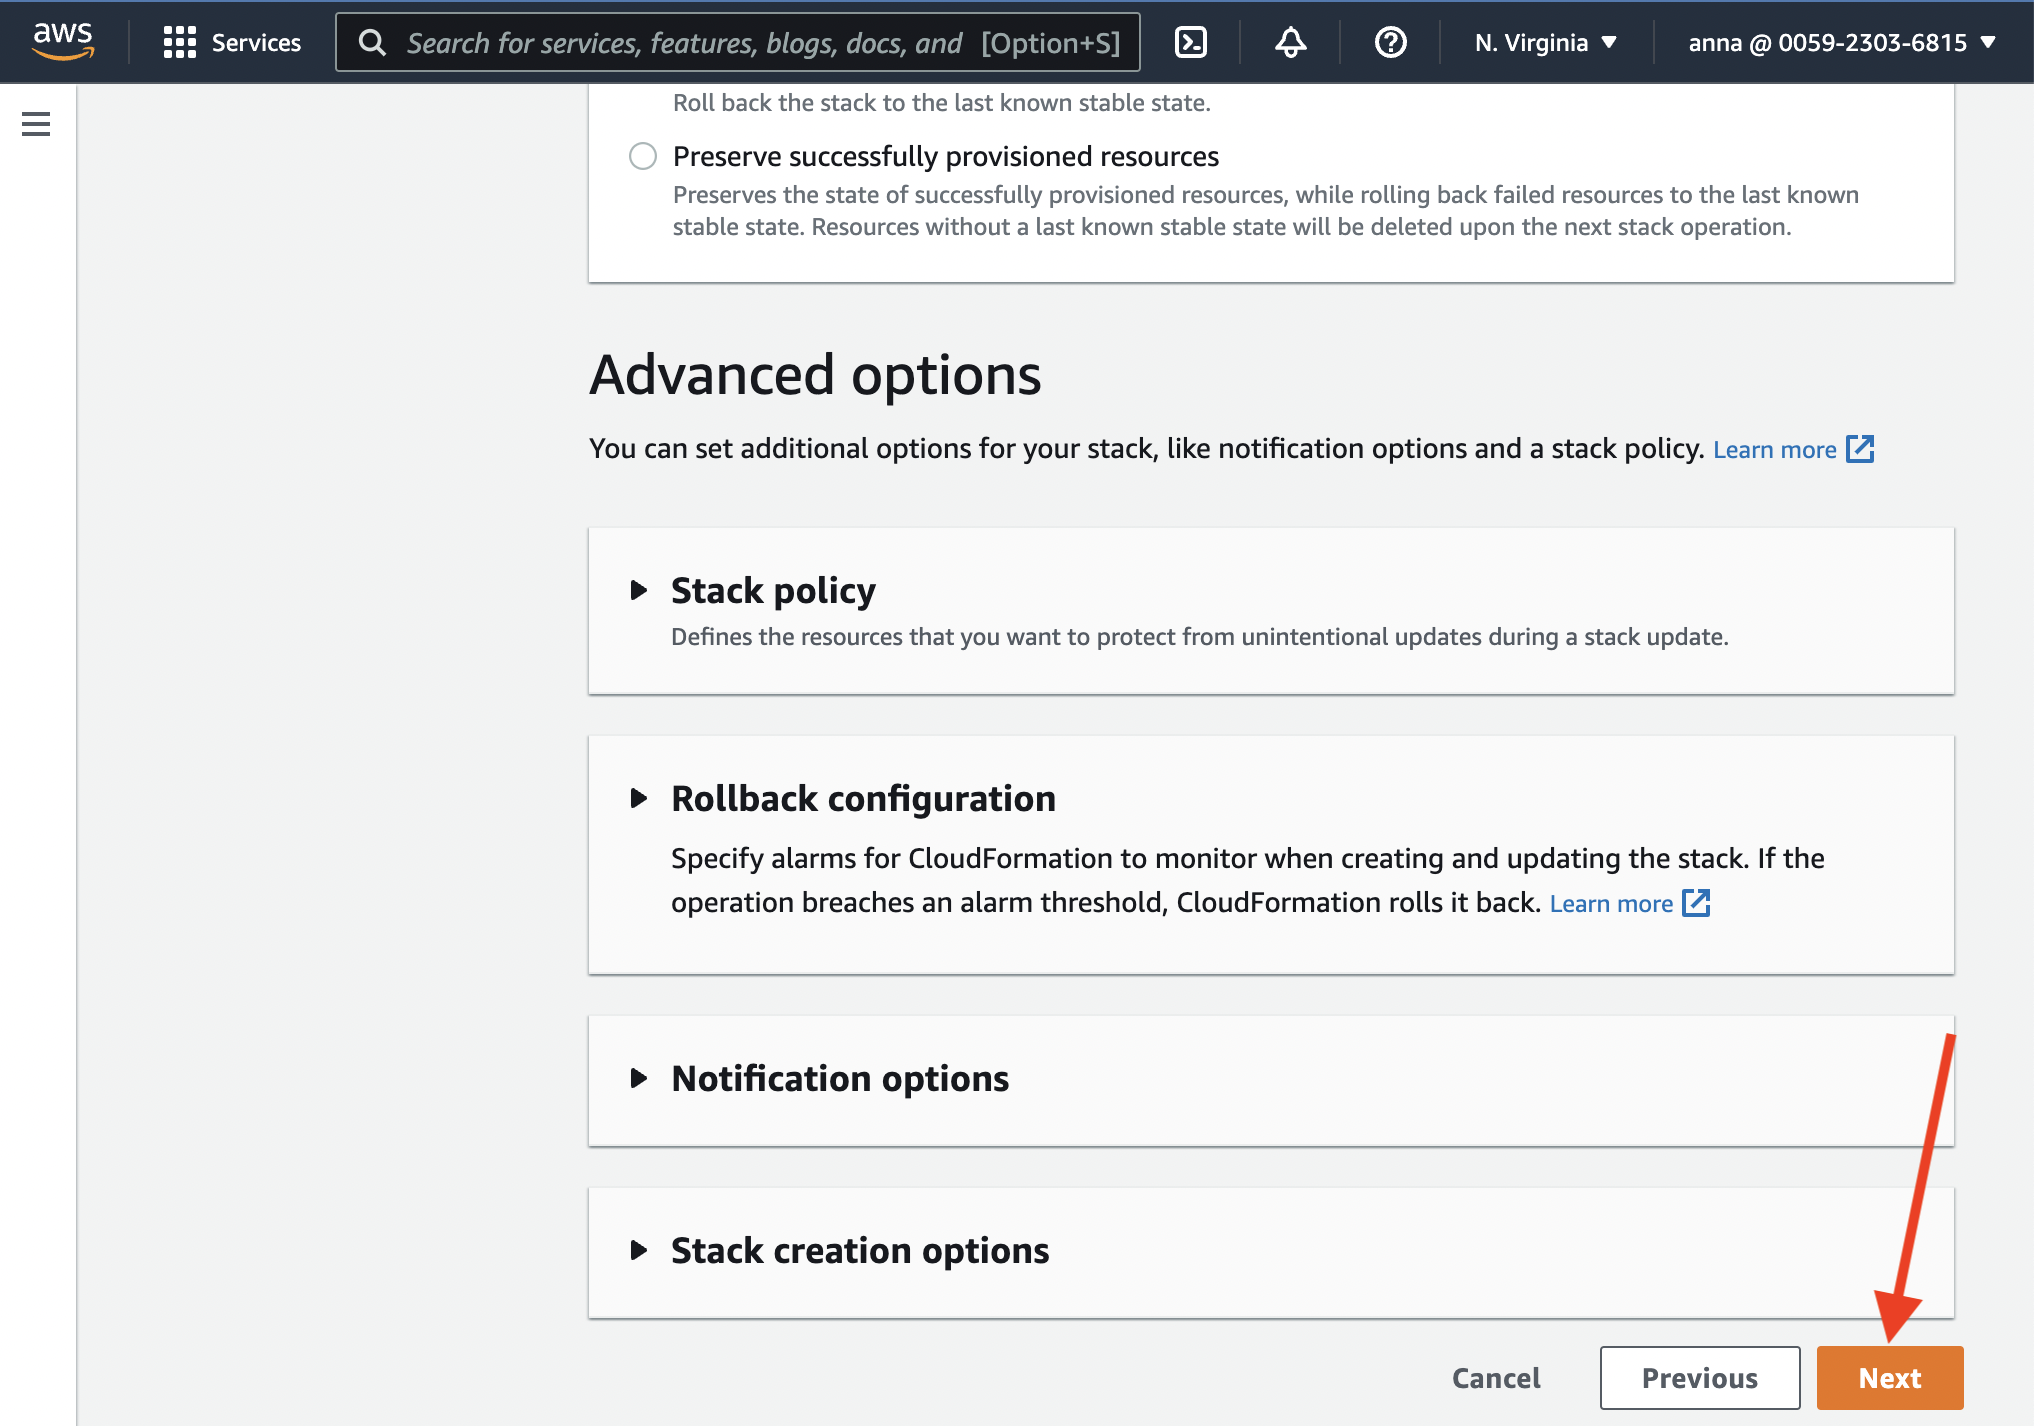
This page should be left unmodified, just press the "Next" button:

Database Lab Engine in AWS Marketplace: step 8

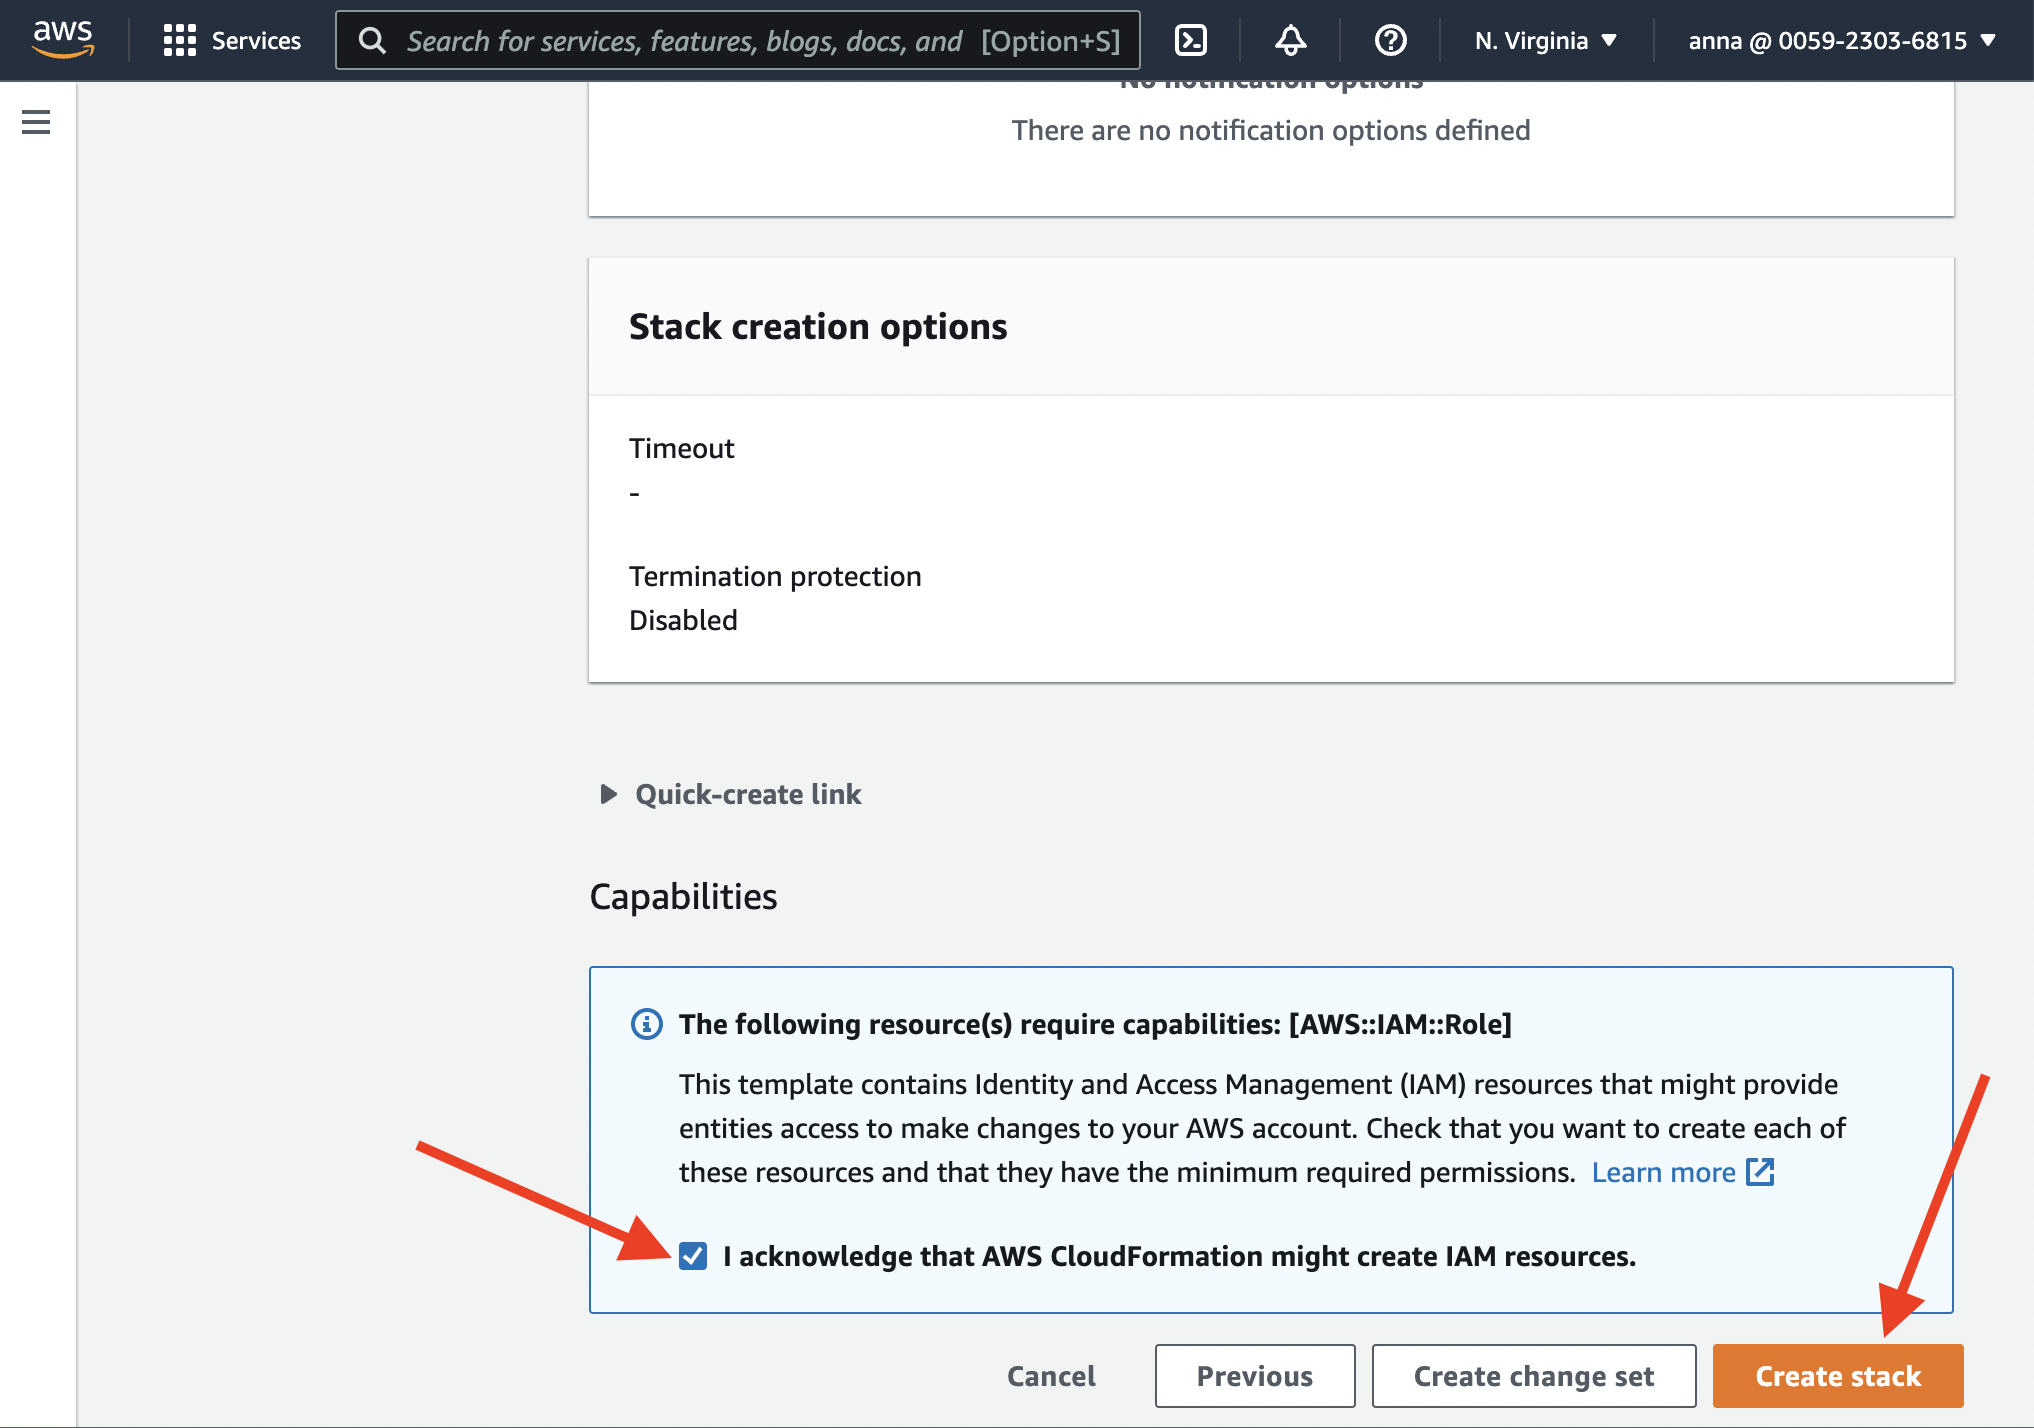
At the bottom of the next page, acknowledge that AWS CloudFormation might create IAM resources. Once you've pressed "Create stack", the process begins:

Database Lab Engine in AWS Marketplace: step 9

You need to wait a few minutes while all resources are being provisioned. Check out the "Outputs" section periodically. Once DLE API and UI are ready, you should see the ordered list of instructions on how to connect to UI and API.

Step 2. Configure and launch the Database Lab Engine

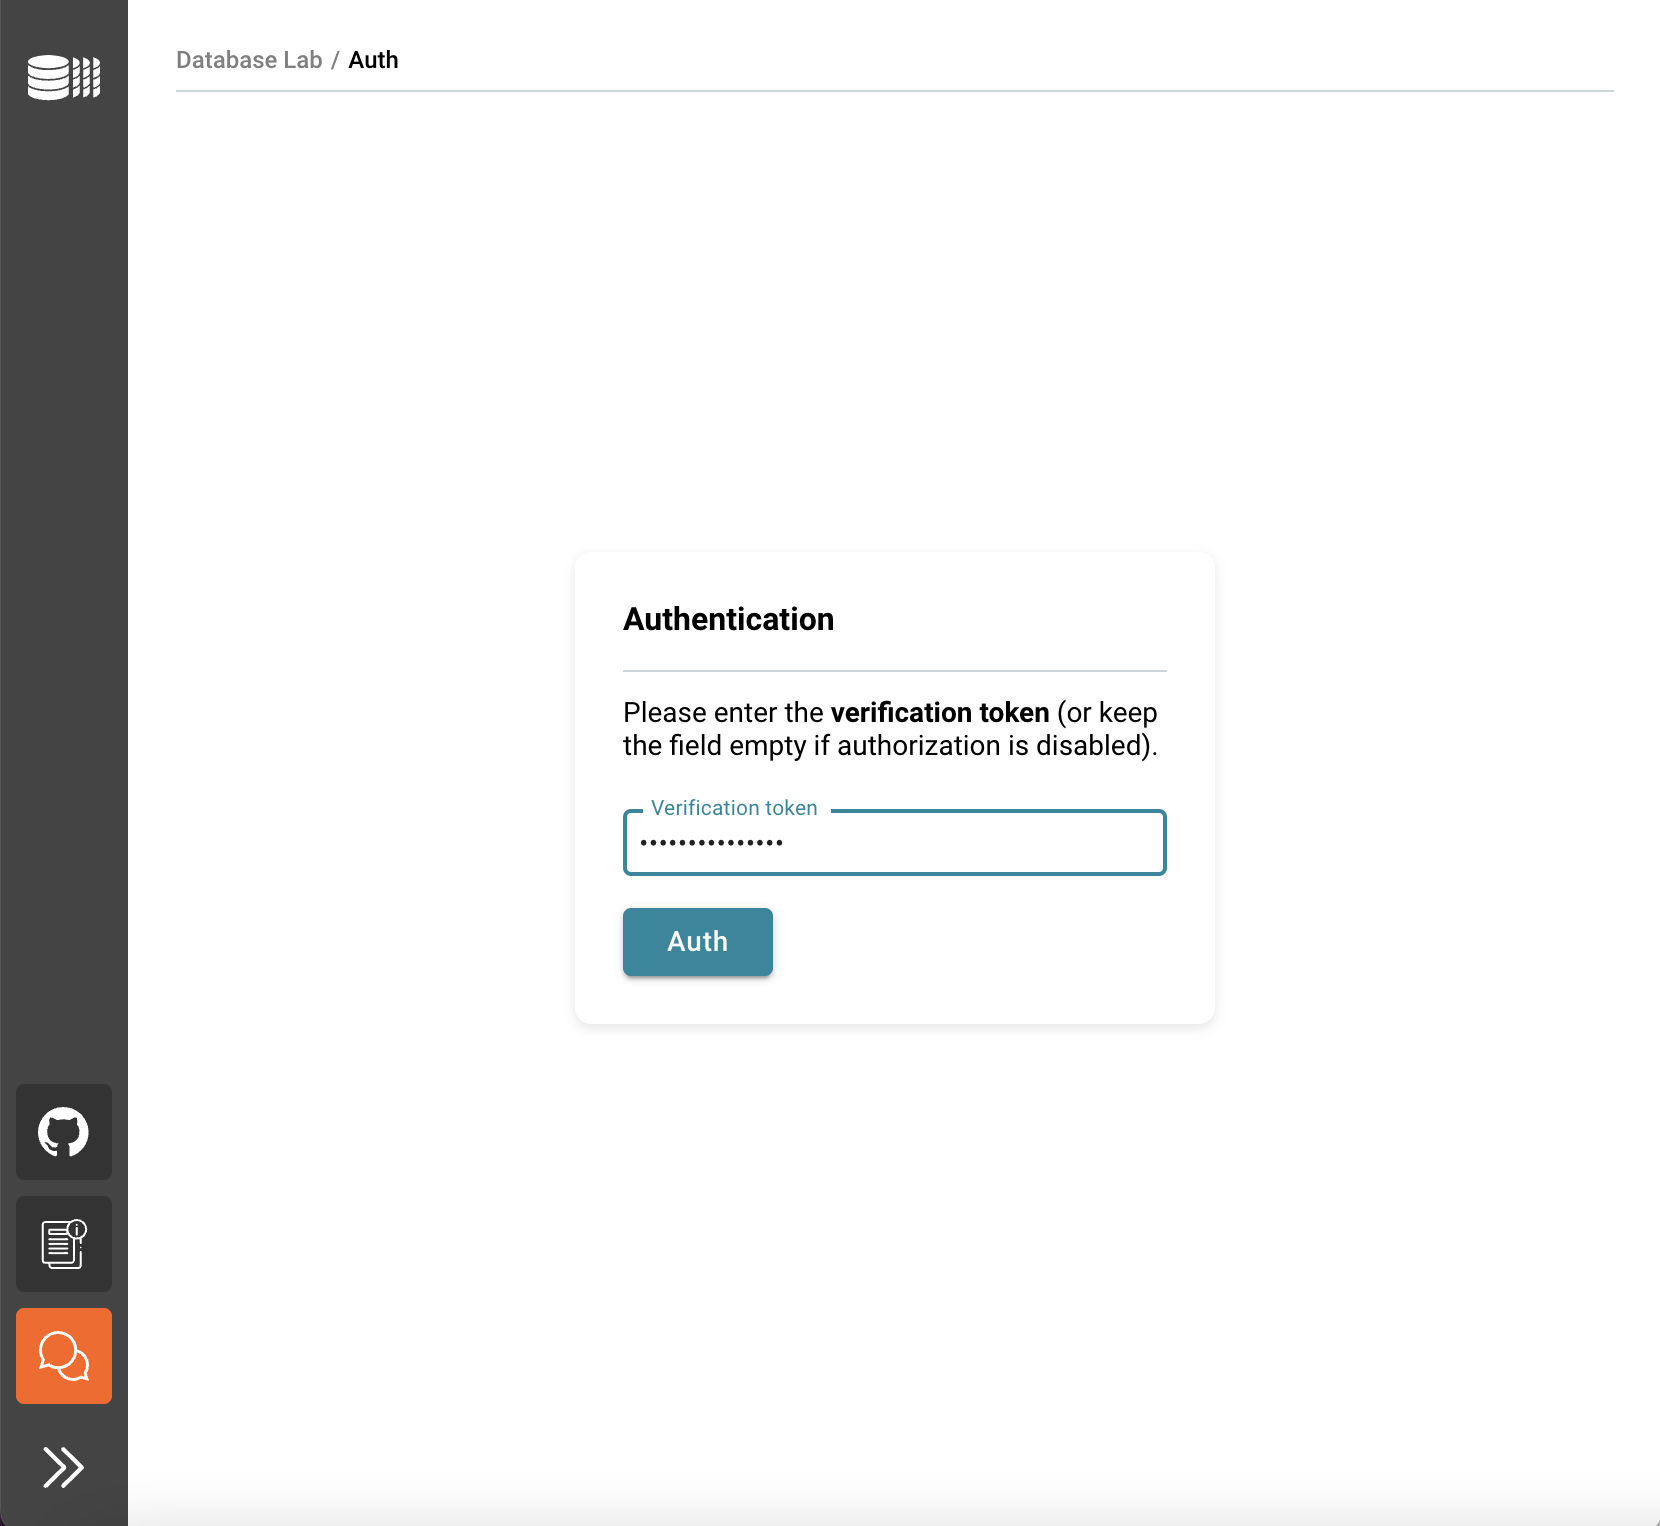
Enter the verification token, you have created earlier. You can also find it in the "Outputs" section.

Database Lab Engine configuration: step 1

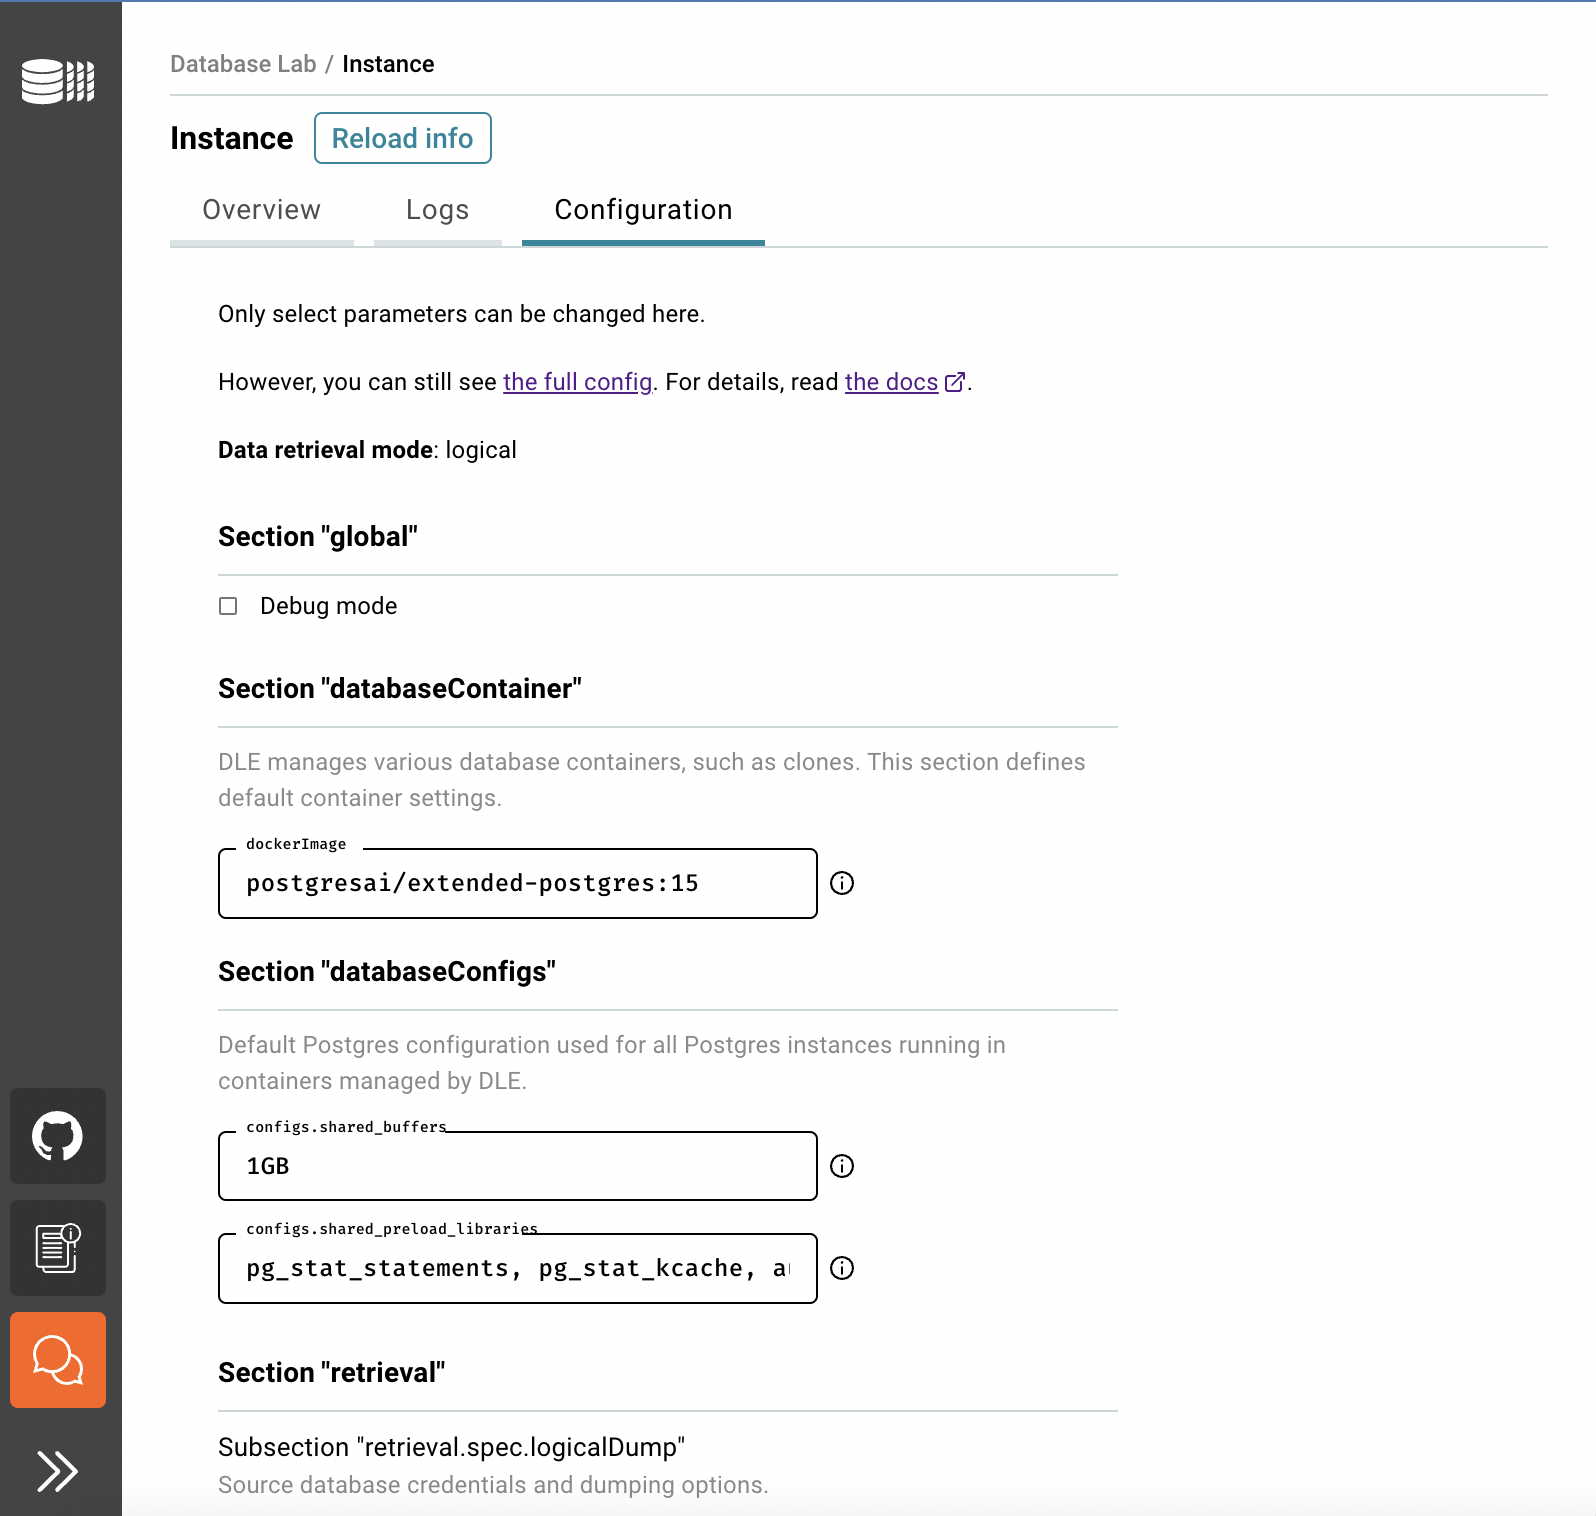
Now it's time to define DB credentials of the source to initiate database privisioning – this is how DLE will be initialized, performing the very first data retrieval, and then the same parameters will be used for scheduled full refreshes according to the schedule defined. Fill the forms, and use the information in the tooltips if needed.

Database Lab Engine configuration: step 2

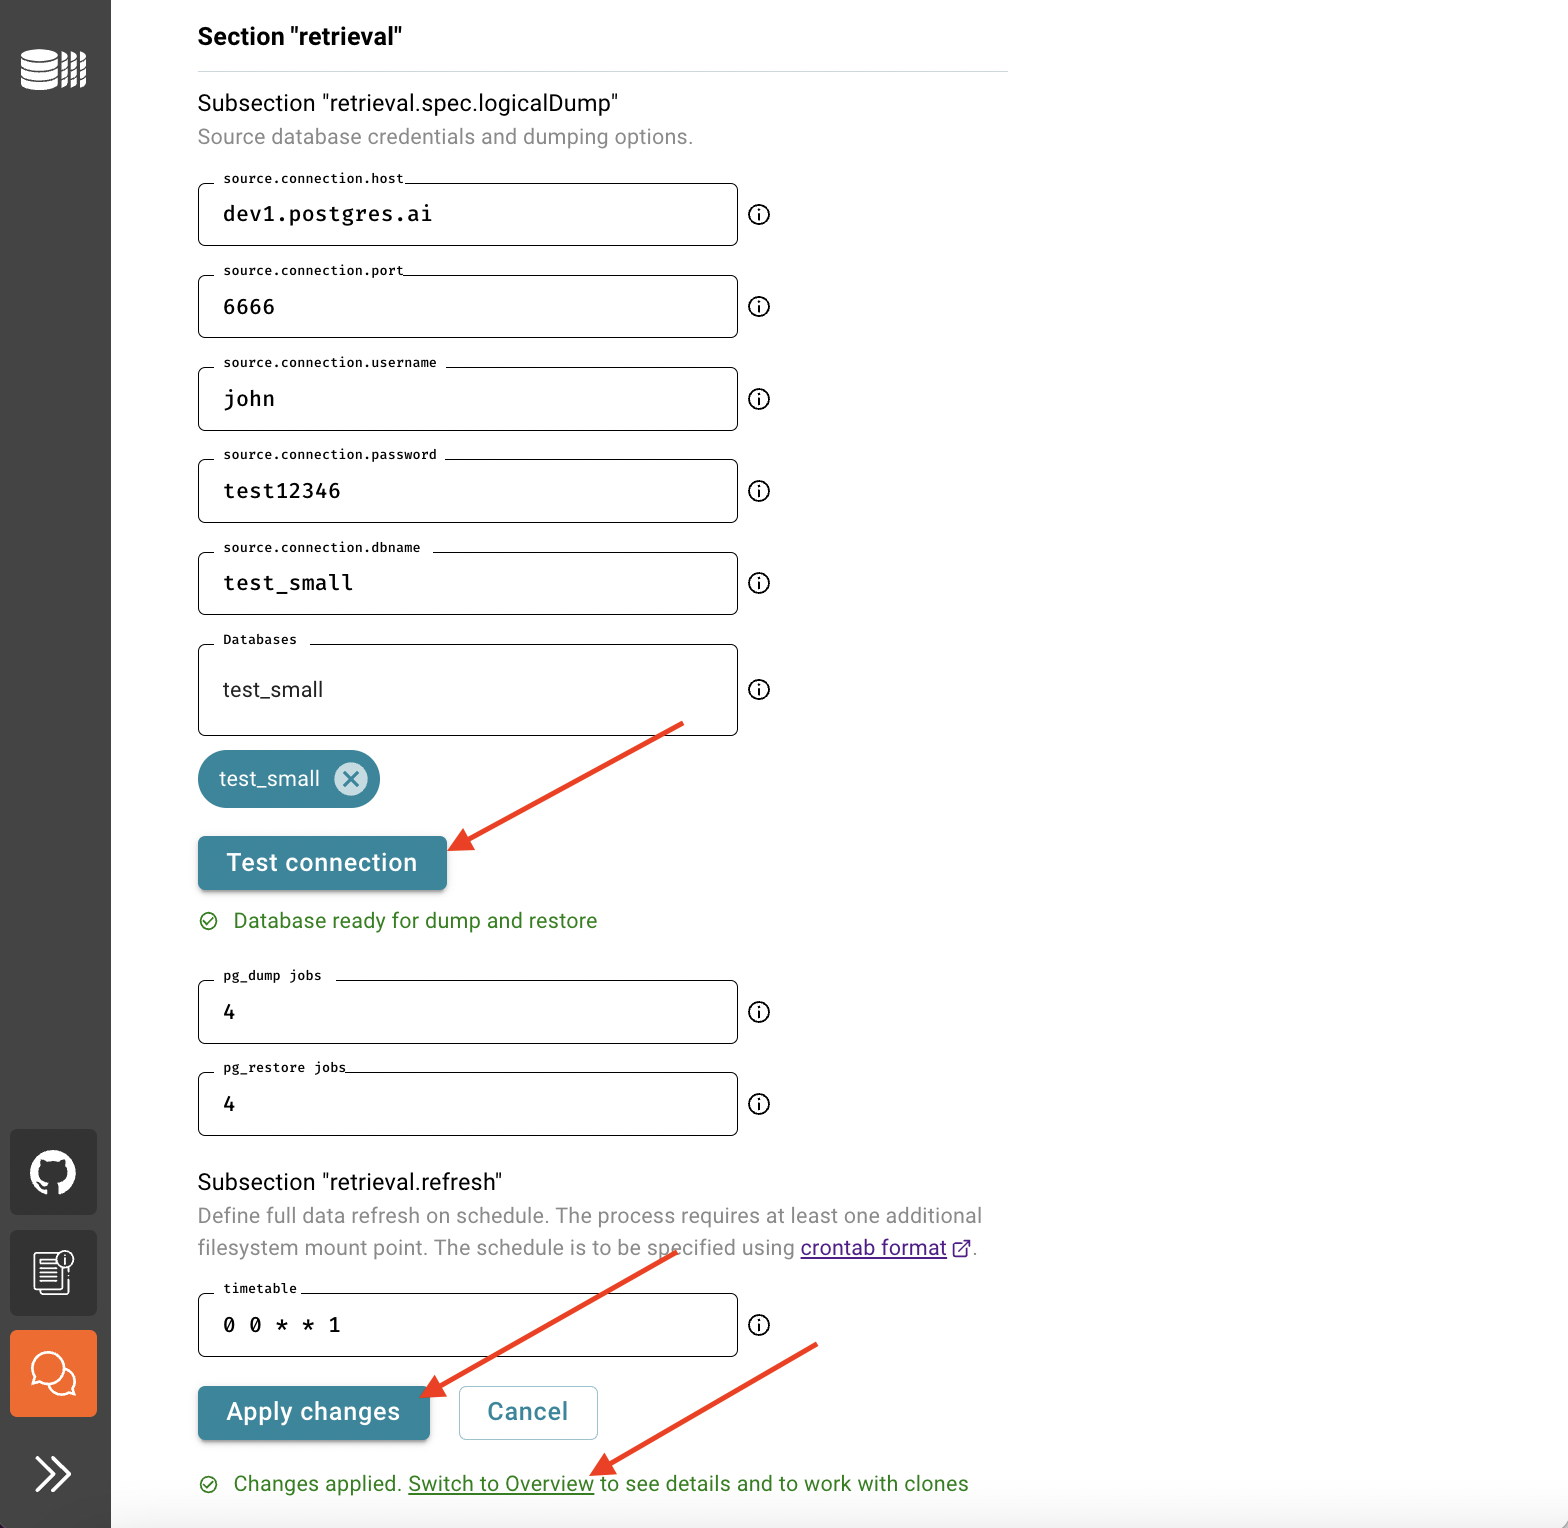
Then press "Test connection". If your database is ready for dump and restore, save the form and press "Switch to Overview" to track the process of data retrieval.

Database Lab Engine configuration: step 3

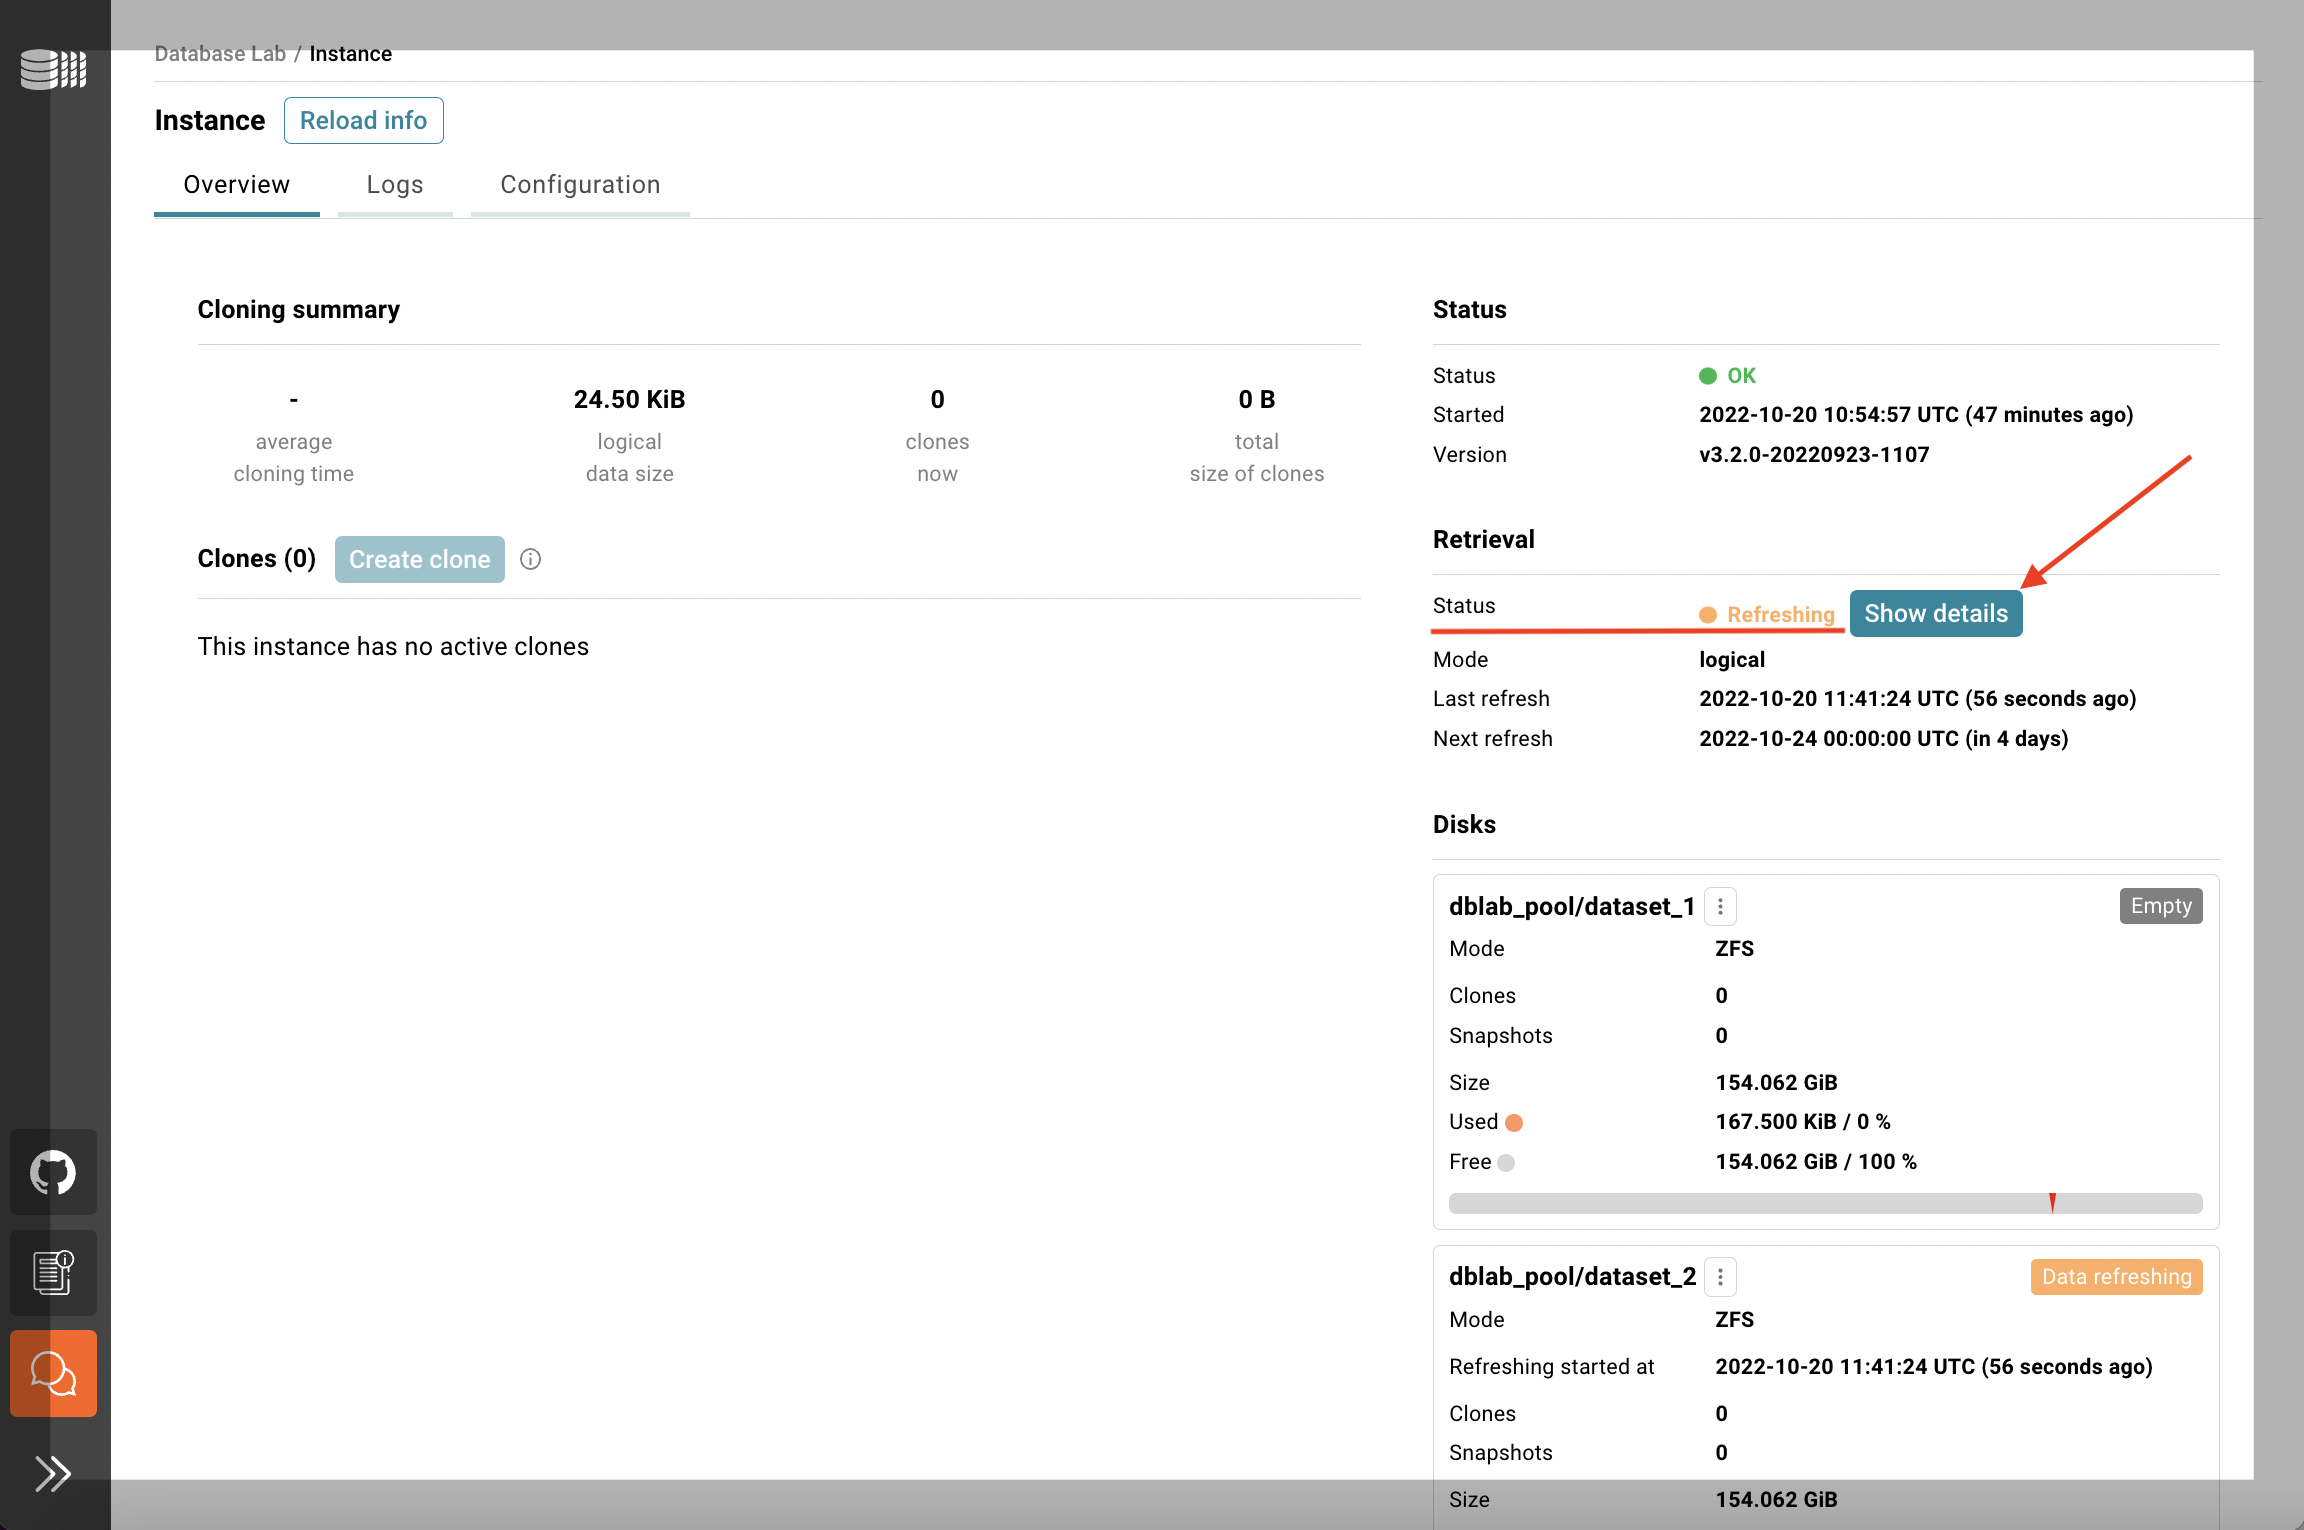
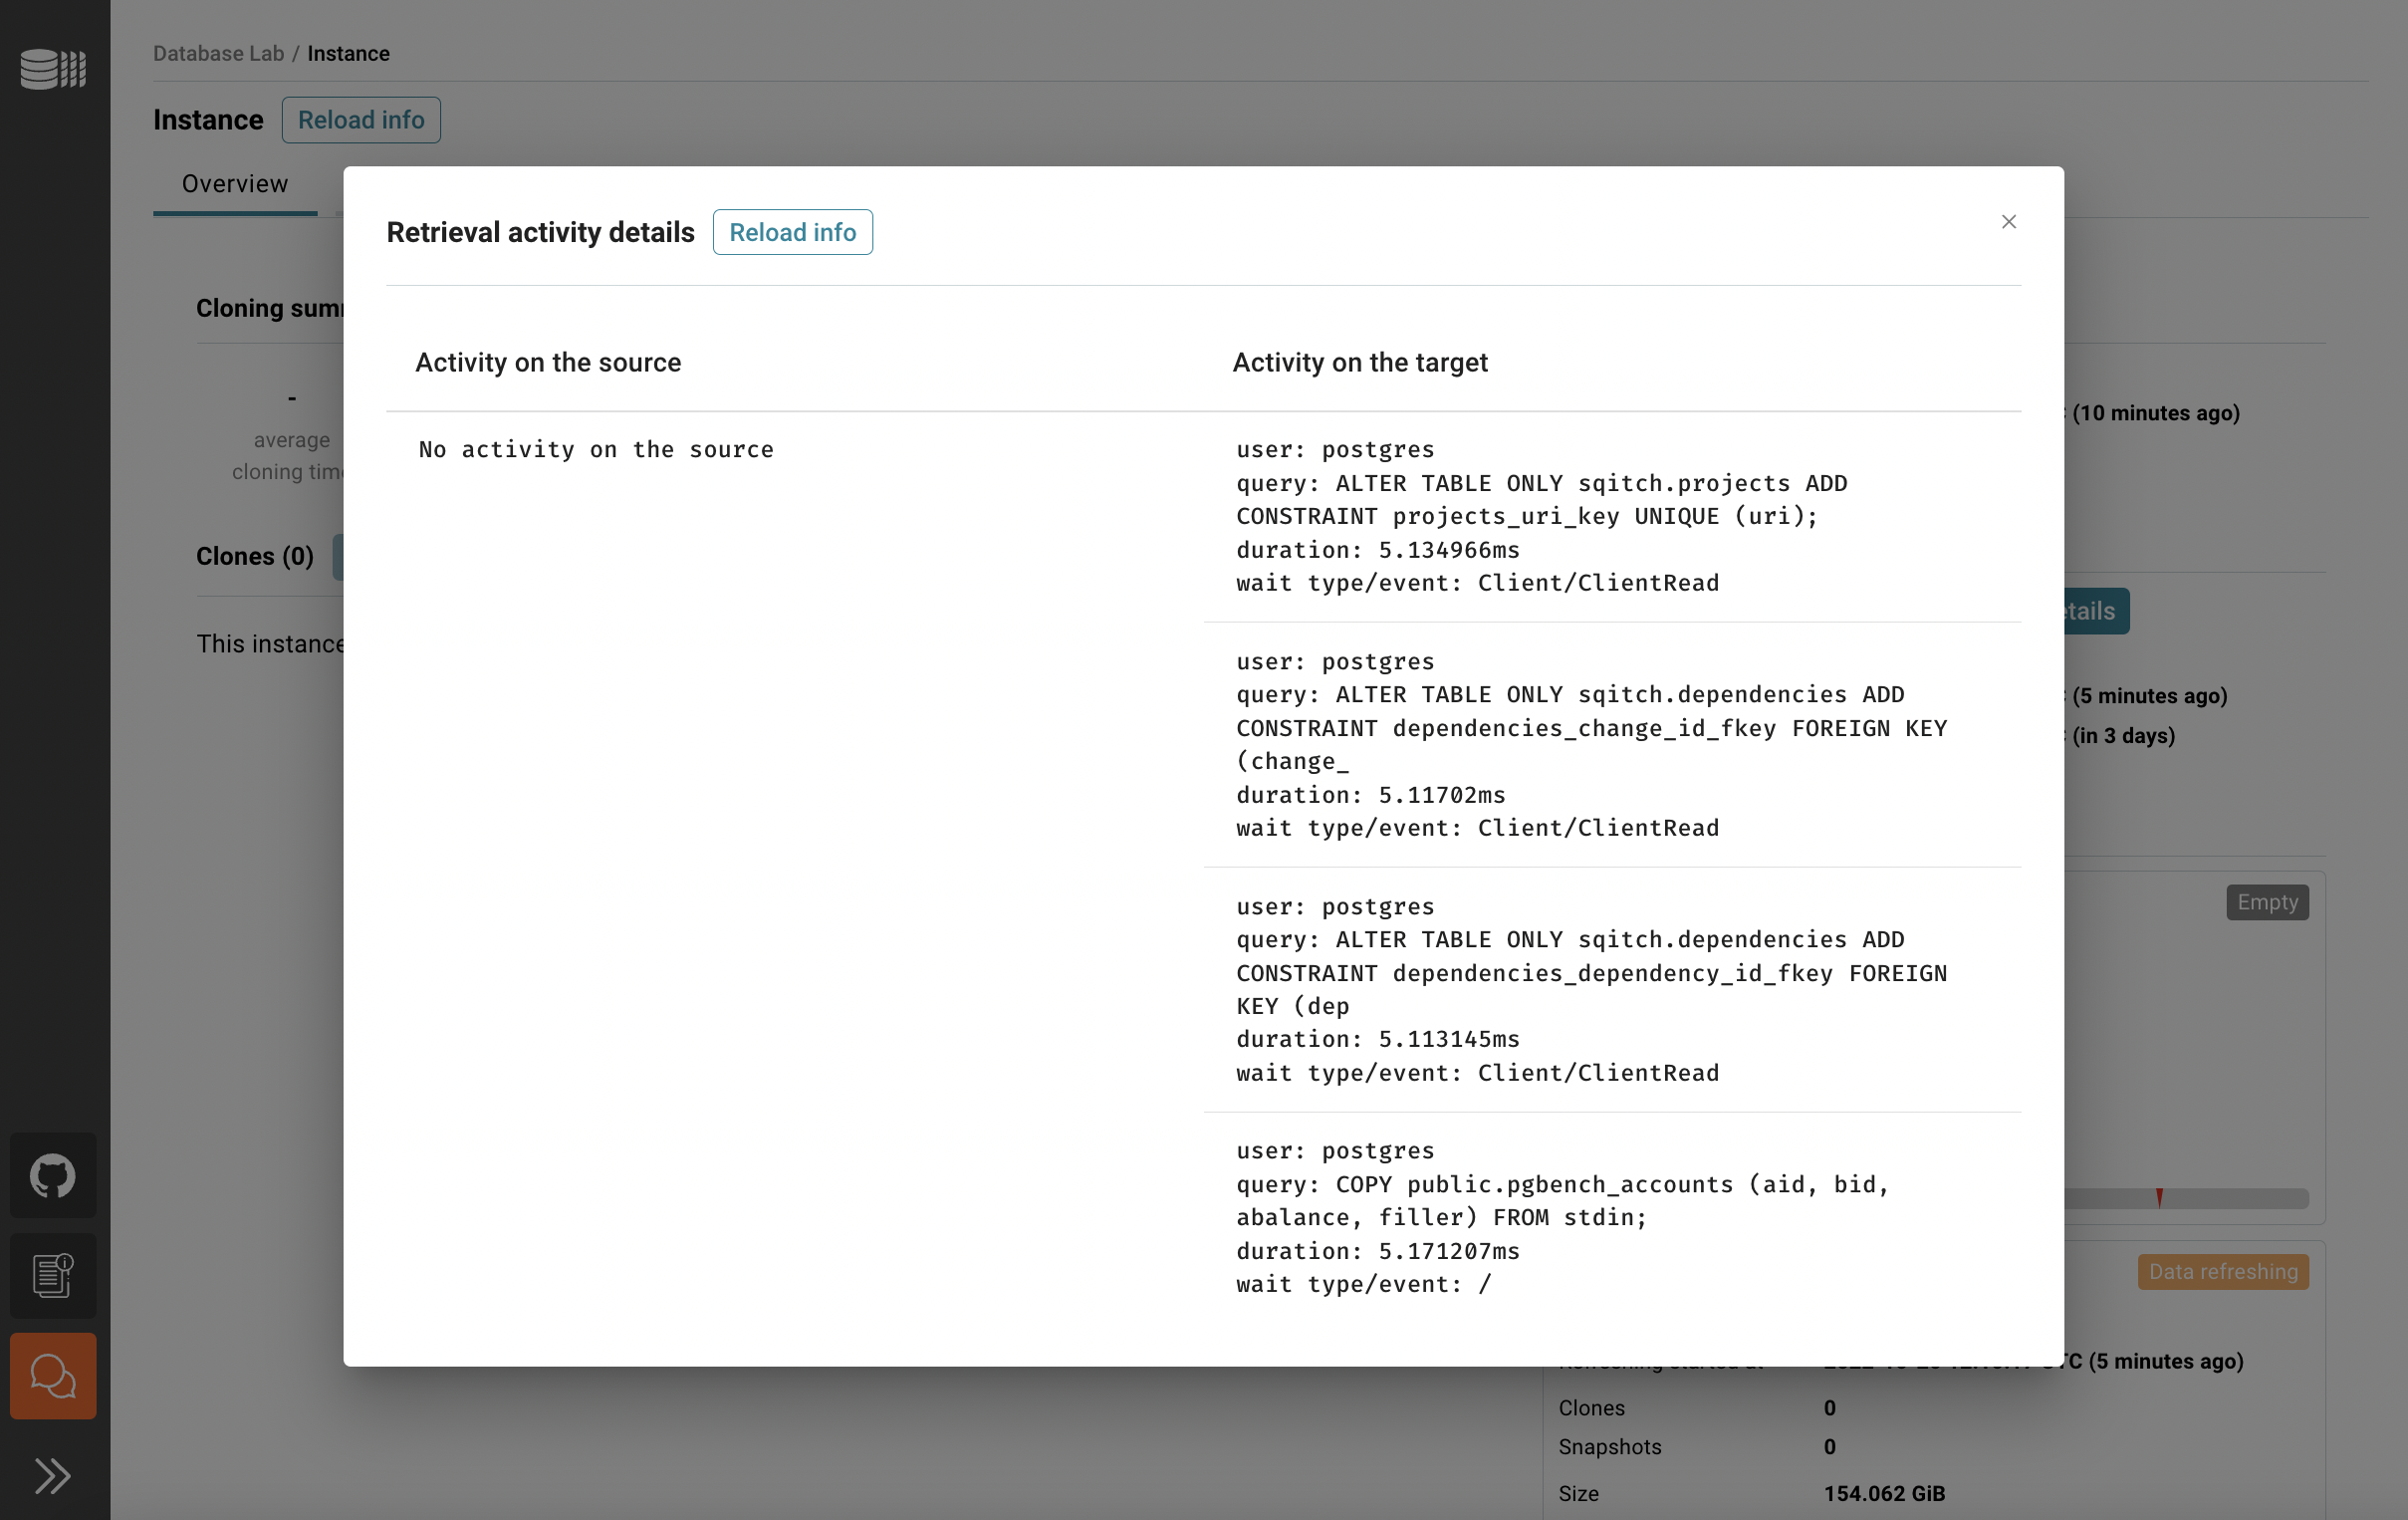
In the Overview tab, you can see the status of the data retrieval. Note that the initial data retrieval takes some time – it depends on the source database size. However, DLE API, CLI, and UI are already available for use. To observe the current activity on both source and target sides use "Show details".

Database Lab Engine configuration: step 4

Database Lab Engine configuration: step 5

Once the retrieval is done, you can create your first clone. Happy cloning!

How to use Cost Management + Billing to help track Azure Lab Services costs.

 How to use Cost Management + Billing to help track Azure Lab Services costs.

Cost management is one of the top concerns with education, especially with cloud resources.  No one wants to be surprised by a large bill at the end of the class session.  There are two key methods to getting a better handle on costs.  The first method is budgeting, which includes being able to set a target for the maximum cost of a lab, department, or school.  Part of the budget is to have alerts that warn the consumer before there is a problem.  The second area is analysis, once the lab has costs allocated to it the consumer will be able to review the costs to verify   that the usage was appropriate and plan for the next classes budget.

With the release of the Azure Lab Services April 2022 Update (preview), there are several additions that, used in conjunction with Azure Cost Management + Billing, can help you have better view of costs.  We’ll look at the analysis first to see the different options that are available to create a budget on.  For this example, I’ll analyze the costs for a single lab then add a budget with alerts.

Analyzing costs

To analyze cost, first open the Azure portal and select the “Cost Management + Billing” and go into “Cost Management” and then “Cost Analysis”

thumbnail image 1 of blog post titled 


							How to use Cost Management + Billing to help track Azure Lab Services costs.

In this view you can see the overall costs, the forecasted cost, a budget, and the budget overage.  For more details you can check the Cost Management + Billing documentation.  For now, we will look at the ways to change the views for the AccumulatedCosts.  The first change is the date range, by default the view is set to the current month.  But classes and the corresponding labs can be weeks or months long and have start/stop dates that aren’t at the beginning or end of the month. We want to make sure we are seeing all the costs in that timeframe. So, the view can be changed using the “Custom Date Range” to include the entire time the class is running. 

Cost for multiple labs (by lab plan)

Now for this example we’ve set up the Azure lab services where each division or group has their own lab plan and every lab is used by a class in that group.   We’ll use the new tags to filter down the costs to what we want to see.  To do this select the “+filter” pill and select the “Tag” option.  A “pill” is the elongated oval shaped button, like a pill, at the upper section of the view. This will add another pill to select the tag name which is “ms-labplanid” for the lab plan.  The last pill is the lab plan id value, the id is fairly long and can be truncated in the pulldown.  If you hover over a specific option a flyout will show the entire resource id. Once you check the plan id(s) you want, the chart will change to show you all the cost for every lab in the lab plan.  This view of the costs can be saved to review at a later date without rebuilding the filter.

thumbnail image 2 of blog post titled 


							How to use Cost Management + Billing to help track Azure Lab Services costs.

Cost per lab

Now that’s nice but let’s dig a little deeper to see the details for a specific lab.  We’ll do the same action of adding another tag filter, but this tag name is “ms-labname” and the value is the lab name you want the costs for.  Select the filter pill, select “tag”, select “ms-labname”, then choose the lab name you want.  The visualization changes to show the costs for just that lab. 

thumbnail image 3 of blog post titled 


							How to use Cost Management + Billing to help track Azure Lab Services costs.

Cost for vms

Now the last automatic tag only pertains to labs that have a template vm.  This will allow you to filter to only show the cost of the student vms, not the template vm.  Following the same pattern with the filter to choose the “Tag”, then the “ms-istemplate” name and select value to be false.  Selecting true would only show the template vm cost.

thumbnail image 4 of blog post titled 


							How to use Cost Management + Billing to help track Azure Lab Services costs.

Given the  spike of student vm usage you could infer that this was the first day of the class.  There is more detailed documentation for common cost analysis uses.

Custom Tags

If you want something with more details than the automatic tags, you can define your own custom tags at either the resource group, the lab plan or the lab level.  Any tags on the lab plan will be included in any labs created with it.  Custom tags can be added to the specific labs from the Azure Portal or programmatically.  The same filtering steps that we did with the automatic tags can be done using the custom tags.  There are some constraints on custom tags, like tags aren’t applied to historical data, which are documented in the “Understanding Cost Management Data”.


While the “AccumulatedCosts” view is really good for seeing cost growth and forecasting, the “CostByResource” view gives you a view into the costs per vm.  To get there in the view section change “AccumulatedCosts” to “CostByResource”, this will reset the date range and remove all the filters. Change the date range back to the same dates as the class/lab to get all the data.  You can either add a filter using the tags for the lab name or enter the lab name in the quick filter at the top of the resource list.

Cost by vm

thumbnail image 5 of blog post titled 


							How to use Cost Management + Billing to help track Azure Lab Services costs.

In the view above there are costs for two vms within the lab that we are analyzing.  From the tags vm 0 is the template vm for the lab, the second is a student vm (1).  So now to find the student that is burning up money! 

The actual vm name isn’t displayed in either the Azure portal (portal.azure.com) or the Labs portal (labs.azure.com), so we’ll have to use to get the detailed vm information.  To get this setup you’ll need to:

Once PowerShell is open here are the commands to install the Az modules and get the lab vms.


Install-Module -Name Az -Scope CurrentUser -Repository PSGallery -Force
Install-Module Az.LabServices
Connect-AzAccount -Subscription <your subscription id>
$vm = Get-AzLabServicesVm -LabName <labName> -ResourceGroupName <groupName> -Name <name ie 1>
Get-AzLabServicesUser -ResourceId $vm.ClaimedByUserId | Format-List -Property Email


This will give you the email address of the student that is using the vm named 1 in this example.  At this point you have detailed information on what the cost is for a specific vm, and the student that the vm is assigned to.  Now that we have lab costs down to the individual vm, let’s take a look at budgeting.

Lab Budgeting

So, let’s set up a budget for a lab using the same tags that will send an email alert when costs reach 50%, 75%, and 90% of the budget and when the cost exceeds the budget.

The first item is to create a budget so in the Azure Portal open the “Cost Management + Billing” and go into “Cost Management” and then “Budget”. 

thumbnail image 6 of blog post titled 


							How to use Cost Management + Billing to help track Azure Lab Services costs.

We’ll select “ + Add” to create a new budget.  In the “Create budget” screen we’ll use the filters to select the lab specific tag.  So, select the “Add filter” pill, select “Tag”, then “ms-labname”, and for the value the lab name.  Set the name to identify the budget and set the “Reset Period” to monthly.  The Creation Date and Expiration date should be the same as the lab.  Then set the overall lab budget. 

thumbnail image 7 of blog post titled 


							How to use Cost Management + Billing to help track Azure Lab Services costs.

Calculating Budget amount

Budgets are reset on Monthly, Quarterly, or Annually basis.  The issue is that the lab costs that are displayed in the lab website (https://labs.azure.com) are for the entire time of the class, which could be for multiple months.  The simple solution is to set the budget to be the displayed lab cost divided by the number of months.

Set Alerts

Select “Next” to move to the “Set alerts” page where you can set conditions to send out emails when lab costs reach key percentages.  I would recommend that you set up a few alerts to give you early warnings.  Below I’ve set up alerts at 50%, 75%, and 90% based on actual usage. Then add in the emails to the appropriate people. 

When the lab costs reach the specific percentage of actual cost you’ll receive an email from “azure-noreply@microsoft.com” that will list out the details of the budget, the alert, the cost, and other details.

thumbnail image 8 of blog post titled 


							How to use Cost Management + Billing to help track Azure Lab Services costs.

Now you have a budget specific to a lab that will alert people when costs reach specific cost levels.  This is a sample to get you up and running with cost management focused on Azure Lab Services.