Friday, 31 May 2024

Azure Storage Account And Storage Container For Blob Storage


Azure Storage Account And Storage Container For Blob Storage

Azure Blob is an Azure storage object like filer, queues, tables, or disks.

In order to use the blob storage, first we should create the Azure storage account.

To create an Azure storage account we need an Azure account. If you are using Visual Studio Professional, you may have a free INR 3000 Azure credit for Azure learning. You can also try a free one-month trial for learning,

Once you log in to the Azure portal you will see the Azure portal home screen as below.

Since the Microsoft team is making changes frequently in the Azure portal you may see a different look at each login.
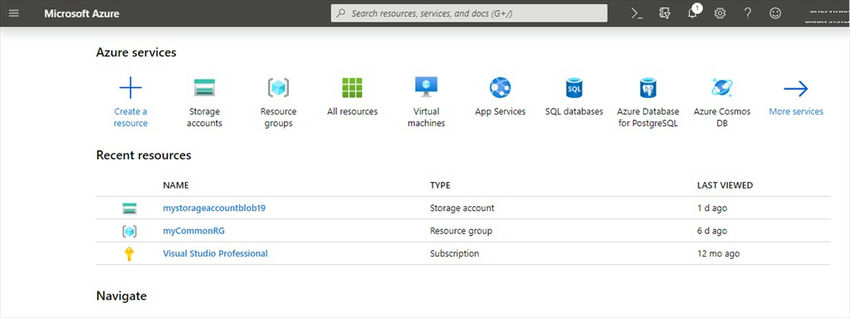
 Azure portal

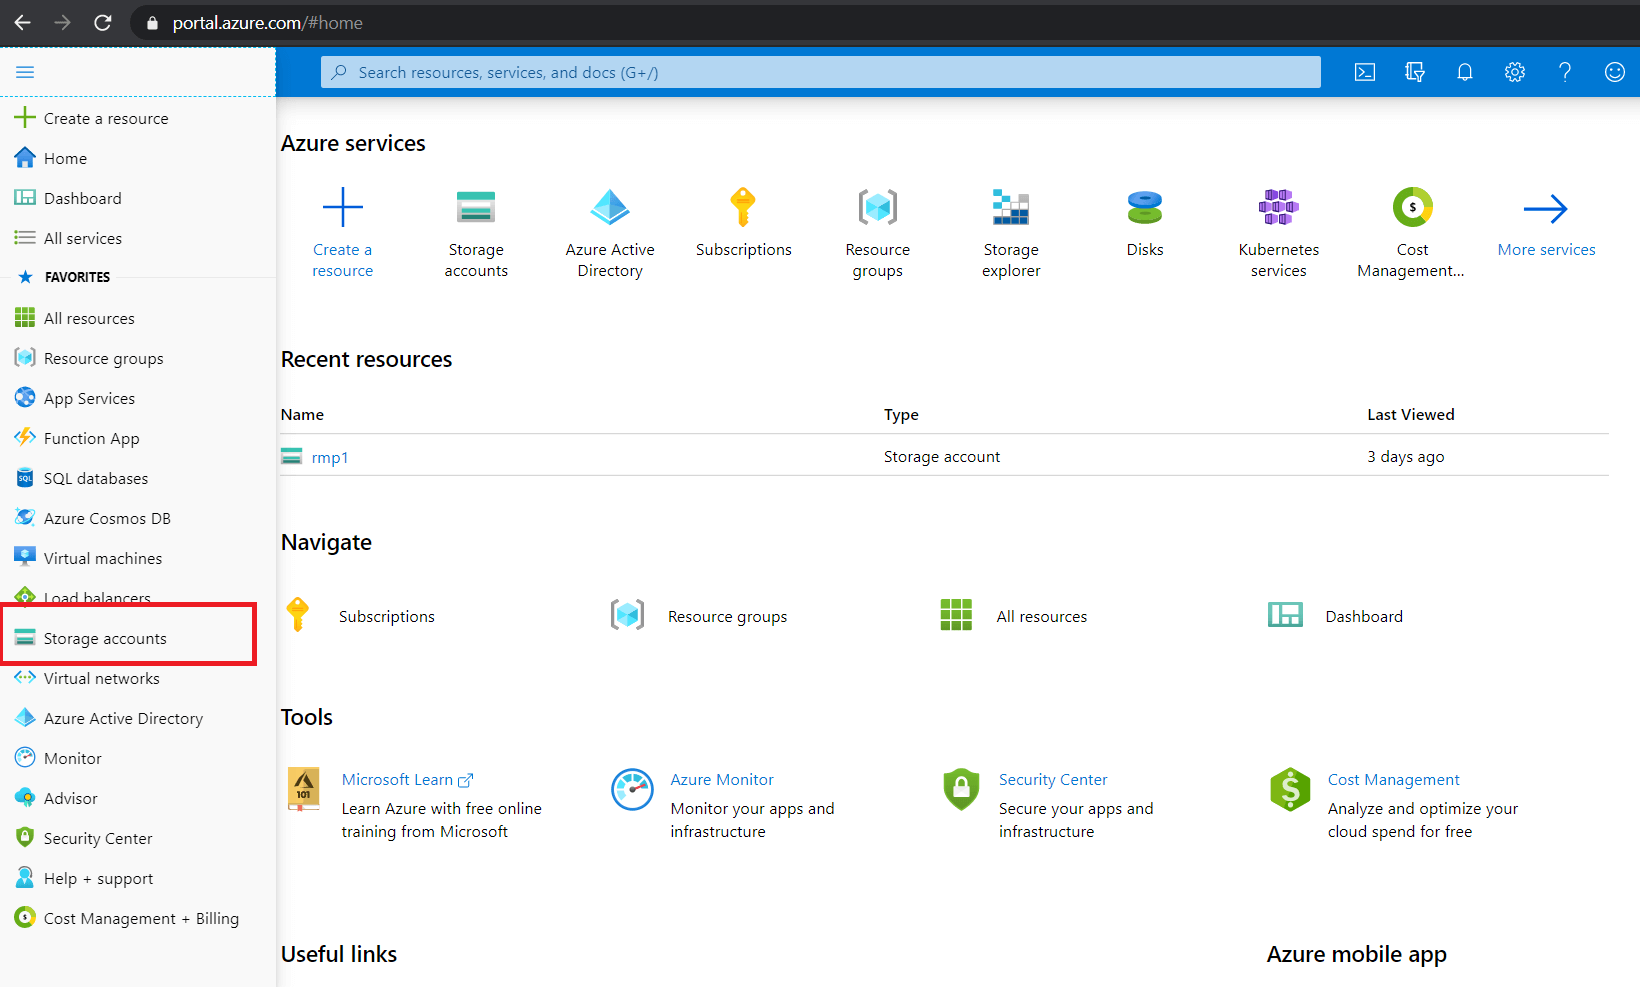
Once we log in to the Azure portal, we can create an Azure storage account by clicking the Storage Accounts button.

Then click the Add button,

Add button

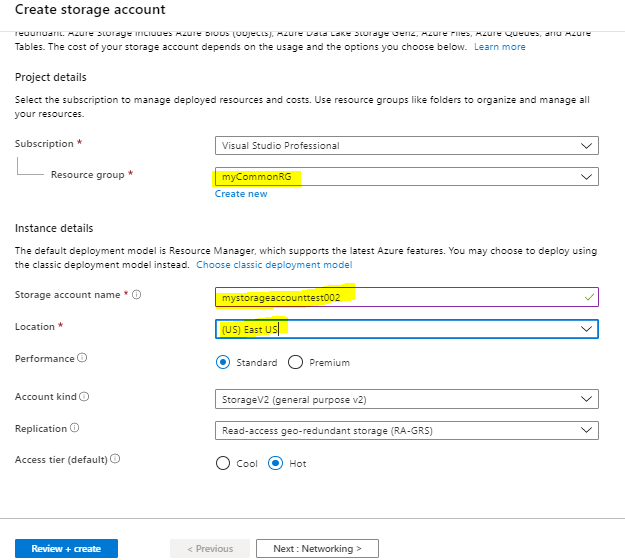
Fill in the mandatory details like resource group name, storage account name, location, etc.

Mandatory details

Since this is a learning activity, we can leave the other optional fields as default.

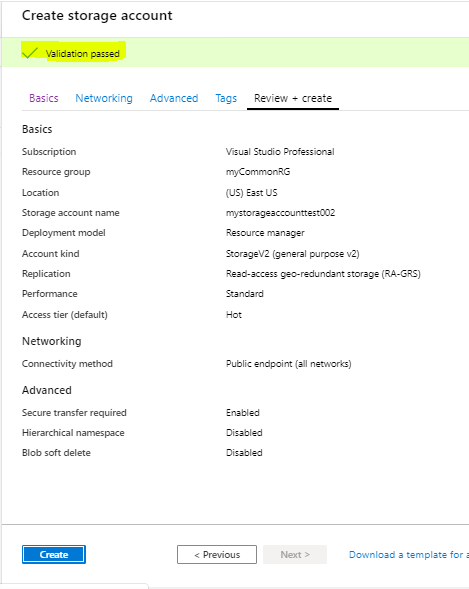
Click the Review + Create button to create the storage account.

This will validate the filled values and will show the warning if any value is wrong.

Warning

Once we click the Create button, it will take a few seconds to create the storage account.

Once the storage account is created, we can get into the storage account by clicking the Go to Resource button
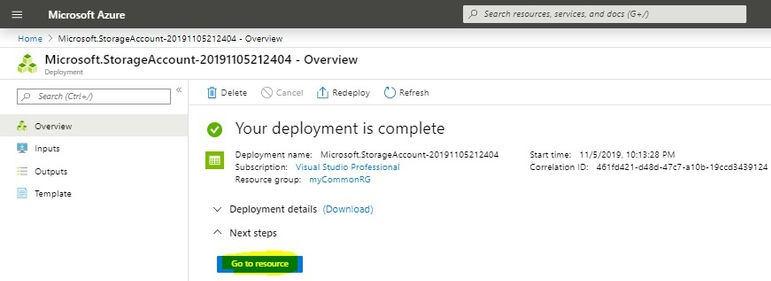
 Resource button

We will be navigated to the below screen.
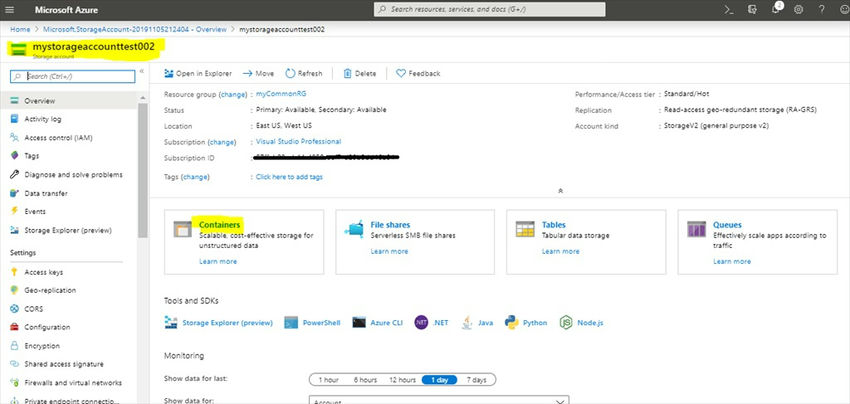
Navigate

Create a Storage Container

Once the storage account has been created, we need to create a storage container inside the storage account

To create a storage container, click the Container tile on the storage account home screen.

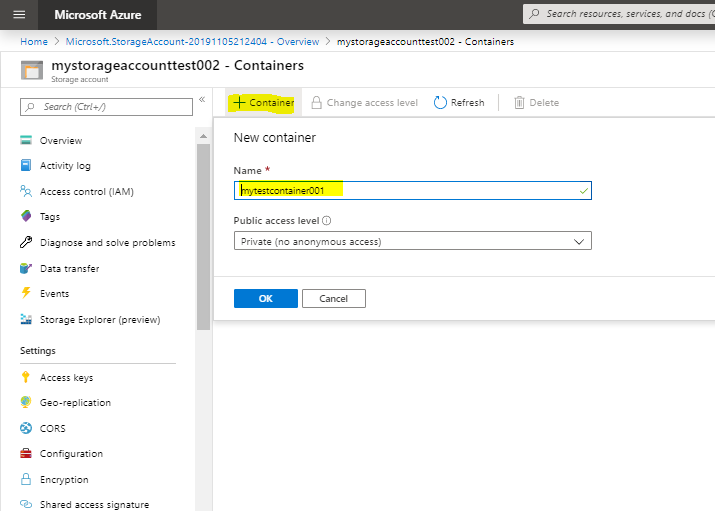
Then click the + Container button to create the container.

 Container button

Fill in the name field and select the access level as public. It will take a few seconds to create the storage container.

Once the storage container has been created we can upload files to the container by clicking the upload button.

Storage container

We have successfully created a storage account and a container.

The next step is to connect the Azure storage account programmatically using C# and upload and download files from/to the storage account.

I have created another article for uploading and downloading files to an Azure storage account using C#.

Please find the next article here Upload and download files from blob storage using C#

Happy Coding!

Create Azure Blob storage from scratch and adding to Telestream Cloud


Create Azure Blob storage from scratch and adding to Telestream Cloud

If you are an enthusiast and use the software and solutions offered by Microsoft on a daily basis, the best solution is to use Azure Blob storage for Telestream Cloud services.

All your data (objects) in Azure Blob is stored as the so-called blobs in the containers. This is the equivalent of buckets that are used in Amazon S3 and Google Cloud Storage.

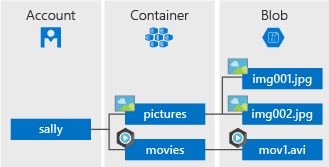
At the beginning, let's explain the structure of Azure Blob storage. It has three types of resources:

  • The storage Account
  • A container in the storage account
  • A blob
azure structure

Now you need to create a container for Telestream Cloud. First, you have to create storage account if you don’t have one already.

How to create storage account, step by step:

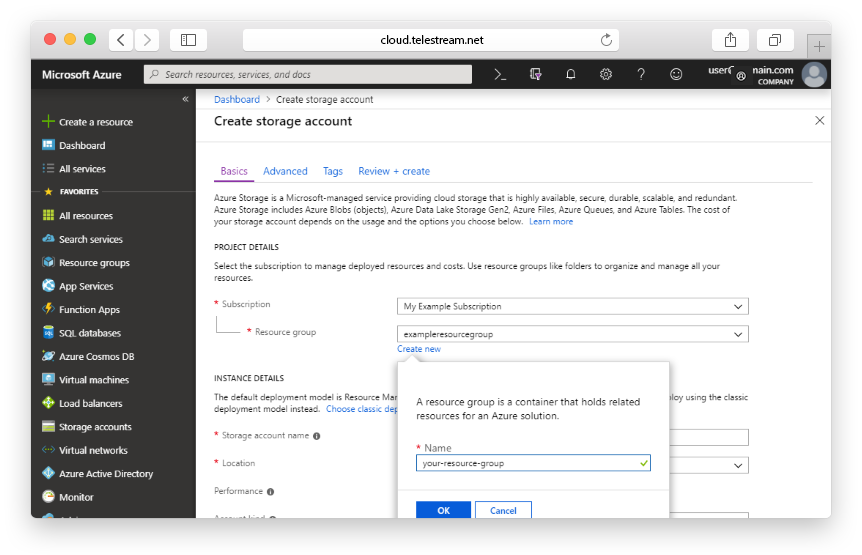
Every storage account must belong to some Azure resource group - a logical container for grouping your Azure services. When you create a storage account, you have the option to either create a new resource group or use an existing one. We’ll show you how to create a new one.

A general-purpose v2 storage account provides access to all of the Azure Storage services: blobs, files, queues, tables, and disks. Go to Azure portal and then:

  • Select All services.
  • Start typing Storage accounts in the list of resources, and select it.
  • The Storage accounts window will appear, choose Add.
  • Select the subscription in which to create the storage account.
  • Click on Create new under Resource group field.
  • Enter a name for your new resources group.
create azure storage account
  • The next thing is the name for your new storage account. It must be unique across Azure. It can consist of 3 to 24 characters and includes numbers and lowercase letters.
  • Select a location for your storage account, or use the default location.
  • Leave these fields set to their default values:
FieldValue
Deployment modelResource Manager
PerformanceStandard
Account kindStorageV2 (general-purpose v2)
ReplicationLocally redundant storage (LRS)
Access tierHot
  • We’re almost done! Select Review + Create.
  • If the review was successful, click Create.

Now it’s the time to create a container for Telestream Cloud.

Follow the instruction, step by step:

  • In the left menu for the storage account, scroll to the Blob service section, then select Blobs.
  • Then click on Container button.
  • Enter a name for your new container. You can use numbers, lowercase letters, and dash (-) characters.
  • Select the level of public access to the container. The default level is Private (no anonymous access) and we recommend to leave it this way..
  • Click OK to create the container.

Your container is ready. Well done!

Enable your Azure Blob storage in Telestream Cloud console

Before you do that you will need to obtain your Storage Access Key.

  • Go to Azure portal.
  • In the navigation panel, click on All resources.
  • Choose the proper storage account.
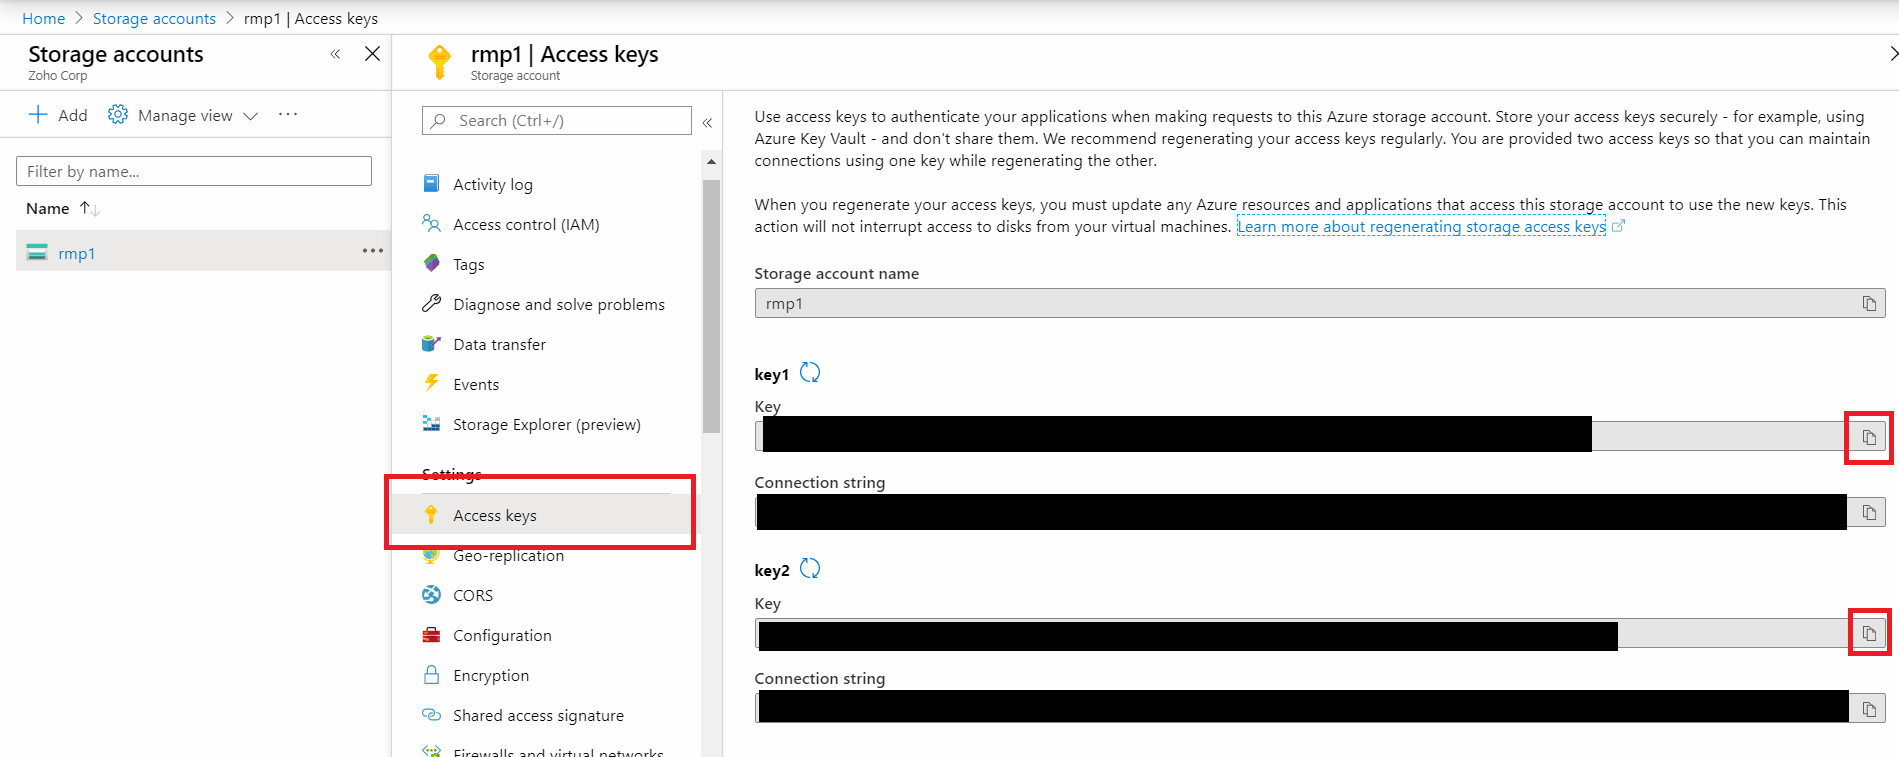
  • Click on the Key icon to view the Access Keys for the storage account. Note that every storage account has two Storage Access Keys.
  • Click on the Copy icon next to the first Storage Access Key.
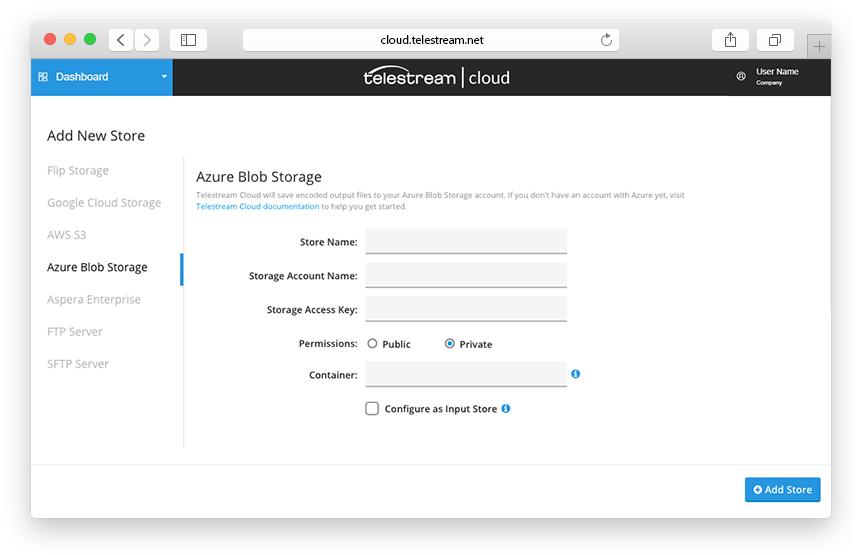
  • Open your Telestream Cloud console and paste the copied Storage Access Key.
azure cloud add
  • Fill in the appropriate fields, giving the store name, entering the storage account name and the container name.
  • Click Add Store and it’s done.

Steps to find the account name and key for your Azure storage account

Steps to find the account name and key for your Azure storage account

  • azure-storage-account
  • In the screen that appears, select the storage account for which you’d like to find the Account Name and Account Key. The name displayed here is the name of your storage account.

    azure-copy-keys

  • Copy Key1 or Key2 by clicking the copy icon. You can use either of the keys.

    azure-access-keys

  • Use the Account Name and Account Key to add your Azure storage account to RecoveryManager Plus.

How to use IBM App Connect with Microsoft Azure Blob storage


How to use IBM App Connect with Microsoft Azure Blob storage


Microsoft Azure Blob storage is a Cloud Object Storage solution. Azure Blob (Binary Large Object) is a secure object storage solution that is optimized for storing massive amounts of unstructured data for cloud-native workloads, archives, data lakes, high-performance computing, and machine learning.


Supported product and API versions

To find out which product and API versions this connector supports, see Detailed System Requirements on the IBM Support page.

Connecting to Microsoft Azure Blob storage 

Complete the connection fields that you see in the App Connect Designer Catalog page or flow editor. If necessary, work with your Microsoft Azure Blob storage administrator to obtain these values.

Microsoft Azure Blob storage connection fields:

Authentication method
Select the authentication method that you want to use, click Continue:
  • Provide credentials for App Connect to use (BASIC) - (the default)
  • Provide credentials for App Connect to use (API KEY) - (Shared key)

Then specify values in the connection fields for your chosen environment:

Table 1. Connection fields for your chosen environmentDescriptions of the fields are given after this table.
Provide credentials for App Connect to use (BASIC)
Provide credentials for App Connect to use (API KEY)
Storage account nameStorage account name
Tenant IDStorage account key
Client ID 
Client secret 
Storage account name
Specify your Microsoft Azure Blob storage account name
  • Required: True
Storage account key
Specify the access key that is used to authorize access to the data in your storage account by Shared Key authorization. Azure generates two 512-bit storage account access keys when creating a storage account.
  • Required: True
Tenant ID
Specify the unique directory (tenant) ID of the Azure Active Directory instance
  • Required: True
Client ID
Specify the application (client) ID of your application that is registered through the App registrations in the Azure portal
  • Required: True
Client secret
Specify the client secret of your application that is generated through the App registrations in the Azure portal
  • Required: True
To obtain connection values for Microsoft Azure Blob storage and to connect to IBM® App Connect, complete the following steps:
  1. Sign in to the Azure portal and go to your storage account.
  2. If you are using the Basic (default) authentication method to connect to App Connect:
    1. Enter your Storage account name. For more information, see Storage account overview on the Microsoft Documentation page.
    2. Enter the Tenant ID.

      To find the Tenant ID, go to Azure Active Directory > Properties. Then, scroll down to the Tenant ID field. Click Copy to copy the Tenant ID.

      Figure 1. The Tenant ID
      Locating the Tenant ID in Microsoft Azure

      For more information about Tenant ID, see How to find your Azure Active Directory tenant ID on the Microsoft Documentation page.

    3. Enter the Client ID.

      To find the Client ID for your application, select Azure Active Directory. From App registrations, select your application. Click Copy to copy the Client ID of your application.

      Figure 2. The Client ID of your application
      Locating the Client ID of your application in Microsoft Azure

      For more information about Client ID, see Use the portal to create an Azure AD application and service principal that can access resources on the Microsoft Documentation page.

    4. Enter the Client secret.

      To find the Client secret for your application, select Azure Active Directory. From App registrations, select your application.

      Go to Certificates & secrets > Client secrets. Click Copy to copy the existing Client secret or click New client secret to create a new Client secret and copy it.

      Figure 3. The Client secret of your application
      Locating the Client Secret of your application in Microsoft Azure

      For more information about Client secret, see Use the portal to create an Azure AD application and service principal that can access resources on the Microsoft Documentation page.

  3. If you are using the API key (Shared key) authentication method to connect to App Connect:
    1. Enter your Storage account name. For more information, see Storage account overview on the Microsoft Documentation page.
    2. Enter the Storage account key.

      To find the Storage account key, go to Security + networking > Access keys. Your account access keys appear, as well as the complete connection string for each key.

      Select Show keys to show your access keys and connection strings, and to enable buttons to copy the values.

      Under key1, find the Key value. Click Copy to copy the Storage account key.

      Figure 4. The Storage account key
      Locating the Storage account key in Microsoft Azure

      For more information about Storage account key, see Manage storage account access keys on the Microsoft Documentation page.

To connect to a Microsoft Azure Blob storage endpoint from the App Connect Designer Catalog page for the first time, expand Microsoft Azure Blob storage, then click Connect.