Introducing data products in Amazon DataZone: Simplify discovery and subscription with business use case based grouping
- Data product creation and publishing – Producers can create data products by selecting assets from their project’s inventory, setting up shared metadata, and publishing these products to make them discoverable to consumers.
- Data discovery and subscription – Consumers can search for and subscribe to data product units. Subscription requests are sent within a single workflow to producers for approval. Subscription approval processes, such as approve, reject, and revoke, ensure that access is managed securely. Once approved, access grants for the individual assets within the data product are automatically managed by the system.
- Data product lifecycle management – Producers have control over the lifecycle of data products, including the ability to edit them and remove them from the catalog. When a producer edits product metadata or adds or removes assets from a data product, they republish it as a new version, and subscriptions are updated without any reapproval.

Solution overview
To demonstrate these capabilities and workflows, consider a use case where a product marketing team wants to drive a campaign on product adoption. To be successful, they need access to sales data, customer data, and review data of similar products. The sales data engineer, acting as the data producer, owns this data and understands the common requests from customers to access these different data assets for sales-related analysis. The data producer’s objective is to group these assets so consumers, such as the product marketing team, can find them together and seamlessly subscribe to perform analysis.
The following high-level implementation steps show how to achieve this use case with data products in Amazon DataZone and are detailed in the following sections.
- Data publisher creates and publishes data product
- Create data product – The data publisher (the project contributor for the producing project) provides a name and description and adds assets to the data product.
- Curate data product – The data publisher adds a readme, glossaries, and metadata forms to the data product.
- Publish data product – The data publisher publishes the data product to make it discoverable to consumers.
- Data consumer discovers and subscribes to data product
- Search data product – The data consumer (the project member of the consuming project) looks for the desired data product in the catalog.
- Request subscription – The data consumer submits a request to access the data product.
- Data owner approves subscription request – The data owner reviews and approves the subscription request.
- Review access approval and grant – The system manages access grants for the underlying assets.
- Query subscribed data – The data consumer receives approval and can now access and query the data assets within the subscribed data product.
- Data owner maintains lifecycle of data product
- Revise data product – The data owner (the project owner for the producing project) updates the data product as needed.
- Unpublish data product – The data owner removes the data product from the catalog if necessary.
- Delete data product – The data owner permanently deletes the data product if it is no longer needed.
- Revoke subscription – The data owner manages subscriptions and revokes access if required.
Prerequisites
To follow along with this post, ensure the publisher of the product sales data asset has ingested individual data assets into Amazon DataZone. In our use case, a data engineer in sales owns the following AWS Glue tables: customers, order_items, orders, products, reviews, and shipments. The data engineer has added a data source to bring these six data assets into the sales producer project inventory, ingesting the metadata in Amazon DataZone. For instructions on ingesting metadata for AWS Glue tables, refer to Create and run an Amazon DataZone data source for the AWS Glue Data Catalog. For Amazon Redshift, see Create and run an Amazon DataZone data source for Amazon Redshift.
On the producer side, a sales product project has been created with a data lake environment. A data source was created to ingest the technical metadata from the AWS Glue salesdb database, which contains the six AWS Glue tables mentioned previously. On the consumer side, a marketing consumer project with a data lake environment has been established.
Data publisher creates and publishes data product
Sign in to Amazon DataZone data portal as a data publisher in the sales producer project. You can now create a data product to group inventory assets relevant to the sales analysis use case. Use the following steps to create and publish a data product, as shown in the following screenshot.
- Select DATA in the top ribbon of the Sales Product Project
- Select Inventory data in the navigation pane
- Choose DATA PRODUCTS to create a data product

Create data product
Follow these steps to create a data product:
- Choose Create new data product. Under Details, in the name field, enter “Sales Data Product.” In the description, enter “A data product containing the following 6 assets: Product, Shipments, Order Items, Orders, Customers, and Reviews,” as shown in the following screenshot.

- Select Choose assets to add the data assets. Select CHOOSE on the right side next to each of the six data products. Be sure to go to the second page to select the sixth asset. After all are selected, choose the blue CHOOSE button at the bottom of the page, as shown in the following screenshot. Then choose Create to create the data product.

Curate data product
You can curate the sales data product by adding a readme, glossary term, and metadata forms to provide business context to the data product, as shown in the following screenshot.
- Choose Add terms under GLOSSARY TERMS. Select a glossary term that you have added to your glossary, for example, Sales. Refer to Create, edit, or delete a business glossary for how to create a business glossary.
- Choose Add metadata form to add a form such as a business owner. Refer to Create, edit, or delete metadata forms for how to create a metadata form. In this example, we added Ownership as a metadata form.

Publish data product
Follow these steps to publish a data product.
- Once all the necessary business metadata has been added, choose Publish to publish the data product to the business catalog, as shown in the following screenshot.
- In the pop-up, choose Publish data product.
The six data assets in the data product will also be published but will only be discoverable through the data product unless published individually. Consumers cannot subscribe to the individual data assets unless they are published and made discoverable in the catalog separately.

Data consumer discovers and subscribes to data product
Now, as the marketing user, inside of the marketing project, you can find and subscribe to the sales data product.

Search data product
Sign in to the Amazon DataZone data portal as a marketing user in the marketing consumer project. In the search bar, enter “sales” or any other metadata that you added to the sales data product.
Once you find the appropriate data product, select it. You can view the metadata added and see which data assets are included in the data product by selecting the DATA ASSETS tab, as shown in the following screenshot.

Request subscription
Choose Subscribe to bring up the Subscribe to Sales Data Product modal. Make sure the project is your consumer project, for example, Marketing Consumer Project. In Reason for request, enter “Running a marketing campaign for the latest sales play.” Choose SUBSCRIBE.

The request will be routed to the sales producer project for approval.
Data owner approves subscription request
Sign in to Amazon DataZone as the project owner for the sales producer project to approve the request. You will see an alert in the task notification bar. Choose the notification icon on the top right to see the notifications, then choose Subscription Request Created, as shown in the following screenshot.

You can also view incoming subscription requests by choosing DATA in the blue ribbon at the top. Then choose Incoming requests in the navigation pane, REQUESTED under Incoming requests, and then View request, as shown in the following screenshot.

On the Subscription request pop-up, you will see who requested access to the Sales Data Product, from which project, the requested date and time, and their reason for requesting it. You can enter a Decision comment and then choose APPROVE.

Review access approval and grant
The marketing consumer is now approved to access the six assets included in the sales data product. Sign in to Amazon DataZone as a marketing user in the marketing consumer project. A new event will appear, showing that the SUBSCRIPTION REQUEST APPROVED has been completed.
You can view this in two different ways. Choose the notification icon on the top right and then EVENTS under Notifications, as shown in the first following screenshot. Alternatively, select DATA in the blue ribbon bar, then Subscribed data, and then Data products, as shown in the second following screenshot.


Choose the Sales Data Product and then Data assets. Amazon DataZone will automatically add the six data assets to the AWS Glue tables that the marketing consumer can use. Wait until you see that all six assets have been added to one environment, as shown in the following screenshot, before proceeding.

Query subscribed data
Once you complete the previous step, return to the main page of the marketing consumer project by choosing Marketing Consumer Project in the top left pull-down project selector, then choose OVERVIEW. The data can now be consumed through the Amazon Athena deep link on the right side. Choose Query data to open Athena, as shown in the following screenshot. In the Open Amazon Athena window, choose Open Amazon Athena.

A new window will open where the marketing consumer has been federated into the role that Amazon DataZone uses for granting permissions to the marketing consumer project data lake environment. The workgroup defaults to the appropriate workgroup that Amazon DataZone manages. Make sure that the Database under Data is the sub_db for the marketing consumer data lake environment. There will be six tables listed that correspond to the original six data assets added to the sales data product. Run your query. In this case, we used a query that looked for the top five best-selling products, as shown in the following code snippet and screenshot.

Data owner maintains lifecycle of data product
Follow these steps to maintain the lifecycle of the data product.
Revise data product
The data owner updates the data product, which includes editing metadata and adding or removing assets as needed. For detailed instructions, refer to Republish data products.
The sales data engineer has been tasked with removing one of the assets, the reviews table, from the sales data product.
- Open the SALES PRODUCER PROJECT by selecting it from the top project selector.
- Select DATA in the top ribbon.
- Select Published data in the navigation pane.
- Choose DATA PRODUCTS on the right side.
- Choose Sales Data Product.
The following screenshot shows these steps.

Once in the data product, the data engineer can add and remove metadata or assets. In To change any of the assets in the data product, follow these steps, as shown in the following screenshot.
- Select ASSETS in Sales Data Product.
- Select any of the assets. For this example, we remove the Reviews
- Select the three dots on the right side.
- Select Remove asset.

- A pop-up will appear confirming that you want to remove the asset. Choose Remove. The Reviews asset will now have a status of Removing asset: This asset is still available to subscribers.
- Republish the data product to remove access to this asset from all subscribers. Choose REPUBLISH and REPUBLISH DATA PRODUCT in the pop-up.
- To confirm the asset has been removed, sign in to the marketing project as the consumer. Open the Amazon Athena deep link on the OVERVIEW After selecting the
sub_dbassociated with the marketing consumer data lake environment, only five tables are visible because the Reviews table was removed from the data product, as shown in the following screenshot.

The consumer doesn’t have to take any action after a data product has been republished. If the data engineer had changed any of the business metadata, such as by adding a metadata form, updating the readme, or adding glossary terms and republishing, the consumer would see those changes reflected when viewing the data product under the subscribed data.
Unpublish data product
The data owner removes the data product from the catalog, making it no longer discoverable to the organization. You can choose to retain existing subscription access for the underlying assets. For detailed instructions, refer to refer to Unpublish data product.
Delete data product
The data owner permanently deletes the data product if it is no longer needed. Before deletion, you need to revoke all subscriptions. This action will not delete the underlying data assets. For detailed instructions, refer to Delete Data Product.
Revoke subscription
The data owner manages subscriptions and may revoke a subscription after it has been approved. For detailed instructions, refer to Revoke subscription.
Cleanup
To ensure no additional charges are incurred after testing, be sure to delete the Amazon DataZone domain. Refer to Delete domains for the process.
Conclusion
Data products are crucial for improving decision-making accuracy and speed in modern businesses. Beyond making raw data available, they offer strategic packaging, curation, and discoverability. Data products help customers address the difficulty of locating and accessing fragmented data, which reduces the time and resources needed to perform this important task.
Amazon DataZone already facilitates data cataloging from various sources. Building on this capability, this new feature streamlines data utilization by bundling data into purpose-built data products aligned with business goals. As a result, customers can unlock the full potential of their data.
The feature is supported in all the AWS commercial Regions where Amazon DataZone is currently available. To get started, check out the Working with data products.
About the authors
 Jason Hines is a Senior Solutions Architect, at AWS, specializing in serving global customers in the Healthcare and Life Sciences industries. With over 25 years of experience, he has worked with numerous Fortune 100 companies across multiple verticals, bringing a wealth of knowledge and expertise to his role. Outside of work, Jason has a passion for an active lifestyle. He enjoys various outdoor activities such as hiking, scuba diving, and exploring nature. Maintaining a healthy work-life balance is essential to him.
 Ramesh H Singh is a Senior Product Manager Technical (External Services) at AWS in Seattle, Washington, currently with the Amazon DataZone team. He is passionate about building high-performance ML/AI and analytics products that enable enterprise customers to achieve their critical goals using cutting-edge technology. Connect with him on LinkedIn.
 Leonardo Gomez is a Principal Analytics Specialist Solutions Architect at AWS. He has over a decade of experience in data management, helping customers around the globe address their business and technical needs. Connect with him on LinkedIn.
Federating access to Amazon DataZone with AWS IAM Identity Center and Okta
Post Syndicated from Carlos Gallegos original https://aws.amazon.com/blogs/big-data/federating-access-to-amazon-datazone-with-aws-iam-identity-center-and-okta/
Many customers rely today on Okta or other identity providers (IdPs) to federate access to their technology stack and tools. With federation, security teams can centralize user management in a single place, which helps simplify and brings agility to their day-to-day operations while keeping highest security standards.
To help develop a data-driven culture, everyone inside an organization can use Amazon DataZone. To realize the benefits of using Amazon DataZone for governing data and making it discoverable and available across different teams for collaboration, customers integrate it with their current technology stack. Handling access through their identity provider and preserving a familiar single sign-on (SSO) experience enables customers to extend the use of Amazon DataZone to users across teams in the organization without any friction while keeping centralized control.
Amazon DataZone is a fully managed data management service that makes it faster and simpler for customers to catalog, discover, share, and govern data stored across Amazon Web Services (AWS), on premises, and third-party sources. It also makes it simpler for data producers, analysts, and business users to access data throughout an organization so that they can discover, use, and collaborate to derive data-driven insights.
You can use AWS IAM Identity Center to securely create and manage identities for your organization’s workforce, or sync and use identities that are already set up and available in Okta or other identity provider, to keep centralized control of them. With IAM Identity Center you can also manage the SSO experience of your organization centrally, across your AWS accounts and applications.
This post guides you through the process of setting up Okta as an identity provider for signing in users to Amazon DataZone. The process uses IAM Identity Center and its native integration with Amazon DataZone to integrate with external identity providers. Note that, even though this post focuses on Okta, the presented pattern relies on the SAML 2.0 standard and so can be replicated with other identity providers.
Prerequisites
To build the solution presented in this post, you must have:
- A developer or licensed Okta account along with administrative access to manage users and permissions.
- IAM Identity Center administrator access for your single or multi-account environment. For more information, see Enabling AWS IAM Identity Center.
- A provisioned Amazon DataZone domain. For more information, see Create domains.
- Have IAM Identity Center for Amazon DataZone enabled. For more information, see Setting up AWS IAM Identity Center for Amazon DataZone.
Process overview
Throughout this post you’ll follow these high-level steps:
- Establish a SAML connection between Okta and IAM Identity Center
- Set up automatic provisioning of users and groups in IAM Identity Center so that users and groups in the Okta domain are created in Identity Center.
- Assign users and groups to your AWS accounts in IAM Identity Center by assuming an AWS Identity and Access Management (IAM) role.
- Access the AWS Management Console and Amazon DataZone portal through Okta SSO.
- Manage Amazon DataZone specific permissions in the Amazon DataZone portal.
Setting up user federation with Okta and IAM Identity Center
This guide follows the steps in Configure SAML and SCIM with Okta and IAM Identity Center.
Before you get started, review the following items in your Okta setup:
- Every Okta user must have a First name, Last name, Username and Display name value specified.
- Each Okta user has only a single value per data attribute, such as email address or phone number. Users that have multiple values will fail to synchronize. If there are users that have multiple values in their attributes, remove the duplicate attributes before attempting to provision the user in IAM Identity Center. For example, only one phone number attribute can be synchronized. Because the default phone number attribute is work phone, use the work phone attribute to store the user’s phone number, even if the phone number for the user is a home phone or a mobile phone.
- If you update a user’s address you must have streetAddress, city, state, zipCode and the countryCode value specified. If any of these values aren’t specified for the Okta user at the time of synchronization, the user (or changes to the user) won’t be provisioned.

1) Establish a SAML connection between Okta and AWS IAM Identity Center
Now, let’s establish a SAML connection between Okta and AWS IAM Identity Center. First, you’ll create an application in Okta to establish the connection:
- Sign in to the Okta admin dashboard, expand Applications, then select Applications.
- On the Applications page, choose Browse App Catalog.
- In the search box, enter
AWS IAM Identity Center, then select the app to add the IAM Identity Center app.

- Choose the Sign On tab.

- Under SAML Signing Certificates, select Actions, and then select View IdP Metadata. A new browser tab opens showing the document tree of an XML file. Select all of the XML from
<md:EntityDescriptor>to</md:EntityDescriptor>and copy it to a text file. - Save the text file as
metadata.xml.

Leave the Okta admin dashboard open, you will continue using it in the later steps.
Second, you’re going to set up Okta as an external identity provider in IAM Identity Center:
- Open the IAM Identity Center console as a user with administrative privileges.
- Choose Settings in the navigation pane.
- On the Settings page, choose Actions, and then select Change identity source.

- Under Choose identity source, select External identity provider, and then choose Next.

- Under Configure external identity provider, do the following:
- Under Service provider metadata, choose Download metadata file to download the IAM Identity Center metadata file and save it on your system. You will provide the Identity Center SAML metadata file to Okta later in this tutorial.
- Copy the following items to a text file for easy access (you’ll need these values later):
- IAM Identity Center Assertion Consumer Service (ACS) URL
- IAM Identity Center issuer URL
- Copy the following items to a text file for easy access (you’ll need these values later):
- Under Identity provider metadata, under IdP SAML metadata, choose Choose file and then select the metadata.xml file you created in the previous step.
- Choose Next.
- Under Service provider metadata, choose Download metadata file to download the IAM Identity Center metadata file and save it on your system. You will provide the Identity Center SAML metadata file to Okta later in this tutorial.
- After you read the disclaimer and are ready to proceed, enter
accept. - Choose Change identity source.

Leave the AWS console open, because you will use it in the next procedure.
- Return to the Okta admin dashboard and choose the Sign On tab of the IAM Identity Center app, then choose Edit.
- Under Advanced Sign-on Settings enter the following:
- For ACS URL, enter the value you copied for IAM Identity Center Assertion Consumer Service (ACS) URL.
- For Issuer URL, enter the value you copied for IAM Identity Center issuer URL.
- For Application username format, select one of the options from the drop-down menu.
Make sure the value you select is unique for each user. For this tutorial, select Okta username.
- Choose Save.

2) Set up automatic provisioning of users and groups in AWS IAM Identity Center
You are now able to set up automatic provisioning of users from Okta into IAM Identity Center. Leave the Okta admin dashboard open and return to the IAM Identity Center console for the next step.
- In the IAM Identity Center console, on the Settings page, locate the Automatic provisioning information box, and then choose Enable. This enables automatic provisioning in IAM Identity Center and displays the necessary System for Cross-domain Identity Management (SCIM) endpoint and access token information.

- In the Inbound automatic provisioning dialog box, copy each of the values for the following options:
- SCIM endpoint
- Access token
You will use these values to configure provisioning in Okta later.
- Choose Close.

- Return to the Okta admin dashboard and navigate to the IAM Identity Center app.
- On the AWS IAM Identity Center app page, choose the Provisioning tab, and then in the navigation pane, under Settings, choose Integration.
- Choose Edit, and then select the check box next to Enable API integration to enable provisioning.
- Configure Okta with the SCIM provisioning values from IAM Identity Center that you copied earlier:
- In the Base URL field, enter the SCIM endpoint Make sure that you remove the trailing forward slash at the end of the URL.
- In the API Token field, enter the Access token value.
- Choose Test API Credentials to verify the credentials entered are valid. The message AWS IAM Identity Center was verified successfully! displays.
- Choose Save. You are taken to the Settings area, with Integration selected.

- Review the following setup before moving forward. In the Provisioning tab, in the navigation pane under Settings, choose To App. Check that all options are enabled. They should be enabled by default, but if not, enable them.

3) Assign users and groups to your AWS accounts in AWS IAM Identity Center by assuming an AWS IAM role
By default, no groups nor users are assigned to your Okta IAM Identity Center app. Complete the following steps to synchronize users with IAM Identity Center.
- In the Okta IAM Identity Center app page, choose the Assignments tab. You can assign both people and groups to the IAM Identity Center app.
- To assign people:
- In the Assignments page, choose Assign, and then choose Assign to people.
- Select the Okta users that you want to have access to the IAM Identity Center app. Choose Assign, choose Save and Go Back, and then choose Done.
This starts the process of provisioning the individual users into IAM Identity Center.

- To assign groups:
- Choose the Push Groups tab. You can create rules to automatically provision Okta groups into IAM Identity Center.

- Choose the Push Groups drop-down list and select Find groups by rule.
- In the By rule section, set a rule name and a condition. For this post we’re using
AWS SSO Ruleas rule name andstarts with awsssoas a group name condition. This condition can be different depending on the name of the group you want to sync. - Choose Create Rule

- (Optional) To create a new group choose Directory in the navigation pane, and then choose Groups.

- Choose Add group and enter a name, and then choose Save.

- After you have created the group, you can assign people to it. Select the group name to manage the group’s users.

- Choose Assign people and select the users that you want to assign to the group.

- You will see the users that are assigned to the group.

- Going back to Applications in the navigation pane, select the AWS IAM Identity Center app and choose the Push Groups tab. You should have the groups that match the rule synchronized between Okta and IAM Identity Center. The group status should be set to Active after the group and its members are updated in Identity Center.

- To assign people:
- Return to the IAM Identity Center console. In the navigation pane, choose Users. You should see the user list that was updated by Okta.

- In the left navigation, select Groups, you should see the group list that was updated by Okta.

Congratulations! You have successfully set up a SAML connection between Okta and AWS and have verified that automatic provisioning is working.
OPTIONAL: If you need to provide Amazon DataZone console access to the Okta users and groups, you can manage these permissions through the IAM Identity Center console.
- In the IAM Identity Center navigation pane, under Multi-account permissions, choose AWS accounts.
- On the AWS accounts page, the Organizational structure displays your organizational root with your accounts underneath it in the hierarchy. Select the checkbox for your management account, then choose Assign users or groups.

- The Assign users and groups workflow displays. It consists of three steps:
- For Step 1: Select users and groups choose the user that will be performing the administrator job function. Then choose Next.
- For Step 2: Select permission sets choose Create permission set to open a new tab that steps you through the three sub-steps involved in creating a permission set.
- For Step 1: Select permission set type complete the following:
- In Permission set type, choose Predefined permission set.
- In Policy for predefined permission set, choose AdministratorAccess.
- Choose Next.
- For Step 2: Specify permission set details, keep the default settings, and choose Next.
The default settings create a permission set named AdministratorAccess with session duration set to one hour. You can also specify reduced permissions with a custom policy just to allow Amazon DataZone console access. - For Step 3: Review and create, verify that the Permission set type uses the AWS managed policy AdministratorAccess or your custom policy. Choose Create. On the Permission sets page, a notification appears informing you that the permission set was created. You can close this tab in your web browser now.
- For Step 1: Select permission set type complete the following:
- On the Assign users and groups browser tab, you are still on Step 2: Select permission sets from which you started the create permission set workflow.
- In the Permissions sets area, Refresh. The AdministratorAccess permission or your custom policy set you created appears in the list. Select the checkbox for that permission set, and then choose Next.

- For Step 3: Review and submit review the selected user and permission set, then choose Submit.
The page updates with a message that your AWS account is being configured. Wait until the process completes. - You are returned to the AWS accounts page. A notification message informs you that your AWS account has been re-provisioned, and the updated permission set is applied. When a user signs in, they will have the option of choosing the AdministratorAccess role or a custom policy role.
- For Step 3: Review and submit review the selected user and permission set, then choose Submit.
4) Access the AWS console and Amazon DataZone portal through Okta SSO
Now, you can test your user access into the console and Amazon DataZone portal using the Okta external identity application.
- Sign in to the Okta dashboard using a test user account.
- Under My Apps, select the AWS IAM Identity Center icon.

- Complete the authentication process using your Okta credentials.

4.1) For administrative users
- You’re signed in to the portal and can see the AWS account icon. Expand that icon to see the list of AWS accounts that the user can access. In this tutorial, you worked with a single account, so expanding the icon only shows one account.
- Select the account to display the permission sets available to the user. In this tutorial you created the AdministratorAccess permission set.
- Next to the permission set are links for the type of access available for that permission set. When you created the permission set, you specified both management console and programmatic access be enabled, so those two options are present. Select Management console to open the console.

- The user is signed in to the console. Using the search bar, look for
Amazon DataZone serviceand open it. - Open the Amazon DataZone console and make sure you have enabled SSO users through IAM Identity Center. In case you haven’t, you can follow the steps in Enable IAM Identity Center for Amazon DataZone.
Note: In this post, we followed the default IAM Identity Center for Amazon DataZone configuration, which has implicit user assignment mode enabled. With this option, any user added to your Identity Center directory can access your Amazon DataZone domain automatically. If you opt for using explicit user assignment instead, remember that you need to manually add users to your Amazon DataZone domain in the Amazon DataZone console for them to have access.
To learn more about how to manage user access to an Amazon DataZone domain, see Manage users in the Amazon DataZone console.
- Choose the Open data portal to access the Amazon DataZone Portal.

4.2) For all other users
- Choose the Applications tab in the AWS access portal window and choose the Amazon DataZone data portal application link.

- In the Amazon DataZone data portal, choose SIGN IN WITH SSO to continue

Congratulations! Now you’re signed in to the Amazon DataZone data portal using your user that’s managed by Okta.

5) Manage Amazon DataZone specific permissions in the Amazon DataZone portal
After you have access to the Amazon DataZone portal, you can work with projects, the data assets within, environments, and other constructs that are specific to Amazon DataZone. A project is the overarching construct that brings together people, data, and analytics tools. A project has two roles: owner and contributor. Next, you’ll learn how a user can be made an owner or contributor of existing projects.
These steps must be completed by the existing project owner in the Amazon DataZone portal:
- Open the Amazon DataZone portal, select the project in the drop-down list on the left top of the portal and choose the project you own

- In the project window, choose the Members tab to see the current users in the project and add a new one.

- Choose Add Members to add a new user. Make sure the User type is SSO User to add an Okta user. Look for the Okta user in the name drop-down list, select it, and select a project role for it. Finally, choose Add Members to add the user.

- The Okta user has been granted the selected project role and can interact with the project, assets, and tools.

- You can also grant permissions to SSO Groups. Choose Add members, then select SSO group in the drop-down list, next select the Group name, set the assigned project role, and choose Add Members.

- The Okta group has been granted the project role and can interact with the project, assets, and tools.

You can also manage SSO user and group access to the Amazon DataZone data portal from the console. See Manage users in the Amazon DataZone console for additional details.
Clean up
To ensure a seamless experience and avoid any future charges, we kindly request that you follow these steps:
- Delete the Amazon DataZone project if you created it as part of this blog post.
- Delete the Amazon DataZone domain if you created it as part of this blog post.
- If you changed your identity source from IAM Identity Center to an external identity provider (IdP), please revert it back to IAM Identity Center.
- If you added an AWS IAM Identity Center app integration to your Okta account as part of this post, please delete the app integration.
- Delete the permission set that you created specifically for this blog post.
By following these steps, you can effectively clean up the resources utilized in this blog post and prevent any unnecessary charges from accruing.
Summary
In this post, you followed a step-by-step guide to set up and use Okta to federate access to Amazon DataZone with AWS IAM Identity Center. You also learned how to group users and manage their permission in Amazon DataZone. As a final thought, now that you’re familiar with the elements involved in the integration of an external identity provider such as Okta to federate access to Amazon DataZone, you’re ready to try it with other identity providers.
To learn more about, see Managing Amazon DataZone domains and user access.
About the Authors
 Carlos Gallegos is a Senior Analytics Specialist Solutions Architect at AWS. Based in Austin, TX, US. He’s an experienced and motivated professional with a proven track record of delivering results worldwide. He specializes in architecture, design, migrations, and modernization strategies for complex data and analytics solutions, both on-premises and on the AWS Cloud. Carlos helps customers accelerate their data journey by providing expertise in these areas. Connect with him on LinkedIn.
 Jose Romero is a Senior Solutions Architect for Startups at AWS. Based in Austin, TX, US. He’s passionate about helping customers architect modern platforms at scale for data, AI, and ML. As a former senior architect in AWS Professional Services, he enjoys building and sharing solutions for common complex problems so that customers can accelerate their cloud journey and adopt best practices. Connect with him on LinkedIn.
 Arun Pradeep Selvaraj is a Senior Solutions Architect at AWS. Arun is passionate about working with his customers and stakeholders on digital transformations and innovation in the cloud while continuing to learn, build, and reinvent. He is creative, fast-paced, deeply customer-obsessed and uses the working backwards process to build modern architectures to help customers solve their unique challenges. Connect with him on LinkedIn.
Get started with the new Amazon DataZone enhancements for Amazon Redshift
Post Syndicated from Carmen Manzulli original https://aws.amazon.com/blogs/big-data/get-started-with-the-new-amazon-datazone-enhancements-for-amazon-redshift/
In today’s data-driven landscape, organizations are seeking ways to streamline their data management processes and unlock the full potential of their data assets, while controlling access and enforcing governance. That’s why we introduced Amazon DataZone.
Amazon DataZone is a powerful data management service that empowers data engineers, data scientists, product managers, analysts, and business users to seamlessly catalog, discover, analyze, and govern data across organizational boundaries, AWS accounts, data lakes, and data warehouses.
On March 21, 2024, Amazon DataZone introduced several exciting enhancements to its Amazon Redshift integration that simplify the process of publishing and subscribing to data warehouse assets like tables and views, while enabling Amazon Redshift customers to take advantage of the data management and governance capabilities or Amazon DataZone.
These updates empower the experience for both data users and administrators.
Data producers and consumers can now quickly create data warehouse environments using preconfigured credentials and connection parameters provided by their Amazon DataZone administrators.
Additionally, these enhancements grant administrators greater control over who can access and use the resources within their AWS accounts and Redshift clusters, and for what purpose.
As an administrator, you can now create parameter sets on top of DefaultDataWarehouseBlueprint by providing parameters such as cluster, database, and an AWS secret. You can use these parameter sets to create environment profiles and authorize Amazon DataZone projects to use these environment profiles for creating environments.
In turn, data producers and data consumers can now select an environment profile to create environments without having to provide the parameters themselves, saving time and reducing the risk of issues.
In this post, we explain how you can use these enhancements to the Amazon Redshift integration to publish your Redshift tables to the Amazon DataZone data catalog, and enable users across the organization to discover and access them in a self-service fashion. We present a sample end-to-end customer workflow that covers the core functionalities of Amazon DataZone, and include a step-by-step guide of how you can implement this workflow.
The same workflow is available as video demonstration on the Amazon DataZone official YouTube channel.
Solution overview
To get started with the new Amazon Redshift integration enhancements, consider the following scenario:
- A sales team acts as the data producer, owning and publishing product sales data (a single table in a Redshift cluster called
catalog_sales) - A marketing team acts as the data consumer, needing access to the sales data in order to analyze it and build product adoption campaigns
At a high level, the steps we walk you through in the following sections include tasks for the Amazon DataZone administrator, Sales team, and Marketing team.
Prerequisites
For the workflow described in this post, we assume a single AWS account, a single AWS Region, and a single AWS Identity and Access Management (IAM) user, who will act as Amazon DataZone administrator, Sales team (producer), and Marketing team (consumer).
To follow along, you need an AWS account. If you don’t have an account, you can create one.
In addition, you must have the following resources configured in your account:
- An Amazon DataZone domain with admin, sales, and marketing projects
- A Redshift namespace and workgroup
If you don’t have these resources already configured, you can create them by deploying an AWS CloudFormation stack:
- Choose Launch Stack to deploy the provided CloudFormation template.
- For
AdminUserPassword, enter a password, and take note of this password to use in later steps. - Leave the remaining settings as default.
- Select I acknowledge that AWS CloudFormation might create IAM resources, then choose Submit.
- When the stack deployment is complete, on the Amazon DataZone console, choose View domains in the navigation pane to see the new created Amazon DataZone domain.
- On the Amazon Redshift Serverless console, in the navigation pane, choose Workgroup configuration and see the new created resource.
You should be logged in using the same role that you used to deploy the CloudFormation stack and verify that you’re in the same Region.
As a final prerequisite, you need to create a catalog_sales table in the default Redshift database (dev).
- On the Amazon Redshift Serverless console, selected your workgroup and choose Query data to open the Amazon Redshift query editor.
- In the query editor, choose your workgroup and select Database user name and password as the type of connection, then provide your admin database user name and password.
- Use the following query to create the
catalog_salestable, which the Sales team will publish in the workflow:
Now you’re ready to get started with the new Amazon Redshift integration enhancements.
Amazon DataZone administrator tasks
As the Amazon DataZone administrator, you perform the following tasks:
- Configure the
DefaultDataWarehouseBlueprint.- Authorize the Amazon DataZone admin project to use the blueprint to create environment profiles.
- Create a parameter set on top of
DefaultDataWarehouseBlueprintby providing parameters such as cluster, database, and AWS secret.
- Set up environment profiles for the Sales and Marketing teams.
Configure the DefaultDataWarehouseBlueprint
Amazon DataZone blueprints define what AWS tools and services are provisioned to be used within an Amazon DataZone environment. Enabling the data warehouse blueprint will allow data consumers and data producers to use Amazon Redshift and the Query Editor for data sharing, accessing, and consuming.
- On the Amazon DataZone console, choose View domains in the navigation pane.
- Choose your Amazon DataZone domain.
- Choose Default Data Warehouse.
If you used the CloudFormation template, the blueprint is already enabled.

Part of the new Amazon Redshift experience involves the Managing projects and Parameter sets tabs. The Managing projects tab lists the projects that are allowed to create environment profiles using the data warehouse blueprint. By default, this is set to all projects. For our purpose, let’s grant only the admin project.
- On the Managing projects tab, choose Edit.

- Select Restrict to only managing projects and choose the
AdminPRJproject. - Choose Save changes.
With this enhancement, the administrator can control which projects can use default blueprints in their account to create environment profile

The Parameter sets tab lists parameters that you can create on top of DefaultDataWarehouseBlueprint by providing parameters such as Redshift cluster or Redshift Serverless workgroup name, database name, and the credentials that allow Amazon DataZone to connect to your cluster or workgroup. You can also create AWS secrets on the Amazon DataZone console. Before these enhancements, AWS secrets had to be managed separately using AWS Secrets Manager, making sure to include the proper tags (key-value) for Amazon Redshift Serverless.
For our scenario, we need to create a parameter set to connect a Redshift Serverless workgroup containing sales data.
- On the Parameter sets tab, choose Create parameter set.

- Enter a name and optional description for the parameter set.
- Choose the Region containing the resource you want to connect to (for example, our workgroup is in
us-east-1). - In the Environment parameters section, select Amazon Redshift Serverless.
If you already have an AWS secret with credentials to your Redshift Serverless workgroup, you can provide the existing AWS secret ARN. In this case, the secret must be tagged with the following (key-value): AmazonDataZoneDomain: <Amazon DataZone domain ID>.
- Because we don’t have an existing AWS secret, we create a new one by choosing Create new AWS Secret.

- In the pop-up, enter a secret name and your Amazon Redshift credentials, then choose Create new AWS Secret.
Amazon DataZone creates a new secret using Secrets Manager and makes sure the secret is tagged with the domain in which you’re creating the parameter set. 
- Enter the Redshift Serverless workgroup name and database name to complete the parameters list. If you used the provided CloudFormation template, use
sales-workgroupfor the workgroup name anddevfor the database name. - Choose Create parameter set.
You can see the parameter set created for your Redshift environment and the blueprint enabled with a single managing project configured.
Set up environment profiles for the Sales and Marketing teams
Environment profiles are predefined templates that encapsulate technical details required to create an environment, such as the AWS account, Region, and resources and tools to be added to projects. The next Amazon DataZone administrator task consists of setting up environment profiles, based on the default enabled blueprint, for the Sales and Marketing teams.
This task will be performed from the admin project in the Amazon DataZone data portal, so let’s follow the data portal URL and start creating an environment profile for the Sales team to publish their data.
- On the details page of your Amazon DataZone domain, in the Summary section, choose the link for your data portal URL.

When you open the data portal for the first time, you’re prompted to create a project. If you used the provided CloudFormation template, the projects are already created.
- Choose the
AdminPRJproject.
- On the Environments page, choose Create environment profile.

- Enter a name (for example,
SalesEnvProfile) and optional description (for example,Sales DWH Environment Profile) for the new environment profile. - For Owner, choose
AdminPRJ. - For Blueprint, select the
DefaultDataWarehouseblueprint (you’ll only see blueprints where the admin project is listed as a managing project).
- Choose the current enabled account and the parameter set you previously created.
Then you will see each pre-compiled value for Redshift Serverless.  Under Authorized projects, you can pick the authorized projects allowed to use this environment profile to create an environment. By default, this is set to All projects.
- Select Authorized projects only.
- Choose Add projects and choose the
SalesPRJproject. - Configure the publishing permissions for this environment profile. Because the Sales team is our data producer, we select Publish from any schema.
- Choose Create environment profile.

Next, you create a second environment profile for the Marketing team to consume data. To do this, you repeat similar steps made for the Sales team.
- Choose the
AdminPRJproject. - On the Environments page, choose Create environment profile.
- Enter a name (for example,
MarketingEnvProfile) and optional description (for example,Marketing DWH Environment Profile). - For Owner, choose
AdminPRJ. - For Blueprint, select the
DefaultDataWarehouseblueprint. - Select the parameter set you created earlier.
- This time, keep All projects as the default (alternatively, you could select Authorized projects only and add
MarketingPRJ). - Configure the publishing permissions for this environment profile. Because the Marketing team is our data consumer, we select Don’t allow publishing.
- Choose Create environment profile.
With these two environment profiles in place, the Sales and Marketing teams can start working on their projects on their own to create their proper environments (resources and tools) with fewer configurations and less risk to incur errors, and publish and consume data securely and efficiently within these environments.
To recap, the new enhancements offer the following features:
- When creating an environment profile, you can choose to provide your own Amazon Redshift parameters or use one of the parameter sets from the blueprint configuration. If you choose to use the parameter set created in the blueprint configuration, the AWS secret only requires the
AmazonDataZoneDomaintag (theAmazonDataZoneProjecttag is only required if you choose to provide your own parameter sets in the environment profile). - In the environment profile, you can specify a list of authorized projects, so that only authorized projects can use this environment profile to create data warehouse environments.
- You can also specify what data authorized projects are allowed to be published. You can choose one of the following options: Publish from any schema, Publish from the default environment schema, and Don’t allow publishing.
These enhancements grant administrators more control over Amazon DataZone resources and projects and facilitate the common activities of all roles involved.
Sales team tasks
As a data producer, the Sales team performs the following tasks:
- Create a sales environment.
- Create a data source.
- Publish sales data to the Amazon DataZone data catalog.
Create a sales environment
Now that you have an environment profile, you need to create an environment in order to work with data and analytics tools in this project.
- Choose the
SalesPRJproject. - On the Environments page, choose Create environment.
- Enter a name (for example,
SalesDwhEnv) and optional description (for example,Environment DWH for Sales) for the new environment. - For Environment profile, choose
SalesEnvProfile.
Data producers can now select an environment profile to create environments, without the need to provide their own Amazon Redshift parameters. The AWS secret, Region, workgroup, and database are ported over to the environment from the environment profile, streamlining and simplifying the experience for Amazon DataZone users.
- Review your data warehouse parameters to confirm everything is correct.
- Choose Create environment.
The environment will be automatically provisioned by Amazon DataZone with the preconfigured credentials and connection parameters, allowing the Sales team to publish Amazon Redshift tables seamlessly.
Create a data source
Now, let’s create a new data source for our sales data.
- Choose the
SalesPRJproject. - On the Data page, choose Create data source.
- Enter a name (for example,
SalesDataSource) and optional description. - For Data source type, select Amazon Redshift.
- For Environment¸ choose
SalesDevEnv. - For Redshift credentials, you can use the same credentials you provided during environment creation, because you’re still using the same Redshift Serverless workgroup.

- Under Data Selection, enter the schema name where your data is located (for example,
public) and then specify a table selection criterion (for example, *).
Here, the * indicates that this data source will bring into Amazon DataZone all the technical metadata from the database tables of your schema (in this case, a single table called catalog_sales).
- Choose Next.

On the next page, automated metadata generation is enabled. This means that Amazon DataZone will automatically generate the business names of the table and columns for that asset.
- Leave the settings as default and choose Next.
- For Run preference, select when to run the data source. Amazon DataZone can automatically publish these assets to the data catalog, but let’s select Run on demand so we can curate the metadata before publishing.
- Choose Next.

- Review all settings and choose Create data source.
- After the data source has been created, you can manually pull technical metadata from the Redshift Serverless workgroup by choosing Run.

When the data source has finished running, you can see the catalog_sales asset correctly added to the inventory.
Publish sales data to the Amazon DataZone data catalog
Open the catalog_sales asset to see details of the new asset (business metadata, technical metadata, and so on).
In a real-world scenario, this pre-publishing phase is when you can enrich the asset providing more business context and information, such as a readme, glossaries, or metadata forms. For example, you can start accepting some metadata automatically generated recommendations and rename the asset or its columns in order to make them more readable, descriptive, and easy to search and understand from a business user.
For this post, simply choose Publish asset to complete the Sales team tasks. 
Marketing team tasks
Let’s switch to the Marketing team and subscribe to the catalog_sales asset published by the Sales team. As a consumer team, the Marketing team will complete the following tasks:
- Create a marketing environment.
- Discover and subscribe to sales data.
- Query the data in Amazon Redshift.
Create a marketing environment
To subscribe and access Amazon DataZone assets, the Marketing team needs to create an environment.
- Choose the
MarketingPRJproject. - On the Environments page, choose Create environment.
- Enter a name (for example,
MarketingDwhEnv) and optional description (for example,Environment DWH for Marketing). - For Environment profile, choose
MarketingEnvProfile.
As with data producers, data consumers can also benefit from a pre-configured profile (created and managed by the administrator) in order to speed up the environment creation process, avoiding mistakes and reducing risks of errors.
- Review your data warehouse parameters to confirm everything is correct.
- Choose Create environment.
Discover and subscribe to sales data
Now that we have a consumer environment, let’s search the catalog_sales table in the Amazon DataZone data catalog.
- Enter
salesin the search bar. - Choose the
catalog_salestable. - Choose Subscribe.

- In the pop-up window, choose your marketing consumer project, provide a reason for the subscription request, and choose Subscribe.

When you get a subscription request as a data producer, Amazon DataZone will notify you through a task in the sales producer project. Because you’re acting as both subscriber and publisher here, you will see a notification.
- Choose the notification, which will open the subscription request.
You can see details including which project has requested access, who is the requestor, and why access is needed.
- To approve, enter a message for approval and choose Approve.

Now that subscription has been approved, let’s go back to the MarketingPRJ. On the Subscribed data page, catalog_sales is listed as an approved asset, but access hasn’t been granted yet. If we choose the asset, you can see that Amazon DataZone is working on the backend to automatically grant the access. When it’s complete, you’ll see the subscription as granted and the message “Asset added to 1 environment.” 
Query data in Amazon Redshift
Now that the marketing project has access to the sales data, we can use the Amazon Redshift Query Editor V2 to analyze the sales data.
- Under
MarketingPRJ, go to the Environments page and select the marketing environment. - Under the analytics tools, choose Query data with Amazon Redshift, which redirects you to the query editor within the environment of the project.
- To connect to Amazon Redshift, choose your workgroup and select Federated user as the connection type.
When you’re connected, you will see the catalog_sales table under the public schema.
- To make sure that you have access to this table, run the following query:
SELECT * FROM catalog_sales LIMIT 10 As a consumer, you’re now able to explore data and create reports, or you can aggregate data and create new assets to publish in Amazon DataZone, becoming a producer of a new data product to share with other users and departments.
Clean up
To clean up your resources, complete the following steps:
- On the Amazon DataZone console, delete the projects used in this post. This will delete most project-related objects like data assets and environments.
- Clean up all Amazon Redshift resources (workgroup and namespace) to avoid incurring additional charges.
Conclusion
In this post, we demonstrated how you can get started with the new Amazon Redshift integration in Amazon DataZone. We showed how to streamline the experience for data producers and consumers and how to grant administrators control over data resources.
Embrace these enhancements and unlock the full potential of Amazon DataZone and Amazon Redshift for your data management needs.
Resources
For more information, refer to the following resources:
- See the Amazon DataZone documentation
- Check out the YouTube playlist for some of the latest demos of Amazon DataZone and short descriptions of the capabilities available
- Check out How Amazon DataZone helps customers find value in oceans of data
About the author
 Carmen is a Solutions Architect at AWS, based in Milan (Italy). She is a Data Lover that enjoys helping companies in the adoption of Cloud technologies, especially with Data Analytics and Data Governance. Outside of work, she is a creative people who loves being in contact with nature and sometimes practicing adrenaline activities.
How ATPCO enables governed self-service data access to accelerate innovation with Amazon DataZone
Post Syndicated from Brian Olsen original https://aws.amazon.com/blogs/big-data/how-atpco-enables-governed-self-service-data-access-to-accelerate-innovation-with-amazon-datazone/
This blog post is co-written with Raj Samineni from ATPCO.
In today’s data-driven world, companies across industries recognize the immense value of data in making decisions, driving innovation, and building new products to serve their customers. However, many organizations face challenges in enabling their employees to discover, get access to, and use data easily with the right governance controls. The significant barriers along the analytics journey constrain their ability to innovate faster and make quick decisions.
ATPCO is the backbone of modern airline retailing, enabling airlines and third-party channels to deliver the right offers to customers at the right time. ATPCO’s reach is impressive, with its fare data covering over 89% of global flight schedules. The company collaborates with more than 440 airlines and 132 channels, managing and processing over 350 million fares in its database at any given time. ATPCO’s vision is to be the platform driving innovation in airline retailing while remaining a trusted partner to the airline ecosystem. ATPCO aims to empower data-driven decision-making by making high quality data discoverable by every business unit, with the appropriate governance on who can access what.
In this post, using one of ATPCO’s use cases, we show you how ATPCO uses AWS services, including Amazon DataZone, to make data discoverable by data consumers across different business units so that they can innovate faster. We encourage you to read Amazon DataZone concepts and terminologies first to become familiar with the terms used in this post.
Use case
One of ATPCO’s use cases is to help airlines understand what products, including fares and ancillaries (like premium seat preference), are being offered and sold across channels and customer segments. To support this need, ATPCO wants to derive insights around product performance by using three different data sources:
- Airline Ticketing data – 1 billion airline ticket sales data processed through ATPCO
- ATPCO pricing data – 87% of worldwide airline offers are powered through ATPCO pricing data. ATPCO is the industry leader in providing pricing and merchandising content for airlines, global distribution systems (GDSs), online travel agencies (OTAs), and other sales channels for consumers to visually understand differences between various offers.
- De-identified customer master data – ATPCO customer master data that has been de-identified for sensitive internal analysis and compliance.
In order to generate insights that will then be shared with airlines as a data product, an ATPCO analyst needs to be able to find the right data related to this topic, get access to the data sets, and then use it in a SQL client (like Amazon Athena) to start forming hypotheses and relationships.
Before Amazon DataZone, ATPCO analysts needed to find potential data assets by talking with colleagues; there wasn’t an easy way to discover data assets across the company. This slowed down their pace of innovation because it added time to the analytics journey.
Solution
To address the challenge, ATPCO sought inspiration from a modern data mesh architecture. Instead of a central data platform team with a data warehouse or data lake serving as the clearinghouse of all data across the company, a data mesh architecture encourages distributed ownership of data by data producers who publish and curate their data as products, which can then be discovered, requested, and used by data consumers.
Amazon DataZone provides rich functionality to help a data platform team distribute ownership of tasks so that these teams can choose to operate less like gatekeepers. In Amazon DataZone, data owners can publish their data and its business catalog (metadata) to ATPCO’s DataZone domain. Data consumers can then search for relevant data assets using these human-friendly metadata terms. Instead of access requests from data consumer going to a ATPCO’s data platform team, they now go to the publisher or a delegated reviewer to evaluate and approve. When data consumers use the data, they do so in their own AWS accounts, which allocates their consumption costs to the right cost center instead of a central pool. Amazon DataZone also avoids duplicating data, which saves on cost and reduces compliance tracking. Amazon DataZone takes care of all of the plumbing, using familiar AWS services such as AWS Identity and Access Management (IAM), AWS Glue, AWS Lake Formation, and AWS Resource Access Manager (AWS RAM) in a way that is fully inspectable by a customer.
The following diagram provides an overview of the solution using Amazon DataZone and other AWS services, following a fully distributed AWS account model, where data sets like airline ticket sales, ticket pricing, and de-identified customer data in this use case are stored in different member accounts in AWS Organizations.

Implementation
Now, we’ll walk through how ATPCO implemented their solution to solve the challenges of analysts discovering, getting access to, and using data quickly to help their airline customers.
There are four parts to this implementation:
- Set up account governance and identity management.
- Create and configure an Amazon DataZone domain.
- Publish data assets.
- Consume data assets as part of analyzing data to generate insights.
Part 1: Set up account governance and identity management
Before you start, compare your current cloud environment, including data architecture, to ATPCO’s environment. We’ve simplified this environment to the following components for the purpose of this blog post:
- ATPCO uses an organization to create and govern AWS accounts.
- ATPCO has existing data lake resources set up in multiple accounts, each owned by different data-producing teams. Having separate accounts helps control access, limits the blast radius if things go wrong, and helps allocate and control cost and usage.
- In each of their data-producing accounts, ATPCO has a common data lake stack: An Amazon Simple Storage Service (Amazon S3) bucket for data storage, AWS Glue crawler and catalog for updating and storing technical metadata, and AWS LakeFormation (in hybrid access mode) for managing data access permissions.
- ATPCO created two new AWS accounts: one to own the Amazon DataZone domain and another for a consumer team to use for analytics with Amazon Athena.
- ATPCO enabled AWS IAM Identity Center and connected their identity provider (IdP) for authentication.
We’ll assume that you have a similar setup, though you might choose differently to suit your unique needs.
Part 2: Create and configure an Amazon DataZone domain
After your cloud environment is set up, the steps in Part 2 will help you create and configure an Amazon DataZone domain. A domain helps you organize your data, people, and their collaborative projects, and includes a unique business data catalog and web portal that publishers and consumers will use to share, collaborate, and use data. For ATPCO, their data platform team created and configured their domain.
Step 2.1: Create an Amazon DataZone domain
Persona: Domain administrator
Go to the Amazon DataZone console in your domain account. If you use AWS IAM Identity Center for corporate workforce identity authentication, then select the AWS Region in which your Identity Center instance is deployed. Choose Create domain.
- Enter a name and description.
- Leave Customize encryption settings (advanced) cleared.
- Leave the radio button selected for Create and use a new role. AWS creates an IAM role in your account on your behalf with the necessary IAM permissions for accessing Amazon DataZone APIs.
- Leave clear the quick setup option for Set-up this account for data consumption and publishing because we don’t plan to publish or consume data in our domain account.
- Skip Add new tag for now. You can always come back later to edit the domain and add tags.
- Choose Create Domain.
After a domain is created, you will see a domain detail page similar to the following. Notice that IAM Identity Center is disabled by default.

Step 2.2: Enable IAM Identity Center for your Amazon DataZone domain and add a group
Persona: Domain administrator
By default, your Amazon domain, its APIs, and its unique web portal are accessible by IAM principals in this AWS account with the necessary datazone IAM permissions. ATPCO wanted its corporate employees to be able to use Amazon DataZone with their corporate single sign-on SSO credentials without needing secondary federation to IAM roles. AWS Identity Center is the AWS cross-service solution for passing identity provider credentials. You can skip this step if you plan to use IAM principals directly for accessing Amazon DataZone.
Navigate to your Amazon DataZone domain’s detail page and choose Enable IAM Identity Center.
- Scroll down to the User management section and select Enable users in IAM Identity Center. When you do, User and group assignment method options appear below. Turn on Require assignments. This means that you need to explicitly allow (add) users and groups to access your domain. Choose Update domain.
Now let’s add a group to the domain to provide its members with access. Back on your domain’s detail page, scroll to the bottom and choose the User management tab. Choose Add, and select Add SSO Groups from the drop-down.
- Enter the first letters of the group name and select it from the options. After you’ve added the desired groups, choose Add group(s).
- You can confirm that the groups are added successfully on the domain’s detail page, under the User management tab by selecting SSO Users and then SSO Groups from the drop-down.
Step 2.3: Associate AWS accounts with the domain for segregated data publishing and consumption
Personas: Domain administrator and AWS account owners
Amazon DataZone supports a distributed AWS account structure, where data assets are segregated from data consumption (such as Amazon Athena usage), and data assets are in their own accounts (owned by their respective data owners). We call these associated accounts. Amazon DataZone and the other AWS services it orchestrates take care of the cross-account data sharing. To make this work, domain and account owners need to perform a one-time account association: the domain needs to be shared with the account, and the account owner needs to configure it for use with Amazon DataZone. For ATPCO, there are four desired associated accounts, three of which are the accounts with data assets stored in Amazon S3 and cataloged in AWS Glue (airline ticketing data, pricing data, and de-identified customer data), and a fourth account that is used for an analyst’s consumption.
The first part of associating an account is to share the Amazon DataZone domain with the desired accounts (Amazon DataZone uses AWS RAM to create the resource policy for you). In ATPCO’s case, their data platform team manages the domain, so a team member does these steps.
- Todo this in the Amazon DataZone console, sign in to the domain account and navigate to the domain detail page, and then scroll down and choose the Associated Accounts tab. Choose Request association.
- Enter the AWS account ID of the first account to be associated.
- Choose Add another account and repeat step one for the remaining accounts to be associated. For ATPCO, there were four to-be associated accounts.
- When complete, choose Request Association.

The second part of associating an account is for the account owner to then configure their account for use by Amazon DataZone. Essentially, this process means that the account owner is allowing Amazon DataZone to perform actions in the account, like granting access to Amazon DataZone projects after a subscription request is approved.
- Sign in to the associated account and go to the Amazon DataZone console in the same Region as the domain. On the Amazon DataZone home page, choose View requests.
- Select the name of the inviting Amazon DataZone domain and choose Review request.

- Choose the Amazon DataZone blueprint you want to enable. We select Data Lake in this example because ATPCO’s use case has data in Amazon S3 and consumption through Amazon Athena.

- Leave the defaults as-is in the Permissions and resources The Glue Manage Access role allows Amazon DataZone to use IAM and LakeFormation to manage IAM roles and permissions to data lake resources after you approve a subscription request in Amazon DataZone. The Provisioning role allows Amazon DataZone to create S3 buckets and AWS Glue databases and tables in your account when you allow users to create Amazon DataZone projects and environments. The Amazon S3 bucket for data lake is where you specify which S3bucket is used by Amazon DataZone when users store data with your account.

- Choose Accept & configure association. This will take you to the associated domains table for this associated account, showing which domains the account is associated with. Repeat this process for other to-be associated accounts.
After the associations are configured by accounts, you will see the status reflected in the Associated accounts tab of the domain detail page.

Step 2.4: Set up environment profiles in the domain
Persona: Domain administrator
The final step to prepare the domain is making the associated AWS accounts usable by Amazon DataZone domain users. You do this with an environment profile, which helps less technical users get started publishing or consuming data. It’s like a template, with pre-defined technical details like blueprint type, AWS account ID, and Region. ATPCO’s data platform team set up an environment profile for each associated account.
To do this in the Amazon DataZone console, the data platform team member sign in to the domain account and navigates to the domain detail page, and chooses Open data portal in the upper right to go to the web-based Amazon DataZone portal.
- Choose Select project in the upper-left next to the DataZone icon and select Create Project. Enter a name, like Domain Administration and choose Create. This will take you to your new project page.
- In the Domain Administration project page, choose the Environments tab, and then choose Environment profiles in the navigation pane. Select Create environment profile.
- Enter a name, such as Sales – Data lake blueprint.
- Select the Domain Administration project as owner, and the DefaultDataLake as the blueprint.
- Select the AWS account with sales data as well as the preferred Region for new resources, such as AWS Glue and Athena consumption.
- Leave All projects and Any database
- Finalize your selection by choosing Create Environment Profile.
Repeat this step for each of your associated accounts. As a result, Amazon DataZone users will be able to create environments in their projects to use AWS resources in specific AWS accounts forpublishing or consumption.

Part 3: Publish assets
With Part 2 complete, the domain is ready for publishers to sign in and start publishing the first data assets to the business data catalog so that potential data consumers find relevant assets to help them with their analyses. We’ll focus on how ATPCO published their first data asset for internal analysis—sales data from their airline customers. ATPCO already had the data extracted, transformed, and loaded in a staged S3 bucket and cataloged with AWS Glue.
Step 3.1: Create a project
Persona: Data publisher
Amazon DataZone projects enable a group of users to collaborate with data. In this part of the ATPCO use case, the project is used to publish sales data as an asset in the project. By tying the eventual data asset to a project (rather than a user), the asset will have long-lived ownership beyond the tenure of any single employee or group of employees.
- As a data publisher, obtain theURL of the domain’s data portal from your domain administrator, navigate to this sign-in page and authenticate with IAM or SSO. After you’re signed in to the data portal, choose Create Project, enter a name (such as Sales Data Assets) and choose Create.
- If you want to add teammates to the project, choose Add Members. On the Project members page, choose Add Members, search for the relevant IAM or SSO principals, and select a role for them in the project. Owners have full permissions in the project, while contributors are not able to edit or delete the project or control membership. Choose Add Members to complete the membership changes.
Step 3.2: Create an environment
Persona: Data publisher
Projects can be comprised of several environments. Amazon DataZone environments are collections of configured resources (for example, an S3 bucket, an AWS Glue database, or an Athena workgroup). They can be useful if you want to manage stages of data production for the same essential data products with separate AWS resources, such as raw, filtered, processed, and curated data stages.
- While signed in to the data portal and in the Sales Data Assets project, choose the Environments tab, and then select Create Environment. Enter a name, such as Processed, referencing the processed stage of the underlying data.
- Select the Sales – Data lake blueprint environment profile the domain administrator created in Part 2.
- Choose Create Environment. Notice that you don’t need any technical details about the AWS account or resources! The creation process might take several minutes while Amazon DataZone sets up Lake Formation, Glue, and Athena.
Step 3.3: Create a new data source and run an ingestion job
Persona: Data publisher
In this use case, ATPCO has cataloged their data using AWS Glue. Amazon DataZone can use AWS Glue as a data source. Amazon DataZone data source (for AWS Glue) is a representation of one or more AWS Glue databases, with the option to set table selection criteria based on their name. Similar to how AWS Glue crawlers scan for new data and metadata, you can run an Amazon DataZone ingestion job against an Amazon DataZone data source (again, AWS Glue) to pull all of the matching tables and technical metadata (such as column headers) as the foundation for one or more data assets. An ingestion job can be run manually or automatically on a schedule.
- While signed in to the data portal and in the Sales Data Assets project, choose the Data tab, and then select Data sources. Choose Create Data Source, and enter a name for your data source, such as Processed Sales data in Glue, select AWS Glue as the type, and choose Next.
- Select the Processed environment from Step 3.2. In the database name box, enter a value or select from the suggested AWS Glue databases that Amazon DataZone identified in the AWS account. You can add additional criteria and another AWS Glue database.
- For Publishing settings, select No. This allows you to review and enrich the suggested assets before publishing them to the business data catalog.
- For Metadata generation methods, keep this box selected. Amazon DataZone will provide you with recommended business names for the data assets and its technical schema to publish an asset that’s easier for consumers to find.
- Clear Data quality unless you have already set up AWS Glue data quality. Choose Next.
- For Run preference, select to run on demand. You can come back later to run this ingestion job automatically on a schedule. Choose Next.
- Review the selections and choose Create.
To run the ingestion job for the first time, choose Run in the upper right corner. This will start the job. The run time is dependent on the quantity of databases, tables, and columns in your data source. You can refresh the status by choosing Refresh.
Step 3.4: Review, curate, and publish assets
Persona: Data publisher
After the ingestion job is complete, the matching AWS Glue tables will be added to the project’s inventory. You can then review the asset, including automated metadata generated by Amazon DataZone, add additional metadata, and publish the asset.
- While signed in to the data portal and in the Sales Data Assets project, go to the Data tab, and select Inventory. You can review each of the data assets generated by the ingestion job. Let’s select the first result. In the asset detail page, you can edit the asset’s name and description to make it easier to find, especially in a list of search results.
- You can edit the Read Me section and add rich descriptions for the asset, with markdown support. This can help reduce the questions consumers message the publisher with for clarification.
- You can edit the technical schema (columns), including adding business names and descriptions. If you enabled automated metadata generation, then you’ll see recommendations here that you can accept or reject.
- After you are done enriching the asset, you can choose Publish to make it searchable in the business data catalog.
Have the data publisher for each asset follow Part 3. For ATPCO, this means two additional teams followed these steps to get pricing and de-identified customer data into the data catalog.
Part 4: Consume assets as part of analyzing data to generate insights
Now that the business data catalog has three published data assets, data consumers will find available data to start their analysis. In this final part, an ATPCO data analyst can find the assets they need, obtain approved access, and analyze the data in Athena, forming the precursor of a data product that ATPCO can then make available to their customer (such as an airline).
Step 4.1: Discover and find data assets in the catalog
Persona: Data consumer
As a data consumer, obtain the URL of the domain’s data portal from your domain administrator, navigate to in the sign-in page, and authenticate with IAM or SSO. In the data portal, enter text to find data assets that match what you need to complete your analysis. In the ATPCO example, the analyst started by entering ticketing data. This returned the sales asset published above because the description noted that the data was related to “sales, including tickets and ancillaries (like premium seat selection preferences).”
The data consumer reviews the detail page of the sales asset, including the description and human-friendly terms in the schema, and confirms that it’s of use to the analysis. They then choose Subscribe. The data consumer is prompted to select a project for the subscription request, in which case they follow the same instructions as creating a project in Step 3.1, naming it Product analysis project. Enter a short justification of the request. Choose Subscribe to send the request to the data publisher.
Repeat Steps 4.2 and 4.3 for each of the needed data assets for the analysis. In the ATPCO use case, this meant searching for and subscribing to pricing and customer data.
While waiting for the subscription requests to be approved, the data consumer creates an Amazon DataZone environment in the Product analysis project, similar to Step 3.2. The data consumer selects an environment profile for their consumption AWS account and the data lake blueprint.
Step 4.2: Review and approve subscription request
Persona: Data publisher
The next time that a member of the Sales Data Assets project signs in to the Amazon DataZone data portal, they will see a notification of the subscription request. Select that notification or navigate in the Amazon DataZone data portal to the project. Choose the Data tab and Incoming requests and then the Requested tab to find the request. Review the request and decide to either Approve or Reject, while providing a disposition reason for future reference.
Step 4.3: Analyze data
Persona: Data consumer
Now that the data consumer has subscribed to all three data assets needed (by repeating steps 4.1-4.2 for each asset), the data consumer navigates to the Product analysis project in the Amazon DataZone data portal. The data consumer can verify that the project has data asset subscriptions by choosing the Data tab and Subscribed data.

Because the project has an environment with the data lake blueprint enabled in their consumption AWS account, the data consumer will see an icon in the right-side tab called Query Data: Amazon Athena. By selecting this icon, they’re taken to the Amazon Athena console.

In the Amazon Athena console, the data consumer sees the data assets their DataZone project is subscribed to (from steps 4.1-4.2). They use the Amazon Athena query editor to query the subscribed data.

Conclusion
In this post, we walked you through an ATPCO use case to demonstrate how Amazon DataZone allows users across an organization to easily discover relevant data products using business terms. Users can then request access to data and build products and insights faster. By providing self-service access to data with the right governance guardrails, Amazon DataZone helps companies tap into the full potential of their data products to drive innovation and data-driven decision making. If you’re looking for a way to unlock the full potential of your data and democratize it across your organization, then Amazon DataZone can help you transform your business by making data-driven insights more accessible and productive.
To learn more about Amazon DataZone and how to get started, refer to the Getting started guide. See the YouTube playlist for some of the latest demos of Amazon DataZone and short descriptions of the capabilities available.
About the Author

Brian Olsen is a Senior Technical Product Manager with Amazon DataZone. His 15 year technology career in research science and product has revolved around helping customers use data to make better decisions. Outside of work, he enjoys learning new adventurous hobbies, with the most recent being paragliding in the sky.

Mitesh Patel is a Principal Solutions Architect at AWS. His passion is helping customers harness the power of Analytics, machine learning and AI to drive business growth. He engages with customers to create innovative solutions on AWS.
 Raj Samineni is the Director of Data Engineering at ATPCO, leading the creation of advanced cloud-based data platforms. His work ensures robust, scalable solutions that support the airline industry’s strategic transformational objectives. By leveraging machine learning and AI, Raj drives innovation and data culture, positioning ATPCO at the forefront of technological advancement.
 Sonal Panda is a Senior Solutions Architect at AWS with over 20 years of experience in architecting and developing intricate systems, primarily in the financial industry. Her expertise lies in Generative AI, application modernization leveraging microservices and serverless architectures to drive innovation and efficiency.
Streamline your data governance by deploying Amazon DataZone with the AWS CDK
Post Syndicated from Bandana Das original https://aws.amazon.com/blogs/big-data/streamline-your-data-governance-by-deploying-amazon-datazone-with-the-aws-cdk/
Managing data across diverse environments can be a complex and daunting task. Amazon DataZone simplifies this so you can catalog, discover, share, and govern data stored across AWS, on premises, and third-party sources.
Many organizations manage vast amounts of data assets owned by various teams, creating a complex landscape that poses challenges for scalable data management. These organizations require a robust infrastructure as code (IaC) approach to deploy and manage their data governance solutions. In this post, we explore how to deploy Amazon DataZone using the AWS Cloud Development Kit (AWS CDK) to achieve seamless, scalable, and secure data governance.
Overview of solution
By using IaC with the AWS CDK, organizations can efficiently deploy and manage their data governance solutions. This approach provides scalability, security, and seamless integration across all teams, allowing for consistent and automated deployments.
The AWS CDK is a framework for defining cloud IaC and provisioning it through AWS CloudFormation. Developers can use any of the supported programming languages to define reusable cloud components known as constructs. A construct is a reusable and programmable component that represents AWS resources. The AWS CDK translates the high-level constructs defined by you into equivalent CloudFormation templates. AWS CloudFormation provisions the resources specified in the template, streamlining the usage of IaC on AWS.
Amazon DataZone core components are the building blocks to create a comprehensive end-to-end solution for data management and data governance. The following are the Amazon DataZone core components. For more details, see Amazon DataZone terminology and concepts.
- Amazon DataZone domain – You can use an Amazon DataZone domain to organize your assets, users, and their projects. By associating additional AWS accounts with your Amazon DataZone domains, you can bring together your data sources.
- Data portal – The data portal is outside the AWS Management Console. This is a browser-based web application where different users can catalog, discover, govern, share, and analyze data in a self-service fashion.
- Business data catalog – You can use this component to catalog data across your organization with business context and enable everyone in your organization to find and understand data quickly.
- Projects – In Amazon DataZone, projects are business use case-based groupings of people, assets (data), and tools used to simplify access to AWS analytics.
- Environments – Within Amazon DataZone projects, environments are collections of zero or more configured resources on which a given set of AWS Identity and Access Management (IAM) principals (for example, users with a contributor permissions) can operate.
- Amazon DataZone data source – In Amazon DataZone, you can publish an AWS Glue Data Catalog data source or Amazon Redshift data source.
- Publish and subscribe workflows – You can use these automated workflows to secure data between producers and consumers in a self-service manner and make sure that everyone in your organization has access to the right data for the right purpose.
We use an AWS CDK app to demonstrate how to create and deploy core components of Amazon DataZone in an AWS account. The following diagram illustrates the primary core components that we create.

In addition to the core components deployed with the AWS CDK, we provide a custom resource module to create Amazon DataZone components such as glossaries, glossary terms, and metadata forms, which are not supported by AWS CDK constructs (at the time of writing).
Prerequisites
The following local machine prerequisites are required before starting:
- An AWS account (with AWS IAM Identity Center enabled).
- Either Bash or ZSH terminal.
- The AWS Command Line Interface (AWS CLI) v2 installed.
- Python version 3.10 or higher.
- The AWS SDK for Python version 1.34.87 or higher.
- Node version v18.17.* or higher.
- NPM version v10.2.* or higher.
- An AWS Glue table to be registered as a sample data source in an Amazon DataZone project.
- As part of this post, we want to publish AWS Glue tables from an AWS Glue database that already exists. For this, you must explicitly provide Amazon DataZone with the permissions to access tables in this existing AWS Glue database. For more information, refer to Configure Lake Formation permissions for Amazon DataZone.
- Remove the IAMAllowedPrincipals permissions from the AWS Lake Formation tables for which Amazon DataZone handles permissions.
- Make sure you have disabled the default permissions under the Data Catalog settings in Lake Formation (see the following screenshot).

Deploy the solution
Complete the following steps to deploy the solution:
- Clone the GitHub repository and go to the root of your downloaded repository folder:
- Install local dependencies:
- Sign in to your AWS account using the AWS CLI by configuring your credential file (replace <PROFILE_NAME> with the profile name of your deployment AWS account):
- Bootstrap the AWS CDK environment (this is a one-time activity and not needed if your AWS account is already bootstrapped):
- Run the script to replace the placeholders for your AWS account and AWS Region in the config files:
The preceding command will replace the AWS_ACCOUNT_ID_PLACEHOLDER and AWS_REGION_PLACEHOLDER values in the following config files:
lib/config/project_config.jsonlib/config/project_environment_config.jsonlib/constants.ts
Next, you configure your Amazon DataZone domain, project, business glossary, metadata forms, and environments with your data source.
- Go to the file
lib/constants.ts. You can keep theDOMAIN_NAMEprovided or update it as needed. - Go to the file
lib/config/project_config.json. You can keep the example values forprojectNameandprojectDescriptionor update them. An example value forprojectMembershas also been provided (as shown in the following code snippet). Update the value of thememberIdentifierparameter with an IAM role ARN of your choice that you would like to be the owner of this project. - Go to the file
lib/config/project_glossary_config.json. An example business glossary and glossary terms are provided for the projects; you can keep them as is or update them with your project name, business glossary, and glossary terms. - Go to the
lib/config/project_form_config.json file. You can keep the example metadata forms provided for the projects or update your project name and metadata forms. - Go to the
lib/config/project_enviornment_config.json file. UpdateEXISTING_GLUE_DB_NAME_PLACEHOLDERwith the existing AWS Glue database name in the same AWS account where you are deploying the Amazon DataZone core components with the AWS CDK. Make sure you have at least one existing AWS Glue table in this AWS Glue database to publish as a data source within Amazon DataZone. ReplaceDATA_SOURCE_NAME_PLACEHOLDERandDATA_SOURCE_DESCRIPTION_PLACEHOLDERwith your choice of Amazon DataZone data source name and description. An example of a cron schedule has been provided (see the following code snippet). This is the schedule for your data source run; you can keep the same or update it.
Next, you update the trust policy of the AWS CDK deployment IAM role to deploy a custom resource module.
- On the IAM console, update the trust policy of the IAM role for your AWS CDK deployment that starts with
cdk-hnb659fds-cfn-exec-role-by adding the following permissions. Replace ${ACCOUNT_ID} and ${REGION} with your specific AWS account and Region.
Now you can configure data lake administrators in Lake Formation.
- On the Lake Formation console, choose Administrative roles and tasks in the navigation pane.
- Under Data lake administrators, choose Add and add the IAM role for AWS CDK deployment that starts with
cdk-hnb659fds-cfn-exec-role-as an administrator.
This IAM role needs permissions in Lake Formation to create resources, such as an AWS Glue database. Without these permissions, the AWS CDK stack deployment will fail.

- Deploy the solution:
- During deployment, enter
yif you want to deploy the changes for some stacks when you see the promptDo you wish to deploy these changes (y/n)?. - After the deployment is complete, sign in to your AWS account and navigate to the AWS CloudFormation console to verify that the infrastructure deployed.
You should see a list of the deployed CloudFormation stacks, as shown in the following screenshot.

- Open the Amazon DataZone console in your AWS account and open your domain.
- Open the data portal URL available in the Summary section.
- Find your project in the data portal and run the data source job.
This is a one-time activity if you want to publish and search the data source immediately within Amazon DataZone. Otherwise, wait for the data source runs according to the cron schedule mentioned in the preceding steps.
Troubleshooting
If you get the message "Domain name already exists under this account, please use another one (Service: DataZone, Status Code: 409, Request ID: 2d054cb0-0 fb7-466f-ae04-c53ff3c57c9a)" (RequestToken: 85ab4aa7-9e22-c7e6-8f00-80b5871e4bf7, HandlerErrorCode: AlreadyExists), change the domain name under lib/constants.ts and try to deploy again.
If you get the message "Resource of type 'AWS::IAM::Role' with identifier 'CustomResourceProviderRole1' already exists." (RequestToken: 17a6384e-7b0f-03b3 -1161-198fb044464d, HandlerErrorCode: AlreadyExists), this means you’re accidentally trying to deploy everything in the same account but a different Region. Make sure to use the Region you configured in your initial deployment. For the sake of simplicity, the DataZonePreReqStack is in one Region in the same account.
If you get the message “Unmanaged asset” Warning in the data asset on your datazone project, you must explicitly provide Amazon DataZone with Lake Formation permissions to access tables in this external AWS Glue database. For instructions, refer to Configure Lake Formation permissions for Amazon DataZone.
Clean up
To avoid incurring future charges, delete the resources. If you have already shared the data source using Amazon DataZone, then you have to remove those manually first in the Amazon DataZone data portal because the AWS CDK isn’t able to automatically do that.
- Unpublish the data within the Amazon DataZone data portal.
- Delete the data asset from the Amazon DataZone data portal.
- From the root of your repository folder, run the following command:
- Delete the Amazon DataZone created databases in AWS Glue. Refer to the tips to troubleshoot Lake Formation permission errors in AWS Glue if needed.

- Remove the created IAM roles from Lake Formation administrative roles and tasks.

Conclusion
Amazon DataZone offers a comprehensive solution for implementing a data mesh architecture, enabling organizations to address advanced data governance challenges effectively. Using the AWS CDK for IaC streamlines the deployment and management of Amazon DataZone resources, promoting consistency, reproducibility, and automation. This approach enhances data organization and sharing across your organization.
Ready to streamline your data governance? Dive deeper into Amazon DataZone by visiting the Amazon DataZone User Guide. To learn more about the AWS CDK, explore the AWS CDK Developer Guide.
About the Authors
 Bandana Das is a Senior Data Architect at Amazon Web Services and specializes in data and analytics. She builds event-driven data architectures to support customers in data management and data-driven decision-making. She is also passionate about enabling customers on their data management journey to the cloud.
 Gezim Musliaj is a Senior DevOps Consultant with AWS Professional Services. He is interested in various things CI/CD, data, and their application in the field of IoT, massive data ingestion, and recently MLOps and GenAI.
 Sameer Ranjha is a Software Development Engineer on the Amazon DataZone team. He works in the domain of modern data architectures and software engineering, developing scalable and efficient solutions.
 Sindi Cali is an Associate Consultant with AWS Professional Services. She supports customers in building data-driven applications in AWS.
 Bhaskar Singh is a Software Development Engineer on the Amazon DataZone team. He has contributed to implementing AWS CloudFormation support for Amazon DataZone. He is passionate about distributed systems and dedicated to solving customers’ problems.
How Volkswagen streamlined access to data across multiple data lakes using Amazon DataZone – Part 1
Post Syndicated from Bandana Das original https://aws.amazon.com/blogs/big-data/how-volkswagen-streamlined-access-to-data-across-multiple-data-lakes-using-amazon-datazone-part-1/
Over the years, organizations have invested in creating purpose-built, cloud-based data lakes that are siloed from one another. A major challenge is enabling cross-organization discovery and access to data across these multiple data lakes, each built on different technology stacks. A data mesh addresses these issues with four principles: domain-oriented decentralized data ownership and architecture, treating data as a product, providing self-serve data infrastructure as a platform, and implementing federated governance. Data mesh enables organizations to organize around data domains with a focus on delivering data as a product.
In 2019, Volkswagen AG (VW) and Amazon Web Services (AWS) formed a strategic partnership to co-develop the Digital Production Platform (DPP), aiming to enhance production and logistics efficiency by 30 percent while reducing production costs by the same margin. The DPP was developed to streamline access to data from shop-floor devices and manufacturing systems by handling integrations and providing standardized interfaces. However, as applications evolved on the platform, a significant challenge emerged: sharing data across applications stored in multiple isolated data lakes in Amazon Simple Storage Service (Amazon S3) buckets in individual AWS accounts without having to consolidate data into a central data lake. Another challenge is discovering available data stored across multiple data lakes and facilitating a workflow to request data access across business domains within each plant. The current method is largely manual, relying on emails and general communication, which not only increases overhead but also varies from one use case to another in terms of data governance. This blog post introduces Amazon DataZone and explores how VW used it to build their data mesh to enable streamlined data access across multiple data lakes. It focuses on the key aspect of the solution, which was enabling data providers to automatically publish data assets to Amazon DataZone, which served as the central data mesh for enhanced data discoverability. Additionally, the post provides code to guide you through the implementation.
Introduction to Amazon DataZone
Amazon DataZone is a data management service that makes it faster and easier for customers to catalog, discover, share, and govern data stored across AWS, on premises, and third-party sources. Key features of Amazon DataZone include a business data catalog that allows users to search for published data, request access, and start working on data in days instead of weeks. Amazon DataZone projects enable collaboration with teams through data assets and the ability to manage and monitor data assets across projects. It also includes the Amazon DataZone portal, which offers a personalized analytics experience for data assets through a web-based application or API. Lastly, Amazon DataZone governed data sharing ensures that the right data is accessed by the right user for the right purpose with a governed workflow.
Architecture for Data Management with Amazon DataZone
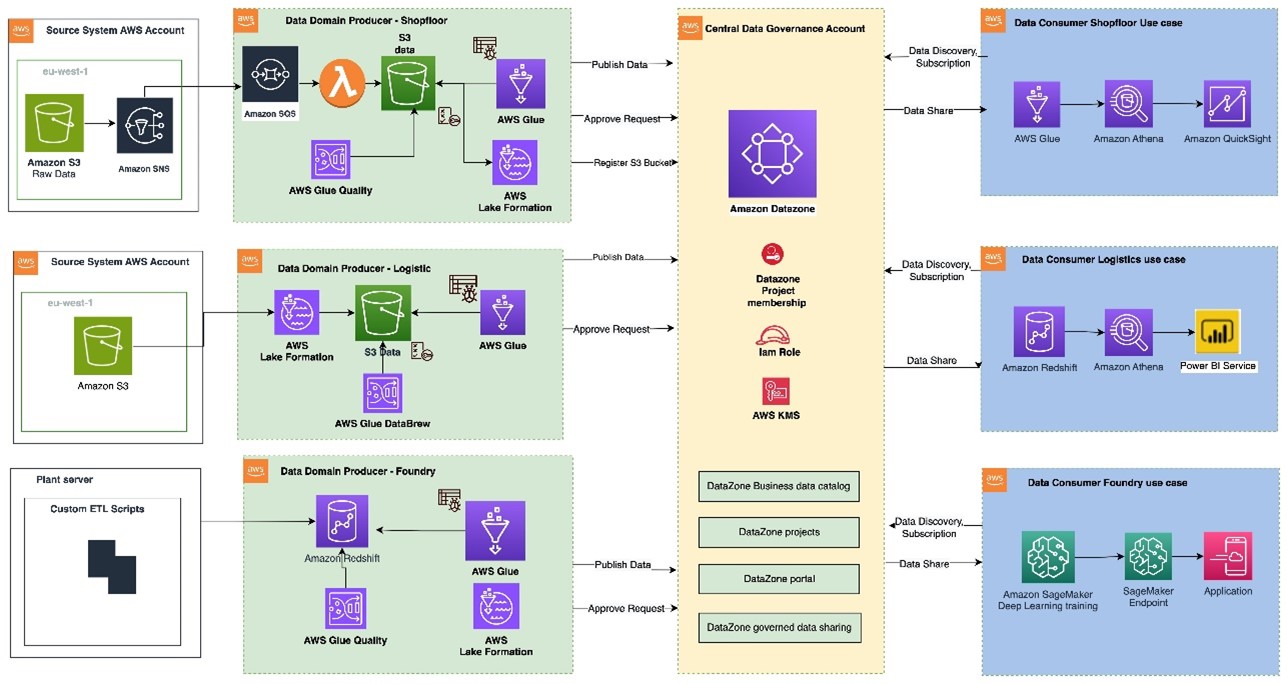
Figure 1: Data mesh pattern implementation on AWS using Amazon DataZone
The architecture diagram (Figure 1) represents a high-level design based on the data mesh pattern. It separates source systems, data domain producers (data publishers), data domain consumers (data subscribers), and central governance to highlight key aspects. This cross-account data mesh architecture aims to create a scalable foundation for data platforms, supporting producers and consumers with consistent governance.
- A data domain producer resides in an AWS account and uses Amazon S3 buckets to store raw and transformed data. Producers ingest data into their S3 buckets through pipelines they manage, own, and operate. They are responsible for the full lifecycle of the data, from raw capture to a form suitable for external consumption.
- A data domain producer maintains its own ETL stack using AWS Glue, AWS Lambda to process, AWS Glue Databrew to profile the data and prepare the data asset (data product) before cataloguing it into AWS Glue Data Catalog in their account.
- A second pattern could be that a data domain producer prepares and stores the data asset as table within Amazon Redshift using AWS S3 Copy.
- Data domain producers publish data assets using datasource run to Amazon DataZone in the Central Governance account. This populates the technical metadata in the business data catalog for each data asset. The business metadata, can be added by business users to provide business context, tags, and data classification for the datasets. Producers control what to share, for how long, and how consumers interact with it.
- Producers can register and create catalog entries with AWS Glue from all their S3 buckets. The central governance account securely shares datasets between producers and consumers via metadata linking, with no data (except logs) existing in this account. Data ownership remains with the producer.
- With Amazon DataZone, once data is cataloged and published into the DataZone domain, it can be shared with multiple consumer accounts.
- The Amazon DataZone Data portal provides a personalized view for users to discover/search and submit requests for subscription of data assets using a web-based application. The data domain producer receives the notification of subscription requests in the Data portal and can approve/reject the requests.
- Once approved, the consumer account can read and further process data assets to implement various use cases with AWS Lambda, AWS Glue, Amazon Athena, Amazon Redshift query editor v2, Amazon QuickSight (Analytics use cases) and with Amazon Sagemaker (Machine learning use cases).
Manual process to publish data assets to Amazon DataZone
To publish a data asset from the producer account, each asset must be registered in Amazon DataZone as a data source for consumer subscription. The Amazon DataZone User Guide provides detailed steps to achieve this. In the absence of an automated registration process, all required tasks must be completed manually for each data asset.
How to automate publishing data assets from AWS Glue Data Catalog from the producer account to Amazon DataZone
Using the automated registration workflow, the manual steps can be automated for any new data asset that needs to be published in an Amazon DataZone domain or when there’s a schema change in an already published data asset.
The automated solution reduces the repetitive manual steps to publish the data sources (AWS Glue tables) into an Amazon DataZone domain.
Architecture for automated data asset publish
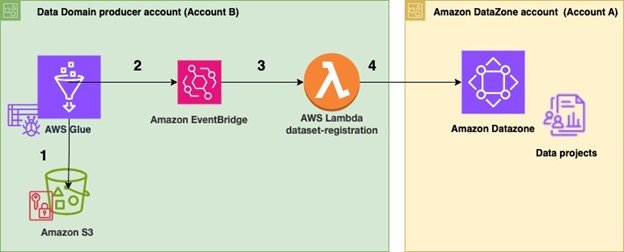
Figure 2 Architecture for automated data publish to Amazon DataZone
To automate publishing data assets:
- In the producer account (Account B), the data to be shared resides in an Amazon S3 bucket (Figure 2). An AWS Glue crawler is configured for the dataset to automatically create the schema using AWS Cloud Development Kit (AWS CDK).
- Once configured, the AWS Glue crawler crawls the Amazon S3 bucket and updates the metadata in the AWS Glue Data Catalog. The successful completion of the AWS Glue crawler generates an event in the default event bus of Amazon EventBridge.
- An EventBridge rule is configured to detect this event and invoke a dataset-registration AWS Lambda function.
- The AWS Lambda function performs all the steps to automatically register and publish the dataset in Amazon Datazone.
Steps performed in the dataset-registration AWS Lambda function
- The AWS Lambda function retrieves the AWS Glue database and Amazon S3 information for the dataset from the Amazon Eventbridge event triggered by the successful run of the AWS Glue crawler.
- It obtains the Amazon DataZone Datalake blueprint ID from the producer account and the Amazon DataZone domain ID and project ID by assuming an IAM role in the central governance account where the Amazon Datazone domain exists.
- It enables the Amazon DataZone Datalake blueprint in the producer account.
- It checks if the Amazon Datazone environment already exists within the Amazon DataZone project. If it does not, then it initiates the environment creation process. If the environment exists, it proceeds to the next step.
- It registers the Amazon S3 location of the dataset in Lake Formation in the producer account.
- The function creates a data source within the Amazon DataZone project and monitors the completion of the data source creation.
- Finally, it checks whether the data source sync job in Amazon DataZone needs to be started. If new AWS Glue tables or metadata is created or updated, then it starts the data source sync job.
Prerequisites
As part of this solution, you will publish data assets from an existing AWS Glue database in a producer account into an Amazon DataZone domain for which the following prerequisites need to be performed.
- You need two AWS accounts to deploy the solution.
- One AWS account will act as the data domain producer account (Account B) which will contain the AWS Glue dataset to be shared.
- The second AWS account is the central governance account (Account A), which will have the Amazon DataZone domain and project deployed. This is the Amazon DataZone account.
- Ensure that both the AWS accounts belong to the same AWS Organization
- Remove the IAMAllowedPrincipals permissions from the AWS Lake Formation tables for which Amazon DataZone handles permissions.
- Make sure in both AWS accounts that you have cleared the checkbox for Default permissions for newly created databases and tables under the Data Catalog settings in Lake Formation (Figure 3).

Figure 3: Clear default permissions in AWS Lake Formation
- Sign in to Account A (central governance account) and make sure you have created an Amazon DataZone domain and a project within the domain.
- If your Amazon DataZone domain is encrypted with an AWS Key Management Service (AWS KMS) key, add Account B (producer account) to the key policy with the following actions:
- Ensure you have created an AWS Identity and Access Management (IAM) role that Account B (producer account) can assume and this IAM role is added as a member (as contributor) of your Amazon DataZone project. The role should have the following permissions:
- This IAM role is called
dz-assumable-env-dataset-registration-rolein this example. Adding this role will enable you to successfully run thedataset-registrationLambda function. Replace theaccount-region,account id, andDataZonekmsKeyin the following policy with your information. These values correspond to where your Amazon DataZone domain is created and the AWS KMS key Amazon Resource Name (ARN) used to encrypt the Amazon DataZone domain. - Add the AWS account in the trust relationship of this role with the following trust relationship. Replace
ProducerAccountIdwith the AWS account ID of Account B (data domain producer account).
- This IAM role is called
- The following tools are needed to deploy the solution using AWS CDK:
- Either Bash or ZSH terminal
- Node and NPM using Node Version Manager
- Install Node Version Manager (NVM)
- Install Node version 18.12.0 using following command
- The node and npm binaries should now be available
- Python
- AWS Command Line Interface (AWS CLI)
- AWS SDK for Python
- AWS CDK
Deployment Steps
After completing the pre-requisites, use the AWS CDK stack provided on GitHub to deploy the solution for automatic registration of data assets into DataZone domain
- Clone the repository from GitHub to your preferred IDE using the following commands.
- At the base of the repository folder, run the following commands to build and deploy resources to AWS.
- Sign in to the AWS account B (the data domain producer account) using AWS Command Line Interface (AWS CLI) with your profile name.
- Ensure you have configured the AWS Region in your credential’s configuration file.
- Bootstrap the CDK environment with the following commands at the base of the repository folder. Replace
<PROFILE_NAME>with the profile name of your deployment account (Account B). Bootstrapping is a one-time activity and is not needed if your AWS account is already bootstrapped. - Replace the placeholder parameters (marked with the suffix
_PLACEHOLDER) in the fileconfig/DataZoneConfig.ts(Figure 4).
- Amazon DataZone domain and project name of your Amazon DataZone instance. Make sure all names are in lowercase.
- The AWS account ID and Region.
- The assumable IAM role from the prerequisites.
- The deployment role starting with
cfn-xxxxxx-cdk-exec-role-.

Figure 4: Edit the DataZoneConfig file
- In the AWS Management Console for Lake Formation, select Administrative roles and tasks from the navigation pane (Figure 5) and make sure the IAM role for AWS CDK deployment that starts with
cfn-xxxxxx-cdk-exec-role-is selected as an administrator in Data lake administrators. This IAM role needs permissions in Lake Formation to create resources, such as an AWS Glue database. Without these permissions, the AWS CDK stack deployment will fail.
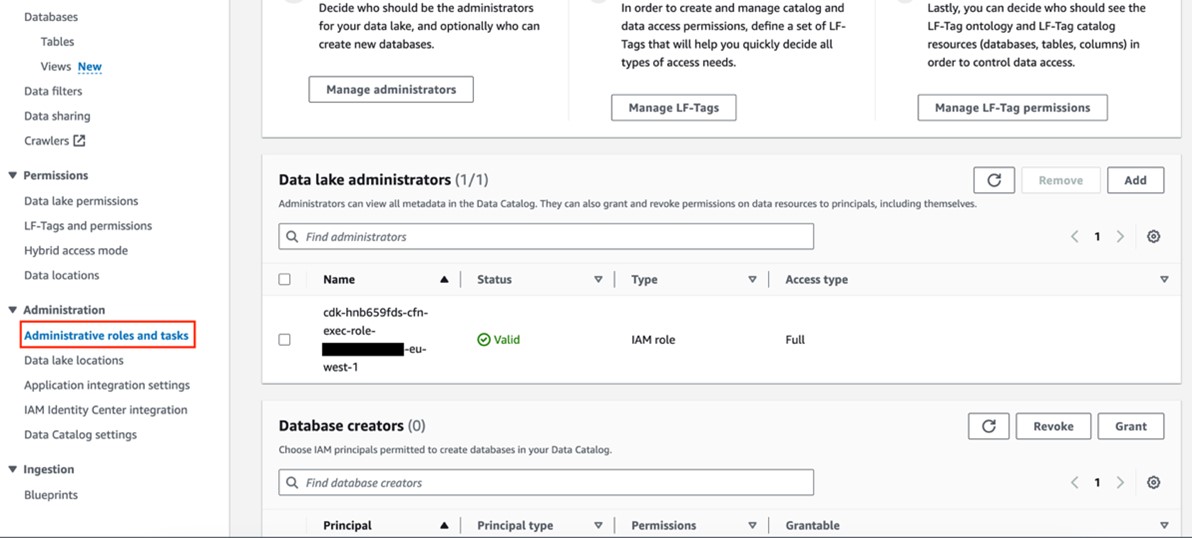
Figure 5: Add cfn-xxxxxx-cdk-exec-role- as a Data Lake administrator
- Use the following command in the base folder to deploy the AWS CDK solution
During deployment, enter y if you want to deploy the changes for some stacks when you see the prompt Do you wish to deploy these changes (y/n)?
- After the deployment is complete, sign in to your AWS account B (producer account) and navigate to the AWS CloudFormation console to verify that the infrastructure deployed. You should see a list of the deployed CloudFormation stacks as shown in Figure 6.
Figure 6: Deployed CloudFormation stacks
Test automatic data registration to Amazon DataZone
To test, we use the Online Retail Transactions dataset from Kaggle as a sample dataset to demonstrate the automatic data registration.
- Download the Online Retail.csv file from Kaggle dataset.
- Login to AWS Account B (producer account) and navigate to the Amazon S3 console, find the
DataZone-test-datasourceS3 bucket, and upload the csv file there (Figure 7).
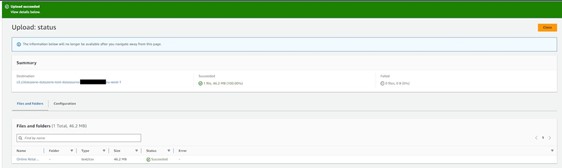
Figure 7: Upload the dataset CSV file
- The AWS Glue crawler is scheduled to run at a specific time each day. However for testing, you can manually run the crawler by going to the AWS Glue console and selecting Crawlers from the navigation pane. Run the on-demand crawler starting with
DataZone-. After the crawler has run, verify that a new table has been created. - Go to the Amazon DataZone console in AWS account A (central governance account) where you deployed the resources. Select Domains in the navigation pane (Figure 8), then Select and open your domain.

Figure 8: Amazon DataZone domains
- After you open the Datazone Domain, you can find the Amazon Datazone data portal URL in the Summary section (Figure 9). Select and open data portal.

Figure 9: Amazon DataZone data portal URL
- In the data portal find your project (Figure 10). Then select the Data tab at the top of the window.

Figure 10: Amazon DataZone Project overview
- Select the section Data Sources (Figure 11) and find the newly created data source DataZone-testdata-db.

Figure 11: Select Data sources in the Amazon Datazone Domain Data portal
- Verify that the data source has been successfully published (Figure 12).

Figure 12: The data sources are visible in the Published data section
- After the data sources are published, users can discover the published data and can submit a subscription request. The data producer can approve or reject requests. Upon approval, users can consume the data by querying data in Amazon Athena. Figure 13 illustrates data discovery in the Amazon DataZone data portal.

Figure 13: Example data discovery in the Amazon DataZone portal
Clean up
Use the following steps to clean up the resources deployed through the CDK.
- Empty the two S3 buckets that were created as part of this deployment.
- Go to the Amazon DataZone domain portal and delete the published data assets that were created in the Amazon DataZone project by the
dataset-registrationLambda function. - Delete the remaining resources created using the following command in the base folder:
Conclusion
By using AWS Glue and Amazon DataZone, organizations can make their data management easier and allow teams to share and collaborate on data smoothly. Automatically sending AWS Glue data to Amazon DataZone not only makes the process simple but also keeps the data consistent, secure, and well-governed. Simplify and standardize publishing data assets to Amazon DataZone and streamline data management with Amazon DataZone. For guidance on establishing your organization’s data mesh with Amazon DataZone, contact your AWS team today.
About the Authors
Bandana Das is a Senior Data Architect at Amazon Web Services and specializes in data and analytics. She builds event-driven data architectures to support customers in data management and data-driven decision-making. She is also passionate about enabling customers on their data management journey to the cloud.
 Anirban Saha is a DevOps Architect at AWS, specializing in architecting and implementation of solutions for customer challenges in the automotive domain. He is passionate about well-architected infrastructures, automation, data-driven solutions and helping make the customer’s cloud journey as seamless as possible. Personally, he likes to keep himself engaged with reading, painting, language learning and traveling.
 Chandana Keswarkar is a Senior Solutions Architect at AWS, who specializes in guiding automotive customers through their digital transformation journeys by using cloud technology. She helps organizations develop and refine their platform and product architectures and make well-informed design decisions. In her free time, she enjoys traveling, reading, and practicing yoga.
Sindi Cali is a ProServe Associate Consultant with AWS Professional Services. She supports customers in building data driven applications in AWS.
Amazon DataZone introduces OpenLineage-compatible data lineage visualization in preview
Post Syndicated from Leonardo Gomez original https://aws.amazon.com/blogs/big-data/amazon-datazone-introduces-openlineage-compatible-data-lineage-visualization-in-preview/
We are excited to announce the preview of API-driven, OpenLineage-compatible data lineage in Amazon DataZone to help you capture, store, and visualize lineage of data movement and transformations of data assets on Amazon DataZone.
With the Amazon DataZone OpenLineage-compatible API, domain administrators and data producers can capture and store lineage events beyond what is available in Amazon DataZone, including transformations in Amazon Simple Storage Service (Amazon S3), AWS Glue, and other AWS services. This provides a comprehensive view for data consumers browsing in Amazon DataZone, who can gain confidence of an asset’s origin, and data producers, who can assess the impact of changes to an asset by understanding its usage.
In this post, we discuss the latest features of data lineage in Amazon DataZone, its compatibility with OpenLineage, and how to get started capturing lineage from other services such as AWS Glue, Amazon Redshift, and Amazon Managed Workflows for Apache Airflow (Amazon MWAA) into Amazon DataZone through the API.
Why it matters to have data lineage
Data lineage gives you an overarching view into data assets, allowing you to see the origin of objects and their chain of connections. Data lineage enables tracking the movement of data over time, providing a clear understanding of where the data originated, how it has changed, and its ultimate destination within the data pipeline. With transparency around data origination, data consumers gain trust that the data is correct for their use case. Data lineage information is captured at levels such as tables, columns, and jobs, allowing you to conduct impact analysis and respond to data issues because, for example, you can see how one field impacts downstream sources. This equips you to make well-informed decisions before committing changes and avoid unwanted changes downstream.
Data lineage in Amazon DataZone is an API-driven, OpenLineage-compatible feature that helps you capture and visualize lineage events from OpenLineage-enabled systems or through an API, to trace data origins, track transformations, and view cross-organizational data consumption. The lineage visualized includes activities inside the Amazon DataZone business data catalog. Lineage captures the assets cataloged as well as the subscribers to those assets and to activities that happen outside the business data catalog captured programmatically using the API.
Additionally, Amazon DataZone versions lineage with each event, enabling you to visualize lineage at any point in time or compare transformations across an asset’s or job’s history. This historical lineage provides a deeper understanding of how data has evolved, which is essential for troubleshooting, auditing, and enforcing the integrity of data assets.
The following screenshot shows an example lineage graph visualized with the Amazon DataZone data catalog.

Introduction to OpenLineage compatible data lineage
The need to capture data lineage consistently across various analytical services and combine them into a unified object model is key in uncovering insights from the lineage artifact. OpenLineage is an open source project that offers a framework to collect and analyze lineage. It also offers reference implementation of an object model to persist metadata along with integration to major data and analytics tools.
The following are key concepts in OpenLineage:
- Lineage events – OpenLineage captures lineage information through a series of events. An event is anything that represents a specific operation performed on the data that occurs in a data pipeline, such as data ingestion, transformation, or data consumption.
- Lineage entities – Entities in OpenLineage represent the various data objects involved in the lineage process, such as datasets and tables.
- Lineage runs – A lineage run represents a specific run of a data pipeline or a job, encompassing multiple lineage events and entities.
- Lineage form types – Form types, or facets, provide additional metadata or context about lineage entities or events, enabling richer and more descriptive lineage information. OpenLineage offers facets for runs, jobs, and datasets, with the option to build custom facets.
The Amazon DataZone data lineage API is OpenLineage compatible and extends OpenLineage’s functionality by providing a materialization endpoint to persist the lineage outputs in an extensible object model. OpenLineage offers integrations for certain sources, and integration of these sources with Amazon DataZone is straightforward because the Amazon DataZone data lineage API understands the format and translates to the lineage data model.
The following diagram illustrates an example of the Amazon DataZone lineage data model.

In Amazon DataZone, every lineage node represents an underlying resource—there is a 1:1 mapping of the lineage node with a logical or physical resource such as table, view, or asset. The nodes represent a specific job with a specific run, or a node for a table or asset, and one node for a subscription target.
Each version of a node captures what happened to the underlying resource at that specific timestamp. In Amazon DataZone, lineage not only shares the story of data movement outside it, but it also represents the lineage of activities inside Amazon DataZone, such as asset creation, curation, publishing, and subscription.
To hydrate the lineage model in Amazon DataZone, two types of lineage are captured:
- Lineage activities inside Amazon DataZone – This includes assets added to the catalog and published, and then details about the subscriptions are captured automatically. When you’re in the producer project context (for example, if the project you’re selected is the owning project of the asset you are browsing and you’re a member of that project), you will see two states of the dataset node:
- The inventory asset type node defines the asset in the catalog that is in an unpublished stage. Other users can’t subscribe to the inventory asset. To learn more, refer to Creating inventory and published data in Amazon DataZone.
- The published asset type represents the actual asset that is discoverable by data users across the organization. This is the asset type that can be subscribed by other project members. If you are a consumer and not part of the producing project of that asset, you will only see the published asset node.
- Lineage activities outside of Amazon DataZone can be captured programmatically using the PostLineageEvent With these events captured either upstream or downstream of cataloged assets, data producers and consumers get a comprehensive view of data movement to check the origin of data or its consumption. We discuss how to use the API to capture lineage events later in this post.
There are two different types of lineage nodes available in Amazon DataZone:
- Dataset node – In Amazon DataZone, lineage visualizes nodes that represent tables and views. Depending on the context of the project, the producers will be able to view both the inventory and published asset, whereas consumers can only view the published asset. When you first open the lineage tab on the asset details page, the cataloged dataset node will be the starting point for lineage graph traversal upstream or downstream. Dataset nodes include lineage nodes automated from Amazon DataZone and custom lineage nodes:
- Automated dataset nodes – These nodes include information about AWS Glue or Amazon Redshift assets published in the Amazon DataZone catalog. They’re automatically generated and include a corresponding AWS Glue or Amazon Redshift icon within the node.
- Custom dataset nodes – These nodes include information about assets that are not published in the Amazon DataZone catalog. They’re created manually by domain administrators (producers) and are represented by a default custom asset icon within the node. These are essentially custom lineage nodes created using the OpenLineage event format.
- Job (run) node – This node captures the details of the job, which represents the latest run of a particular job and its run details. This node also captures multiple runs of the job and can be viewed on the History tab of the node details. Node details are made visible when you choose the icon.
Visualizing lineage in Amazon DataZone
Amazon DataZone offers a comprehensive experience for data producers and consumers. The asset details page provides a graphical representation of lineage, making it straightforward to visualize data relationships upstream or downstream. The asset details page provides the following capabilities to navigate the graph:
- Column-level lineage – You can expand column-level lineage when available in dataset nodes. This automatically shows relationships with upstream or downstream dataset nodes if source column information is available.
- Column search – If the dataset has more than 10 columns, the node presents pagination to navigate to columns not initially presented. To quickly view a particular column, you can search on the dataset node that lists just the searched column.
- View dataset nodes only – If you want filter out the job nodes, you can choose the Open view control icon in the graph viewer and toggle the Display dataset nodes only This will remove all the job nodes from the graph and let you navigate just the dataset nodes.
- Details pane – Each lineage node captures and displays the following details:
- Every dataset node has three tabs: Lineage info, Schema, and History. The History tab lists the different versions of lineage event captured for that node.
- The job node has a details pane to display job details with the tabs Job info and History. The details pane also captures queries or expressions run as part of the job.
- Version tabs – All lineage nodes in Amazon DataZone data lineage will have versioning, captured as history, based on lineage events captured. You can view lineage at a selected timestamp that opens a new tab on the lineage page to help compare or contrast between the different timestamps.
The following screenshot shows an example of data lineage visualization.

You can experience the visualization with sample data by choosing Preview on the Lineage tab and choosing the Try sample lineage link. This opens a new browser tab with sample data to test and learn about the feature with or without a guided tour, as shown in the following screenshot.

Solution overview
Now that we understand the capabilities of the new data lineage feature in Amazon DataZone, let’s explore how you can get started in capturing lineage from AWS Glue tables and ETL (extract, transform, and load) jobs, Amazon Redshift, and Amazon MWAA.
The getting started scripts are also available in Amazon DataZone’s new GitHub repository.
Prerequisites
For this walkthrough, you should have the following prerequisites:
- An AWS account
- An AWS Identity and Access Management (IAM) user with access to the following services:
- AWS Cloud9
- AWS CloudFormation
- AWS CloudShell
- Amazon DataZone
- AWS Glue
- Amazon S3
- An Amazon DataZone domain
- An Amazon DataZone project, with a data lake environment created
If the AWS account you use to follow this post uses AWS Lake Formation to manage permissions on the AWS Glue Data Catalog, make sure that you log in as a user with access to create databases and tables. For more information, refer to Implicit Lake Formation permissions.
Launch the CloudFormation stack
To create your resources for this use case using AWS CloudFormation, complete the following steps:
- Launch the CloudFormation stack in
us-east-1:
- For Stack name, enter a name for your stack.
- Choose Next.
- Select I acknowledge that AWS CloudFormation might create IAM resources with custom names.
- Choose Create stack.
Wait for the stack formation to finish provisioning the resources. When you see the CREATE_COMPLETE status, you can proceed to the next steps.
Capture lineage from AWS Glue tables
For this example, we use CloudShell, which is a browser-based shell, to run the commands necessary to harvest lineage metadata from AWS Glue tables. Complete the following steps:
- On the AWS Glue console, choose Crawlers in the navigation pane.
- Select the AWSomeRetailCrawler crawler created by the CloudFormation template.
- Choose Run.
When the crawler is complete, you’ll see a Succeeded status.

Now let’s harvest the lineage metadata using CloudShell.
- Download the
extract_glue_crawler_lineage.pyfile. - On the Amazon DataZone console, open CloudShell.

- On the Actions menu, choose Update file.
- Upload the
extract_glue_crawler_lineage.pyfile.

- Run the following commands:
You should get the following results.

- After all the libraries and dependencies are configured, run the following command to harvest the lineage metadata from the inventory table:
- The script asks for verification of the settings provided; enter
Yes.
You should receive a notification indicating that the script ran successfully.

After you capture the lineage information from the Inventory table, complete the following steps to run the data source.
- On the Amazon DataZone data portal, open the
Sales - On the Data tab, choose Data sources in the navigation pane.

- Select your data source job and choose Run.
For this example, we had a data source job called SalesDLDataSourceV2 already created pointing to the awesome_retail_db database. To learn more about how to create data source jobs, refer to Create and run an Amazon DataZone data source for the AWS Glue Data Catalog.
After the job runs successfully, you should see a confirmation message.

Now let’s view the lineage diagram generated by Amazon DataZone.
- On the Data inventory tab, choose the
Inventorytable.
- On the
Inventoryasset page, choose the new Lineage tab.
On the Lineage tab, you can see that Amazon DataZone created three nodes:
- Job / Job run – This is based on the AWS Glue crawler used to harvest the asset technical metadata
- Dataset – This is based on the S3 object that contains the data related to this asset
- Table – This is the AWS Glue table created by the crawler
If you choose the Dataset node, Amazon DataZone offers information about the S3 object used to create the asset.

Capture data lineage for AWS Glue ETL jobs
In the previous section, we covered how to generate a data lineage diagram on top of a data asset. Now let’s see how we can create one for an AWS Glue job.
The CloudFormation template that we launched earlier created an AWS Glue job called Inventory_Insights. This job gets data from the Inventory table and creates a new table called Inventory_Insights with the aggregated data of the total products available in all the stores.
The CloudFormation template also copied the openlineage-spark_2.12-1.9.1.jar file to the S3 bucket created for this post. This file is necessary to generate lineage metadata from the AWS Glue job. We use version 1.9.1, which is compatible with AWS Glue 3.0, the version used to create the AWS Glue job for this post. If you’re using a different version of AWS Glue, you need to download the corresponding OpenLineage Spark plugin file that matches your AWS Glue version.
The OpenLineage Spark plugin is not able to extract data lineage from AWS Glue Spark jobs that use AWS Glue DynamicFrames. Use Spark SQL DataFrames instead.
- Download the extract_glue_spark_lineage.py file.
- On the Amazon DataZone console, open CloudShell.
- On the Actions menu, choose Update file.
- Upload the extract_glue_spark_lineage.py file.
- On the CloudShell console, run the following command (if your CloudShell session expired, you can open a new session):
- Confirm the information showed by the script by entering
yes.
You will see the following message; this means that the script is ready to get the AWS Glue job lineage metadata after you run it.
Now let’s run the AWS Glue job created by the Cloud formation template.
- On the AWS Glue console, choose ETL jobs in the navigation pane.
- Select the Inventory_Insights job and choose Run job.
On the Job details tab, you will notice that the job has the following configuration:
- Key
--confwith valueextraListeners=io.openlineage.spark.agent.OpenLineageSparkListener --conf spark.openlineage.transport.type=console --conf spark.openlineage.facets.custom_environment_variables=[AWS_DEFAULT_REGION;GLUE_VERSION;GLUE_COMMAND_CRITERIA;GLUE_PYTHON_VERSION;] - Key
--user-jars-firstwith valuetrue - Dependent JARs path set as the S3 path
s3://{your bucket}/lib/openlineage-spark_2.12-1.9.1.jar - The AWS Glue version set as 3.0
During the run of the job, you will see the following output on the CloudShell console.

This means that the script has successfully harvested the lineage metadata from the AWS Glue job.
Now let’s create an AWS Glue table based on the data created by the AWS Glue job. For this example, we use an AWS Glue crawler.
- On the AWS Glue console, choose Crawlers in the navigation pane.
- Select the
AWSomeRetailCrawlercrawler created by the CloudFormation template and choose Run.
When the crawler is complete, you will see the following message.

Now let’s open the Amazon DataZone portal to see how the diagram is represented in Amazon DataZone.
- On the Amazon DataZone portal, choose the
Salesproject. - On the Data tab, choose Inventory data in the navigation pane.
- Choose the
inventory insightsasset
On the Lineage tab, you can see the diagram created by Amazon DataZone. It shows three nodes:
- The AWS Glue crawler used to create the AWS Glue table
- The AWS Glue table created by the crawler
- The Amazon DataZone cataloged asset
- To see the lineage information about the AWS Glue job that you ran to create the
inventory_insightstable, choose the arrows icon on the left side of the diagram.
Now you can see the full lineage diagram for the Inventory_insights table.

- Choose the blue arrow icon in the inventory node to the left of the diagram.

You can see the evolution of the columns and the transformations that they had.
When you choose any of the nodes that are part of the diagram, you can see more details. For example, the inventory_insights node shows the following information.

Capture lineage from Amazon Redshift
Let’s explore how to generate a lineage diagram from Amazon Redshift. In this example, we use AWS Cloud9 because it allows us to configure the connection to the virtual private cloud (VPC) where our Redshift cluster resides. For more information about AWS Cloud9, refer to the AWS Cloud9 User Guide.
The CloudFormation template included as part of this post doesn’t cover the creation of a Redshift cluster or the creation of the tables used in this section. To learn more about how to create a Redshift cluster, see Step 1: Create a sample Amazon Redshift cluster. We use the following query to create the tables needed for this section of the post:
Remember to add the IP address of your AWS Cloud9 environment to the security group with access to the Redshift cluster.
- Download the
requirements.txtandextract_redshift_lineage.pyfiles. - On the File menu, choose Upload Local Files.
- Upload the
requirements.txtandextract_redshift_lineage.pyfiles. - Run the following commands:
You should be able to see the following messages.

- To set the AWS credentials, run the following command:
- Run the
extract_redshift_lineage.pyscript to harvest the metadata necessary to generate the lineage diagram: - Next, you will be prompted to enter the user name and password for the connection to your Amazon DataZone database.
- When you receive a confirmation message, enter
yes.

If the configuration was done correctly, you will see the following confirmation message.

Now let’s see how the diagram was created in Amazon DataZone.
- On the Amazon DataZone data portal, open the
Salesproject. - On the Data tab, choose Data sources.
- Run the data source job.
For this post, we already created a data source job called Sales_DW_Enviroment-default-datasource to add the Redshift data source to our Amazon DataZone project. To learn how to create a data source job, refer to Create and run an Amazon DataZone data source for Amazon Redshift
After you run the job, you’ll see the following confirmation message.

- On the Data tab, choose Inventory data in the navigation pane.
- Choose the
total_salesasset.
- Choose the Lineage tab.

Amazon DataZone create a three-node lineage diagram for the total sales table; you can choose any node to view its details.
- Choose the arrows icon next to the Job/ Job run node to view a more complete lineage diagram.

- Choose the Job / Job run
The Job Info section shows the query that was used to create the total sales table.

Capture lineage from Amazon MWAA
Apache Airflow is an open-source platform for developing, scheduling, and monitoring batch-oriented workflows. Amazon MWAA is a managed service for Airflow that lets you use your current Airflow platform to orchestrate your workflows. OpenLineage supports integration with Airflow 2.6.3 using the openlineage-airflow package, and the same can be enabled on Amazon MWAA as a plugin. Once enabled, the plugin converts Airflow metadata to OpenLineage events, which are consumable by DataZone.PostLineageEvent.
The following diagram shows the setup required in Amazon MWAA to capture data lineage using OpenLineage and publish it to Amazon DataZone.

The workflow uses an Amazon MWAA DAG to invoke a data pipeline. The process is as follows:
- The
openlineage-airflowplugin is configured on Amazon MWAA as a lineage backend. Metadata about the DAG run is passed to the plugin, which converts it into OpenLineage format. - The lineage information collected is written to Amazon CloudWatch log group according to the Amazon MWAA environment.
- A helper function captures the lineage information from the log file and publishes it to Amazon DataZone using the
PostLineageEventAPI.
The example used in the post uses Amazon MWAA version 2.6.3 and OpenLineage plugin version 1.4.1. For other Airflow versions supported by OpenLineage, refer to Supported Airflow versions.
Configure the OpenLineage plugin on Amazon MWAA to capture lineage
When harvesting lineage using OpenLineage, a Transport configuration needs to be set up, which tells OpenLineage where to emit the events to, for example the console or an HTTP endpoint. You can use ConsoleTransport, which logs the OpenLineage events in the Amazon MWAA task CloudWatch log group, which can then be published to Amazon DataZone using a helper function.
Specify the following in the requirements.txt file added to the S3 bucket configured for Amazon MWAA:
openlineage-airflow==1.4.1
In the Airflow logging configuration section under the MWAA configuration for the Airflow environment, enable Airflow task logs with log level INFO. The following screenshot shows a sample configuration.

A successful configuration will add a plugin to Airflow, which can be verified from the Airflow UI by choosing Plugins on the Admin menu.


In this post, we use a sample DAG to hydrate data to Redshift tables. The following screenshot shows the DAG in graph view.

Run the DAG and upon successful completion of a run, open the Amazon MWAA task CloudWatch log group for your Airflow environment (airflow-env_name-task) and filter based on the expression console.py to select events emitted by OpenLineage. The following screenshot shows the results.

Publish lineage to Amazon DataZone
Now that you have the lineage events emitted to CloudWatch, the next step is to publish them to Amazon DataZone to associate them to a data asset and visualize them on the business data catalog.
- Download the files
requirements.txtandairflow_cw_parse_log.pyand gather environment details like AWS region, Amazon MWAA environment name and Amazon DataZone Domain ID. - The Amazon MWAA environment name can be obtained from the Amazon MWAA console.

- The Amazon DataZone domain ID can be obtained from Amazon DataZone service console or from the Amazon DataZone portal.

- Navigate to CloudShell and choose Upload files on the Actions menu to upload the files
requirements.txtandextract_airflow_lineage.py.

- After the files are uploaded, run the following script to filter lineage events from the Airflow task logs and publish them to Amazon DataZone:
The function extract_airflow_lineage.py filters the lineage events from the Amazon MWAA task log group and publishes the lineage to the specified domain within Amazon DataZone.
Visualize lineage on Amazon DataZone
After the lineage is published to DataZone, open your DataZone project, navigate to the Data tab and chose a data asset that was accessed by the Amazon MWAA DAG. In this case, it is a subscribed asset.

Navigate to the Lineage tab to visualize the lineage published to Amazon DataZone.

Choose a node to look at additional lineage metadata. In the following screenshot, we can observe the producer of the lineage has been marked as airflow.

Conclusion
In this post, we shared the preview feature of data lineage in Amazon DataZone, how it works, and how you can capture lineage events, from AWS Glue, Amazon Redshift, and Amazon MWAA, to be visualized as part of the asset browsing experience.
To learn more about Amazon DataZone and how to get started, refer to the Getting started guide. Check out the YouTube playlist for some of the latest demos of Amazon DataZone and short descriptions of the capabilities available.
About the Authors
 Leonardo Gomez is a Principal Analytics Specialist at AWS, with over a decade of experience in data management. Specializing in data governance, he assists customers worldwide in maximizing their data’s potential while promoting data democratization. Connect with him on LinkedIn.
 Priya Tiruthani is a Senior Technical Product Manager with Amazon DataZone at AWS. She focuses on improving data discovery and curation required for data analytics. She is passionate about building innovative products to simplify customers’ end-to-end data journey, especially around data governance and analytics. Outside of work, she enjoys being outdoors to hike, capture nature’s beauty, and recently play pickleball.
 Ron Kyker is a Principal Engineer with Amazon DataZone at AWS, where he helps drive innovation, solve complex problems, and set the bar for engineering excellence for his team. Outside of work, he enjoys board gaming with friends and family, movies, and wine tasting.
 Srinivasan Kuppusamy is a Senior Cloud Architect – Data at AWS ProServe, where he helps customers solve their business problems using the power of AWS Cloud technology. His areas of interests are data and analytics, data governance, and AI/ML.
AWS Weekly Roundup: Amazon S3 Access Grants, AWS Lambda, European Sovereign Cloud Region, and more (July 8, 2024).
Post Syndicated from Sébastien Stormacq original https://aws.amazon.com/blogs/aws/aws-weekly-roundup-amazon-s3-access-grants-aws-lambda-european-sovereign-cloud-region-and-more-july-8-2024/
I counted only 21 AWS news since last Monday, most of them being Regional expansions of existing services and capabilities. I hope you enjoyed a relatively quiet week, because this one will be busier.
This week, we’re welcoming our customers and partners at the Jacob Javits Convention Center for the AWS Summit New York on Wednesday, July 10. I can tell you there is a stream of announcements coming, if I judge by the number of AWS News Blog posts ready to be published.
I am writing these lines just before packing my bag to attend the AWS Community Day in Douala, Cameroon next Saturday. I can’t wait to meet our customers and partners, students, and the whole AWS community there.
But for now, let’s look at last week’s new announcements.
Last week’s launches
Here are the launches that got my attention.
Amazon Simple Storage Service (Amazon S3) Access Grants now integrate with Amazon SageMaker and open souce Python frameworks – Amazon S3 Access Grants maps identities in directories such as Active Directory or AWS Identity and Access Management (IAM) principals, to datasets in S3. The integration with Amazon SageMaker Studio for machine learning (ML) helps you map identities to your machine learning (ML) datasets in S3. The integration with the AWS SDK for Python (Boto3) plugin replaces any custom code required to manage data permissions, so you can use S3 Access Grants in open source Python frameworks such as Django, TensorFlow, NumPy, Pandas, and more.
AWS Lambda introduces new controls to make it easier to search, filter, and aggregate Lambda function logs – You can now capture your Lambda logs in JSON structured format without bringing your own logging libraries. You can also control the log level (for example, ERROR, DEBUG, or INFO) of your Lambda logs without making any code changes. Lastly, you can choose the Amazon CloudWatch log group to which Lambda sends your logs.
Amazon DataZone introduces fine-grained access control – Amazon DataZone has introduced fine-grained access control, providing data owners granular control over their data at row and column levels. You use Amazon DataZone to catalog, discover, analyze, share, and govern data at scale across organizational boundaries with governance and access controls. Data owners can now restrict access to specific records of data instead of granting access to an entire dataset.
AWS Direct Connect proposes native 400 Gbps dedicated connections at select locations – AWS Direct Connect provides private, high-bandwidth connectivity between AWS and your data center, office, or colocation facility. Native 400 Gbps connections provide higher bandwidth without the operational overhead of managing multiple 100 Gbps connections in a link aggregation group. The increased capacity delivered by 400 Gbps connections is particularly beneficial to applications that transfer large-scale datasets, such as for ML and large language model (LLM) training or advanced driver assistance systems for autonomous vehicles.
For a full list of AWS announcements, be sure to keep an eye on the What’s New at AWS page.
Other AWS news
Here are some additional news items that you might find interesting:
The list of services available at launch in the upcoming AWS Europe Sovereign Cloud Region is available – we shared the list of AWS services that will be initially available at launch in the new AWS European Sovereign Cloud Region. The list has no surprises. Services for security, networking, storage, computing, containers, artificial intelligence (AI), and serverless will be available at launch. We are building the AWS European Sovereign Cloud to offer public sector organizations and customers in highly regulated industries further choice to help them meet their unique digital sovereignty requirements, as well as stringent data residency, operational autonomy, and resiliency requirements. This is an investment of 7.8 billion euros (approximately $8.46 billion). The new Region will be available by the end of 2025.
Upcoming AWS events
Check your calendars and sign up for upcoming AWS events:
AWS Summits – Join free online and in-person events that bring the cloud computing community together to connect, collaborate, and learn about AWS. To learn more about future AWS Summit events, visit the AWS Summit page. Register in your nearest city: New York (July 10), Bogotá (July 18), and Taipei (July 23–24).
AWS Community Days – Join community-led conferences that feature technical discussions, workshops, and hands-on labs led by expert AWS users and industry leaders from around the world. Upcoming AWS Community Days are in Cameroon (July 13), Aotearoa (August 15), and Nigeria (August 24).
Browse all upcoming AWS led in-person and virtual events and developer-focused events.
That’s all for this week. Check back next Monday for another Weekly Roundup!
This post is part of our Weekly Roundup series. Check back each week for a quick roundup of interesting news and announcements from AWS!
Enhance data security with fine-grained access controls in Amazon DataZone
Post Syndicated from Deepmala Agarwal original https://aws.amazon.com/blogs/big-data/enhance-data-security-with-fine-grained-access-controls-in-amazon-datazone/
Fine-grained access control is a crucial aspect of data security for modern data lakes and data warehouses. As organizations handle vast amounts of data across multiple data sources, the need to manage sensitive information has become increasingly important. Making sure the right people have access to the right data, without exposing sensitive information to unauthorized individuals, is essential for maintaining data privacy, compliance, and security.
Today, Amazon DataZone has introduced fine-grained access control, providing you granular control over your data assets in the Amazon DataZone business data catalog across data lakes and data warehouses. With the new capability, data owners can now restrict access to specific records of data at row and column levels, instead of granting access to the entire data asset. For example, if your data contains columns with sensitive information such as personally identifiable information (PII), you can restrict access to only the necessary columns, making sure sensitive information is protected while still allowing access to non-sensitive data. Similarly, you can control access at the row level, allowing users to see only the records that are relevant to their role or task.
In this post, we discuss how to implement fine-grained access control with row and column asset filters using this new feature in Amazon DataZone.
Row and column filters
Row filters enable you to restrict access to specific rows based on criteria you define. For instance, if your table contains data for two regions (America and Europe) and you want to make sure that employees in Europe only access data relevant to their region, you can create a row filter that excludes rows where the region is not Europe (for example, region != 'Europe'). This way, employees in America won’t have access to Europe’s data.
Column filters allow you to limit access to specific columns within your data assets. For example, if your table includes sensitive information such as PII, you can create a column filter to exclude PII columns. This makes sure subscribers can only access non-sensitive data.
The row and column asset filters in Amazon DataZone enable you to control who can access what using a consistent, business user-friendly mechanism for all of your data across AWS data lakes and data warehouses. To use fine-grained access control in Amazon DataZone, you can create row and column filters on top of your data assets in the Amazon DataZone business data catalog. When a user requests a subscription to your data asset, you can approve the subscription by applying the appropriate row and column filters. Amazon DataZone enforces these filters using AWS Lake Formation and Amazon Redshift, making sure the subscriber can only access the rows and columns that they are authorized to use.
Solution overview
To demonstrate the new capability, we consider a sample customer use case where an electronics ecommerce platform is looking to implement fine-grained access controls using Amazon DataZone. The customer has multiple product categories, each operated by different divisions of the company. The platform governance team wants to make sure each division has visibility only to data belonging to their own categories. Additionally, the platform governance team needs to adhere to the finance team requirements that pricing information should be visible only to the finance team.
The sales team, acting as the data producer, has published an AWS Glue table called Product sales that contains data for both Laptops and Servers categories to the Amazon DataZone business data catalog using the project Product-Sales. The analytic teams in both the laptop and server divisions need to access this data for their respective analytics projects. The data owner’s objective is to grant data access to consumers based on the division they belong to. This means giving access to only rows of data with laptop sales to the laptops sales analytics team, and rows with servers sales to the server sales analytics team. Additionally, the data owner wants to restrict both teams from accessing the pricing data. This post demonstrates the implementation steps to achieve this use case in Amazon DataZone.
The steps to configure this solution are as follows:
- The publisher creates asset filters for limiting access:
- We create two row filters: a
Laptop Onlyrow filter that limits access to only the rows of data with laptop sales, and aServer Onlyrow filter that limits access to the rows of data with server sales. - We also create a column filter called
exclude-price-columnsthat excludes the price-related columns from theProduct Sales
- We create two row filters: a
- Consumers discover and request subscriptions:
- The analyst from the laptops division requests a subscription to the
Product Salesdata asset. - The analyst from the servers division also request a subscription to the
Product Salesdata asset. - Both subscription requests are sent to the publisher for approval.
- The analyst from the laptops division requests a subscription to the
- The publisher approves the subscriptions and applies the appropriate filters:
- The publisher approves the request from the analysts in the laptops division, applying the
Laptop Onlyrow filter and the exclude-price-columns columns filter. - The publisher approves the request from the consumer in the servers division, applying the
Server Onlyrow filter and the exclude-price-columns columns filter.
- The publisher approves the request from the analysts in the laptops division, applying the
- Consumers access the authorized data in Amazon Athena:
- After the subscription is approved, we query the data in Athena to make sure that the analyst from the laptops division can now access only the product sales data for the
Laptop - Similarly, the analyst from the servers division can access only the product sales data for the
Server - Both consumers can see all columns except the price-related columns, as per the applied column filter.
- After the subscription is approved, we query the data in Athena to make sure that the analyst from the laptops division can now access only the product sales data for the
The following diagram illustrates the solution architecture and process flow.

Prerequisites
To follow along with this post, the publisher of the product sales data asset must have published a sales dataset in Amazon DataZone.
Publisher creates asset filters for limiting access
In this section, we detail the steps the publisher takes to create asset filers.
Create row filters
This dataset contains the product categories Laptops and Servers. We want to restrict access to the dataset that is authorized based on the product category. We use the row filter feature in Amazon DataZone to achieve this.
Amazon DataZone allows you to create row filters that can be used when approving subscriptions to make sure that the subscriber can only access rows of data as defined in the row filters. To create a row filter, complete the following steps:
- On the Amazon DataZone console, navigate to the product-sales project (the project to which the asset belongs).

- Navigate to the Data tab for the project.

- Choose Inventory data in the navigation pane, then the asset
Product Sales, where you want to create the row filter.
You can add row filters for assets of type AWS Glue tables or Redshift tables.

- On the asset detail page, on the Asset filters tab, choose Add asset filter.
We create two row filters, one each for the Laptops and Servers categories.

- Complete the following steps to create a laptop only asset row filter:
- Enter a name for this filter (
Laptop Only). - Enter a description of the filter (Allow rows with product category as
Laptop Only). - For the filter type, select Row filter.
- For the row filter expression, enter one or more expressions:
- Choose the column
Product Categoryfrom the column dropdown menu. - Choose the operator
=from the operator dropdown menu. - Enter the value
Laptopsin the Value field.
- Choose the column
- If you need to add another condition to the filter expression, choose Add condition. For this post, we create a filter with one condition.
- When using multiple conditions in the row filter expression, choose And or Or to link the conditions.
- You can also define the subscriber visibility. For this post, we kept the default value (No, show values to subscriber).
- Choose Create asset filter.

- Enter a name for this filter (
- Repeat the same steps to create a row filter called
Server Only, except this time enter the value Servers in the Value field.
Create column filters
Next, we create column filters to restrict access to columns with price-related data. Complete the following steps:
- In the same asset, add another asset filter of type column filter.
- On the Asset filters tab, choose Add asset filter.
- For Name, enter a name for the filter (for this post,
exclude-price-columns). - For Description, enter a description of the filters (for this post,
exclude price data columns).
- For the filter type, select Column to create the column filter. This will display all the available columns in the data asset’s schema.
- Select all columns except the price-related ones.

- Choose Create asset filter.
Consumers discover and request subscriptions
In this section, we switch to the role of an analyst from the laptop division who is working within the project Sales Analytics - Laptop. As the data consumer, we search the catalog to find the Product Sales data asset and request access by subscribing to it.
- Log in to your project as a consumer and search for the
Product Salesdata asset.
- On the
Product Salesdata asset details page, choose Subscribe.
- For Project, choose Sales Analytics – Laptops.
- For Reason for request, enter the reason for the subscription request.
- Choose Subscribe to submit the subscription request.

Publisher approves subscriptions with filters
After the subscription request is submitted, the publisher will receive the request, and they can approve it by following these steps:
- As the publisher, open the project
Product-Sales. - On the Data tab, choose Incoming requests in the left navigation pane.
- Locate the request and choose View request. You can filter by Pending to see only requests that are still open.
This opens the details of the request, where you can see details like who requested the access, for what project, and the reason for the request.
- To approve the request, there are two options:
- Full access – If you choose to approve the subscription with full access option, the subscriber will get access to all the rows and columns in our data asset.
- Approve with row and column filters – To limit access to specific rows and columns of data, you can choose the option to approve with row and column filters. For this post, we use both filters that we created earlier.

- Select Choose filter, then on the dropdown menu, choose the
Laptops Onlyandpii-col-filter - Choose Approve to approve the request.

After access is granted and fulfilled, the subscription looks as shown in the following screenshot.

- Now let’s log in as a consumer from the server division.
- Repeat the same steps, but this time, while approving the subscription, the publisher of sales data approves with the Server only The other steps remain the same.

Consumers access authorized data in Athena
Now that we have successfully published an asset to the Amazon DataZone catalog and subscribed to it, we can analyze it. Let’s log in as a consumer from the laptop division.
- In the Amazon DataZone data portal, choose the consumer project
Sales Analytics - Laptops. - On the Schema tab, we can view the subscribed assets.

- Choose the project
Sales Analytics - Laptopsand choose the Overview - In the right pane, open the Athena environment.
We can now run queries on the subscribed table.
- Choose the table under Tables and views, then choose Preview to view the SELECT statement in the query editor.
- Run a query as the consumer of
Sales Analytics - Laptops, in which we can view data only with product categoryLaptops.
Under Tables and views, you can expand the table product_sales. The price-related columns are not visible in the Athena environment for querying.

- Next, you can switch to the role of analyst from the server division and analyze the dataset in similar way.
- We run the same query and see that under
product_category, the analyst can seeServersonly.
Conclusion
Amazon DataZone offers a straightforward way to implement fine-grained access controls on top of your data assets. This feature allows you to define column-level and row-level filters to enforce data privacy before the data is available to data consumers. Amazon DataZone fine-grained access control is generally available in all AWS Regions that support Amazon DataZone.
Try out the fine-grained access control feature in your own use case, and let us know your feedback in the comments section.
About the Authors
 Deepmala Agarwal works as an AWS Data Specialist Solutions Architect. She is passionate about helping customers build out scalable, distributed, and data-driven solutions on AWS. When not at work, Deepmala likes spending time with family, walking, listening to music, watching movies, and cooking!
Leonardo Gomez is a Principal Analytics Specialist Solutions Architect at AWS. He has over a decade of experience in data management, helping customers around the globe address their business and technical needs. Connect with him on LinkedIn.
 Utkarsh Mittal is a Senior Technical Product Manager for Amazon DataZone at AWS. He is passionate about building innovative products that simplify customers’ end-to-end analytics journeys. Outside of the tech world, Utkarsh loves to play music, with drums being his latest endeavor.
Amazon DataZone enhances data discovery with advanced search filtering
Post Syndicated from Chaitanya Vejendla original https://aws.amazon.com/blogs/big-data/amazon-datazone-enhances-data-discovery-with-advanced-search-filtering/
Amazon DataZone, a fully managed data management service, helps organizations catalog, discover, analyze, share, and govern data between data producers and consumers. We are excited to announce the introduction of advanced search filtering capabilities in the Amazon DataZone business data catalog.
With the improved rendering of glossary terms, you can now navigate large sets of terms with ease in an expandable and collapsible hierarchy, reducing the time and effort required to locate specific data assets. The introduction of logical operators (AND and OR) for filtering allows for more precise searches, enabling you to combine multiple criteria in a way that best suits your needs. The descriptive summary of search criteria helps users keep track of their applied filters, making it simple to adjust search parameters on the fly.
In this post, we discuss how these new search filtering capabilities enhance the user experience and boost the accuracy of search results, facilitating the ability to find data quickly.
Challenges
Many of our customers manage vast numbers of data assets within the Amazon DataZone catalog for discoverability. Data producers tag these assets with business glossary terms to classify and enhance discovery. For example, data assets owned by a particular department can be tagged with the glossary term for that department, like “Marketing.”
Data consumers searching for the right data assets use faceted search with various criteria, including business glossary terms, and apply filters to refine their search results. However, finding the right data assets can be challenging, especially when it involves combining multiple filters. Customers wanted more flexibility and precision in their search capabilities, such as:
- A more intuitive way to navigate through extensive lists of glossary terms
- The ability to apply more nuanced search logic to refine search results with greater precision
- A summary of applied filters to effortlessly review and adjust search criteria
New features in Amazon DataZone
With the latest release, Amazon DataZone now supports features that enhance search flexibility and accuracy:
- Improved rendering of glossary terms – Glossary terms are now displayed in a hierarchical view, providing a more organized structure. You can navigate and select from long lists of glossary terms presented in an expandable and collapsible hierarchy within the search facets. For instance, a data scientist can quickly find specific customer demographic data without sifting through an overwhelming flat list.
- Logical operators for refined search – You can now choose logical operators to refine your search results, offering greater control and precision. For example, a financial analyst preparing a report on investment performance can use AND logic to combine criteria like investment type and region to pinpoint the exact data needed, or use OR logic to broaden the search to include any investments that meet either criterion.
- Summary of search criteria – A descriptive summary of applied search filters is now provided, allowing you to review and manage your search criteria with ease. For example, a project manager can quickly adjust filters to find project-related assets matching specific phases or statuses.
These enhancements enable you to better understand the relationships between different search facets, enhancing the overall search experience and making it effortless to find the right data assets.
Use case overview
To demonstrate these search enhancements, we set up a new Amazon DataZone domain with two projects:
- Marketing project – Publishes campaign-related data assets from the Marketing department. These data assets have been tagged with relevant business glossary terms corresponding to marketing.
- Sales project – Publishes sales-related datasets from the Sales department. These data assets have been tagged with relevant business glossary terms corresponding to sales.
The following screenshots show examples of the different tagged assets.


In the following sections, we demonstrate the improvements in the user search experience for this use case.
Improved rendering of glossary terms
As a data consumer, you want to discover data assets using the faceted search capability within Amazon DataZone.
The search result panel has been enhanced to display glossaries and glossary terms in a hierarchical fashion. This allows you to expand and collapse sections for a more intuitive search experience.

For example, if you want to find product sales data assets from the Corporate Sales department, you can select the appropriate term within the glossary. The selection criteria and the corresponding result list show a total of 18 data assets, as shown in the following screenshot.

Next, if you want to further refine your search to focus only on the product category of Smartphones, you can do so.
Because OR is the default logical operator for your search within the glossary terms, it lists all the assets that are either part of Corporate Sales or tagged with Smartphones.

Logical operators for refined search
You now have the flexibility to change the default operator to AND to list only those data assets that are part of Corporate Sales and tagged with Smartphones, narrowing down the result set.

Additionally, you can further filter based on the asset type by selecting the available options. When you select Glue Table as your asset type, it defaults to the AND condition across the glossary terms and the asset type filter, thereby showing the data assets that satisfy all the filter conditions.

You also have the flexibility to change the operator to OR across these filters, yielding a more exhaustive list of data assets.

Summary of search criteria
As we showed in the preceding screenshots, the results also display a summary of the filters you applied for the search. This enables you to review and better manage your search criteria.
Conclusion
This post demonstrated new Amazon DataZone search enhancement features that streamline data discovery for a more intuitive user experience. These enhancements are designed to empower data consumers within organizations to make more informed decisions, faster. By streamlining the search process and making it more intuitive, Amazon DataZone continues to support the growing needs of data-driven businesses, helping you unlock the full potential of your data assets.
For more information about Amazon DataZone and to get started, refer to the Amazon DataZone User Guide.
About the authors
 Chaitanya Vejendla is a Senior Solutions Architect specialized in DataLake & Analytics primarily working for Healthcare and Life Sciences industry division at AWS. Chaitanya is responsible for helping life sciences organizations and healthcare companies in developing modern data strategies, deploy data governance and analytical applications, electronic medical records, devices, and AI/ML-based applications, while educating customers about how to build secure, scalable, and cost-effective AWS solutions. His expertise spans across data analytics, data governance, AI, ML, big data, and healthcare-related technologies.
Ramesh H Singh is a Senior Product Manager Technical (External Services) at AWS in Seattle, Washington, currently with the Amazon DataZone team. He is passionate about building high-performance ML/AI and analytics products that enable enterprise customers to achieve their critical goals using cutting-edge technology.
 Rishabh Asthana is a Front-end Engineer at AWS, working with the Amazon DataZone team based in New York City, USA.
 Somdeb Bhattacharjee is an Enterprise Solutions Architect based out of New York, USA focused on helping customers on their cloud journey. He has interest in Databases, Big Data and Analytics.
AWS Weekly Roundup: AI21 Labs’ Jamba-Instruct in Amazon Bedrock, Amazon WorkSpaces Pools, and more (July 1, 2024)
Post Syndicated from Esra Kayabali original https://aws.amazon.com/blogs/aws/aws-weekly-roundup-ai21-labs-jamba-instruct-in-amazon-bedrock-amazon-workspaces-pools-and-more-july-1-2024/
AWS Summit New York is 10 days away, and I am very excited about the new announcements and more than 170 sessions. There will be A Night Out with AWS event after the summit for professionals from the media and entertainment, gaming, and sports industries who are existing Amazon Web Services (AWS) customers or have a keen interest in using AWS Cloud services for their business. You’ll have the opportunity to relax, collaborate, and build new connections with AWS leaders and industry peers.
Let’s look at the last week’s new announcements.
Last week’s launches
Here are the launches that got my attention.
AI21 Labs’ Jamba-Instruct now available in Amazon Bedrock – AI21 Labs’ Jamba-Instruct is an instruction-following large language model (LLM) for reliable commercial use, with the ability to understand context and subtext, complete tasks from natural language instructions, and ingest information from long documents or financial filings. With strong reasoning capabilities, Jamba-Instruct can break down complex problems, gather relevant information, and provide structured outputs to enable uses like Q&A on calls, summarizing documents, building chatbots, and more. For more information, visit AI21 Labs in Amazon Bedrock and the Amazon Bedrock User Guide.
Amazon WorkSpaces Pools, a new feature of Amazon WorkSpaces – You can now create a pool of non-persistent virtual desktops using Amazon WorkSpaces and save costs by sharing them across users who receive a fresh desktop each time they sign in. WorkSpaces Pools provides the flexibility to support shared environments like training labs and contact centers, and some user settings like bookmarks and files stored in a central storage repository such as Amazon Simple Storage Service (Amazon S3) or Amazon FSx can be saved for improved personalization. You can use AWS Auto Scaling to automatically scale the pool of virtual desktops based on usage metrics or schedules. For pricing information, refer to the Amazon WorkSpaces Pricing page.
API-driven, OpenLineage-compatible data lineage visualization in Amazon DataZone (preview) – Amazon DataZone introduces a new data lineage feature that allows you to visualize how data moves from source to consumption across organizations. The service captures lineage events from OpenLineage-enabled systems or through API to trace data transformations. Data consumers can gain confidence in an asset’s origin, and producers can assess the impact of changes by understanding its consumption through the comprehensive lineage view. Additionally, Amazon DataZone versions lineage with each event to enable visualizing lineage at any point in time or comparing transformations across an asset or job’s history. To learn more, visit Amazon DataZone, read my News Blog post, and get started with data lineage documentation.
Knowledge Bases for Amazon Bedrock now offers observability logs – You can now monitor knowledge ingestion logs through Amazon CloudWatch, S3 buckets, or Amazon Data Firehose streams. This provides enhanced visibility into whether documents were successfully processed or encountered failures during ingestion. Having these comprehensive insights promptly ensures that you can efficiently determine when your documents are ready for use. For more details on these new capabilities, refer to the Knowledge Bases for Amazon Bedrock documentation.
Updates and expansion to the AWS Well-Architected Framework and Lens Catalog – We announced updates to the AWS Well-Architected Framework and Lens Catalog to provide expanded guidance and recommendations on architectural best practices for building secure and resilient cloud workloads. The updates reduce redundancies and enhance consistency in resources and framework structure. The Lens Catalog now includes the new Financial Services Industry Lens and updates to the Mergers and Acquisitions Lens. We also made important updates to the Change Enablement in the Cloud whitepaper. You can use the updated Well-Architected Framework and Lens Catalog to design cloud architectures optimized for your unique requirements by following current best practices.
Cross-account machine learning (ML) model sharing support in Amazon SageMaker Model Registry – Amazon SageMaker Model Registry now integrates with AWS Resource Access Manager (AWS RAM), allowing you to easily share ML models across AWS accounts. This helps data scientists, ML engineers, and governance officers access models in different accounts like development, staging, and production. You can share models in Amazon SageMaker Model Registry by specifying the model in the AWS RAM console and granting access to other accounts. This new feature is now available in all AWS Regions where SageMaker Model Registry is available except GovCloud Regions. To learn more, visit the Amazon SageMaker Developer Guide.
AWS CodeBuild supports Arm-based workloads using AWS Graviton3 – AWS CodeBuild now supports natively building and testing Arm workloads on AWS Graviton3 processors without additional configuration, providing up to 25% higher performance and 60% lower energy usage than previous Graviton processors. To learn more about CodeBuild’s support for Arm, visit our AWS CodeBuild User Guide.
For a full list of AWS announcements, be sure to keep an eye on the What’s New at AWS page.
We launched existing services and instance types in additional Regions:
- Amazon RDS now supports integration with AWS Secrets Manager in the AWS GovCloud (US) Regions. RDS integration with AWS Secrets Manager improves your database security by ensuring your RDS master user password is not visible in plaintext to administrators or engineers during your database creation workflow.
- Amazon OpenSearch Serverless is now available in Canada (Central) Region. OpenSearch Serverless is a serverless deployment option for Amazon OpenSearch Service that makes it simple to run search and analytics workloads without the complexities of infrastructure management.
- Amazon Redshift Concurrency Scaling is now available in the AWS Europe (Spain, Zurich) and Middle East (UAE) Regions. Amazon Redshift Concurrency Scaling elastically scales query processing power to provide consistently fast performance for hundreds of concurrent queries.
- Amazon ElastiCache now supports Graviton3-based M7g and R7g node families in the following AWS Regions: US East (N. Virginia, Ohio), US West (Oregon, N. California), Canada (Central), South America (São Paulo), Europe (Frankfurt, Ireland, London, Paris (M7g only), Spain, Stockholm), and Asia Pacific (Hyderabad, Mumbai, Seoul, Singapore, Sydney, Tokyo). These new nodes deliver up to 28% increased throughput, 21% improved P99 latency, and 25% higher networking bandwidth compared to Graviton2 nodes for improved price performance.
- Amazon EC2 C6a instances are now available in Asia Pacific (Hong Kong) Region. C6a instances are powered by third-generation AMD EPYC processors with a maximum frequency of 3.6 GHz. C6a instances deliver up to 15% better price performance than comparable C5a instances.
- Amazon Redshift Serverless with lower base capacity is now available in the Asia Pacific (Mumbai), Europe (Stockholm), and US West (N. California) Regions. Amazon Redshift Serverless now has a lower minimum base capacity of 8 RPUs, down from 32 RPUs, providing more flexibility to support a diverse range of small to large workloads based on price-performance requirements by measuring capacity in RPUs paid per second.
- Amazon Athena Provisioned Capacity is now available in South America (São Paulo) and Europe (Spain) Regions. Provisioned Capacity is a feature of Athena that allows you to run SQL queries on fully managed, dedicated serverless resources for a fixed price and no long-term commitments.
- Amazon CloudWatch Logs account-level subscription filter is now available in the AWS GovCloud (US-East, US-West) Regions, as well as Israel (Tel Aviv), and Canada West (Calgary) Regions. With this new capability, you can deliver real-time log events that are ingested into Amazon CloudWatch Logs to a Kinesis Data Streams data stream, an Amazon Data Firehose delivery stream, or an AWS Lambda function for custom processing, analysis, or delivery to other destinations using a single account level subscription filter.
- Amazon Route 53 Application Recovery Controller (Route 53 ARC) zonal autoshift is now generally available in the AWS GovCloud (US-East, US-West) Regions. With this feature, you can safely and automatically shift an application’s traffic away from an Availability Zone when AWS identifies a potential failure affecting that Availability Zone.
- AWS Backup support for Amazon S3 is now available in AWS Canada West (Calgary) Region. AWS Backup is a policy-based, fully managed, and cost-effective solution that enables you to centralize and automate data protection of Amazon S3 along with other AWS services (spanning compute, storage, and databases) and third-party applications.
- Amazon EC2 High Memory instances with 3TiB of memory are now available in Asia Pacific (Hong Kong) Region. You can start using these new High Memory instances with On Demand and Savings Plan purchase options.
Other AWS news
Here are some additional news items that you might find interesting:
Top reasons to build and scale generative AI applications on Amazon Bedrock – Check out Jeff Barr’s video, where he discusses why our customers are choosing Amazon Bedrock to build and scale generative artificial intelligence (generative AI) applications that deliver fast value and business growth. Amazon Bedrock is becoming a preferred platform for building and scaling generative AI due to its features, innovation, availability, and security. Leading organizations across diverse sectors use Amazon Bedrock to speed their generative AI work, like creating intelligent virtual assistants, creative design solutions, document processing systems, and a lot more.
Four ways AWS is engineering infrastructure to power generative AI – We continue to optimize our infrastructure to support generative AI at scale through innovations like delivering low-latency, large-scale networking to enable faster model training, continuously improving data center energy efficiency, prioritizing security throughout our infrastructure design, and developing custom AI chips like AWS Trainium to increase computing performance while lowering costs and energy usage. Read the new blog post about how AWS is engineering infrastructure for generative AI.
AWS re:Inforce 2024 re:Cap – It’s been 2 weeks since AWS re:Inforce 2024, our annual cloud-security learning event. Check out the summary of the event prepared by Wojtek.
Upcoming AWS events
Check your calendars and sign up for upcoming AWS events:
AWS Summits – Join free online and in-person events that bring the cloud computing community together to connect, collaborate, and learn about AWS. To learn more about future AWS Summit events, visit the AWS Summit page. Register in your nearest city: New York (July 10), Bogotá (July 18), and Taipei (July 23–24).
AWS Community Days – Join community-led conferences that feature technical discussions, workshops, and hands-on labs led by expert AWS users and industry leaders from around the world. Upcoming AWS Community Days are in Cameroon (July 13), Aotearoa (August 15), and Nigeria (August 24).
Browse all upcoming AWS led in-person and virtual events and developer-focused events.
That’s all for this week. Check back next Monday for another Weekly Roundup!
This post is part of our Weekly Roundup series. Check back each week for a quick roundup of interesting news and announcements from AWS!
Introducing end-to-end data lineage (preview) visualization in Amazon DataZone
Post Syndicated from Esra Kayabali original https://aws.amazon.com/blogs/aws/introducing-end-to-end-data-lineage-preview-visualization-in-amazon-datazone/
Amazon DataZone is a data management service to catalog, discover, analyze, share, and govern data between data producers and consumers in your organization. Engineers, data scientists, product managers, analysts, and business users can easily access data throughout your organization using a unified data portal so that they can discover, use, and collaborate to derive data-driven insights.
Now, I am excited to announce in preview a new API-driven and OpenLineage compatible data lineage capability in Amazon DataZone, which provides an end-to-end view of data movement over time. Data lineage is a new feature within Amazon DataZone that helps users visualize and understand data provenance, trace change management, conduct root cause analysis when a data error is reported, and be prepared for questions on data movement from source to target. This feature provides a comprehensive view of lineage events, captured automatically from Amazon DataZone’s catalog along with other events captured programmatically outside of Amazon DataZone by stitching them together for an asset.
When you need to validate how the data of interest originated in the organization, you may rely on manual documentation or human connections. This manual process is time-consuming and can result in inconsistency, which directly reduces your trust in the data. Data lineage in Amazon DataZone can raise trust by helping you understand where the data originated, how it has changed, and its consumption in time. For example, data lineage can be programmatically setup to show the data from the time it was captured as raw files in Amazon Simple Storage Service (Amazon S3), through its ETL transformations using AWS Glue, to the time it was consumed in tools such as Amazon QuickSight.
With Amazon DataZone’s data lineage, you can reduce the time spent mapping a data asset and its relationships, troubleshooting and developing pipelines, and asserting data governance practices. Data lineage helps you gather all lineage information in one place using API, and then provide a graphical view with which data users can be more productive, make better data-driven decisions, and also identify the root cause of data issues.
Let me tell you how to get started with data lineage in Amazon DataZone. Then, I will show you how data lineage enhances the Amazon DataZone data catalog experience by visually displaying connections about how a data asset came to be so you can make informed decisions when searching or using the data asset.
Getting started with data lineage in Amazon DataZone
In preview, I can get started by hydrating lineage information into Amazon DataZone programmatically by either directly creating lineage nodes using Amazon DataZone APIs or by sending OpenLineage compatible events from existing pipeline components to capture data movement or transformations that happens outside of Amazon DataZone. For information about assets in the catalog, Amazon DataZone automatically captures lineage of its states (i.e., inventory or published states), and its subscriptions for producers, such as data engineers, to trace who is consuming the data they produced or for data consumers, such as data analyst or data engineers, to understand if they are using the right data for their analysis.
With the information being sent, Amazon DataZone will start populating the lineage model and will be able to map the identifier sent through the APIs with the assets already cataloged. As new lineage information is being sent, the model starts creating versions to start the visualization of the asset at a given time, but it also allows me to navigate to previous versions.
I use a preconfigured Amazon DataZone domain for this use case. I use Amazon DataZone domains to organize my data assets, users, and projects. I go to the Amazon DataZone console and choose View domains. I choose my domain Sales_Domain and choose Open data portal.

I have five projects under my domain: one for a data producer (SalesProject) and four for data consumers (MarketingTestProject, AdCampaignProject, SocialCampaignProject, and WebCampaignProject). You can visit Amazon DataZone Now Generally Available – Collaborate on Data Projects across Organizational Boundaries to create your own domain and all the core components.

I enter “Market Sales Table” in the Search Assets bar and then go to the detail page for the Market Sales Table asset. I choose the LINEAGE tab to visualize lineage with upstream and downstream nodes.

I can now dive into asset details, processes, or jobs that lead to or from those assets and drill into column-level lineage.
Interactive visualization with data lineage
I will show you the graphical interface using various personas who regularly interact with Amazon DataZone and will benefit from the data lineage feature.
First, let’s say I am a marketing analyst, who needs to confirm the origin of a data asset to confidently use in my analysis. I go to the MarketingTestProject page and choose the LINEAGE tab. I notice the lineage includes information about the asset as it occurs inside and out of Amazon DataZone. The labels Cataloged, Published, and Access requested represent actions inside the catalog. I expand the market_sales dataset item to see where the data came from.

I now feel assured of the origin of the data asset and trust that it aligns with my business purpose ahead of starting my analysis.
Second, let’s say I am a data engineer. I need to understand the impact of my work on dependent objects to avoid unintended changes. As a data engineer, any changes made to the system should not break any downstream processes. By browsing lineage, I can clearly see who has subscribed and has access to the asset. With this information, I can inform the project teams about an impending change that can affect their pipeline. When a data issue is reported, I can investigate each node and traverse between its versions to dive into what has changed over time to identify the root cause of the issue and fix it in a timely manner.

Finally, as an administrator or steward, I am responsible for securing data, standardizing business taxonomies, enacting data management processes, and for general catalog management. I need to collect details about the source of data and understand the transformations that have happened along the way.
For example, as an administrator looking to respond to questions from an auditor, I traverse the graph upstream to see where the data is coming from and notice that the data is from two different sources: online sale and in-store sale. These sources have their own pipelines until the flow reaches a point where the pipelines merge.

While navigating through the lineage graph, I can expand the columns to ensure sensitive columns are dropped during the transformation processes and respond to the auditors with details in a timely manner.

Join the preview
Data lineage capability is available in preview in all Regions where Amazon DataZone is generally available. For a list of Regions where Amazon DataZone domains can be provisioned, visit AWS Services by Region.
Data lineage costs are dependent on storage usage and API requests, which are already included in Amazon DataZone’s pricing model. For more details, visit Amazon DataZone pricing.
To learn more about data lineage in Amazon DataZone, visit the Amazon DataZone User Guide.
Amazon DataZone announces custom blueprints for AWS services
Post Syndicated from Anish Anturkar original https://aws.amazon.com/blogs/big-data/amazon-datazone-announces-custom-blueprints-for-aws-services/
Last week, we announced the general availability of custom AWS service blueprints, a new feature in Amazon DataZone allowing you to customize your Amazon DataZone project environments to use existing AWS Identity and Access Management (IAM) roles and AWS services to embed the service into your existing processes. In this post, we share how this new feature can help you in federating to your existing AWS resources using your own IAM role. We also delve into details on how to configure data sources and subscription targets for a project using a custom AWS service blueprint.
New feature: Custom AWS service blueprints
Previously, Amazon DataZone provided default blueprints that created AWS resources required for data lake, data warehouse, and machine learning use cases. However, you may have existing AWS resources such as Amazon Redshift databases, Amazon Simple Storage Service (Amazon S3) buckets, AWS Glue Data Catalog tables, AWS Glue ETL jobs, Amazon EMR clusters, and many more for your data lake, data warehouse, and other use cases. With Amazon DataZone default blueprints, you were limited to only using preconfigured AWS resources that Amazon DataZone created. Customers needed a way to integrate these existing AWS service resources with Amazon DataZone, using a customized IAM role so that Amazon DataZone users can get federated access to those AWS service resources and use the publication and subscription features of Amazon DataZone to share and govern them.
Now, with custom AWS service blueprints, you can use your existing resources using your preconfigured IAM role. Administrators can customize Amazon DataZone to use existing AWS resources, enabling Amazon DataZone portal users to have federated access to those AWS services to catalog, share, and subscribe to data, thereby establishing data governance across the platform.
Benefits of custom AWS service blueprints
Custom AWS service blueprints don’t provision any resources for you, unlike other blueprints. Instead, you can configure your IAM role (bring your own role) to integrate your existing AWS resources with Amazon DataZone. Additionally, you can configure action links, which provide federated access to any AWS resources like S3 buckets, AWS Glue ETL jobs, and so on, using your IAM role.
You can also configure custom AWS service blueprints to bring your own resources, namely AWS databases, as data sources and subscription targets to enhance governance across those assets. With this release, administrators can configure data sources and subscription targets on the Amazon DataZone console and not be restricted to do those actions in the data portal.
Custom blueprints and environments can only be set up by administrators to manage access to configured AWS resources. As custom environments are created in specific projects, the right to grant access to custom resources is delegated to the project owners who can manage project membership by adding or removing members. This restricts the ability of portal users to create custom environments without the right permissions in AWS Console for Amazon DataZone or access custom AWS resources configured in a project that they are not a member of.
Solution overview
To get started, administrators need to enable the custom AWS service blueprints feature on the Amazon DataZone console. Then administrators can customize configurations by defining which project and IAM role to use when federating to the AWS services that are set up as action links for end-users. After the customized set up is complete, when a data producer or consumer logs in to the Amazon DataZone portal and if they’re part of those customized projects, they can federate to any of the configured AWS services such as Amazon S3 to upload or download files or seamlessly go to existing AWS Glue ETL jobs using their own IAM roles and continue their work with data with the customized tool of choice. With this feature, you can how include Amazon DataZone in your existing data pipeline processes to catalog, share, and govern data.
The following diagram shows an administrator’s workflow to set up a custom blueprint.

In the following sections, we discuss common use cases for custom blueprints, and walk through the setup step by step. If you’re new to Amazon DataZone, refer to Getting started.
Use case 1: Bring your own role and resources
Customers manage data platforms that consist of AWS managed services such as AWS Lake Formation, Amazon S3 for data lakes, AWS Glue for ETL, and so on. With those processes already set up, you may want to bring your own roles and resources to Amazon DataZone to continue with an existing process without any disruption. In such cases, you may not want Amazon DataZone to create new resources because it disrupts existing processes in data pipelines and to also curtail AWS resource usage and costs.
In the current setup, you can create an Amazon DataZone domain associated with different accounts. There could be a dedicated account that acts like a producer to share data, and a few other consumer accounts to subscribe to published assets in the catalog. The consumer account has IAM permissions set up for the AWS Glue ETL job to use for the subscription environment of a project. By doing so, the role has access to the newly subscribed data as well as permissions from previous setups to access data from other AWS resources. After you configure the AWS Glue job IAM role in the environment using the custom AWS service blueprint, the authorized users of that role can use the subscribed assets in the AWS Glue ETL job and extend that data for downstream activities to store them in Amazon S3 and other databases to be queried and analyzed using the Amazon Athena SQL editor or Amazon QuickSight.
Use case 2: Amazon S3 multi-file downloads
Customers and users of the Amazon DataZone portal often need the ability to download files after searching and filtering through the catalog in an Amazon DataZone project. This requirement arises because the data and analytics associated with a particular use case can sometimes involve hundreds of files. Downloading these files individually would be a tedious and time-consuming process for Amazon DataZone users. To address this need, the Amazon DataZone portal can take advantage of the capabilities provided by custom AWS service blueprints. These custom blueprints allow you to configure action links to S3 bucket folders associated with specified Amazon DataZone projects.
You can build projects and subscribe to both unstructured and structured data assets within the Amazon DataZone portal. For structured datasets, you can use Amazon DataZone blueprint-based environments like data lakes (Athena) and data warehouses (Amazon Redshift). For unstructured data assets, you can use the custom blueprint-based Amazon S3 environment, which provides a familiar Amazon S3 browser interface with access to specific buckets and folders, using an IAM role owned and provided by the customer. This functionality streamlines the process of finding and accessing unstructured data and allows you to download multiple files at once, enabling you to build and enhance your analytics more efficiently.
Use case 3: Amazon S3 file uploads
In addition to the download functionality, users often need to retain and attach metadata to new versions of files. For example, when you download a file, you can perform data changes, enrichment, or analysis on the file, and then upload the updated version back to the Amazon DataZone portal. For uploading files, Amazon DataZone users can use the same custom blueprint-based Amazon S3 environment action links to upload files.
Use case 4: Extend existing environments to custom blueprint environments
You may have existing Amazon DataZone project environments created using default data lake and data warehouse blueprints. With other AWS services set up in the data platform, you may want to extend the configured project environments to include those additional services to provide a seamless experience for your data producers or consumers while switching between tools.
Now that you understand the capabilities of the new feature, let’s look at how administrators can set up a custom role and resources on the Amazon DataZone console.
Create a domain
First, you need an Amazon DataZone domain. If you already have one, you can skip to enabling your custom blueprints. Otherwise, refer to Create domains for instructions to set up a domain. Optionally, you can associate accounts if you want to set up Amazon DataZone across multiple accounts.
Associate accounts for cross-account scenarios
You can optionally associate accounts. For instructions, refer to Request association with other AWS accounts. Make sure to use the latest AWS Resource Access Manager (AWS RAM) DataZonePortalReadWrite policy when requesting account association. If your account is already associated, request access again with the new policy.

Accept the account association request
To accept the account associated request, refer to Accept an account association request from an Amazon DataZone domain and enable an environment blueprint. After you accept the account association, you should see the following screenshot.

Add associated account users in the Amazon DataZon domain account
With this launch, you can set up associated account owners to access the Amazon DataZone data portal from their account. To enable this, they need to be registered as users in the domain account. As a domain admin, you can create Amazon DataZone user profiles to allow Amazon DataZone access to users and roles from the associated account. Complete the following steps:
- On the Amazon DataZone console, navigate to your domain.
- On the User management tab, choose Add IAM Users from the Add dropdown menu.

- Enter the ARNs of your associated account IAM users or roles. For this post, we add
arn:aws:iam::123456789101:role/serviceBlueprintRoleandarn:aws:iam::123456789101:user/Jacob. - Choose Add users(s).

Back on the User management tab, you should see the new user state with Assigned status. This means that the domain owner has assigned associated account users to access Amazon DataZone. This status will change to Active when the identity starts using Amazon DataZone from the associated account.

As of writing this post, there is a maximum limit of adding six identities (users or roles) per associated account.
Enable the custom AWS service blueprint feature
You can enable custom AWS service blueprints in the domain account or the associated account, according to your requirements. Complete the following steps:
- On the Account associations tab, choose the associated domain.
- Choose the AWS service blueprint.
- Choose Enable.

Create an environment using the custom blueprint
If an associated account is being used to create this environment, use the same associated account IAM identity assigned by the domain owner in the previous step. Your identity needs to be explicitly assigned a user profile in order for you to create this environment. Complete the following steps:
- Choose the custom blueprint.
- In the Created environments section, choose Create environment.

- Select Create and use a new project or use an existing project if you already have one.
- For Environment role, choose a role. For this post, we curated a cross-account role called
AmazonDataZoneAdminand gave itAdministratorAccessThis is the bring your own role feature. You should curate your role according to your requirements. Here are some guidelines on how to set up custom role as we have used a more permissible policy for this blog:- You can use AWS Policy Generator to build a policy that fits your requirements and attach it to the custom IAM role you want to use.
- Make sure the role begins with
AmazonDataZone*to follow conventions. This is not mandatory, but recommended. If the IAM admin is using anAmazonDataZoneFullAccesspolicy, you need to follow this convention because there is a pass role check validation. - When you create the
CustomRole(AWSDataZone*) make sure it trustsamazonaws.comin its trust policy:
- For Region, choose an AWS Region.
- Choose Create environment.

Although you could use the same IAM role for multiple environments in a project, the recommendation is to not use a same IAM role for multiple environments across projects. Subscription grants are fulfilled at the project construct and therefore we don’t allow the same environment role to be used across different projects.
Configure custom action links
After you create the AWS service environment, you can configure any AWS Management Console links to your environment. Amazon DataZone will assume the custom role to help federate environment users to the configured action links. Complete the following steps:
- In your environment, choose Customize AWS links.

- Configure any S3 buckets, Athena workgroups, AWS Glue jobs, or other custom resources.

- Select Custom AWS links and enter any AWS service console custom resources. For this post, we link to the Amazon Relational Database Service (Amazon RDS) console.

You should now see the console links set up for your environment.

Access resources using a custom role through the Amazon DataZone portal from an associated account
Associate account users who have been added to Amazon DataZone can access the data portal from their associated account directly. Complete the following steps:
- In your environment, in the Summary section, choose the My Environment link.

You should see all your configured resources (role and action links) for your environment.

- Choose any action link to navigate to the appropriate console resources.

- Choose any action link for a custom resource (for this post, Amazon RDS).

You’re directed to the appropriate service console.

With this setup, you have now configured a custom AWS service blueprint to use your own role for the environment to use for data access as well. You have also set up action links for configured AWS resources to be shown to data producers and consumers in the Amazon DataZone data portal. With these links, you can federate to those services in a single click and take the project context along while working with the data.
Configure data sources and subscription targets
Additionally, administrators can now configure data sources and subscription targets on the Amazon DataZone console using custom AWS service blueprint environments. This needs to be configured to set up the database role ManagedAccessRole to the data source and subscription target, which you can’t do through the Amazon DataZone portal.
Configure data sources in the custom AWS service blueprint environment for publishing
Complete the following steps to configure your data source:
- On the Amazon DataZone console, navigate to the custom AWS service blueprint environment you just created.
- On the Data sources tab, choose Add
- Select AWS Glue or Amazon Redshift.
- For AWS Glue, complete the following steps:
- Enter your AWS Glue database. If you don’t already have an existing AWS Glue database setup, refer to Create a database.
- Enter the
manageAccessRolerole that is added as a Lake Formation admin. Make sure the role provided hasaws.internalin its trust policy. The role starts withAmazonDataZone*. - Choose Add.

- For Amazon Redshift, complete the following steps:
- Select Cluster or Serverless. If you don’t already have a Redshift cluster, refer to Create a sample Amazon Redshift cluster. If you don’t already have an Amazon Redshift Serverless workgroup, refer Amazon Redshift Serverless to create a sample database.
- Choose Create new AWS Secret or use a preexisting one.
- If you’re creating a new secret, enter a secret name, user name, and password.

- Choose the cluster or workgroup you want to connect to.
- Enter the database and schema names.
- Enter the role ARN for
manageAccessRole. - Choose Add.

Configure a subscription target in the AWS service environment for subscribing
Complete the following steps to add your subscription target
- On the Amazon DataZone console, navigate the custom AWS service blueprint environment you just created.
- On the Subscription targets tab, choose Add.
- Follow the same steps as you did to set up a data source.
- For Redshift subscription targets, you also need to add a database role that will be granted access to the given schema. You can enter a specific Redshift user role or, if you’re a Redshift admin, enter
sys:superuser. - Create a new tag on the environment role (BYOR) with
RedshiftDbRolesas key and the database name used for configuring the Redshift subscription target as value.
Extend existing data lake and data warehouse blueprints
Finally, if you want to extend existing data lake or data warehouse project environments to create to use existing AWS services in the platform, complete the following steps:
- Create a copy of the environment role of an existing Amazon DataZone project environment.
- Extend this role by adding additional required policies to allow this custom role to access additional resources.
- Create a custom AWS service environment in the same Amazon DataZone project using this new custom role.
- Configure the subscription target and data source using the database name of the existing Amazon DataZone environment (
<env_name>_pub_db,<env_name>_sub_db). - Use the same
managedAccessRolerole from the existing Amazon DataZone environment. - Request subscription to the required data assets or add subscribed assets from the project to this new AWS service environment.
Clean up
To clean up your resources, complete the following steps:
- If you used sample code for AWS Glue and Redshift databases, make sure to clean up all those resources to avoid incurring additional charges. Delete any S3 buckets you created as well.
- On the Amazon DataZone console, delete the projects used in this post. This will delete most project-related objects like data assets and environments.
- On the Lake Formation console, delete the Lake Formation admins registered by Amazon DataZone.
- On the Lake Formation console, delete any tables and databases created by Amazon DataZone.
Conclusion
In this post, we discussed how the custom AWS service blueprint simplifies the process to start using existing IAM roles and AWS services in Amazon DataZone for end-to-end governance of your data in AWS. This integration helps you circumvent the prescriptive default data lake and data warehouse blueprints.
To learn more about Amazon DataZone and how to get started, refer to the Getting started guide. Check out the YouTube playlist for some of the latest demos of Amazon DataZone and more information about the capabilities available.
About the Authors
 Anish Anturkar is a Software Engineer and Designer and part of Amazon DataZone with an expertise in distributed software solutions. He is passionate about building robust, scalable, and sustainable software solutions for his customers.
 Navneet Srivastava is a Principal Specialist and Analytics Strategy Leader, and develops strategic plans for building an end-to-end analytical strategy for large biopharma, healthcare, and life sciences organizations. Navneet is responsible for helping life sciences organizations and healthcare companies deploy data governance and analytical applications, electronic medical records, devices, and AI/ML-based applications, while educating customers about how to build secure, scalable, and cost-effective AWS solutions. His expertise spans across data analytics, data governance, AI, ML, big data, and healthcare-related technologies.
Priya Tiruthani is a Senior Technical Product Manager with Amazon DataZone at AWS. She focuses on improving data discovery and curation required for data analytics. She is passionate about building innovative products to simplify customers’ end-to-end data journey, especially around data governance and analytics. Outside of work, she enjoys being outdoors to hike, capture nature’s beauty, and recently play pickleball.
 Subrat Das is a Senior Solutions Architect and part of the Global Healthcare and Life Sciences industry division at AWS. He is passionate about modernizing and architecting complex customer workloads. When he’s not working on technology solutions, he enjoys long hikes and traveling around the world.
Governing data in relational databases using Amazon DataZone
Post Syndicated from Jose Romero original https://aws.amazon.com/blogs/big-data/governing-data-in-relational-databases-using-amazon-datazone/
Data governance is a key enabler for teams adopting a data-driven culture and operational model to drive innovation with data. Amazon DataZone is a fully managed data management service that makes it faster and easier for customers to catalog, discover, share, and govern data stored across Amazon Web Services (AWS), on premises, and on third-party sources. It also makes it easier for engineers, data scientists, product managers, analysts, and business users to access data throughout an organization to discover, use, and collaborate to derive data-driven insights.
Amazon DataZone allows you to simply and securely govern end-to-end data assets stored in your Amazon Redshift data warehouses or data lakes cataloged with the AWS Glue data catalog. As you experience the benefits of consolidating your data governance strategy on top of Amazon DataZone, you may want to extend its coverage to new, diverse data repositories (either self-managed or as managed services) including relational databases, third-party data warehouses, analytic platforms and more.
This post explains how you can extend the governance capabilities of Amazon DataZone to data assets hosted in relational databases based on MySQL, PostgreSQL, Oracle or SQL Server engines. What’s covered in this post is already implemented and available in the Guidance for Connecting Data Products with Amazon DataZone solution, published in the AWS Solutions Library. This solution was built using the AWS Cloud Development Kit (AWS CDK) and was designed to be easy to set up in any AWS environment. It is based on a serverless stack for cost-effectiveness and simplicity and follows the best practices in the AWS Well-Architected-Framework.
Self-service analytics experience in Amazon DataZone
In Amazon DataZone, data producers populate the business data catalog with data assets from data sources such as the AWS Glue data catalog and Amazon Redshift. They also enrich their assets with business context to make them accessible to the consumers.
After the data asset is available in the Amazon DataZone business catalog, data consumers such as analysts and data scientists can search and access this data by requesting subscriptions. When the request is approved, Amazon DataZone can automatically provision access to the managed data asset by managing permissions in AWS Lake Formation or Amazon Redshift so that the data consumer can start querying the data using tools such as Amazon Athena or Amazon Redshift. Note that a managed data asset is an asset for which Amazon DataZone can manage permissions. It includes those stored in Amazon Simple Storage Service (Amazon S3) data lakes (and cataloged in the AWS Glue data catalog) or Amazon Redshift.
As you’ll see next, when working with relational databases, most of the experience described above will remain the same because Amazon DataZone provides a set features and integrations that data producers and consumers can use with a consistent experience, even when working with additional data sources. However, there are some additional tasks that need to be accounted for to achieve a frictionless experience, which will be addressed later in this post.
The following diagram illustrates a high-level overview of the flow of actions when a data producer and consumer collaborate around a data asset stored in a relational database using Amazon DataZone.
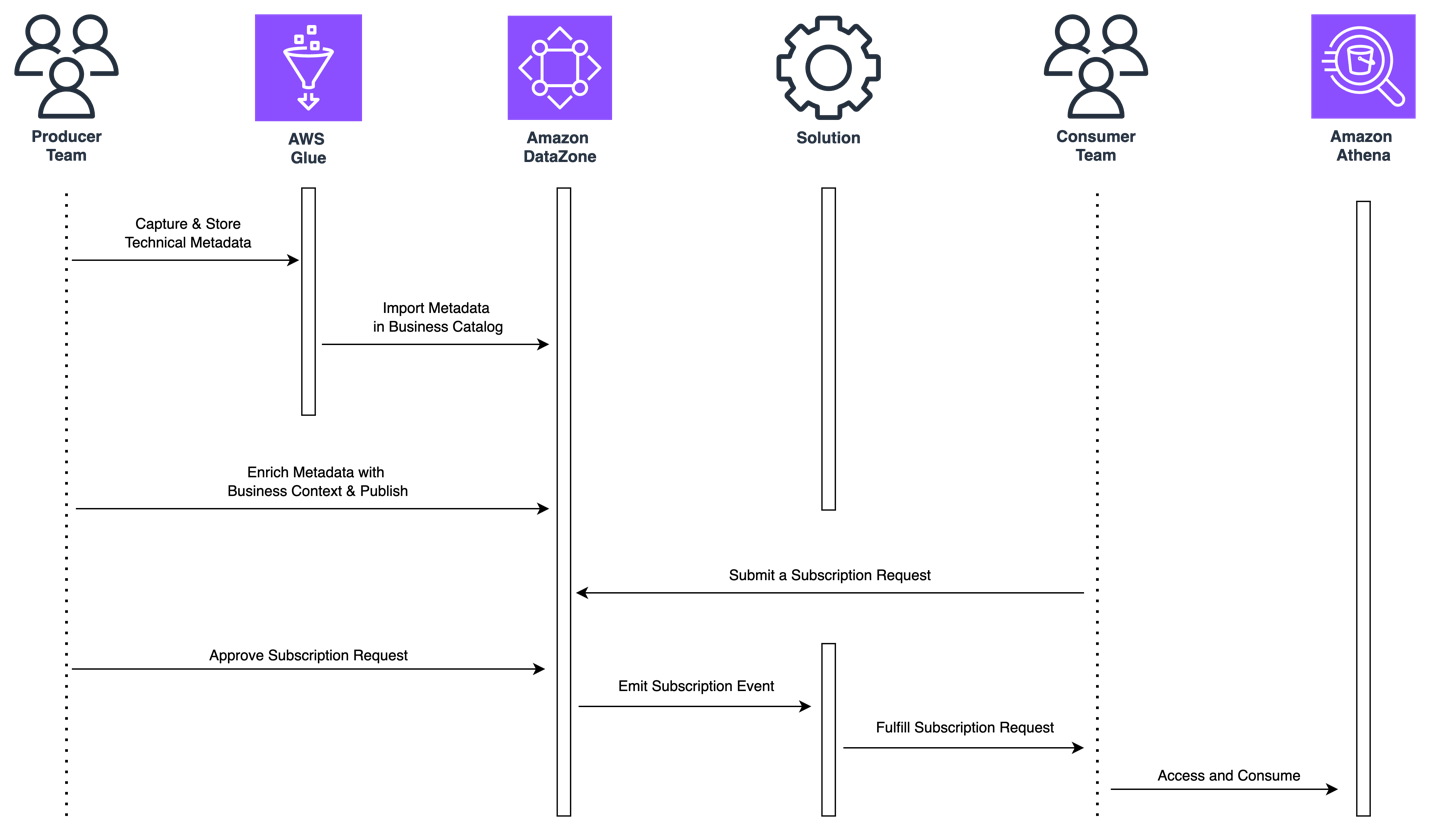
Figure 1: Flow of actions for self-service analytics around data assets stored in relational databases
First, the data producer needs to capture and catalog the technical metadata of the data asset.
The AWS Glue data catalog can be used to store metadata from a variety of data assets, like those stored in relational databases, including their schema, connection details, and more. It offers AWS Glue connections and AWS Glue crawlers as a means to capture the data asset’s metadata easily from their source database and keep it up to date. Later in this post, we’ll introduce how the “Guidance for Connecting Data Products with Amazon DataZone” solution can help data producers easily deploy and run AWS Glue connections and crawlers to capture technical metadata.
Second, the data producer needs to consolidate the data asset’s metadata in the business catalog and enrich it with business metadata. The producer also needs to manage and publish the data asset so it’s discoverable throughout the organization.
Amazon DataZone provides built-in data sources that allow you to easily fetch metadata (such as table name, column name, or data types) of assets in the AWS Glue data catalog into Amazon DataZone’s business catalog. You can also include data quality details thanks to the integration with AWS Glue Data Quality or external data quality solutions. Amazon DataZone also provides metadata forms and generative artificial intelligence (generative AI) driven suggestions to simplify the enrichment of data assets’ metadata with business context. Finally, the Amazon DataZone data portal helps you manage and publish your data assets.
Third, a data consumer needs to subscribe to the data asset published by the producer. To do so, the data consumer will submit a subscription request that, once approved by the producer, triggers a mechanism that automatically provisions read access to the consumer without moving or duplicating data.
In Amazon DataZone, data assets stored in relational databases are considered unmanaged data assets, which means that Amazon DataZone will not be able to manage permissions to them on the customer’s behalf. This is where the “Guidance for Connecting Data Products with Amazon DataZone” solution also comes in handy because it deploys the required mechanism to provision access automatically when subscriptions are approved. You’ll learn how the solution does this later in this post.
Finally, the data consumer needs to access the subscribed data once access has been provisioned. Depending on the use case, consumers would like to use SQL-based engines to run exploratory analysis, business intelligence (BI) tools to build dashboards for decision-making, or data science tools for machine learning (ML) development.
Amazon DataZone provides blueprints to give options for consuming data and provides default ones for Amazon Athena and Amazon Redshift, with more to come soon. Amazon Athena connectors is a good way to run one-time queries on top of relational databases. Later in this post we’ll introduce how the “Guidance for Connecting Data Products with Amazon DataZone” solution can help data consumers deploy Amazon Athena connectors and become a platform to deploy custom tools for data consumers.
Solution’s core components
Now that we have covered what the self-service analytics experience looks like when working with data assets stored in relational databases, let’s review at a high level the core components of the “Guidance for Connecting Data Products with Amazon DataZone” solution.
You’ll be able to identify where some of the core components fit in the flow of actions described in the last section because they were developed to bring simplicity and automation for a frictionless experience. Other components, even though they are not directly tied to the experience, are as relevant since they take care of the prerequisites for the solution to work properly.

Figure 2: Solution’s core components
- The toolkit component is a set of tools (in AWS Service Catalog) that producer and consumer teams can easily deploy and use, in a self-service fashion, to support some of the tasks described in the experience, such as the following.
- As a data producer, capture metadata from data assets stored in relational databases into the AWS Glue data catalog by leveraging AWS Glue connectors and crawlers.
- As a data consumer, query a subscribed data asset directly from its source database with Amazon Athena by deploying and using an Amazon Athena connector.
- The workflows component is a set of automated workflows (orchestrated through AWS Step Functions) that will trigger automatically on certain Amazon DataZone events such as:
- When a new Amazon DataZone data lake environment is successfully deployed so that its default capabilities are extended to support this solution’s toolkit.
- When a subscription request is accepted by a data producer so that access is provisioned automatically for data assets stored in relational databases. This workflow is the mechanism that was referred to in the experience of the last section as the means to provision access to unmanaged data assets governed by Amazon DataZone.
- When a subscription is revoked or canceled so that access is revoked automatically for data assets in relational databases.
- When an existing Amazon DataZone environment deletion starts so that non default Amazon DataZone capabilities are removed.
The following table lists the multiple AWS services that the solution uses to provide an add-on for Amazon DataZone with the purpose of providing the core components described in this section.
| AWS Service | Description |
| Amazon DataZone | Data governance service whose capabilities are extended when deploying this add-on solution. |
| Amazon EventBridge | Used as a mechanism to capture Amazon DataZone events and trigger solution’s corresponding workflow. |
| Amazon Step Functions | Used as orchestration engine to execute solution workflows. |
| AWS Lambda | Provides logic for the workflow tasks, such as extending environment’s capabilities or sharing secrets with environment credentials. |
| AWS Secrets Manager | Used to store database credentials as secrets. Each consumer environment with granted subscription to one or many data assets in the same relational database will have its own individual credentials (secret). |
| Amazon DynamoDB | Used to store workflows’ output metadata. Governance teams can track subscription details for data assets stored in relational databases. |
| Amazon Service Catalog | Used to provide a complementary toolkit for users (producers and consumers), so that they can provision products to execute tasks specific to their roles in a self-service manner. |
| AWS Glue | Multiple components are used, such as the AWS Glue data catalog as the direct publishing source for Amazon DataZone business catalog and connectors and crawlers to connect on infer schemas from data assets stored in relational databases. |
| Amazon Athena | Used as one of the consumption mechanisms that allow users and teams to query data assets that they are subscribed to, either on top of Amazon S3 backed data lakes and relational databases. |
Solution overview
Now let’s dive into the workflow that automatically provisions access to an approved subscription request (2b in the last section). Figure 3 outlines the AWS services involved in its execution. It also illustrates when the solution’s toolkit is used to simplify some of the tasks that producers and consumers need to perform before and after a subscription is requested and granted. If you’d like to learn more about other workflows in this solution, please refer to the implementation guide.
The architecture illustrates how the solution works in a multi-account environment, which is a common scenario. In a multi-account environment, the governance account will host the Amazon DataZone domain and the remaining accounts will be associated to it. The producer account hosts the subscription’s data asset and the consumer account hosts the environment subscribing to the data asset.

Figure 3 – Architecture for subscription grant workflow
Solution walkthrough
1. Capture data asset’s metadata
A data producer captures metadata of a data asset to be published from its data source into the AWS Glue catalog. This can be done by using AWS Glue connections and crawlers. To speed up the process, the solution includes a Producer Toolkit using the AWS Service Catalog to simplify the deployment of such resources by just filling out a form.
Once the data asset’s technical metadata is captured, the data producer will run a data source job in Amazon DataZone to publish it into the business catalog. In the Amazon DataZone portal, a consumer will discover the data asset and subsequently, subscribe to it when needed. Any subscription action will create a subscription request in Amazon DataZone.
2. Approve a subscription request
The data producer approves the incoming subscription request. An event is sent to Amazon EventBridge, where a rule deployed by the solution captures it and triggers an instance of the AWS Step Functions primary state machine in the governance account for each environment of the subscribing project.
3. Fulfill read-access in the relational database (producer account)
The primary state machine in the governance account triggers an instance of the AWS Step Functions secondary state machine in the producer account, which will run a set of AWS Lambda functions to:
- Retrieve the subscription data asset’s metadata from the AWS Glue catalog, including the details required for connecting to the data source hosting the subscription’s data asset.
- Connect to the data source hosting the subscription’s data asset, create credentials for the subscription’s target environment (if nonexistent) and grant read access to the subscription’s data asset.
- Store the new data source credentials in an AWS Secrets Manager producer secret (if nonexistent) with a resource policy allowing read cross-account access to the environment’s associated consumer account.
- Update tracking records in Amazon DynamoDB in the governance account.
4. Share access credentials to the subscribing environment (consumer account)
The primary state machine in the governance account triggers an instance of the AWS Step Functions secondary state machine in the consumer account, which will run a set of AWS Lambda functions to:
- Retrieve connection credentials from the producer secret in the producer account through cross-account access, then copy the credentials into a new consumer secret (if nonexistent) in AWS Secrets Manager local to the consumer account.
- Update tracking records in Amazon DynamoDB in the governance account.
5. Access the subscribed data
The data consumer uses the consumer secret to connect to that data source and query the subscribed data asset using any preferred means.
To speed up the process, the solution includes a consumer toolkit using the AWS Service Catalog to simplify the deployment of such resources by just filling out a form. Current scope for this toolkit includes a tool that deploys an Amazon Athena connector for a corresponding MySQL, PostgreSQL, Oracle, or SQL Server data source. However, it could be extended to support other tools on top of AWS Glue, Amazon EMR, Amazon SageMaker, Amazon Quicksight, or other AWS services, and keep the same simple-to-deploy experience.
Conclusion
In this post we went through how teams can extend the governance of Amazon DataZone to cover relational databases, including those with MySQL, Postgres, Oracle, and SQL Server engines. Now, teams are one step further in unifying their data governance strategy in Amazon DataZone to deliver self-service analytics across their organizations for all of their data.
As a final thought, the solution explained in this post introduces a replicable pattern that can be extended to other relational databases. The pattern is based on access grants through environment-specific credentials that are shared as secrets in AWS Secrets Manager. For data sources with different authentication and authorization methods, the solution can be extended to provide the required means to grant access to them (such as through AWS Identity and Access Management (IAM) roles and policies). We encourage teams to experiment with this approach as well.
How to get started
With the “Guidance for Connecting Data Products with Amazon DataZone” solution, you have multiple resources to learn more, test it, and make it your own.
You can learn more on the AWS Solutions Library solutions page. You can download the source code from GitHub and follow the README file to learn more of its underlying components and how to set it up and deploy it in a single or multi-account environment. You can also use it to learn how to think of costs when using the solution. Finally, it explains how best practices from the AWS Well-Architected Framework were included in the solution.
You can follow the solution’s hands-on lab either with the help of the AWS Solutions Architect team or on your own. The lab will take you through the entire workflow described in this post for each of the supported database engines (MySQL, PostgreSQL, Oracle, and SQL Server). We encourage you to start here before trying the solution in your own testing environments and your own sample datasets. Once you have full clarity on how to set up and use the solution, you can test it with your workloads and even customize it to make it your own.
The implementation guide is an asset for customers eager to customize or extend the solution to their specific challenges and needs. It provides an in-depth description of the code repository structure and the solution’s underlying components, as well as all the details to understand the mechanisms used to track all subscriptions handled by the solution.
About the authors
 Jose Romero is a Senior Solutions Architect for Startups at AWS, based in Austin, TX, US. He is passionate about helping customers architect modern platforms at scale for data, AI, and ML. As a former senior architect with AWS Professional Services, he enjoys building and sharing solutions for common complex problems so that customers can accelerate their cloud journey and adopt best practices. Connect with him on LinkedIn..
Leonardo Gómez is a Principal Big Data / ETL Solutions Architect at AWS, based in Florida, US. He has over a decade of experience in data management, helping customers around the globe address their business and technical needs. Connect with him on LinkedIn.
Amazon DataZone announces integration with AWS Lake Formation hybrid access mode for the AWS Glue Data Catalog
Post Syndicated from Utkarsh Mittal original https://aws.amazon.com/blogs/big-data/amazon-datazone-announces-integration-with-aws-lake-formation-hybrid-access-mode-for-the-aws-glue-data-catalog/
Last week, we announced the general availability of the integration between Amazon DataZone and AWS Lake Formation hybrid access mode. In this post, we share how this new feature helps you simplify the way you use Amazon DataZone to enable secure and governed sharing of your data in the AWS Glue Data Catalog. We also delve into how data producers can share their AWS Glue tables through Amazon DataZone without needing to register them in Lake Formation first.
Overview of the Amazon DataZone integration with Lake Formation hybrid access mode
Amazon DataZone is a fully managed data management service to catalog, discover, analyze, share, and govern data between data producers and consumers in your organization. With Amazon DataZone, data producers populate the business data catalog with data assets from data sources such as the AWS Glue Data Catalog and Amazon Redshift. They also enrich their assets with business context to make it straightforward for data consumers to understand. After the data is available in the catalog, data consumers such as analysts and data scientists can search and access this data by requesting subscriptions. When the request is approved, Amazon DataZone can automatically provision access to the data by managing permissions in Lake Formation or Amazon Redshift so that the data consumer can start querying the data using tools such as Amazon Athena or Amazon Redshift.
To manage the access to data in the AWS Glue Data Catalog, Amazon DataZone uses Lake Formation. Previously, if you wanted to use Amazon DataZone for managing access to your data in the AWS Glue Data Catalog, you had to onboard your data to Lake Formation first. Now, the integration of Amazon DataZone and Lake Formation hybrid access mode simplifies how you can get started with your Amazon DataZone journey by removing the need to onboard your data to Lake Formation first.
Lake Formation hybrid access mode allows you to start managing permissions on your AWS Glue databases and tables through Lake Formation, while continuing to maintain any existing AWS Identity and Access Management (IAM) permissions on these tables and databases. Lake Formation hybrid access mode supports two permission pathways to the same Data Catalog databases and tables:
- In the first pathway, Lake Formation allows you to select specific principals (opt-in principals) and grant them Lake Formation permissions to access databases and tables by opting in
- The second pathway allows all other principals (that are not added as opt-in principals) to access these resources through the IAM principal policies for Amazon Simple Storage Service (Amazon S3) and AWS Glue actions
With the integration between Amazon DataZone and Lake Formation hybrid access mode, if you have tables in the AWS Glue Data Catalog that are managed through IAM-based policies, you can publish these tables directly to Amazon DataZone, without registering them in Lake Formation. Amazon DataZone registers the location of these tables in Lake Formation using hybrid access mode, which allows managing permissions on AWS Glue tables through Lake Formation, while continuing to maintain any existing IAM permissions.
Amazon DataZone enables you to publish any type of asset in the business data catalog. For some of these assets, Amazon DataZone can automatically manage access grants. These assets are called managed assets, and include Lake Formation-managed Data Catalog tables and Amazon Redshift tables and views. Prior to this integration, you had to complete the following steps before Amazon DataZone could treat the published Data Catalog table as a managed asset:
- Identity the Amazon S3 location associated with Data Catalog table.
- Register the Amazon S3 location with Lake Formation in hybrid access mode using a role with appropriate permissions.
- Publish the table metadata to the Amazon DataZone business data catalog.
The following diagram illustrates this workflow.

With the Amazon DataZone’s integration with Lake Formation hybrid access mode, you can simply publish your AWS Glue tables to Amazon DataZone without having to worry about registering the Amazon S3 location or adding an opt-in principal in Lake Formation by delegating these steps to Amazon DataZone. The administrator of an AWS account can enable the data location registration setting under the DefaultDataLake blueprint on the Amazon DataZone console. Now, a data owner or publisher can publish their AWS Glue table (managed through IAM permissions) to Amazon DataZone without the extra setup steps. When a data consumer subscribes to this table, Amazon DataZone registers the Amazon S3 locations of the table in hybrid access mode, adds the data consumer’s IAM role as an opt-in principal, and grants access to the same IAM role by managing permissions on the table through Lake Formation. This makes sure that IAM permissions on the table can coexist with newly granted Lake Formation permissions, without disrupting any existing workflows. The following diagram illustrates this workflow.

Solution overview
To demonstrate this new capability, we use a sample customer scenario where the finance team wants to access data owned by the sales team for financial analysis and reporting. The sales team has a pipeline that creates a dataset containing valuable information about ticket sales, popular events, venues, and seasons. We call it the tickit dataset. The sales team stores this dataset in Amazon S3 and registers it in a database in the Data Catalog. The access to this table is currently managed through IAM-based permissions. However, the sales team wants to publish this table to Amazon DataZone to facilitate secure and governed data sharing with the finance team.
The steps to configure this solution are as follows:
- The Amazon DataZone administrator enables the data lake location registration setting in Amazon DataZone to automatically register the Amazon S3 location of the AWS Glue tables in Lake Formation hybrid access mode.
- After the hybrid access mode integration is enabled in Amazon DataZone, the finance team requests a subscription to the sales data asset. The asset shows up as a managed asset, which means Amazon DataZone can manage access to this asset even if the Amazon S3 location of this asset isn’t registered in Lake Formation.
- The sales team is notified of a subscription request raised by the finance team. They review and approve the access request. After the request is approved, Amazon DataZone fulfills the subscription request by managing permissions in the Lake Formation. It registers the Amazon S3 location of the subscribed table in Lake Formation hybrid mode.
- The finance team gains access to the sales dataset required for their financial reports. They can go to their DataZone environment and start running queries using Athena against their subscribed dataset.
Prerequisites
To follow the steps in this post, you need an AWS account. If you don’t have an account, you can create one. In addition, you must have the following resources configured in your account:
- An S3 bucket
- An AWS Glue database and crawler
- IAM roles for different personas and services
- An Amazon DataZone domain and project
- An Amazon DataZone environment profile and environment
- An Amazon DataZone data source
If you don’t have these resources already configured, you can create them by deploying the following AWS CloudFormation stack:
- Choose Launch Stack to deploy a CloudFormation template.

- Complete the steps to deploy the template and leave all settings as default.
- Select I acknowledge that AWS CloudFormation might create IAM resources, then choose Submit.
After the CloudFormation deployment is complete, you can log in to the Amazon DataZone portal and manually trigger a data source run. This pulls any new or modified metadata from the source and updates the associated assets in the inventory. This data source has been configured to automatically publish the data assets to the catalog.
- On the Amazon DataZone console, choose View domains.
You should be logged in using the same role that is used to deploy CloudFormation and verify that you are in the same AWS Region.

- Find the domain
blog_dz_domain, then choose Open data portal. - Choose Browse all projects and choose Sales producer project.

- On the Data tab, choose Data sources in the navigation pane.
- Locate and choose the data source that you want to run.
This opens the data source details page.
- Choose the options menu (three vertical dots) next to
tickit_datasourceand choose Run.
The data source status changes to Running as Amazon DataZone updates the asset metadata.
Enable hybrid mode integration in Amazon DataZone
In this step, the Amazon DataZone administrator goes through the process of enabling the Amazon DataZone integration with Lake Formation hybrid access mode. Complete the following steps:
- On a separate browser tab, open the Amazon DataZone console.
Verify that you are in the same Region where you deployed the CloudFormation template.
- Choose View domains.
- Choose the domain created by AWS CloudFormation,
blog_dz_domain. - Scroll down on the domain details page and choose the Blueprints tab.
A blueprint defines what AWS tools and services can be used with the data assets published in Amazon DataZone. The DefaultDataLake blueprint is enabled as part of the CloudFormation stack deployment. This blueprint enables you to create and query AWS Glue tables using Athena. For the steps to enable this in your own deployments, refer to Enable built-in blueprints in the AWS account that owns the Amazon DataZone domain.
- Choose the
DefaultDataLakeblueprint.
- On the Provisioning tab, choose Edit.

- Select Enable Amazon DataZone to register S3 locations using AWS Lake Formation hybrid access mode.
You have the option of excluding specific Amazon S3 locations if you don’t want Amazon DataZone to automatically register them to Lake Formation hybrid access mode.
- Choose Save changes.

Request access
In this step, you log in to Amazon DataZone as the finance team, search for the sales data asset, and subscribe to it. Complete the following steps:
- Return to your Amazon DataZone data portal browser tab.
- Switch to the finance consumer project by choosing the dropdown menu next to the project name and choosing Finance consumer project.
From this step onwards, you take on the persona of a finance user looking to subscribe to a data asset published in the previous step.

- In the search bar, search for and choose the
salesdata asset.
- Choose Subscribe.

The asset shows up as managed asset. This means that Amazon DataZone can grant access to this data asset to the finance team’s project by managing the permissions in Lake Formation.
- Enter a reason for the access request and choose Subscribe.

Approve access request
The sales team gets a notification that an access request from the finance team is submitted. To approve the request, complete the following steps:
- Choose the dropdown menu next to the project name and choose Sales producer project.
You now assume the persona of the sales team, who are the owners and stewards of the sales data assets.
- Choose the notification icon at the top-right corner of the DataZone portal.
- Choose the Subscription Request Created task.

- Grant access to the sales data asset to the finance team and choose Approve.

Analyze the data
The finance team has now been granted access to the sales data, and this dataset has been to their Amazon DataZone environment. They can access the environment and query the sales dataset with Athena, along with any other datasets they currently own. Complete the following steps:
- On the dropdown menu, choose Finance consumer project.
On the right pane of the project overview screen, you can find a list of active environments available for use.
- Choose the Amazon DataZone environment
finance_dz_environment.
- In the navigation pane, under Data assets, choose Subscribed.
- Verify that your environment now has access to the sales data.
It may take a few minutes for the data asset to be automatically added to your environment.
- Choose the new tab icon for Query data.

A new tab opens with the Athena query editor.
- For Database, choose
finance_consumer_db_tickitdb-<suffix>.
This database will contain your subscribed data assets.

- Generate a preview of the sales table by choosing the options menu (three vertical dots) and choosing Preview table.

Clean up
To clean up your resources, complete the following steps:
- Switch back to the administrator role you used to deploy the CloudFormation stack.
- On the Amazon DataZone console, delete the projects used in this post. This will delete most project-related objects like data assets and environments.
- On the AWS CloudFormation console, delete the stack you deployed in the beginning of this post.
- On the Amazon S3 console, delete the S3 buckets containing the tickit dataset.
- On the Lake Formation console, delete the Lake Formation admins registered by Amazon DataZone.
- On the Lake Formation console, delete tables and databases created by Amazon DataZone.
Conclusion
In this post, we discussed how the integration between Amazon DataZone and Lake Formation hybrid access mode simplifies the process to start using Amazon DataZone for end-to-end governance of your data in the AWS Glue Data Catalog. This integration helps you bypass the manual steps of onboarding to Lake Formation before you can start using Amazon DataZone.
For more information on how to get started with Amazon DataZone, refer to the Getting started guide. Check out the YouTube playlist for some of the latest demos of Amazon DataZone and short descriptions of the capabilities available. For more information about Amazon DataZone, see How Amazon DataZone helps customers find value in oceans of data.
About the Authors
 Utkarsh Mittal is a Senior Technical Product Manager for Amazon DataZone at AWS. He is passionate about building innovative products that simplify customers’ end-to-end analytics journeys. Outside of the tech world, Utkarsh loves to play music, with drums being his latest endeavor.
 Praveen Kumar is a Principal Analytics Solution Architect at AWS with expertise in designing, building, and implementing modern data and analytics platforms using cloud-centered services. His areas of interests are serverless technology, modern cloud data warehouses, streaming, and generative AI applications.
 Paul Villena is a Senior Analytics Solutions Architect in AWS with expertise in building modern data and analytics solutions to drive business value. He works with customers to help them harness the power of the cloud. His areas of interests are infrastructure as code, serverless technologies, and coding in Python
Amazon DataZone now integrates with AWS Glue Data Quality and external data quality solutions
Post Syndicated from Andrea Filippo La Scola original https://aws.amazon.com/blogs/big-data/amazon-datazone-now-integrates-with-aws-glue-data-quality-and-external-data-quality-solutions/
Today, we are pleased to announce that Amazon DataZone is now able to present data quality information for data assets. This information empowers end-users to make informed decisions as to whether or not to use specific assets.
Many organizations already use AWS Glue Data Quality to define and enforce data quality rules on their data, validate data against predefined rules, track data quality metrics, and monitor data quality over time using artificial intelligence (AI). Other organizations monitor the quality of their data through third-party solutions.
Amazon DataZone now integrates directly with AWS Glue to display data quality scores for AWS Glue Data Catalog assets. Additionally, Amazon DataZone now offers APIs for importing data quality scores from external systems.
In this post, we discuss the latest features of Amazon DataZone for data quality, the integration between Amazon DataZone and AWS Glue Data Quality and how you can import data quality scores produced by external systems into Amazon DataZone via API.
Challenges
One of the most common questions we get from customers is related to displaying data quality scores in the Amazon DataZone business data catalog to let business users have visibility into the health and reliability of the datasets.
As data becomes increasingly crucial for driving business decisions, Amazon DataZone users are keenly interested in providing the highest standards of data quality. They recognize the importance of accurate, complete, and timely data in enabling informed decision-making and fostering trust in their analytics and reporting processes.
Amazon DataZone data assets can be updated at varying frequencies. As data is refreshed and updated, changes can happen through upstream processes that put it at risk of not maintaining the intended quality. Data quality scores help you understand if data has maintained the expected level of quality for data consumers to use (through analysis or downstream processes).
From a producer’s perspective, data stewards can now set up Amazon DataZone to automatically import the data quality scores from AWS Glue Data Quality (scheduled or on demand) and include this information in the Amazon DataZone catalog to share with business users. Additionally, you can now use new Amazon DataZone APIs to import data quality scores produced by external systems into the data assets.
With the latest enhancement, Amazon DataZone users can now accomplish the following:
- Access insights about data quality standards directly from the Amazon DataZone web portal
- View data quality scores on various KPIs, including data completeness, uniqueness, accuracy
- Make sure users have a holistic view of the quality and trustworthiness of their data.
In the first part of this post, we walk through the integration between AWS Glue Data Quality and Amazon DataZone. We discuss how to visualize data quality scores in Amazon DataZone, enable AWS Glue Data Quality when creating a new Amazon DataZone data source, and enable data quality for an existing data asset.
In the second part of this post, we discuss how you can import data quality scores produced by external systems into Amazon DataZone via API. In this example, we use Amazon EMR Serverless in combination with the open source library Pydeequ to act as an external system for data quality.
Visualize AWS Glue Data Quality scores in Amazon DataZone
You can now visualize AWS Glue Data Quality scores in data assets that have been published in the Amazon DataZone business catalog and that are searchable through the Amazon DataZone web portal.
If the asset has AWS Glue Data Quality enabled, you can now quickly visualize the data quality score directly in the catalog search pane.

By selecting the corresponding asset, you can understand its content through the readme, glossary terms, and technical and business metadata. Additionally, the overall quality score indicator is displayed in the Asset Details section.

A data quality score serves as an overall indicator of a dataset’s quality, calculated based on the rules you define.
On the Data quality tab, you can access the details of data quality overview indicators and the results of the data quality runs.

The indicators shown on the Overview tab are calculated based on the results of the rulesets from the data quality runs.
Each rule is assigned an attribute that contributes to the calculation of the indicator. For example, rules that have the Completeness attribute will contribute to the calculation of the corresponding indicator on the Overview tab.
To filter data quality results, choose the Applicable column dropdown menu and choose your desired filter parameter.

You can also visualize column-level data quality starting on the Schema tab.

When data quality is enabled for the asset, the data quality results become available, providing insightful quality scores that reflect the integrity and reliability of each column within the dataset.
When you choose one of the data quality result links, you’re redirected to the data quality detail page, filtered by the selected column.

Data quality historical results in Amazon DataZone
Data quality can change over time for many reasons:
- Data formats may change because of changes in the source systems
- As data accumulates over time, it may become outdated or inconsistent
- Data quality can be affected by human errors in data entry, data processing, or data manipulation
In Amazon DataZone, you can now track data quality over time to confirm reliability and accuracy. By analyzing the historical report snapshot, you can identify areas for improvement, implement changes, and measure the effectiveness of those changes.

Enable AWS Glue Data Quality when creating a new Amazon DataZone data source
In this section, we walk through the steps to enable AWS Glue Data Quality when creating a new Amazon DataZone data source.
Prerequisites
To follow along, you should have a domain for Amazon DataZone, an Amazon DataZone project, and a new Amazon DataZone environment (with a DataLakeProfile). For instructions, refer to Amazon DataZone quickstart with AWS Glue data.
You also need to define and run a ruleset against your data, which is a set of data quality rules in AWS Glue Data Quality. To set up the data quality rules and for more information on the topic, refer to the following posts:
- Part 1: Getting started with AWS Glue Data Quality from the AWS Glue Data Catalog
- Part 2: Getting started with AWS Glue Data Quality for ETL Pipelines
- Part 3: Set up data quality rules across multiple datasets using AWS Glue Data Quality
- Part 4: Set up alerts and orchestrate data quality rules with AWS Glue Data Quality
- Part 5: Visualize data quality score and metrics generated by AWS Glue Data Quality
- Part 6: Measure performance of AWS Glue Data Quality for ETL pipelines
After you create the data quality rules, make sure that Amazon DataZone has the permissions to access the AWS Glue database managed through AWS Lake Formation. For instructions, see Configure Lake Formation permissions for Amazon DataZone.
In our example, we have configured a ruleset against a table containing patient data within a healthcare synthetic dataset generated using Synthea. Synthea is a synthetic patient generator that creates realistic patient data and associated medical records that can be used for testing healthcare software applications.
The ruleset contains 27 individual rules (one of them failing), so the overall data quality score is 96%.

If you use Amazon DataZone managed policies, there is no action needed because these will get automatically updated with the needed actions. Otherwise, you need to allow Amazon DataZone to have the required permissions to list and get AWS Glue Data Quality results, as shown in the Amazon DataZone user guide.
Create a data source with data quality enabled
In this section, we create a data source and enable data quality. You can also update an existing data source to enable data quality. We use this data source to import metadata information related to our datasets. Amazon DataZone will also import data quality information related to the (one or more) assets contained in the data source.
- On the Amazon DataZone console, choose Data sources in the navigation pane.
- Choose Create data source.

- For Name, enter a name for your data source.
- For Data source type, select AWS Glue.
- For Environment, choose your environment.

- For Database name, enter a name for the database.
- For Table selection criteria, choose your criteria.
- Choose Next.

- For Data quality, select Enable data quality for this data source.
If data quality is enabled, Amazon DataZone will automatically fetch data quality scores from AWS Glue at each data source run.
- Choose Next.

Now you can run the data source.

While running the data source, Amazon DataZone imports the last 100 AWS Glue Data Quality run results. This information is now visible on the asset page and will be visible to all Amazon DataZone users after publishing the asset.

Enable data quality for an existing data asset
In this section, we enable data quality for an existing asset. This might be useful for users that already have data sources in place and want to enable the feature afterwards.
Prerequisites
To follow along, you should have already run the data source and produced an AWS Glue table data asset. Additionally, you should have defined a ruleset in AWS Glue Data Quality over the target table in the Data Catalog.

For this example, we ran the data quality job multiple times against the table, producing the related AWS Glue Data Quality scores, as shown in the following screenshot.

Import data quality scores into the data asset
Complete the following steps to import the existing AWS Glue Data Quality scores into the data asset in Amazon DataZone:
- Within the Amazon DataZone project, navigate to the Inventory data pane and choose the data source.
If you choose the Data quality tab, you can see that there’s still no information on data quality because AWS Glue Data Quality integration is not enabled for this data asset yet.
- On the Data quality tab, choose Enable data quality.

- In the Data quality section, select Enable data quality for this data source.
- Choose Save.

Now, back on the Inventory data pane, you can see a new tab: Data quality.

On the Data quality tab, you can see data quality scores imported from AWS Glue Data Quality.

Ingest data quality scores from an external source using Amazon DataZone APIs
Many organizations already use systems that calculate data quality by performing tests and assertions on their datasets. Amazon DataZone now supports importing third-party originated data quality scores via API, allowing users that navigate the web portal to view this information.
In this section, we simulate a third-party system pushing data quality scores into Amazon DataZone via APIs through Boto3 (Python SDK for AWS).
For this example, we use the same synthetic dataset as earlier, generated with Synthea.
The following diagram illustrates the solution architecture.

The workflow consists of the following steps:
- Read a dataset of patients in Amazon Simple Storage Service (Amazon S3) directly from Amazon EMR using Spark.
The dataset is created as a generic S3 asset collection in Amazon DataZone.

- In Amazon EMR, perform data validation rules against the dataset.
- The metrics are saved in Amazon S3 to have a persistent output.
- Use Amazon DataZone APIs through Boto3 to push custom data quality metadata.
- End-users can see the data quality scores by navigating to the data portal.
Prerequisites
We use Amazon EMR Serverless and Pydeequ to run a fully managed Spark environment. To learn more about Pydeequ as a data testing framework, see Testing Data quality at scale with Pydeequ.
To allow Amazon EMR to send data to the Amazon DataZone domain, make sure that the IAM role used by Amazon EMR has the permissions to do the following:
- Read from and write to the S3 buckets
- Call the
post_time_series_data_pointsaction for Amazon DataZone:
Make sure that you added the EMR role as a project member in the Amazon DataZone project. On the Amazon DataZone console, navigate to the Project members page and choose Add members.

Add the EMR role as a contributor.

Ingest and analyze PySpark code
In this section, we analyze the PySpark code that we use to perform data quality checks and send the results to Amazon DataZone. You can download the complete PySpark script.
To run the script entirely, you can submit a job to EMR Serverless. The service will take care of scheduling the job and automatically allocating the resources needed, enabling you to track the job run statuses throughout the process.
You can submit a job to EMR within the Amazon EMR console using EMR Studio or programmatically, using the AWS CLI or using one of the AWS SDKs.
In Apache Spark, a SparkSession is the entry point for interacting with DataFrames and Spark’s built-in functions. The script will start initializing a SparkSession:
We read a dataset from Amazon S3. For increased modularity, you can use the script input to refer to the S3 path:
Next, we set up a metrics repository. This can be helpful to persist the run results in Amazon S3.
Pydeequ allows you to create data quality rules using the builder pattern, which is a well-known software engineering design pattern, concatenating instruction to instantiate a VerificationSuite object:
The following is the output for the data validation rules:
At this point, we want to insert these data quality values in Amazon DataZone. To do so, we use the post_time_series_data_points function in the Boto3 Amazon DataZone client.
The PostTimeSeriesDataPoints DataZone API allows you to insert new time series data points for a given asset or listing, without creating a new revision.
At this point, you might also want to have more information on which fields are sent as input for the API. You can use the APIs to obtain the specification for Amazon DataZone form types; in our case, it’s amazon.datazone.DataQualityResultFormType.
You can also use the AWS CLI to invoke the API and display the form structure:
This output helps identify the required API parameters, including fields and value limits:
To send the appropriate form data, we need to convert the Pydeequ output to match the DataQualityResultsFormType contract. This can be achieved with a Python function that processes the results.
For each DataFrame row, we extract information from the constraint column. For example, take the following code:
We convert it to the following:
Make sure to send an output that matches the KPIs that you want to track. In our case, we are appending _custom to the statistic name, resulting in the following format for KPIs:
Completeness_customUniqueness_custom
In a real-world scenario, you might want to set a value that matches with your data quality framework in relation to the KPIs that you want to track in Amazon DataZone.
After applying a transformation function, we have a Python object for each rule evaluation:
We also use the constraint_status column to compute the overall score:
In our example, this results in a passing percentage of 85.71%.
We set this value in the passingPercentage input field along with the other information related to the evaluations in the input of the Boto3 method post_time_series_data_points:
Boto3 invokes the Amazon DataZone APIs. In these examples, we used Boto3 and Python, but you can choose one of the AWS SDKs developed in the language you prefer.
After setting the appropriate domain and asset ID and running the method, we can check on the Amazon DataZone console that the asset data quality is now visible on the asset page.
We can observe that the overall score matches with the API input value. We can also see that we were able to add customized KPIs on the overview tab through custom types parameter values.

With the new Amazon DataZone APIs, you can load data quality rules from third-party systems into a specific data asset. With this capability, Amazon DataZone allows you to extend the types of indicators present in AWS Glue Data Quality (such as completeness, minimum, and uniqueness) with custom indicators.
Clean up
We recommend deleting any potentially unused resources to avoid incurring unexpected costs. For example, you can delete the Amazon DataZone domain and the EMR application you created during this process.
Conclusion
In this post, we highlighted the latest features of Amazon DataZone for data quality, empowering end-users with enhanced context and visibility into their data assets. Furthermore, we delved into the seamless integration between Amazon DataZone and AWS Glue Data Quality. You can also use the Amazon DataZone APIs to integrate with external data quality providers, enabling you to maintain a comprehensive and robust data strategy within your AWS environment.
To learn more about Amazon DataZone, refer to the Amazon DataZone User Guide.
About the Authors
 Andrea Filippo is a Partner Solutions Architect at AWS supporting Public Sector partners and customers in Italy. He focuses on modern data architectures and helping customers accelerate their cloud journey with serverless technologies.
 Emanuele is a Solutions Architect at AWS, based in Italy, after living and working for more than 5 years in Spain. He enjoys helping large companies with the adoption of cloud technologies, and his area of expertise is mainly focused on Data Analytics and Data Management. Outside of work, he enjoys traveling and collecting action figures.
 Varsha Velagapudi is a Senior Technical Product Manager with Amazon DataZone at AWS. She focuses on improving data discovery and curation required for data analytics. She is passionate about simplifying customers’ AI/ML and analytics journey to help them succeed in their day-to-day tasks. Outside of work, she enjoys nature and outdoor activities, reading, and traveling.
AI recommendations for descriptions in Amazon DataZone for enhanced business data cataloging and discovery is now generally available
Post Syndicated from Varsha Velagapudi original https://aws.amazon.com/blogs/big-data/ai-recommendations-for-descriptions-in-amazon-datazone-for-enhanced-business-data-cataloging-and-discovery-is-now-generally-available/
In March 2024, we announced the general availability of the generative artificial intelligence (AI) generated data descriptions in Amazon DataZone. In this post, we share what we heard from our customers that led us to add the AI-generated data descriptions and discuss specific customer use cases addressed by this capability. We also detail how the feature works and what criteria was applied for the model and prompt selection while building on Amazon Bedrock.
Amazon DataZone enables you to discover, access, share, and govern data at scale across organizational boundaries, reducing the undifferentiated heavy lifting of making data and analytics tools accessible to everyone in the organization. With Amazon DataZone, data users like data engineers, data scientists, and data analysts can share and access data across AWS accounts using a unified data portal, allowing them to discover, use, and collaborate on this data across their teams and organizations. Additionally, data owners and data stewards can make data discovery simpler by adding business context to data while balancing access governance to the data in the user interface.
What we hear from customers
Organizations are adopting enterprise-wide data discovery and governance solutions like Amazon DataZone to unlock the value from petabytes, and even exabytes, of data spread across multiple departments, services, on-premises databases, and third-party sources (such as partner solutions and public datasets). Data consumers need detailed descriptions of the business context of a data asset and documentation about its recommended use cases to quickly identify the relevant data for their intended use case. Without the right metadata and documentation, data consumers overlook valuable datasets relevant to their use case or spend more time going back and forth with data producers to understand the data and its relevance for their use case—or worse, misuse the data for a purpose it was not intended for. For instance, a dataset designated for testing might mistakenly be used for financial forecasting, resulting in poor predictions. Data producers find it tedious and time consuming to maintain extensive and up-to-date documentation on their data and respond to continued questions from data consumers. As data proliferates across the data mesh, these challenges only intensify, often resulting in under-utilization of their data.
Introducing generative AI-powered data descriptions
With AI-generated descriptions in Amazon DataZone, data consumers have these recommended descriptions to identify data tables and columns for analysis, which enhances data discoverability and cuts down on back-and-forth communications with data producers. Data consumers have more contextualized data at their fingertips to inform their analysis. The automatically generated descriptions enable a richer search experience for data consumers because search results are now also based on detailed descriptions, possible use cases, and key columns. This feature also elevates data discovery and interpretation by providing recommendations on analytical applications for a dataset giving customers additional confidence in their analysis. Because data producers can generate contextual descriptions of data, its schema, and data insights with a single click, they are incentivized to make more data available to data consumers. With the addition of automatically generated descriptions, Amazon DataZone helps organizations interpret their extensive and distributed data repositories.
The following is an example of the asset summary and use cases detailed description.

Use cases served by generative AI-powered data descriptions
The automatically generated descriptions capability in Amazon DataZone streamlines relevant descriptions, provides usage recommendations and ultimately enhances the overall efficiency of data-driven decision-making. It saves organizations time for catalog curation and speeds discovery for relevant use cases of the data. It offers the following benefits:
- Aid search and discovery of valuable datasets – With the clarity provided by automatically generated descriptions, data consumers are less likely to overlook critical datasets through enhanced search and faster understanding, so every valuable insight from the data is recognized and utilized.
- Guide data application – Misapplying data can lead to incorrect analyses, missed opportunities, or skewed results. Automatically generated descriptions offer AI-driven recommendations on how best to use datasets, helping customers apply them in contexts where they are appropriate and effective.
- Increase efficiency in data documentation and discovery – Automatically generated descriptions streamline the traditionally tedious and manual process of data cataloging. This reduces the need for time-consuming manual documentation, making data more easily discoverable and comprehensible.
Solution overview
The AI recommendations feature in Amazon DataZone was built on Amazon Bedrock, a fully managed service that offers a choice of high-performing foundation models. To generate high-quality descriptions and impactful use cases, we use the available metadata on the asset such as the table name, column names, and optional metadata provided by the data producers. The recommendations don’t use any data that resides in the tables unless explicitly provided by the user as content in the metadata.
To get the customized generations, we first infer the domain corresponding to the table (such as automotive industry, finance, or healthcare), which then guides the rest of the workflow towards generating customized descriptions and use cases. The generated table description contains information about how the columns are related to each other, as well as the overall meaning of the table, in the context of the identified industry segment. The table description also contains a narrative style description of the most important constituent columns. The use cases provided are also tailored to the domain identified, which are suitable not just for expert practitioners from the specific domain, but also for generalists.
The generated descriptions are composed from LLM-produced outputs for table description, column description, and use cases, generated in a sequential order. For instance, the column descriptions are generated first by jointly passing the table name, schema (list of column names and their data types), and other available optional metadata. The obtained column descriptions are then used in conjunction with the table schema and metadata to obtain table descriptions and so on. This follows a consistent order like what a human would follow when trying to understand a table.
The following diagram illustrates this workflow.

Evaluating and selecting the foundation model and prompts
Amazon DataZone manages the model(s) selection for the recommendation generation. The model(s) used can be updated or changed from time-to-time. Selecting the appropriate models and prompting strategies is a critical step in confirming the quality of the generated content, while also achieving low costs and low latencies. To realize this, we evaluated our workflow using multiple criteria on datasets that spanned more than 20 different industry domains before finalizing a model. Our evaluation mechanisms can be summarized as follows:
- Tracking automated metrics for quality assessment – We tracked a combination of more than 10 supervised and unsupervised metrics to evaluate essential quality factors such as informativeness, conciseness, reliability, semantic coverage, coherence, and cohesiveness. This allowed us to capture and quantify the nuanced attributes of generated content, confirming that it meets our high standards for clarity and relevance.
- Detecting inconsistencies and hallucinations – Next, we addressed the challenge of content reliability generated by LLMs through our self-consistency-based hallucination detection. This identifies any potential non-factuality in the generated content, and also serves as a proxy for confidence scores, as an additional layer of quality assurance.
- Using large language models as judges – Lastly, our evaluation process incorporates a method of judgment: using multiple state-of-the-art large language models (LLMs) as evaluators. By using bias-mitigation techniques and aggregating the scores from these advanced models, we can obtain a well-rounded assessment of the content’s quality.
The approach of using LLMs as a judge, hallucination detection, and automated metrics brings diverse perspectives into our evaluation, as a proxy for expert human evaluations.
Getting started with generative AI-powered data descriptions
To get started, log in to the Amazon DataZone data portal. Go to your asset in your data project and choose Generate summary to obtain the detailed description of the asset and its columns. Amazon DataZone uses the available metadata on the asset to generate the descriptions. You can optionally provide additional context as metadata in the readme section or metadata form content on the asset for more customized descriptions. For detailed instructions, refer to New generative AI capabilities for Amazon DataZone further simplify data cataloging and discovery (preview). For API instructions, see Using machine learning and generative AI.
Amazon DataZone AI recommendations for descriptions is generally available in Amazon DataZone domains provisioned in the following AWS Regions: US East (N. Virginia), US West (Oregon), Asia Pacific (Tokyo), and Europe (Frankfurt).
For pricing, you will be charged for input and output tokens for generating column descriptions, asset descriptions, and analytical use cases in AI recommendations for descriptions. For more details, see Amazon DataZone Pricing.
Conclusion
In this post, we discussed the challenges and key use cases for the new AI recommendations for descriptions feature in Amazon DataZone. We detailed how the feature works and how the model and prompt selection were done to provide the most useful recommendations.
If you have any feedback or questions, leave them in the comments section.
About the Authors
 Varsha Velagapudi is a Senior Technical Product Manager with Amazon DataZone at AWS. She focuses on improving data discovery and curation required for data analytics. She is passionate about simplifying customers’ AI/ML and analytics journey to help them succeed in their day-to-day tasks. Outside of work, she enjoys playing with her 3-year old, reading, and traveling.
 Zhengyuan Shen is an Applied Scientist at Amazon AWS, specializing in advancements in AI, particularly in large language models and their application in data comprehension. He is passionate about leveraging innovative ML scientific solutions to enhance products or services, thereby simplifying the lives of customers through a seamless blend of science and engineering. Outside of work, he enjoys cooking, weightlifting, and playing poker.
 Balasubramaniam Srinivasan is an Applied Scientist at Amazon AWS, working on foundational models for structured data and natural sciences. He enjoys enriching ML models with domain-specific knowledge and inductive biases to delight customers. Outside of work, he enjoys playing and watching tennis and soccer.
AWS Weekly Roundup — AWS Chips Taste Test, generative AI updates, Community Days, and more — April 1, 2024
Post Syndicated from Channy Yun original https://aws.amazon.com/blogs/aws/aws-weekly-roundup-aws-chips-taste-test-generative-ai-updates-community-days-and-more-april-1-2024/
Today is April Fool’s Day. About 10 years ago, some tech companies would joke about an idea that was thought to be fun and unfeasible on April 1st, to the delight of readers. Jeff Barr has also posted seemingly far-fetched ideas on this blog in the past, and some of these have surprisingly come true! Here are examples:
| Year | Joke | Reality |
| 2010 | Introducing QC2 – the Quantum Compute Cloud, a production-ready quantum computer to solve certain types of math and logic problems with breathtaking speed. | In 2019, we launched Amazon Braket, a fully managed service that allows scientists, researchers, and developers to begin experimenting with computers from multiple quantum hardware providers in a single place. |
| 2011 | Announcing AWS $NAME, a scalable event service to find and automatically integrate with your systems on the cloud, on premises, and even your house and room. | In 2019, we introduced Amazon EventBridge to make it easy for you to integrate your own AWS applications with third-party applications. If you use AWS IoT Events, you can monitor and respond to events at scale from your IoT devices at home. |
| 2012 | New Amazon EC2 Fresh Servers to deliver a fresh (physical) EC2 server in 15 minutes using atmospheric delivery and communucation from a fleet of satellites. | In 2021, we launched AWS Outposts Server, 1U/2U physical servers with built-in AWS services. In 2023, Project Kuiper completed successful tests of an optical mesh network in low Earth orbit. Now, we only need to develop satellite warehouse and atmospheric re-entry technology to follow Amazon PrimeAir’s drone delivery. |
| 2013 | PC2 – The New Punched Card Cloud, a new mf (mainframe) instance family, Mainframe Machine Images (MMI), tape storage, and punched card interfaces for mainframe computers used from the 1970s to ’80s. | In 2022, we launched AWS Mainframe Modernization to help you modernize your mainframe applications and deploy them to AWS fully managed runtime environments. |
 Jeff returns! This year, we have AWS “Chips” Taste Test for him to indulge in, drawing unique parallels between chip flavors and silicon innovations. He compared the taste of “Golden Nacho Cheese,” “Al Chili Lime,” and “BBQ Training Wheels” with AWS Graviton, AWS Inferentia, and AWS Trainium chips.
What’s your favorite? Watch a fun video in the LinkedIn and X post of AWS social media channels.
Last week’s launches
If we stay curious, keep learning, and insist on high standards, we will continue to see more ideas turn into reality. The same goes for the generative artificial intelligence (generative AI) world. Here are some launches that utilize generative AI technology this week.
Knowledge Bases for Amazon Bedrock – Anthropic’s Claude 3 Sonnet foundation model (FM) is now generally available on Knowledge Bases for Amazon Bedrock to connect internal data sources for Retrieval Augmented Generation (RAG).
Knowledge Bases for Amazon Bedrock support metadata filtering, which improves retrieval accuracy by ensuring the documents are relevant to the query. You can narrow search results by specifying which documents to include or exclude from a query, resulting in more relevant responses generated by FMs such as Claude 3 Sonnet.

Finally, you can customize prompts and number of retrieval results in Knowledge Bases for Amazon Bedrock. With custom prompts, you can tailor the prompt instructions by adding context, user input, or output indicator(s), for the model to generate responses that more closely match your use case needs. You can now control the amount of information needed to generate a final response by adjusting the number of retrieved passages. To learn more these new features, visit Knowledge bases for Amazon Bedrock in the AWS documentation.
Amazon Connect Contact Lens – At AWS re:Invent 2023, we previewed a generative AI capability to summarize long customer conversations into succinct, coherent, and context-rich contact summaries to help improve contact quality and agent performance. These generative AI–powered post-contact summaries are now available in Amazon Connect Contact Lens.

Amazon DataZone – At AWS re:Invent 2023, we also previewed a generative AI–based capability to generate comprehensive business data descriptions and context and include recommendations on analytical use cases. These generative AI–powered recommendations for descriptions are now available in Amazon DataZone.

There are also other important launches you shouldn’t miss:
A new Local Zone in Miami, Florida – AWS Local Zones are an AWS infrastructure deployment that places compute, storage, database, and other select services closer to large populations, industry, and IT centers where no AWS Region exists. You can now use a new Local Zone in Miami, Florida, to run applications that require single-digit millisecond latency, such as real-time gaming, hybrid migrations, and live video streaming. Enable the new Local Zone in Miami (use1-mia2-az1) from the Zones tab in the Amazon EC2 console settings to get started.

New Amazon EC2 C7gn metal instance – You can use AWS Graviton based new C7gn bare metal instances to run applications that benefit from deep performance analysis tools, specialized workloads that require direct access to bare metal infrastructure, legacy workloads not supported in virtual environments, and licensing-restricted business-critical applications. The EC2 C7gn metal size comes with 64 vCPUs and 128 GiB of memory.
AWS Batch multi-container jobs – You can use multi-container jobs in AWS Batch, making it easier and faster to run large-scale simulations in areas like autonomous vehicles and robotics. With the ability to run multiple containers per job, you get the advanced scaling, scheduling, and cost optimization offered by AWS Batch, and you can use modular containers representing different components like 3D environments, robot sensors, or monitoring sidecars.
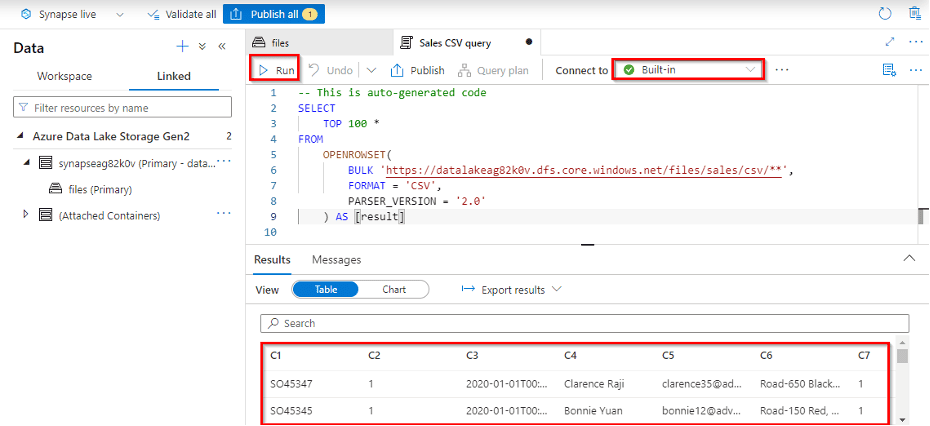
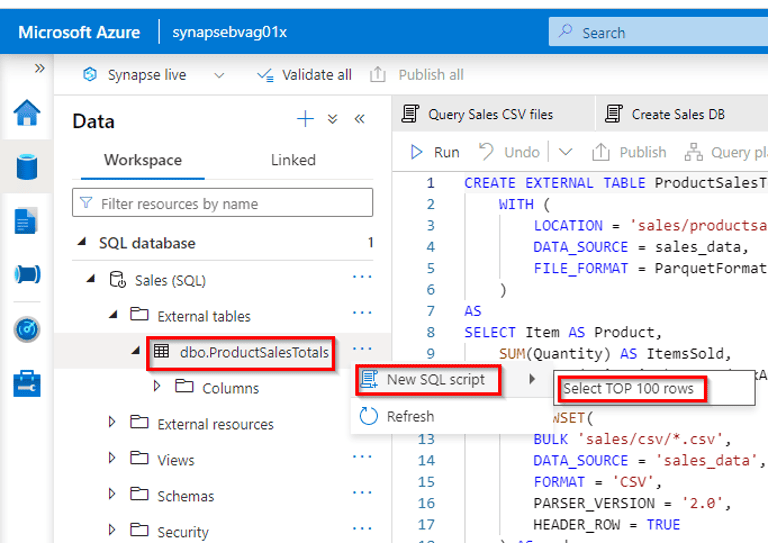
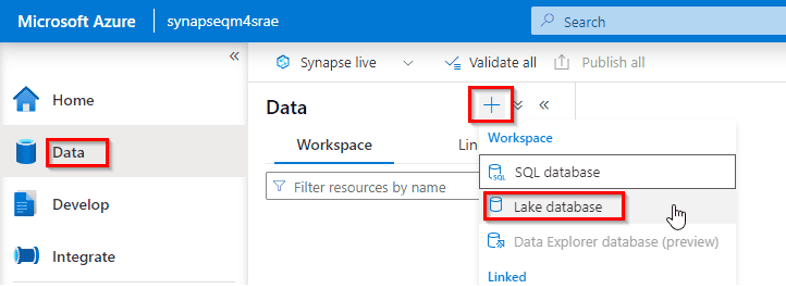
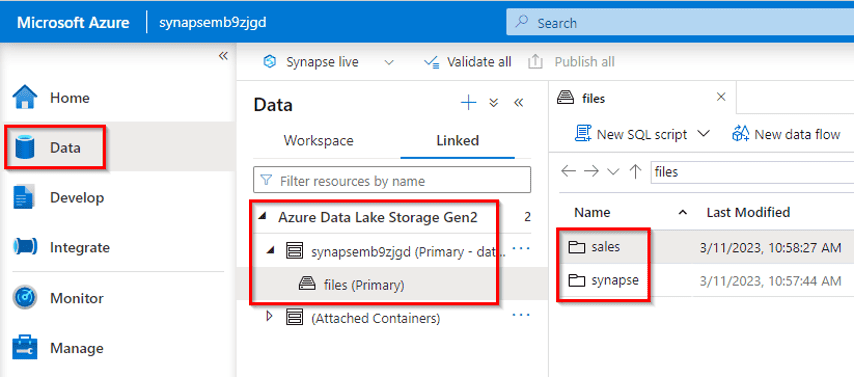
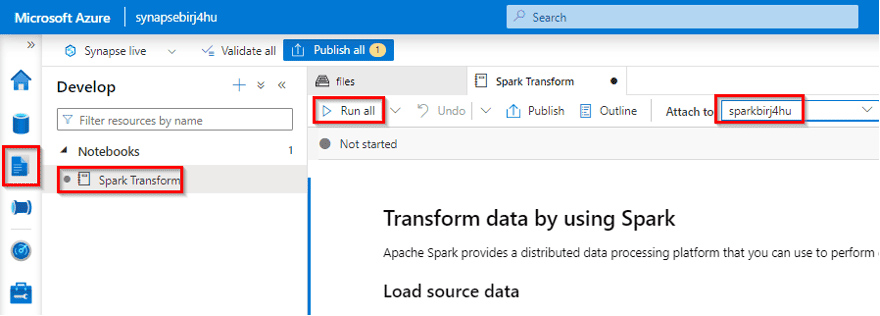
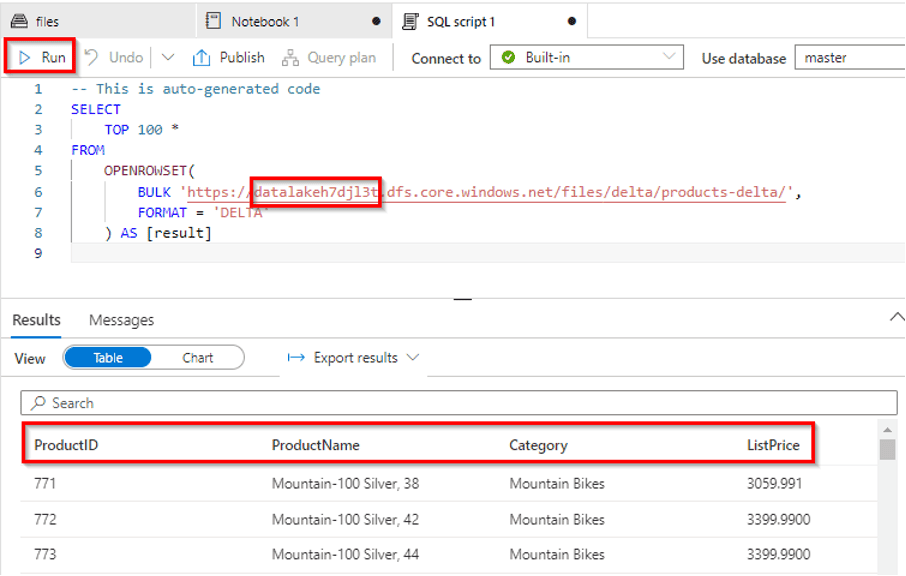
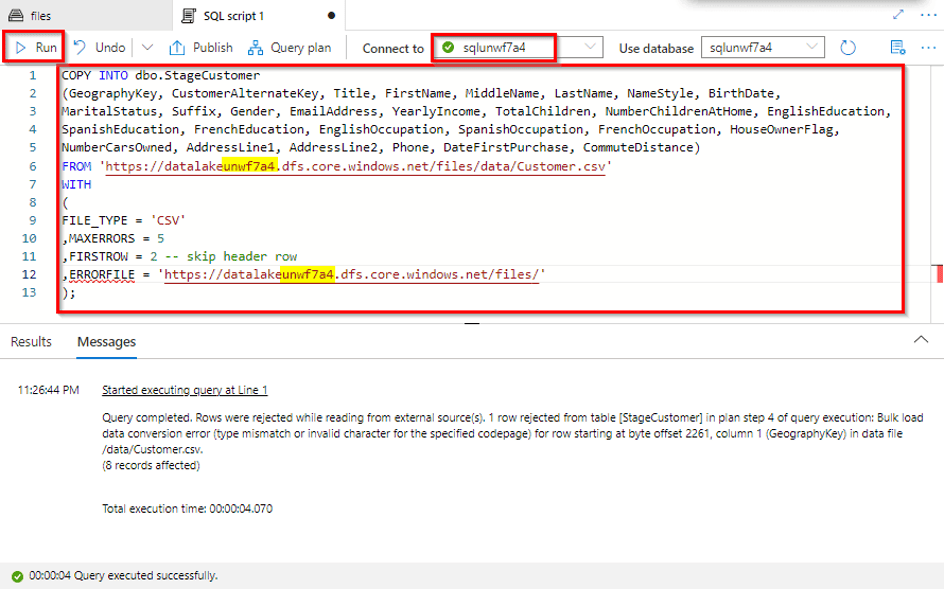
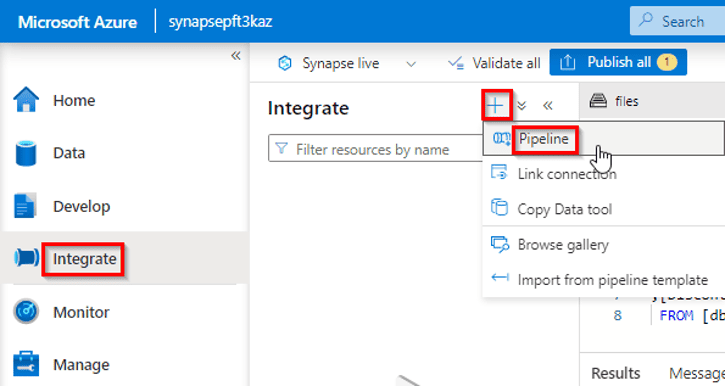
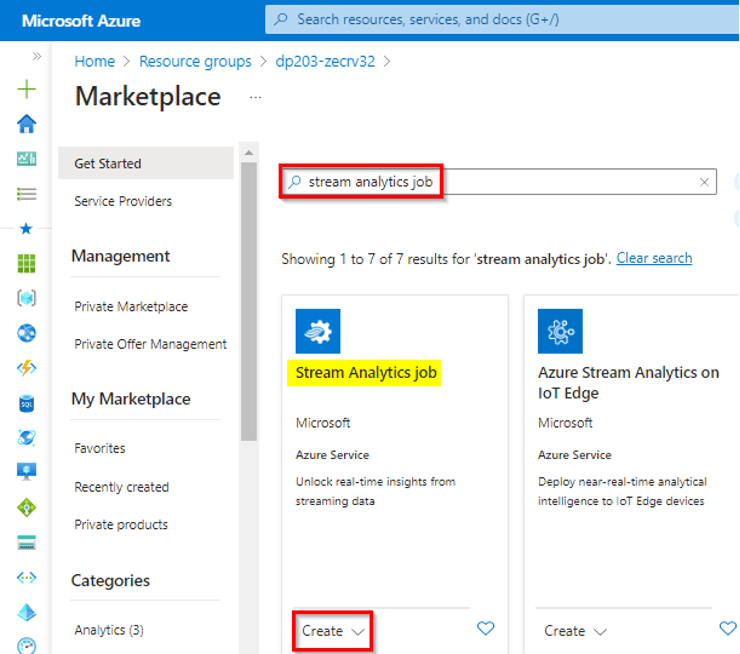
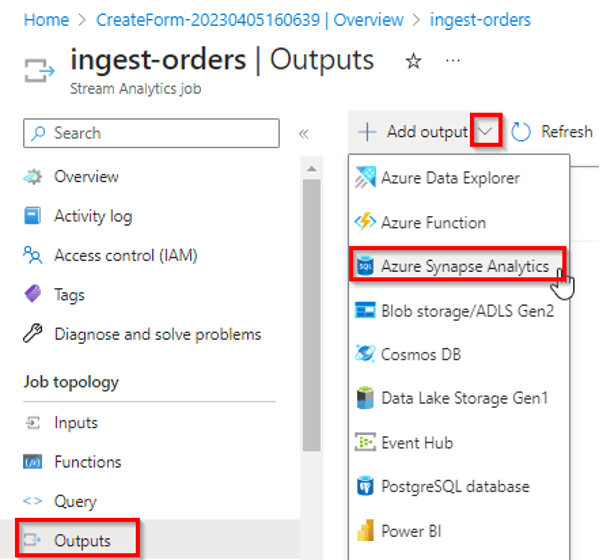
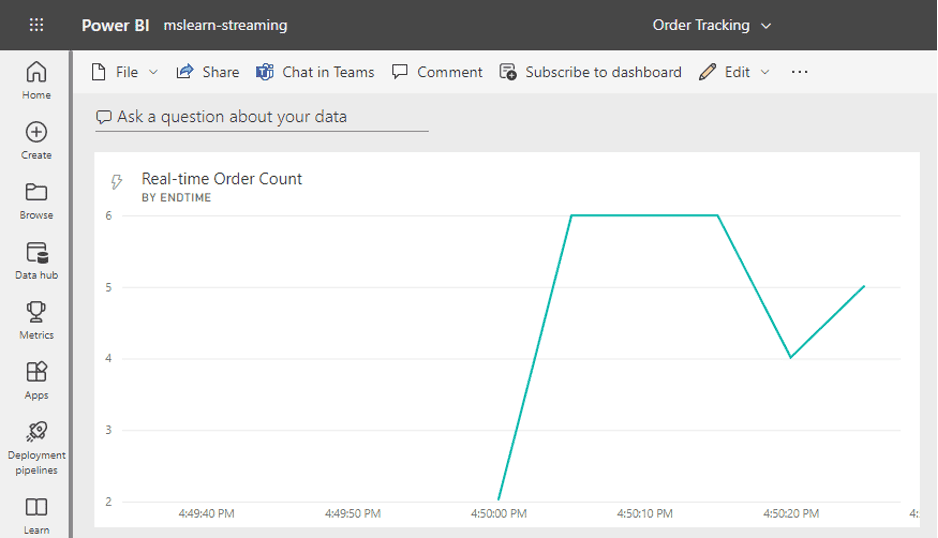
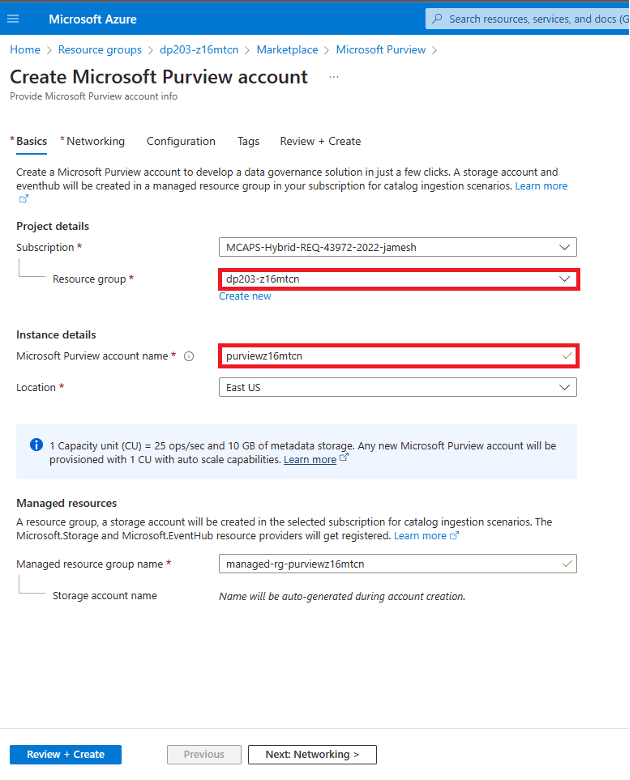
 20) Use Spark in Azure Databricks