Monday 5 August 2024

AWS lab

If you browse through a wide variety of websites, one thing you will find in common just about everywhere is the search option. If you are a music lover browsing through your favorite tracks, a food blogger checking out new food trends from the modern city you are visiting, looking for your favorite artist playing their next gig or just doing window shopping on your favorite shopping app, searching is the essential part of any significant data-driven website. Without search or even a suitable searching mechanism your data is virtually inaccessible from the reach of your users.

So, to put it in simple words, your search engine’s implementation is one of the essential parts of your web application. This drives users to the content they are looking for in the fastest and efficient way. This also brings up the discussion about selecting the right search tool for your application. There are multiple searches as service provider tools available to choose from.

  • Google Cloud Search
  • Azure Cognitive Search
  • SharePoint Online / Office 365 Search
  • Amazon CloudSearch
  • Amazon ElasticSearch

Amazon

Elasticsearch and CloudSearch are Amazon’s cloud-based solutions for search. Elasticsearch is an open source solution, whereas CloudSearch is a fully managed search service. It is quite simple to set up, easy to, and a cost-effective search solution. Amazon CloudSearch is an AWS Cloud managed service that helps users to create fast, scalable, profitable, easy to setup search solutions for their applications. Amazon CloudSearch uses Apache Solr as the underlying text search engine, which supports full-text search, faceted search, real-time indexing, dynamic clustering, database integration, NoSQL features, and productive document handling.

You will be able to interact with Amazon CloudSearch through three service layers mentioned below:

  • Document service
  • Configuration Service
  • Search service

Your Identity and Access Management (IAM) policies will allow you to access, manage, and configure your Amazon CloudSearch services. The Configuration service and Document service are for developers to set up and maintain the CloudSearch domain and its data. Whereas Search service is client facing where developers and QA can verify the configuration, indexes, and validate the data. Also, this is exposed to the real world users where it’ll cater all the search requests coming from either a web application or from a mobile app where the search domain is configured. Search service is also responsible for delivering fast, accurate, and real-time data for all the user queries.
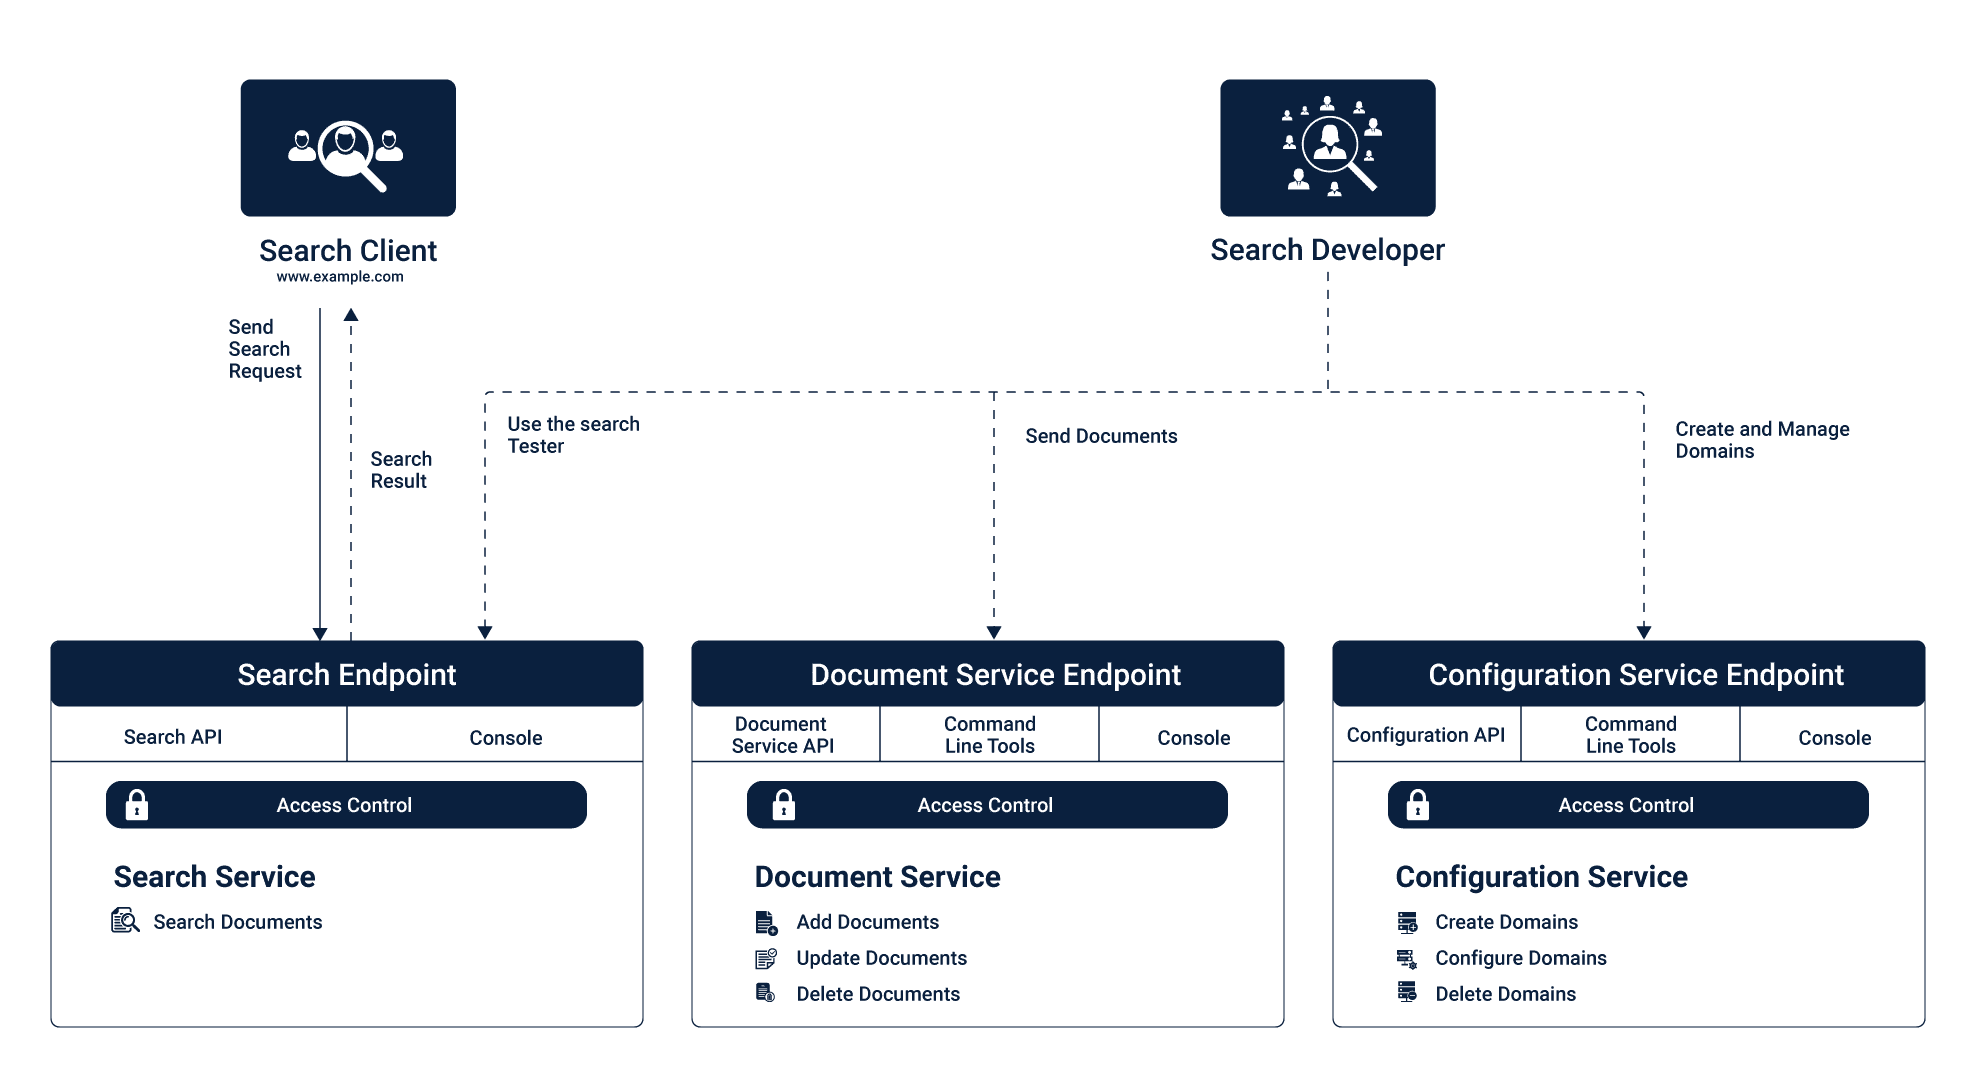
cloudsearch architecture

Document service

Document service is used to manage and configure searchable data of the domain. Each domain will have its endpoint. To upload your data, you need to format it into XML or JSON. Each item that you want to be returnable as a search response is called a document. Every object in your search response will have that unique document id and search fields that you requested in your search request. Document service also allows you to add new data anytime you want. Once the information is uploaded, it’ll reindex automatically and will be available to search in just minutes.

Configuration Service

Configuration Service allows you to create and manage the search domain. This helps you to index, scale deploy it to multiple availability zones. This has quite a helpful step by step wizard to guide you through all the configuration steps for your search domain. You have to start with a unique name for your search domain, then configure the search index, set your scaling options and availability zone with the instance size.

Search service

Once all this is set up, you’ll be able to test out your domain with unique HTTP endpoint and query parameters handled by Search service. Search service handles search and suggestion requests for the area. The search service will have a single HTTP endpoint for querying. You can configure your search results in either XML or JSON format. CloudeSeach supports rich query language that helps users to build search queries with related text search, range search, facet option to filter through options and other options to create composite questions.

Following are the main benefits Amazon CloudSearch provides that compelled me to use CloudSearch over other services:

Simple

If your tech stack is already hosted on AWS, then setting up CloudSearch is quite simple. You can set that up via AWS Management Console, AWS SDKs or AWS CLI. Adding data to your search is as simple as uploading a file(JSON, XML or text file) from AWS Management Console, browse your data and upload it. CloudSearch will automatically do the grunt work, identifies the file type, analyze the data, set up indexes, create a search, sort and facet options. The user has to review it and save changes.

Fully Managed

Amazon CloudSearch is a fully managed custom search service, where you will be able to pick your instance type, select availability zones, provisioning as well as scaling and partition using either AWS CLI or management console. Data uploading, reindexing, suggesting facet search options are all done from the quite intuitive and user-friendly management console, which helps to set up your domain and be ready for start testing it in minutes with simple wizard-based instructions.

Scalable

Scalability is one of the essential aspects when you are growing. The CloudSearch domain will autoscale as your data or query volumes increases. AWS CloudSearch will automatically scale up or down depending on your domain’s as per its usage. So if the load increases, it’ll scale up to meet the requirements and scale down when there aren’t any significant number of queries.

Reliable

Reliability is most important when you are working with data that drives your applications search service. AWS CloudSearch has Multi-AZ options, so your data is secure of any hardware failure and also minimize latency. Search traffic automatically distributes across all available zones to meet the requirements and auto-scales depending on the load. It will make sure if one free zone fails then it’ll request to next nearest data source and fetch the data.

High Performance

Performance is one of the most important criteria while choosing your search engine. Faster data delivery is one if the main reason many engineers migrate from having a self build searching mechanism from searching from DB to externally hosted search service like AWS CloudSearch. Automatic indexing, horizontal – vertical scaling, and distributed data give you all the edge for delivering your data with low latency and high performance.

Prepare your test data :

Now we’ll show you how to create your domain on Amazon CloudSearch and set that up with your personal data. As we discussed earlier, you can upload your data in json, XML or text CSV file for your search domain. If you have your data, then you can upload that, or you can download a wide range of pre-formatted data from kaggle datasets. For this document purpose, I have chosen Google Play Store Apps data set. This data set has around 10.8K records; for this example purpose I have truncated it down to about 5K lines. You could do that with the following command.

head -100 oldfile > newfile

The truncated sample file is uploaded to https://github.com/akashs-cuelogic/CloudSearch. Feel free to use that.

Prerequisite:

AWS account !!

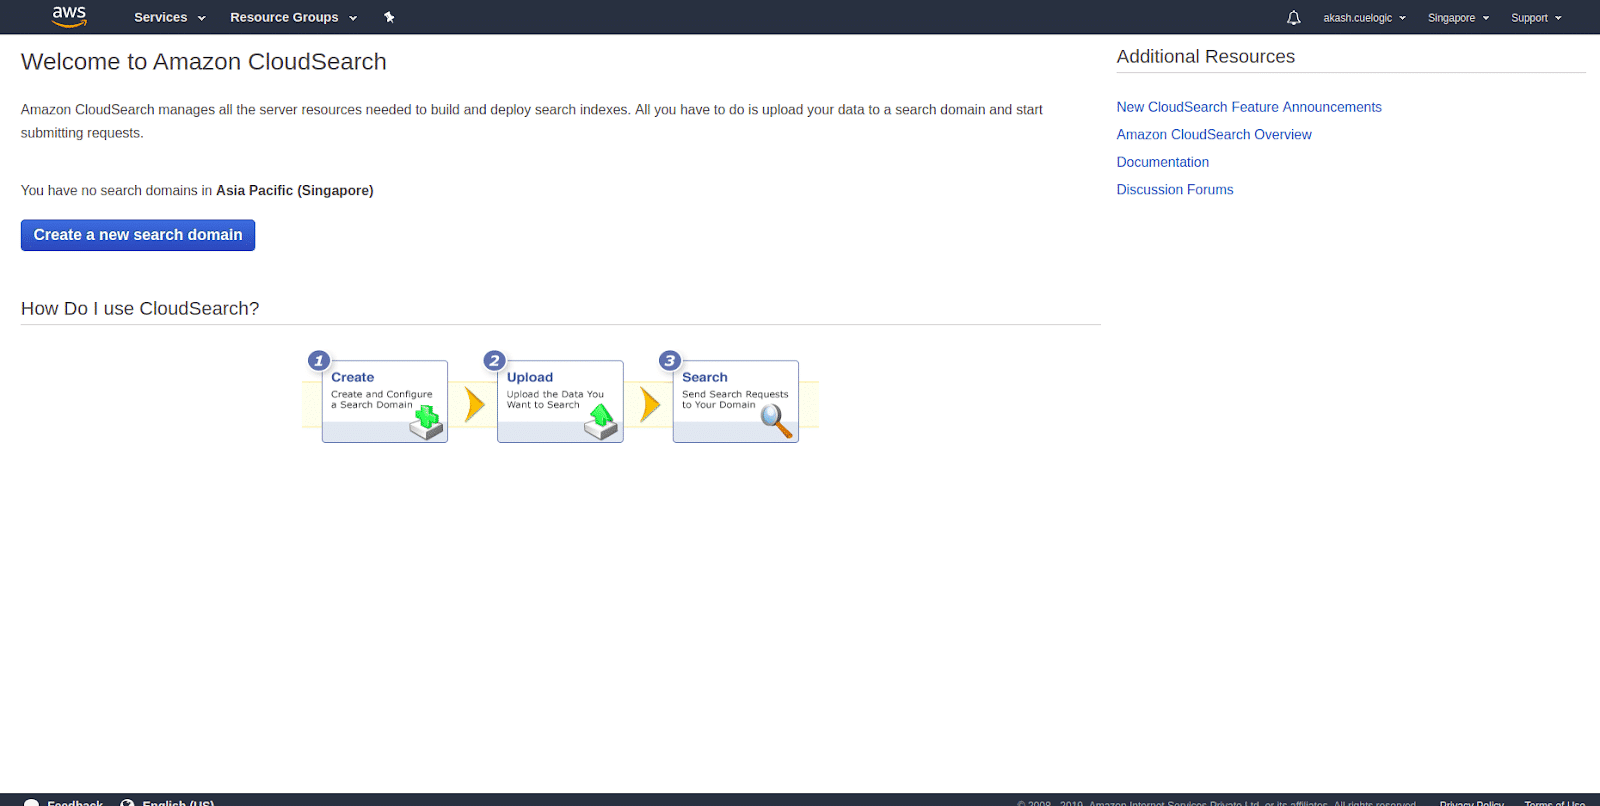
  1. Collect data From the AWS home page, navigate to Cloud Search under the Analytics section. This will give you a step by step instructions on how to create your own Cloud Search domain, upload data, set indexes, and start searching. Start by clicking the Create a new search domain shown in the picture below.AWS_create
  2. Create a new search domain and setup size Setting up a name for you CloudSearch domain is relevant because that will also be a part of your search API’s url. Under that, you’ll see a couple of options to set up the size of your instance and replication count. The size of the case and replication count is directly proportional to the size of your data and the volume of your request. If you are working with an extensive set of data, it’s advisable to use a more significant instance type. And if you are expecting a large number of concurrent requests, then increase the replication count accordingly.
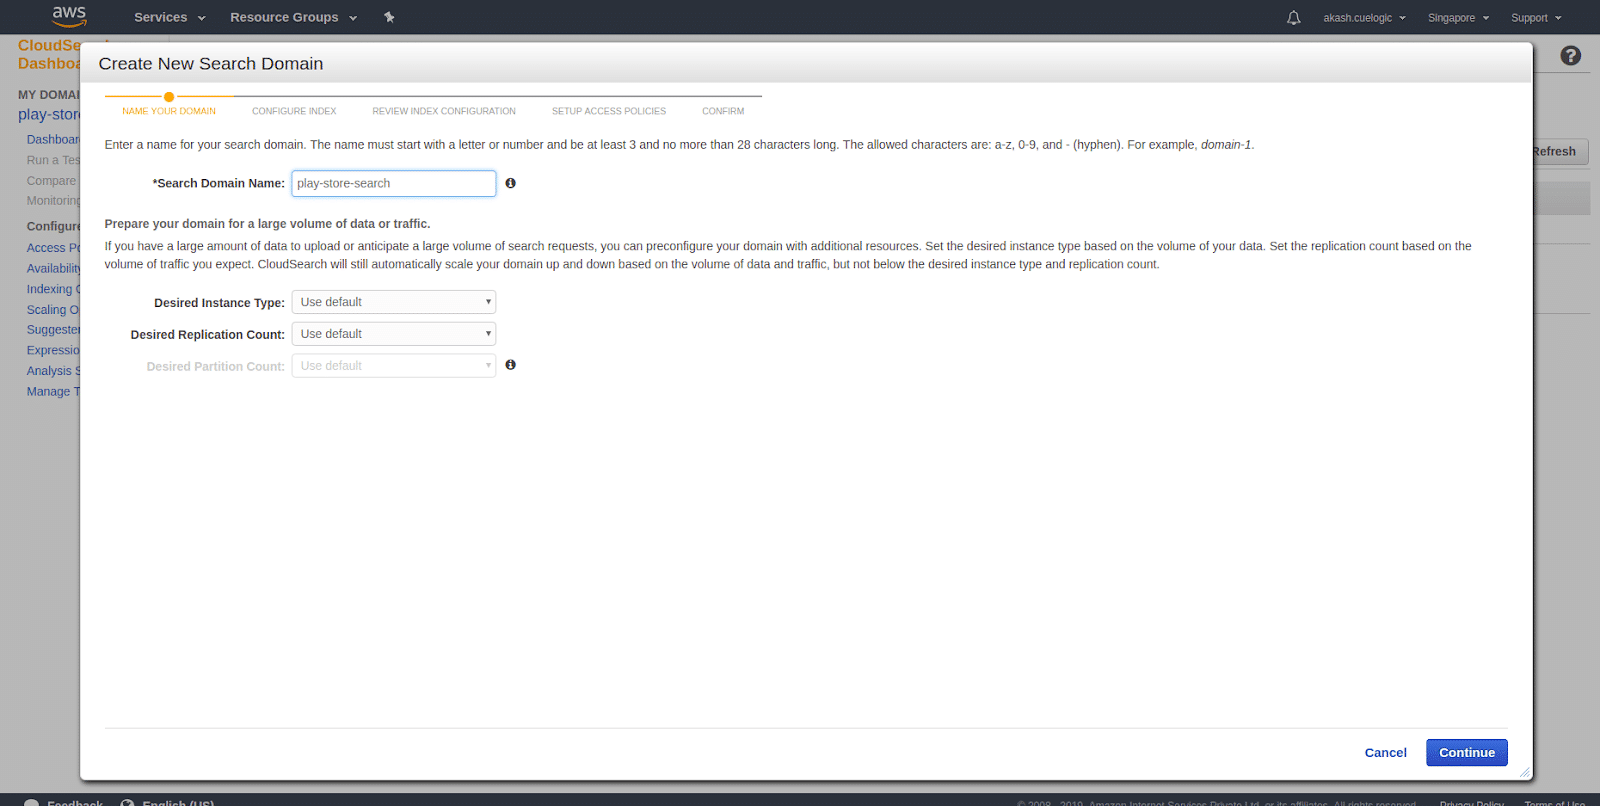
    AWS_add_title
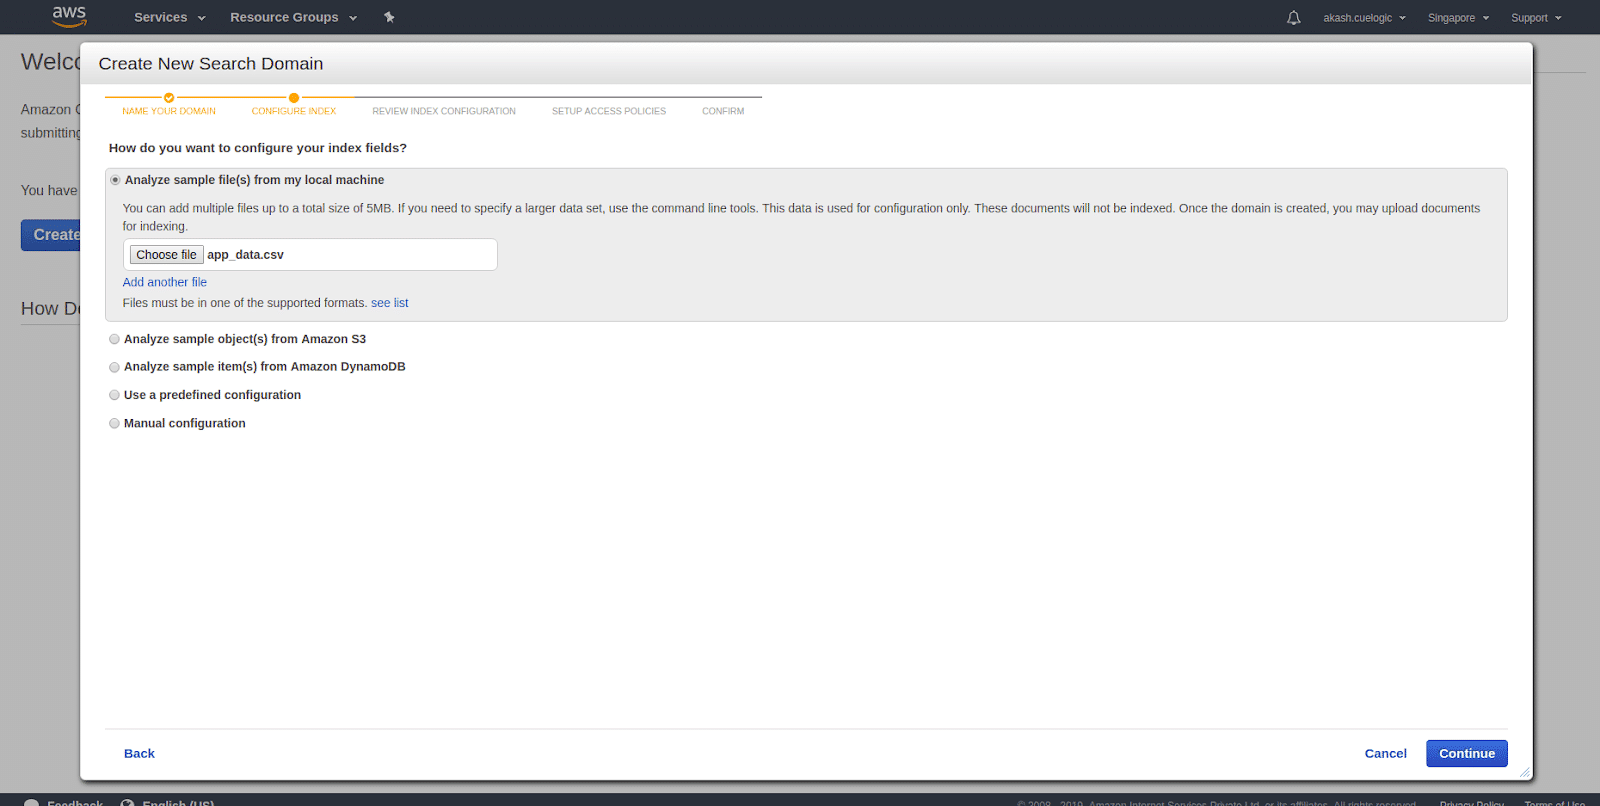
  3. Upload index definitions Indexing your data will dramatically increase the performance of your search and Cloud Search will do that automatically when you upload your data. For indexing, you don’t need your the whole set of data, and you need a few samples for Cloud Search to identify the data attributes and how to index them. There are multiple ways to upload sample data. You can upload it from your local machine, from your S3 bucket. You can also provide your DynamoDB data or do it manually. If you are trying things out, then, they also have sets of sample data to choose from and start testing things.AWS_configuring_index
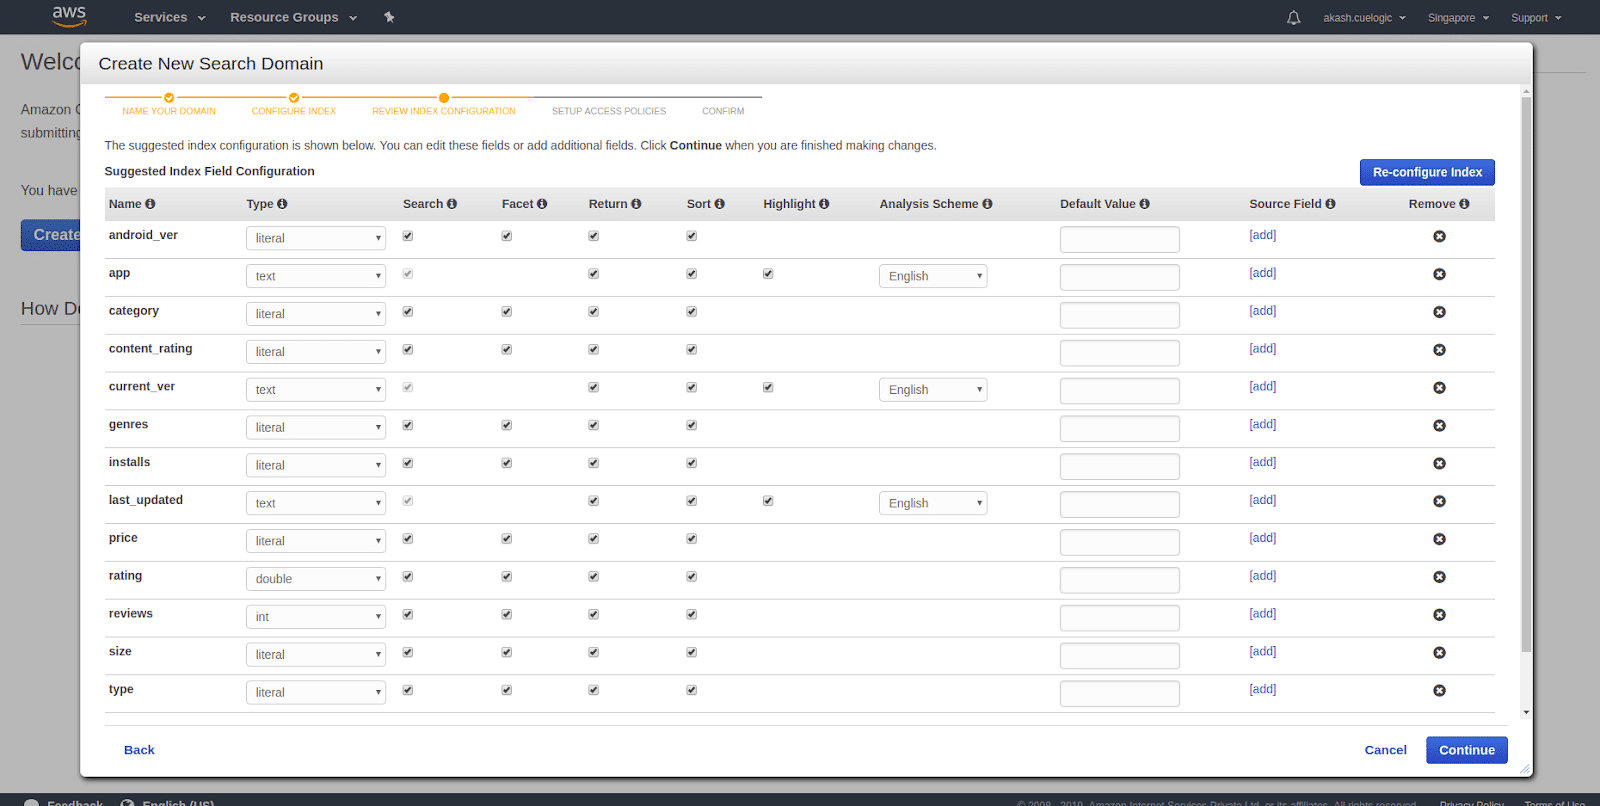
  4. Configuring indexes Index configuration is the essential thing while setting up your domain. In most cases, Amazon CloudSearch will automatically index your data and will be reflected in your results in a few minutes. Once any changes on your domain configuration need reindexing your data and you can run it manually also from either client or the dashboard.Indexing options control how your data is mapped to index fields and what information you can search and retrieve from the index. The data you upload must contain the same fields configured in your domain’s indexing options, and the field values must be compatible with the set field types.AWS_review_index
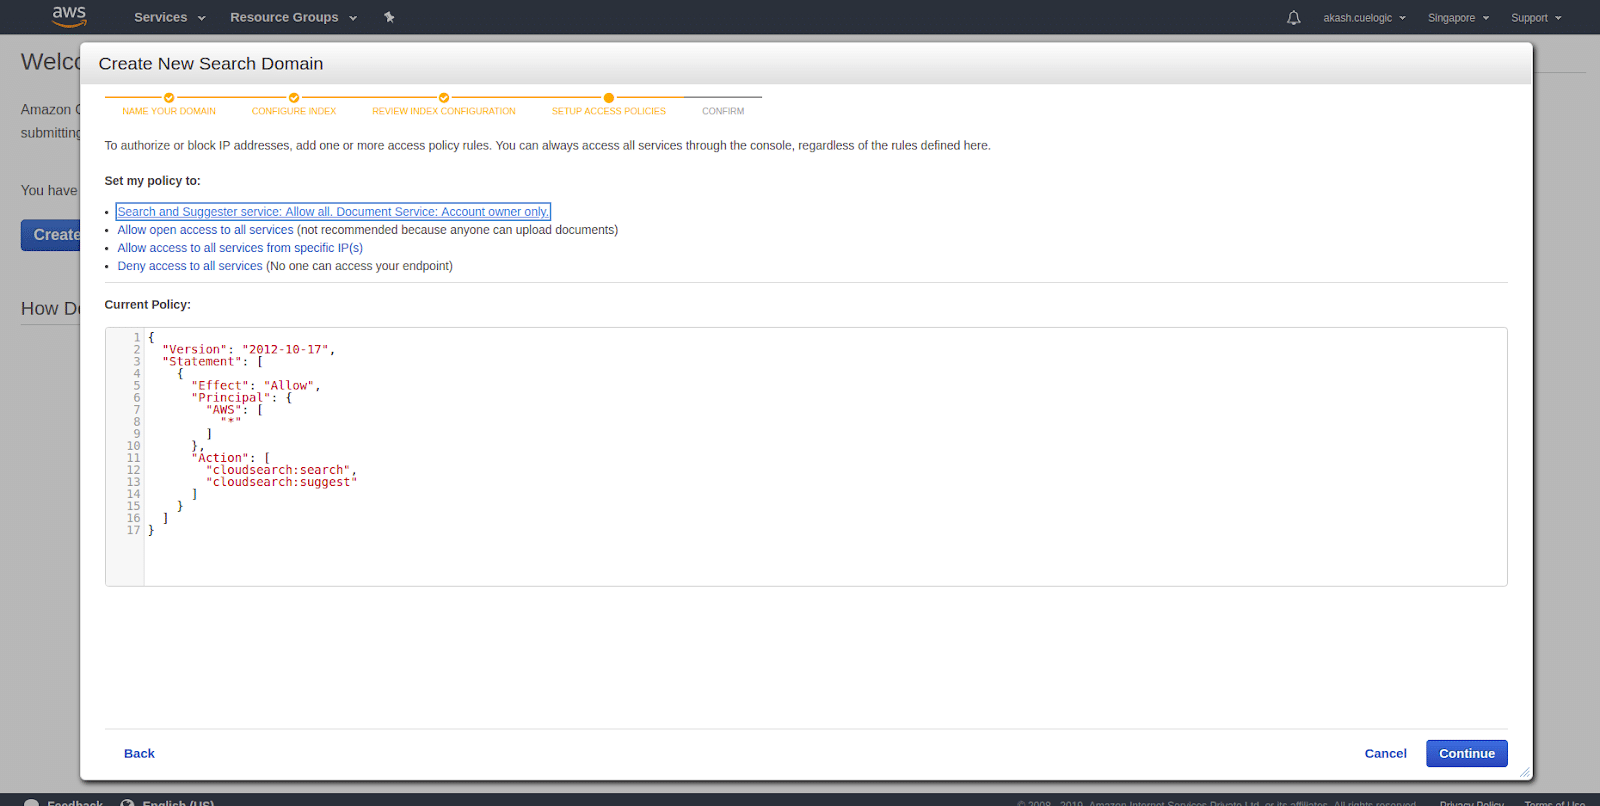
  5. Set up Access Policies Amazon CloudSearch providers you various way to allow and restrict service APIs(Search and Suggester) and the domain(Document) services APIs. There are multiple options you can toggle your accessibility to your services.
    1. Search and Suggester service: Allow all. Document Service: Account owner only.
      This will allow search and suggester service accessible to everyone without any restrictions. And for who maintains domain and data there will be another service where they can upload new data, index them and make all the scaling and optimization they require for the CloudSearch to work efficiently.
    2. Allow open access to all services (not recommended because anyone can upload documents)
      This will all open access to search as well as maintain the data and other options. This is not recommended as it will expose all the data and may not be the secure option if you want to use it in your application where there is sensitive data.
    3. Allow access to all services from specific IP(s)
      This is the same as above, but we are restricting the search, suggestions, and domain request from some particular IPs only. This is a good option where you search domain used in some internal application, and it is not open for other users. Then you can whitelist those IPs and restrict others.
    4. Deny access to all services (No one can access your endpoint)
      Search and document requests must either be submitted through the console or authenticated with your account credentials. The document and search endpoints do not allow anonymous access or accept requests from other AWS users.AWS_access_settings
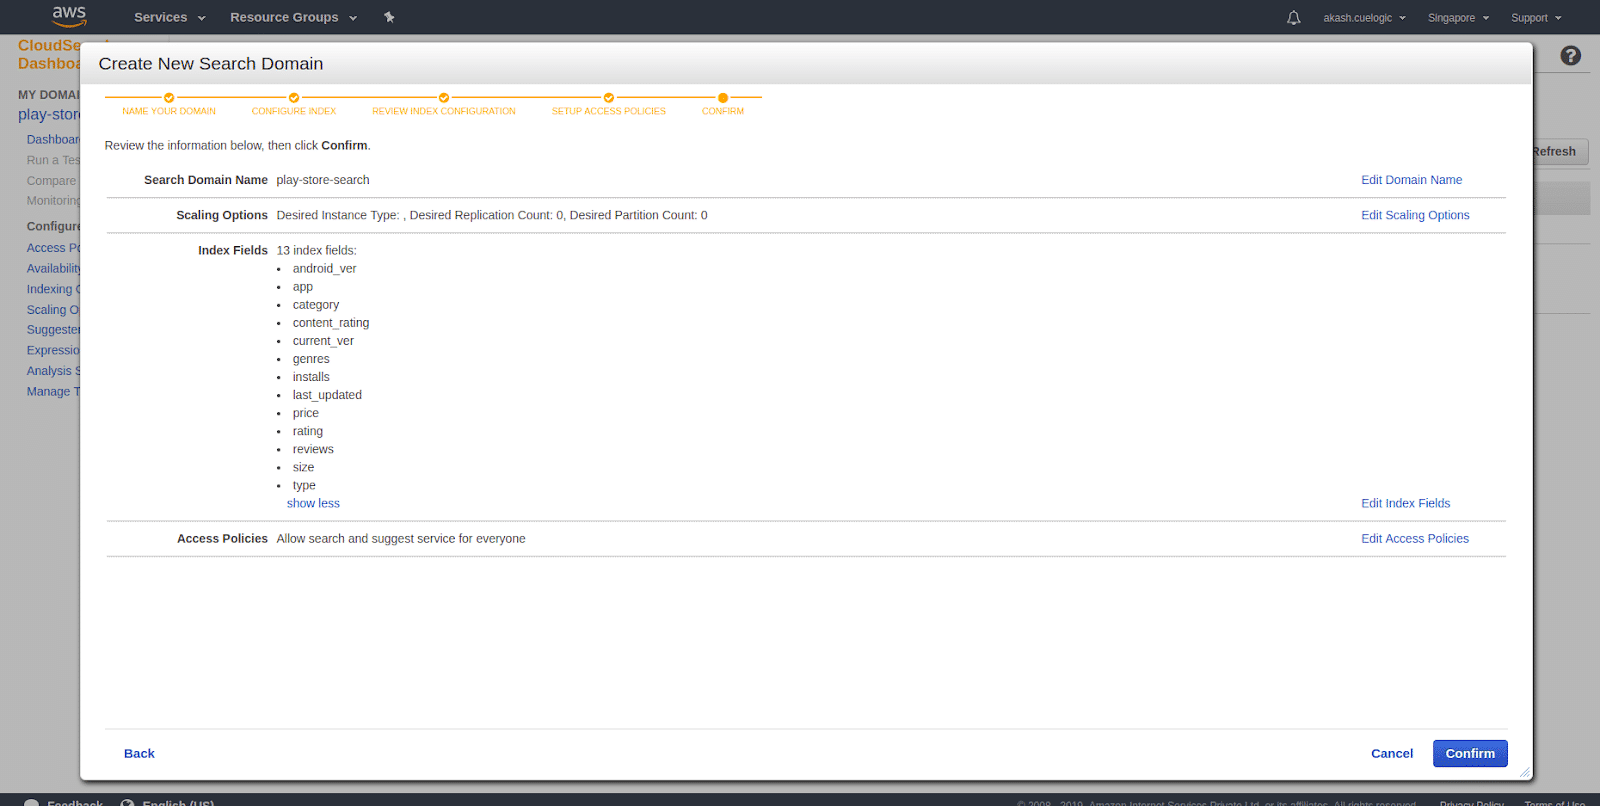
  6. Confirm Domain info The last step is to verify the domain information. It’ll list all the indexed fields, scaling options, and access policies. You can click on edit options next to it and make changes before confirming. If you are satisfied with your configuration, click Confirm. This will take you to the dashboard page where you will see the status of the domain with other information.AWS_confirming_settings
  7. Domain dashboard The dashboard will have the following information
    Searchable documents: Count of number of records that are available to search from
    Index Fields: Fields which are indexed and either searchable, returnable, or have sort options.
    Search Endpoint: Endpoint of an API where you’ll be querying your data.
    Document Endpoint : It’ll have all the information needed to set up the domain and how to use search services.
    Domain ARN: Amazon Resource Names (ARNs) uniquely identify AWS resources. Every resource in AWS will have a unique identification number with specifying a resource unambiguously across all of AWS.
    Engine Type: Type of search engine (CloudSearch) with the API version (2013). A search engine makes it possible to search extensive collections of mostly textual data items (called documents) to find the best matching results quickly.Note: Search Endpoint and Document Endpoint will be dynamically created from the name of your search domain given in the first step.
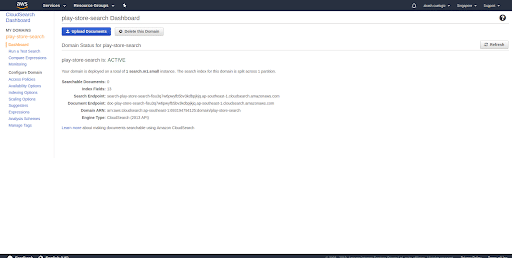
    AWS_Domain_dashboard
  8. Upload search documents As you can see above, the count of searchable papers is 0. In the initial steps, we just configured the indexes and added options to make them searchable sortable, etc. But if that is only a schema of search documents, we need the data sets with the same attributes and make them available for search requests. CloudSearch will allow you to upload your data in multiple ways. They are the same options that we choose in part 3, where we were uploading the document for adding indexes. Upload search documents
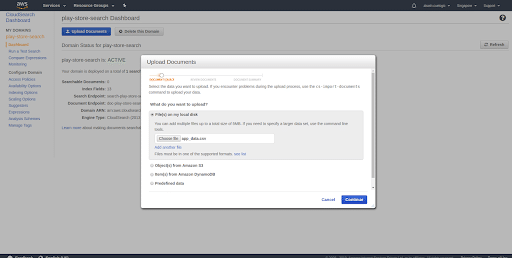
  9. Review the data Before all the records get uploaded to the service, it’ll first ask you to verify the data fields. Once you confirm that it’ll upload it to the service. Once you click on Upload Documents, it’ll start uploading all the records from the selected data source and index them and make them searchable. Review the data
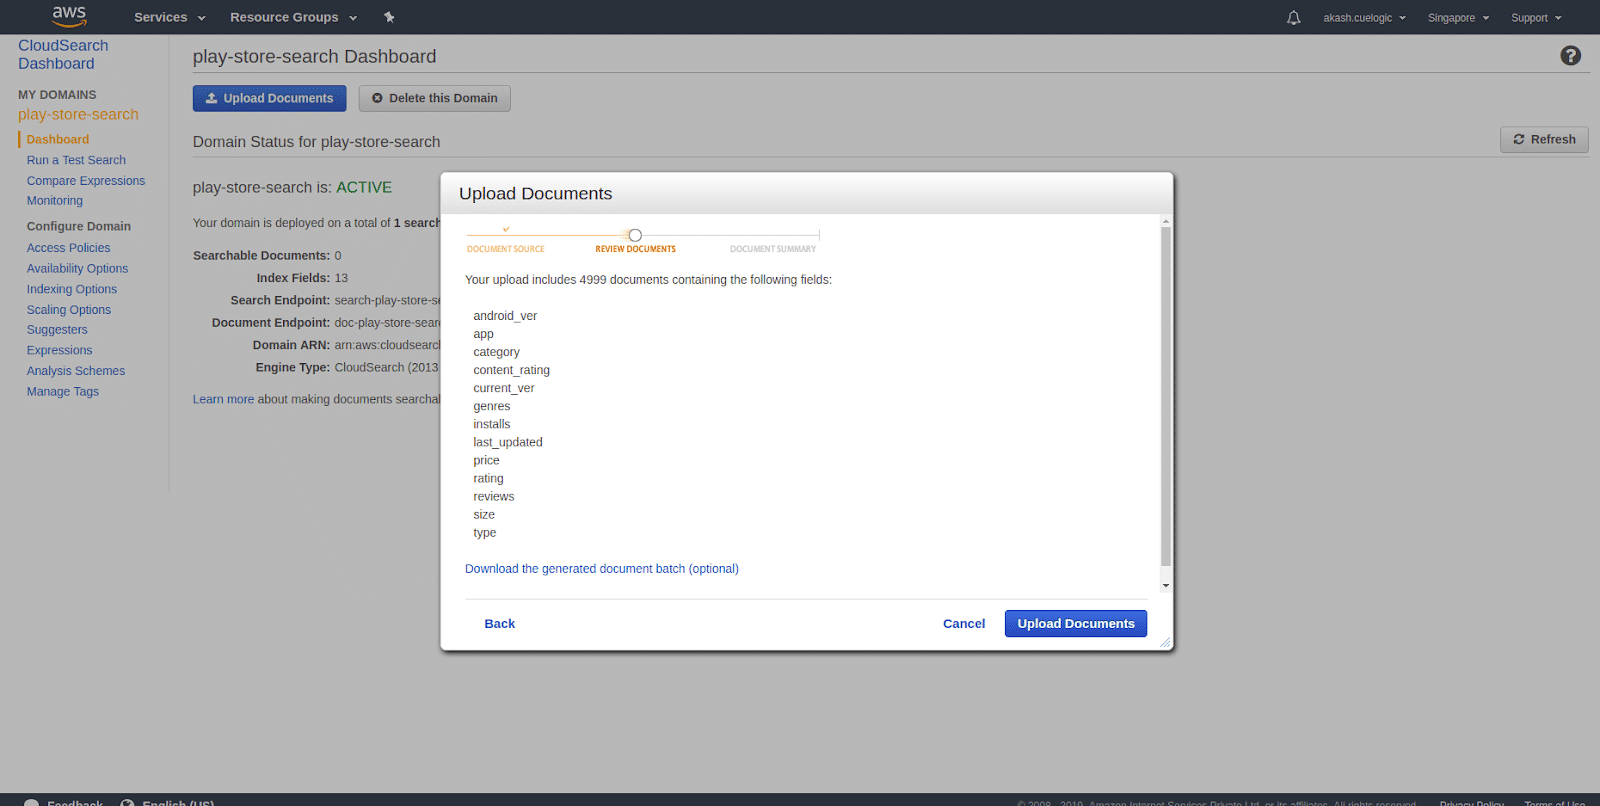
    After all the data is uploaded, you can start testing out your data ……..
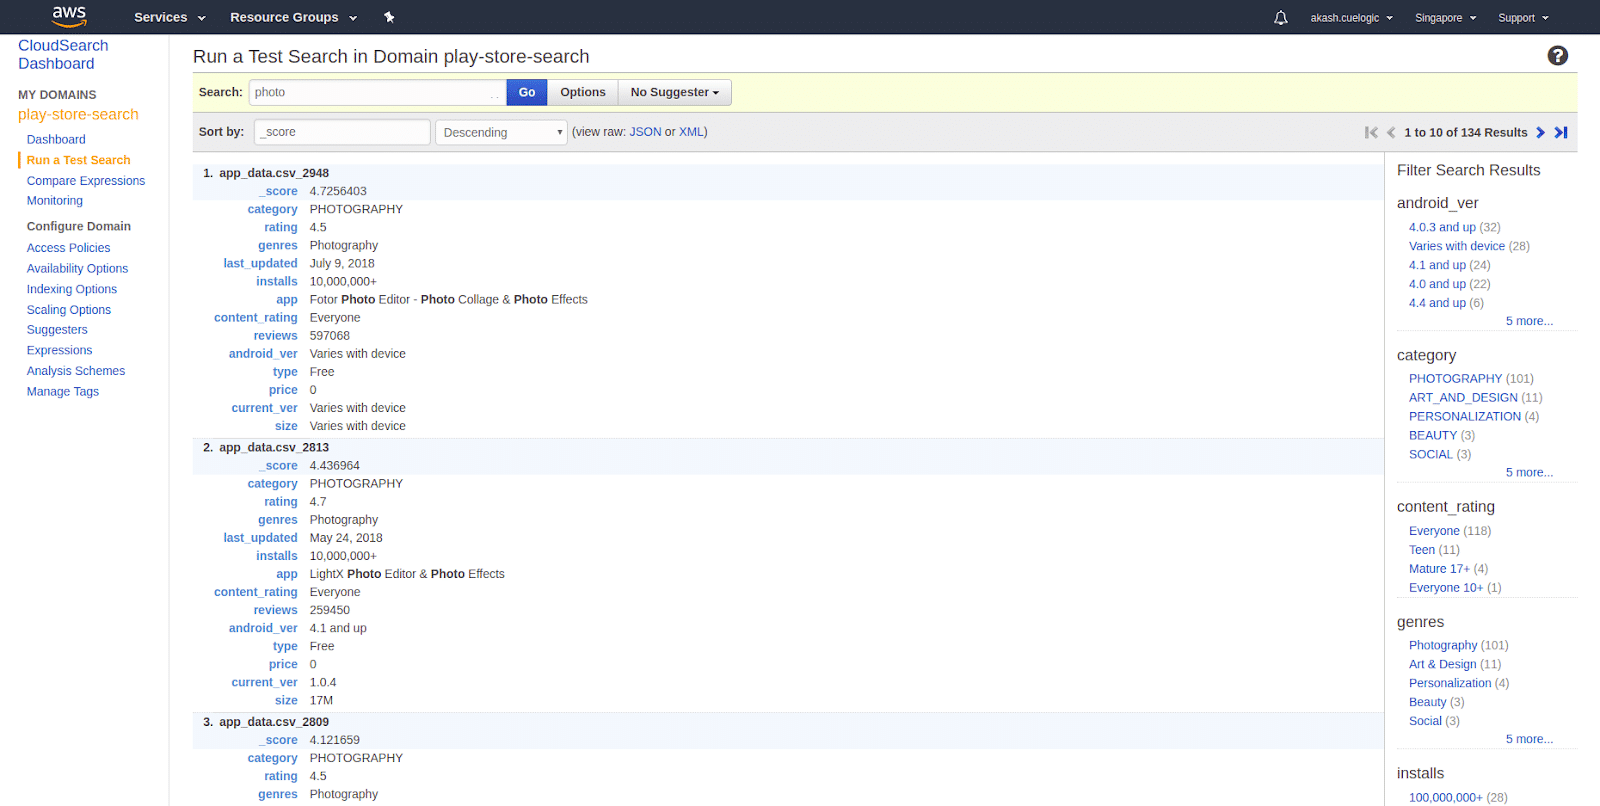
  10. Testing your data Testing your data is quite easy in Amazon CloudSearch. You can put your query text in Test Search input field and click GO. This will search through all the searchable fields that you selected while indexing and give you results as shown below. Testing your dataYou can also query via your Amazon CloudSearch Domain and simple q expression which will do a default search to all the searchable fields.
So these are the steps to set up your Cloud domain with your personal data set and start testing and tweaking with indexes and data configurations. There are multiple options available to do the advanced search options with nested and query suggestions that you can build depending on your search filters. We will try to cover in the next part. Amazon CloudSearch is a complete search solution which will allow you to scale and upload new data realine and make available to search in no time. With Amazon CloudSearch, one should be able to create their search domain, set search attributes, upload the data, and start testing them out in no time. It provides intuitive step by step wizard that will allow you to set that up easily.

aws lab step by step process


Prerequisites

  1. Have an AWS account.
  2. Create an IAM user with administrator permissions. To do this, you can just follow this tutorial. I recommend you give granular permissions to the user that will do the provisioning.
  3. Install and configure AWS CLI.

If something from the above doesn’t work, it might be because a permission is missing, or the CLI is not configured properly. I’ll let you know exactly what’s needed in the following steps.

Go to AWS Batch

Log in to your AWS account and look for AWS Batch in the initial screen, or you can go directly by using this link.

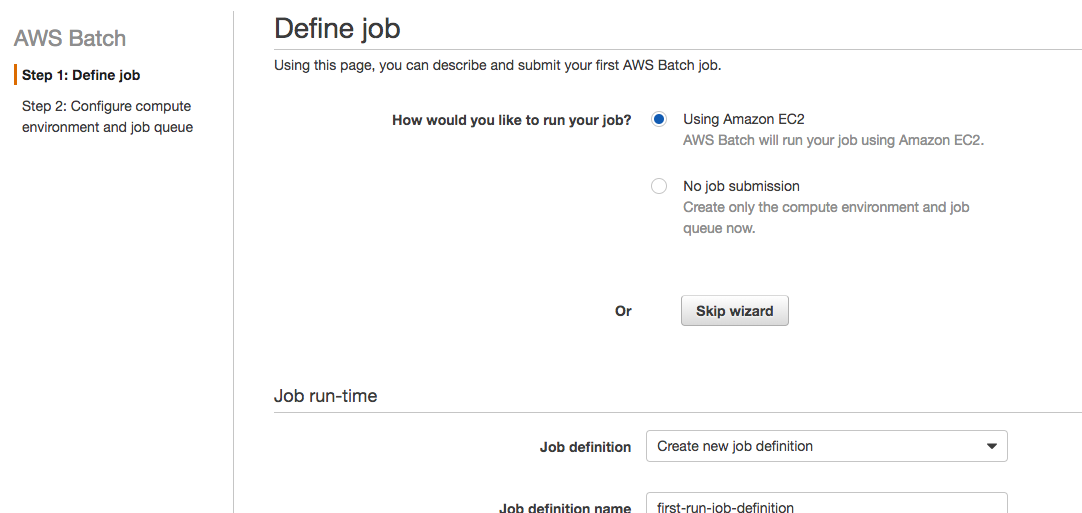
You’ll see a screen like the following:

AWS Batch guide

Click the “Get started” button. Then, this next screen will appear:

AWS Batch guide

Click the “Skip wizard” button. We’re not going to follow this wizard because I want to explain each step to you. Also, after this, you’ll probably use AWS CloudFormation or something else to provision, not the wizard.

Create a Compute Environment

The jobs will run on a compute environment. Here, you’ll configure the instance type, family, and some other things that we’ll see in a bit.

It’s important that you know we’re not going to create any instances now. AWS Batch will create one when it’s needed. You can also configure things to create instances right away, speeding up job scheduling, but we won’t tackle that in this post.

Click the “Compute environments” link that appears in the left menu. You’ll see the following screen:

AWS Batch guide instances

Instance Type and Permissions

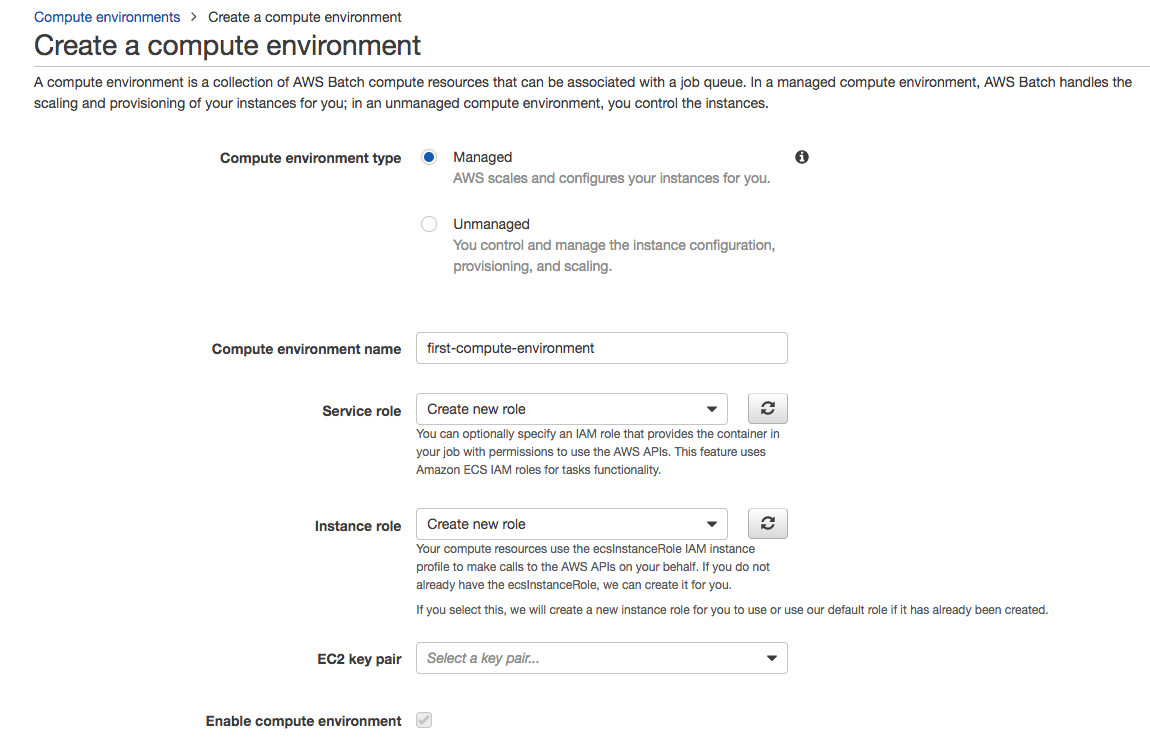
Now click the “Create environment” blue button so you can start defining the compute environment. You’ll start configuring the environment in the following screen:

AWS Batch guide create environment

For simplicity, we’re going to choose all default values. You just need to name the environment. I called it “first-compute-environment.”

You don’t have to worry about creating a service or instance role right now. Just choose the option “Create new role” for both, and AWS will create them for you with the proper permissions. It will help you see which permissions are needed and adjust them if you want to.

Leave the EC2 key pair blank because we don’t need to access the servers for now.

Compute Resources

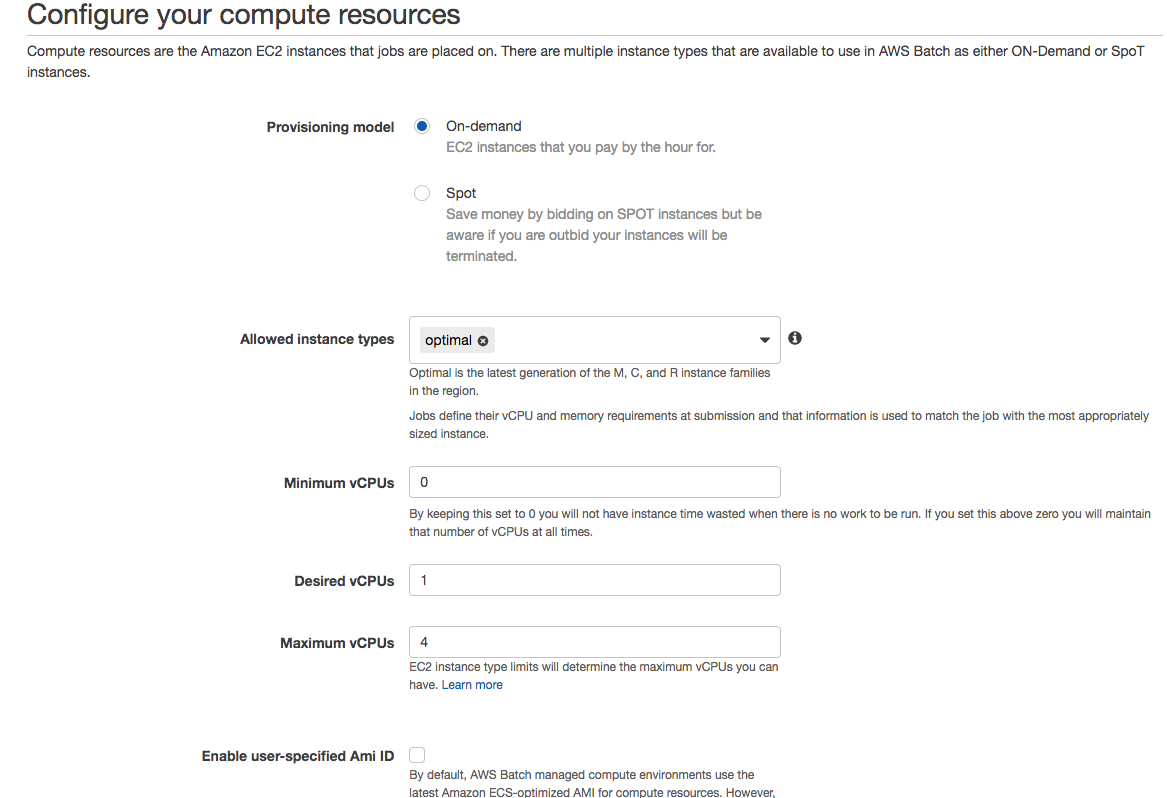
Scroll down a little bit, and let’s talk about the compute resources section. You’ll see the following screen:

AWS Batch guide compute resources

This is where you get to choose if you want to use on-demand or spot instances. For simplicity, let’s choose “On-demand.”

The “Allowed instance types” field is where you define which family type you’d like these environments to create. This is where things get fun because you can create compute environments that are CPU-intensive and choose between C family instance types. Or if there are jobs that are memory intensive, you can choose M family instance types. You’re limiting which instance types can be created. I chose “optimal,” so AWS decides for me which instance is better based on the configuration of job queues.

Now, vCPUs are one of the most important things here in order for your first job to run.

If you’re familiar with running workloads using ECS, you might get confused here. You might configure so many vCPUs that AWS won’t be able to create the environment. And even if there are a few instances running, jobs won’t run until the environment is ready. So keep in mind that vCPUs are virtual CPUs, not CPU units that you configure in a container when running in ECS.

I configured a maximum of four vCPUs. It means that if at some point the cluster has four vCPUs among all instances, it won’t create more. Jobs will run slowly, but your costs will remain controlled. I also put one vCPU as desired, just so it starts creating an instance right now. AWS will adjust this later if needed, and you can change it when submitting a job if you’re in a hurry.

Networking

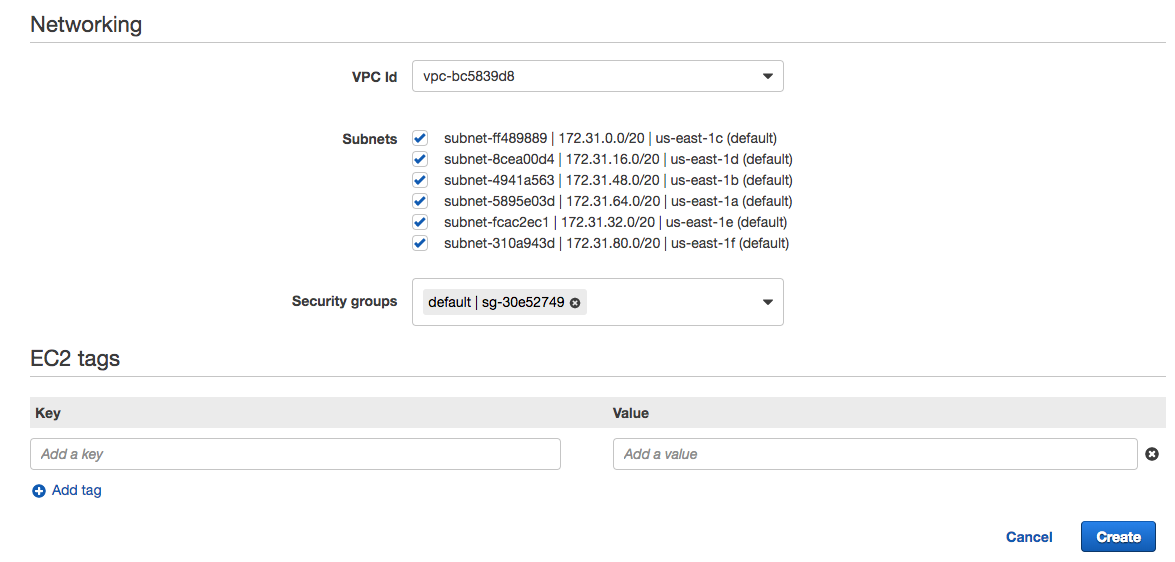
Scroll down a little bit, and you’ll now configure the networking section and tags. You’ll see a screen like this:

AWS Batch guide networking

Leave the VPC and subnets as default for now. Click the “Create” blue button and wait a bit while the environment is created.

AWS Batch guide compute environments

Create a Job Queue

Now you need a queue where you’ll send the jobs to get executed. This queue will be attached to a compute environment so the AWS Batch service will create the resources needed based on the load of the queue. It will use the min, max, and desired vCPUs configuration to know how many instances to create.

Click the “Job queues” link in the left menu and you’ll see the following screen:

AWS Batch guide jon queues

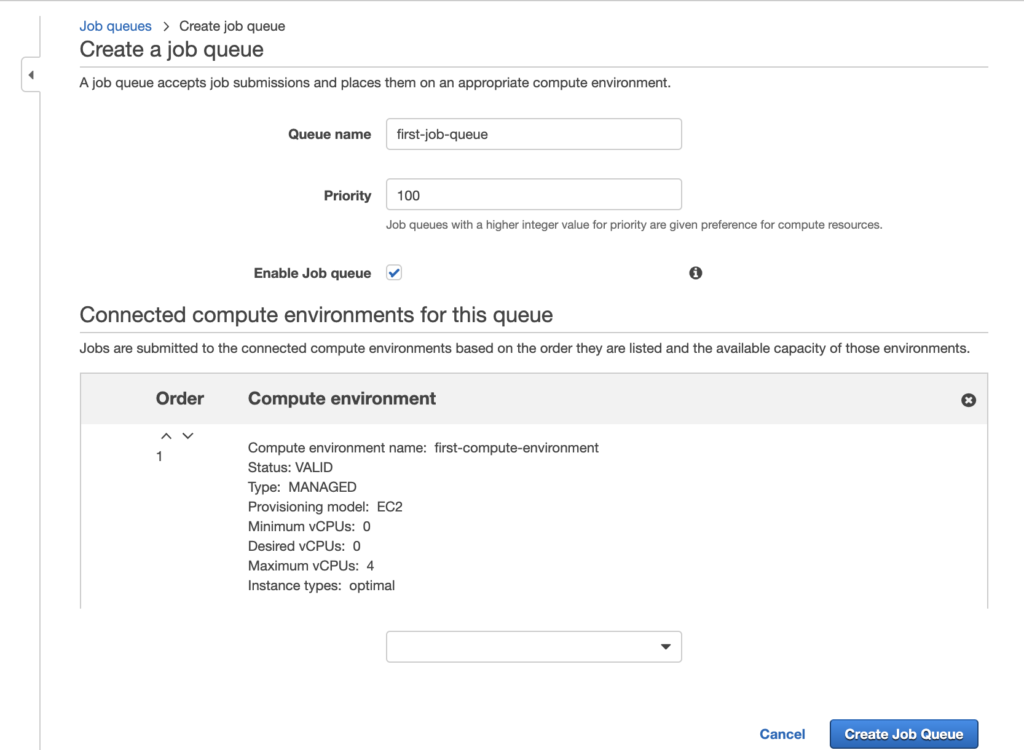
Then, you can click the “Create queue” blue button. You’ll see this:

Let’s put a name to the queue so it’s easy to identify. I called it “first-job-queue.”

In the priority, make sure you type a value that lets you play with lower priority queues later. I put “100” in case I need to create a lower priority queue later—say, for example, one with 50.

Enable the job queue. By default, this checkbox will be checked. You should leave it that way.

You now need to connect this queue to one or more compute environments. I chose the one I just created, the “first-compute-environment” one. If there were any other environment, this is where you’d choose it.

Why would I like to have more than one compute environment? Well, it’s useful if you want to speed up a job’s processing time by creating more instances using the spot market. You can have an on-demand compute environment where you always have resources available. And if the load increases, you can create spot instances if there are any available, based on the bid you configured.

Click the “Create queue” blue button.

http://www.hitsubscribe.com/wp-content/uploads/2018/03/Screen-Shot-2018-03-13-at-2.24.36-PM.png

Create a Job Using Docker

We’re going to use a “hello world” job that AWS evangelists have used for demo purposes. I couldn’t find a repository with all the files they’ve used, so I created one with all the files we’re going to need. You can find it on GitHub here.

Let’s explore what’s in there, as well as why and how to use those files to create our first job in AWS Batch.

 Docker Image

We’re going to create a simple job that will pull a Bash script from S3 and execute it. The Dockerfile and the script that does what I just described is located in the “job” folder of the repository.

AWS Batch guide create job

I won’t explain either the script or the Dockerfile just yet—we’ll just use it. So let’s build the Docker image and push it to the Docker hub. You need to have Docker installed on your machine, a Docker hub account, and a login for your computer.

Let’s build the Docker image. You can skip this step and use my image located here, or you can run the following command and tag the image using your username instead of mine:

docker build -t christianhxc/aws-batch-101:latest .

Now, let’s push the image. You need to be logged in with your user ID. And make sure you push the image that has your username in the tag. Run the following command:

docker push christianhxc/aws-batch-101:latest

That’s it! You now have the Docker image that will download a Bash script from S3 and run it.

A Bash Script

Let’s create the Bash script. You can use the one I have in the repo. That script simply puts a Fibonacci sequence in a DynamoDB table. It uses an environment variable called FOO to create the series of numbers, and it uses an argument just to print it in the console.

This script is in the root of the GitHub repository I linked before, and it’s called mapjob.sh

AWS Batch guide bash script

Now, because this is outside the scope of AWS Batch, I’m just going to list the actions you’ll need for this guide to work. We’ll need to do the following:

  1. Create a DynamoDB table in the Virginia region with primary key of “jobID”. Mine is called “fetch_and_run.” If you decide to enter a different name, make sure you change it at the end in the mapjob.sh script.
  2. Create an S3 bucket in the Virginia region. Mine is called “cm-aws-batch-101.” Don’t make it public.
  3. Upload the mapjob.sh script in the bucket you just created.
  4. Create an IAM role for an ECS service task with permissions to the S3 bucket and the DynamoDB table. If you don’t know how to do that, follow these instructions. I called my IAM role “aws-batch-101.” We’ll use this one next.

You’re almost ready to kick off your first job. You already have a script and a Docker image to use.

Let’s create the job definition in AWS and then submit a job.

Create a Job Definition

At this point, you’ve defined the environment where your jobs will run and the queue, which means AWS takes care of creating resources only when they’re needed. Now you need to run the job definition. And this is where things get more interesting.

Click the “Job definitions” link in the left menu and you’ll see the following screen:

AWS Batch guide job definitions

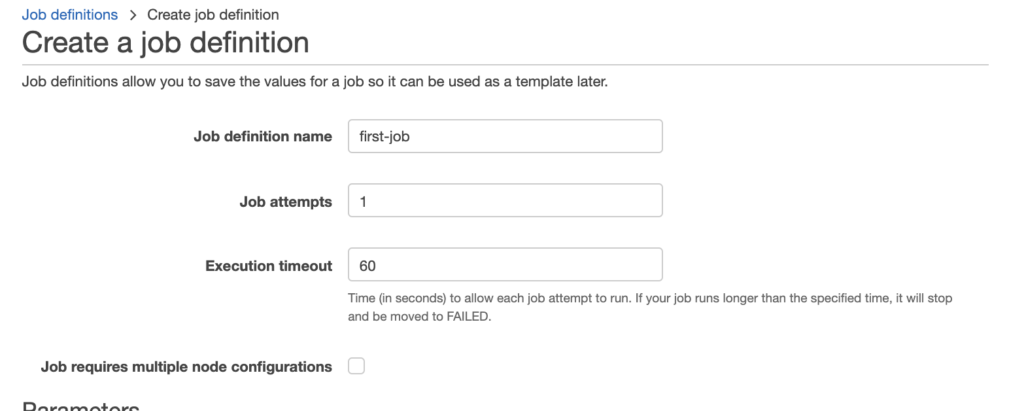
Click the “Create” blue button and let’s start defining the job.

Enter any name you’d like. I put “first-job.” We set job attempts to 1.   Job attempts is the maximum number of times to retry your job if it fails. And Execution timeout, is the maximum number of seconds your job attempts would run. For this example, we set it to 60 seconds.

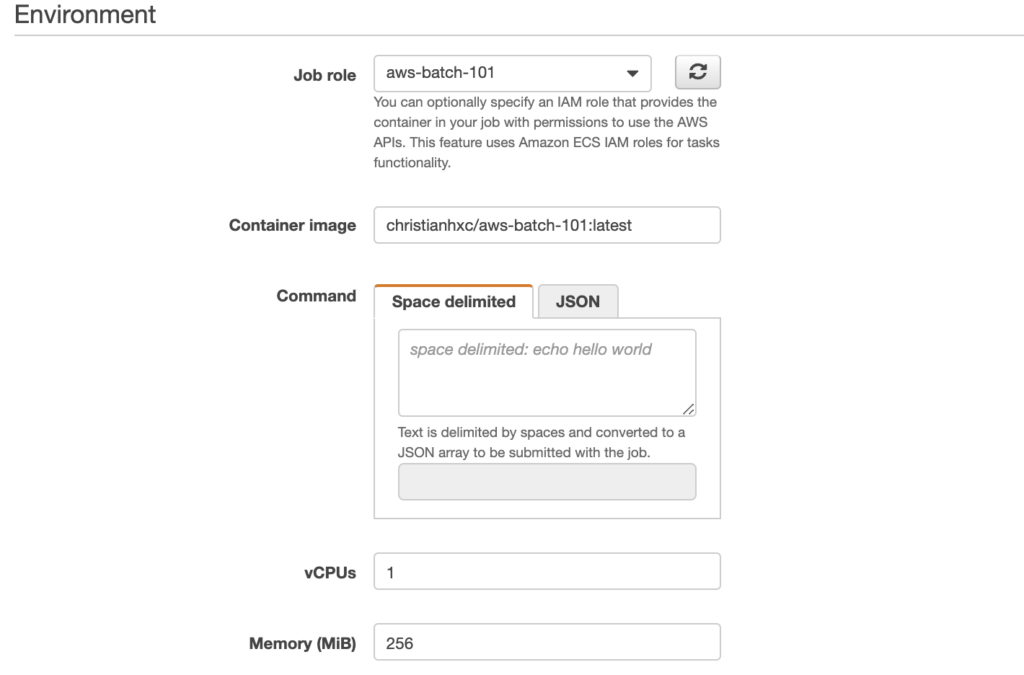
Scroll down a bit and let me explain what’s there:

Job role provides a drop down menu where you select the job role. choose the IAM role you created previously; mine is “aws-batch-101.”

Note that:  Only roles with Amazon Elastic Container Service Task Role  trust relationship will be shown. You can learn more about creating roles with AWS ECS trust relationship here.

Now pick a name for the container image. Like I said before, for simplicity, you can use mine. I called it “christianhxc/aws-batch-101:latest.” These values can’t be changed when submitting a job, but the ones we’re about to explore can be changed.

The command field describes the command passed to the container. It maps to the COMMAND parameter to docker run. Here, we’ll type the name of the script that will run the container and its parameters. Because we can override this value, we’ll leave it as it is right now.

Now, here’s another trick to be able to run a job. Unfortunately, you can’t configure CPU units to a container, only vCPUs. It means that, at minimum, the container will have 1024 CPU units because that’s the equivalent to one vCPU. You can configure the CPU, then, in blocks of 1024. This is important because I entered 256, thinking that this was CPU units, and the job never started. It sticks in the RUNNABLE state if there’s nowhere to run it.

Configure how much memory this container will need. I put 256. Leave the rest as it is.

Submit a Job

You’re now, finally, able to submit a job.

Click the “Jobs” link in the left menu, and you’ll see the following screen:

AWS Batch guide jobs

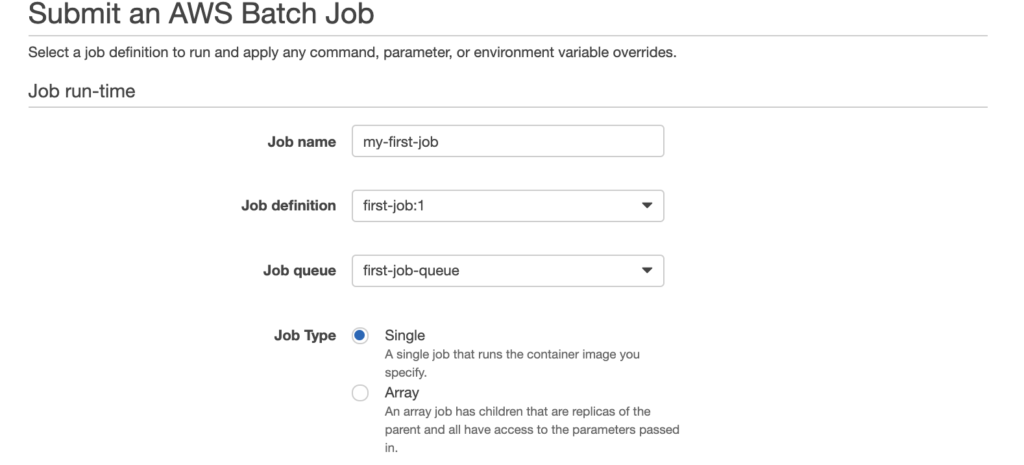
Click the “Submit job” blue button. Let’s submit one!

Next, name your job submission. I called it “my-first-job.” Choose the job definition and the queue we just created, and choose “Single” as a job type.

Scroll down a little and let’s override some values here:

In here, you’ll need to put the name of the script in the S3 bucket and the Fibonacci number as parameter. But these are only for reference. I used “mapjob.sh 60.” Type in “1” for vCPU and “256” for memory.

Scroll down some because our scripts need environment variables in order to work. Let’s add the corresponding values:

http://www.hitsubscribe.com/wp-content/uploads/2018/03/Screen-Shot-2018-03-13-at-3.46.47-PM.png

Let’s add the environment variables. For FOO, enter the Fibonacci number. I used 60. For BATCH_FILE_TYPE, put “script”, and for BATCH_FILE_S3_URL, put the S3 URL of the script that will fetch and run.

Click the “Submit job” blue button and wait a while. You can go to the computer environment and changed the desired vCPUs to 1 to speed up the process.

http://www.hitsubscribe.com/wp-content/uploads/2018/03/Screen-Shot-2018-03-13-at-3.52.53-PM.png

It will start creating one instance. When the instance is ready to process a job, the job will transition from RUNNABLE to SUCCEEDED.

http://www.hitsubscribe.com/wp-content/uploads/2018/03/Screen-Shot-2018-03-13-at-3.54.01-PM.png

And you’ll see a new entry in the DynamoDB table.

http://www.hitsubscribe.com/wp-content/uploads/2018/03/Screen-Shot-2018-03-13-at-3.55.38-PM.png

You can keep submitting jobs and change the FOO var to generate a different sequence of numbers. When you don’t submit any other job, AWS Batch will terminate the instance it created.

Thursday 1 August 2024

Unveiling the Latest Features of the Azure Native New Relic Service

Unveiling the Latest Features of the Azure Native New Relic Service

The Azure Native New Relic Service is a cloud native deep integration experience for Azure and New Relic’s joint customers. Using this experience, you can easily provision, manage, and tightly integrate the New Relic service on Azure. This service allows you to monitor Azure resources and diagnose possible issues by sending logs and metrics to your New Relic .

With this partnership we are looking to further enhance the user experience by introducing the following capabilities that will help you monitor your Azure resources with ease.

  1. Multi-subscription monitoring using a single New Relic resource
  2. Connected New Relic Resources experience in Azure portal 
  3. Suggest a feature in Azure resource overview blade

Multi-subscription monitoring using a single New Relic resource

With this capability, you can now monitor all your subscriptions through a single New Relic resource. This simplifies your experience as you do not have to setup a New Relic resource in every subscription that you intend to monitor.

To use this feature, browse to your Azure Native New Relic resource and select Monitored Subscriptions on the left navigation blade under the New Relic account config section.

thumbnail image 1 of blog post titled 


							What’s New? Unveiling the Latest Features of the Azure Native New Relic Service


The subscription where this resource is present is monitored by default. Click on the Add subscriptions button to add more subscriptions that you would like to monitor. You will be able to view the subscriptions where you are listed as the owner.

thumbnail image 2 of blog post titled 


							What’s New? Unveiling the Latest Features of the Azure Native New Relic Service


thumbnail image 3 of blog post titled 


							What’s New? Unveiling the Latest Features of the Azure Native New Relic Service


The tag rules and logs that you have defined for the New Relic resource will be applied to all the subscriptions that you have selected to be monitored. If you would like to reconfigure the tag rules, you can follow the steps described here.

Now you can browse to the Monitored Resources blade in your New Relic resource and select the subscription for which you would like to check the status of the logs and metrics for the resources being sent to the New Relic resource. You can filter by the subscription for which you would like to list all the monitored resources.

thumbnail image 4 of blog post titled 


							What’s New? Unveiling the Latest Features of the Azure Native New Relic Service


Similarly, the agent management experience for App Services and Virtual Machines can span different subscriptions. In the example below, you can view the App Services agent management experience for the different subscriptions which you have selected.

thumbnail image 5 of blog post titled 


							What’s New? Unveiling the Latest Features of the Azure Native New Relic Service


For more information about the following capabilities, you can refer to the following articles Monitor Virtual Machines using the New Relic agent and Monitor App Services using the New Relic agent.  

If you would like to stop monitoring the resources in a particular subscription at any time you can browse to the Monitored Subscriptions blade, select the subscription for which you would like to stop monitoring, and then select Remove subscription. The subscription where the New Relic resource has been created cannot be removed.

thumbnail image 6 of blog post titled 


							What’s New? Unveiling the Latest Features of the Azure Native New Relic Service


Connected New Relic Resources experience in Azure portal

Customers can setup New Relic resources from the Azure portal across multiple subscriptions through the Azure Native New Relic Service. While customers can view a unified bill across the resources which have been created, there is still a need to have a consolidated view of all the Azure resources which have been created through the Azure Native New Relic Service. This experience will help in easy management of the Azure resources in a single view instead of switching across multiple resources.

Considering this, we are happy to announce the Connected New Relic Resources blade within your Azure Native New Relic resource.

thumbnail image 7 of blog post titled 


							What’s New? Unveiling the Latest Features of the Azure Native New Relic Service


This new experience will be made available for all the Azure Native New Relic resources within the Azure portal. This will cover all the New Relic resources which are created across Azure subscriptions or from the New Relic portal.

With this experience, you can switch to your New Relic resource deployment experience within the New Relic portal by selecting the links present in the column New Relic Account ID. Similarly, you can also switch between multiple New Relic resources across Azure subscriptions by using the links present in the Azure Resource column. You would be able to access the other resources only if you have the owner or contributor rights to manage the resource.

Suggest a feature

We are always looking for ways to improve our product experience. We would love to hear your suggestions for new features or enhancements you would like to see. To suggest a new feature, you can click on Suggest a Feature in your New Relic resource’s overview blade. This redirects to the Developer community forum where you can also view other feature suggestions from other customers, and you can also upvote other posts and comment on them.

thumbnail image 8 of blog post titled 


							What’s New? Unveiling the Latest Features of the Azure Native New Relic Service


Next steps

  • If you would like to subscribe to the service, select the following New Relic Marketplace item
  • If you are a user of the Azure Native New Relic Service and have feedback or feature requests, please share in our feedback forum
  • To learn more about the service, refer our documentation