Tuesday, 30 July 2024

Fix common errors for Datadog - An Azure Native ISV Service


Fix common errors for Datadog - An Azure Native ISV Service

Marketplace Purchase errors

  • The Microsoft.SaaS RP is not registered on the Azure subscription.

  • Plan cannot be purchased on a free subscription, please upgrade your account.

  • Purchase has failed because we couldn't find a valid payment method associated with your Azure subscription.

  • The Publisher does not make available Offer, Plan in your Subscription/Azure account’s region.

    • The offer or the specific plan isn't available to the billing account market that is connected to the Azure Subscription.
  • Enrollment for Azure Marketplace is set to Free/BYOL SKUs only, purchase for Azure product is not allowed. Please contact your enrollment administrator to change EA settings.

  • Marketplace is not enabled for the Azure subscription.

  • Plan by publisher is not available to you for purchase due to private marketplace settings made by your tenant’s IT administrator.

    • Customer uses private marketplace to limit the access of its organization to specific offers and plans. The specific offer or the plan weren't set up to be available in the tenant's private marketplace. Contact your tenant’s IT administrator.
  • The EA subscription doesn't allow Marketplace purchases.

    • Use a different subscription or check if your EA subscription is enabled for Marketplace purchase. For more information, see Enable Marketplace purchases.

If those options don't solve the problem, contact Datadog support.

Unable to create Datadog - An Azure Native ISV Service resource

To set up the Azure Datadog integration, you must have Owner access on the Azure subscription. Ensure you have the appropriate access before starting the setup.

Single sign-on errors

  • Unable to save Single sign-on settings

    • This error happens where there's another Enterprise app that is using the Datadog SAML identifier. To find which app is using it, select Edit on the Basic SAML Configuration section.

    To resolve this issue, either disable the other app or use the other app as the Enterprise app to set up SAML SSO with Datadog. If you decide to use the other app, ensure the app has the required settings.

  • App not showing in Single sign-on setting page

    • First, search for the application ID. If no result is shown, check the SAML settings of the app. The grid only shows apps with correct SAML settings.

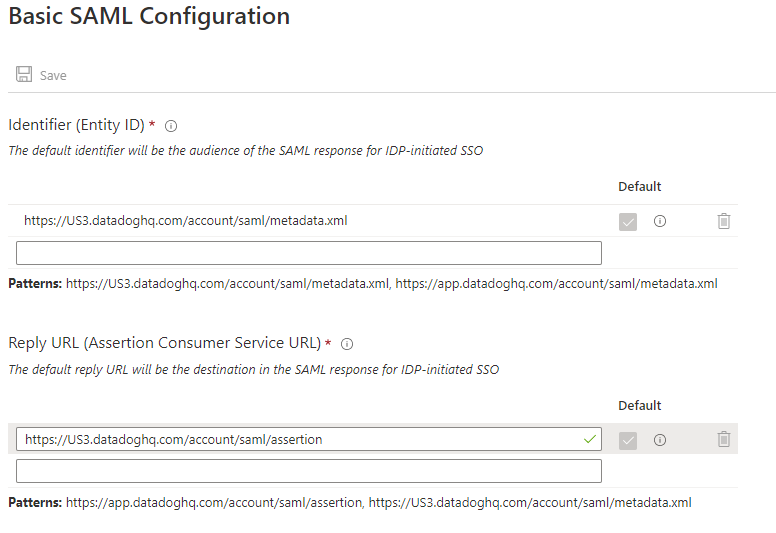
      The Identifier URL must be https://us3.datadoghq.com/account/saml/metadata.xml.

      The reply URL must be https://us3.datadoghq.com/account/saml/assertion.

      The following image shows the correct values.

      Check SAML settings for the Datadog application in Microsoft Entra ID.

  • Guest users invited to the tenant are unable to access Single sign-on

    • Some users have two email addresses in Azure portal. Typically, one email is the user principal name (UPN) and the other email is an alternative email.

    When inviting guest user, use the home tenant UPN. By using the UPN, you keep the email address in-sync during the Single sign-on process. You can find the UPN by looking for the email address in the top-right corner of the user's Azure portal.

Logs not being emitted

  • Only resources listed in the Azure Monitor resource log categories emit logs to Datadog.

    To verify whether the resource is emitting logs to Datadog:

    1. Navigate to Azure diagnostic setting for the specific resource.

    2. Verify that there's a Datadog diagnostic setting.

    Datadog diagnostic setting on the Azure resource

  • Resource doesn't support sending logs. Only resource types with monitoring log categories can be configured to send logs. For more information, see supported categories.

  • Limit of five diagnostic settings reached. Each Azure resource can have a maximum of five diagnostic settings. For more information, see diagnostic settings.

  • Export of Metrics data isn't supported currently by the partner solutions under Azure Monitor diagnostic settings.

Metrics not being emitted

The Datadog resource is assigned a Monitoring Reader role in the appropriate Azure subscription. This role enables the Datadog resource to collect metrics and send those metrics to Datadog.

To verify the resource has the correct role assignment, open the Azure portal and select the subscription. In the left pane, select Access Control (IAM). Search for the Datadog resource name. Confirm that the Datadog resource has the Monitoring Reader role assignment.
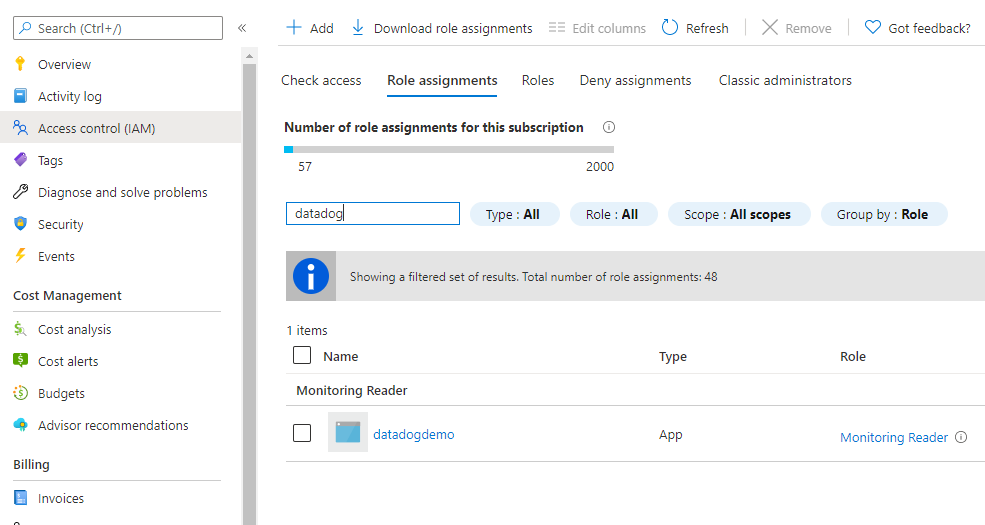
Datadog role assignment in the Azure subscription

Datadog agent installation fails

The Azure Datadog integration provides you with the ability to install Datadog agent on a virtual machine or app service. The API key selected as Default Key in the API Keys screen is used to configure the Datadog agent. If a default key isn't selected, the Datadog agent installation fails.

If the Datadog agent is configured with an incorrect key, navigate to the API keys screen and change the Default Key. You must uninstall the Datadog agent and reinstall it to configure the virtual machine with the new API keys.

Link to existing Datadog organization

Link to existing Datadog organization

Prerequisites

Before creating your first instance of Datadog - An Azure Native ISV Service, configure your environment. These steps must be completed before continuing with the next steps in this quickstart.

Find offer

Use the Azure portal to find Datadog - An Azure Native ISV Service.

  1. Go to the Azure portal and sign in.

  2. If you've visited the Marketplace in a recent session, select the icon from the available options. Otherwise, search for Marketplace.

    Marketplace icon.

  3. In the Marketplace, search for Datadog - An Azure Native ISV Service.

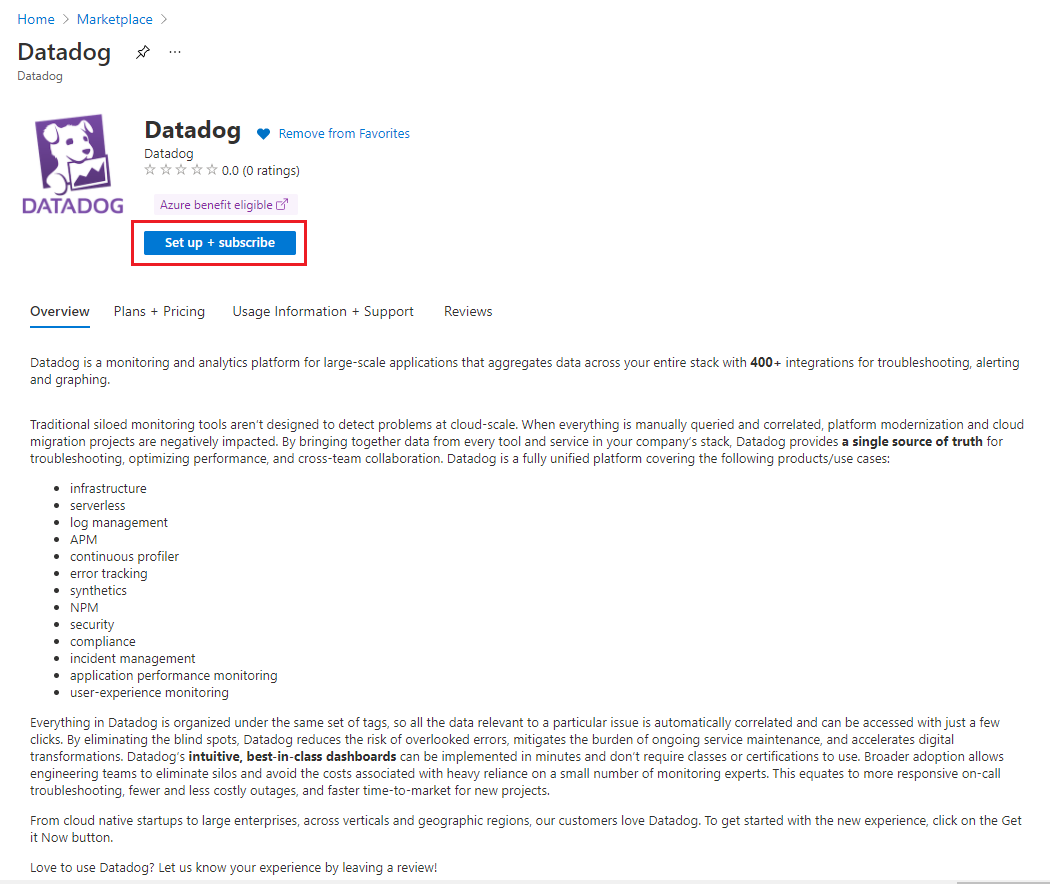
  4. In the plan overview screen, select Set up + subscribe.

    Datadog application in Azure Marketplace.

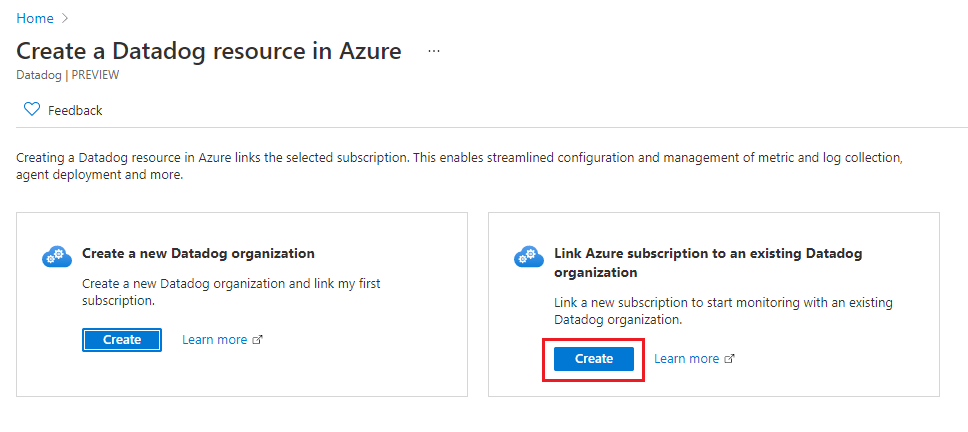
The portal displays a selection asking whether you would like to create a Datadog organization or link Azure subscription to an existing Datadog organization.

If you're linking to an existing Datadog organization, select Create under the Link Azure subscription to an existing Datadog organization

Create or link a Datadog organization

You can link your new Datadog resource in Azure to an existing Datadog organization in US3.

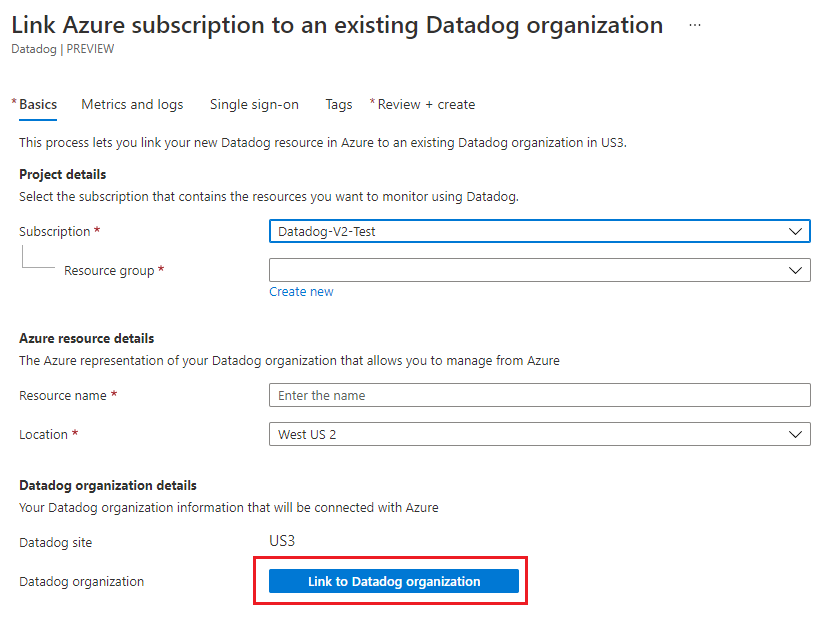
The portal displays a form for creating the Datadog resource.

Link to existing Datadog organization.

Provide the following values.

PropertyDescription
SubscriptionSelect the Azure subscription you want to use for creating the Datadog resource. You must have owner access.
Resource groupSpecify whether you want to create a new resource group or use an existing one. A resource group is a container that holds related resources for an Azure solution.
Resource nameSpecify a name for the Datadog resource. This name is the name of the new Datadog organization, when creating a new Datadog organization.
LocationSelect West US 2. Currently, West US 2 is the only supported region.

Select Link to Datadog organization. The link opens a Datadog authentication window. Sign in to Datadog.

By default, Azure links your current Datadog organization to your Datadog resource. If you would like to link to a different organization, select the appropriate organization in the authentication window.

Select Next: Metrics and logs to configure metrics and logs.

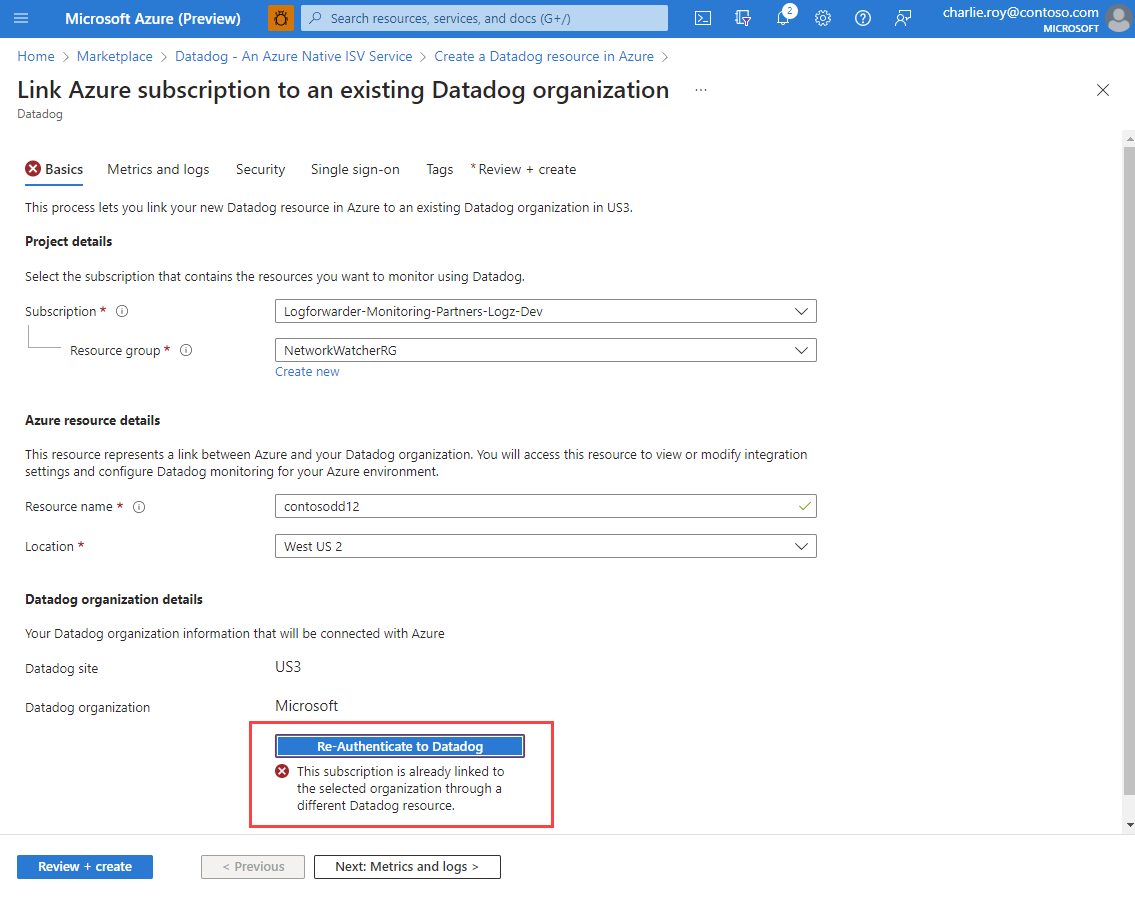
If the subscription is already linked to an organization through a Datadog resource, an attempt to link the subscription to the same organization through a different Datadog resource would be blocked. It's blocked to avoid scenarios where duplicate logs and metrics get shipped to the same organization for the same subscription.

Screenshot stating that a subscription is already linked to the selected organization through a different Datadog resource.

Configure metrics and logs

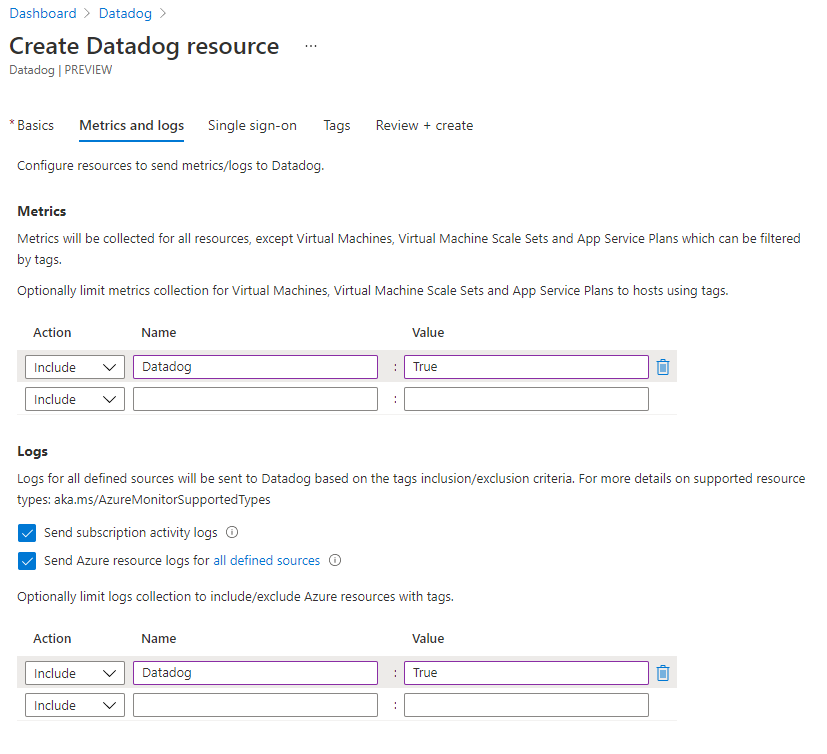
Use Azure resource tags to configure which metrics and logs are sent to Datadog. You can include or exclude metrics and logs for specific resources.

Tag rules for sending metrics are:

  • By default, metrics are collected for all resources, except Virtual Machines, Virtual Machine Scale Sets, and App Service Plans.
  • Virtual Machines, Virtual Machine Scale Sets, and App Service Plans with Include tags send metrics to Datadog.
  • Virtual Machines, Virtual Machine Scale Sets, and App Service Plans with Exclude tags don't send metrics to Datadog.
  • If there's a conflict between inclusion and exclusion rules, exclusion takes priority

Tag rules for sending logs are:

  • By default, logs are collected for all resources.
  • Azure resources with Include tags send logs to Datadog.
  • Azure resources with Exclude tags don't send logs to Datadog.
  • If there's a conflict between inclusion and exclusion rules, exclusion takes priority.

For example, the screenshot shows a tag rule where only those Virtual Machines, Virtual Machine Scale Sets, and App Service Plans tagged as Datadog = True send metrics to Datadog.

Configure Logs and Metrics.

There are two types of logs that can be emitted from Azure to Datadog.

  • Subscription level logs - Provide insight into the operations on your resources at the control plane. Updates on service health events are also included. Use the activity log to determine the what, who, and when for any write operations (PUT, POST, DELETE). There's a single activity log for each Azure subscription.

  • Azure resource logs - Provide insight into operations that were taken on an Azure resource at the data plane. For example, getting a secret from a Key Vault is a data plane operation. Or, making a request to a database is also a data plane operation. The content of resource logs varies by the Azure service and resource type.

To send subscription level logs to Datadog, select Send subscription activity logs. If this option is left unchecked, none of the subscription level logs are sent to Datadog.

To send Azure resource logs to Datadog, select Send Azure resource logs for all defined resources. The types of Azure resource logs are listed in Azure Monitor Resource Log categories. To filter the set of Azure resources sending logs to Datadog, use Azure resource tags.

The logs sent to Datadog are charged by Azure. For more information, see the pricing of platform logs sent to Azure Marketplace partners.

Once you have completed configuring metrics and logs, select Next: Single sign-on.

Configure single sign-on

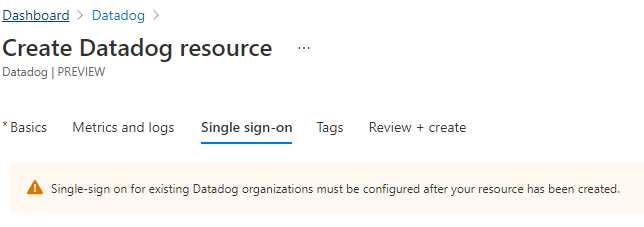
If you're linking the Datadog resource to an existing Datadog organization, you can't set up single sign-on at this step. Instead, you set up single sign-on after creating the Datadog resource. For more information, see Reconfigure single sign-on.

Single sign-on for linking to existing Datadog organization.

Select Next: Tags.

Add custom tags

You can specify custom tags for the new Datadog resource. Provide name and value pairs for the tags to apply to the Datadog resource.

Add custom tags for the Datadog resource.

When you've finished adding tags, select Next: Review+Create.

Review + Create Datadog resource

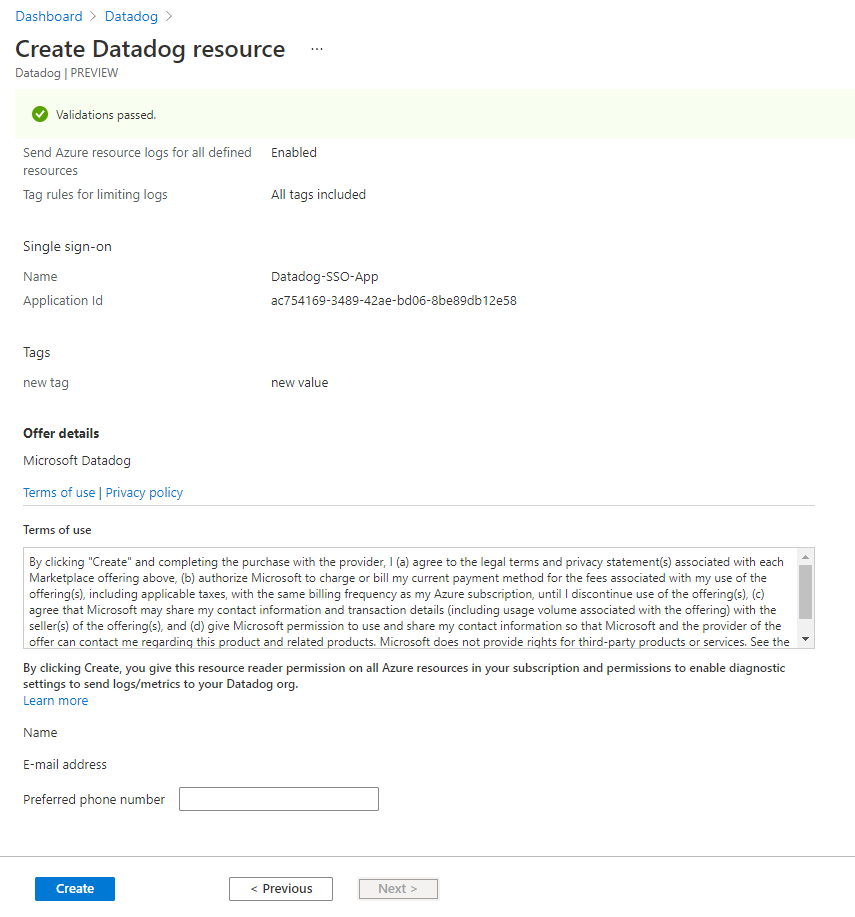
Review your selections and the terms of use. After validation completes, select Create.

Review and Create Datadog resource.

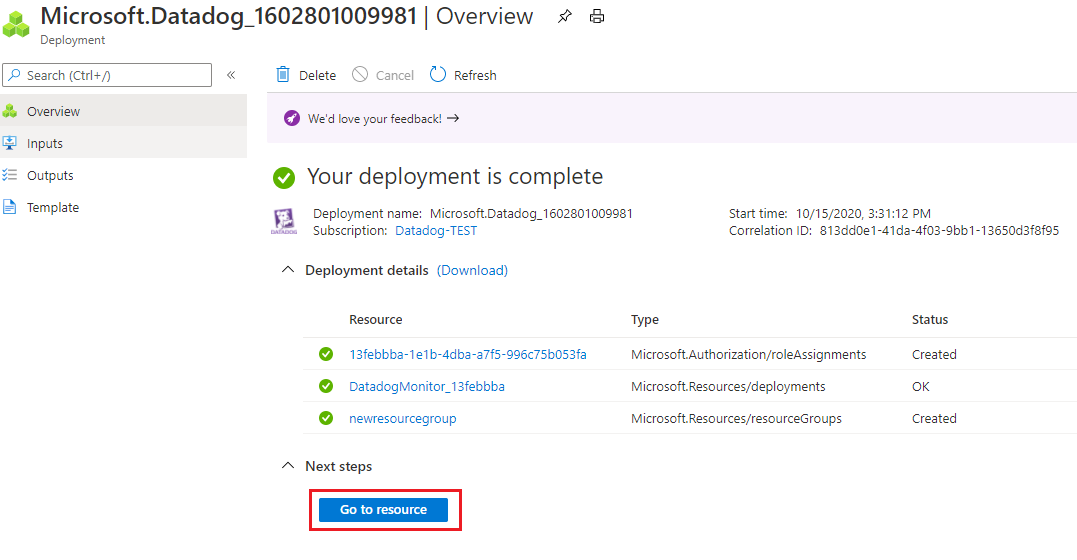
Azure deploys the Datadog resource.

When the process completes, select Go to Resource to see the Datadog resource.

Datadog resource deployment.

Monitor Microsoft Azure with the Azure Native ISV Service


Monitor Microsoft Azure with the Azure Native ISV Service

Create an Elasticsearch resourceedit

  1. Log in to the Azure portal.

  2. In the search bar, enter Elastic Cloud (Elasticsearch) and then select Elastic Cloud (Elasticsearch) – An Azure Native ISV Service.
  3. Click Create.
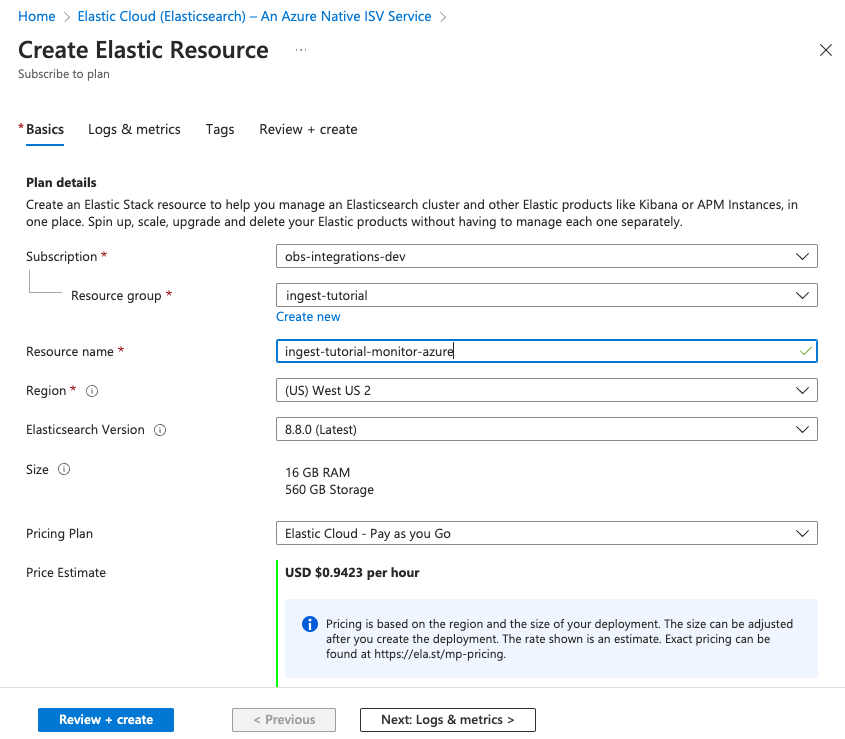
  4. Enter the SubscriptionResource group, and the Resource name.
  5. Select an Elasticsearch version.
  6. Select a region and then click Review + create.

    Screenshot of Elastic resource creation in Azure
  7. To create the Elasticsearch deployment, click Create.
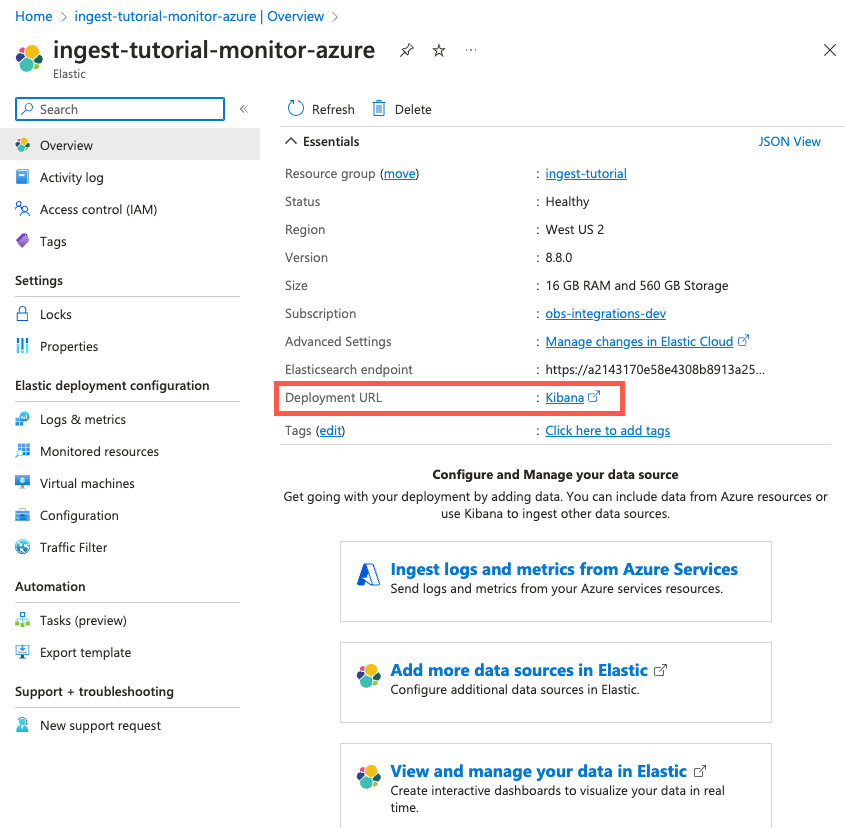
  8. After deployment is complete, click Go to resource. Here you can view and configure your deployment details. To access the cluster, click Kibana.

    Screenshot of deployment details for Elastic resource in Azure
  9. Click Accept (if necessary) to grant permissions to use your Azure account, then log in to Elastic Cloud using your Azure credentials as a single sign-on.
  10. To look for available data, click Observability. There should be no data yet. Next, you’ll ingest logs.

Step 2: Ingest logs by using the Azure Native ISV Serviceedit

To ingest Azure subscription and resource logs into Elastic, you use the Azure Native ISV Service.

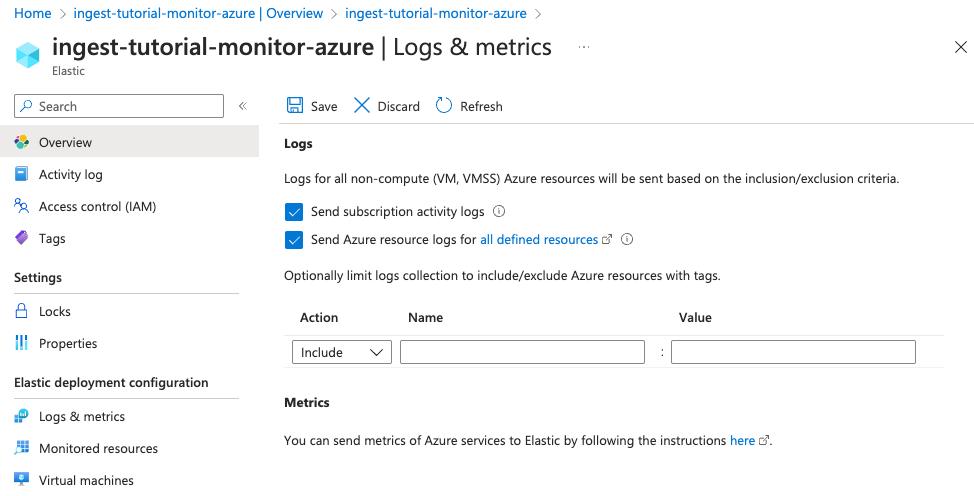
  1. In the Azure portal, go to your Elasticsearch resource page and click Ingest logs and metrics from Azure Services.
  2. Under Logs, select both checkboxes to collect subscription activity logs and Azure resource logs. Click Save.

    Screenshot of logs and metrics configuration for Elastic resource in Azure

    This configuration can also be applied during the Elastic resource creation. To make the concepts clearer, this tutorial separates the two steps.

    Native metrics collection for Azure services is not fully supported yet. To learn how to collect metrics from Azure services, refer to Monitor Microsoft Azure with Elastic Agent.

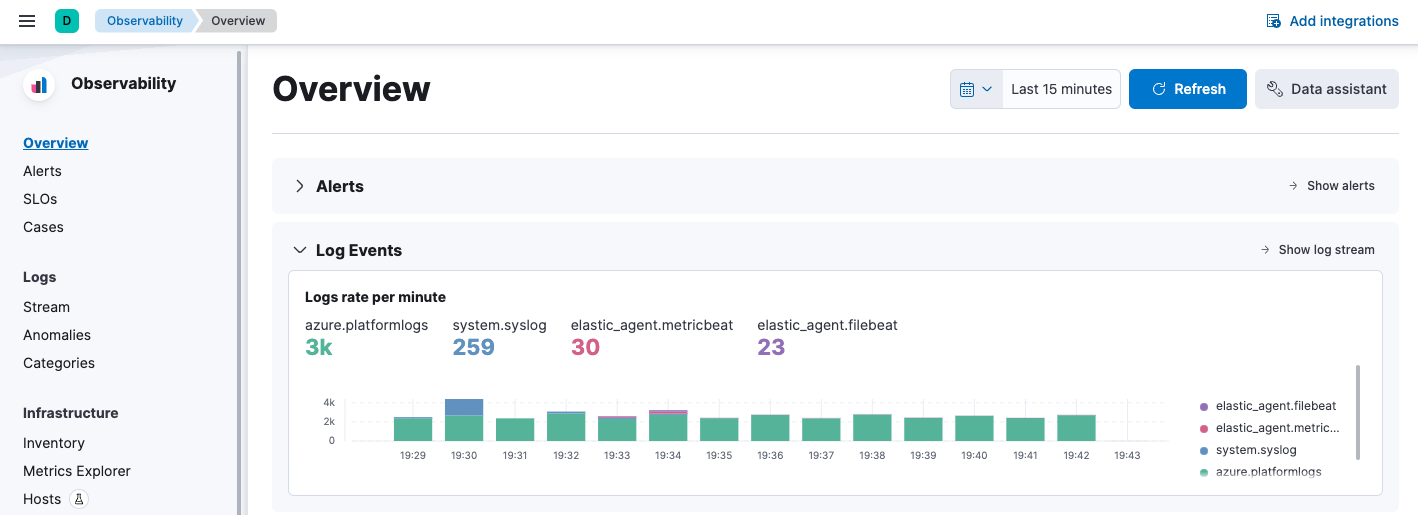
  3. In Kibana, under Observability, click Overview until data appears in Kibana. This might take several minutes.

    Screenshot of Kibana Observability overview
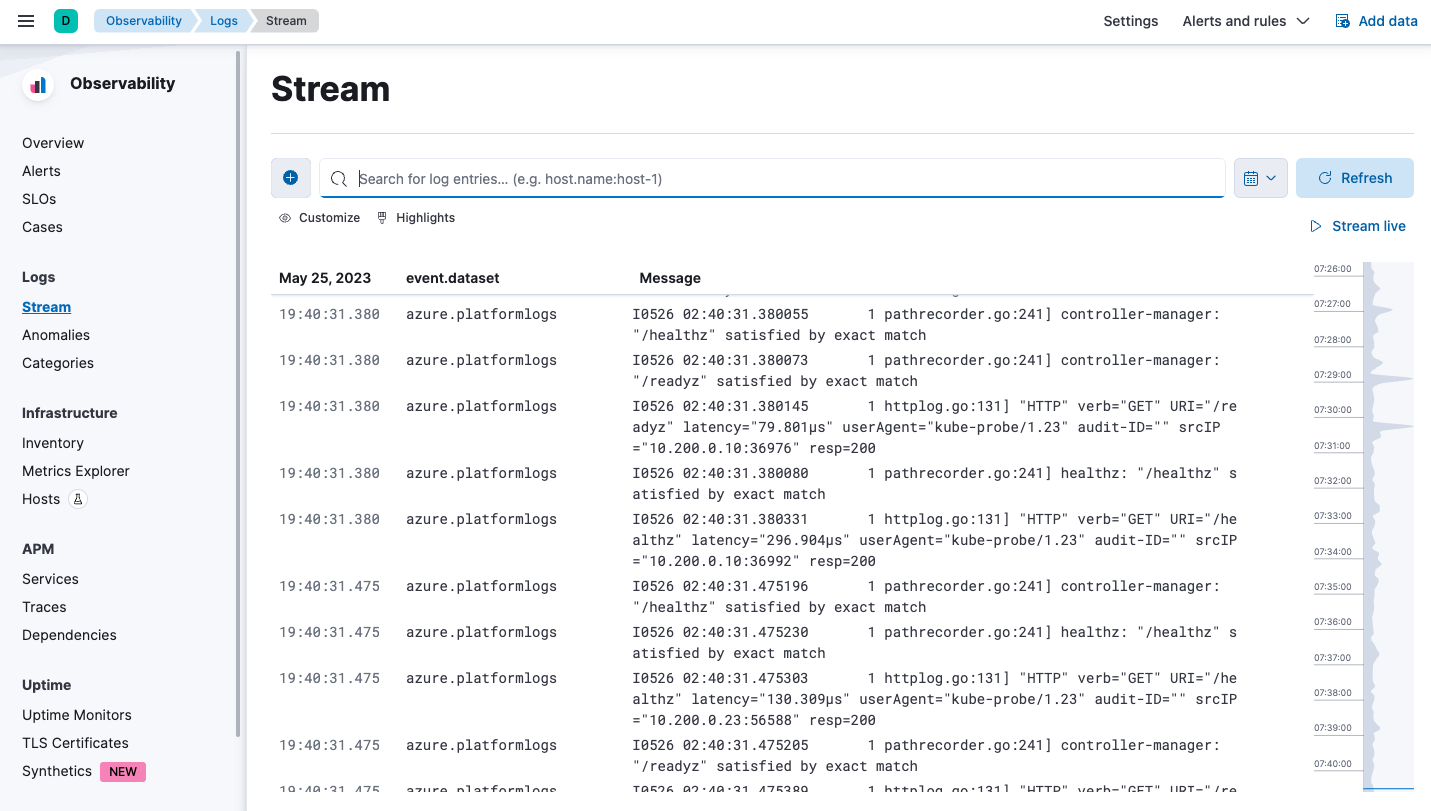
  4. To analyze your subscription and resource logs, click Show log stream (or click Stream in the navigation pane).

    Kibana Logs app

Step 3: Ingest logs and metrics from your virtual machines (VMs)edit

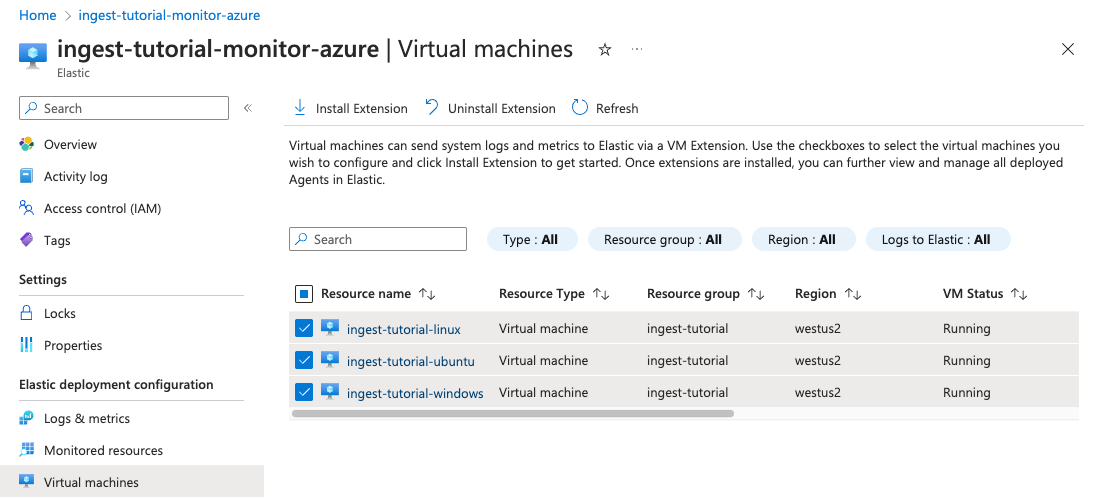
  1. In the Azure portal, go to your Elasticsearch resource and click Virtual machines.
  2. Select the VMs that you want to collect logs and metrics from, click Install Extension, and then click OK.

    Screenshot that shows VMs selected for logs and metrics collection
  3. Wait until the extension is installed and sending data (if the list does not update, click Refresh ).
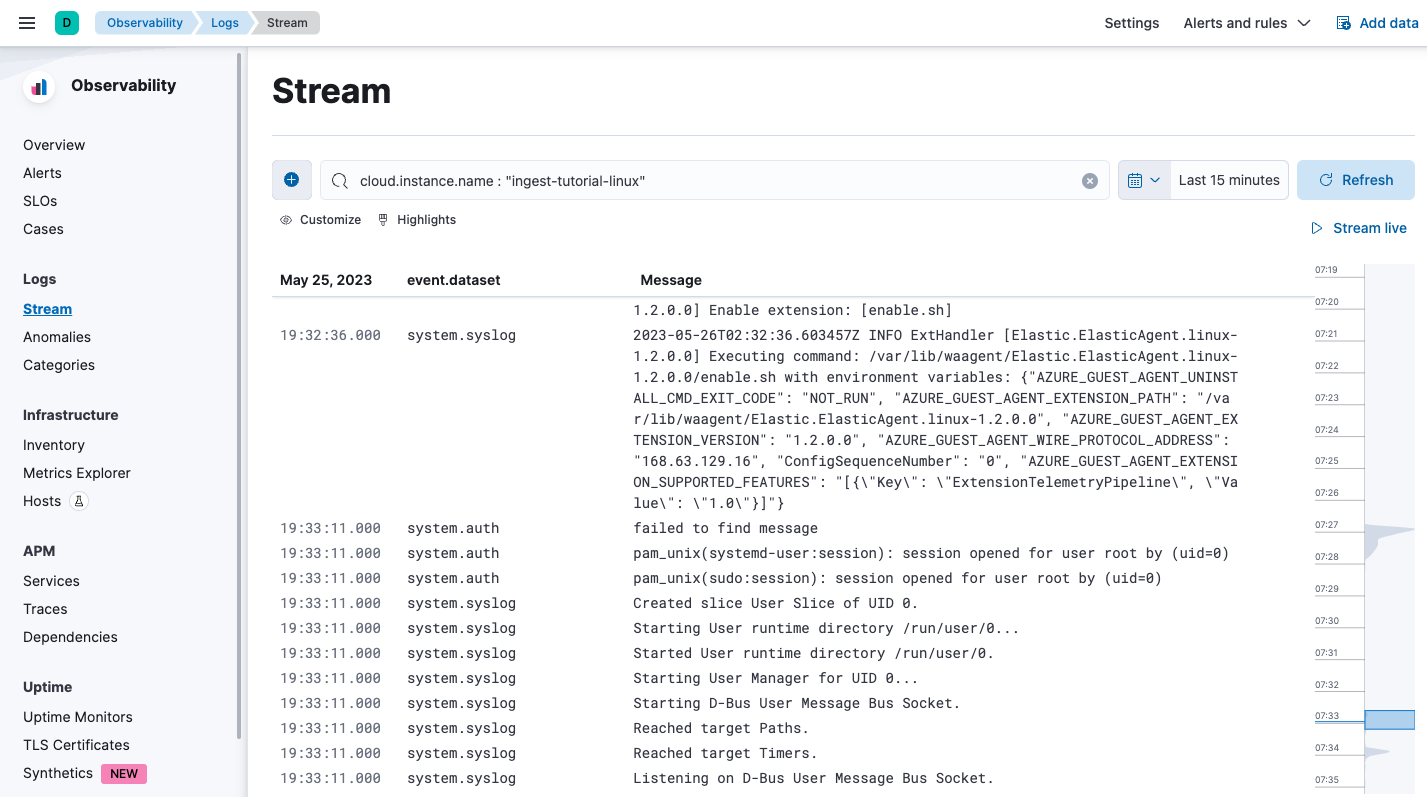
  4. Back in Kibana, view the log stream again (Logs → Stream). Notice that you can filter the view to show logs for a specific instance, for example cloud.instance.name : "ingest-tutorial-linux":

    Screenshot of VM logs in the Logs app
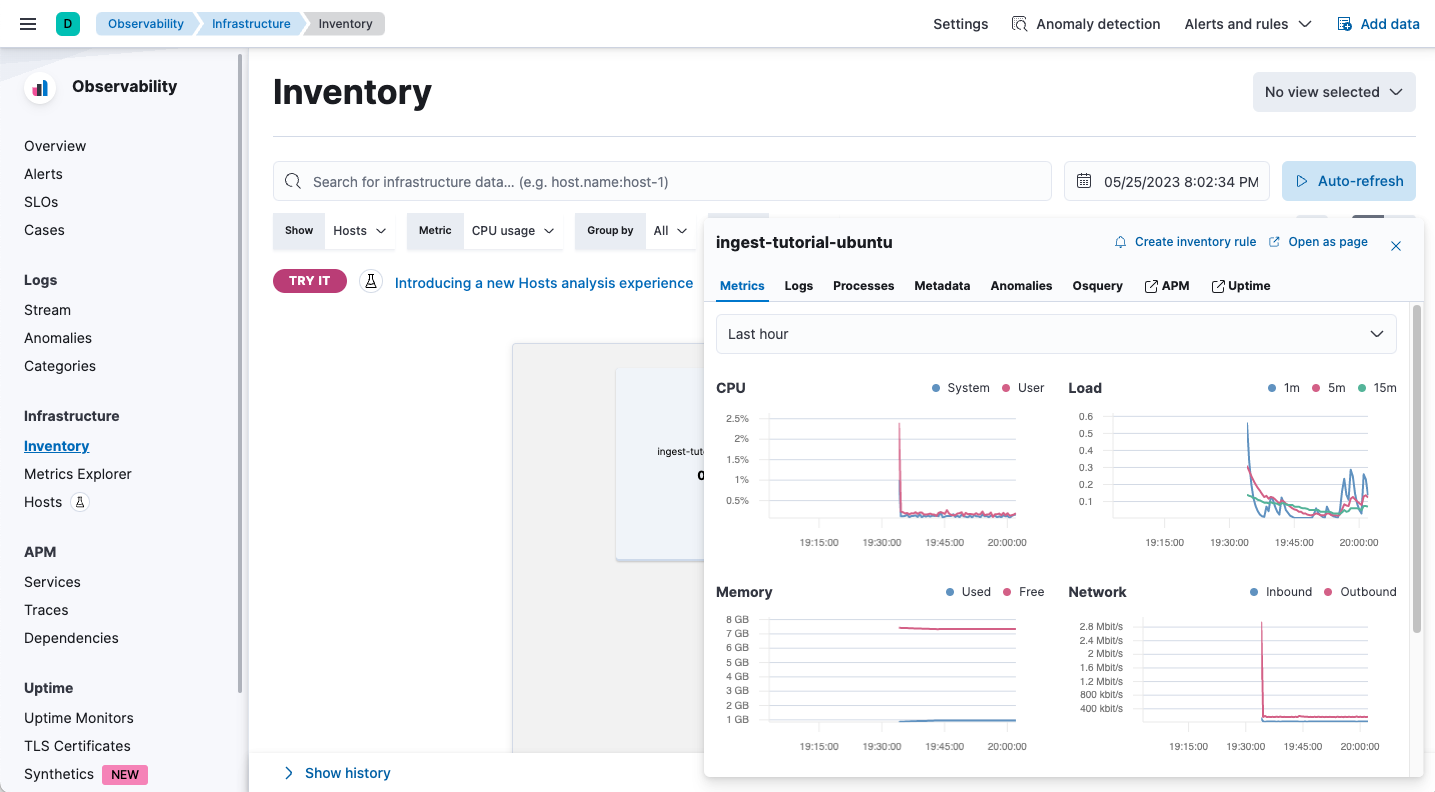
  5. To view VM metrics, go to Infrastructure → Inventory and then select a VM.

    Screenshot of VM metrics

    To explore the data further, click Open as page.

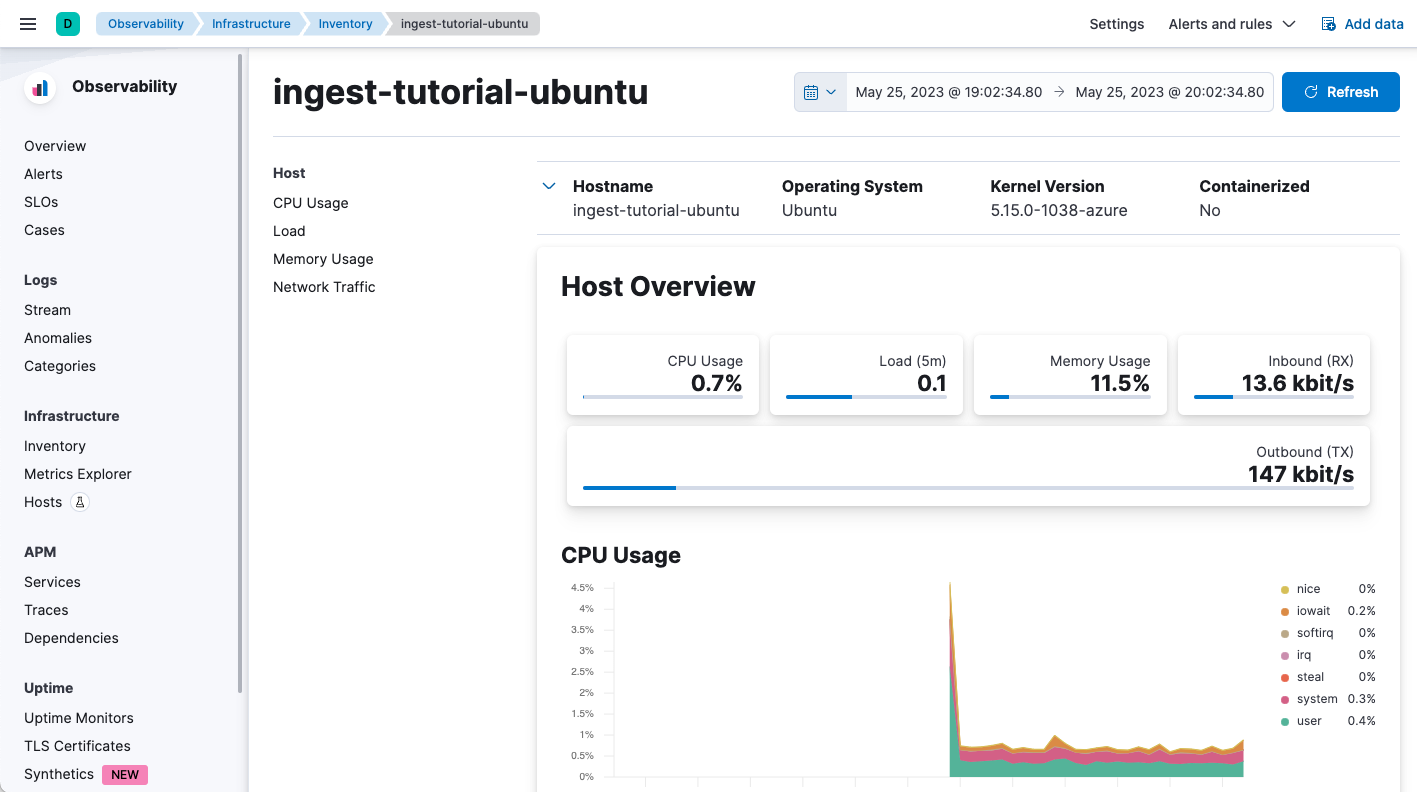
    Screenshot of detailed VM metrics

Configure environment before Datadog - An Azure Native ISV Service deployment


Configure environment before Datadog - An Azure Native ISV Service deployment


Access control

To set up the Datadog - An Azure Native ISV Service, you must have Owner access on the Azure subscription. Confirm that you have the appropriate access before starting the setup.

Add enterprise application

To use the Security Assertion Markup Language (SAML) single sign-on (SSO) feature within the Datadog resource, you must set up an enterprise application. To add an enterprise application, you need one of these roles: Global Administrator, Cloud Application Administrator, Application Administrator, or owner of the service principal.

Use the following steps to set up the enterprise application:

  1. Go to Azure portal. Select Microsoft Entra ID.

  2. In the left pane, select Enterprise applications.

  3. Select New Application.

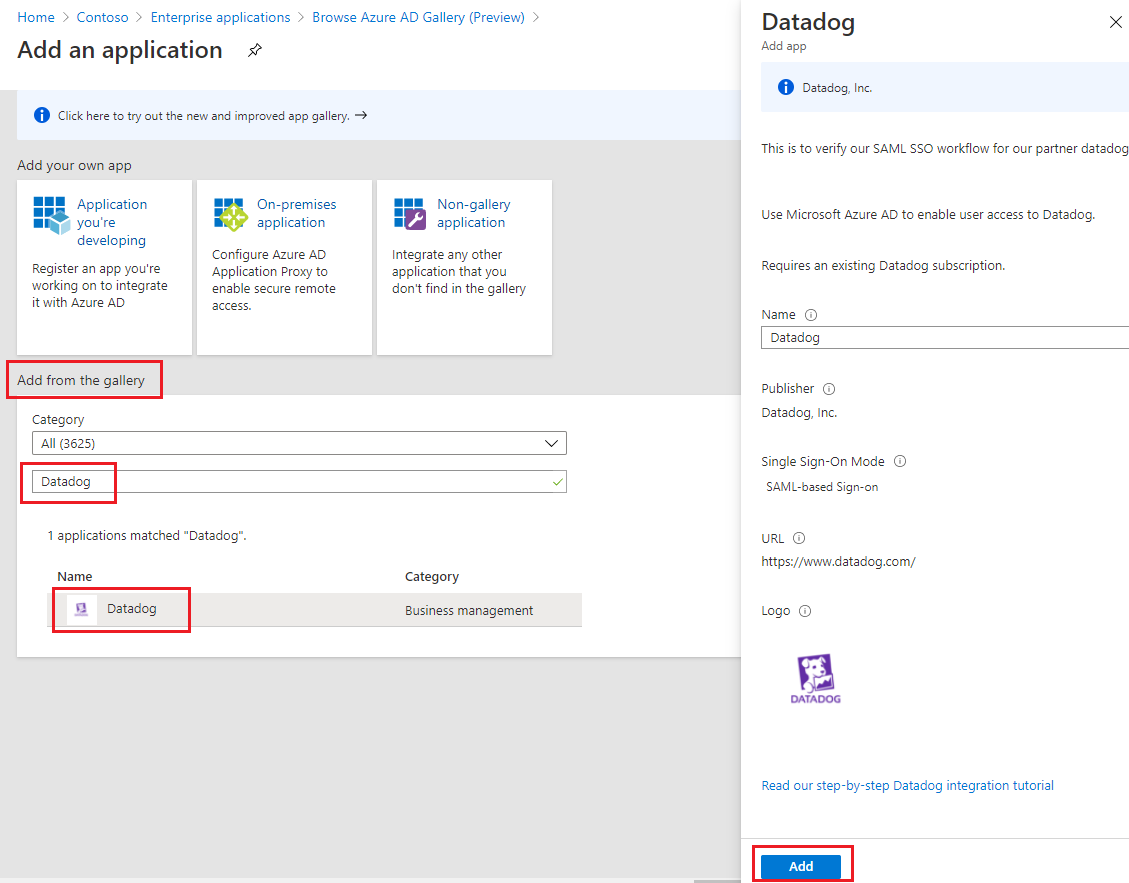
  4. In Add from the gallery, search for Datadog. Select the search result then select Add.

    Datadog application in the Microsoft Entra enterprise gallery.

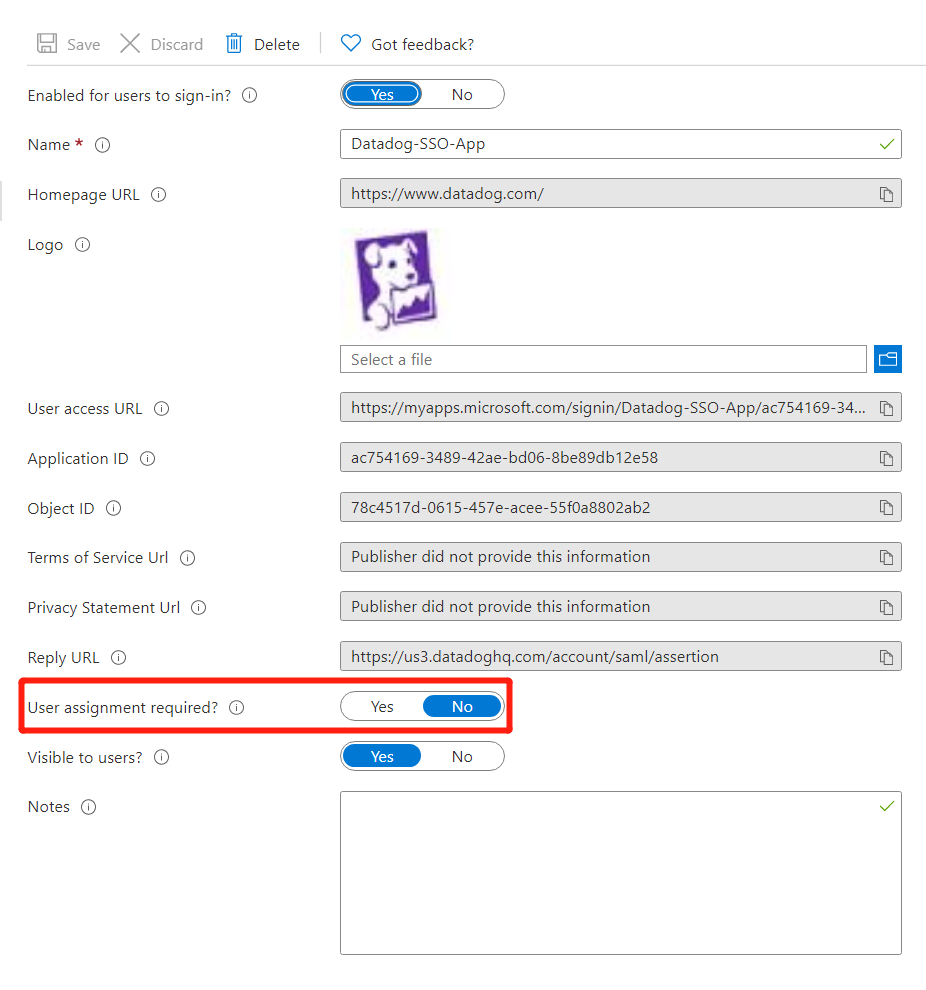
  5. Once the app is created, go to properties from the side panel. Set User assignment required? to No, and select Save.

    Set properties for the Datadog application

  6. Go to Single sign-on from the side panel. Then select SAML.

    SAML authentication.

  7. Select Yes when prompted to Save single sign-on settings.

    Save single-sign on for the Datadog app

  8. The setup of single sign-on is now complete.