Friday, 26 July 2024

Azure API Management Integration


Azure API Management Integration

Microsoft Azure API Management allows developers to publish and maintain APIs in the Azure cloud. SwaggerHub integrates with Azure API Management, which allows you to easily export your API definitions to Azure. This way you can design your APIs on SwaggerHub, then deploy your API design to your Azure API Management instance from SwaggerHub, keeping the APIs updated with any changes you make to the design.

The vendor extension x-azure-api-id will be automatically added to your API definition to link it with the API saved to your Azure API Management service instance.

Video tutorial


Requirements

To use the integration, you need an active Microsoft Azure subscription. You can sign up at https://azure.microsoft.com. An Azure subscription is also included in the Visual Studio subscription and some other Microsoft subscriptions.

Supported OpenAPI versions

This integration supports OpenAPI 2.0 and OpenAPI 3.0. SwaggerHub On-Premise users need v. 1.20.0 or later to use OpenAPI 3.0 definitions with Azure API Management.

Considerations

  • The integration is one-way, which means your API definitions go only from SwaggerHub to Azure API Management. You should edit your API definitions in SwaggerHub only.

  • The integration is bound to a specific version of the API and is not copied when you add a new version. To integrate different API versions with Azure, you need to add the integration to each version separately.

1. Create an Azure API management service instance

To use the integration, you must have an API Management service instance running in the Azure cloud. If you do not have one yet, follow the instructions in Create an API Management service instance.

API Management service instance in Azure

Click the image to enlarge it.

2. Additional steps for SwaggerHub On-Premise

SwaggerHub On-Premise requires some additional configuration in Azure and in the Admin Center before the users can use this integration. If you have already done this, proceed to the next step.

2a. Register an application in Azure

Applies to SwaggerHub On-Premise 1.20.0 and later.

To push API definitions from SwaggerHub On-Premise to Azure, you need to register an application in Azure AD that will be used to authorize the connection to Azure. The application’s client ID and secret need to be specified in the SwaggerHub On-Premise Admin Center. For instructions, see Configuring Azure API Management Integration.

2b. Generate an Azure access token

Applies to OpenAPI 2.0 definitions in SwaggerHub On-Premise versions before 1.21.0.

Important

These access tokens are valid for 30 days only. Before the token expires, you will have to generate a new one and update the token in SwaggerHub's integration settings. To avoid having to update the tokens, upgrade to the latest version of SwaggerHub On-Premise, which uses another method to authorize the integration.

To generate an access token:

  1. Open the Azure portal, https://portal.azure.com.

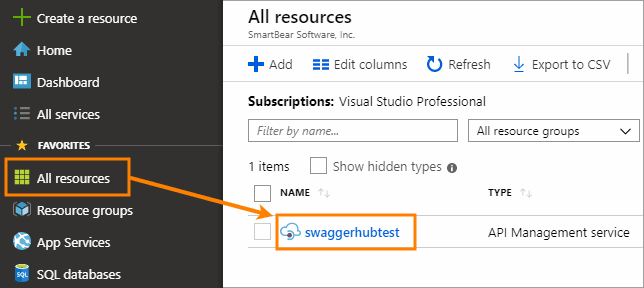
  2. On the left, select All resources.

  3. Click your service instance in the list.

    API Management service instance
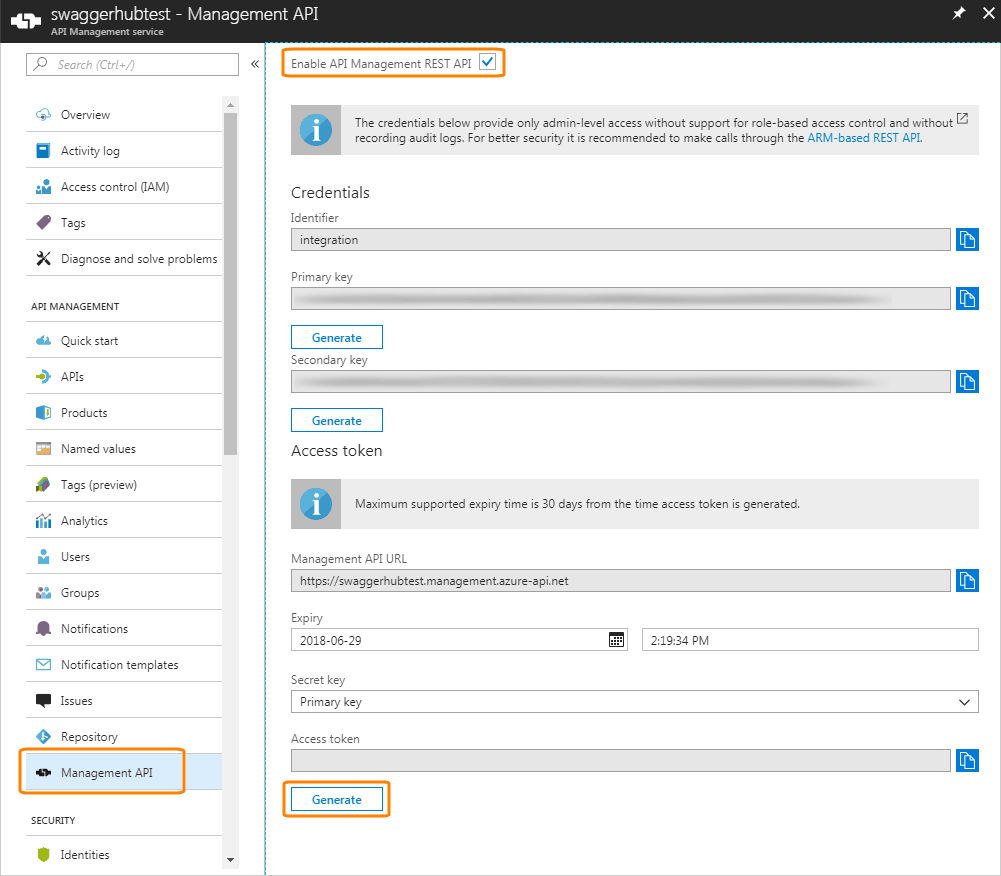
  4. On the left, select Management API.

  5. Select the Enable API Management REST API check box.

  6. At the bottom, under Access token, click Generate.

    Generating an access token for Azure API Management

    Click the image to enlarge it.

  7. Copy the generated token (the entire string), because you will not be able to see it later.

    Copying the access token

3. Configure the integration

  1. Open your API in the SwaggerHub editor.

  2. If the API has several versions, select the version you want to push to Azure API Management.

    Selecting an API version
  3. If this version is published, unpublish it. Only unpublished APIs can be integrated with Azure API Management.

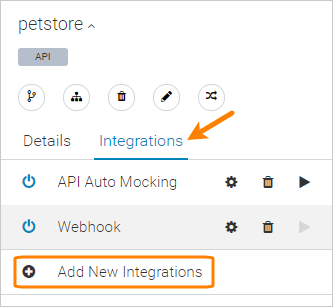
  4. Click the API name, switch to the Integrations tab, and click Add New Integrations:

    Add New Integration menu command
  5. Select Azure API Management from the list of integrations.

  6. Enter the integration parameters:

    • Name – Required. The display name for the integration.

    • Azure API Management service instance name – Required. The name of your Azure API Management service instance as it appears in the resources list in the Azure portal.

      Azure API Management service instance name

      The service instance name can also be found in the developer portal URL. It is the {name} part of the URL - https://{name}.portal.azure-api.net

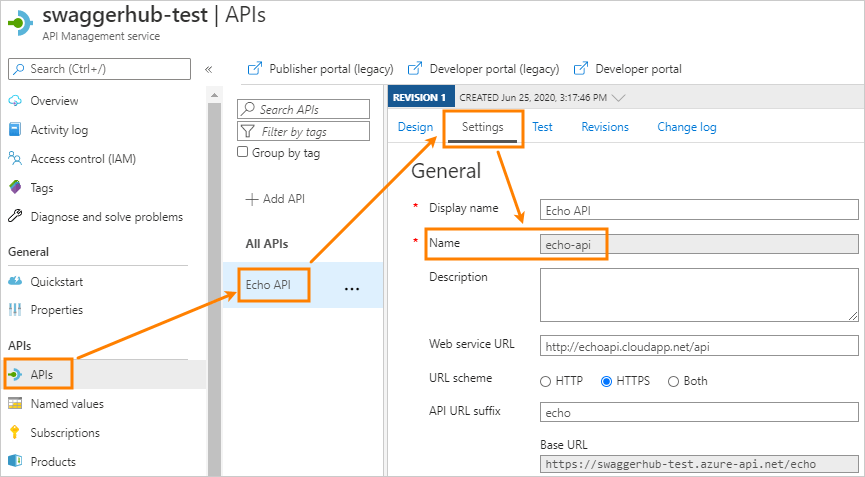
    • Azure API Identifier – Leave it blank to create a new API in Azure API Management. Alternatively, if you want to update an existing API in Azure API Management, specify the API name here or in the x-azure-api-id key at the root level of your API definition.

      Tip: The API name can be found in the API settings in Azure:

      API name in Azure

      Click the image to enlarge it.

    • API URL Suffix – This suffix will be appended to the hostname of your API Management service instance to create a public URL for your API. As such, it must be unique within an API Management service instance.

      Note

      This option was added in v. 1.26.

      Examples:

      API URL Suffix

      Public base URL of the API in Azure

      myapi

      https://{instance}.azure-api.net/myapi

      myapi/reports

      https://{instance}.azure-api.net/myapi/reports

      If omitted, the suffix will be set to an empty string for OpenAPI 3.0 definitions, or the basePath value for OpenAPI 2.0 definitions.

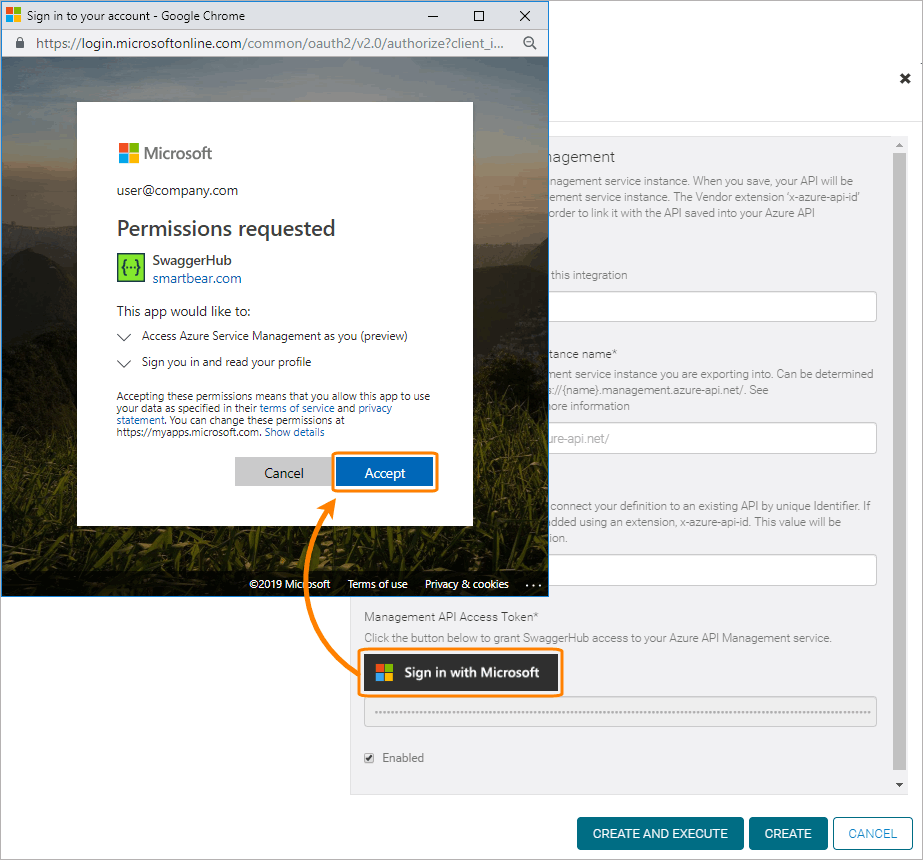
    • Management API Access Token – Click Sign in with Microsoft. You will be prompted to log into your Azure account and authorize the connection with SwaggerHub.

      Notes for SwaggerHub On-Premise users:

      • If the "Sign in with Microsoft" button does not appear, follow these steps to configure Azure and your SwaggerHub On-Premise instance.

      • In versions prior to 1.21.0, paste the access token you generated earlier.

      Sign in with Microsoft

      Click the image to enlarge it.

    • Enable – Keep this check box selected for the integration to work. Unselect it to disable the integration temporarily.

  7. Click Create and Execute.

That’s it! Now, every time you save this version of the API, the definition is synced and updated in Azure API Management.

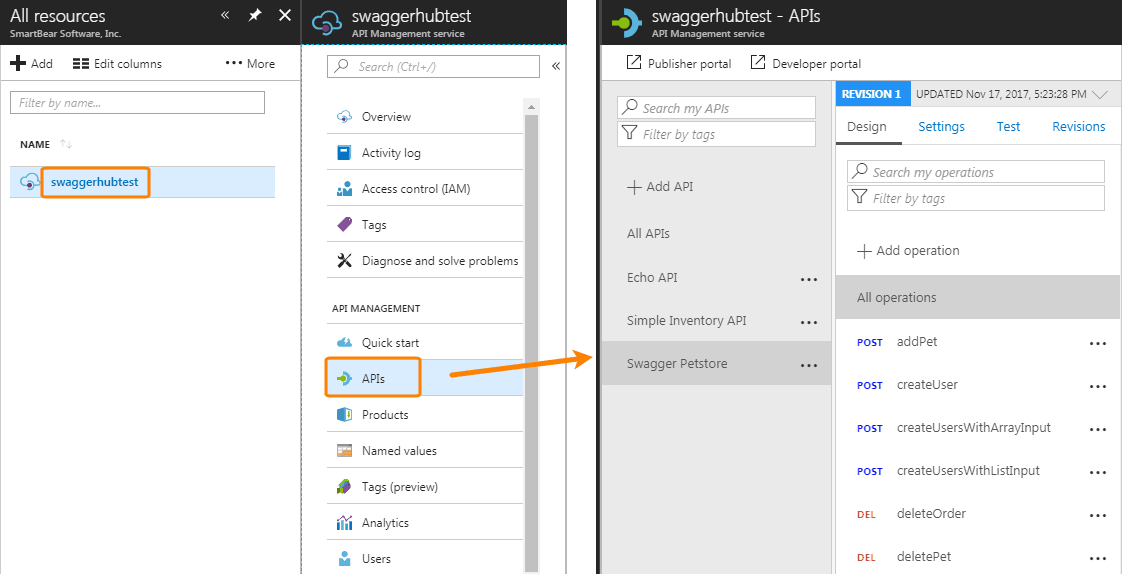
You can see the created or updated API in your Azure API Management portal:

API in Azure API Management

Click the image to enlarge it.

Troubleshooting

If there was a problem with pushing your API to Azure, you will see an Integration Error at the top of the SwaggerHub Editor. Below are some common errors you might run into and their solutions:

A definition must have a unique basePath section

All APIs in Azure API Management must have a unique basePath. This error means that an API with the same basePath already exists. To resolve the problem, specify another basePath in your API definition on SwaggerHub.

401 Unauthorized errors

This usually means that the access token has expired. To resolve the issue, open the integration settings and click Sign in with Microsoft. If there is no "Sign in" button, generate an access token manually as explained above and specify the new token in the integration settings.

A Comprehensive Guide


Getting Started with Azure API Management: A Comprehensive Guide

APIs have recently increased due to Internet, social media, and mobile sector developments. Through APIs, businesses connect data and services with customers, employees, and business partners. New problems arise when the number of APIs increases. They consist of elements, including performance, management, documentation, and security. In this essay, we’ll talk about managing Azure APIs.

What is Azure API Management?

API Management Azure is a comprehensive service designed to facilitate the secure exposure of APIs to internal and external customers. It offers developers a complete suite of tools and services for creating, publishing, and managing APIs while ensuring robust security measures, scalability options, and efficient monitoring of API usage.

This API management solution encompasses an array of features and resources, including an API gateway for seamless communication, a user-friendly developer portal accessible through the web, API lifecycle management capabilities, and monitoring and analytics tools to track performance and gain valuable insights.

Additionally, Azure API Management integrates seamlessly with various backend Azure API Management services like Azure Functions, Azure Logic Apps, and Azure Virtual Machines. It is also compatible with on-premises and third-party systems, making it a versatile solution.

By leveraging Azure API manager, developers can streamline the development and management of APIs, guaranteeing a secure, scalable, user-friendly, and efficient environment.

Azure API Management Components

Developer Portal

The developer portal has a portal with an API catalog, instructions, and code samples that are all made automatically. A developer site is where people who use APIs can find information about APIs and learn more about them. The developer can find the API key to subscribe to APIs and set up a console for trying API endpoints.

Api

The API Gateway

API Gateway is a front-end service that sits on top of our backend services. It works like a proxy. The gateway receives all requests, sends them to the right services, and returns the findings. In this layer, things like authentication, permissions, and limits are set up. A request is sent to the system when it meets the requirements and restrictions. It makes it easy to get to things like Cache, Logging, Request and Response Transformation, and analyzing data.

Azure Portal

Azure Portal allows developers to set up and control their APIs. It lets us handle users, analytical data, policy definitions, and APIs as different products in different projects.

API 2

Management API

Access the API Management system via code with the help of the Management API, which is a RESTful interface.

Using the Management API, businesses may automate APIs’ development, distribution, and maintenance and keep tabs on their utilization and efficiency.

Main Azure API components have been covered so far; nevertheless, Groups and Products play significant roles in Azure.

In Azure API Management, two of the most important categories are Groups and Products. APIs can be organized into groups, allowing administrators to control which users can access specific APIs.

APIs and their related policies can be packaged together using products. Assigning products to users enables them to utilize the product’s APIs.

How Azure API Management Works

Azure API manager acts as a shield between the client and the backend API service. Whenever a client initiates a request, it is first redirected to the API Management gateway, which verifies whether the request is permissible based on the applied security policies, rate limiting, and other regulations.

If the request gets through the gateway, it is sent to the backend API service to fulfill the client’s requirements. The API service then sends the desired output to the API Management gateway, which forwards it to the client.

Whether you’re a beginner, a professional, or an administrator, Azure API Management service simplifies the management of APIs by making it easy for all users to monitor, analyze, and modify API behaviors. So whether you are a beginner peeking to get started or an experienced API administrator seeking better management tools, Azure API Management has covered you.

API Consumers

For API users, Azure API Management presents a hassle-free solution for reaching out and utilizing APIs that are skillfully governed by the service. The following procedures are usually observed whenever an API user is eager to employ an API controlled by API Management.

  • Find the API: Discovering an API can be done in two ways. First, the consumer can visit the developer portal provided by API Management and browse through all the available APIs listed there. Second, the consumer can utilize the API Management REST API to discover APIs programmatically.
  • Get API credentials: Once the consumer has found an API that they want to use, they need to obtain API credentials. These credentials could come as an API key or an OAuth token. To obtain them, the consumer has to create an application in the developer portal after signing up for an API Management account.
  • Send a request: After receiving the API credentials, the consumer can request the API. The request can be created by sending an HTTP request to the API Management gateway using the API endpoint and the credentials. Once the request reaches the backend API service, it will process and respond to the API Management gateway.
  • Get a response: The final step is to receive the response sent by the API Management gateway. The answer will contain the requested data or functionality if the request is successful. However, if there is an error, the reaction will include an error code and message that the consumer can use to troubleshoot and improve their future requests.

API providers

Azure API Management is a suite of resources for developers, publishers, and administrators of APIs. These are the common actions taken by an API provider while implementing API Management:

  • Make an API Management service instance: In the Azure portal; the API provider must make an API Management service instance. As a result, the provider has a different environment for managing APIs that they may use.
  • Define the API: The API provider must provide the API endpoint, supported actions, and request and response formats. The provider can define the API using the API Management portal or the API Management REST API.
  • Set up security: The API’s provider describes the authentication and authorization procedures that the API will employ. API keys, OAuth, and certificates are just a few of the authentication and authorization techniques that API Management offers.
  • Establish policies: The provider can establish guidelines and actions for the API using approaches. For instance, the provider may utilize rules to impose rate limitations, alter requests and responses, or cache responses.
  • Publish the API: The developer portal, which enables developers to find, understand, and interact with APIs, can be made available by the API provider.

Azure API Management: A Step-by-Step Guide

Benefits of Azure API Management

API Management is a cloud-based service enabling businesses to manage and expose their APIs securely.

It offers a variety of advantages for businesses trying to harness the power of APIs to accelerate digital transformation and satisfy the needs of a market that is changing quickly.

  • Centralized Governance: API Management is a centralized platform that gives developers control over who may access and use their APIs.

This enables developers to manage how users access their APIs while assisting them in maintaining a consistent architectural and security strategy across all of their APIs.

  • Security: API Management offers a secure environment for creating, implementing, and administrating APIs.

It offers comprehensive threat prevention, analytics, and features like API keys and access control to help secure APIs and find and stop fraudulent activity.

  • Developer Experience: API Management offers a wide range of capabilities to simplify the creation and administration of APIs.

Its features make it simple and quick for developers to construct and maintain APIs, including API definitions, API testing, API versioning, and API documentation.

  • Scalability: API Management is constructed on a highly scalable platform capable of handling enormous volumes of API traffic.

To assist in guaranteeing those APIs are always available and perform at their best, it also offers capabilities like auto-scaling.

  • Analytics: To assist developers in understanding how their APIs are used, API Management offers thorough analytics.

It gives developers information about the performance, availability, and usage patterns of APIs and enables them to pinpoint areas for improvement.