Azure API Management Integration
Microsoft Azure API Management allows developers to publish and maintain APIs in the Azure cloud. SwaggerHub integrates with Azure API Management, which allows you to easily export your API definitions to Azure. This way you can design your APIs on SwaggerHub, then deploy your API design to your Azure API Management instance from SwaggerHub, keeping the APIs updated with any changes you make to the design.
The vendor extension x-azure-api-id will be automatically added to your API definition to link it with the API saved to your Azure API Management service instance.
To use the integration, you need an active Microsoft Azure subscription. You can sign up at https://azure.microsoft.com. An Azure subscription is also included in the Visual Studio subscription and some other Microsoft subscriptions.
This integration supports OpenAPI 2.0 and OpenAPI 3.0. SwaggerHub On-Premise users need v. 1.20.0 or later to use OpenAPI 3.0 definitions with Azure API Management.
The integration is one-way, which means your API definitions go only from SwaggerHub to Azure API Management. You should edit your API definitions in SwaggerHub only.
The integration is bound to a specific version of the API and is not copied when you add a new version. To integrate different API versions with Azure, you need to add the integration to each version separately.
To use the integration, you must have an API Management service instance running in the Azure cloud. If you do not have one yet, follow the instructions in Create an API Management service instance.
Click the image to enlarge it.
SwaggerHub On-Premise requires some additional configuration in Azure and in the Admin Center before the users can use this integration. If you have already done this, proceed to the next step.
Applies to SwaggerHub On-Premise 1.20.0 and later.
To push API definitions from SwaggerHub On-Premise to Azure, you need to register an application in Azure AD that will be used to authorize the connection to Azure. The application’s client ID and secret need to be specified in the SwaggerHub On-Premise Admin Center. For instructions, see Configuring Azure API Management Integration.
Applies to OpenAPI 2.0 definitions in SwaggerHub On-Premise versions before 1.21.0.
Important
These access tokens are valid for 30 days only. Before the token expires, you will have to generate a new one and update the token in SwaggerHub's integration settings. To avoid having to update the tokens, upgrade to the latest version of SwaggerHub On-Premise, which uses another method to authorize the integration.
To generate an access token:
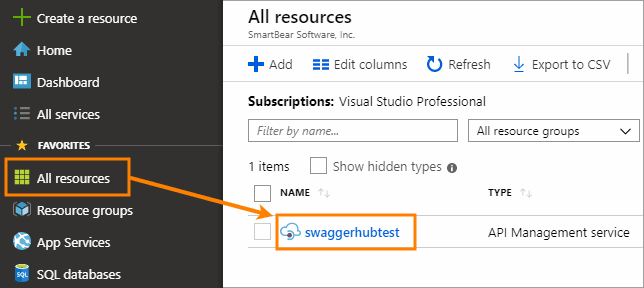
Open the Azure portal, https://portal.azure.com.
On the left, select All resources.
Click your service instance in the list.
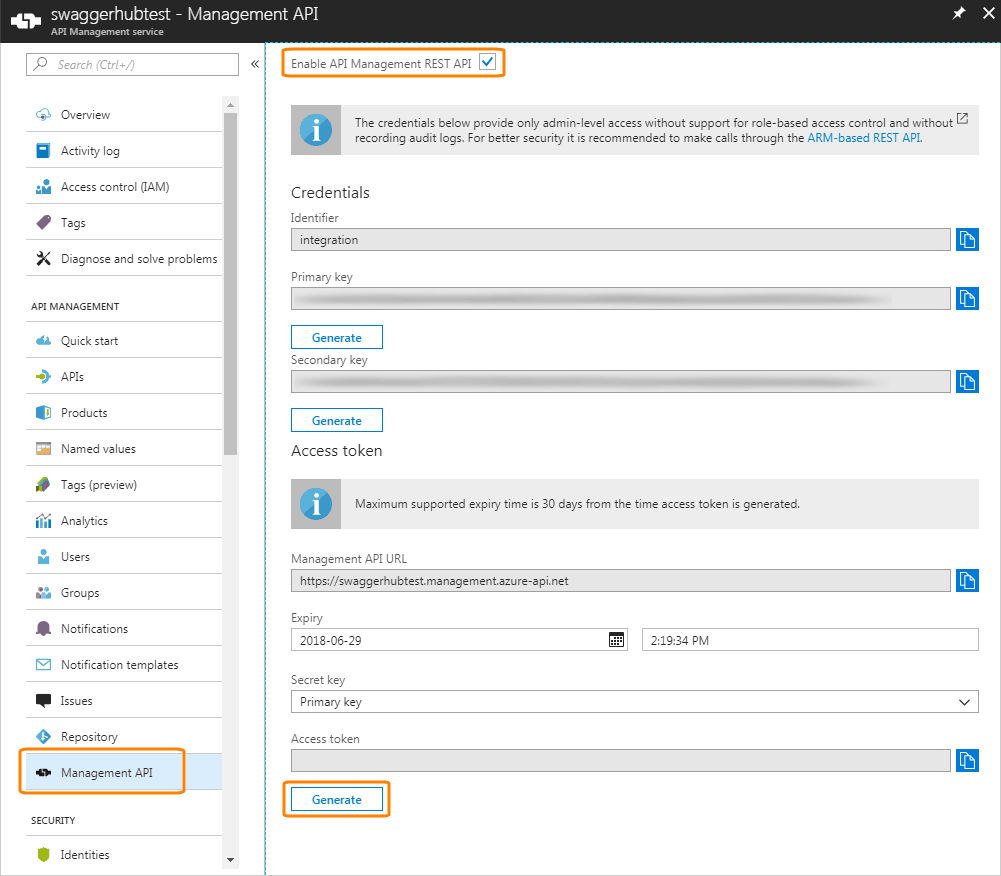
On the left, select Management API.
Select the Enable API Management REST API check box.
At the bottom, under Access token, click Generate.
Click the image to enlarge it.
Copy the generated token (the entire string), because you will not be able to see it later.
Open your API in the SwaggerHub editor.
If the API has several versions, select the version you want to push to Azure API Management.
If this version is published, unpublish it. Only unpublished APIs can be integrated with Azure API Management.
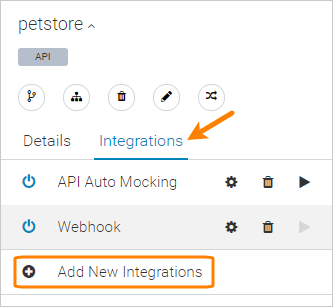
Click the API name, switch to the Integrations tab, and click Add New Integrations:
Select Azure API Management from the list of integrations.
Enter the integration parameters:
Name – Required. The display name for the integration.
Azure API Management service instance name – Required. The name of your Azure API Management service instance as it appears in the resources list in the Azure portal.
The service instance name can also be found in the developer portal URL. It is the
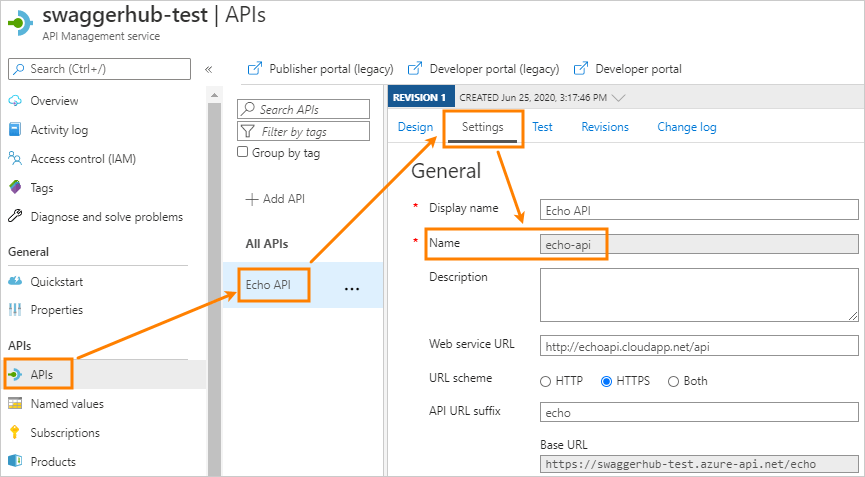
{name}part of the URL -https://{name}.portal.azure-api.netAzure API Identifier – Leave it blank to create a new API in Azure API Management. Alternatively, if you want to update an existing API in Azure API Management, specify the API name here or in the
x-azure-api-idkey at the root level of your API definition.Tip: The API name can be found in the API settings in Azure:
Click the image to enlarge it.
API URL Suffix – This suffix will be appended to the hostname of your API Management service instance to create a public URL for your API. As such, it must be unique within an API Management service instance.
Note
This option was added in v. 1.26.
Examples:
API URL Suffix
Public base URL of the API in Azure
myapihttps://{instance}.azure-api.net/myapimyapi/reportshttps://{instance}.azure-api.net/myapi/reportsIf omitted, the suffix will be set to an empty string for OpenAPI 3.0 definitions, or the
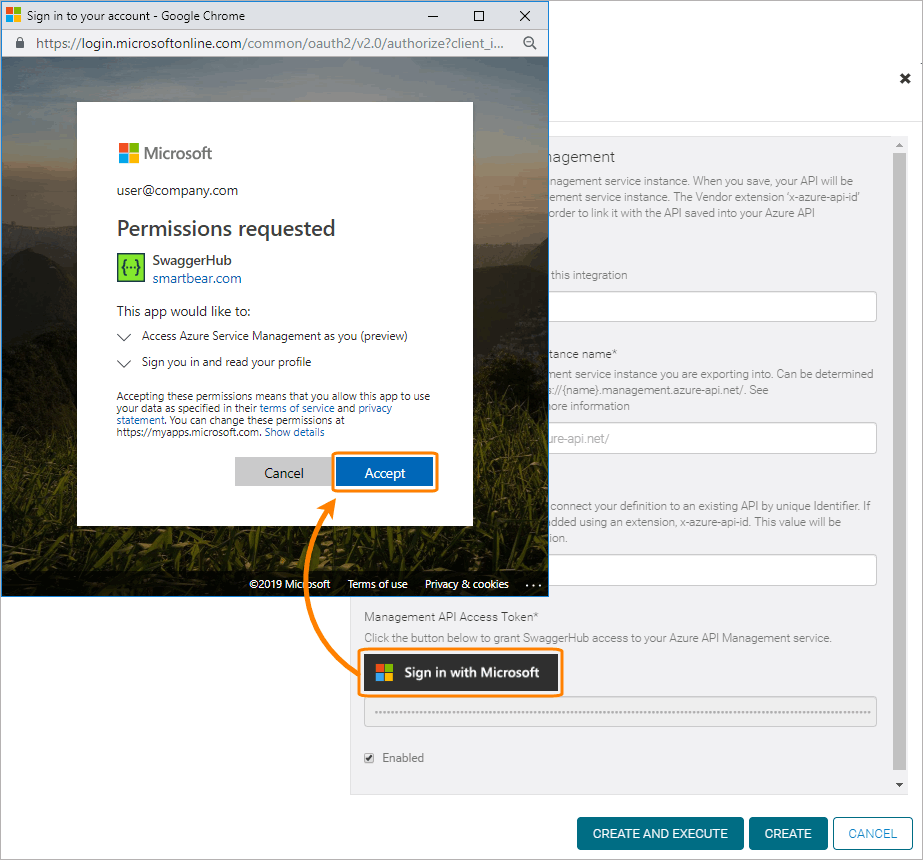
basePathvalue for OpenAPI 2.0 definitions.Management API Access Token – Click Sign in with Microsoft. You will be prompted to log into your Azure account and authorize the connection with SwaggerHub.
Notes for SwaggerHub On-Premise users:
If the "Sign in with Microsoft" button does not appear, follow these steps to configure Azure and your SwaggerHub On-Premise instance.
In versions prior to 1.21.0, paste the access token you generated earlier.
Click the image to enlarge it.
Enable – Keep this check box selected for the integration to work. Unselect it to disable the integration temporarily.
Click Create and Execute.
That’s it! Now, every time you save this version of the API, the definition is synced and updated in Azure API Management.
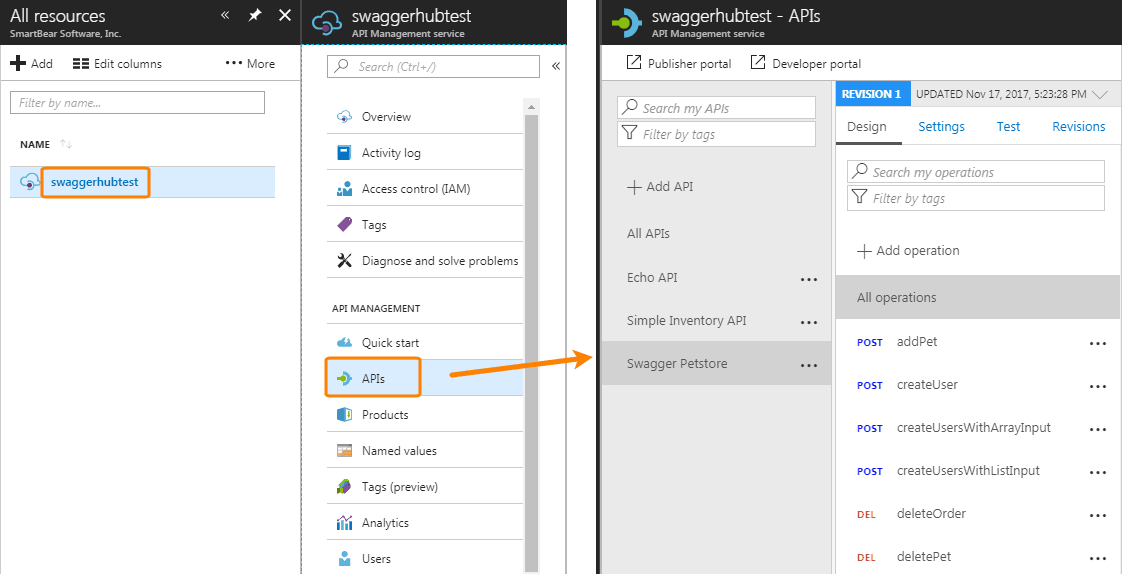
You can see the created or updated API in your Azure API Management portal:
Click the image to enlarge it.
If there was a problem with pushing your API to Azure, you will see an Integration Error at the top of the SwaggerHub Editor. Below are some common errors you might run into and their solutions:
A definition must have a unique basePath section
All APIs in Azure API Management must have a unique basePath. This error means that an API with the same basePath already exists. To resolve the problem, specify another basePath in your API definition on SwaggerHub.
401 Unauthorized errors
This usually means that the access token has expired. To resolve the issue, open the integration settings and click Sign in with Microsoft. If there is no "Sign in" button, generate an access token manually as explained above and specify the new token in the integration settings.





No comments:
Post a Comment