Sunday, 16 June 2024

View and configure Azure DDoS protection telemetry


View and configure Azure DDoS protection telemetry

Azure DDoS Protection offers in-depth insights and visualizations of attack patterns through DDoS Attack Analytics. It provides customers with comprehensive visibility into attack traffic and mitigation actions via reports and flow logs. During a DDoS attack, detailed metrics are available through Azure Monitor, which also allows alert configurations based on these metrics.

In this tutorial, you'll learn how to:

  • View Azure DDoS Protection telemetry
  • View Azure DDoS Protection mitigation policies
  • Validate and test Azure DDoS Protection telemetry

If you don't have an Azure subscription, create a free account before you begin.

Prerequisites

  • If you don't have an Azure subscription, create a free account before you begin.
  • Before you can complete the steps in this tutorial, you must first create a DDoS simulation attack to generate the telemetry. Telemetry data is recorded during an attack. For more information, see Test DDoS Protection through simulation.

View Azure DDoS Protection telemetry

Telemetry for an attack is provided through Azure Monitor in real time. While mitigation triggers for TCP SYN, TCP & UDP are available during peace-time, other telemetry is available only when a public IP address has been under mitigation.

You can view DDoS telemetry for a protected public IP address through three different resource types: DDoS protection plan, virtual network, and public IP address.

Logging can be further integrated with Microsoft Sentinel, Splunk (Azure Event Hubs), OMS Log Analytics, and Azure Storage for advanced analysis via the Azure Monitor Diagnostics interface.

For more information on metrics, see Monitoring Azure DDoS Protection for details on DDoS Protection monitoring logs.

View metrics from DDoS protection plan

  1. Sign in to the Azure portal and select your DDoS protection plan.
  2. On the Azure portal menu, select or search for and select DDoS protection plans then select your DDoS protection plan.
  3. Under Monitoring, select Metrics.
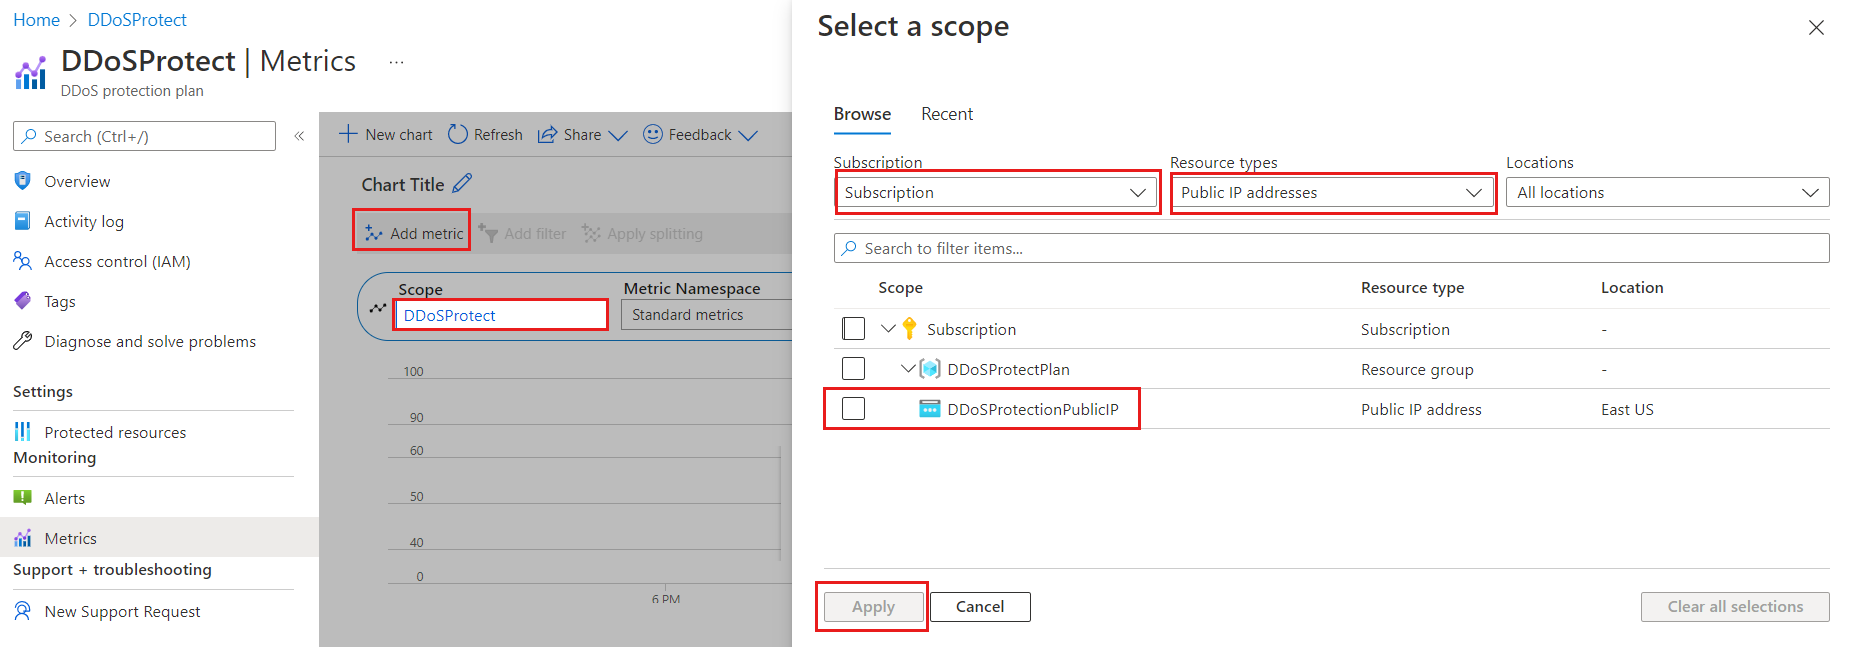
  4. Select Add metric then select Scope.
  5. In the Select a scope menu, select the Subscription that contains the public IP address you want to log.
  6. Select Public IP Address for Resource type then select the specific public IP address you want to log metrics for, and then select Apply.
  7. For Metric select Under DDoS attack or not.
  8. Select the Aggregation type as Max.

Screenshot of creating DDoS protection metrics menu.

View metrics from virtual network

  1. Sign in to the Azure portal and browse to your virtual network that has DDoS protection enabled.
  2. Under Monitoring, select Metrics.
  3. Select Add metric then select Scope.
  4. In the Select a scope menu, select the Subscription that contains the public IP address you want to log.
  5. Select Public IP Address for Resource type then select the specific public IP address you want to log metrics for, and then select Apply.
  6. Under Metric select your chosen metric then under Aggregation select type as Max.


Screenshot of DDoS diagnostic settings.

View metrics from Public IP address

  1. Sign in to the Azure portal and browse to your public IP address.
  2. On the Azure portal menu, select or search for and select Public IP addresses then select your public IP address.
  3. Under Monitoring, select Metrics.
  4. Select Add metric then select Scope.
  5. In the Select a scope menu, select the Subscription that contains the public IP address you want to log.
  6. Select Public IP Address for Resource type then select the specific public IP address you want to log metrics for, and then select Apply.
  7. Under Metric select your chosen metric then under Aggregation select type as Max.


View DDoS mitigation policies

Azure DDoS Protection uses three automatically adjusted mitigation policies (TCP SYN, TCP, and UDP) for each public IP address of the resource being protected. This applies to any virtual network with DDoS protection enabled.

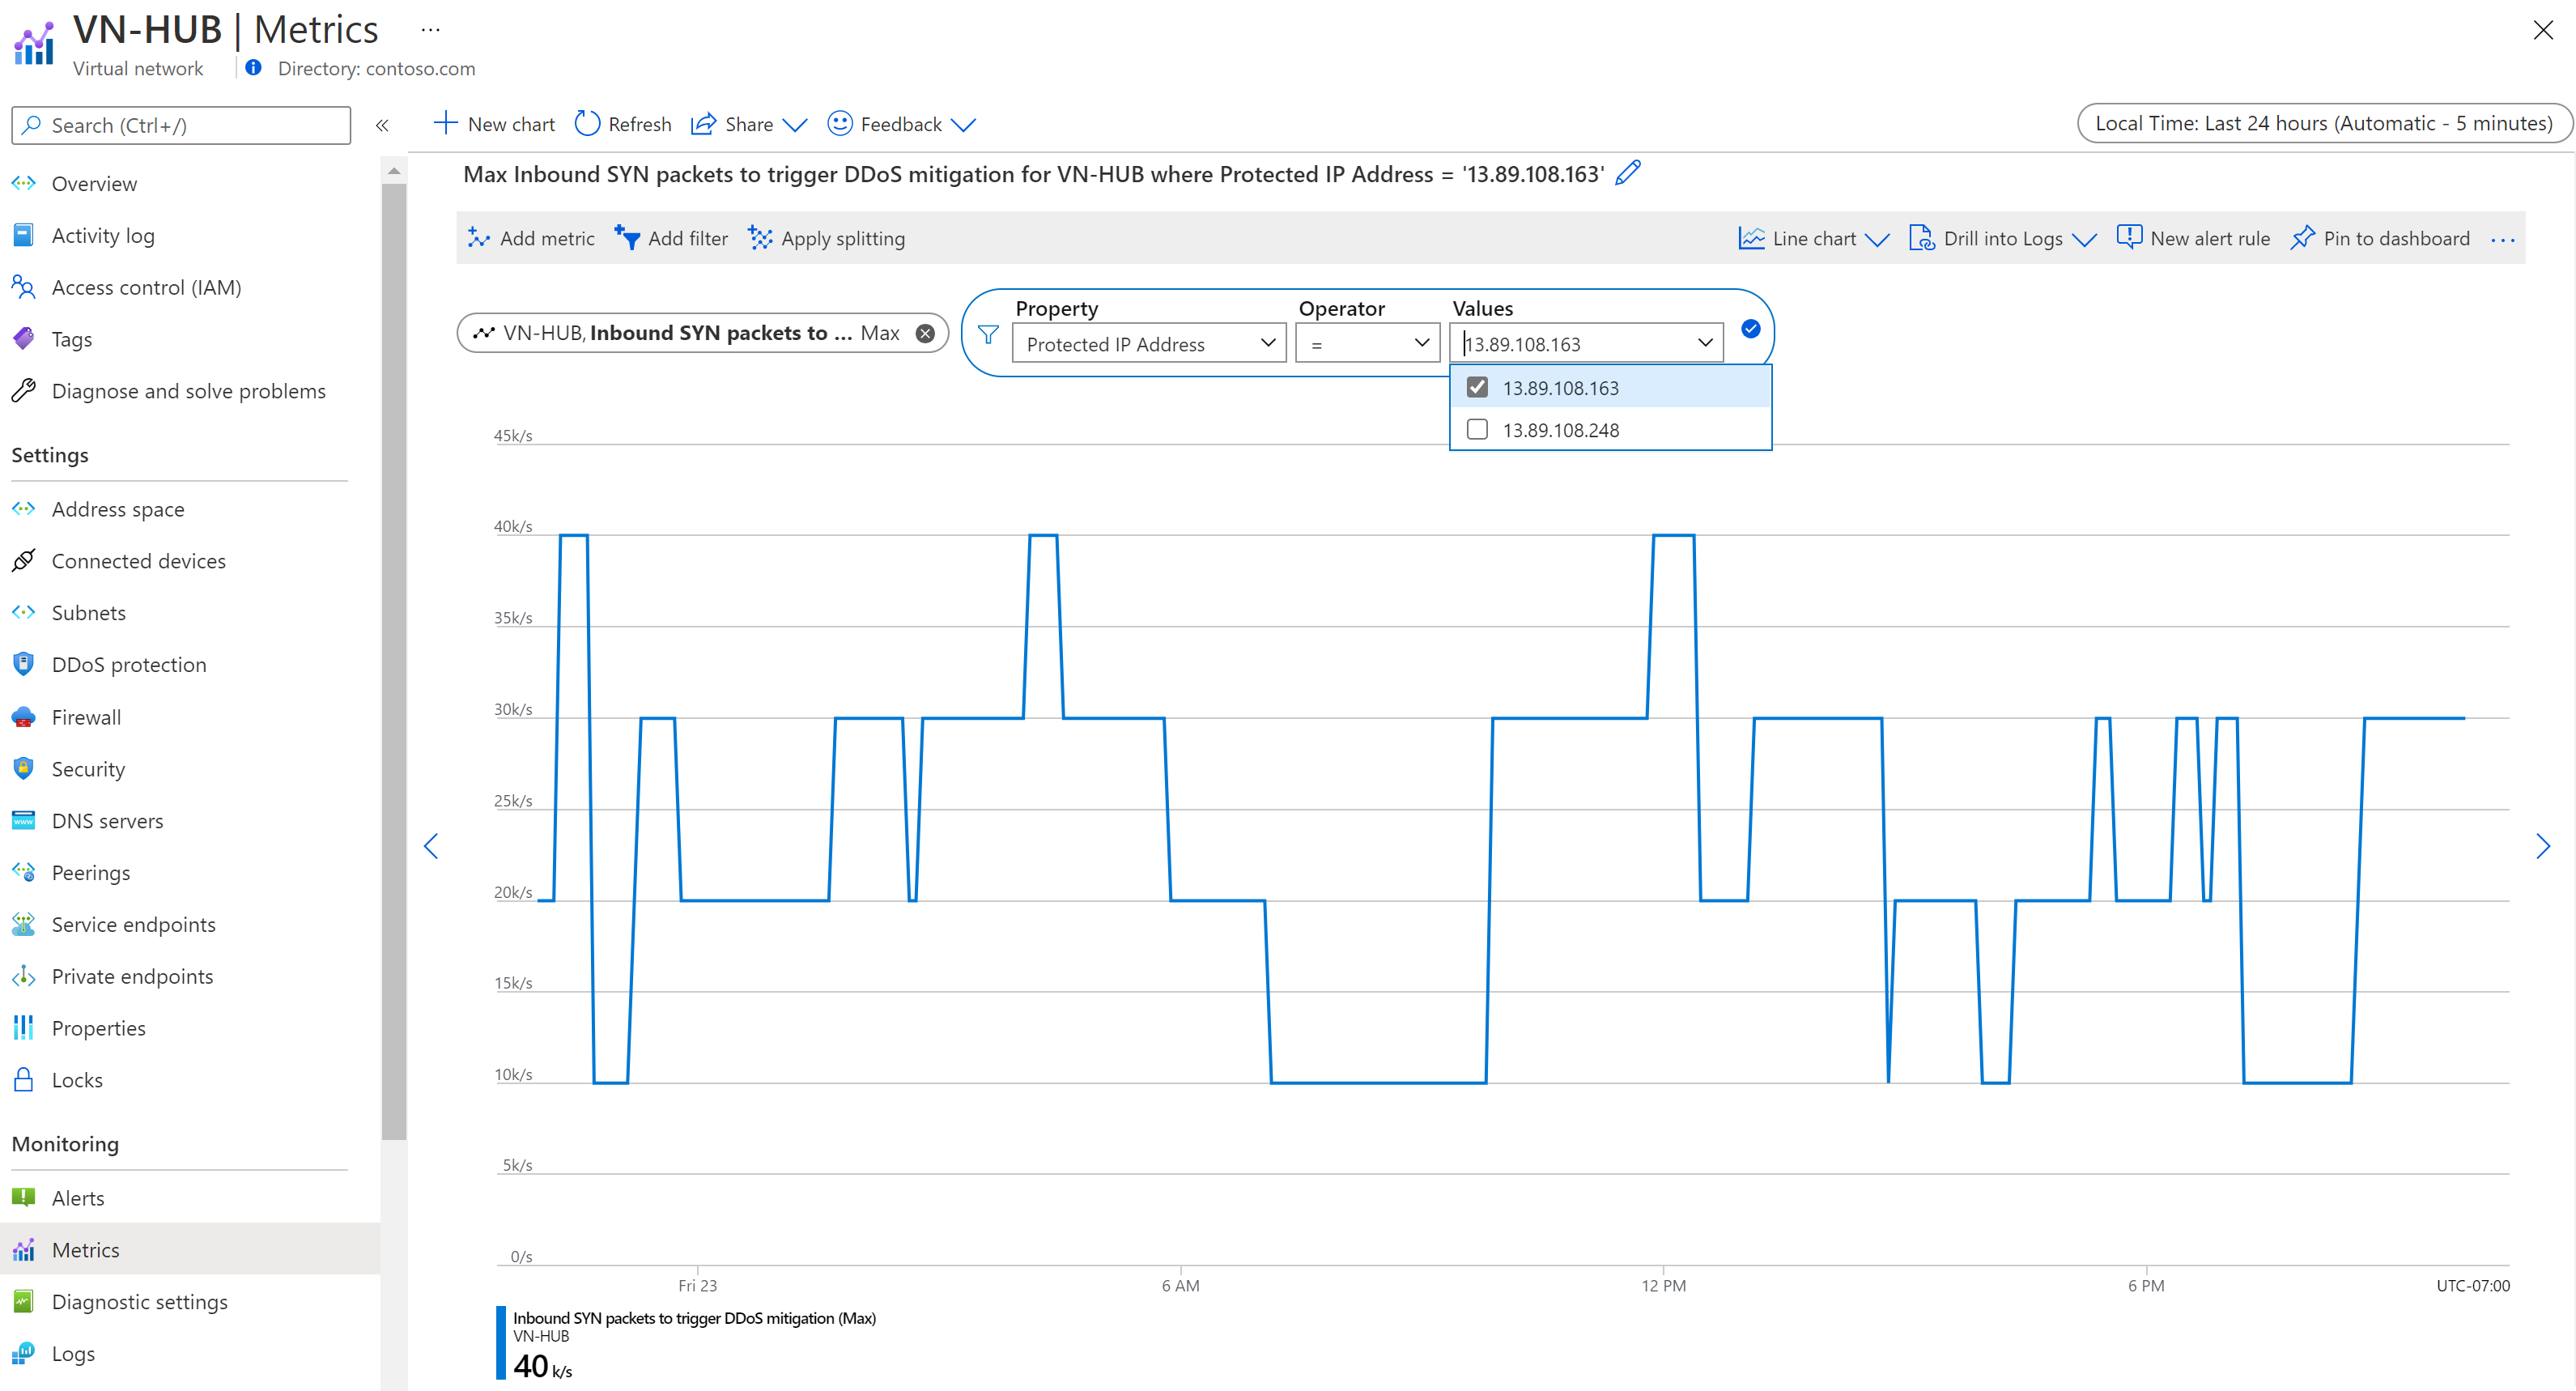
You can see the policy limits within your public IP address metrics by choosing the Inbound SYN packets to trigger DDoS mitigationInbound TCP packets to trigger DDoS mitigation, and Inbound UDP packets to trigger DDoS mitigation metrics. Make sure to set the aggregation type to Max.

Screenshot of viewing mitigation policies.

View peace time traffic telemetry

It's important to keep an eye on the metrics for TCP SYN, UDP, and TCP detection triggers. These metrics help you know when DDoS protection starts. Make sure these triggers reflect the normal traffic levels when there's no attack.

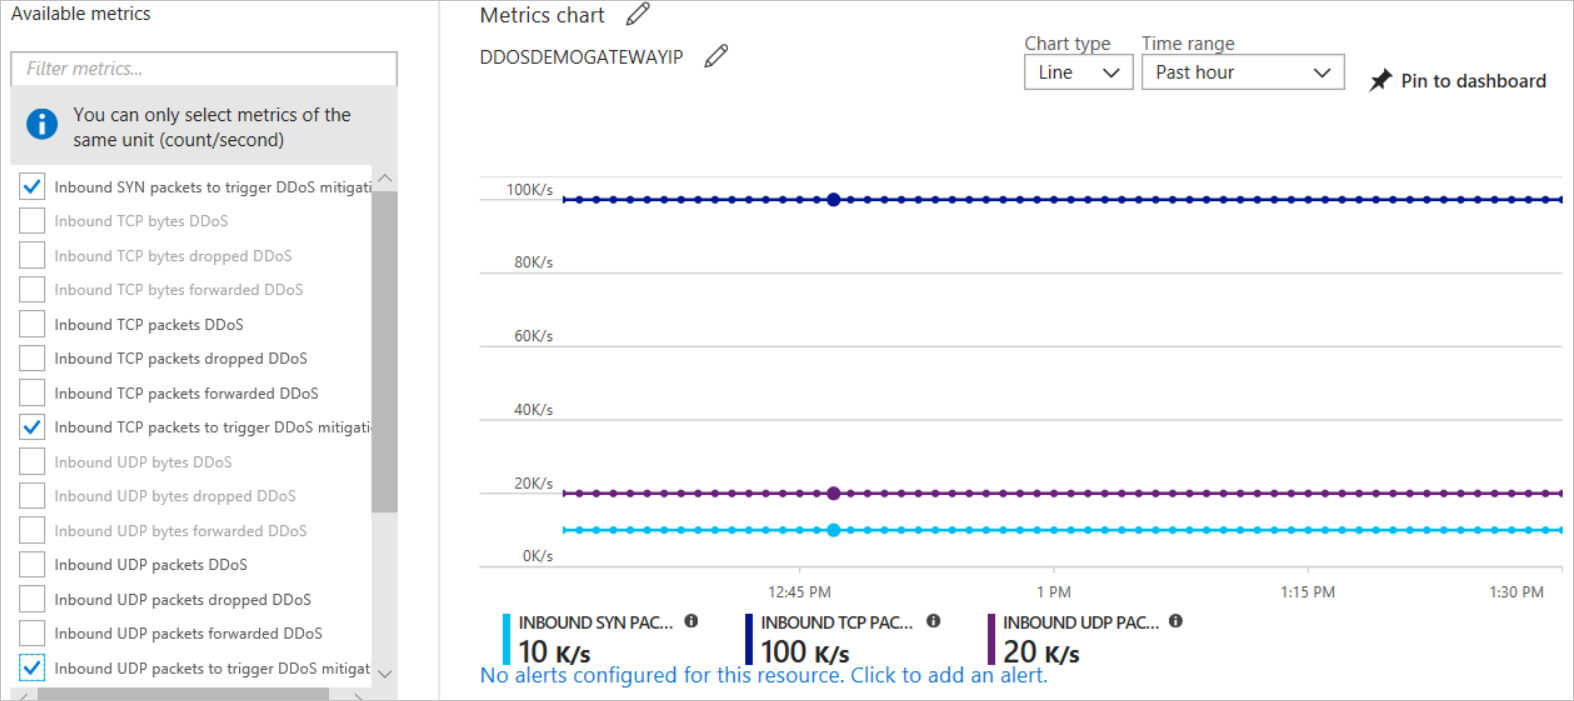
You can make a chart for the public IP address resource. In this chart, include the Packet Count and SYN Count metrics. The Packet count includes both TCP and UDP Packets. This shows you the sum of traffic.

Screenshot of viewing peace time telemetry.

Azure DDoS Protection : Overview

 Azure DDoS Protection : Overview

A DDoS attack is a malicious attempt to interrupt the regular operation of a targeted server, service, or network by overloading it with a large volume of internet traffic from various sources.

Azure DDoS Protection is a service that helps to defend Azure resources from DDoS attacks. It detects, mitigates, and stops DDoS attacks, ensuring that Azure-hosted applications and services remain available and perform well. Azure DDoS Protection is a critical component of Azure security, protecting the cloud infrastructure from disruptive cyber attacks.

If you are planning to go for Azure Security Engineer (AZ-500) Certification then you must checkout this Azure DDoS Protection Blog , also we cover these topics in our Azure Job Program, You can join the Free Class for Azure Job Program.

Topics covered in this blog are:

Introduction to DDoS Attack

A Distributed Denial of Service (DDoS) attack is a malicious effort to interrupt regular traffic to a specific server, service, or network by flooding it with internet traffic from many sources. These assaults are carried out via an attacker-controlled network of hacked computers or devices, often known as a botnet.

DDOS Attack

A DDoS assault aims to render the targeted system or network inaccessible to its intended users, resulting in downtime, financial losses, and reputational harm to the victim. Several approaches, including amplification assaults, SYN floods, and HTTP floods, are used to create huge amounts of traffic and deplete the target’s resources.

Azure DDoS protection

Azure DDoS Protection is a service that protects Azure resources from distributed denial-of-service (DDoS) assaults. It runs at the Azure network edge, automatically detecting and mitigating DDoS assaults to ensure Azure service availability even during large-scale attacks. Azure DDoS Protection offers continuous monitoring and real-time mitigation, harnessing the size and flexibility of the Azure global network to absorb and mitigate DDoS assaults before they affect client workloads.

Azure DDOS protection

Azure DDoS Protection Tiers

Azure DDoS security provides two tiers of security to protect your resources from denial-of-service attacks: DDoS IP Protection and DDoS Network Protection.

DDoS IP protection

This tier protects particular Azure resources, such as virtual machines and web applications. It analyses traffic patterns particular to the protected IP addresses and automatically mitigates threats to those resources.

DDoS Network Protection

This tier protects your whole virtual network. It analyses network traffic and detects malicious DDoS assaults before they reach your particular resources. This provides more comprehensive protection for all resources in the virtual network.

Azure DDoS Protection Comparison

FeatureDDoS IP ProtectionDDoS Network Protection
Active traffic monitoring & always-on detectionYesYes
L3/L4 Automatic attack mitigationYesYes
Automatic attack mitigationYesYes
Application-based mitigation policiesYesYes
Metrics & alertsYesYes
Mitigation reportsYesYes
Mitigation flow logsYesYes
Mitigation policies tuned to customer’s applicationYesYes
Integration with Firewall ManagerYesYes
Microsoft Sentinel data connector and workbookYesYes
Protection of resources across subscriptions in a tenantYesYes
Public IP Standard tier protectionYesYes
Public IP Basic tier protectionNoYes
DDoS rapid response supportNot availableYes
Cost protectionNot availableYes
WAF discountNot availableYes
PricePer protected IPPer 100 protected IP addresses

Azure DDoS protection Features

  • Always-on Traffic Monitoring: Continuously analyses traffic patterns for unusual behavior, which aids in detecting DDoS assaults before they impair service.
  • Automatic Attack Mitigation: Detects and mitigates DDoS assaults without operator intervention, resulting in minimum disruption during an attack.
  • Multi-layered security: Provides security at Layers 3 (network) and 4 (transport) of the OSI model, protecting against common DDoS assaults such as volumetric and SYN floods.
  • Scaling to Address Threats: Scales automatically to fight DDoS assaults of any magnitude, maintaining service uptime while minimizing the effect on genuine users.
  • Cost Guarantee: Receive service credit for proven DDoS attack resource charges, ensuring financial security throughout an assault.
    Native Integration: A seamless setup experience via the Azure portal that simplifies deployment and administration.
  • Turnkey Protection: Provides immediate protection for virtual networks and public IP resources upon activation, ensuring that your resources are protected from the time you activate protection.
  • Advanced Analytics: Machine learning customizes mitigation rules for each protected IP address, maximizing resource utilization and assuring timely attack response.

Steps to create DDoS protection in Azure Portal

1.Login into your Azure account

2.Search DDoS Protection in search bar & Click on it  .
DDoS_image

3. Click on Create.

DDoS_image

4. Enter or select the following values.
DDoS_img

5.Click Create once validation is passed.

DDoS_img

6.Click on Go to Resource, your DDoS Protection is created.

DDoS_img

Conclusion

In conclusion, Azure DDoS Protection provides a comprehensive solution for protecting Azure resources from distributed denial-of-service (DDoS) assaults. Azure DDoS Protection uses advanced mitigation algorithms, real-time monitoring, and interaction with other Azure services to successfully identify and neutralize DDoS assaults. Organizations may improve the resilience of their cloud infrastructure, assure continuous service availability, and reduce the effect of DDoS assaults on their business operations by utilizing Azure DDoS Protection.

Create and configure Azure DDoS Network Protection using the Azure portal


Create and configure Azure DDoS Network Protection using the Azure portal

A DDoS protection plan defines a set of virtual networks that have DDoS Network Protection enabled, across subscriptions. You can configure one DDoS protection plan for your organization and link virtual networks from multiple subscriptions under a single Microsoft Entra tenant to the same plan.

In this QuickStart, you create a DDoS protection plan and link it to a virtual network.

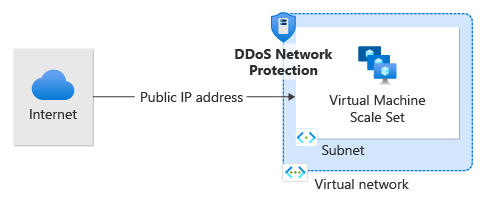
Diagram of DDoS Network Protection.

Prerequisites

Create a DDoS protection plan

  1. Select Create a resource in the upper left corner of the Azure portal.

  2. Search the term DDoS. When DDoS protection plan appears in the search results, select it.

  3. Select Create.

  4. Enter or select the following values.

    SettingValue
    SubscriptionSelect your subscription.
    Resource groupSelect Create new and enter MyResourceGroup.
    NameEnter MyDdosProtectionPlan.
    RegionEnter East US.
  5. Select Review + create then Create


Although DDoS Protection Plan resources needs to be associated with a region, users can enable DDoS protection on Virtual Networks in different regions and across multiple subscriptions under a single Microsoft Entra tenant.

Enable DDoS protection for a virtual network

Enable for a new virtual network

  1. Select Create a resource in the upper left corner of the Azure portal.

  2. Select Networking, and then select Virtual network.

  3. Enter or select the following values then select Next.

    SettingValue
    SubscriptionSelect your subscription.
    Resource groupSelect Use existing, and then select MyResourceGroup
    NameEnter MyVnet.
    RegionEnter East US.
  4. In the Security pane, select Enable on the Azure DDoS Network Protection radio.

  5. Select MyDdosProtectionPlan from the DDoS protection plan pane. The plan you select can be in the same, or different subscription than the virtual network, but both subscriptions must be associated to the same Microsoft Entra tenant.

  6. Select Next. In the IP address pane, select Add IPv4 address space and enter the following values. Then select Add.

    SettingValue
    IPv4 address spaceEnter 10.1.0.0/16.
    Subnet nameUnder Subnet name, select the Add subnet link and enter mySubnet.
    Subnet address rangeEnter 10.1.0.0/24.
  7. Select Review + create then Create.

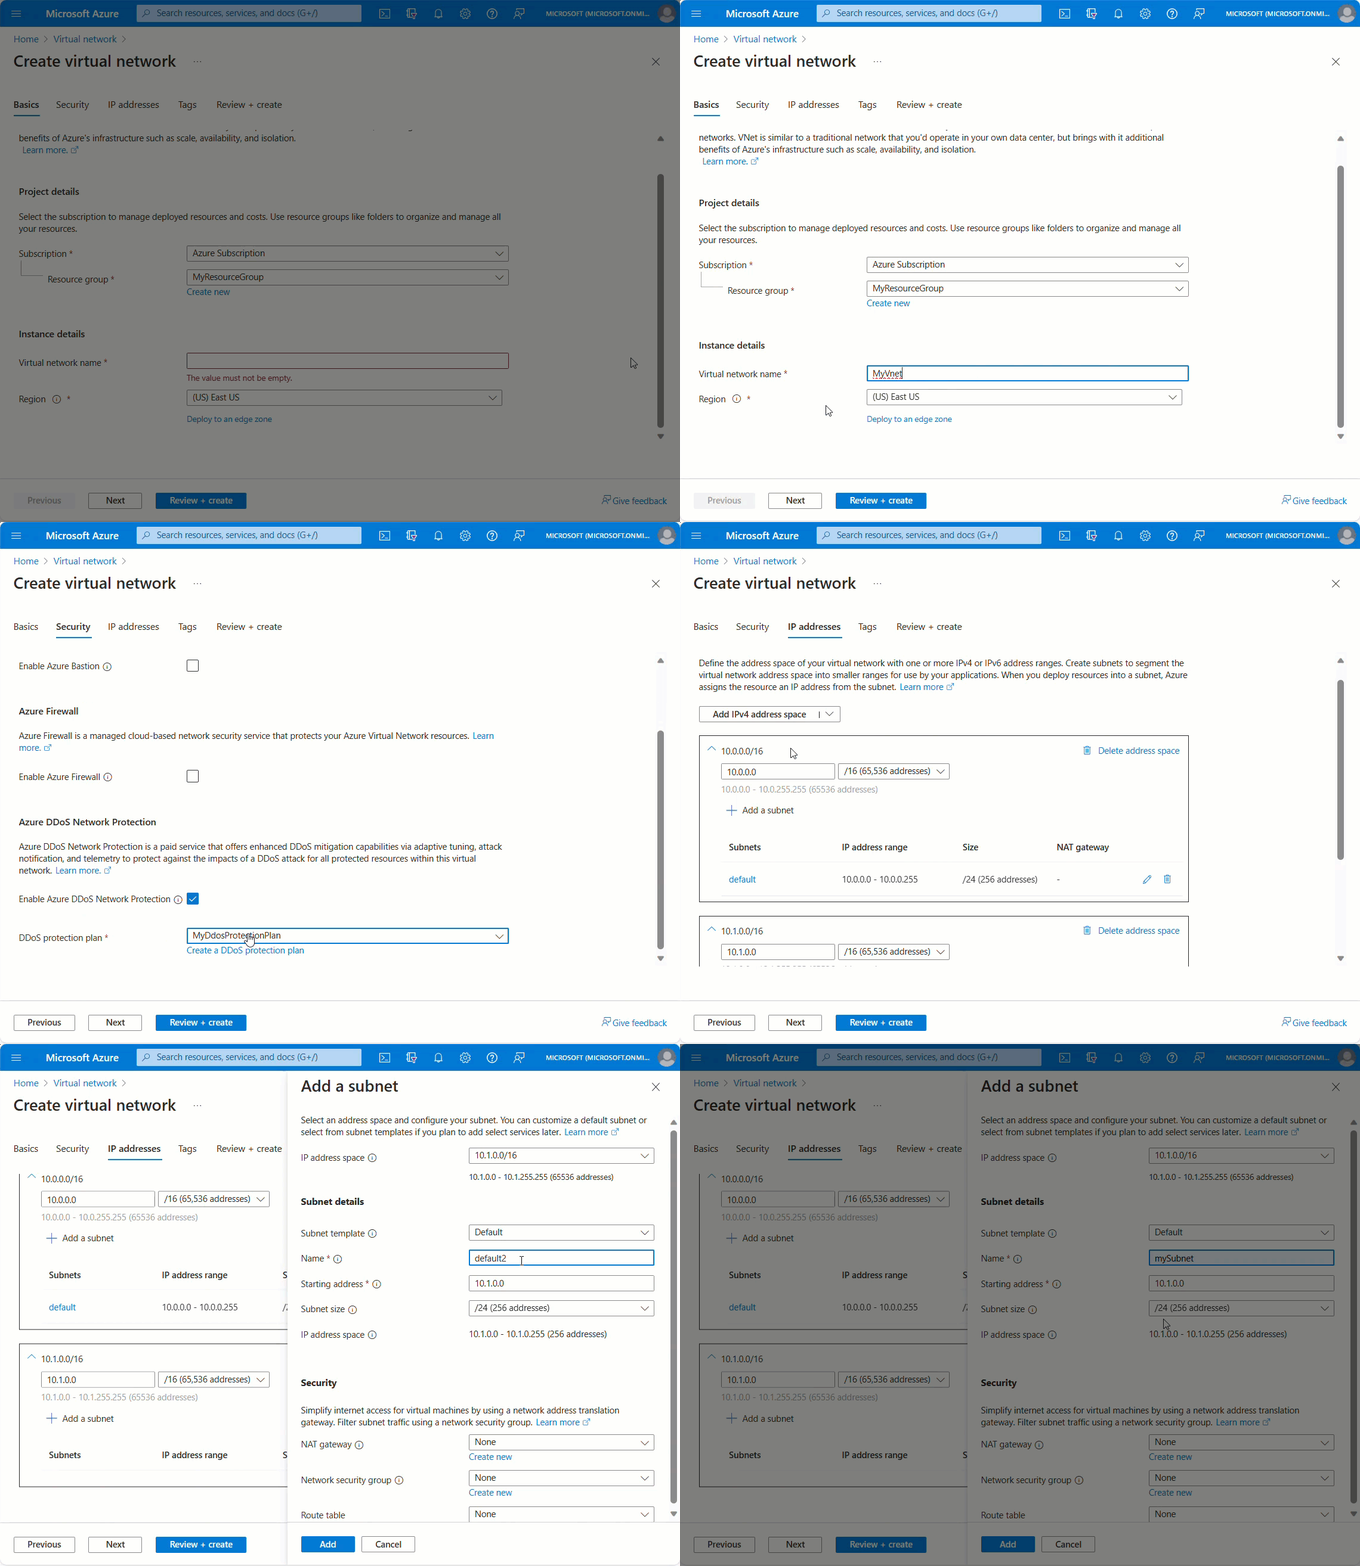
    Gif of creating a virtual network with Azure DDoS Protection.


You cannot move a virtual network to another resource group or subscription when DDoS Protection is enabled for the virtual network. If you need to move a virtual network with DDoS Protection enabled, disable DDoS Protection first, move the virtual network, and then enable DDoS Protection. After the move, the auto-tuned policy thresholds for all the protected public IP addresses in the virtual network are reset.

Enable for an existing virtual network

  1. Create a DDoS protection plan by completing the steps in Create a DDoS protection plan, if you don't have an existing DDoS protection plan.

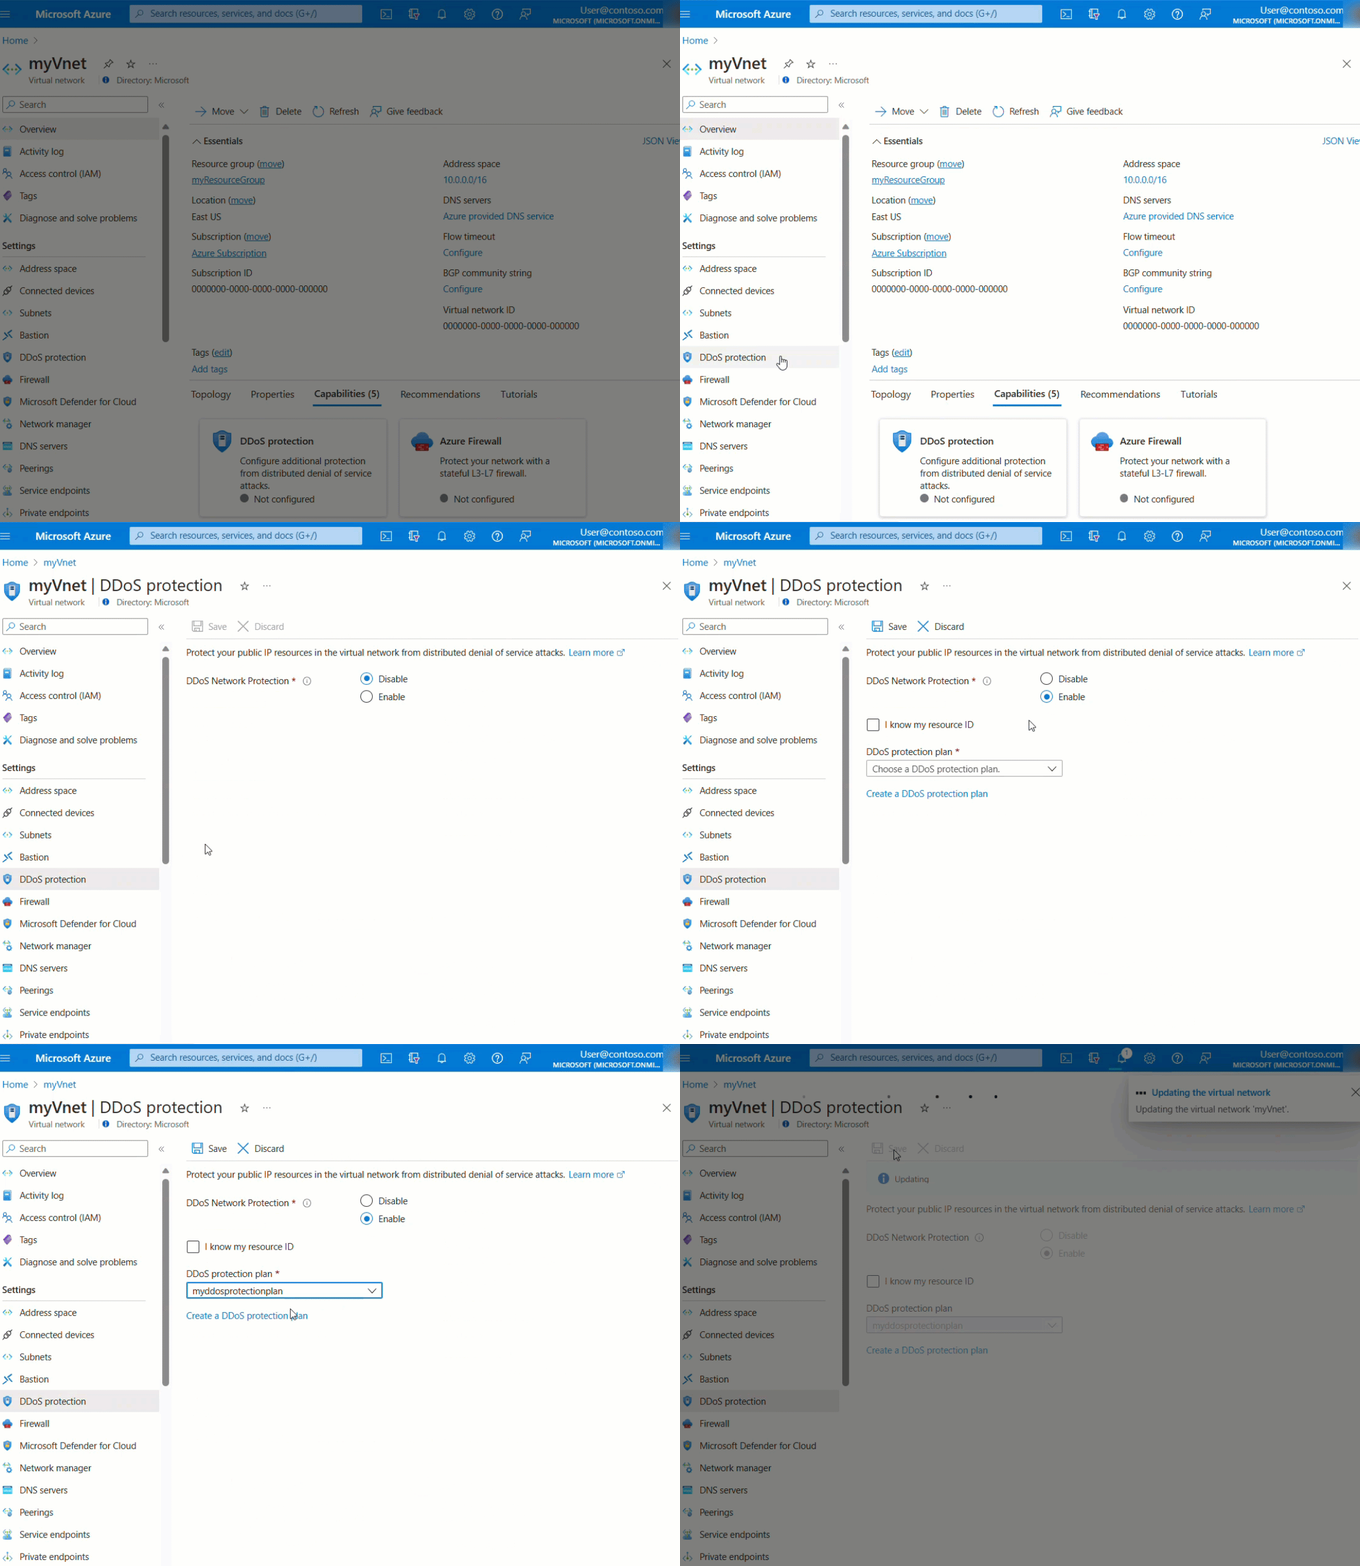
  2. Enter the name of the virtual network that you want to enable DDoS Network Protection for in the Search resources, services, and docs box at the top of the Azure portal. When the name of the virtual network appears in the search results, select it.

  3. Select DDoS protection, under Settings.

  4. Select Enable. Under DDoS protection plan, select an existing DDoS protection plan, or the plan you created in step 1, and then select Save. The plan you select can be in the same, or different subscription than the virtual network, but both subscriptions must be associated to the same Microsoft Entra tenant.

    Gif of enabling DDoS Protection for a virtual network.

Add Virtual Networks to an existing DDoS protection plan

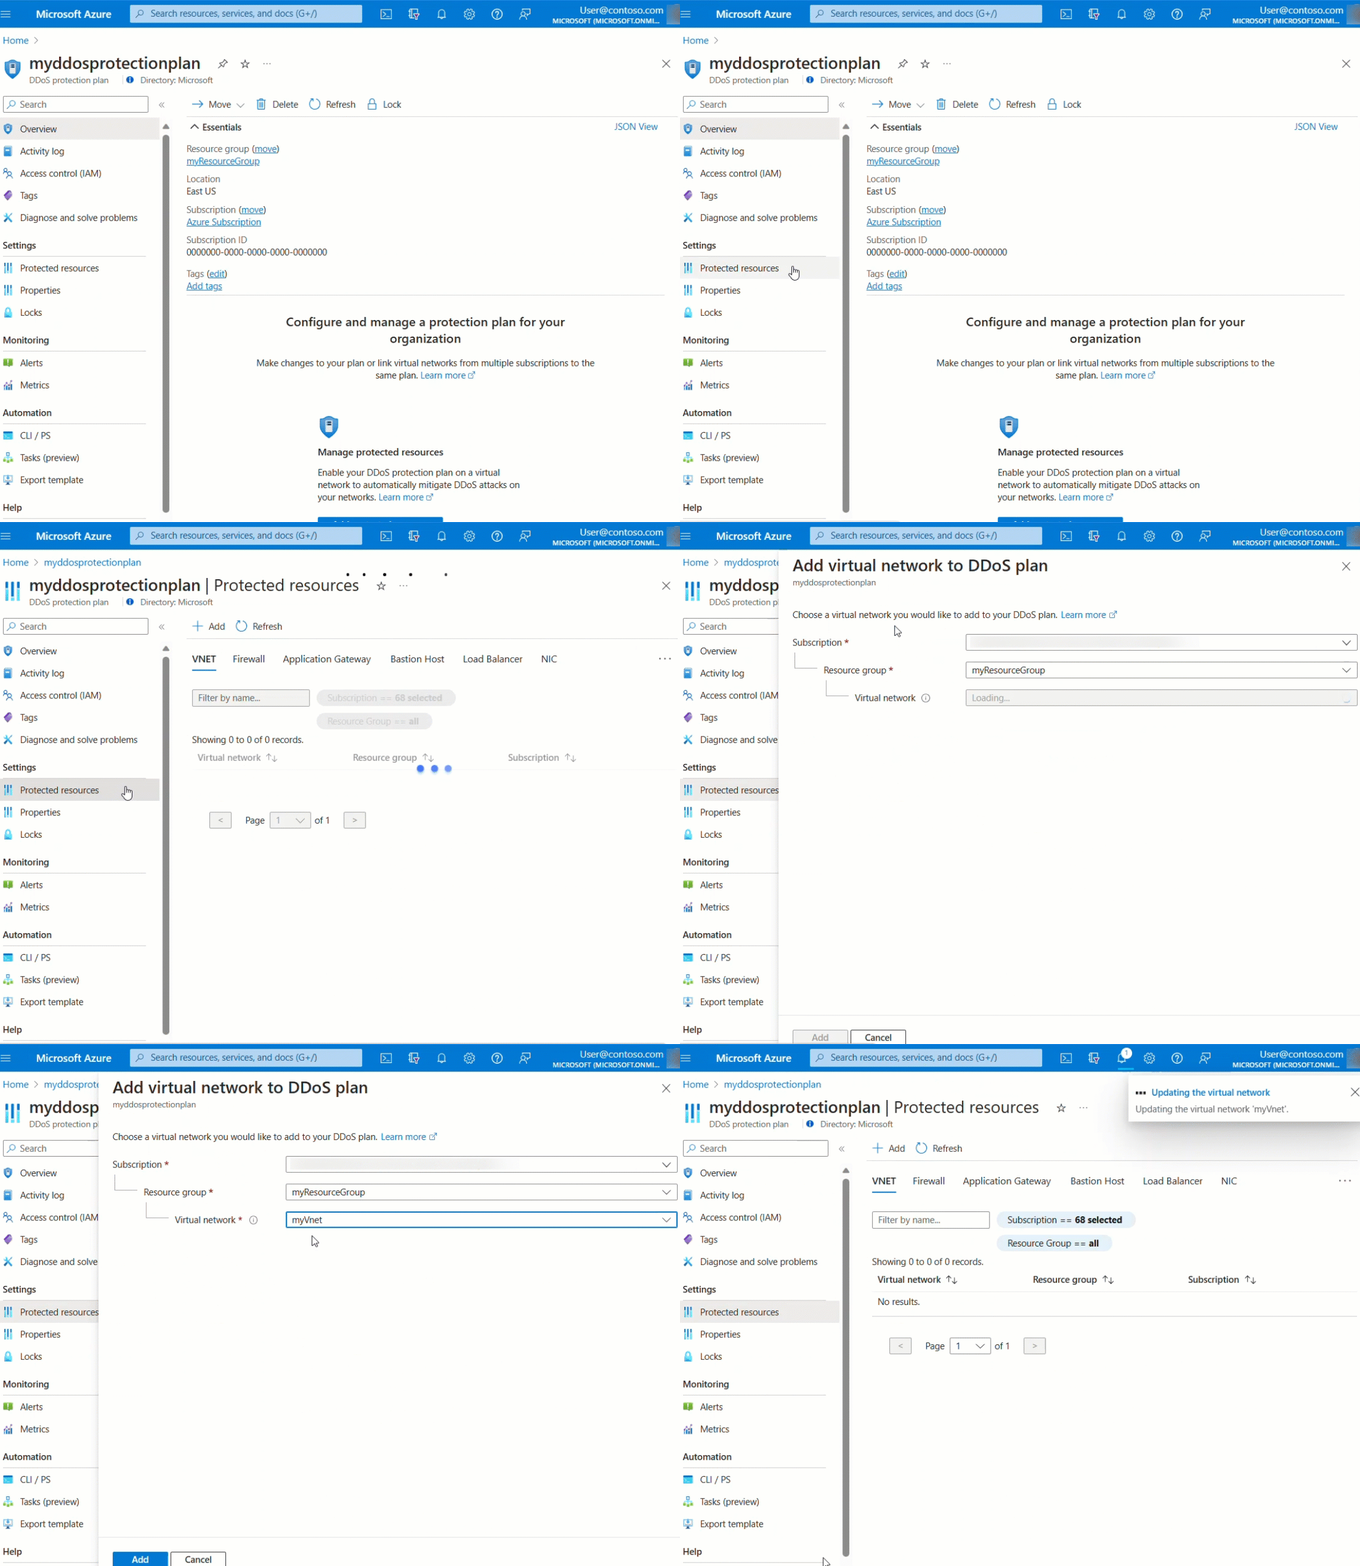
You can also enable the DDoS protection plan for an existing virtual network from the DDoS Protection plan, not from the virtual network.

  1. Search for "DDoS protection plans" in the Search resources, services, and docs box at the top of the Azure portal. When DDoS protection plans appears in the search results, select it.

  2. Select the desired DDoS protection plan you want to enable for your virtual network.

  3. Select Protected resources under Settings.

  4. Select +Add and select the right subscription, resource group and the virtual network name. Select Add again.

    Gif of adding a virtual network with Azure DDoS Protection.

Configure an Azure DDoS Protection Plan using Azure Firewall Manager (preview)

Azure Firewall Manager is a platform to manage and protect your network resources at scale. You can associate your virtual networks with a DDoS protection plan within Azure Firewall Manager. This functionality is currently available in Public Preview. See Configure an Azure DDoS Protection Plan using Azure Firewall Manager.

Screenshot showing virtual network with DDoS Protection Plan.

Enable DDoS protection for all virtual networks

This built-in policy detects any virtual networks in a defined scope that don't have DDoS Network Protection enabled. This policy will then optionally create a remediation task that creates the association to protect the Virtual Network. See Azure Policy built-in definitions for Azure DDoS Network Protection for full list of built-in policies.

Validate and test

First, check the details of your DDoS protection plan:

  1. Select All services on the top, left of the portal.
  2. Enter DDoS in the Filter box. When DDoS protection plans appear in the results, select it.
  3. Select your DDoS protection plan from the list.

The MyVnet virtual network should be listed.

View protected resources

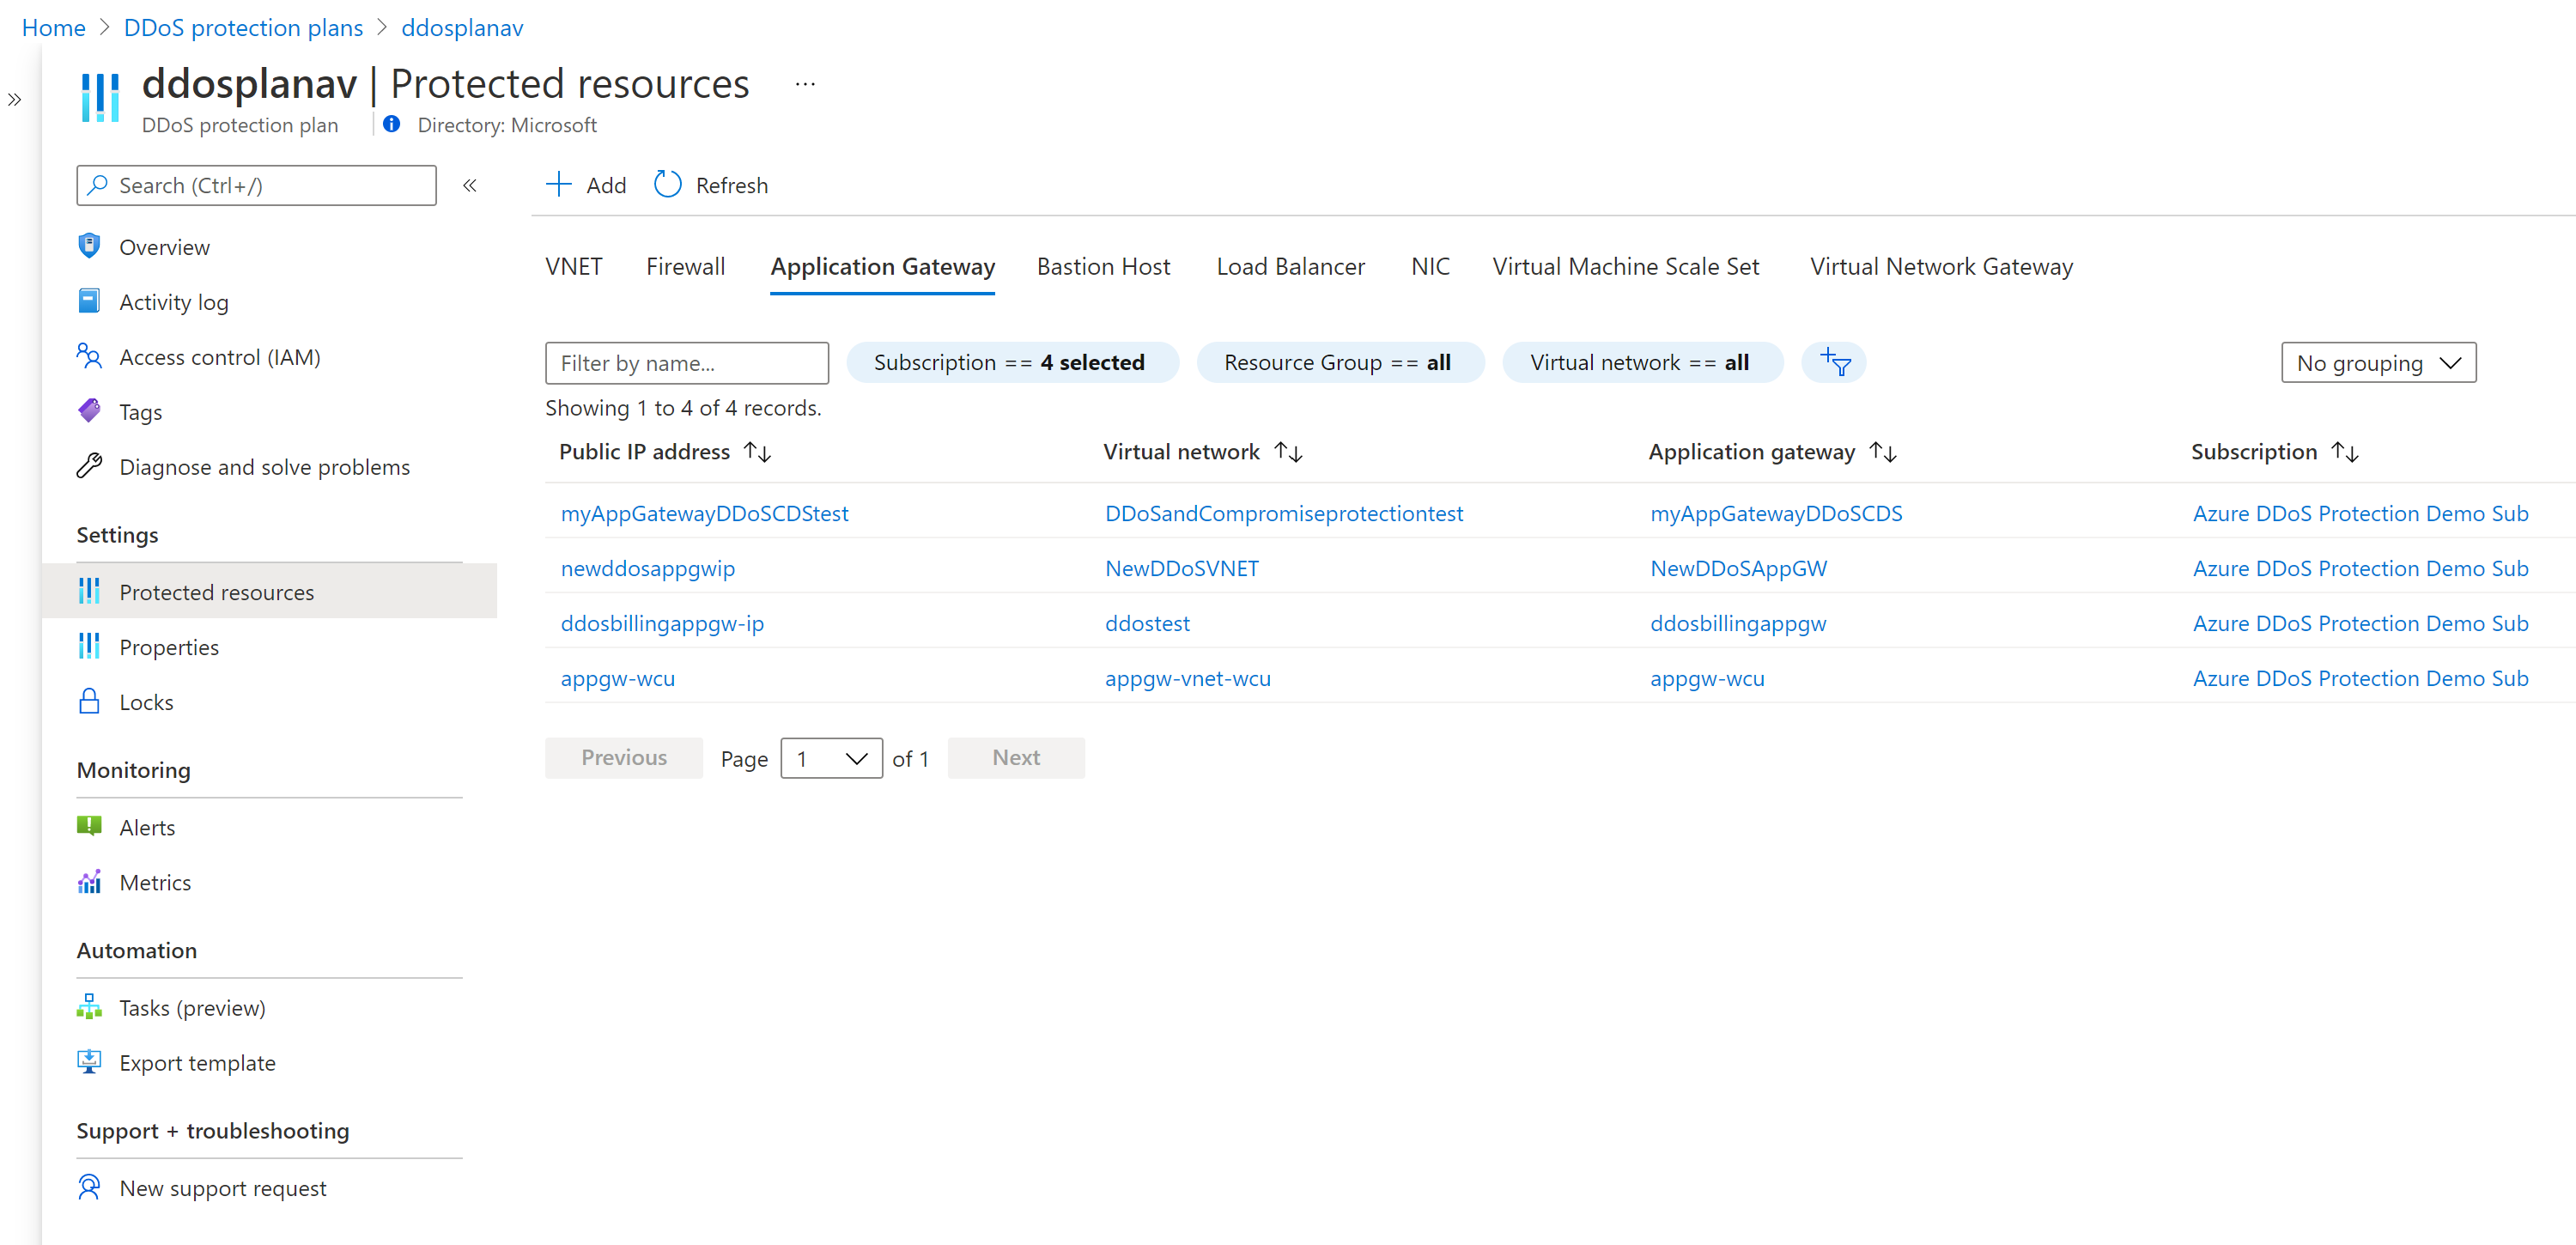
Under Protected resources, you can view your protected virtual networks and public IP addresses, or add more virtual networks to your DDoS protection plan:

Screenshot showing protected resources.

Disable for a virtual network:

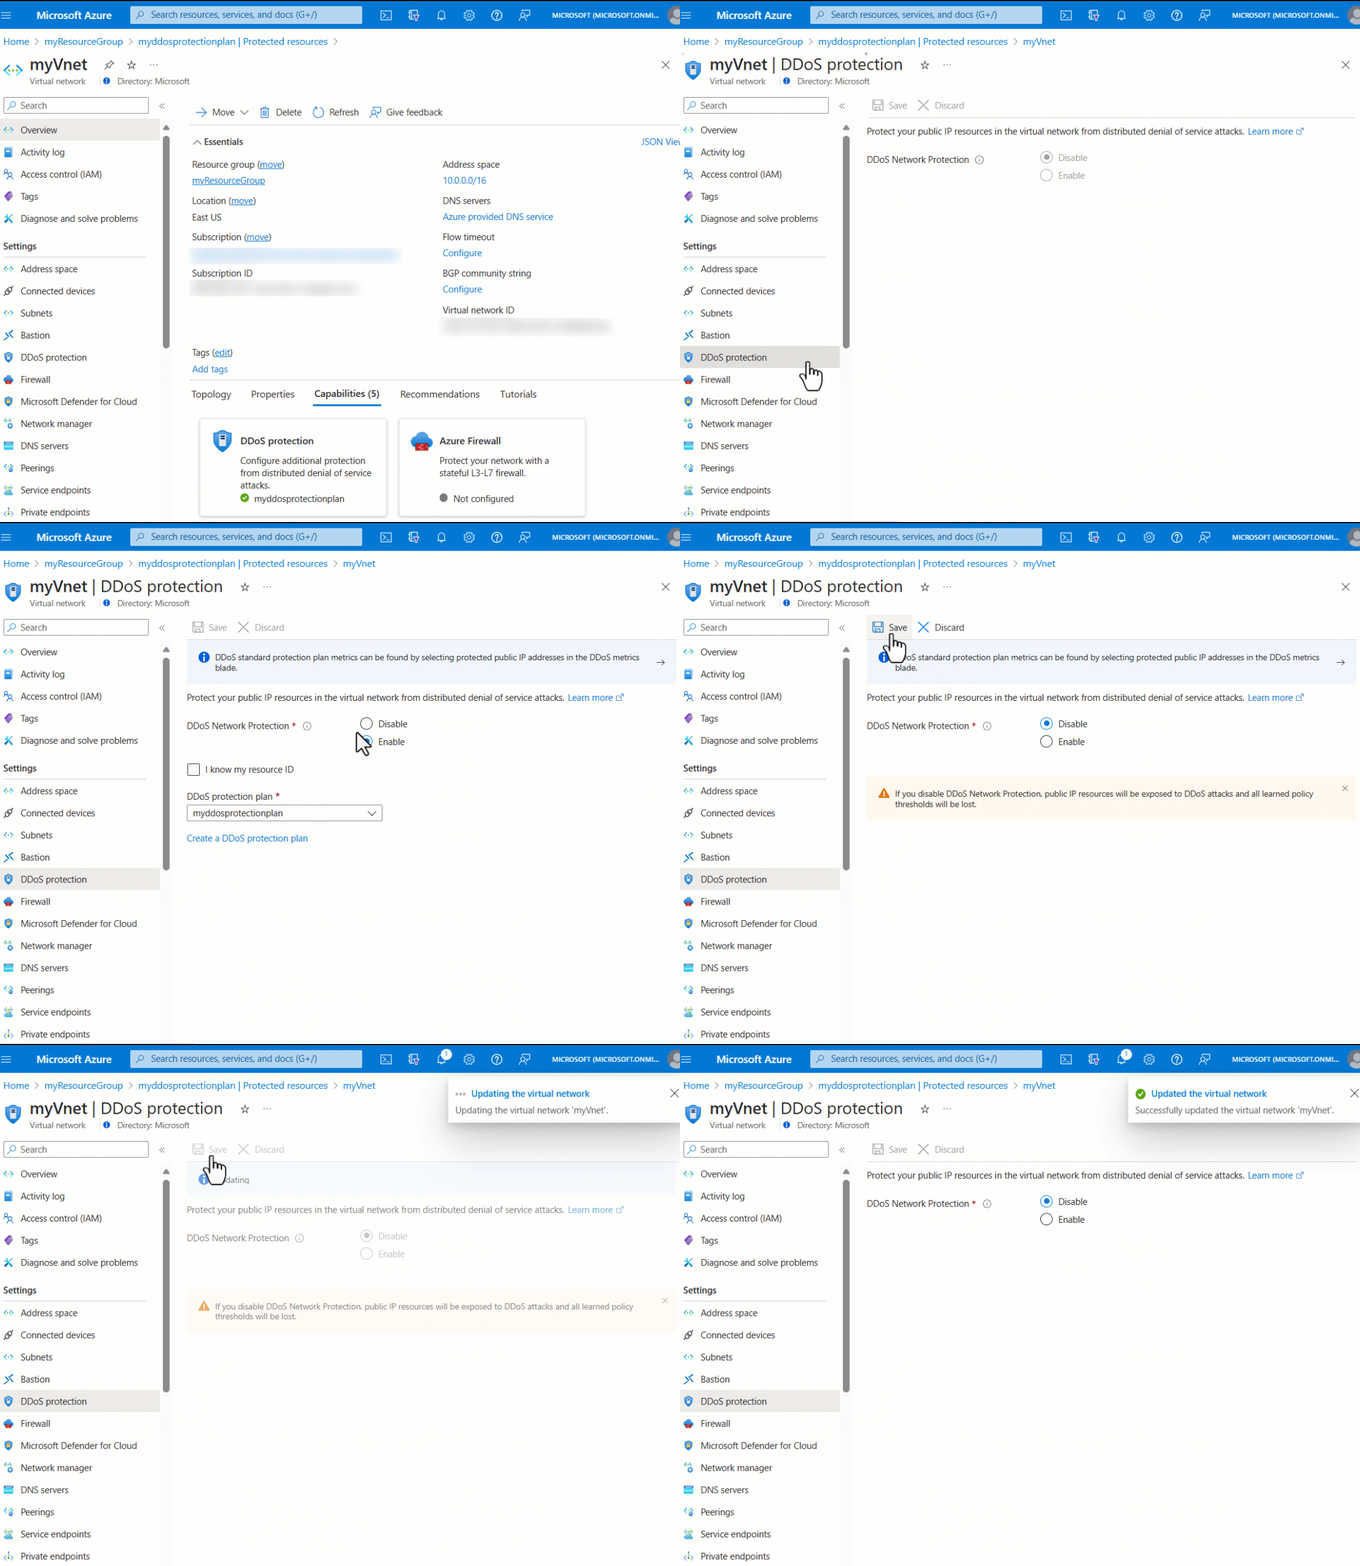
You can disable the DDoS protection from a virtual network, while it is still enabled on other virtual networks. To disable DDoS protection for a virtual network proceed with the following steps.

  1. Enter the name of the virtual network you want to disable DDoS Network Protection for in the Search resources, services, and docs box at the top of the portal. When the name of the virtual network appears in the search results, select it.

  2. Under DDoS Network Protection, select Disable.

    Gif of disabling DDoS Protection within virtual network.