Sunday, 16 June 2024

Azure Private Link traffic filters


Azure Private Link traffic filters

Traffic filtering, to allow only Azure Private Link connections, is one of the security layers available in Elasticsearch Service. It allows you to limit how your deployments can be accessed.

Read more about Traffic Filtering for the general concepts behind traffic filtering in Elasticsearch Service.

Azure Private Link establishes a secure connection between two Azure VNets. The VNets can belong to separate accounts, for example a service provider and their service consumers. Azure routes the Private Link traffic within the Azure data centers and never exposes it to the public internet. In such a configuration, Elastic Cloud is the third-party service provider and the customers are service consumers.

Private Link is a connection between an Azure Private Endpoint and a Azure Private Link Service.

Azure Private Link Service aliases

Private Link Services are set up by Elastic in all supported Azure regions under the following aliases:

Azure Public Regions

The process of setting up the Private link connection to your clusters is split between Azure (e.g. by using Azure portal), Elastic Cloud Support, and Elastic Cloud UI. These are the high-level steps:

Azure portalElastic Cloud UI

1. Create a private endpoint using Elastic Cloud service alias.

2. Create a DNS record pointing to the private endpoint.

3. Create an Azure Private Link rule set with the private endpoint Name and ID.

4. Associate the Azure Private Link rule set with your deployments.

5. Interact with your deployments over Private Link.

Create your private endpoint and DNS entries in Azure

  1. Create a private endpoint in your VNet using the alias for your region.

    Follow the Azure instructions for details on creating a private endpoint to an endpoint service.

    Use the service aliases for your region. Select the "Connect to an Azure resource by resource ID or alias" option. For example for the region eastus2 the service alias is eastus2-prod-002-privatelink-service.64359fdd-7893-4215-9929-ece3287e1371.eastus2.azure.privatelinkservice

  2. Create a DNS record.

    1. Create a Private DNS Zone. Get the private hosted zone domain name in Azure Private Link Service Alias for the name of the zone. For example, in eastus2 use privatelink.*eastus2*.azure.elastic-cloud.com as the zone domain name. Using this zone domain name is required to ensure certificate names match.
    2. After creating the Private DNS Zone, associate the zone with your VNet by creating a virtual network link.
    3. Then create a DNS A record pointing to the private endpoint. Use * as the record name, A as the type, and put the private endpoint IP address as the record value.

      Follow the Azure instructions for details on creating an A record which points to your private endpoint IP address

Add the Private Link rules to your deployments

Follow these high-level steps to add Private Link rules to your deployments.

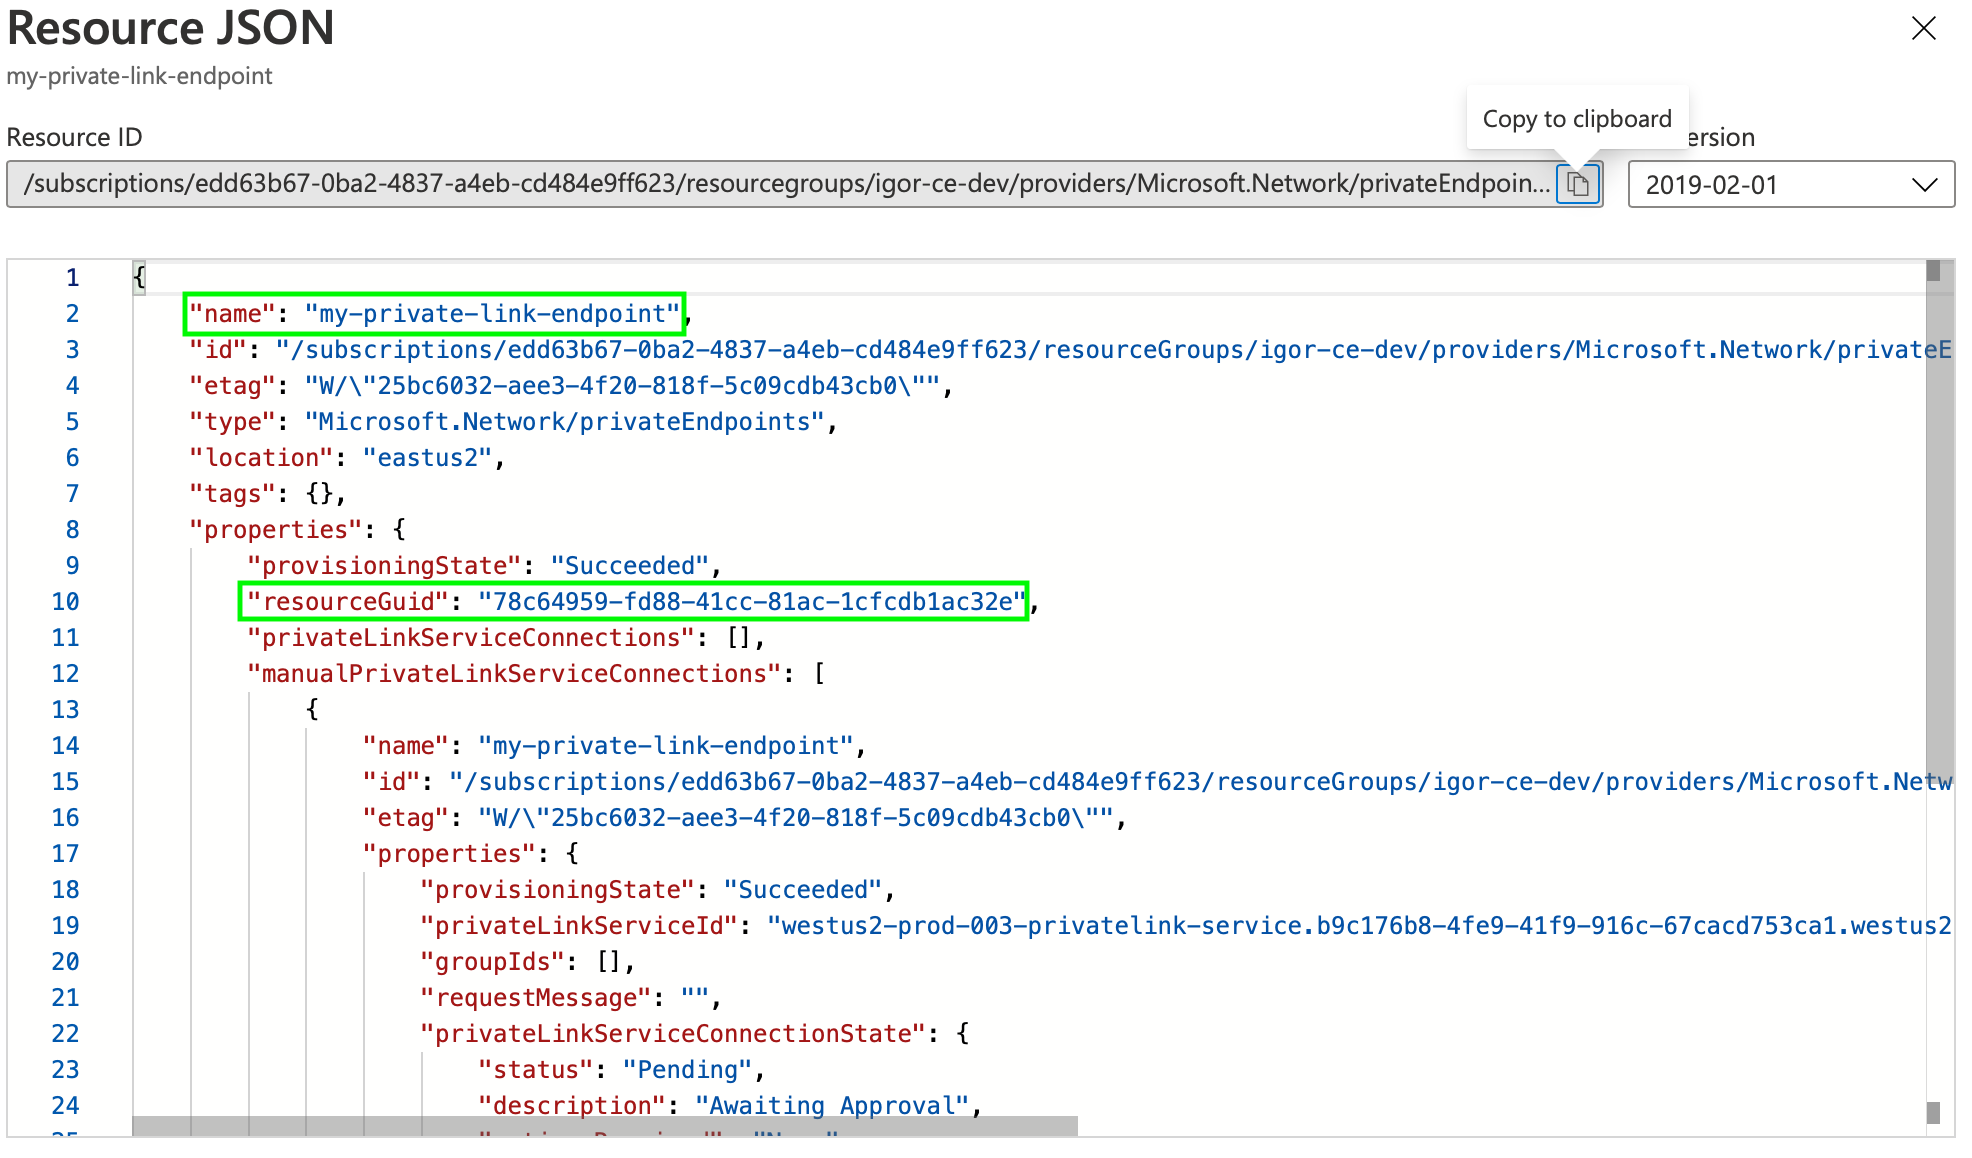
Find your private endpoint resource name

  1. Go to your Private Link Endpoint in the Azure Portal.
  2. Select JSON View.
  3. Copy the value of the top level name property.

Find your private endpoint resource ID

  1. Go to your Private Link Endpoint in the Azure Portal.
  2. Select JSON View.
  3. Copy the value of the properties.resourceGUID property.
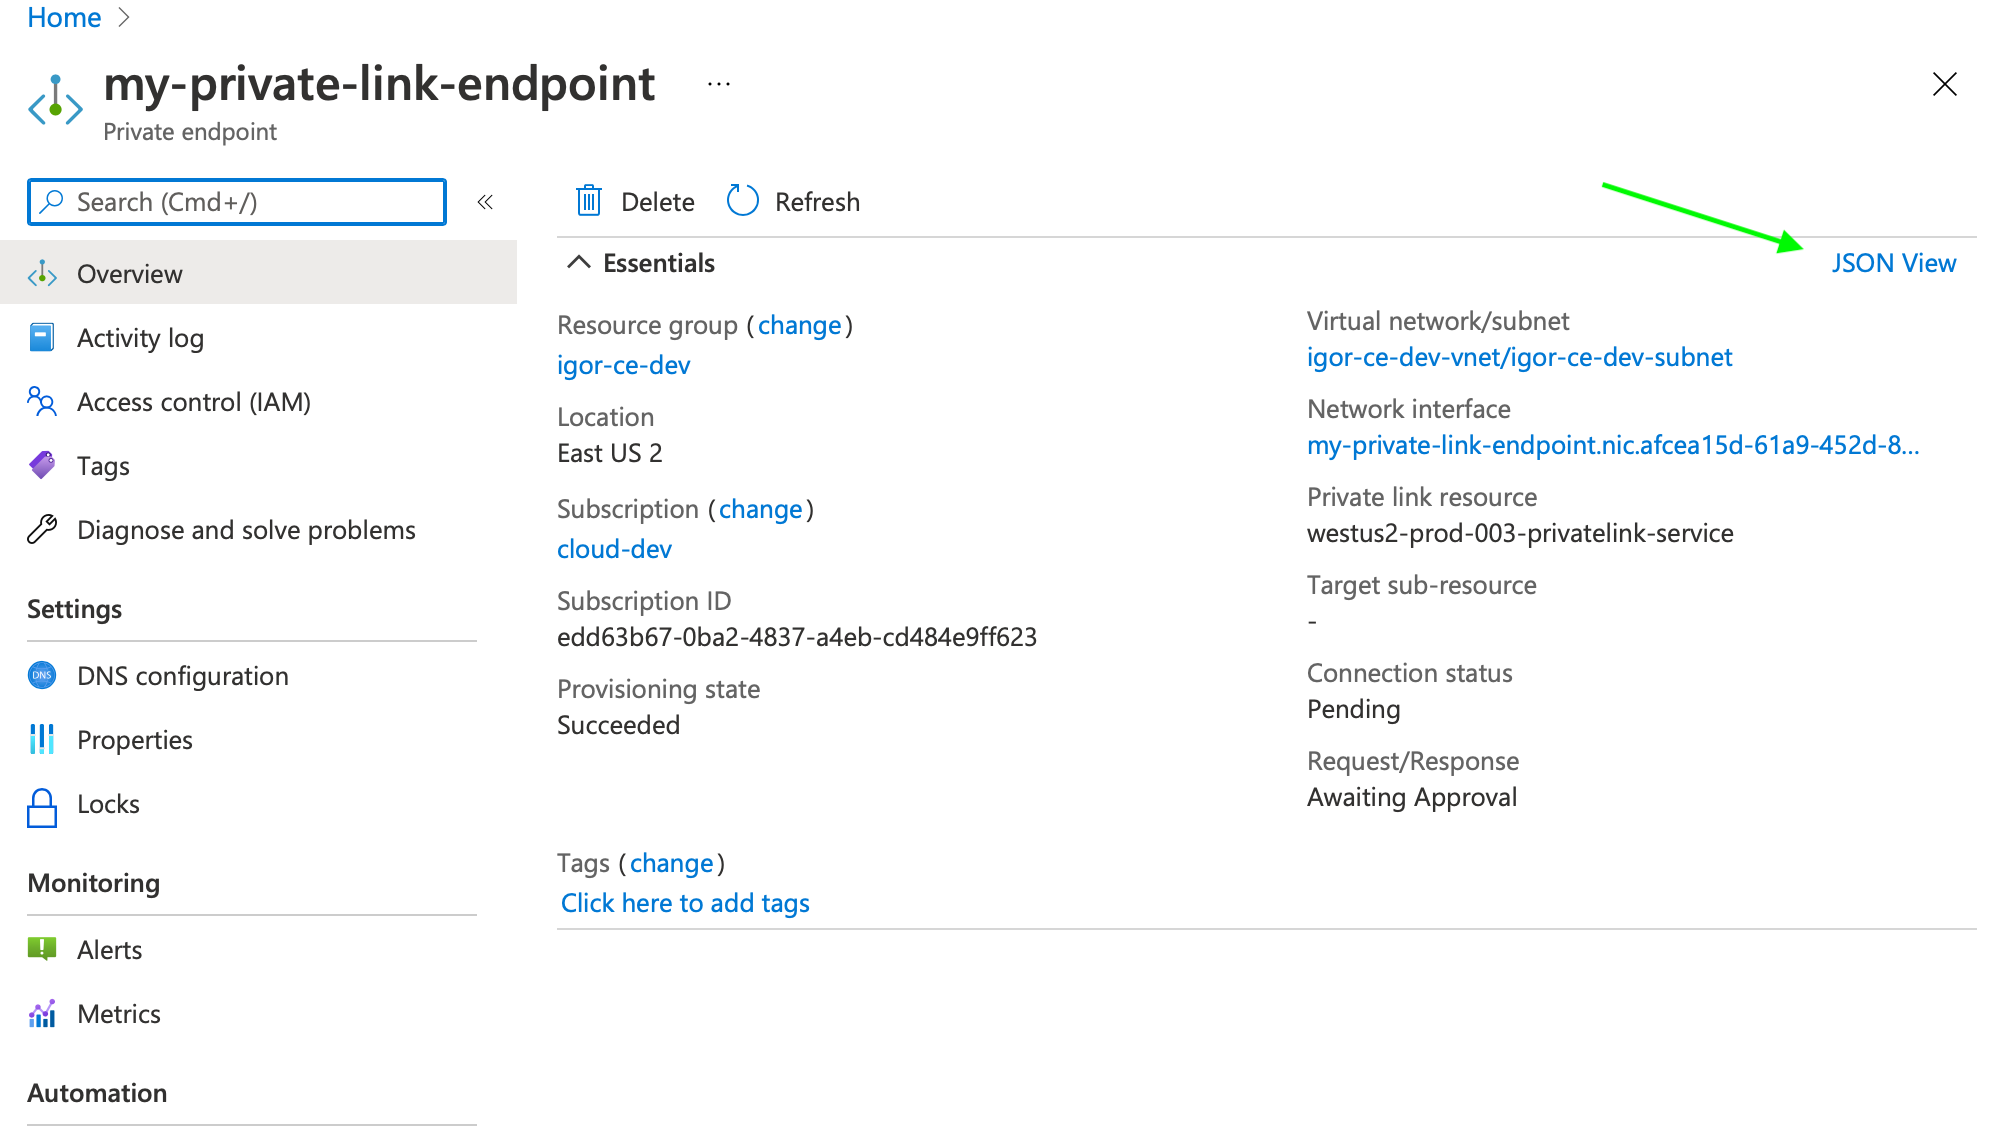
Private endpoint JSON View
Private endpoint Properties

Create rules using the Private Link Endpoint Resource Name and Resource ID

When you have your private endpoint name and ID, you can create a Private Link traffic filter rule set.

  1. From the Account menu, select Traffic filters.
  2. Select Create filter.
  3. Select Private link endpoint.
  4. Create your rule set, providing a meaningful name and description.
  5. Select the region for the rule set.
  6. Enter your Private Endpoint Resource Name and Resource ID.
  7. Select if this rule set should be automatically attached to new deployments.

  8. (Optional) You can claim your Private Endpoint Resource Name and Resource ID, so that no other organization is able to use it in a traffic filter ruleset.

Creating the filter approves the Private Link connection.

Let’s test the connection:

  1. Find out the Elasticsearch cluster ID of your deployment. You can do that by selecting Copy cluster id in the Cloud UI. It looks something like 9c794b7c08fa494b9990fa3f6f74c2f8.

  2. To access your Elasticsearch cluster over Private Link:

    • If you have a custom endpoint alias configured, you can use the custom endpoint URL to connect.

      https://{alias}.{product}.{private_hosted_zone_domain_name}

      For example:

      https://my-deployment-d53192.es.privatelink.eastus2.azure.elastic-cloud.com

    • Alternatively, use the following URL structure:

      https://{elasticsearch_cluster_ID}.{private_hosted_zone_domain_name}:9243

      For example:

      https://6b111580caaa4a9e84b18ec7c600155e.privatelink.eastus2.azure.elastic-cloud.com:9243

  3. You can test the Azure portal part of the setup with the following command (substitute the region and Elasticsearch ID with your cluster).

    The output should look like this:

    $ curl -v https://6b111580caaa4a9e84b18ec7c600155e.privatelink.eastus2.azure.elastic-cloud.com:9243
    * Rebuilt URL to: https://6b111580caaa4a9e84b18ec7c600155e.privatelink.eastus2.azure.elastic-cloud.com:9243/
    *   Trying 192.168.46.5...         # <== note this IP address
    ..
    * SSL connection using TLS1.2 / ECDHE_RSA_AES_256_GCM_SHA384
    * 	 server certificate verification OK
    * 	 common name: *.privatelink.elastic-cloud.com (matched)
    ..
    < HTTP/1.1 403 Forbidden
    {"ok":false,"message":"Forbidden"}

    Check the IP address 192.168.46.5 it should be the same as the IP address of your private endpoint.

    The connection is established, and a valid certificate is presented to the client. The 403 Forbidden is expected, you haven’t associate the rule set with any deployment yet.

  4. In the event that the Private Link connection is not approved by Elastic Cloud, you’ll get an error message like the following. Double check that the filter you’ve created in the previous step uses the right resource name and GUID.

    $ curl -v https://6b111580caaa4a9e84b18ec7c600155e.privatelink.eastus2.azure.elastic-cloud.com:9243
    * Rebuilt URL to: https://6b111580caaa4a9e84b18ec7c600155e.privatelink.eastus2.azure.elastic-cloud.com:9243/
    *   Trying 192.168.46.5...
    * connect to 192.168.46.5 port 9243 failed: No route to host
    * Failed to connect to 6b111580caaa4a9e84b18ec7c600155e.privatelink.eastus2.azure.elastic-cloud.com port 9243: No route to host
    * Closing connection 0
    curl: (7) Failed to connect to 6b111580caaa4a9e84b18ec7c600155e.privatelink.eastus2.azure.elastic-cloud.com port 9243: No route to host

The next step is to associate the rule set with your deployments.

Associate a Private Link rule set with your deployment

To associate a Private Link rule set with your deployment:

  1. Go to the deployment.
  2. On the Security page, under Traffic filters select Apply filter.
  3. Choose the filter you want to apply and select Apply filter.

Access the deployment over a Private Link

For traffic to connect with the deployment over Azure Private Link, the client making the request needs to be located within the VNet where you’ve created the private endpoint. You can also setup network traffic to flow through the originating VNet from somewhere else, such as another VNet or a VPN from your corporate network. This assumes that the private endpoint and the DNS record are also available within that context. Check your service provider documentation for setup instructions.

For example, if your Elasticsearch ID is 6b111580caaa4a9e84b18ec7c600155e and it is located in eastus2 region you can access it under https://6b111580caaa4a9e84b18ec7c600155e.privatelink.eastus2.azure.elastic-cloud.com:9243.

$ curl -u 'username:password'  -v https://6b111580caaa4a9e84b18ec7c600155e.privatelink.eastus2.azure.elastic-cloud.com:9243
..
< HTTP/1.1 200 OK
..

Edit a Private Link connection

You can edit a rule set name or to change the VPC endpoint ID.

  1. From the Account menu, select Traffic filters.
  2. Find the rule set you want to edit.
  3. Select the Edit icon.

Delete a Private Link rule set

If you need to remove a rule set, you must first remove any associations with deployments.

To delete a rule set with all its rules:

  1. Remove any deployment associations.
  2. From the Account menu, select Traffic filters.
  3. Find the rule set you want to edit.
  4. Select the Remove icon. The icon is inactive if there are deployments assigned to the rule set.

Remove a Private Link rule set association from your deployment

To remove an association through the UI:

  1. Go to the deployment.
  2. On the Security page, under Traffic filters select Remove.

Setting up an inter-region Private Link connection

Azure supports inter-region Private Link as described in the Azure documentation. "The Private Link resource can be deployed in a different region than the virtual network and private endpoint."

This means your deployment on Elastic Cloud can be in a different region than the Private Link endpoints or the clients that consume the deployment endpoints.
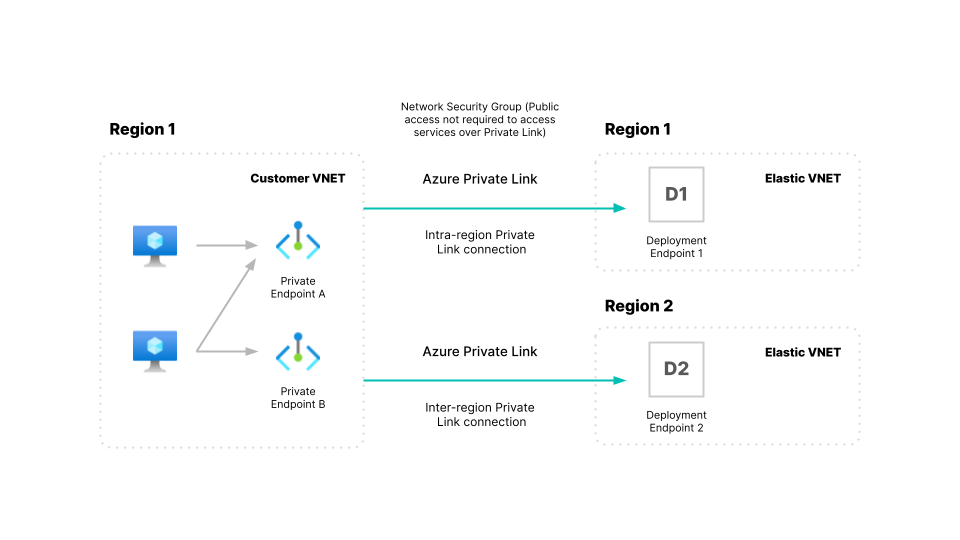
Inter-region Private Link
  1. Set up Private Link Endpoint in region 1 for a deployment hosted in region 2.

    1. Create your Private Endpoint using the service alias for region 2 in the region 1 VNET (let’s call this VNET1).
    2. Create a Private Hosted Zone for region 2, and associate it with VNET1 similar to the step Create a Private Link endpoint and DNS. Note that you are creating these resources in region 1, VNET1.
  2. Create a traffic filter rule set and Associate the rule set through the Elasticsearch Service Console, just as you would for any deployment.

Private Link Service


Private Link Service

As an ISV, you can leverage Private Link Service to provide secure private endpoints for your own applications to your end customers. In this lab you'll use an internal load balancer on a few VMs and then provide a private link service before testing it out.

Introduction

There is a hidden Private Link Service for every Azure service that offers Private Endpoint functionality. Private Link allows Private Endpoints to connect securely to Private Link Service.

The good news for ISVs and SIs hosting their applications on Azure is that they can offer the same functionality to their end customers using the Private Link Service. This opens up a number of new opportunities with a clean and safe onboarding process for customers who want secure private network access to your SaaS offering. Historically there have been concerns for ISVs deploying their software into customer environments if that exposes their intellectual property, and Private Links Service (PLS) gives a viable option that protects that IP.

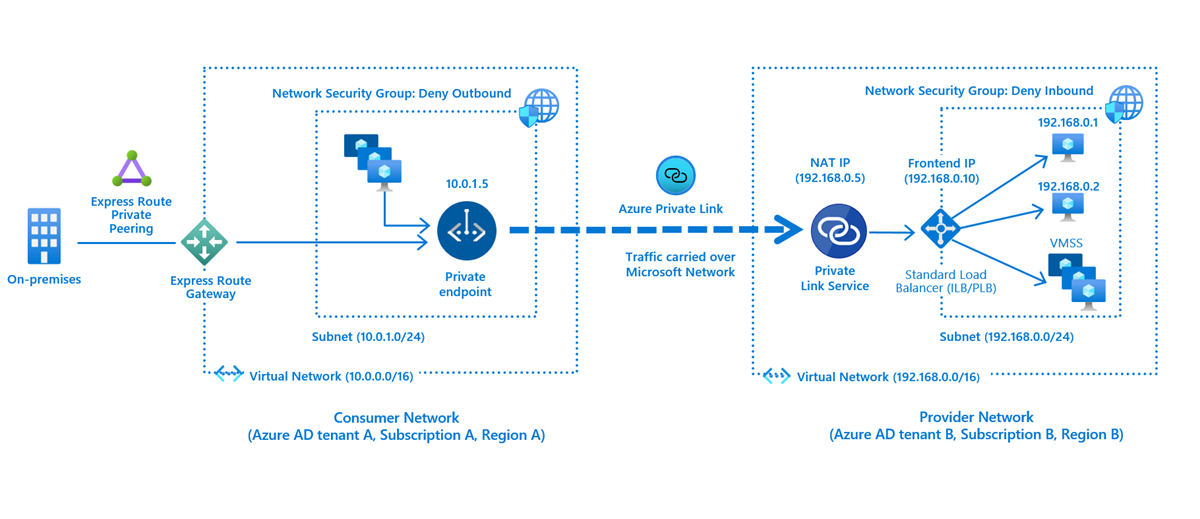
The concepts page for Private Link Service is excellent in describing the use and includes this conceptual connectivity picture:

Private Link Service

Note that the ip addresses and address spaces in the diagram do not match those used in this lab.

Multiple Private Endpoints can connect to a Private Link Service, and they can exist in different tenants.

Overview

  1. Clone a Terraform repo
  2. Deploy an isolated virtual network containing Ubuntu VMs running a basic (and ugly) web server on nginx
    • An NSG and ASG to permit port 80 access to the VMs
    • The three VMs will be distributed across multiple zones in the region
    • This will serve as the ISV application in the lab
  3. Create a standard load balancer and add the VMs into the back end pool
  4. Create a Private Link Service connected to the internal load balancer
  5. Follow the workflow between the customer and provider to establish the connection
  6. Test the web service is accessible

Choose a tenant and subscription

One of the benefits of private link is that they work in a customer / provider scenario.

If possible, deploy the Terraform resources for this lab in a different tenant to your privatelink microhack environment. (If you don’t have a separate tenant to test with then just continue to work in your usual subscription.)

At the end of the lab we’ll create the private endpoint in the private link microhack environment and consume the private link service. (Some additional commands have been included to recreate resources if you have already removed it.)

Deploy the “application”

Clone a Terraform repo into your home directory and then deploy the “application” environment.

Cloud Shell is recommended as it has the terraform binary include in the Bash container image. (If you have your own Bash environment with terraform, git, jq and the Azure CLI then feel free to use that instead.)

  1. Log into Azure

    The Cloud Shell will log you in automatically.

    az login
    
  2. Check your context

    Make sure you are in the correct subscription.

    az account show
    

    If not then change using az account set --subscription <subscriptionId>.

  3. Clone the repo

    Make sure that you are in your home directory (cd ~) and then clone.

    git clone https://github.com/richeney/pls
    
  4. Move to the new subdirectory

    cd pls
    
  5. Initialise

    terraform init
    
  6. Deploy

    The deployment assumes that you have a default public SSH key at ~/.ssh/id-rsa.pub.

    If you do not then you can create one with ssh-keygen -t rsa.

    Deploy the base resources:

    terraform apply --auto-approve
    

    The deployment should only take a few moments, and the terraform output displays the VM names and their IP addresses.

    Example output:

    vms = [
      {
        "ip_address" = "10.0.1.5"
        "name" = "web1"
        "zone" = 1
      },
      {
        "ip_address" = "10.0.1.6"
        "name" = "web2"
        "zone" = 2
      },
      {
        "ip_address" = "10.0.1.4"
        "name" = "web3"
        "zone" = 3
      },
    ]
    

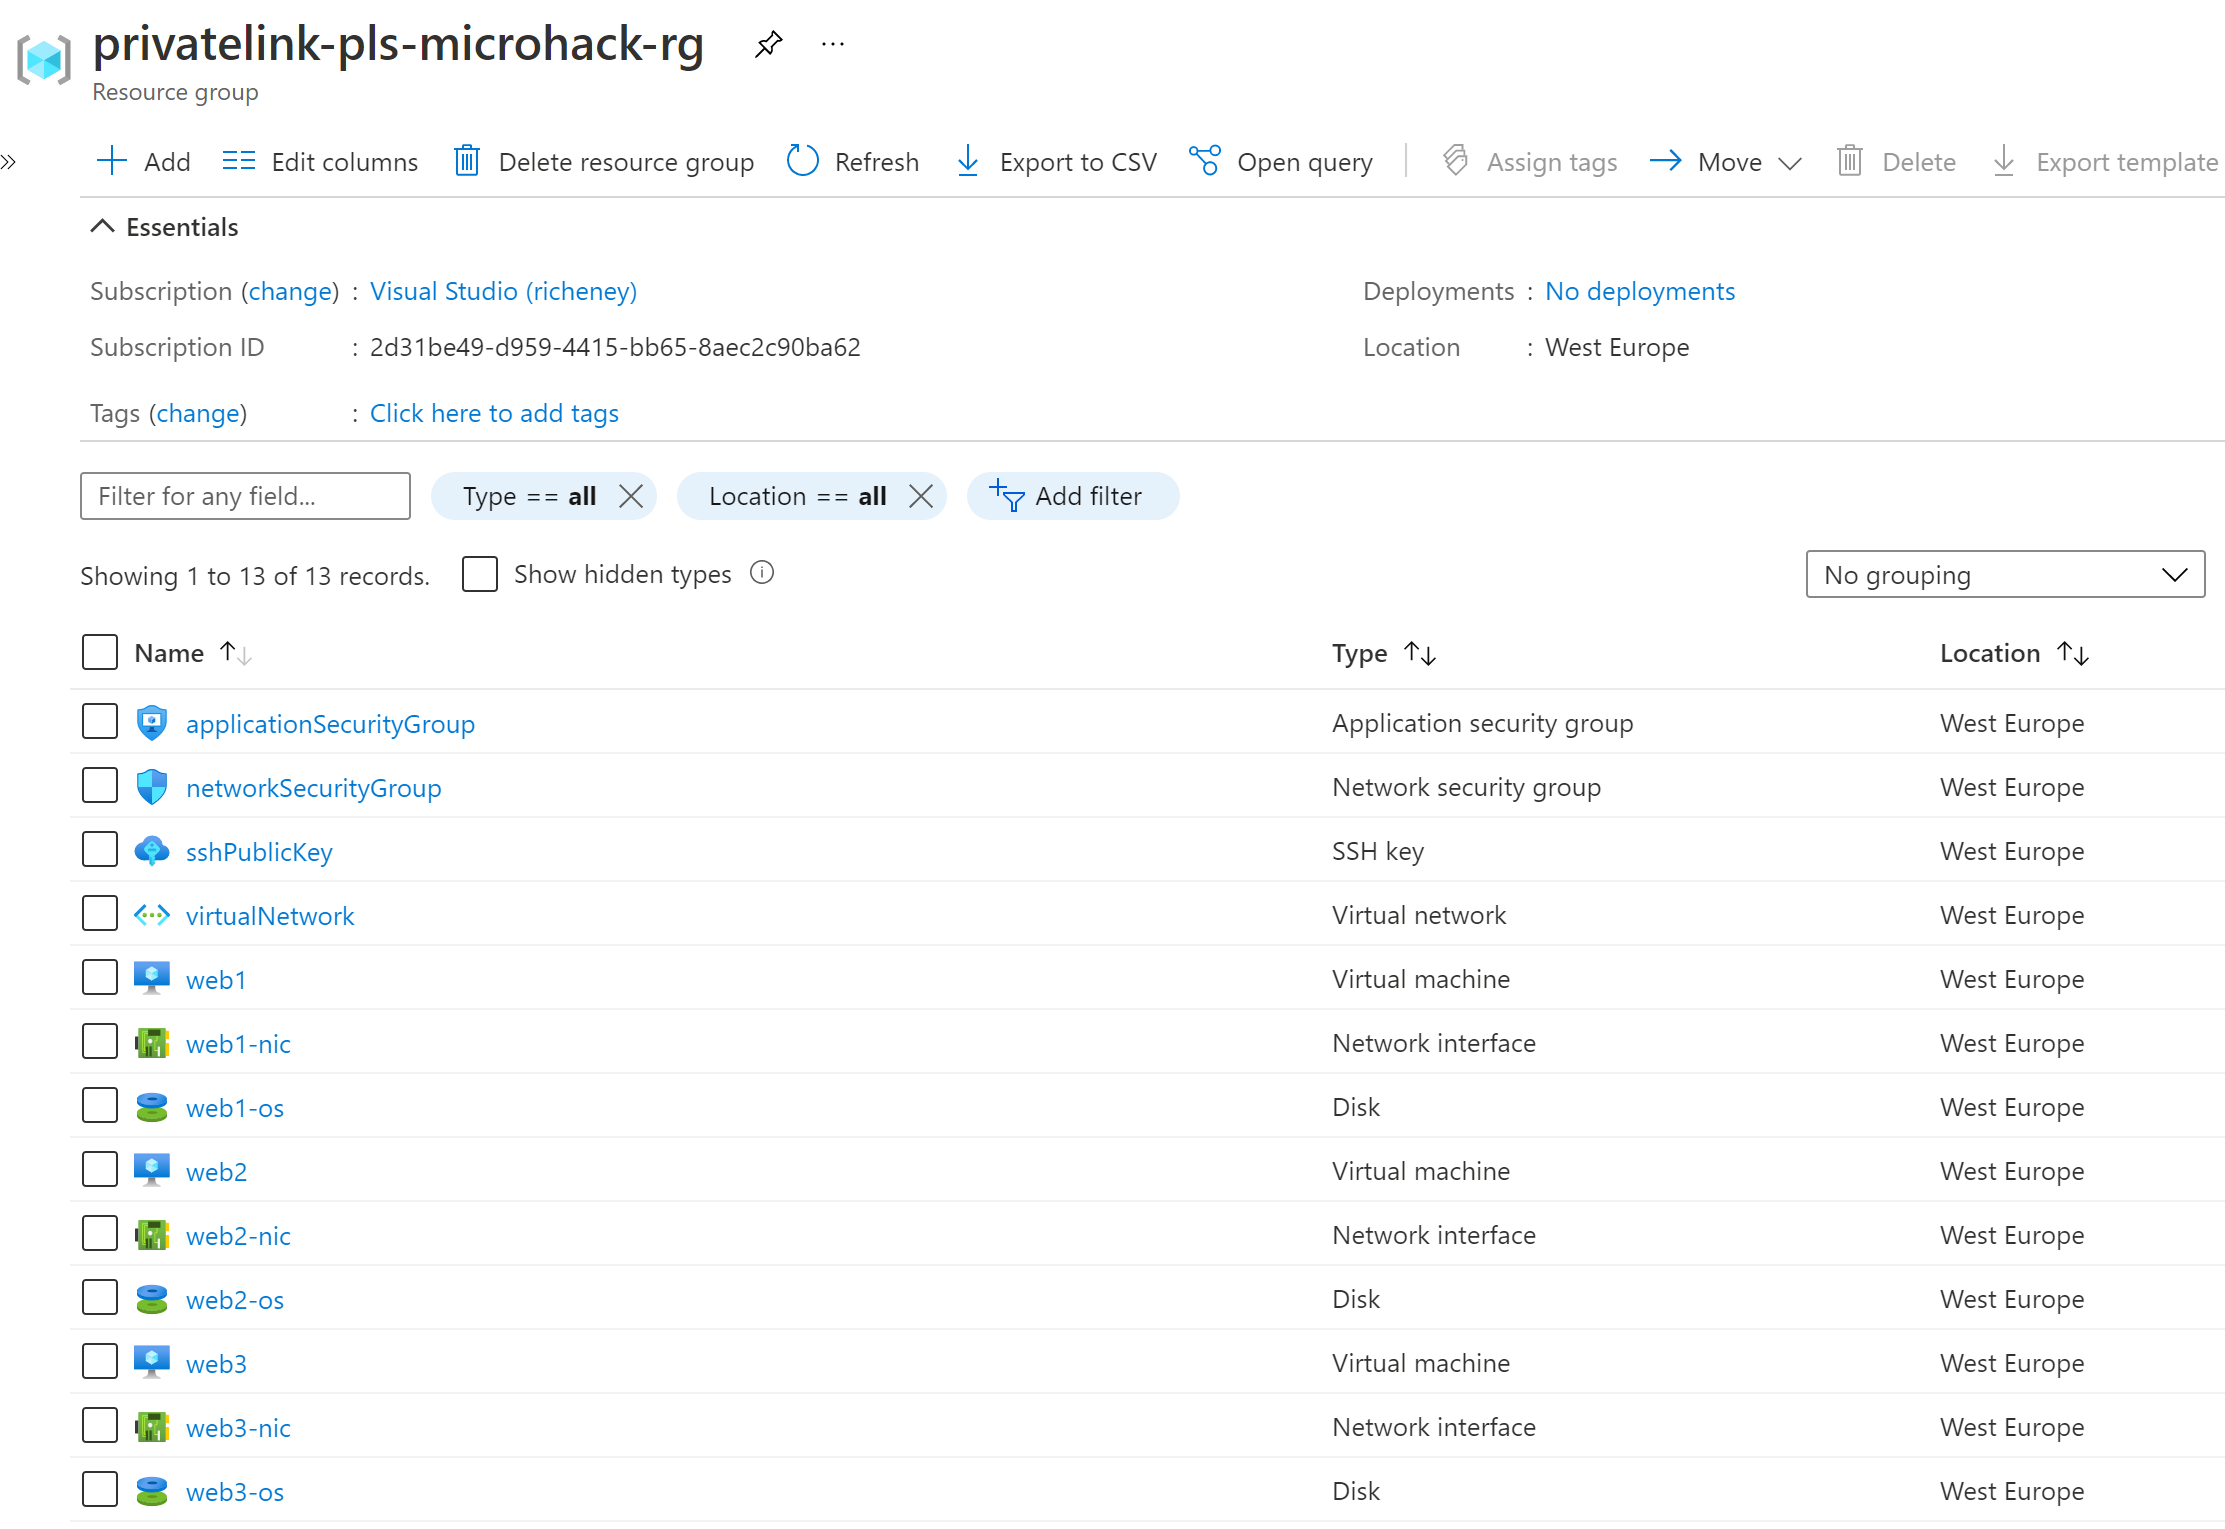
    Check the privatelink-pls-microhack-rg resource group.

    ISVs

Load balancer

Create a standard internal load balancer for the three VMs.

  1. Set temporary environment variables

    export AZURE_DEFAULTS_GROUP="privatelink-pls-microhack-rg"
    export AZURE_DEFAULTS_LOCATION="West Europe"
    

    This sets defaults for the current shell session so you don’t need to set --resource-group or --location.

    If you get logged out of your session then reset these environment variables before continuing.

  2. Create the load balancer

    az network lb create \
      --name loadBalancer \
      --sku Standard \
      --vnet-name virtualNetwork \
      --subnet saas \
      --frontend-ip-name loadBalancerFrontEnd \
      --backend-pool-name saasBackendPool
    
  3. Add the health probe

    az network lb probe create \
      --lb-name loadBalancer \
      --name http \
      --protocol tcp \
      --port 80
    
  4. Add a load balancer rule

    az network lb rule create \
      --lb-name loadBalancer \
      --name http \
      --protocol tcp \
      --frontend-port 80 \
      --backend-port 80 \
      --frontend-ip-name loadBalancerFrontEnd \
      --backend-pool-name saasBackendPool \
      --probe-name http \
      --idle-timeout 15 \
      --enable-tcp-reset true
    

Add VMs to the backend pool

  1. Update the NIC ip configs to specify the load balancer backend pool

    ipConfigIds=$(az network nic list --query "[*].ipConfigurations[0].id" --output tsv)
    az network nic ip-config update --ids $ipConfigIds --lb-name loadBalancer --lb-address-pools saasBackendPool
    

The Private Link Service needs to be in the same region as the Load Balancer. The subnet it is deployed into needs to have the disable-private-link-service-network-policies property set to true.

  1. Update the subnet

    az network vnet subnet update \
      --vnet-name virtualNetwork \
      --name saas \
      --disable-private-link-service-network-policies true
    
  2. Create the Private Link Service

    az network private-link-service create \
      --name saasPrivateLinkService \
      --vnet-name virtualNetwork \
      --subnet saas \
      --lb-name loadBalancer \
      --lb-frontend-ip-configs loadBalancerFrontEnd
    

Private Endpoint Workflow

In the microhack you created a private endpoint which went through an auto-approval process. We’ll now step through the manual process.

Here is the workflow from the concepts page. We have already completed steps 1 and 2.

Workflow

Each of the steps below matches the diagram, with the persona involved at each point. As you may be swapping between CLI sessions and browser tabs as you play out the process from both side’s point of view then the colours will help remind you to switch from one side to the other.

  • ISV ðŸ”µ for the service provider
  • Customer ðŸŸ¢ for the service consumer

OK, let’s step through it and remember to run the commands in the right subscription.

ISV 🔵 subscription.

As the ISV, you need to give the ID of your private link service to your customer.

  1. Display the Private Link Service ID.

    az network private-link-service show --name saasPrivateLinkService --query id --output tsv
    
  2. Provide the Private Link Service ID to the customer.

4. Create the Private Endpoint

Customer 🟢 subscription.

  1. Set a variable to the Private Link Service ID provided by the ISV

    privateLinkServiceId=<providedId>
    
  2. Recreate the spoke-vnet and InfrastructureSubnet (if required)

    If you’ve no longer got access to the microhack environment then you can use the following code block to recreate a few resources.

    az group create --name privatelink-dns-microhack-rg --location "West Europe"
    
    az network vnet create --name spoke-vnet --address-prefixes 10.1.0.0/16 \
      --resource-group privatelink-dns-microhack-rg --location "West Europe"
    
    subnetId=$(az network vnet subnet create --name InfrastructureSubnet \
      --address-prefixes 10.1.0.0/24 --vnet-name spoke-vnet \
      --disable-private-endpoint-network-policies true \
      --resource-group privatelink-dns-microhack-rg \
      --query id --output tsv)
    
    az network private-dns zone create \
        --resource-group privatelink-dns-microhack-rg \
        --name "privatelink.azurewebsites.net"
    
    az network private-dns link vnet create \
        --resource-group privatelink-dns-microhack-rg \
        --zone-name "privatelink.azurewebsites.net" \
        --name dnsLink --virtual-network spoke-vnet \
        --registration-enabled false
    
    az vm create --name testVM \
      --vnet-name spoke-vnet --subnet InfrastructureSubnet \
      --image win2019datacenter \
      --admin-username azureuser --admin-password Microhack2021 \
      --resource-group privatelink-dns-microhack-rg --location "West Europe"
    

    Note the public IP address for the testVM.

  3. Create the private endpoint, specifying the provided private link service ID

    az network private-endpoint create \
      --connection-name connectionToSaasService \
      --name saasPrivateEndpoint \
      --private-connection-resource-id $privateLinkServiceId \
      --resource-group privatelink-dns-microhack-rg --location "West Europe" \
      --vnet-name spoke-vnet --subnet InfrastructureSubnet \
      --manual-request true \
      --request-message "Customer: Tradewinds, Order no.: 314159"
    

    Note the manual request and the message.

5. Approve or reject the request

ISV 🔵 subscription.

The message from the customer is sent to the ISV.

  1. View the request in the portal.

    Connection request

  2. Approve the connection

    Select the request and click on Approve.

6. Configure the DNS record

Customer 🟢 subscription.

When we created a private endpoint to one of the Azure PaaS services, we had to use split horizon DNS with a Private DNS zone linked to the virtual network so that the DNS lookup resolved the FQDN to the private IP address of the private endpoint.

Connecting to a private link service is different. As there is no public DNS record to override, you only need to create your own DNS record. That can be in a standard Azure DNS zone, or your custom / on prem DNS. No need to use a Private DNS zone. As long as the DNS resolves to the private IP address then you’re good.

  1. Show the private endpoint’s IP

    You can browse to the private endpoint’s associated NIC and see the private IP address, or run these CLI commands.

    privateLinkNicId=$(az network private-endpoint show \
      --name saasPrivateEndpoint \
      --resource-group privatelink-dns-microhack-rg \
      --query networkInterfaces[0].id --output tsv)
    
    az network nic show --ids $privateLinkNicId \
      --query ipConfigurations[0].privateIpAddress --output tsv
    
  2. Create a DNS record (optional)

Add the IP address as an A record called saas-pls.

If you haven’t got a standard DNS Zone or custom DNS then you can skip and just use the IP address.

Test

  1. Log on to the VM. Either

    • connect over Bastion to az-mgmt-vm
    • connect over RDP to the testVM
  2. Browse to either

    • http://saas-pls.yourdomain.com
    • http://\<privateLinkIp>

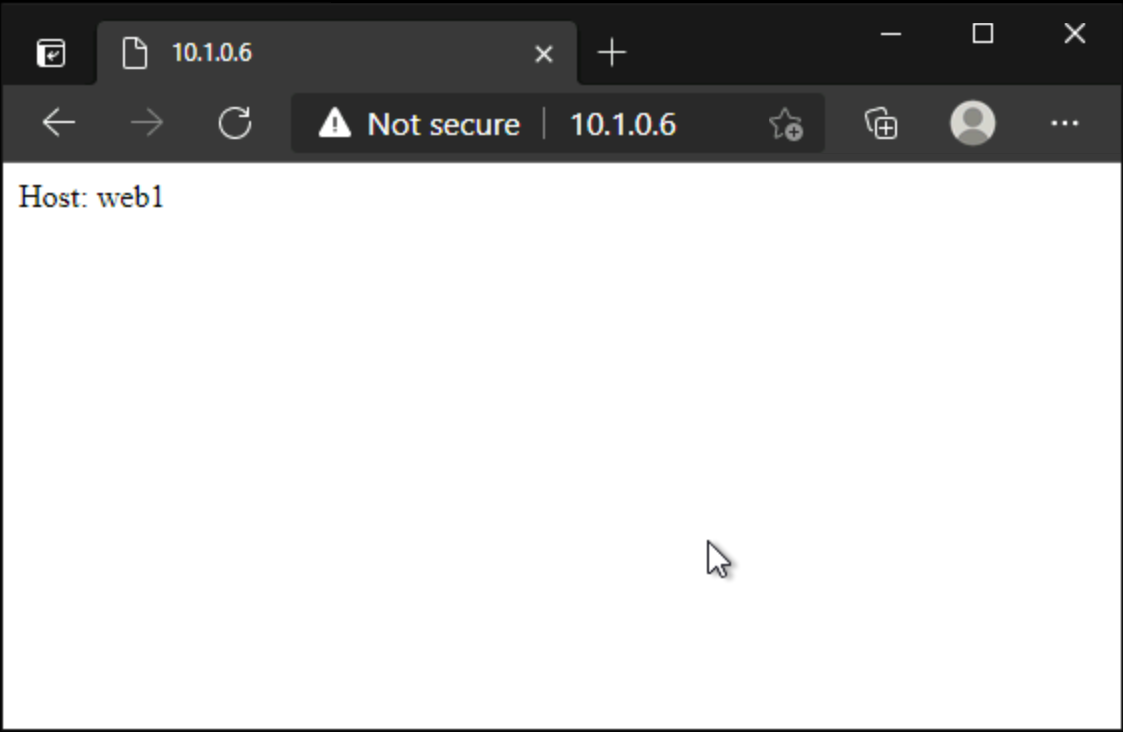
    You should open a basic web page showing Host: <hostname>.

    Success

    If so, success! (I did say that it would be ugly.)

    But the VM is connecting using private link to a private link service fronted SaaS application running in another tenant, which is a beautiful thing.

Configure Azure Private Link


Configure Azure Private Link

Send telemetry data from your Azure Virtual Network to Grafana Cloud via Azure Private Link in order to:

  • Reduce your Azure egress costs.
  • Improve security by keeping your data within the Azure network.

To use this feature, configure a Private Endpoint in your Azure Virtual Network. Your local agents can use this endpoint to route data to Grafana Cloud via Azure Private Link.

Prerequisites

To use Azure Private Link, you need a Grafana Cloud stack hosted on Azure and an Azure Virtual Network.

You need also to provide a list of Subscription IDs from where you plan to connect to Grafana Cloud.

Grafana Cloud stack on Azure

  1. To check where your stack is hosted, navigate to your account in Grafana Cloud, and click Details for a given service, such as Prometheus or Loki.

  2. If the region matches one of the Azure regions where Grafana Cloud is hosted, then your stack is hosted on Azure.

  3. If your stack is not hosted on Azure, create a new stack, forward telemetry to it, and query it from your existing stack.

Azure Virtual Network

On the Azure Virtual Network, create a private endpoint to forward your telemetry data.

Subscription IDs

Before proceeding with Azure Private Link setup, contact Grafana Support and share from which Subscription IDs you plan to connect to Grafana Cloud services.

After Grafana Support confirms your Subscription IDs have been added to the Private Link allowlist, you can proceed setting up the connection.

Other regions

Azure Private Link supports cross-regional connections. If your infrastructure is hosted in a different Azure region than the one where Grafana is hosted, you can still benefit from Private Link.

Set up a Private Endpoint

Create a Private Endpoint in the Azure console, or provision one using Terraform.

Use the Azure Console

  1. Open your Azure Console and navigate to Private EndpointsSelect Private Endpoint &gt; Endpoints
  2. Choose Create.
  3. Select the subscription and resource group where your virtual network is.
  4. Give the endpoint a name, for example, grafana-plEnter name
  5. Continue to the Resource tab and select Connect to an Azure resource by resource ID or alias.
  6. In the Resource ID or alias field, enter the service alias from your Grafana Cloud stack.
Azure RegionGrafana ClusterService Alias
Central USus-central-2internal-ingress-nginx.fc1ffc23-597f-463b-910f-f11aaf43196b.centralus.azure.privatelinkservice
West Europeprod-eu-west-3internal-ingress-nginx.837de879-b929-40fe-a7e5-673072f4b71e.westeurope.azure.privatelinkservice

Select service

  1. Continue to Virtual Network. Select your Virtual Network and Subnet. Network
  2. Choose Review + Create and proceed to create the resource. The Private Endpoint is created and after few minutes, Connection status should be displayed as Approved. If status stays as Awaiting Approval, the Subscription ID from where you are connecting is not included in the allowlist. Please contact Grafana Support to request the approval of the connection.
  3. Under DNS Configuration, copy the local IP address of the private endpoint. You will need this IP later. IP Address
  4. Navigate now to Private DNS zones and click on Create. Create DNS Zone
  5. Select the subscription and resource group.
  6. In Instance Details > Name, enter grafana.net and then proceed to create. DNS Zone
  7. Return to Private DNS Zone overview and add a Record Set.
  8. In Name , introduce a wildcard *.
  9. In IP Address, enter the local IP Address of the Private Endpoint.Record Set.
  10. Navigate to Virtual network links, then click on Add.
  11. Name the network link, for example grafana-pl.
  12. Select your subscription and Virtual Network. Virtual Network Link.
  13. After you create this link, all endpoints under grafana.net resolve to the Private Endpoint IP, so all your telemetry data is sent to Grafana Cloud via Private Link.

Use Terraform

Use the following snippet to automate Private Endpoint setup in Azure using Terraform:

hcl

locals {
  region                    = "<your azure region>"
  resource_group_name       = "<your resource group name>"
  vnet_id                   = "<your virtual network id>"
  subnet_id                 = "<your subnet id>"
  privatelink_service_alias = "<private link service alias provided by Grafana>"
}

resource "azurerm_private_endpoint" "privatelink_grafana" {
  name                = "grafana-pl"
  location            = local.region
  resource_group_name = local.resource_group_name
  subnet_id           = local.subnet_id

  private_service_connection {
    name                           = "grafana-pl"
    is_manual_connection           = false
    private_connection_resource_id = local.privatelink_service_alias
  }
}

resource "azurerm_private_dns_zone" "privatelink_grafana" {
  name                = "grafana.net"
  resource_group_name = local.resource_group_name
}

resource "azurerm_private_dns_zone_virtual_network_link" "privatelink_grafana" {
  name                  = "grafana-pl"
  resource_group_name   = local.resource_group_name
  private_dns_zone_name = azurerm_private_dns_zone.privatelink_grafana.name
  virtual_network_id    = local.vnet_id
}

resource "azurerm_private_dns_a_record" "privatelink_grafana" {
  name                = "*"
  zone_name           = azurerm_private_dns_zone.privatelink_grafana.name
  resource_group_name = local.resource_group_name
  ttl                 = 300
  records             = [azurerm_private_endpoint.private_service_connection.private_ip_address]