Disaster Recovery with Azure NetApp Files (ANF) and Azure VMware Solution (AVS)
Overview
With Azure NetApp files (ANF) cross-region volume replication, VMware workloads running on an Azure VMware Solution (AVS) SDDC site using Azure NetApp files volumes as an NFS datastore on the primary AVS site can be replicated to a designated secondary AVS site in the target recovery region.
Disaster Recovery Orchestrator (DRO) (a scripted solution with a UI) can be used to seamlessly recover workloads replicated from one AVS SDDC to another. DRO automates recovery by breaking replication peering and then mounting the destination volume as a datastore, through VM registration to AVS, to network mappings directly on NSX-T (included with all AVS private clouds).

Prerequisites and general recommendations
Verify that you have enabled cross-region replication by creating replication peering. See Create volume replication for Azure NetApp Files.
You must configure ExpressRoute Global Reach between the source and target Azure VMware Solution private clouds.
You must have a service principal that can access resources.
The following topology is supported: primary AVS site to secondary AVS site.
Configure the replication schedule for each volume appropriately based on business needs and the data- change rate.
Getting started
Deploy Azure VMware Solution
The Azure VMware Solution (AVS) is a hybrid cloud service that provides fully functional VMware SDDCs within a Microsoft Azure public cloud. AVS is a first-party solution fully managed and supported by Microsoft and verified by VMware that uses Azure infrastructure. Therefore, customers get VMware ESXi for compute virtualization, vSAN for hyper-converged storage, and NSX for networking and security, all while taking advantage of Microsoft Azure’s global presence, class-leading data- center facilities, and proximity to the rich ecosystem of native Azure services and solutions. A combination of Azure VMware Solution SDDC and Azure NetApp Files provides the best performance with minimal network latency.
To configure an AVS private cloud on Azure, follow the steps in this link for NetApp documentation and in this link for Microsoft documentation. A pilot- light environment set up with a minimal configuration can be used for DR purposes. This setup only contains core components to support critical applications, and it can scale out and spawn more hosts to take the bulk of the load if a failover occurs.
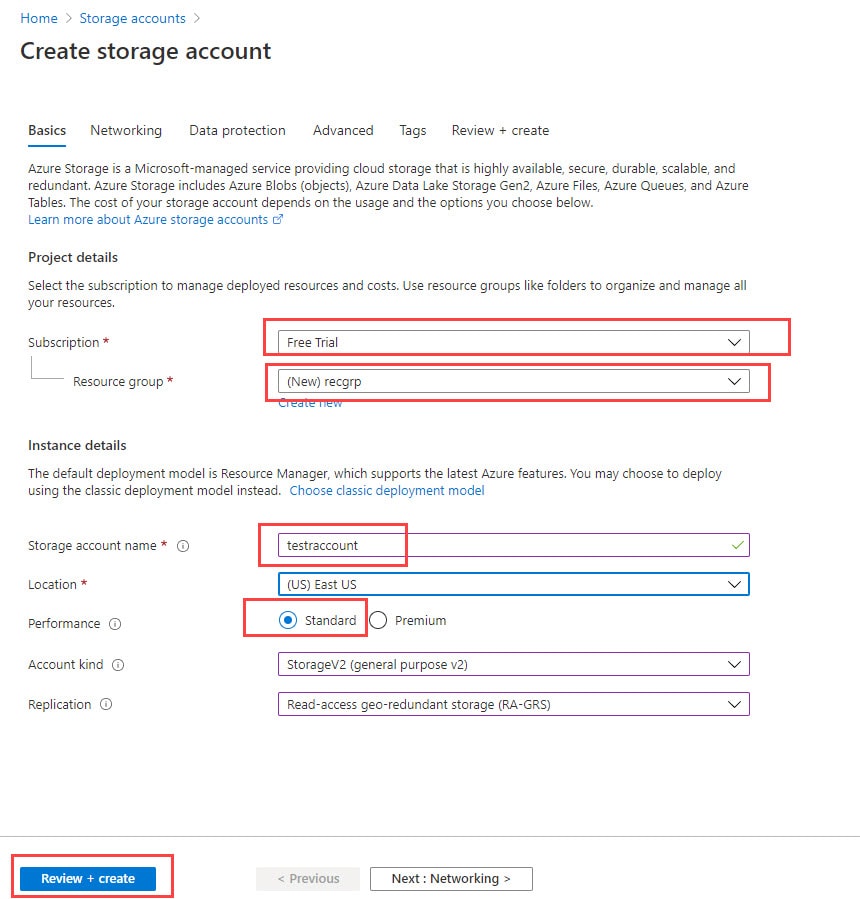
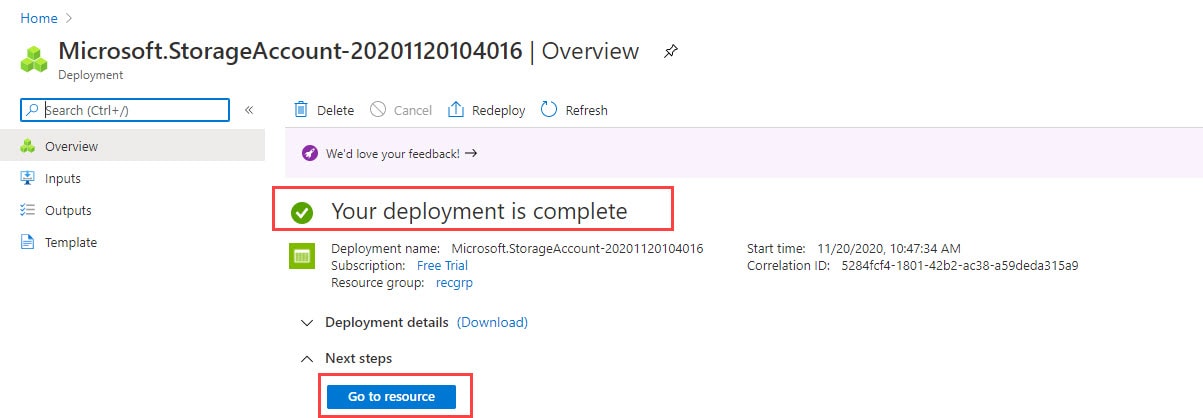
Provision and configure Azure NetApp Files
Azure NetApp Files is a high-performance, enterprise-class, metered file- storage service. Follow the steps in this link to provision and configure Azure NetApp Files as a NFS datastore to optimize AVS private cloud deployments.
Create volume replication for Azure NetApp Files-powered datastore volumes
The first step is to set up cross- region replication for the desired datastore volumes from the AVS primary site to the AVS secondary site with the appropriate frequencies and retentions.

Follow the steps in this link to set up cross-region replication by creating replication peering. The service level for the destination capacity pool can match that of the source capacity pool. However, for this specific use case, you can select the standard service level and then modify the service level in the event of a real disaster or DR simulations.
DRO installation
To get started with DRO, use the Ubuntu operating system on the designated Azure virtual machine and make sure you meet the prerequisites. Then install the package.
Prerequisites:
Service principal that can access resources.
Make sure that appropriate connectivity exists to the source and destination SDDC and Azure NetApp Files instances.
DNS resolution should be in place if you are using DNS names. Otherwise, use IP addresses for vCenter.
OS requirements:
Ubuntu Focal 20.04 (LTS)The following packages must be installed on the designated agent virtual machine:
Docker
Docker- compose
JqChange
docker.sockto this new permission:sudo chmod 666 /var/run/docker.sock.
The steps are as follows:
Download the installation package on the designated virtual machine:
git clone https://github.com/NetApp/DRO-Azure.git
Unzip the package, run the deployment script, and enter the host IP (for example,
10.10.10.10).tar xvf draas_package.tar Navigate to the directory and run the deploy script as below: sudo sh deploy.sh
Access the UI using the following credentials:
Username:
adminPassword:
admin
DRO configuration
After Azure NetApp Files and AVS have been configured properly, you can begin configuring DRO to automate the recovery of workloads from the primary AVS site to the secondary AVS site. NetApp recommends deploying the DRO agent in the secondary AVS site and configuring the ExpressRoute gateway connection so that the DRO agent can communicate via the network with the appropriate AVS and Azure NetApp Files components.
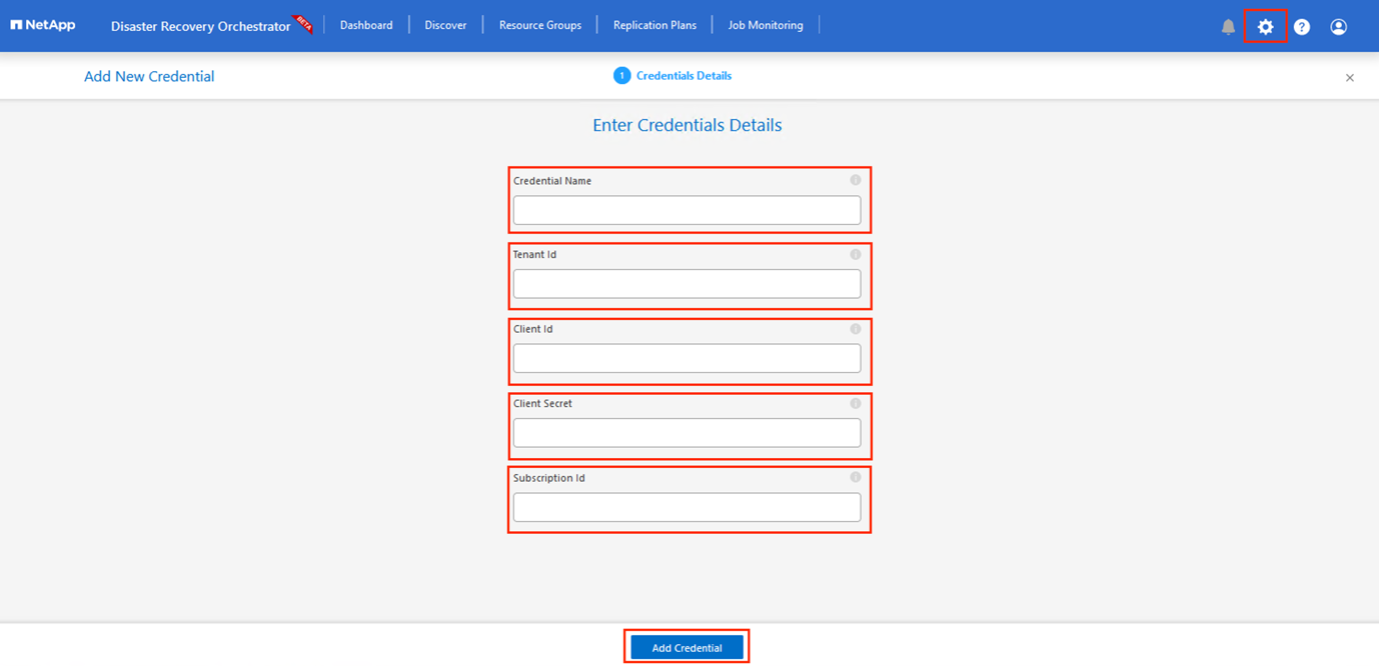
The first step is to Add credentials. DRO requires permission to discover Azure NetApp Files and the Azure VMware Solution. You can grant the required permissions to an Azure account by creating and setting up an Azure Active Directory (AD) application and by obtaining the Azure credentials that DRO needs. You must bind the service principal to your Azure subscription and assign it a custom role that has the relevant required permissions. When you add source and destination environments, you are prompted to select the credentials associated with the service principal. You need to add these credentials to DRO before you can click Add New Site.
To perform this operation, complete the following steps:
Open DRO in a supported browser and use the default username and password (
admin/admin). The password can be reset after the first login using the Change Password option.In the upper right of the DRO console, click the Settings icon, and select Credentials.
Click Add New Credential and follow the steps in the wizard.
To define the credentials, enter information about the Azure Active Directory service principal that grants the required permissions:
Credential name
Tenant ID
Client ID
Client secret
Subscription ID
You should have captured this information when you created the AD application.
Confirm the details about the new credentials and click Add Credential.
After you add the credentials, it’s time to discover and add the primary and secondary AVS sites (both vCenter and the Azure NetApp files storage account) to DRO. To add the source and destination site, complete the following steps:
Go to the Discover tab.
Click Add New Site.
Add the following primary AVS site (designated as Source in the console).
SDDC vCenter
Azure NetApp Files storage account
Add the following secondary AVS site (designated as Destination in the console).
SDDC vCenter
Azure NetApp Files storage account
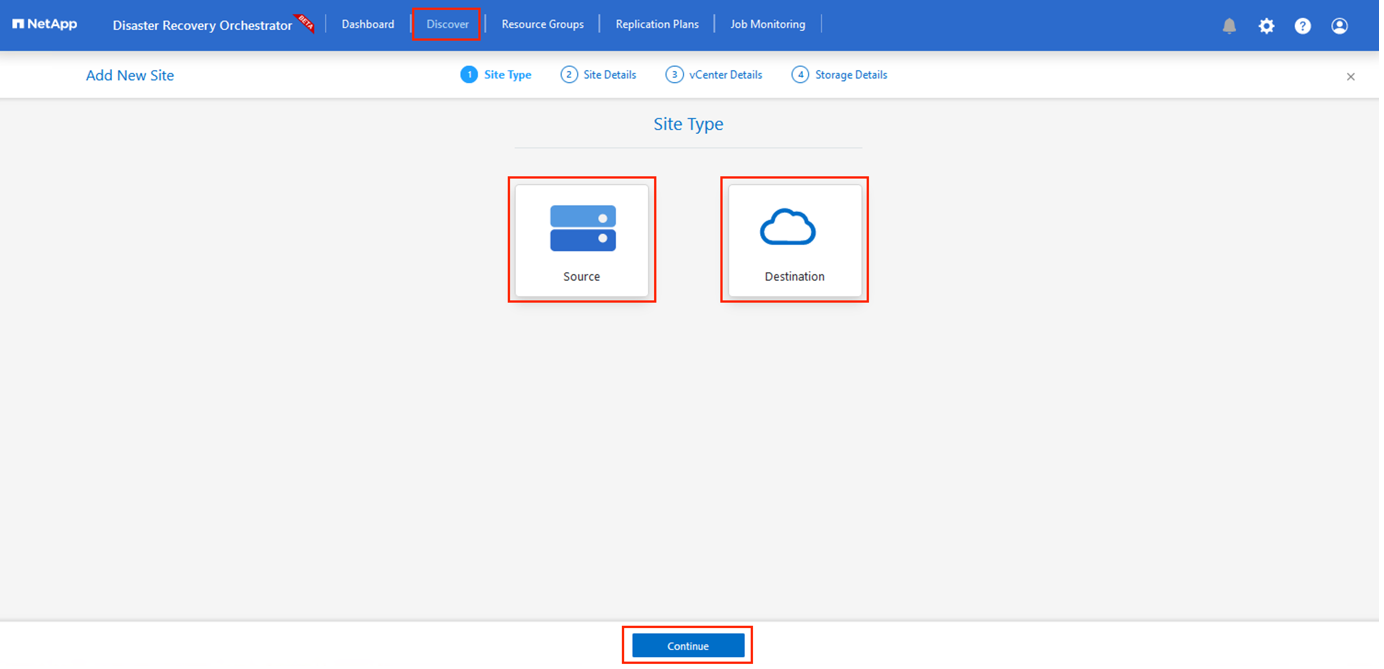
Add site details by clicking Source, entering a friendly site name, and select the connector. Then click Continue.
Update the vCenter details. To do this, select the credentials, Azure region, and resource group from the dropdown for the primary AVS SDDC.
DRO lists all the available SDDCs within the region. Select the designated private cloud URL from the dropdown.
Enter the
cloudadmin@vsphere.localuser credentials. This can be accessed from Azure Portal. Follow the steps mentioned in this link. Once done, click Continue.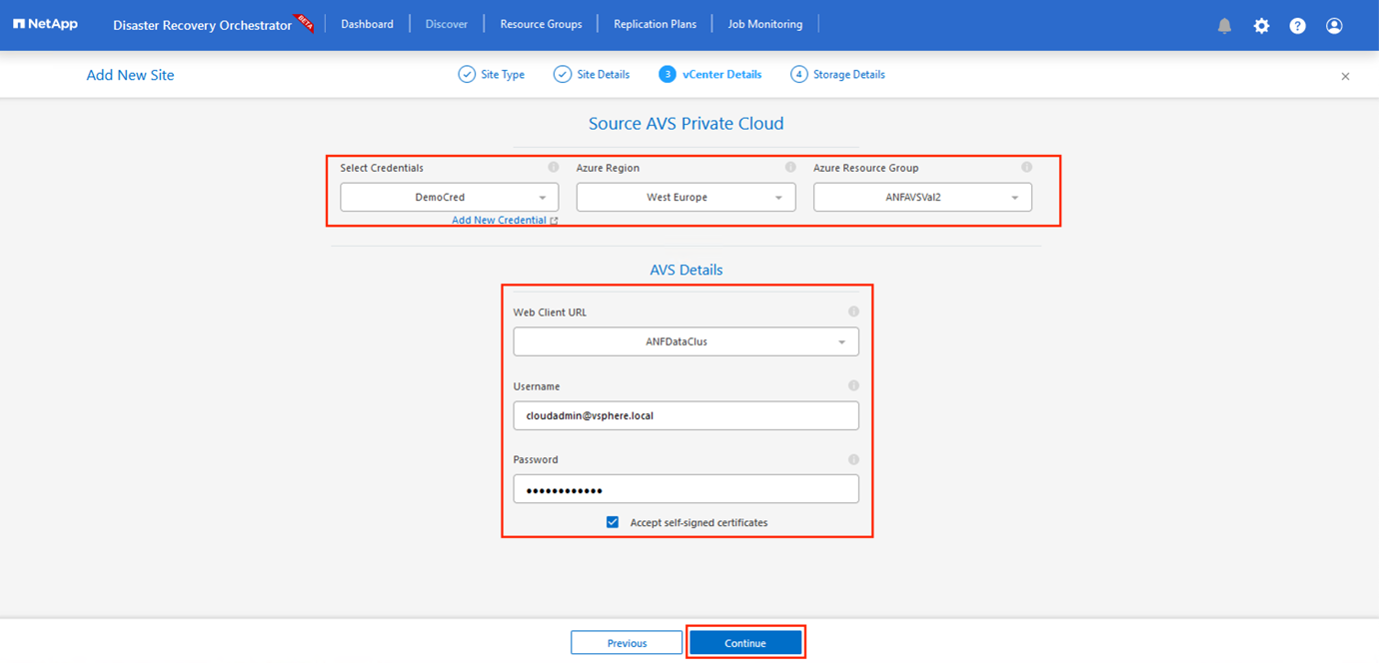
Select the Source Storge details (ANF) by selecting the Azure Resource group and NetApp account.
Click Create Site.
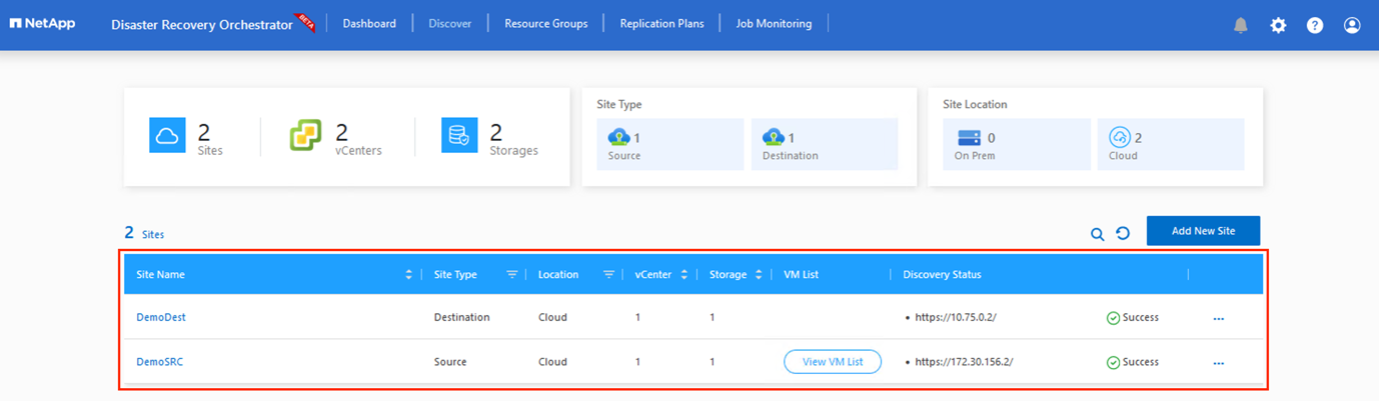
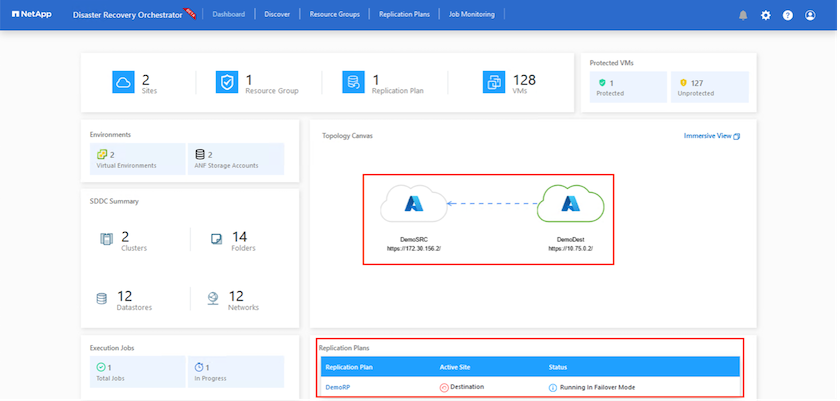
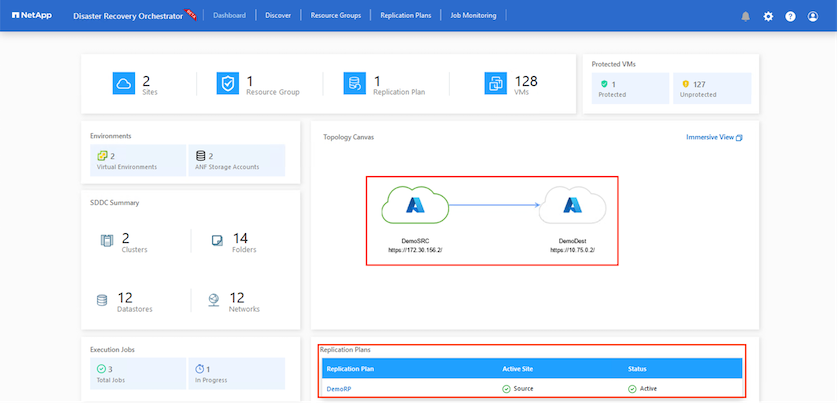
Once added, DRO performs automatic discovery and displays the VMs that have corresponding cross- region replicas from the source site to the destination site. DRO automatically detects the networks and segments used by the VMs and populates them.
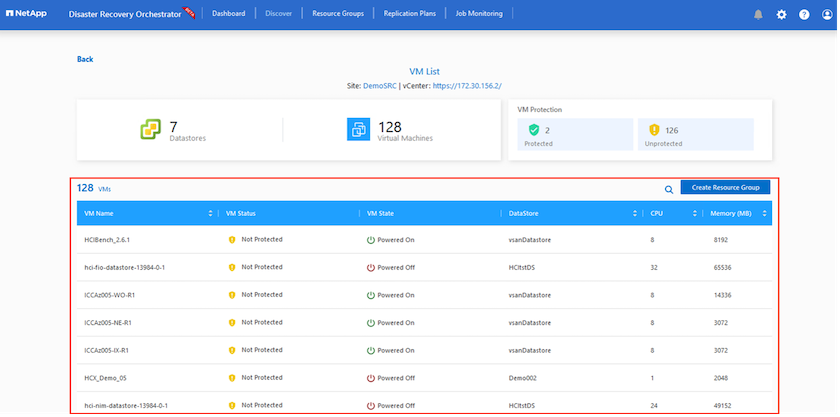
The next step is to group the required VMs into their functional groups as resource groups.
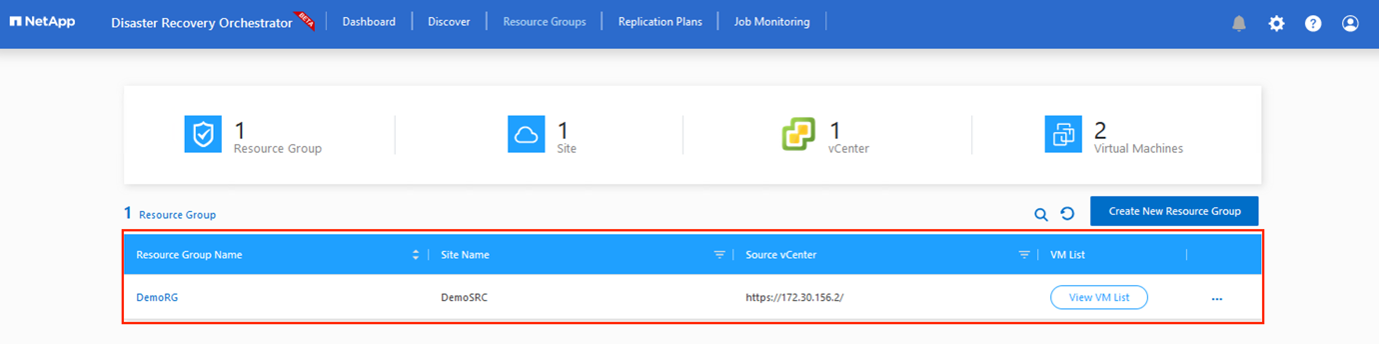
Resource groupings
After the platforms have been added, group the VMs you want to recover into resource groups. DRO resource groups allow you to group a set of dependent VMs into logical groups that contain their boot orders, boot delays, and optional application validations that can be executed upon recovery.
To start creating resource groups, click the Create New Resource Group menu item.
Access Resource Grou*ps and click *Create New Resource Group.
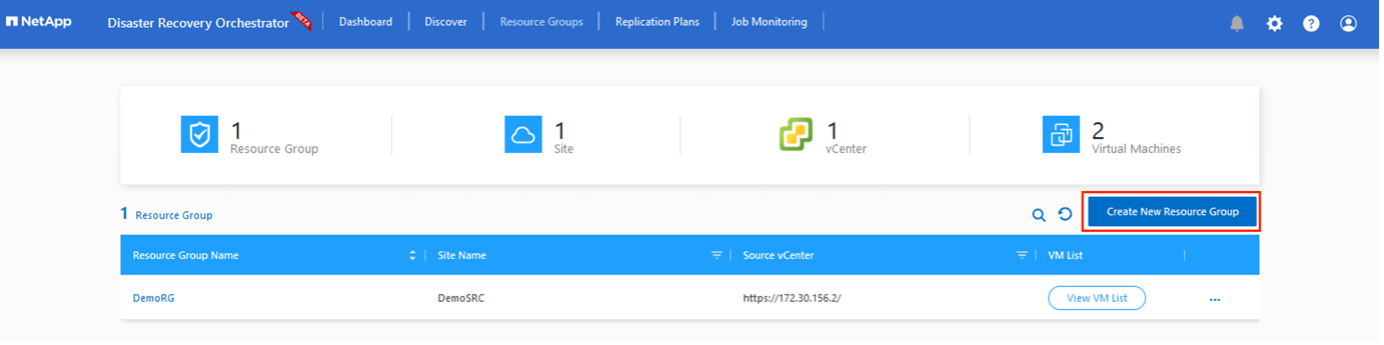
Under New Resource Group, select the source site from the dropdown and click Create.
Provide the resource group details and click Continue.
Select appropriate VMs using the search option.
Select the Boot Order and Boot Delay (secs) for all the selected VMs. Set the order of the power- on sequence by selecting each virtual machine and setting up the priority for it. The default value for all virtual machines is 3. The options are as follows:
The first virtual machine to power on
Default
The last virtual machine to power on
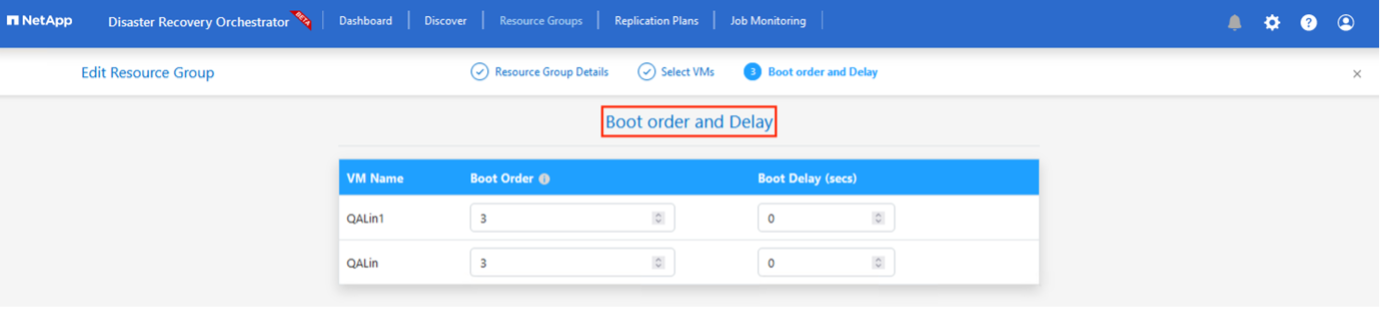
Click Create Resource Group.
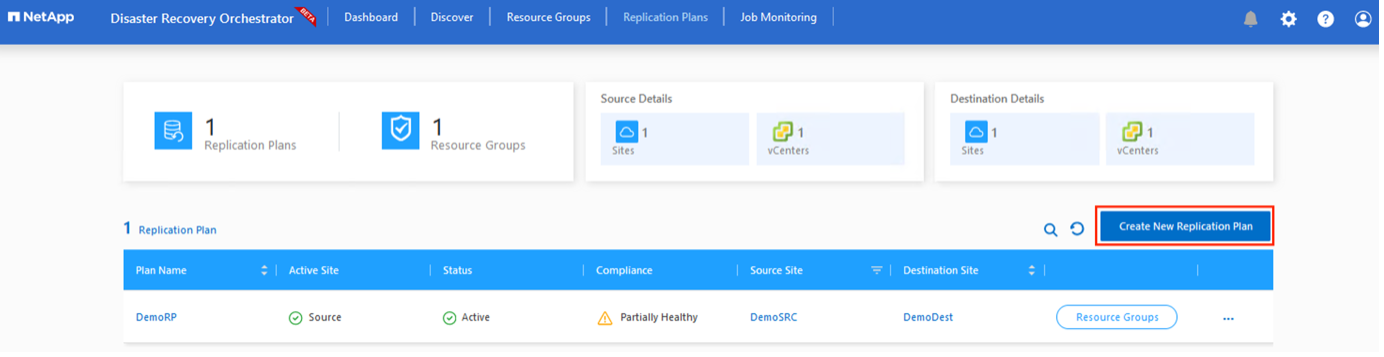
Replication plans
You must have a plan to recover applications in the event of a disaster. Select the source and destination vCenter platforms from the drop down, pick the resource groups to be included in this plan, and also include the grouping of how applications should be restored and powered on (for example, domain controllers, tier-1, tier-2, and so on). Plans are often called blueprints as well. To define the recovery plan, navigate to the Replication Plan tab, and click New Replication Plan.
To start creating a replication plan, complete the following steps:
Navigate to Replication Plans and click Create New Replication Plan.
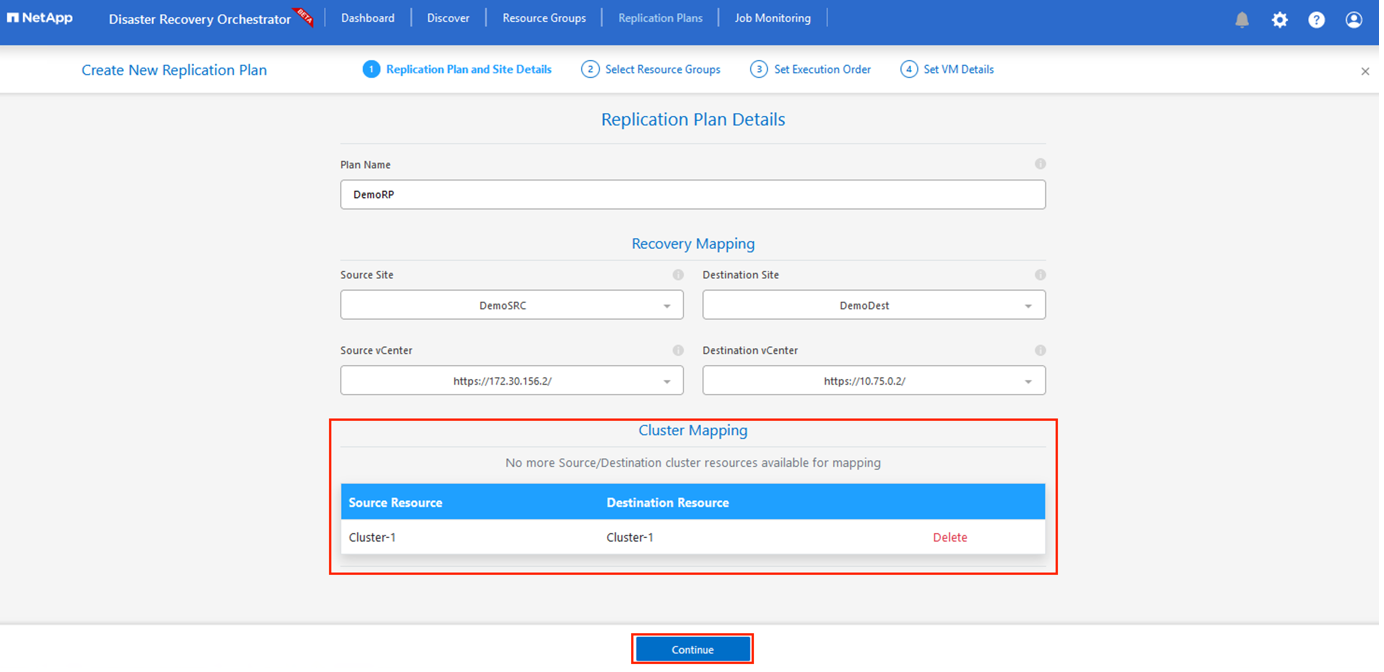
On the New Replication Plan, provide a name for the plan and add recovery mappings by selecting the Source Site, associated vCenter, Destination Site, and associated vCenter.
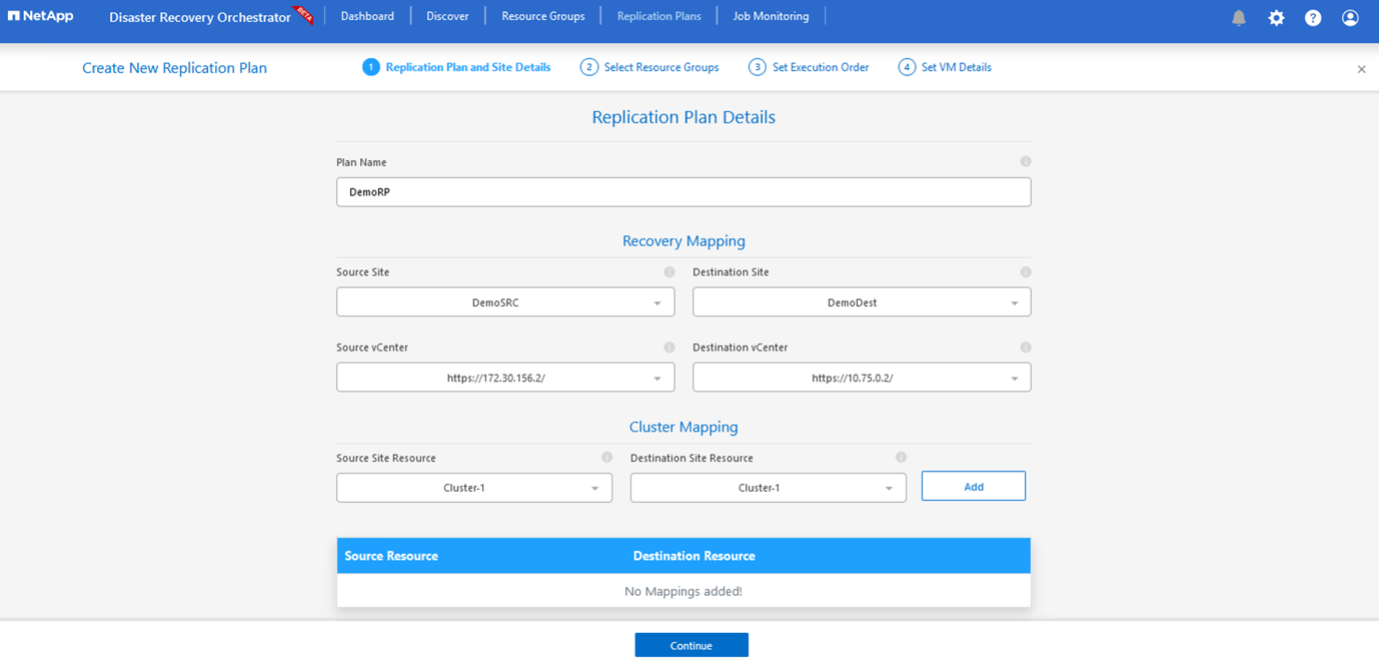
After recovery mapping is complete, select the Cluster Mapping.
Select Resource Group Details and click Continue.
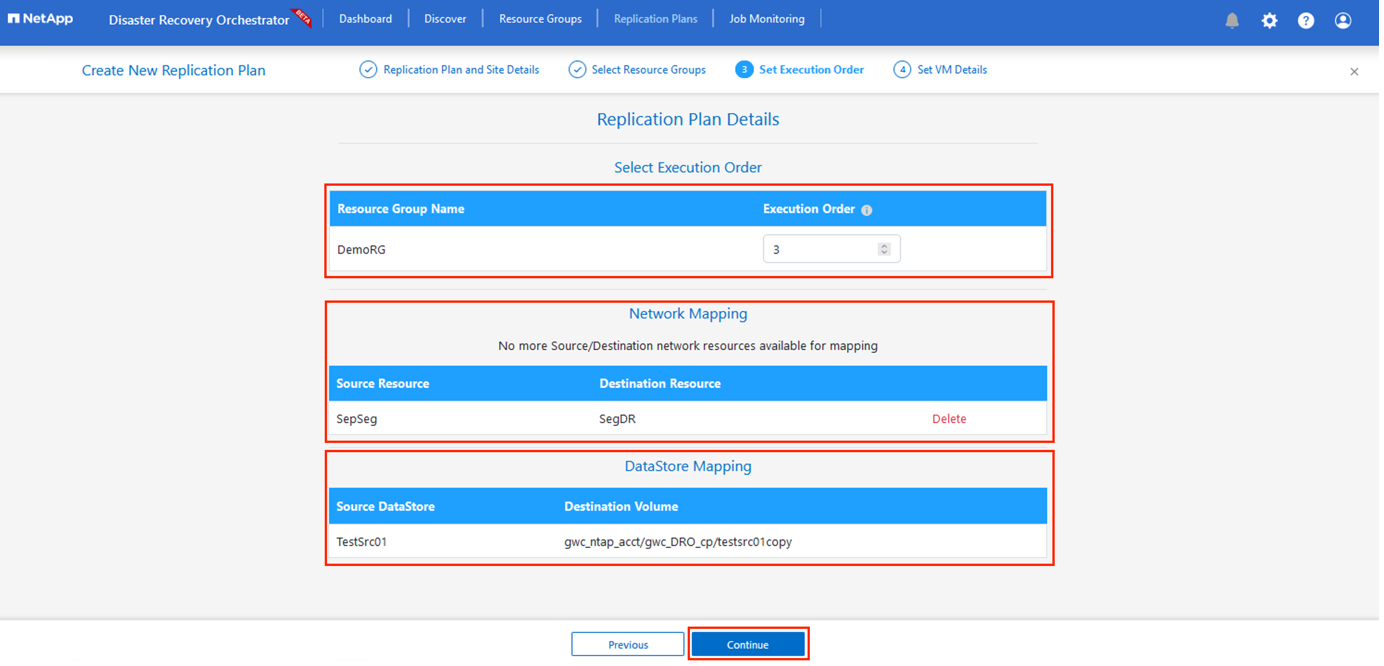
Set the execution order for the resource group. This option enables you to select the sequence of operations when multiple resource groups exist.
Once done, set network mapping to the appropriate segment. The segments should already be provisioned on the secondary AVS cluster, and, to map the VMs to those, select the appropriate segment.
Datastore mappings are automatically selected based on the selection of VMs.
Under VM details, you can optionally resize the VMs CPU and RAM parameters. This can be very helpful when you are recovering large environments to smaller target clusters or when you are conducting DR tests without having to provision a one-to-one physical VMware infrastructure. Also, modify the boot order and boot delay (secs) for all the selected VMs across the resource groups. There is an additional option to modify the boot order if any changes are required from what you selected during resource- group boot- order selection. By default, the boot order selected during resource- group selection is used, however any modifications can be performed at this stage.
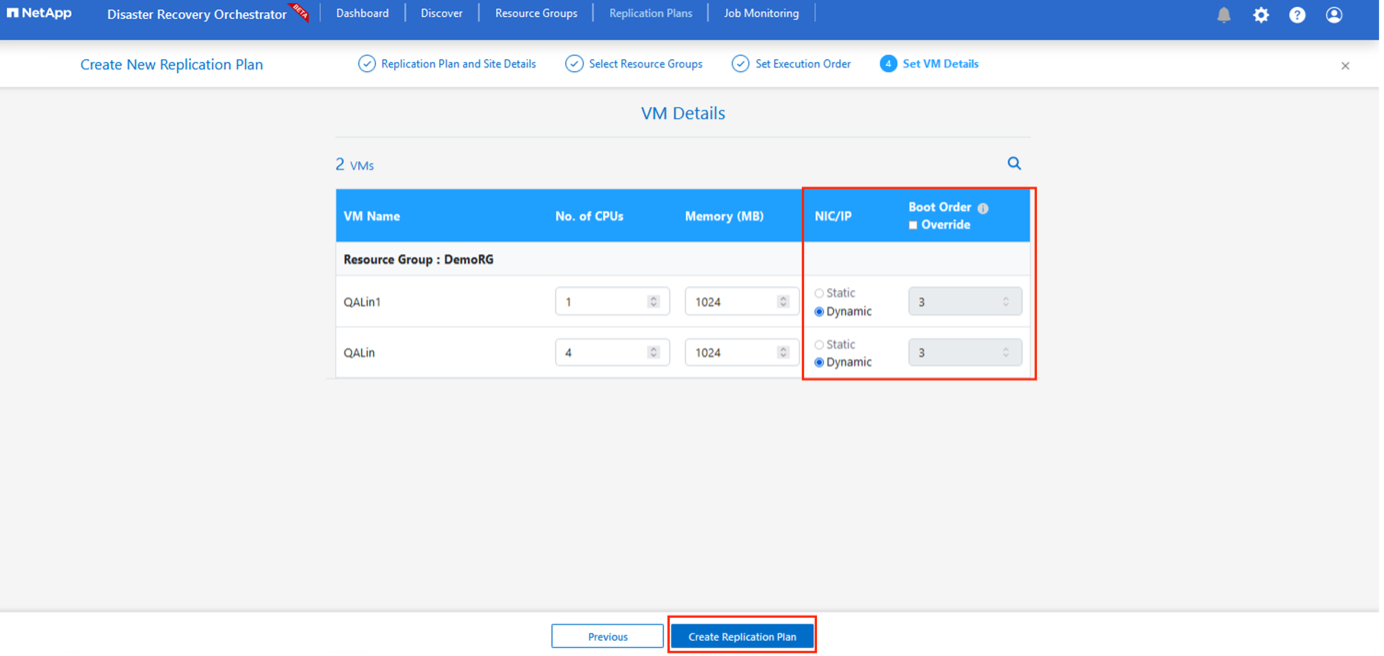
Click Create Replication Plan.After the replication plan is created, you can exercise the failover, test failover, or migrate options depending on your requirements.
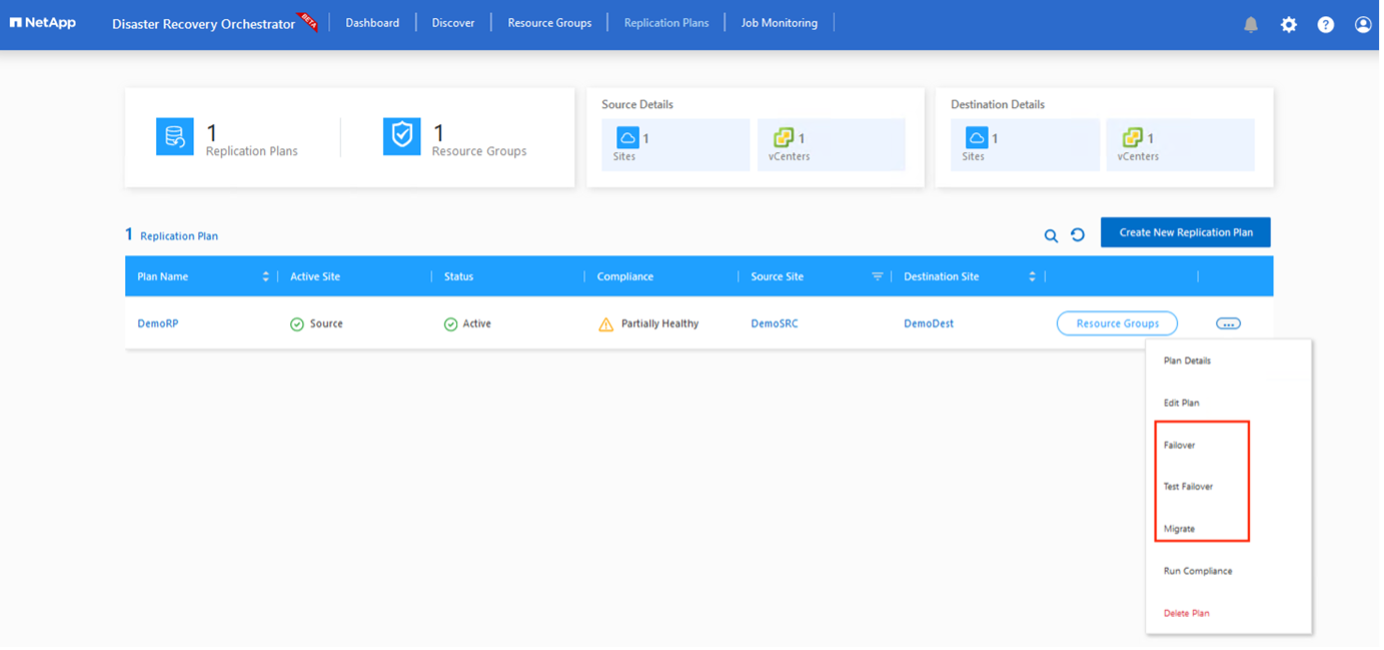
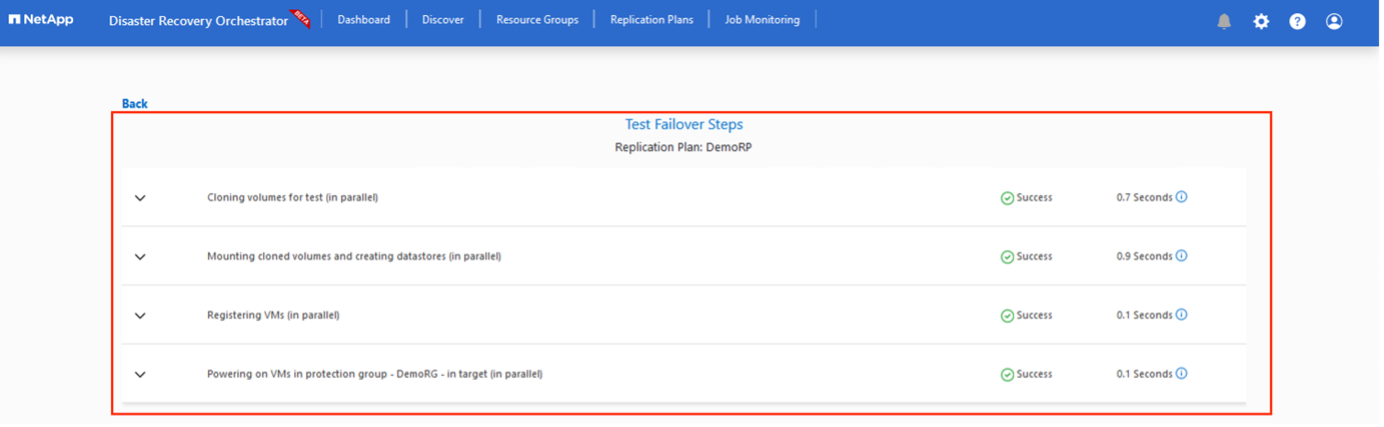
During the failover and test failover options, the most recent snapshot is used, or a specific snapshot can be selected from a point-in-time snapshot. The point-in-time option can be very beneficial if you are facing a corruption event like ransomware, where the most recent replicas are already compromised or encrypted. DRO shows all available time points.
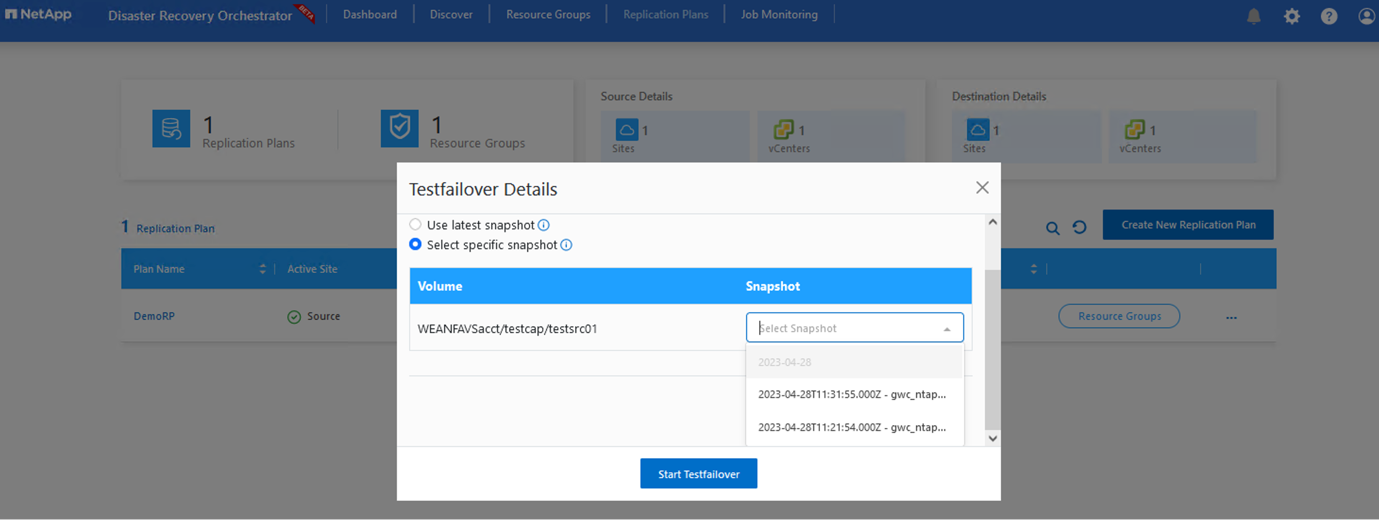
To trigger failover or test failover with the configuration specified in the replication plan, you can click Failover or Test Failover. You can monitor the replication plan in the task menu.
After failover is triggered, the recovered items can be seen in the secondary site AVS SDDC vCenter (VMs, networks, and datastores). By default, the VMs are recovered to Workload folder.
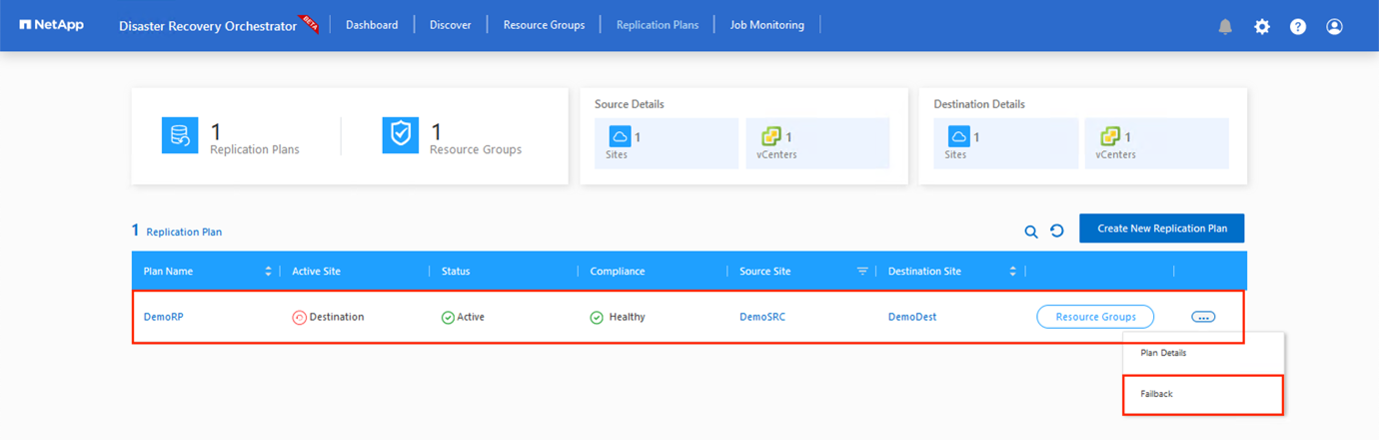
Failback can be triggered at the replication plan level. In case of test failover, the tear down option can be used to roll back the changes and remove the newly created volume. Failbacks related to failover are a two- step process. Select the replication plan and select Reverse Data sync.
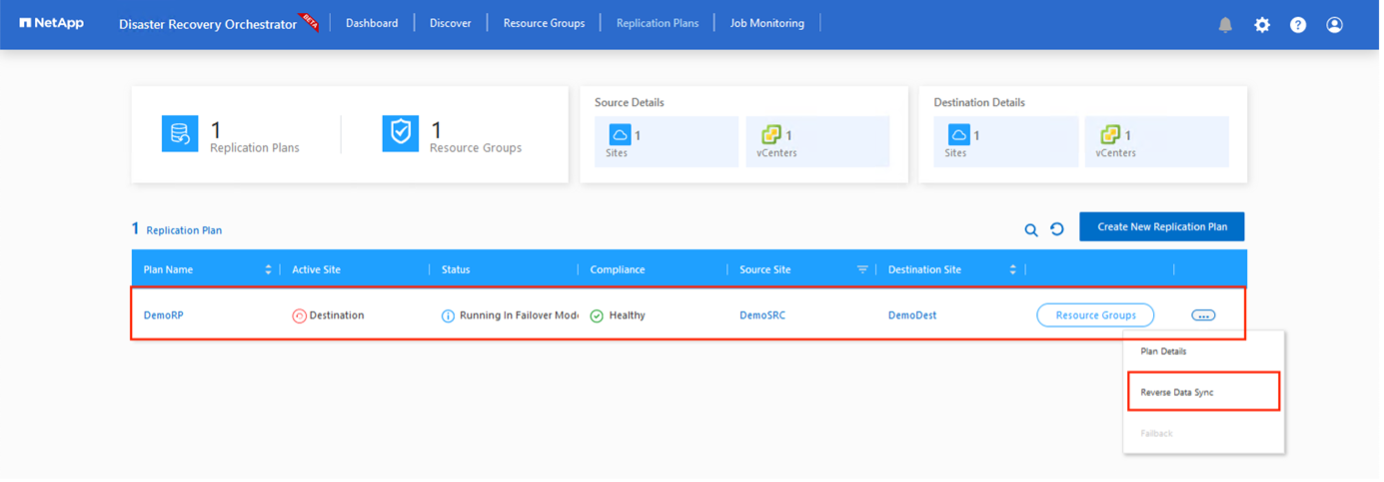
After this step is complete, trigger failback to move back to the primary AVS site.
From the Azure portal, we can see that the replication health has been broken off for the appropriate volumes that were mapped to the secondary site AVS SDDC as read/write volumes. During test failover, DRO does not map the destination or replica volume. Instead, it creates a new volume of the required cross- region replication snapshot and exposes the volume as a datastore, which consumes additional physical capacity from the capacity pool and ensures that the source volume is not modified. Notably, replication jobs can continue during DR tests or triage workflows. Additionally, this process makes sure that the recovery can be cleaned up without the risk of the replica being destroyed if errors occur or corrupted data is recovered.


 Step 2)

 Step 5)