Thursday, 30 May 2024

Step by Step Azure Stack Edge – Azure Data Box Gateway for a Hybrid Cloud


Step by Step Azure Stack Edge – Azure Data Box Gateway for a Hybrid Cloud


Azure Data Box Gateway Where is the difference between Azure Files Sync or Azure file share or even a StorSimple now a Data Box. As you may know a Azure Data box the the ultimate device to bring data fast to the Azure Cloud.

image

This blog was long pending as I did many Azure migrations and new stuff came up every time.  Now that there is a Azure Data Box Gateway that you can run on your favorite hypervisor Hyper-V you can create a virtual instance to bring your data to a  Azure storage account. Now days there is a lot of overlap in products.

  • Azure Files (Sync) sync’s your data to an Azure Storage account  – Auto Sync.
  • Azure files uses Net use to connect to a storage account  – Manual copy and writes direct to Azure
  • StorSimple (old but still seen in the wild)
  • Azure Data Box Gateway    

One of the primary advantages of Data Box Gateway is the ability to continuously ingest data into the device to copy to the cloud, regardless of the data size. Keep in mind this is not a file server replacement. but my first impression is this could replace a storsimple as this may not the goal for this. As you could run a virtual StorSimple.

As the data is written to the gateway device, the device uploads the data to Azure Storage. The device automatically manages storage by removing the files locally while retaining the metadata when it reaches a certain threshold. Keeping a local copy of the metadata enables the gateway device to only upload the changes when the file is updated. Keep in mind the Azure Storage account limits https://docs.microsoft.com/nl-nl/azure/databox-online/data-box-gateway-limits#azure-object-size-limits

there is a thin line between the products and I must say I was impressed by the speed of the upload it was fast and I could used the whole bandwidth.

So let us start building.

To create any Azure Stack Edge / Data Box Gateway resource, you should have permissions as a contributor (or higher) scoped at resource group level. You also need to make sure that the DataBoxEdge provider is registered.

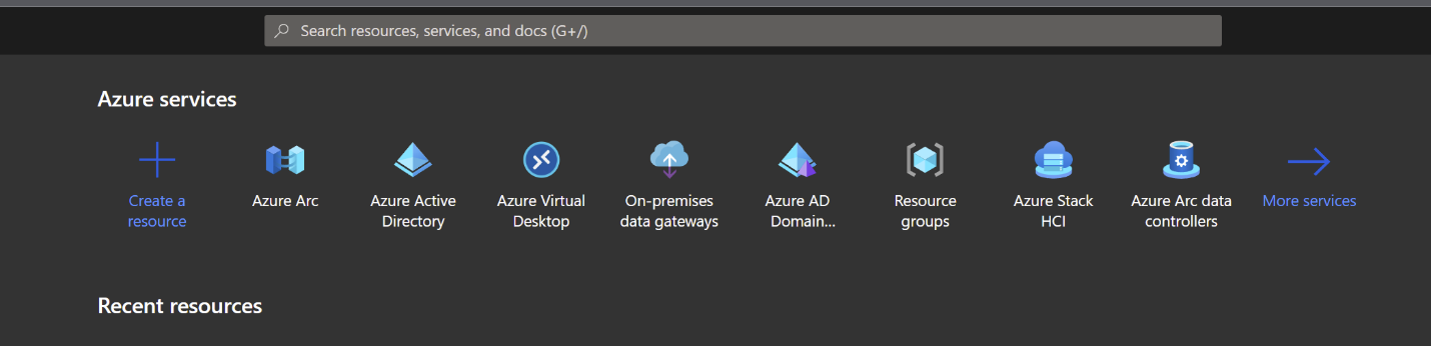
In the Azure portal we go to the Data Box Gateway.

image

Do Add to create a new BOX below is the Databox blade and not the Gateway option

image

Selecting the DataBox gateway gives you the option to select the hypervisor this option is not available in the DataBox.

image

image 

I used the Hypervisor

image

In this we pick the DataBox Gateway. the Cost are $105 per month not a big price.


image

We create a resource group as for all Azure resources. and a location

image

PAYG-Azure Sponsorship

Resource group

rg-databox-gw-001

Name

mvp-databox-gateway-001

Region

West Europe

Details above easy setup in Azure.

image

Now that the Azure Databox Gateway is bought in the Marketplace we can setup the device. First we need to download the VHDX file for our VM

image

So We download the 5GB image and use this in our Hyper-v Server

image

 On the Download image tile, select the virtual device image corresponding to the operating system on the host server used to provision the VM. The image files are approximately 5.6 GB.

image

Extract the File and use the VHDX as an Gen 2 VM

image

Some basic specs for the VM

image

I played with the settings a bit to see if I could lower the VM’s Specs. You will see that later in a screenshot.

image

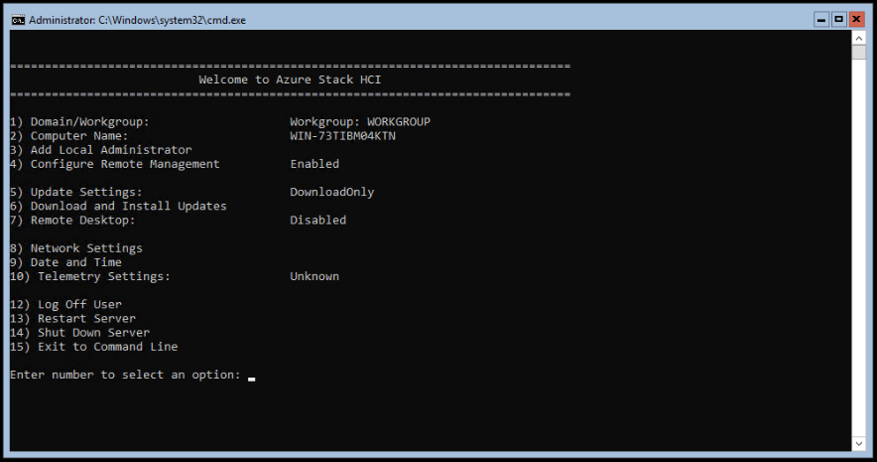
You may have to wait 10-15 minutes for the device to be ready. A status message is displayed on the console to indicate the progress. After the device is ready, go to Action. Press Ctrl + Alt + Delete to sign in to the virtual device.

The default user is EdgeUser and the default password is Password1.

image

image

Use Password1 as default password.

imageimage

as you can see I used 1 CPU the setup stopped and I changed it to 8 CPU and 8 GB memory.

image

Now that the VM is setup we can go to the management page that runs on the IP.


imageimage

Using the default password Password1

image

Chaning the Pasword in eh is something that you can remember

image

There are not much settings that you can change as time and IP and stop or reboot but the configuration is done from the Azure portal.

The one thing that is needed is to activate the VM

image 

In the portal you can set the name and get the key.

image

Generate a key and use the keyvault name if you lose the key


image imageimage

When activating the device with the key the device is live!

image

There are 3 modes for the device I used the full connected setting.

image

There is some diagnostics in the VM and for now it all looks good.

image

Our Next steps are creating a share and an extra user and test some performance

image image

We add a user that can be used to connect to the Share as it is not AD or AADDS

Our next step is to create a share

make sure the storage account where the files need to land is already created

In the Azure portal, select your Data Box Gateway resource and then go to Overview. Your device should be online. Select + Add share on the device command bar.

image

You’re notified that the share creation is in progress. After the share is created with the specified settings, the Shares tile updates to reflect the new share.

Connect to the SMB share

On your Windows Server client connected to your Data Box Gateway, connect to an SMB share by entering the commands:

  1. In a command window, type:

    net use \\<IP address of the device>\<share name> /u:<user name for the share>

    Enter the password for the share when prompted.

image

net use * \\192.168.1.96\agwfiles001 /u:mvpadmin

now that the device is up and running we can push some data to the cloud. as the gateway is the man in the middle and the extra drive is holding the files and then transferred to Azure.

imageimage

I had no limit set and I was surprised that it could eat the full line. this makes it more fun.

image

just a few files to test, but I need more files to test this. and let me set some bandwidth limits

image

Setting a limit from 200Mbps did limit the speed

imageimage

Think I need to see and play a bit more as the 200 Mbps is not really working, it is more that I have still 200 Mbps over.  but there is a schedule and that is really nice so these files or backup can be transferred in the night hours at high speed.

now back to no limit

imageimage

yeb it is working and I think I need a bigger internet line. Remember this image

If we had Azure in these days

image

Deleting the files from the Gateway did not remove the files from the storage account and showed as a nice archive, If you need to copy a large amount of files than this is a great solution and cheaper than the big data box.

Migrating Stack Overflow Teams to Azure


Migrating Stack Overflow Teams to Azure

Why go to the cloud?

Since the beginning, Stack Overflow and its sites ran on physical hardware designed to maximize the efficient use of resources so that we could run on the least amount of servers possible. We were pretty proud of this: one of the original servers hung on the wall of our New York City office long after it stopped working.

But once we saw our Stack Overflow for Teams business take off, running everything on a set number of machines was no longer feasible. We want to move away from having engineers need to physically go to our data center in order to address hardware issues and upgrade hardware. Our engineers should focus on what adds the most value to our customers, and that’s not maintaining a physical infrastructure.

Another benefit that cloud migration brings us is the ability to maintain security compliance frameworks such as SOC 2. Azure makes this a lot easier: their data centers maintain multiple compliance attestations and certifications, and their tooling helps keep our resources compliant. We went through our first SOC 2 process in 2020, and it can be time consuming. Azure would simplify a lot of this.

An additional benefit is that with virtual infrastructure, Azure makes it a lot easier to spin up additional ephemeral environments where we can test new features and infrastructure changes without disrupting other developers.

So how did you do it?

Three years ago, we came up with our plan to split our Stack Overflow for Teams product and move just the Business tier into Azure. This would mean getting SOC 2 Type II accreditation for our Business customers as quickly as possible while keeping our Free and Basic customers on-premises and making the migration a future problem.

As we executed this plan, we found out that it was incredibly difficult to split our product across two locations without severely impacting the user experience. Suddenly, the user needed to know to which environment their account was linked when trying to sign in. While we could build something to help with logins, this split between Business and Basic/Free environments proved fatal when it came to integrations (Slack, Jira, Microsoft Teams) since we can't control their app installation process without creating two separate apps, which the app stores didn’t allow.

After working on this path for almost a year, we decided to pivot to a new plan: move all three tiers of Teams and all existing customers to Azure all at once.

V2 consisted of several phases:

  • Phase I: Move Stack Overflow for Teams from stackoverflow.com to stackoverflowteams.com
  • Phase II: Decouple Teams and stackoverflow.com infrastructure within the data center
  • Phase III: Build a cloud environment in Azure as a read-only replica while the datacenter remains as primary
  • Phase IV: Switch the Azure environment to be the primary environment customers use
  • Phase V: Remove the link to the on-premises datacenter

In this blog post we will discuss phase I. The second post will cover the other phases.

A multi-tenant Stack Exchange Network

When we started Teams six years ago, it was part of stackoverflow.com. Our company is known for our Stack Exchange Network and we wanted to give developers a familiar feeling and integrate with their daily usage of stackoverflow.com. Naturally, it made sense to let Teams users access their private sites from the sidebar of the public site.

Now to understand how we built Teams, you first need to know how we architected the Stack Exchange Network. You may be most familiar with stackoverflow.com, but if you look at https://stackexchange.com/sites, there is a huge list of sites (173 at last count) that all use the same Q&A foundation that we originally built for stackoverflow.com.

This foundation is multi-tenant. We have a central SQL Server database named “Sites” that contains data shared across the network. Most important for this discussion: the Sites database contains a list of network sites. Each network site then has its own content database that contains all the users, posts, votes, and other data for that specific site. All of this data belongs to publically accessible sites, so the controls on them were pretty simple and uniform.

Each site has a host address such as stackoverflow.comsuperuser.com, or cooking.stackexchange.com. Whenever a request comes into our app, we inspect the host and see if that matches one of our known network sites. That's why you'll see the following when you go to a non-existing website such as https://idontexist.stackexchange.com/:

The 404 screen for Stack Exchange. It reads "Couldn't find site
The Q&A site you are looking for doesn't seem to exist…yet.

You can vote for it to be created through our democratic, community-driven process at area51.stackexchange.com, or see a complete directory of all our Q&A sites at stackexchange.com.

If you are the administrator of a Stack Exchange 1.0 site, please contact the community team with any questions you may have."
This Stack Exchange doesn't exist.

Teams adds another level of multi-tenancy where we have a site (the parent) that hosts Teams (the children). In the past when you would hit stackoverflow.com/c/yourteam, the first layer of multi-tenancy through the Sites database would bring you to stackoverflow.com and then the team name was used to find the content of your team.

Functionally, this gave us what we needed to make it work, but because this was private customer data instead of public site data, we also needed to think about securing this data.

A secure data center

Historically, because we only hosted publicly available data, engineers had a lot of permissions to access the servers and databases to troubleshoot issues. For example, at our scale, we sometimes have performance issues that we can most easily solve by connecting to a machine and creating a memory dump.

This wouldn't work for our Teams product. Teams contains private customer data that we as engineers should never be able to access. So to make sure that we can secure customer data, we had to make some changes to the data center as shown in the following diagram:

An architecture diagram of the Teams database.

On the left side, you see our DMZ. This is what we've always had before launching Teams. The DMZ is where your request as a user comes in, the Sites database is located, and all the content databases for the different Stack Exchange sites live.

Now if you hit https://stackoverflow.com/c/my-team, your request gets intercepted and forwarded to the right side of the diagram: the TFZ (teams firewall zone or teams fun zone depending on who you ask). The TFZ is fully locked down. Engineers don't have access outside of documented break-the-glass situations and customer data cannot be queried.

This does mean that although all the Teams databases are inside the TFZ, the Sites database is shared between Teams and Stack Overflow.

Getting Teams into Azure meant that we had to separate Teams from Public on a functional level all the way down to the hardware. Splitting off Teams to its own hardware and databases was a complex project. What scared us most was that certain steps were big bang steps without a possibility to roll back. We had to get things right or fix forward and that added a lot of risk.

That’s why we looked at making the individual phases smaller and less risky. We decided the first thing we could do was move Teams from stackoverflow.com to its own domain: stackoverflowteams.com.

Moving to stackoverflowteams.com

We can already run multiple sites from our application and sites can have a parent. We came up with the idea of making Teams a separate site in the Stack Exchange network with some special settings and make all Teams a child of this new site. The new parent site will have its own domain: stackoverflowteams.com. We would build out this new site in small steps and figure out all the user experience things we had to change. This way, we could decouple the infrastructure changes from the user experience changes, making things less complicated and less risky—and eliminate some of those big bang steps altogether.

We added a new entry in the Sites DB for our new 'Stack Overflow for Teams' site and added a new site type, TeamsShellSite, that we could use in code to differentiate between a regular Stack Exchange site such as stackoverflow.com and our new site: stackoverflowteams.com.

The TeamsShellSite became the new parent for all individual Teams. If you go to stackoverflowteams.com while not logged in, you will see a welcome page with some information and the option to create a free team and log in. This is served from the TeamsShellSite.

The front page for stackoverflowteams.com

If you do have a team and go to stackoverflowteams.com/c/your-team, your request still hits the DMZ, the base host address is mapped to the new TeamsShellSite record, and your requests get forwarded to the TFZ.

Removing stackoverflow.com as a parent required a lot of changes. Anything previously hosted on stackoverflow.com now had to be handled by the TeamsShellSite, including the account page, navigation between Teams, third-party integrations, and customer configurations for SSO and SCIM. We also had to make sure to have redirects in place so customers could access a Team by both stackoverflow.com/c/your-team and stackoverflowteams.com/c/your-team.

This was especially important for our authentication and ChatOps integrations. A lot of our customers have set up integrations like SSO, SCIM, Jira, Slack, and Microsoft Teams. These integrations point to stackoverflow.com, and we wanted to make sure we wouldn't break them when we migrated a Team to stackoverflowteams.com. We also wanted to point our integrations to a new subdomain: integrations.stackoverflowteams.com to decouple them from our host domain.

As you can imagine, this took a lot of testing to make sure we covered all edge cases. For example, until we updated all our integrations to point to integrations.stackoverflowteams.com, we added redirects from stackoverflow.com. However, it turned out the Jira integration installation page didn’t work with redirects due to an embedded iframe Jira uses. We had to work around that limitation by replacing host headers instead of redirecting for that specific page. All these changes were the bulk of the work for moving Teams away from Stack Overflow as a parent site and to a new domain.

Once we had the code changes to support the TeamsShellSite in place, we could start moving Teams from stackoverflow.com to stackoverflowteams.com by changing the parent of a site and updating the cache. We created some internal helpers to move a single team or a batch of Teams to a new parent to make this process easy and painless. The big advantage was that we could easily move a team but also move it back if something went wrong. This made all the changes we had to do less scary since we knew it wasn’t a big bang change without a rollback.

We started with migrating our own internal Teams—if we were going to break something, we should be the ones to feel it. Once we had our own Teams working, we started migrating customers. We first moved all small, free Teams. Then our Basic tier and finally our Business tier.

We ran into an issue with caching. If a team was moved from stackoverflow.com to stackoverflowteams.com and a user tried to access it on stackoverflow.com, our code looked at the cached data, couldn’t find the site, reloaded all sites in the cache only to then figure out it should redirect. That happened every time. Now reloading all the cached sites is a very expensive operation so yes, we might have taken the site down once or twice but that only added to all the excitement.

In December 2022, we completed this first phase after almost a year of work. The customer-facing changes were now finished, and all customers received communication and support for the changes they had to make. We were now successfully running all of Stack Overflow for Teams on its own domain!

Now we could move on to Phase II: Removing the dependency on the shared Sites database and removing the dependency we have on the DMZ.

Technical Brief for Microsoft Azure Arc on ThinkAgile MX

MX

Why Azure Arc Service on Azure Stack HCI?

Azure Stack HCI provides enterprise customers with a highly available, cost-efficient, flexible platform to run high-performance workloads. These workloads could run within traditional virtual machines or within containers, ensuring you get the best utilization from your hyperconverged infrastructure. While Azure Stack HCI provides a flexible hyperconverged infrastructure to modernize on-premises environments, Azure Hybrid Service and Azure Arc provide the latest security, performance and feature updates. Bringing them together, Windows Admin Center allows you to remotely manage and enable your Azure Services.

In many organizations, there are legacy workloads that cannot be moved - or that the business has decided are not going to the cloud. In other organizations, there are data privacy regulations, intellectual property (IP) concerns, or application entanglement that requires an on-premises presence. In these situations, a hybrid cloud environment is needed – one with consistency across the different environments. A hybrid cloud environment where you can connect back to the cloud and take advantage of the control plane and cloud practices.

A single control plane. Azure Arc provides the governance control, via a control plane, that gives you a common view and a single way to do it. Additionally, Azure Arc also provides you with the ability to run Azure services anywhere and to start leveraging the portability of Kubernetes. In that way, IT end-developers can start leveraging the same skills and same technology everywhere.

Push governance on-premises. Hybrid is much larger than the single pane. The ARM Control plane is designed for hybrid, from the beginning: inventory, governance, configuration management, policy aspects, security. This enables push governance down into on-premises environments. Some examples include:

  • Email applications like Office365 are covered by rules and regulations. With the appropriate governance rules in place through Azure Arc, you should be able to pass when an auditor comes to check the environment. The same should be true when you start using the governance practices from the cloud in your on-premises environment.
  • A simple (real-time) inventory can be run if you are using the cloud to govern your on-premises environment instead of an outdated configuration management database (CMDB) application. You can use Resource Graph to query the Azure resources and on-premises resources. You can use the same Azure Policies for your cloud resources and what is on-premises as well.

Scalability. Finally, another important benefit of hybrid solutions is scalability. When computing and processing demand is cyclical and increases beyond an on-premises datacenter’s capabilities, businesses can use the cloud to instantly scale capacity up to support the business. Moreover, it allows them to avoid the time and cost of purchasing, installing, and maintaining new servers that may not always be needed.


Before You Get Started

The following summarizes, at a high-level, what you will need to run Azure Arc.

To use Arc, you must deploy an Azure Arc resource bridge (preview) in your ThinkAgile MX environment. The resource bridge provides an ongoing connection between your ThinkAgile MX servers and Azure. Once you've connected your ThinkAgile MX server to Azure, components on the resource bridge discover your ThinkAgile MX inventory. You can enable them in Azure and start performing virtual hardware and guest OS operations on them using Azure Arc.

  • An Azure subscription with the appropriate permissions.
  • Any ThinkAgile MX server running Azure Stack HCI 22H2 with ethernet access.
  • You need a Azure AD account that can: Read all inventory.
  • Deploy and update VMs to all the resource pools (or clusters), networks, and VM templates that you want to use with Azure Arc.
  • For the Arc-enabled ThinkAgile MX solution, the resource bridge has the following minimum virtual hardware requirements:
    • 16 GB of memory
    • 4 vCPUs
    • An external virtual switch that can provide access to the internet directly or through a proxy. If internet access is through a proxy or firewall, ensure these URLs are allow-listed.
  • Deploying the Connected Machine agent on a machine requires that you have administrator permissions to install and configure the agent. On Linux this is done by using the root account, and on Windows, with an account that is a member of the Local Administrators group.
  • Before you get started, be sure to review the agent prerequisites and verify the following:
    • Your target machine is running a supported operating system.
    • Your account has the required Azure built-in roles.
    • Ensure the machine is in a supported region.
    • Confirm that the Linux hostname or Windows computer name doesn't use a reserved word or trademark.
    • If the machine connects through a firewall or proxy server to communicate over the Internet, make sure the URLs listed are not blocked.

Deploying Azure Arc Service on Azure Stack HCI on Lenovo Servers

The first step in the process is to obtain and setup your Lenovo server that will support Azure Stack HCI.

Step 1: Hardware and OS configuration for Azure Arc Service on Azure Stack HCI

Lenovo certified Azure Stack HCI solutions can be found at this link – ThinkAgile MX.

Lenovo rack systems feature innovative hardware, software and services that solve customer challenges today and deliver an evolutionary fit-for-purpose, modular design approach to address tomorrow’s challenges. These servers capitalize on best-in-class, industry-standard technologies coupled with differentiated Lenovo innovations to provide the greatest possible flexibility in x86 servers. Key advantages of deploying Lenovo rack servers include:

  • Highly scalable, modular designs to grow with your business
  • Industry-leading resilience to save hours of costly unscheduled downtime
  • Expansive storage capacity and flexible storage configurations for optimized workloads

With fast flash technologies for lower latencies, quicker response times and smarter data management in real-time for cloud deployments, database, or virtualization workloads, trust Lenovo racks for world-class performance, power-efficient designs and extensive standard features at an affordable price.

The following Lenovo servers have been certified for Microsoft Azure Stack HCI and are equipped to support 4 to 64-core processors, up to 4TB of memory and over 100TB of storage:

  • Lenovo ThinkAgile MX3530 Integrated systems / MX3531 validated nodes (based on ThinkSystem SR650 V2)
  • Lenovo ThinkAgile MX3330 Integrated systems / MX3331 validated nodes (based on ThinkSystem SR630 V2)
  • Lenovo ThinkAgile MX3520 Integrated systems / MX validated nodes (based on ThinkSystem SR650)
  • Lenovo ThinkAgile MX1020 Integrated systems / MX1021 validated nodes (based on ThinkSystem SE350)
  • Lenovo ThinkSystem SR630 validated nodes
  • Lenovo ThinkSystem SR665 validated nodes
  • Lenovo ThinkSystem SR655 validated nodes
  • Lenovo ThinkSystem SR645 validated nodes
  • Lenovo ThinkSystem SR635 validated nodes
  • Lenovo ThinkEdge SE450 validated nodes

With your Lenovo servers racked, configured, and connected, you are ready to deploy the Azure Stack HCI OS. The first step in deploying Azure Stack HCI is to download Azure Stack HCI and install the operating system on each server that you want to cluster. You can deploy Azure Stack HCI using your preferred method – this could be via USB, network deployment, ISO boot over a dedicated OOB management port, etc. Step through the simple Azure Stack HCI OS installation wizard, and once complete, you should be at the Server Configuration Tool (SCONFIG) interface. If you need to, make any simple changes here, but all that should be required is a single NIC with an IP address on your management network.


Figure 2. SCONFIG in Azure Stack HCI

Step 2: Deploy and Configure Windows Admin Center

With your Azure Stack HCI nodes deployed, and accessible over the network, the next step is to deploy the Windows Admin Center. If you haven’t already, download the Windows Admin Center software. This should be installed on a Windows 10 or Windows Server 2016/2019 machine. This machine should also be joined to your management domain. This should be the same domain that your Azure Stack HCI nodes will be joined to.

Step 3: Create an Azure Stack HCI Cluster

With the Windows Admin Center installed, open the Windows Admin Center, and step through the process of creating an Azure Stack HCI cluster.

The wizard will walk you through selecting your nodes, joining the nodes to the domain, installing required roles and features, and updates, before moving on to configuring the physical and virtual networks, clustering and software defined storage. When the wizard is complete, you should see your new cluster in your All connections view within Windows Admin Center.


Figure 3. Deploying an Azure Stack HCI Cluster in Windows Admin Center

Step 4: Check the registration of the cluster

With your Azure Stack HCI cluster under dashboard of Windows Admin Center, the next step is to check that the status of the Azure Connection.


Figure 4. Validating the Azure Registration in Windows Admin Center

Step 5: Deploy a new virtual machine on your Azure Stack HCI infrastructure and join it to a domain

You can easily create a new VM using Windows Admin Center.


  • On the Windows Admin Center home screen, under All connections, select the server or cluster you want to create the VM on.
  • Under Tools, scroll down and select Virtual machines.
  • Under Virtual machines, select the Inventory tab, then select Add and New.


Figure 5. VM Creation from Windows Admin Center


  • Under New virtual machine, enter a name for your VM.
  • Select Generation 2 (Recommended).
  • Under Host, select the server you want the VM to reside on.
  • Under Path, select a preassigned file path from the dropdown list or click Browse to choose the folder to save the VM configuration and virtual hard disk (VHD) files to. You can browse to any available SMB share on the network by entering the path as \server\share.
  • Under Virtual processors, select the number of virtual processors and whether you want nested virtualization enabled for the VM. If the cluster is running Azure Stack HCI, version 21H2, you'll also see a checkbox to enable processor compatibility mode on the VM.
  • Under Memory, select the amount of startup memory (4 GB is recommended as a minimum), and a min and max range of dynamic memory as applicable to be allocated to the VM.
  • Under Network, select a virtual switch from the dropdown list.
  • Under Network, select one of the following for the isolation mode from the dropdown list:
    • Set to Default (None) if the VM is connected to the virtual switch in access mode.
    • Set to VLAN if the VM is connected to the virtual switch over a VLAN. Specify the VLAN identifier as well.
  • Set to Virtual Network (SDN) if the VM is part of an SDN virtual network. Select a virtual network name, subnet, and specify the IP Address. Optionally, select an access control list that can be applied to the VM.
  • Set to Logical Network (SDN) if the VM is part of an SDN logical network. Select the logical network name, subnet, and specify the IP Address. Optionally, select an access control list that can be applied to the VM.
  • Under Storage, click Add and select whether to create a new empty virtual hard disk or to use an existing virtual hard disk. If you're using an existing virtual hard disk, click Browse and select the applicable file path.
  • Under Operating system, do one of the following:
    • Select Install an operating system later if you want to install an operating system for the VM after the VM is created.
    • Select Install an operating system from an image file (*.iso), click Browse, then select the applicable .iso image file to use.
  • When finished, click Create to create the VM.
  • Under State, verify that the VM state is running.

Step 6: Enable Azure ARC on the Virtual Machine on Azure Stack HCI

Launch the Azure Arc service in the Azure portal by clicking All services, then searching for and selecting Servers - Azure Arc.


Figure 6. Azure Services form Azure Portal


  1. On the Servers - Azure Arc page, select Add at the upper left.
  2. On the Select a method page, select the Add servers using interactive script tile, and then select Generate script.
  3. On the Generate script page, select the subscription and resource group where you want the machine to be managed within Azure. Select an Azure location where the machine metadata will be stored. This location can be the same or different, as the resource group's location.
  4. On the Prerequisites page, review the information and then select Next: Resource details.
  5. On the Resource details page, provide the following:
    • In the Resource group drop-down list, select the resource group the machine will be managed from.
    • In the Region drop-down list, select the Azure region to store the servers' metadata.
    • In the Operating system drop-down list, select the operating system that the script be configured to run on.
    • If the machine is communicating through a proxy server to connect to the internet, specify the proxy server IP address or the name and port number that the machine will use to communicate with the proxy server. Enter the value in the format http://(proxyURL):(proxyport).
    • Select Next: Tags.
  6. On the Tags page, review the default Physical location tags suggested and enter a value, or specify one or more Custom tags to support your standards.
  7. Select Next: Download and run script.
  8. On the Download and run script page, review the summary information, and then select Download. If you still need to make changes, select Previous.
  9. Log in to the server.
  10. Open an elevated 64-bit PowerShell command prompt.
  11. Change to the folder or share that you copied the script to and execute it on the server by running the ./OnboardingScript.ps1 script.

On the Azure platform the Machine will appear under the Azure Arc systems as connected.


Figure 7. Azure ARC status on Azure Portal


Managing Lenovo Systems through Windows Admin Center

Microsoft Windows Admin Center (WAC) is a browser-based application that is deployed locally and used to manage Windows Servers, Windows Server Clusters and Azure Stack HCI clusters. Microsoft has made WAC extensible so that hardware partners can build additional features specific to their hardware and firmware. Lenovo XClarity Integrator is an example of one such extension implementation. Lenovo XClarity Integrator is designed to help users manage and monitor the Lenovo ThinkSystem servers and ThinkAgile systems through Lenovo XClarity Administrator in Windows Admin Center. Lenovo XClarity Integrator and Windows Admin Center run in the same environment. Lenovo XClarity Integrator is integrated with Lenovo XClarity Administrator and can be used as an out-of-box management tool and a high-efficiency tool for managing and monitoring the Lenovo servers and components (e.g. monitoring the overall status of servers, viewing the inventory of components, checking the firmware consistency of cluster nodes, and launching the management interface).

This link provides information on features in the Lenovo XClarity Integrator extension and instructions for installing the extension for Windows Admin Center.

Summary

Following this guide, you have installed Azure Stack HCI, deployed Windows Admin Center and integrated the Azure Arc Service extension on Lenovo ThinkAgile MX systems. You can then deploy the Azure Kubernetes Service management cluster onto your Azure Stack HCI cluster, and setup the integration for the management of your workloads.

How to Find Hardware Information of an Azure Stack Edge


How to Find Hardware Information of an Azure Stack Edge


What is Azure Stack Edge?

For some of you Azure Stack Edge is maybe quite new, so let me try to explain it.

Azure Stack Edge is an Artificial Intelligence enabled Azure Edge computing device with the capability to transfer large amounts of data through networks to Microsoft Azure.

Azure Stack Edge is a Hardware-as-a-Service or Black Box solution, developed by Microsoft in partnership with an Original Equipment Manufacturer. Microsoft sends the Azure Stack Edge as a cloud-managed device to the customer. The device is then equipped with either a built-in Field Programmable Gate Array (FPGA) that enables accelerated AI-inferencing or a Graphics Processing Unit (GPU). Both device types have all the capabilities of a network storage gateway to for example act as a cloud synchronized backup or storage target.

Depending on the device, you are also able to run several other workloads like:

  • IoT Edge
  • Virtual Machines
  • Backup and Storage Target
  • Machine Learning
  • etc.

Why Do I Need to Know Which Hardware is used in an Azure Stack Edge?

In my case, the reason is pretty simple, I needed to buy a few GBIC modules for the Azure Stack Edge but wasn’t able to find any information on compatible modules. There is also no information on the NIC vendor in the Azure Stack interface and opening an Azure Stack Edge and cracking the guarantee label results in losing support.

How can I find Compatible Modules using the Hardware Information?

You are still able to find that information with a small but nasty trick. When looking on the properties page of the Azure Stack Edge, there is a piece of very important information.

  1. The Device Serial Number

AWE Azure Stack Device Serial Number

First, we need to find out the Hardware vendor, there are two options you can try. First, searching for the MAC address marked with two in the screenshot above. The other and most obvious sign showing you the OEM (Original Equipment Manufacturer) is the chassis and the rack rails used to mount the Azure Stack Edge. As you probably already noticed, Azure Stack Edge is using Dell Rails. So the thought is near that the OEM is Dell.

Next step was, I tried to find something which looks like a Dell Service Tag. The Device serial number looked very promising to me.

I gave it a try and searched for the Device serial number.

DEll EMC Support Technologies


After putting in the Serial Number, some magic happens. The page is showing me an OEM Version of a Dell PowerEdge R640.

OEM Version of a Dell PowerEdge R640

As you can see in the screenshot, you can also see the system configuration. With that, you get more details on the Network Interfaces used.

Network Interfaces System Configuration

As you can see in the screenshot, the server is using QLogic FastLinQ 41264 rNDC and QLogic FastLinQ 41262 NIC Adapters. With that information, you can go to the optics seller of your choice and buy the right optics.

Move Azure Edge Hardware Center resource across Azure subscriptions and resource groups via the Azure portal


Move Azure Edge Hardware Center resource across Azure subscriptions and resource groups via the Azure portal

This article explains how to move an Azure Edge Hardware Center resource across Azure subscriptions, or to another resource group in the same subscription using the Azure portal.

Both the source group and the target group are locked during the move operation. Write and delete operations are blocked on the resource groups until the move completes. This lock means you can't add, update, or delete resources in the resource groups. It doesn't mean the resources are frozen. The lock can last for a maximum of four hours, but most moves complete in much less time.

Moving a resource only moves it to a new resource group or subscription. It doesn't change the location of the resource.

Prerequisites

Before you begin:

  • If moving your resource to a different subscription:

    • Make sure that both the source and destinations subscriptions are active.
    • Make sure that both the source and resource subscriptions exist within the same Microsoft Entra tenant.
    • The destination subscription must be registered to the Microsoft.EdgeOrder resource provider. If not, you receive an error stating that the subscription is not registered for a resource type. You might see this error when moving a resource to a new subscription, but that subscription has never been used with that resource type.
  • If moving your resource to a different resource group, make sure that the account moving the resources must have at least the following permissions:

    • Microsoft.Resources/subscriptions/resourceGroups/moveResources/action on the source resource group.
    • Microsoft.Resources/subscriptions/resourceGroups/write on the destination resource group.

Move resource group or subscription

  1. In the Azure portal, go to the Azure Edge Hardware Center resource that you want to move. The Azure Edge Hardware Center resource in this example is created for an Azure Stack Edge order.

    • To move to another subscription, select the option available for Resource group (Move).
    • To move to another resource group within the same subscription, select the option available for Subscription ID (Move).

    Screenshot showing Overview pane for the resource that will move.

  2. On the Source + target tab, specify the destination Resource group in the same subscription. The source resource group is automatically set. If you are moving to a new subscription, also specify the subscription. Select Next.

    Screenshot showing how to select Move option to move to a different resource group.

  3. On the Resources to move tab, Edge Hardware Center service will determine if the resource move is allowed. As the validation begins, the validation status is shown as Pending validation. Wait for the validation to complete.

    Validation pending to move the resource group in the same subscription.

    After the validation is complete and if the service determines that the resource move is allowed, validation status updates to Succeeded.

    Screenshot showing validation succeeded to move the resource group in the same subscription.

    Select Next.

  4. On the Review tab, verify the Selection summary and select the checkbox to acknowledge that tools and scripts will need to be updated when moving to another resource group. To start moving the resources, select Move.

    Screenshot showing how to acknowledge the impact of moving to another resource group in the same subscription on Review tab.

  5. Check the notification in the Azure portal to verify that the resource move has completed.

    Screenshot showing the notification indicating that the resource was successfully moved to a specified resource group.

Verify migration

Follow these steps to verify that the resource was successfully moved to the specified subscription or resource group.

  • If you moved across subscriptions, go to the target subscription to see the moved resource. Go to All resources and filter against the target subscription to which you moved your resource.

    Screenshot showing how to filter the list of all resources against the target subscription for the move.

  • If you moved to another resource group in the same subscription, go to the target resource group to see the moved resource. Go to All resources and filter against the target resource group to which you moved your resource.

    Screenshot showing how to filter the list of all subscription against the target subscription for the move.