SAP HANA infrastructure configurations and operations on Azure
This document provides guidance for configuring Azure infrastructure and operating SAP HANA systems that are deployed on Azure native virtual machines (VMs). The document also includes configuration information for SAP HANA scale-out for the M128s VM SKU. This document isn't intended to replace the standard SAP documentation, which includes the following content:
Prerequisites
To use this guide, you need basic knowledge of the following Azure components:
To learn more about SAP NetWeaver and other SAP components on Azure, see the SAP on Azure section of the Azure documentation.
Basic setup considerations
The following sections describe basic setup considerations for deploying SAP HANA systems on Azure VMs.
Connect into Azure virtual machines
As documented in the Azure virtual machines planning guide, there are two basic methods for connecting into Azure VMs:
- Connect through the internet and public endpoints on a Jump VM or on the VM that is running SAP HANA.
- Connect through a VPN or Azure ExpressRoute.
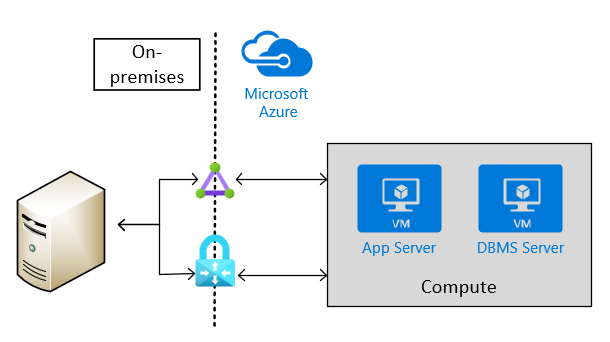
Site-to-site connectivity via VPN or ExpressRoute is necessary for production scenarios. This type of connection is also needed for non-production scenarios that feed into production scenarios where SAP software is being used. The following image shows an example of cross-site connectivity:
Choose Azure VM types
SAP lists which Azure VM types that you can use for production scenarios. For non-production scenarios, a wider variety of native Azure VM types is available.
Note
For non-production scenarios, use the VM types that are listed in the SAP note #1928533. For the usage of Azure VMs for production scenarios, check for SAP HANA certified VMs in the SAP published Certified IaaS Platforms list.
Deploy the VMs in Azure by using:
- The Azure portal.
- Azure PowerShell cmdlets.
- The Azure CLI.
You also can deploy a complete installed SAP HANA platform on the Azure VM services through the SAP Cloud platform. The installation process is described in Deploy SAP S/4HANA or BW/4HANA on Azure.
Important
In order to use M208xx_v2 VMs, you need to be careful selecting your Linux image. For more information, see Memory optimized virtual machine sizes.
Storage configuration for SAP HANA
For storage configurations and storage types to be used with SAP HANA in Azure, read the document SAP HANA Azure virtual machine storage configurations
Set up Azure virtual networks
When you have site-to-site connectivity into Azure via VPN or ExpressRoute, you must have at least one Azure virtual network that is connected through a Virtual Gateway to the VPN or ExpressRoute circuit. In simple deployments, the Virtual Gateway can be deployed in a subnet of the Azure virtual network (VNet) that hosts the SAP HANA instances as well. To install SAP HANA, you create two more subnets within the Azure virtual network. One subnet hosts the VMs to run the SAP HANA instances. The other subnet runs Jumpbox or Management VMs to host SAP HANA Studio, other management software, or your application software.
Important
Out of functionality, but more important out of performance reasons, it is not supported to configure Azure Network Virtual Appliances in the communication path between the SAP application and the DBMS layer of a SAP NetWeaver, Hybris or S/4HANA based SAP system. The communication between the SAP application layer and the DBMS layer needs to be a direct one. The restriction does not include Azure ASG and NSG rules as long as those ASG and NSG rules allow a direct communication. Further scenarios where NVAs are not supported are in communication paths between Azure VMs that represent Linux Pacemaker cluster nodes and SBD devices as described in High availability for SAP NetWeaver on Azure VMs on SUSE Linux Enterprise Server for SAP applications. Or in communication paths between Azure VMs and Windows Server SOFS set up as described in Cluster an SAP ASCS/SCS instance on a Windows failover cluster by using a file share in Azure. NVAs in communication paths can easily double the network latency between two communication partners, can restrict throughput in critical paths between the SAP application layer and the DBMS layer. In some scenarios observed with customers, NVAs can cause Pacemaker Linux clusters to fail in cases where communications between the Linux Pacemaker cluster nodes need to communicate to their SBD device through an NVA.
Important
Another design that is NOT supported is the segregation of the SAP application layer and the DBMS layer into different Azure virtual networks that are not peered with each other. It is recommended to segregate the SAP application layer and DBMS layer using subnets within an Azure virtual network instead of using different Azure virtual networks. If you decide not to follow the recommendation, and instead segregate the two layers into different virtual network, the two virtual networks need to be peered. Be aware that network traffic between two peered Azure virtual networks are subject of transfer costs. With the huge data volume in many Terabytes exchanged between the SAP application layer and DBMS layer substantial costs can be accumulated if the SAP application layer and DBMS layer is segregated between two peered Azure virtual networks.
If you deployed Jumpbox or management VMs in a separate subnet, you can define multiple virtual network interface cards (vNICs) for the HANA VM, with each vNIC assigned to different subnet. With the ability to have multiple vNICs, you can set up network traffic separation, if necessary. For example, client traffic can be routed through the primary vNIC and admin traffic is routed through a second vNIC.
You also assign static private IP addresses that are deployed for both virtual NICs.
However, for deployments that are enduring, you need to create a virtual datacenter network architecture in Azure. This architecture recommends the separation of the Azure VNet Gateway that connects to on-premises into a separate Azure VNet. This separate VNet should host all the traffic that leaves either to on-premises or to the internet. This approach allows you to deploy software for auditing and logging traffic that enters the virtual datacenter in Azure in this separate hub VNet. So you have one VNet that hosts all the software and configurations that relate to in- and outgoing traffic to your Azure deployment.
The articles Azure Virtual Datacenter: A Network Perspective and Azure Virtual Datacenter and the Enterprise Control Plane give more information on the virtual datacenter approach and related Azure VNet design.
For an overview of the different methods for assigning IP addresses, see IP address types and allocation methods in Azure.
For VMs running SAP HANA, you should work with static IP addresses assigned. Reason is that some configuration attributes for HANA reference IP addresses.
Azure Network Security Groups (NSGs) are used to direct traffic that's routed to the SAP HANA instance or the jumpbox. The NSGs and eventually Application Security Groups are associated to the SAP HANA subnet and the Management subnet.
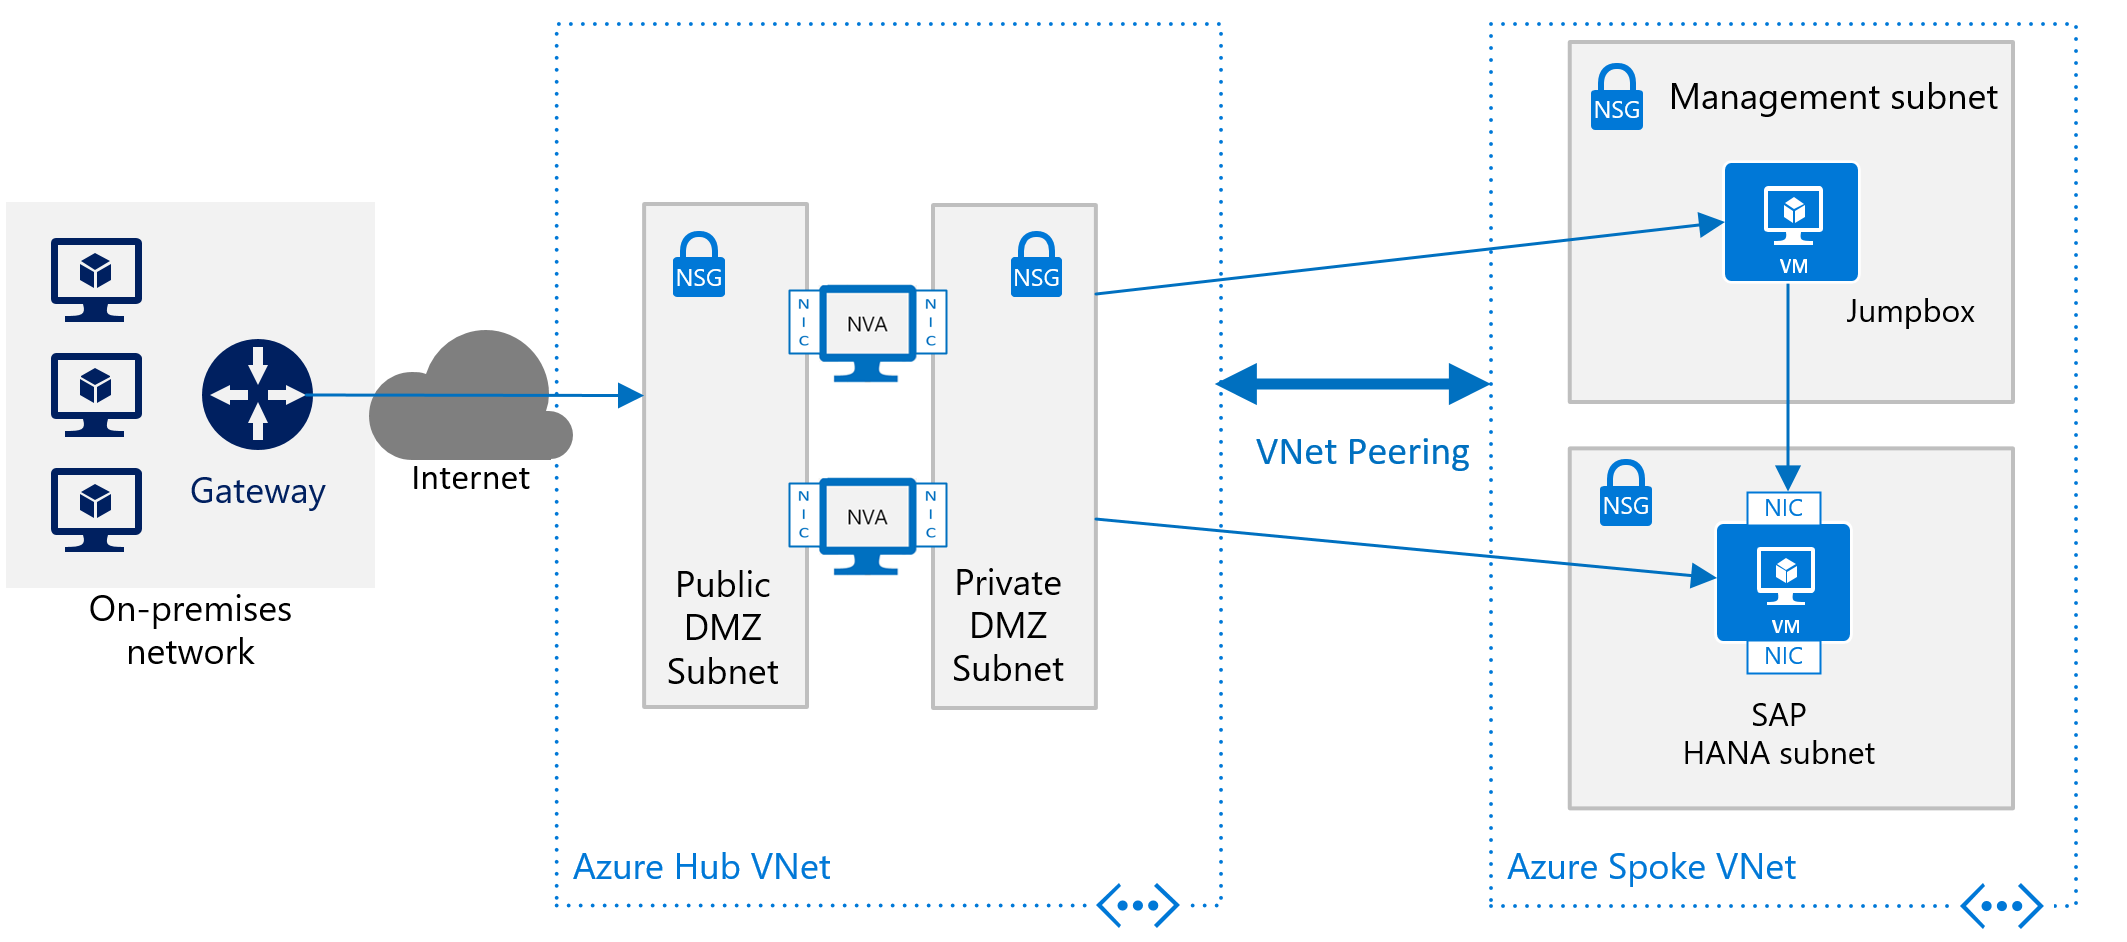
To deploy SAP HANA in Azure without a site-to-site connection, you still want to shield the SAP HANA instance from the public internet and hide it behind a forward proxy. In this basic scenario, the deployment relies on Azure built-in DNS services to resolve hostnames. In a more complex deployment where public-facing IP addresses are used, Azure built-in DNS services are especially important. Use Azure NSGs and Azure NVAs to control, monitor the routing from the internet into your Azure VNet architecture in Azure. The following image shows a rough schema for deploying SAP HANA without a site-to-site connection in a hub and spoke VNet architecture:
Another description on how to use Azure NVAs to control and monitor access from Internet without the hub and spoke VNet architecture can be found in the article Deploy highly available network virtual appliances.
Configuring Azure infrastructure for SAP HANA scale-out
In order to find out the Azure VM types that are certified for either OLAP scale-out or S/4HANA scale-out, check the SAP HANA hardware directory. A checkmark in the column 'Clustering' indicates scale-out support. Application type indicates whether OLAP scale-out or S/4HANA scale-out is supported. For details on nodes certified in scale-out, review the entry for a specific VM SKU listed in the SAP HANA hardware directory.
The minimum OS releases for deploying scale-out configurations in Azure VMs, check the details of the entries in the particular VM SKU listed in the SAP HANA hardware directory. Of a n-node OLAP scale-out configuration, one node functions as the main node. The other nodes up to the limit of the certification act as worker node. More standby nodes don't count into the number of certified nodes
For /hana/shared, we recommend the usage of Azure NetApp Files or Azure Files.
A typical basic design for a single node in a scale-out configuration, with /hana/shared deployed on Azure NetApp Files, looks like:
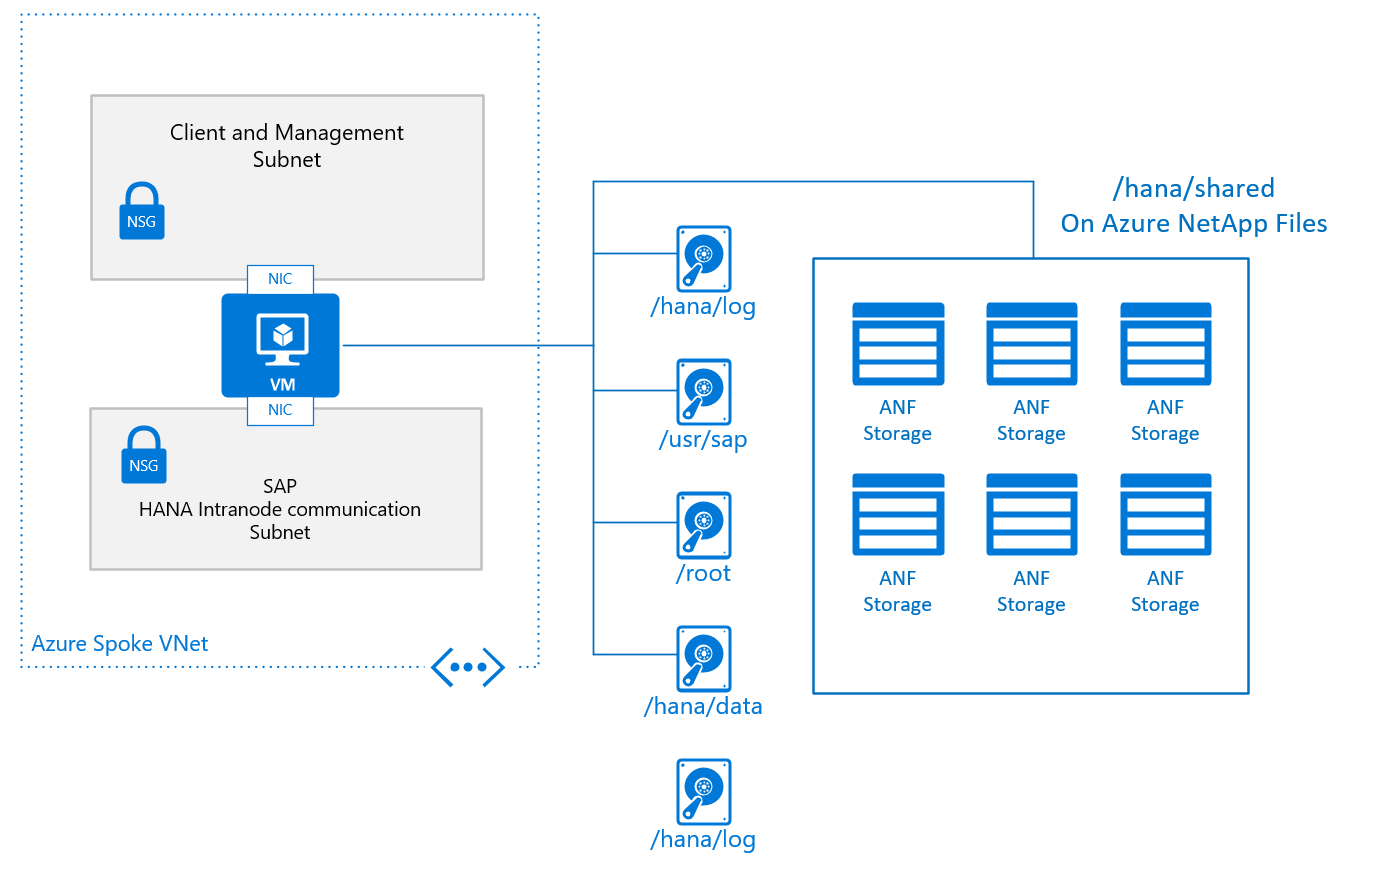
The basic configuration of a VM node for SAP HANA scale-out looks like:
- For /hana/shared, you use the native NFS service provided through Azure NetApp Files or Azure Files.
- All other disk volumes aren't shared among the different nodes and aren't based on NFS. Installation configurations and steps for scale-out HANA installations with non-shared /hana/data and /hana/log is provided further later in this document. For HANA certified storage that can be used, check the article SAP HANA Azure virtual machine storage configurations.
Sizing the volumes or disks, you need to check the document SAP HANA TDI Storage Requirements, for the size required dependent on the number of worker nodes. The document releases a formula you need to apply to get the required capacity of the volume
The other design criteria that is displayed in the graphics of the single node configuration for a scale-out SAP HANA VM is the VNet, or better the subnet configuration. SAP highly recommends a separation of the client/application facing traffic from the communications between the HANA nodes. As shown in the graphics, this goal is achieved by having two different vNICs attached to the VM. Both vNICs are in different subnets, have two different IP addresses. You then control the flow of traffic with routing rules using NSGs or user-defined routes.
Particularly in Azure, there are no means and methods to enforce quality of service and quotas on specific vNICs. As a result, the separation of client/application facing and intra-node communication doesn't open any opportunities to prioritize one traffic stream over the other. Instead the separation remains a measure of security in shielding the intra-node communications of the scale-out configurations.
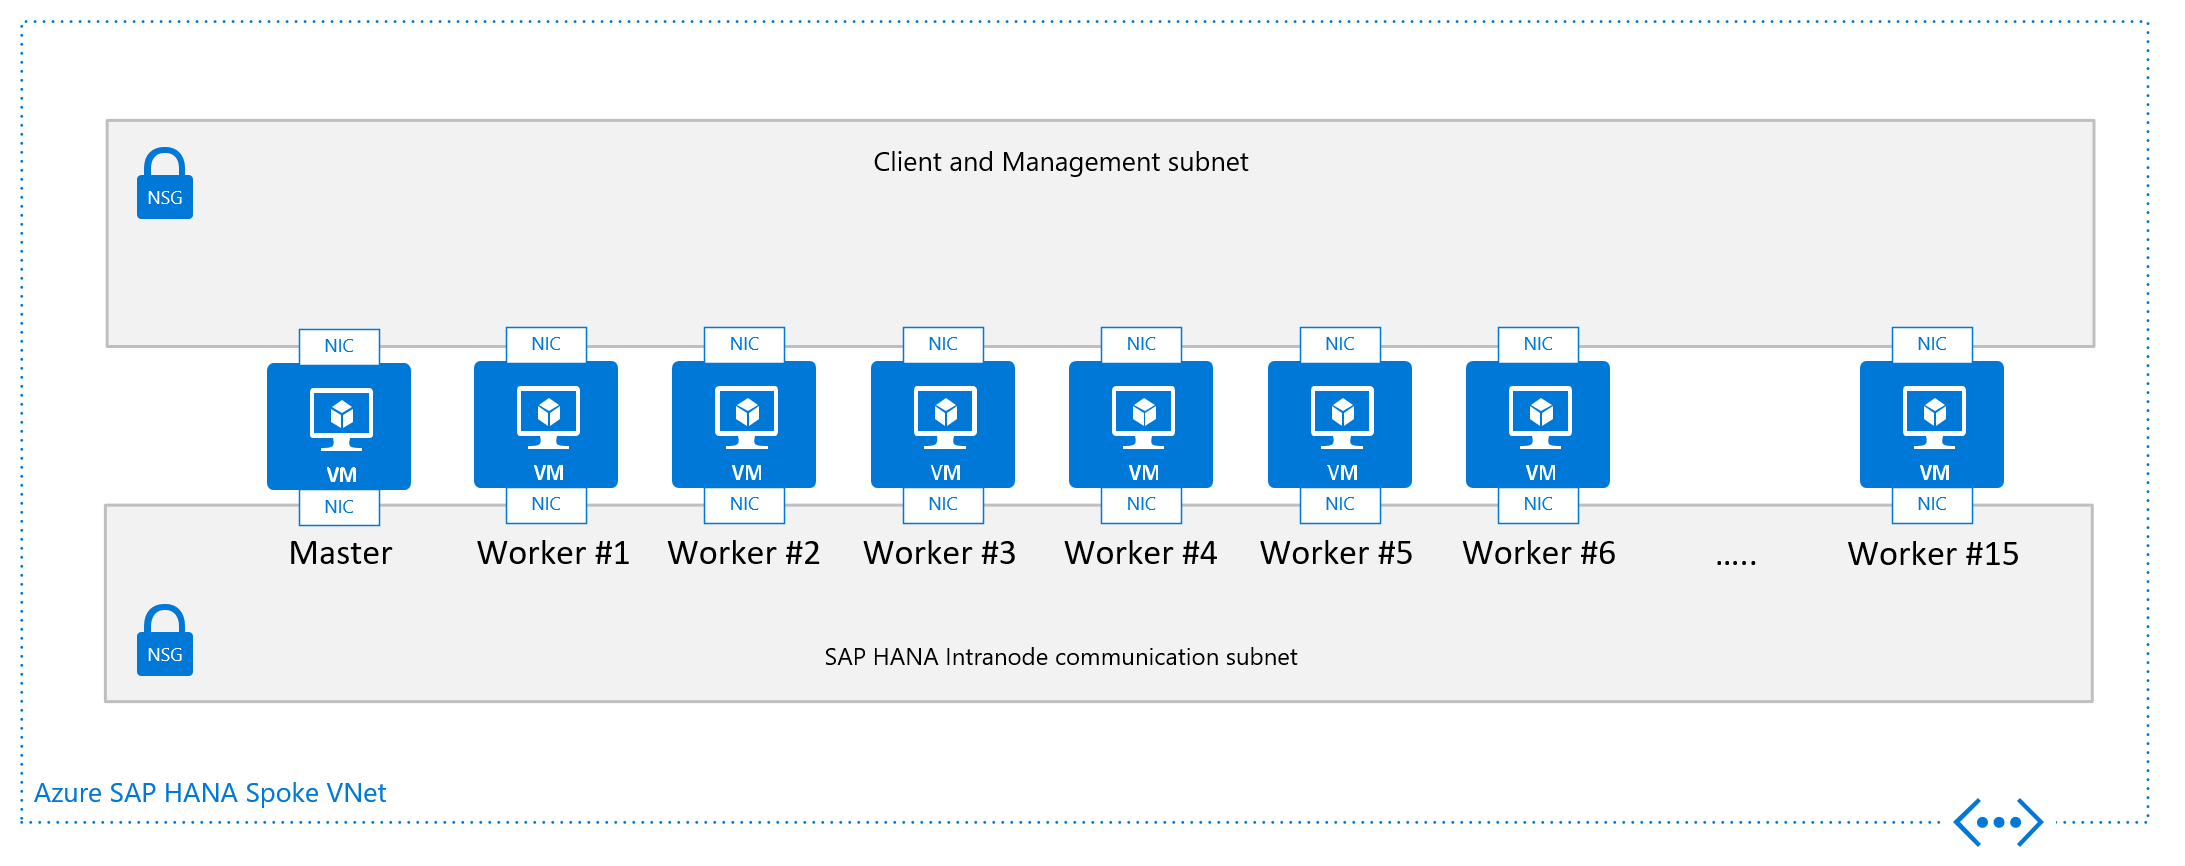
From a networking point of view the minimum required network architecture would look like:
Installing SAP HANA scale-out n Azure
Installing a scale-out SAP configuration, you need to perform rough steps of:
- Deploying new or adapting an existing Azure VNet infrastructure
- Deploying the new VMs using Azure Managed Premium Storage, Ultra disk volumes, and/or NFS volumes based on ANF
- Adapt network routing to make sure that, for example, intra-node communication between VMs isn't routed through an NVA.
- Install the SAP HANA main node.
- Adapt configuration parameters of the SAP HANA main node
- Continue with the installation of the SAP HANA worker nodes
Installation of SAP HANA in scale-out configuration
As your Azure VM infrastructure is deployed, and all other preparations are done, you need to install the SAP HANA scale-out configurations in these steps:
- Install the SAP HANA main node according to SAP's documentation
- When using Azure Premium Storage or Ultra disk storage with non-shared disks of
/hana/dataand/hana/log, add the parameterbasepath_shared = noto theglobal.inifile. This parameter enables SAP HANA to run in scale-out without shared/hana/dataand/hana/logvolumes between the nodes. Details are documented in SAP Note #2080991. If you're using NFS volumes based on ANF for /hana/data and /hana/log, you don't need to make this change - After the eventual change in the global.ini parameter, restart the SAP HANA instance
- Add more worker nodes. For more information, see Add Hosts Using the Command-Line Interface. Specify the internal network for SAP HANA inter-node communication during the installation or afterwards using, for example, the local hdblcm. For more detailed documentation, see SAP Note #2183363.
To set up an SAP HANA scale-out system with a standby node, see the SUSE Linux deployment instructions or the Red Hat deployment instructions.
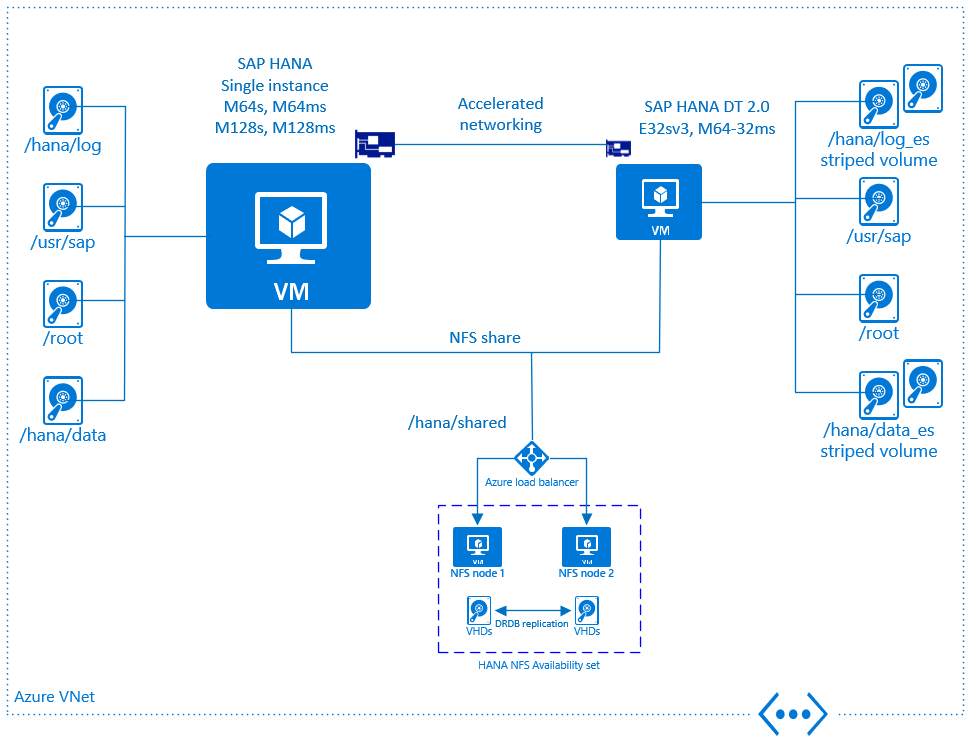
SAP HANA Dynamic Tiering 2.0 for Azure virtual machines
In addition to the SAP HANA certifications on Azure M-series VMs, SAP HANA Dynamic Tiering 2.0 is also supported on Microsoft Azure. For more information, see Links to DT 2.0 documentation. There's no difference in installing or operating the product. For example, you can install SAP HANA Cockpit inside an Azure VM. However, there are some mandatory requirements, as described in the following section, for official support on Azure. Throughout the article, the abbreviation "DT 2.0" is going to be used instead of the full name Dynamic Tiering 2.0.
SAP HANA Dynamic Tiering 2.0 isn't supported by SAP BW or S4HANA. Main use cases right now are native HANA applications.
Overview
The picture below gives an overview regarding DT 2.0 support on Microsoft Azure. There's a set of mandatory requirements, which has to be followed to comply with the official certification:
- DT 2.0 must be installed on a dedicated Azure VM. It may not run on the same VM where SAP HANA runs
- SAP HANA and DT 2.0 VMs must be deployed within the same Azure Vnet
- The SAP HANA and DT 2.0 VMs must be deployed with Azure accelerated networking enabled
- Storage type for the DT 2.0 VMs must be Azure Premium Storage
- Multiple Azure disks must be attached to the DT 2.0 VM
- It's required to create a software raid / striped volume (either via lvm or mdadm) using striping across the Azure disks
More details are going to be explained in the following sections.