Sunday, 26 May 2024

Create an Automator Config key

 Create an Automator Config key

Open a command line interface and generate a 256-bit AES key in URL-encoded format using one of the methods below, depending on your operating system:

Generate a Key

openssl rand -base64 32

Save the resulting value produced by this command for Step (3).

Example of generated key value in Mac/Linux
Example of generated key value in PowerShell

(2) Create a Container App

From Azure, create a new Container App.

Create a Container App
  • Select or create a new Resource Group

  • Set the Container App Name to "keeperautomator" or whatever you prefer

  • Select the region where you would like the service hosted

  • Create a new Apps Environment or select an existing environment

  • Click Next : Container >

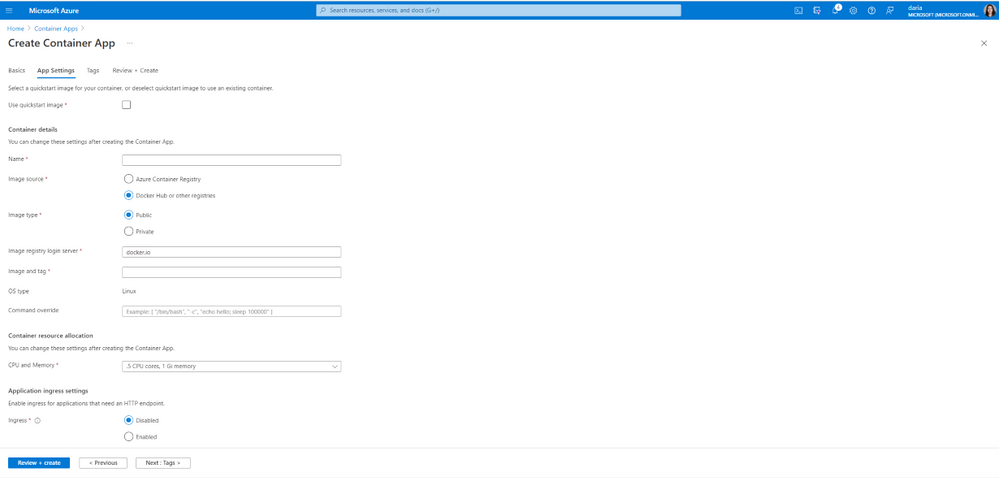
(3) Setup Container Details

In the "Container" step, make the following selections:

  • Uncheck the "Use quickstart image"

  • Select "Docker Hub or other registries"

  • Select "Public"

  • Select Registry login server as docker.io

  • Set the Image and tag as keeper/automator:latest

  • For CPU and Memory, 0.5 CPU cores and 1Gi memory is sufficient, but this can be updated based on your volume of new device logins.

  • Create an environment variable called AUTOMATOR_CONFIG_KEY with the value from Step 1 above of the setup guide.

  • Create an environment variable called AUTOMATOR_PORT with the value of 8089

  • Create an environment variable called SSL_MODE with the value of none

  • Click "Next : Bindings >"

  • Click "Next : Ingress >"

(4) Ingress Setup

On the Ingress setup screen, select the following:

  • Enable Ingress

  • Ingress traffic Accepting traffic from anywhere (we'll modify this in a later step)

  • Ingress type HTTP

  • Target port set to 8089

(5) Create Container App

Click "Review + Create" and then click "Create"

After a few minutes, the container app will be created and automatically start up.

Clicking on "Go to Resource" will take you to the container environment.

Go to resource

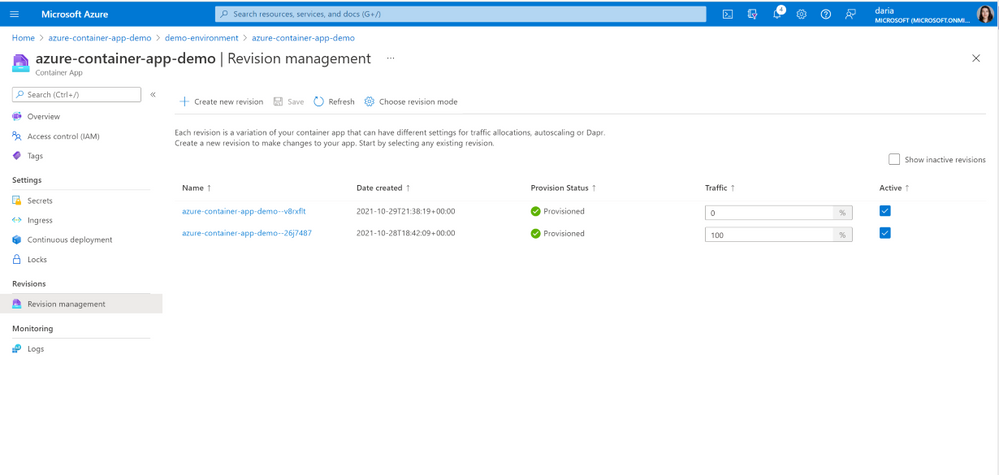
(6) Customize the Ingress Setup

To restrict communications to the Keeper Automator service, click on the "Ingress" link on the left side of the screen.

  • Click on "Ingress"

  • Select "Allow traffic from IPs configured below, deny all other traffic"

  • Click "Add" to add two of Keeper's IPs and any of your IPs required for testing the service.

  • Click Save

Ingress Setup
Keeper Tenant RegionIP1IP2

US

54.208.20.102/32

34.203.159.189/32

US GovCloud

18.252.135.74/32

18.253.212.59/32

EU

52.210.163.45/32

54.246.185.95/32

AU

3.106.40.41/32

54.206.208.132/32

CA

35.182.216.11/32

15.223.136.134/32

JP

54.150.11.204/32

52.68.53.105/32

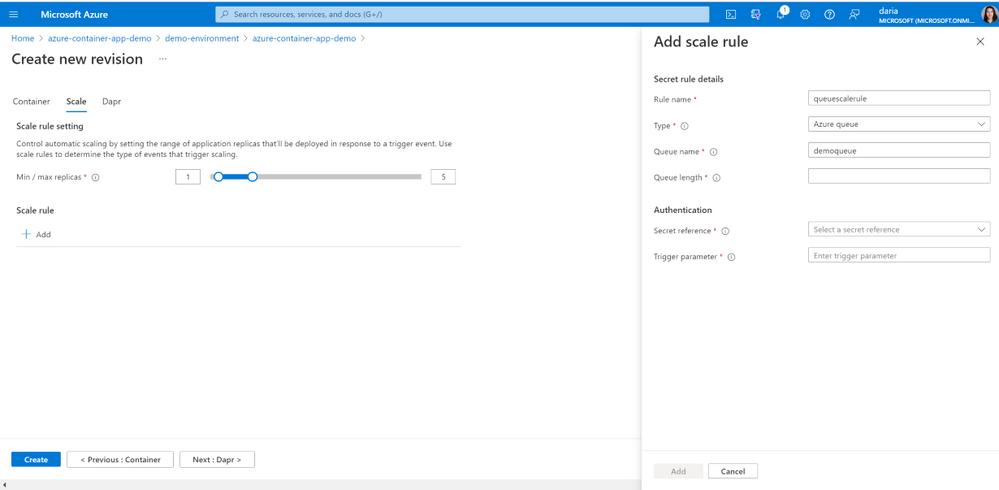
(7) Set up Scaling, Health Probes and Volume Mount

In order to prevent Azure from downscaling to zero instances, it's important to set the minimum number of instances to 1.

  • Click on "Scale and replicas"

  • Click "Edit and deploy"

  • Click on the "Scale" tab

  • For now, let's set the Min / max both to 1.

Min and Max replicas
  • Next, click on the "Container" tab, click on the container image name

  • Click on the "Health probes" tab on the upper right

Under "Liveness probes":

  • Enable liveness probes

  • Transport: HTTP

  • Path: /health

  • Port: 8089

  • Initial delay seconds: 5

  • Period seconds: 30

Liveness probes

Under "Startup probes":

  • Enable startup probes

  • Transport: HTTP

  • Path: /health

  • Port: 8089

  • Initial delay seconds: 5

  • Period seconds: 30

Startup probes

Under "Volume Mounts":

  • Select "Ephemeral Storage"

  • Add volume name automatordata

  • Add Mount Path as /usr/mybin/config

Volume mounts

Finish the configuration

  • Click on Save

  • Then click on Create to build the new configuration

  • After a few minutes, the new containers should start up

(8) Retrieve the Application URL

From the Overview section of the Container App, on the right side is the "Application URL" that was assigned. Copy this and use this Application URL in the next step.

For example, https://craigautomator1.xyx-1234.azurecontainerapps.io

Retrieve the Application URL

(9) Login to Keeper Commander

Keeper Commander is required to perform the final step of Automator configuration. This can be run from anywhere, it does not need to be installed on the server.

On your workstation or server, install Keeper Commander CLI. The installation instructions including binary installers are here: https://docs.keeper.io/secrets-manager/commander-cli/commander-installation-setup After Commander is installed, launch Keeper Commander, or from an existing terminal you can type keeper shell to open the session, then login using the login command. In order to set up Automator, you must login as a Keeper Administrator, or an Admin with the ability to manage the SSO node.

$ keeper shell

My Vault> login admin@company.com

  _  __  
 | |/ /___ ___ _ __  ___ _ _ 
 | ' </ -_) -_) '_ \/ -_) '_|
 |_|\_\___\___| .__/\___|_|
 v16.x.xxx    |_|

 password manager & digital vault

Logging in to Keeper Commander
Enter password for admin@company.com
Password: ********************
Successfully authenticated with Master Password
Syncing...
Decrypted [58] record(s)

My Vault>

(10) Create the Automator

Create the Automator using a series of commands, starting with automator create

My Vault> automator create --name "My Automator" --node "Azure Cloud"

The Node Name (in this case "Azure Cloud") comes from the Admin Console UI as seen below.

Automator Create

The output of the command will display the Automator settings, including metadata from the identity provider.

                    Automator ID: 1477468749950
                            Name: My Automator
                             URL: 
                         Enabled: No
                     Initialized: No
                          Skills: Device Approval

Note that the "URL" is not populated yet. This is the Application URL from Step 8.

Run the "automator edit" command as displayed below, which sets the URL and also sets up the skills (team, team_for_user and device).

automator edit --url https://<application URL> --skill=team --skill=team_for_user --skill=device "My Automator"

Next we exchange keys: The enterprise private key encrypted with the Automator public key is provided to Automator:

automator setup "My Automator"

Initialize the Automator with the new configuration

automator init "My Automator"

Enable the service

automator enable "My Automator"

At this point, the configuration is complete.

For external health checks, you can use the below URL:

https://<server>/health

Example curl command:

$ curl https://craigautomator1.xyz.azurecontainerapps.io/health
OK

a serverless container service for running modern apps at scale

 a serverless container service for running modern apps at scale


The fast pace of innovation today requires businesses to focus on differentiated business logic and high velocity delivery to maximize impact. Business logic is often encapsulated in modern cloud native applications represented as microservices with multiple application components that are independently developed and interconnected. Many cloud hosting options for microservices and containerized applications require infrastructure management and orchestration that can increase solution complexity, overall cost, and time to market.


At Ignite, we announced Azure Container Apps, a serverless application centric hosting service where users do not see or manage any underlying VMs, orchestrators, or other cloud infrastructure. Azure Container Apps enables executing application code packaged in any container and is unopinionated about runtime or programming model. Applications can scale in response to HTTP requests, events (e.g. storage queue messages, Kafka topics, etc.), or simply run as always-on background jobs. Azure Container Apps addresses specific requirements for microservices including encrypted service to service communication and the independent versioning and scaling of services.


Azure Container Apps is built on the foundation of powerful open-source technology in the Kubernetes ecosystem . The open-source centric approach enables a path for teams to build microservices without having to overcome the concept and operational overhead of working with Kubernetes directly and enables continued application portability by leveraging open standards and APIs. Behind the scenes, every application runs on Azure Kubernetes Service, with Kubernetes Event Driven Autoscaling (KEDA)Distributed Application Runtime (Dapr), and Envoy deeply integrated in the hosting service.


Getting started with Azure Container Apps

Multiple individual Container Apps can be deployed to a single Container Apps environment, which acts as an isolation and observability boundary between a group of Container Apps. Container Apps deployed to the same environment write logs to the same Log Analytics workspace. This structure enables easy communication between microservices that compose the overall solution. Additionally, multiple containers can be deployed to the same container app and in that case, they’ll be deployed and scaled together as a single unit or pod of containers. To get started with Azure Container Apps see Quickstart: Deploy an HTTP application to Azure Container Apps.


thumbnail image 1 captioned Create a container appCreate a container app

You can use the Azure CLI to create and manage Container Apps.


thumbnail image 2 captioned Create a new Container App using the Azure CLICreate a new Container App using the Azure CLI


Horizontal autoscaling and scale triggers

Azure Container Apps manages horizontal autoscaling through a set of declarative scaling rules. By default, Azure Container Apps scale to zero and pause billing when not in use. As a Container App scales out, new instances of the Container App are created on-demand. Container Apps supports many scale triggers including HTTP and event-based triggers using Kubernetes Event Driven Autoscaling (KEDA). KEDA is a rich autoscaler with many event scaler options continuously contributed by the community. For more information about supported scale triggers, see KEDA Scalers. See How-to – Set scaling rules in Azure Container Apps for more details.


thumbnail image 3 captioned Add a scale ruleAdd a scale rule


Making microservices development easier with Distributed Application Runtime (Dapr)

Dapr is an open-source event-driven runtime that codifies best practices for building portable microservice applications into independent platform agnostic building blocks using the development language and framework of your choice. Azure Container Apps offers a fully managed version of the Dapr APIs. With Dapr for Azure Container Apps, sidecars can be enabled to run next to your application instances and provide a rich set of capabilities and productivity gains. You can use the following Dapr APIs: Service to Service callsPub/SubEvent BindingsState Stores, and Actors. See Tutorial – Use Dapr in Azure Container Apps for more details.


thumbnail image 4 captioned Dapr integrationDapr integration

App lifecycle management

Azure Container Apps streamlines the application lifecycle management by supporting multiple revisions to manage application versions, enabling traffic splitting and balancing across application versions, securing application secrets, connecting different applications, and delivering integrated monitoring via Log Analytics. See Concepts - Application lifecycle management in Azure Container Apps for more details.


thumbnail image 5 captioned Revision management

Windows 11 on ESXi 7

 When you get the error picture above simply press Shift + F10 and this will bring up a dos prompt. Type regedit and hit enter.

Navigate to HKEY_LOCAL_MACHINE\SYSTEM\Setup and create a new Key called: LabConfig

Create inside the LabConfig Key a ByPassTPMCheck DWORD (32-bit) with the value of 1

Click OK after editing the value data and then close out of all of the screens. Once you click on the red x in the corner of the setup screen, the setup will start again and ignore the TPM requirements.