Wednesday, 22 May 2024

Mastering Azure's Compute Gallery and VM Image Creation


 Mastering Azure's Compute Gallery and VM Image Creation


Azure Compute Gallery is a service in Microsoft Azure that allows you to create, manage, and share custom virtual machine (VM) images with ease. This write-up will guide you through the process of creating an Azure Compute Gallery step by step.

Prerequisites
Before you begin, ensure that you have the following prerequisites in place:

Azure Subscription: You need an active Azure subscription. If you don't have one, you can sign up for a free trial at Azure Portal.

Azure Resource Group: Create an Azure Resource Group to organize and manage your gallery resources.

Virtual Machine: An existing Azure virtual machine that you want to capture an image from.

Step 1: Create a Gallery

  • Log in to the Azure Portal.

In the left-hand menu, click on Create a resource.

Create a resource

  • In the search bar, type "Compute Gallery" and select it from the search results.

Compute Gallery

  • Click the Create button.

Create button

  • Fill in the required details:
  1. Subscription: Select your Azure subscription.

Azure subscription

  1. Resource group: Choose the resource group you created earlier.Resource group
  2. Gallery name: Choose a unique name for your gallery.

Gallery name

  1. Region: Choose the Azure region where you want to deploy the gallery.

Region

  • Click the 'Next + Sharing method' button.

Next + Sharing method

  • Sharing method: On the sharing method page, leave it on default which is the Role based access control(RBAC). Role-Based Access Control (RBAC) in Azure is a security mechanism that regulates access to resources. It employs roles with specific permissions, which are assigned to users, groups, or applications through role assignments. RBAC functions across various levels like management groups, subscriptions, resource groups, and resources themselves. It prioritizes least privilege and can be managed through the Azure Portal, PowerShell, CLI, or templates. Regular audits are important for maintaining security and compliance.

Sharing method.

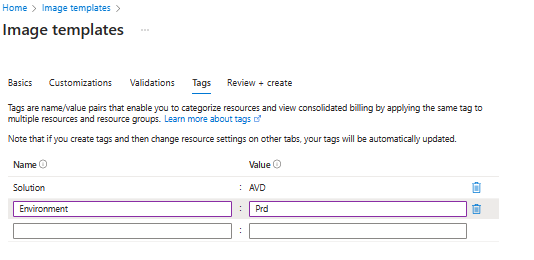
  • Click the 'Next: Tag' button.

Next: Tag

Leave the Tags on default or you can create a Tag or you can assign tags based on your preference. Click the Review + create button to review your settings. Make sure everything is configured correctly.

Next: Tag

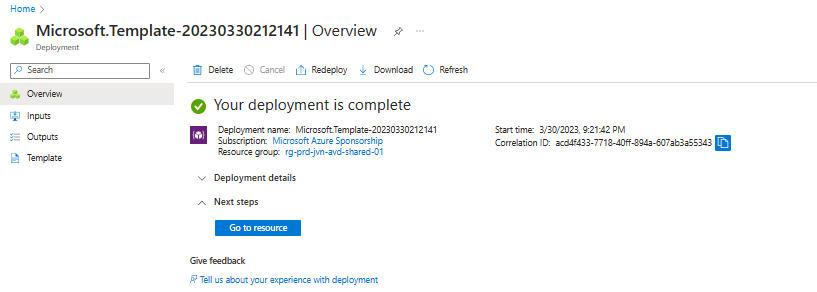
  • Finally, click the Create button to create the gallery once validation is passed.

click the Create button

Once your deployment is completed, you have successfully created an Azure Compute Gallery. Click on the 'Go to resource' button to access your newly deployed compute gallery.

Go to resource

Go to resource

Step 2: Capturing an Azure Virtual Machine Image to Compute Gallery

Prepare the Virtual Machine
Before capturing the VM image, ensure that your VM is in a suitable state:

  • Stop the VM: It's recommended to stop the VM to ensure a consistent state during the capture process. You can stop it from the Azure Portal.

  • Deallocate the VM: If you are capturing an image from a VM that is not in a deallocated state, you can deallocate it from the Azure Portal to avoid additional charges. Azure deallocates VM automatically during this process if you don't do it manually.

Step 3: Capture the VM Image

In the Azure Portal, navigate to the Virtual machines section.

Select the VM you want to capture an image from.

VM

In the VM's overview page, under Settings, click on Capture. This action initiates the image capture process.

click on Capture

Provide the required information:

  • Image target gallery: Select the Azure Compute Gallery where you want to store this image.

Image target gallery

  • Operating system state: choose one out of the two option Generalized and Specialized, In the context of Azure Virtual Machine (VM) image capture, "Generalized" and "Specialized" refer to two different states of the VM:

Generalized: When a VM is in a "Generalized" state, it has been prepared to be a reusable image. In this state, any specific configuration and unique information, such as the computer name, have been removed or generalized. This process typically involves running the "Sysprep" tool on a Windows VM or executing similar steps on a Linux VM. After this, the VM is often shut down. Generalized VMs are suitable for creating custom images that can be used to deploy multiple VM instances with the same base configuration.

Specialized: A VM in a "Specialized" state is one that hasn't undergone the generalization process. It's in a specific, unique configuration with potentially personalized settings and data. Specialized VMs are typically used for ongoing production purposes and are not intended to be used as a template for creating new VM instances.

When capturing an image of an Azure VM, it's essential to generalize the VM first if you want to create a reusable image. Specialized VMs, on the other hand, are kept as-is for ongoing operations. Understanding and appropriately managing the state of your VMs is crucial for efficient image management in Azure. Here we picked Specialized since we are having an ongoing operation and want to have the ease of not authenticating when we scale.

Target VM image definition:

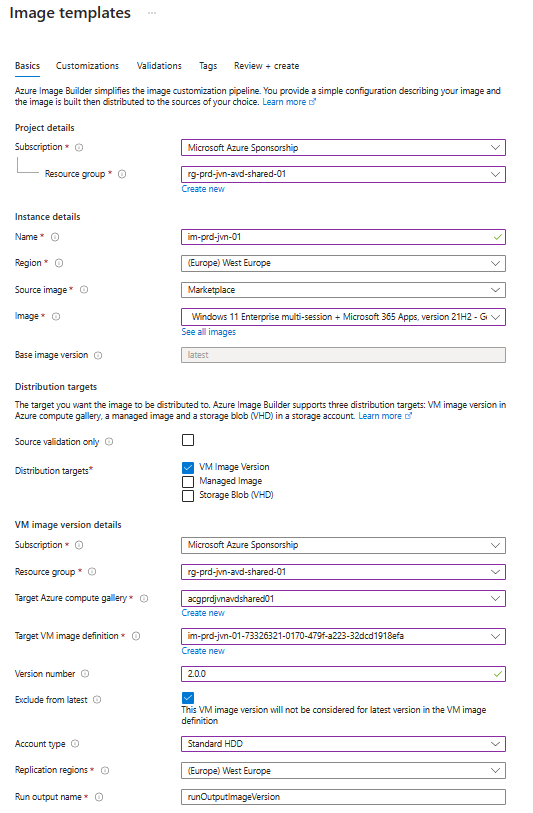
  • Target VM image definition: Click on 'Create New'.

Target VM image definition:

  • VM Image definition name: Choose a unique name for your captured image. Leave other fields as default and click 'Ok'.

VM Image definition name

  • Image version: Provide a version number and an optional description for this image version. Versioning in VM image capture is the practice of maintaining multiple snapshots or versions of a virtual machine image in Azure. Instead of overwriting the original image, each change or update creates a new version. This allows for flexible deployment, enabling you to choose specific image versions when creating VM instances. It's essential for managing changes and ensuring the ability to revert to known, stable configurations when needed.

Image version

  • Replication: This refers to the process of duplicating the VM's virtual hard disk (VHD) to create a copy of the VM's entire state, including the operating system, installed software, and data. Here we are replicating just 1 image of our VM and our storage option is Zone Redundant. Configure the target region(s) where this image version will be available.

Replication

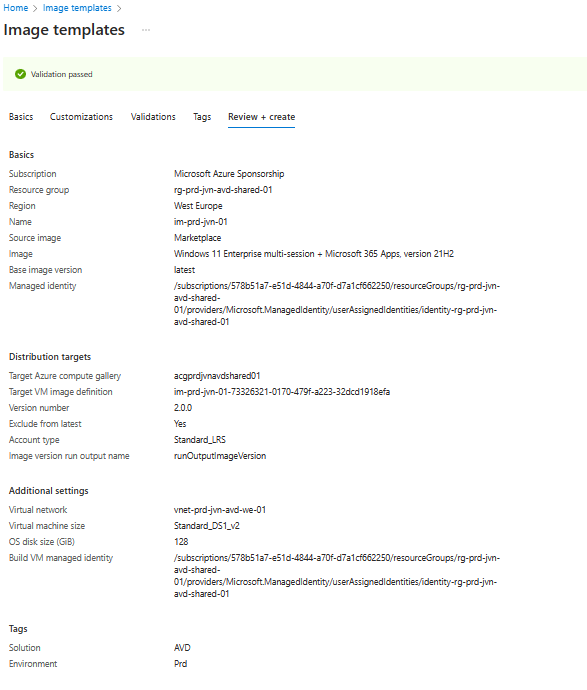
  • Click 'Review + create' to review your settings. Ensure that everything is configured correctly.

Review + create

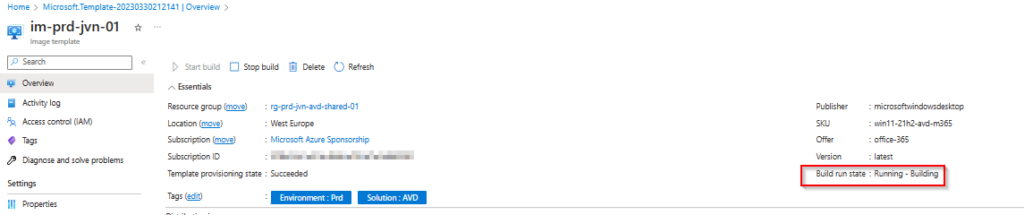
  • Finally, click 'Create' to start the image capture process. The VM will be deallocated, and Azure will capture an image of it.

Create

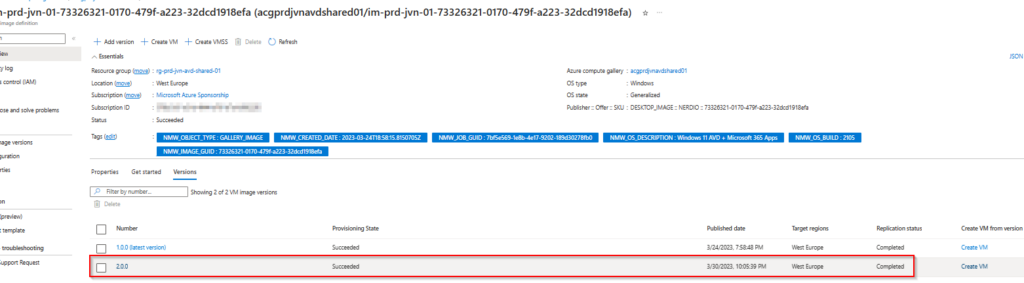
Once the process is complete, the captured image will be stored in your specified Azure Compute Gallery. Once deployment is complete you can now 'Go to resource'.

Go to resource

Tadaa! ๐ŸŽ‰This is our captured VM Image in our compute gallery.

Tadaa!

Conclusion

You've successfully captured an image from an Azure virtual machine and stored it in an Azure Compute Gallery. This process allows you to maintain a library of custom VM images, making it easier to provision standardized virtual machines for your Azure deployments. Remember to update your gallery with new versions as your VM images evolve over time.

๐Ÿ‘‹ Was this post useful to you?

Why haven't you joined DEV yet?

It takes one minute to join DEV and is worth it for your career.

Join now

Top comments (0)

profile
Pieces.app
PROMOTED

A Workflow Copilot. Tailored to You.

Pieces.app image

Our desktop app, with its intelligent copilot, streamlines coding by generating snippets, extracting code from screenshots, and accelerating problem-solving.

Images Azure


Images

When you create a catalog to deliver desktops or apps, an image is used (with other settings) as a template for creating the machines.

Citrix prepared images

Citrix DaaS Standard for Azure (formerly Citrix Virtual Apps and Desktops Standard for Azure) provides several Citrix prepared images:

  • Windows 11 Pro (single-session)
  • Windows 11 Enterprise Virtual Desktop (multi-session)
  • Windows 11 Enterprise Virtual Desktop (multi-session) with Office 365 ProPlus
  • Windows 10 Pro (single-session)
  • Windows 10 Enterprise Virtual Desktop (multi-session)
  • Windows 10 Enterprise Virtual Desktop (multi-session) with Office 365 ProPlus
  • Windows Server 2022 (multi-session)
  • Windows Server 2019 (multi-session)
  • Windows Server 2016 (multi-session)
  • Linux Ubuntu 22.04 LTS (single-session)
  • Linux Ubuntu 22.04 LTS (multi-session)

The Citrix prepared images have a current Citrix Virtual Delivery Agent (VDA) and troubleshooting tools installed. The VDA is the communication mechanism between your users’ machines and the Citrix Cloud infrastructure that manages Citrix DaaS for Azure. Images provided by Citrix are notated as CITRIX.

You can also import and use your own image from Azure.

Ways to use images

You can:

  • Use a Citrix prepared image when creating a catalog. This choice is recommended only for proof of concept deployments.
  • Use a Citrix prepared image to create another image. After the new image created, you customize it by adding applications and other software that your users need. Then, you can use that customized image when creating a catalog.
  • Import an image from Azure. After you import an image from Azure, you can then use that image when creating a catalog. Or, you can use that image to create a new image, and then customize it by adding apps. Then, you can use that customized image when creating a catalog.

When you create a catalog, Citrix DaaS for Azure verifies that the image uses a valid operating system, and has a Citrix VDA and troubleshooting tools installed (along with other checks).

Display image information

  1. From the Manage > Azure Quick Deploy dashboard, expand Master Images on the right. The display lists the images that Citrix provides, and images you created and imported.

    Images display in Manage > Quick Deploy dashboard

  2. Click an image to display its details.

    Image details display

    From the details card, you can:

    • Change (edit) the image’s name.
    • Add and edit notes (Available only for images you prepared or imported, not Citrix-provided images).
    • Delete the image.

Prepare a new image

Preparing a new image includes creating the image and then customizing it. When you create an image, a new VM is created to load the new image.

Requirements:

  • Know the performance characteristics that the machines need. For example, running CAD apps might require different CPU, RAM, and storage than other office apps.
  • If you plan to use a connection to your on-premises resources, set up that connection before creating the image and the catalog. For details, see Network connections.

When using a Citrix prepared Ubuntu image to build a new image, a root password is created for the new image. You can change that root password, but only during the image creation and customization process. (You cannot change the root password after the image is used in a catalog.)

  • When the image is created, the administrator account that you specified (Login details for image building machine) is added to the sudoers group.
  • After you RDP to the machine containing the new image, launch the terminal application and type sudo passwd root. When prompted, provide the password you specified when creating the image. After verification, you’re prompted to enter a new password for the root user.

To create an image:

  1. From the Manage > Azure Quick Deploy dashboard, expand Master Images on the right.
  2. Click Build Image.

    Build image fields

  3. Enter values in the following fields:

    • Name: Enter a name for the new image.
    • Master image: Select an existing image. This is the base image that is used to create the new image.
    • Subscription: Select an Azure subscription. For details, see Azure subscriptions.
    • Network connection:

      • If using a Citrix Managed Azure subscription, select No connectivity or a previously created connection.
      • If using your own customer-managed Azure subscription, select your resource group, virtual network, and subnet. Then add domain details: FQDN, OU, service account name, and credentials.
    • Domain configuration: Select the domain type: Active Directory or non-domain-joined.

      • If you select Active Directory, select or add a domain. Specify an OU (optional), service account name, and password.
      • If you select non-domain-joined, no additional information is needed.
    • Region: (Available only for No connectivity.) Select a region where you want the machine containing the image to be created.
    • Logon credentials for image machine: You’ll use these credentials later when you connect (RDP) to the machine containing the new image, so that you can install apps and other software.
    • Machine performance: This is CPU, RAM, and storage information for the machine that runs the image. Select a machine performance that meets your apps’ requirements.
    • Restricted IP access: If you want to restrict access to specific addresses, select Add IP addresses and then enter one or more addresses. After adding the addresses, click Done to return to the Build image card.
    • Notes: Optionally add up to 1024 characters of notes. After the image is created, you can update the notes from the image’s details display.
    • Local domain join: Indicate whether you want to join the local Active Directory domain.
      • If you select Yes, enter the Azure information: FQDN, OU, service account name, and credentials.
      • If you select No, enter the credentials for the host machine.
  4. When you’re done, click Build Image.

An image can take up to 30 minutes to build. On the Manage > Azure Quick Deploy dashboard, expand Master Images on the right to see the current state (such as Building image or Ready to customize).

What to do next: Connect to a new image and customize it.

Connect to a new image and customize it

After a new image is created, its name is added to the images list, with a status of Ready to customize (or similar wording). To customize that image, you first download an RDP file. When you use that file to connect to the image, you can then add applications and other software to the image.

  1. From the Manage > Azure Quick Deploy dashboard, expand Master Images on the right. Click the image you want to connect to.
  2. Click Download RDP file. An RDP client downloads.

    The image machine might power off if you do not RDP to it shortly after it’s created. This saves costs. When that happens, click Power On.

  3. Double-click the downloaded RDP client. It automatically attempts to connect to the address of the machine containing the new image. When prompted, enter the credentials you specified when creating the image.
  4. After you connect to the machine, add or remove apps, install updates, and finish any other customization work.

    Do NOT Sysprep the image.

  5. When you’re done customizing the new image, return to the Master Images box and click Finish build. The new image automatically undergoes validation testing.

Later, when you create a catalog, the new image is included in the list of images you can select.

On the Manage > Quick Deploy dashboard, the images display on the right indicates how many catalogs and machines use each image.

NOTE:

After you finalize an image, you cannot edit it. You must create a new image (using the previous image as a starting point), and then update the new image.

Import an image from Azure

When you import an image from Azure that has a Citrix VDA and applications your users need, you can use it to create a catalog or replace the image in an existing catalog.

Imported image requirements

Citrix runs validation tests on the imported image. Ensure that the following requirements are met when you prepare the image that you’ll import into Citrix DaaS for Azure.

  • Supported OS: The image must be a supported OS. To check a Windows OS version, run Get-WmiObject Win32_OperatingSystem.
  • Supported generation: Generation 1 virtual machines support most guest operating systems. Generation 2 virtual machines support most 64-bit versions of Windows and more current version of Linux operating systems.
  • Not generalized: The image must not be generalized.
  • No configured Delivery Controllers: Ensure that no Citrix Delivery Controllers are configured in the image. Ensure that the following registry keys are cleared.
    • HKLM:\SOFTWARE\Citrix\VirtualDesktopAgent\ListOfDDCs
    • HKLM:\SOFTWARE\Policies\Citrix\VirtualDesktopAgent\ListOfDDCs
    • HKLM:\SOFTWARE\Citrix\VirtualDesktopAgent\FarmGUID
    • HKLM:\SOFTWARE\Policies\Citrix\VirtualDesktopAgent\FarmGUID
  • Personality.ini file: The personality.ini file must exist on the system drive.
  • Valid VDA: The image must have a Citrix VDA newer than 7.11 installed.

    • Windows: To check, use Get HKLM:\SOFTWARE\Microsoft\Windows\CurrentVersion\Uninstall\Citrix Virtual Desktop Agent. For installation guidance, see Install a Windows VDA on an image.
    • Red Hat Enterprise Linux and Ubuntu: For installation guidance, see the product documentation.
  • Azure Virtual Machine Agent: Before importing an image, make sure that the Azure Virtual Machine Agent is installed on the image. For more information, see the Microsoft article Azure Virtual Machine Agent overview.

Import the image

  1. From the Manage > Azure Quick Deploy dashboard, expand Master Images on the right.

    Images display in Manage dashboard

  2. Click Import Image.

    Import image

  3. Choose how to import the image.

    • For managed disks, use the export feature to generate a SAS URL. Set the expiration time to 7200 seconds or more.
    • For VHDs in a storage account, choose one of the following:
      • Generate a SAS URL for the VHD file.
      • Update the access level of a block storage container to blob or container. Then, get the file’s URL.
  4. If you selected Browse storage account:

    1. Sequentially select a subscription > resource group > storage account > image.
    2. Name the image.
  5. If you selected Azure public URL:

    1. Enter the Azure-generated URL for the VHD. For guidance, click the link to the Microsoft document Download a Windows VHD from Azure.
    2. Select a subscription. (A Linux image can be imported only if you select a customer-managed subscription.)
    3. Name the image.
  6. When you’re done, click Import Image.

Update a catalog with a new image

The catalog type determines which machines are updated when you update the catalog.

  • For a random catalog, all the machines currently in the catalog are updated with the latest image. If you add more desktops to that catalog, they are based on the latest image.
  • For a static catalog, the machines currently in the catalog are not updated with the latest image. Machines currently in the catalog continue to use the image they were created from. However, if you add more machines to that catalog, they are based on the latest image.

You can update a catalog containing machines with gen1 images with a gen2 image, if the catalog’s machines support gen2. Similarly, you can update a catalog containing gen2 machines with a gen1 image, if the catalog’s machines support gen1.

To update a catalog with a new image:

  1. From the Manage > Azure Quick Deploy dashboard, click anywhere in the catalog’s entry.
  2. On the Details tab, click Update Image.

    Update an image in a catalog

  3. Select an image.
  4. For random or multi-session catalogs: Select a logoff interval. After Citrix DaaS for Azure completes the initial image processing, subscribers receive a warning to save their work and log off from their desktops. The logoff interval indicates how long subscribers have after receiving the message until the session ends automatically.
  5. Click Update Image.

Delete an image

  1. From the Manage > Azure Quick Deploy dashboard, expand Master Images on the right.
  2. Click the image you want to delete.
  3. Click Delete Image at the bottom of the card. Confirm the deletion.

Install a Windows VDA on an image

Use the following procedure when preparing a Windows image that you plan to import into Citrix DaaS for Azure. For Linux VDA installation guidance, see the Linux VDA product documentation.

  1. In your Azure environment, connect to the image VM (if you’re not already connected).
  2. You can download a VDA by using the Downloads link on the Citrix Cloud navigation bar. Or, use a browser to navigate to Citrix DaaS for Azure download page.

    Download a VDA onto the VM. There are separate VDA download packages for a desktop (single-session) OS and a server (multi-session) OS.

  3. Launch the VDA installer by double-clicking the downloaded file. The installation wizard launches.
  4. On the Environment page, select the option to create an image using MCS, and then click Next.
  5. On the Core Components page, click Next.
  6. On the Delivery Controller page, select Let Machine Creation Services do it automatically and then click Next.
  7. Leave the default settings on the Additional ComponentsFeatures, and Firewall pages, unless Citrix instructs you otherwise. Click Next on each page.
  8. On the Summary page, click Install. Prerequisites begin to install. When prompted to restart, agree.
  9. The VDA installation resumes automatically. Prerequisite installation completes and then the components and features are installed. On the Call Home page, leave the default setting (unless Citrix instructs you otherwise). After you connect, click Next.
  10. Click Finish. The machine restarts automatically.
  11. To ensure that the configuration is correct, launch one or more of the applications you installed on the VM.
  12. Shut down the VM. Do not Sysprep the image.

For more information about installing VDAs, see Install VDAs.

Tuesday, 21 May 2024

Create an image through the Azure portal with Azure Image Builder


Create an image through the Azure portal with Azure Image Builder


To start with this new service go to the Azure portal and search for Image template in the global search bar

Next, click on Create Image template

The first block of information that you need to enter comes up. Here you can choose which image to take from the marketplace and if you want to store it in an Azure Compute Gallery.

The last item to select in the first screen is the Managed identity.

If you didn’t give the managed enough access you will get the below error message.

In the next step you need to select your virtual network. You can also change the vm size that will be used to create the image. To further customize the image you have the option to select some scripts.

After the Validations section you can enter the tags you want use for the image and the last step is to see if you pass the validation.

When the deployment is done you can go to the Image Template and Start the build.

During the build you can hit refresh to see the current state of the image build.

When you see that the build is succeeded you can see the new image version being available in the Azure Compute Gallery.

This concludes this blog post about the new Azure Image Builder feature in the Azure portal. I hope this blog post can help you getting started with this new feature. If you have any questions feel free to reach out.