Monday, 19 February 2024

A Complete Guide To Deploy GitHub Project on Amazon EC2 Using GitHub Actions and AWS CodeDeploy


Auto Deploy in Amazon EC2 on Git Commit. A complete guide to configure CodeDeploy and GitHub CI/CD Action.

image


Prerequisite


  • Create a GitHub account.
  • Create AWS Account.

Table Of Contents


Note


Select a particular region of AWS Services which CodeDeploy Agent and GitHub will use.

Create IAM Role For EC2 and CodeDeploy


image


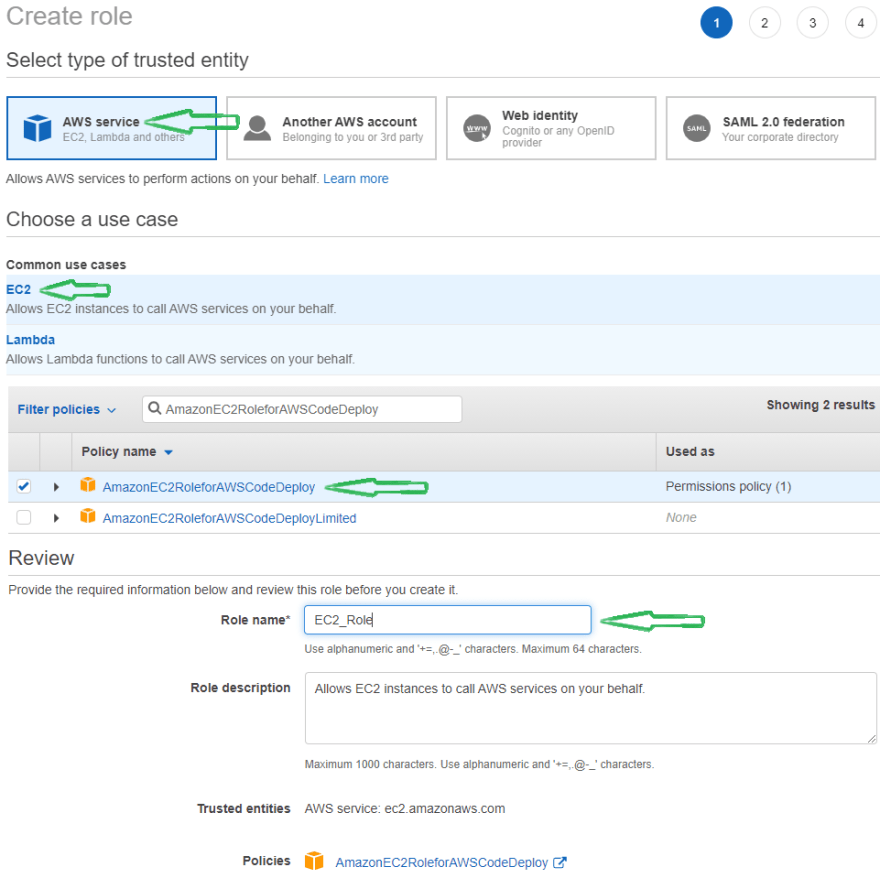
Create a role for EC2 Instance -

  1. Select AWS Service as trusted entity and EC2 as usecase, click on Next:Permissions.
  2. On the Permissions page, select AmazonEC2RoleforAWSCodeDeploy Policy and Click on Next:Tags
  3. Ignore the tags and click Next:Review.
  4. Provide the role name as EC2_Role on the review page.image
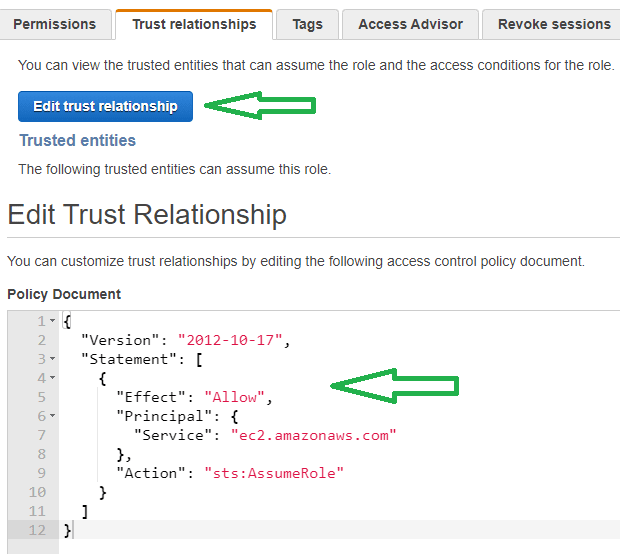
  5. Open the EC2_Role and go to Trust Relationships, then Edit Trust Relationship and paste below policy -
  {
    "Version": "2012-10-17",
    "Statement": [
      {
        "Effect": "Allow",
        "Principal": {
          "Service": "ec2.amazonaws.com"
        },
        "Action": "sts:AssumeRole"
      }
    ]
  }

image


Now we will create a role for CodeDeploy.

  1. Select AWS Service as trusted entity and EC2 as usecase, click on Next:Permissions.
  2. On the Permissions page, select the below policy and Click on Next:TagsAmazonEC2FullAccess, AWSCodeDeployFullAccess, AdministratorAccess, AWSCodeDeployRole
  3. Tags can be ignored, click on Next:Review.
  4. Provide the role name as CodeDeploy_Role on the review page.image
  5. Once CodeDeploy Role created, Open the CodeDeploy_Role and go to Trust Relationships then Edit Trust Relationship and use below policy -

    {
      "Version": "2012-10-17",
      "Statement": [
        {
          "Effect": "Allow",
          "Principal": {
            "Service": "codedeploy.amazonaws.com"
          },
          "Action": "sts:AssumeRole"
        }
      ]
    }
    

Create EC2 Instance

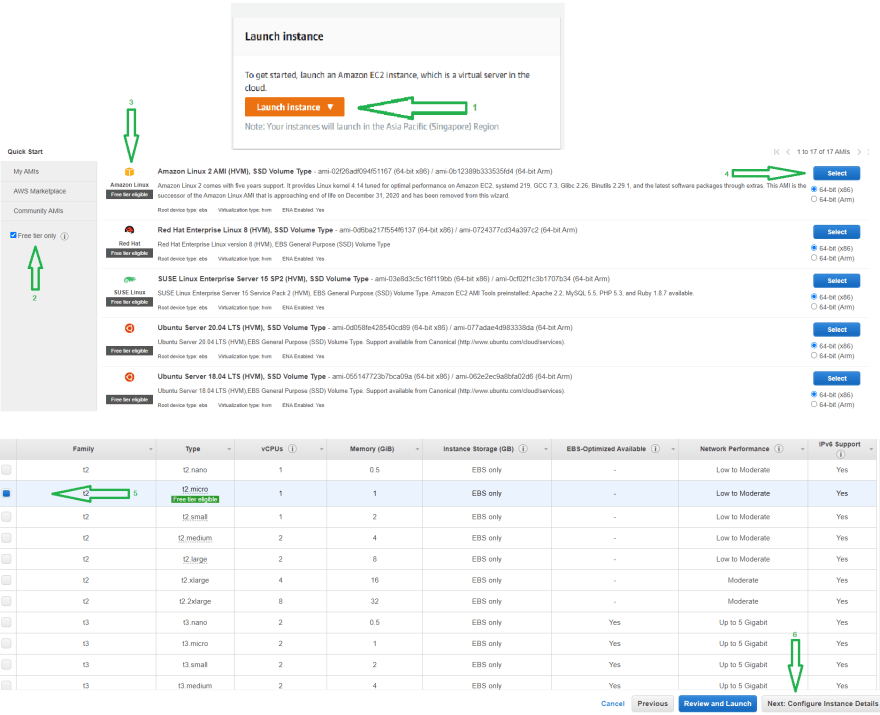
To create an EC2 instance, Go to EC2 Dashboard on AWS Management Console and click on Launch Instance.

On the AIM page, You can select any Volume Type based on your requirement. This article will choose Free Tier Amazon Linux 2 AMI (HVM), SSD Volume Type and 64-bit (x86) Volume and click on select.

Select t2.micro in Choose Instance Typ page and proceed to Configure Instance page.

To establish the connection between EC2 instance and codeDeploy, Select EC2_Role, which we created before.

On the Tag page, add a tag called development. The tag will require creating a codeDeploy service.

In Configure Security Group page Add Rule called All traffic, select source called anywhere.

This rule will enable you to connect the Instance from anywhere.
NOTE - This is not advisable in the Production environment.

Select the review page, then Launch the Instance. Wait for a few minutes to start the EC2 Instance.

If you want to access the Instance (ssh) from your local system, create a new Key Pair and download the key.

image
image


Launch EC2 Instance

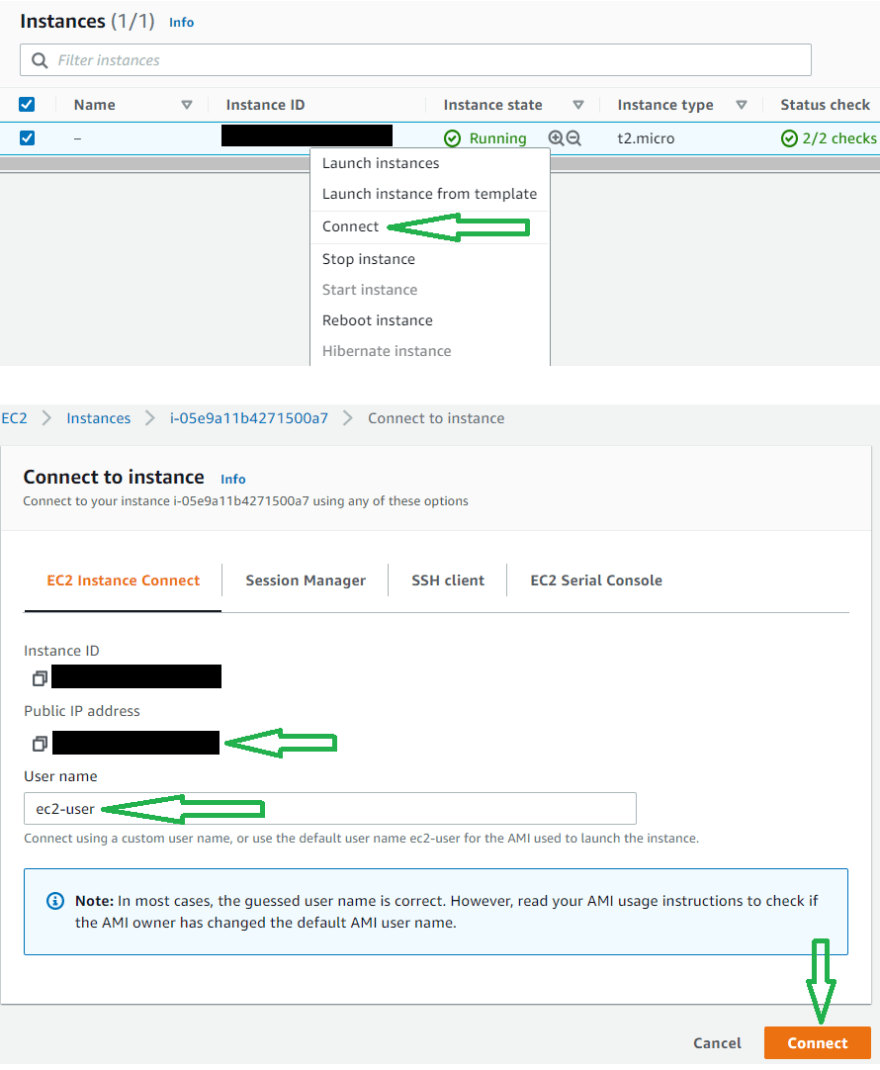
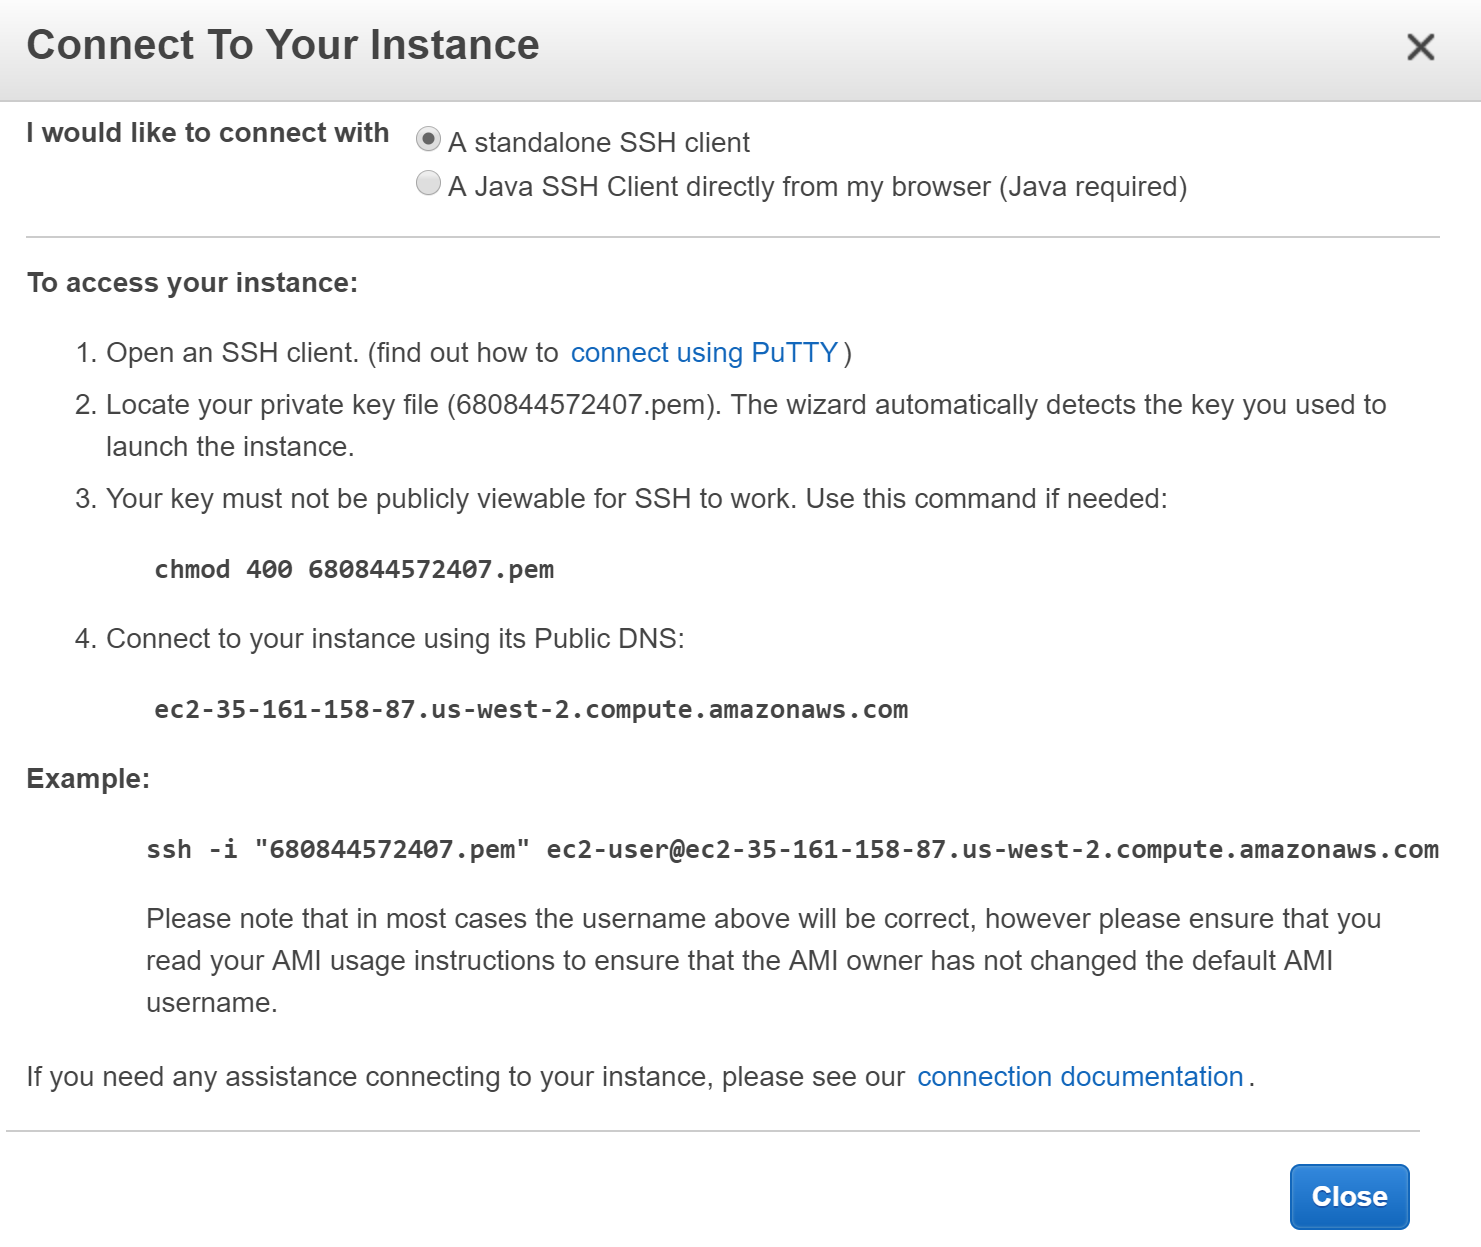
Once Instance is up and running, Right-click on instance id and click on connect.

On the next page, Take a note of the Public IP Address and connect using the default User name.

image


photo-1576267423429-569309b31e84


Install CodeDeploy Agent on EC2 Instance

TO Deploy the git repo by using CodeDeploy Service, codeDeploy-agent must install in the EC2 instance.

Use the below commands to install codedeploy-agent.

sudo yum update
sudo yum install -y ruby
sudo yum install wget
wget https://bucket-name.s3.region-identifier.amazonaws.com/latest/install

bucket-name is the Amazon S3 bucket containing the CodeDeploy Resource Kit files for your region. region-identifier is the identifier for your region.
list of bucket names and region identifiers

For example - wget https://aws-codedeploy-ap-south-1.s3.ap-south-1.amazonaws.com/latest/install

chmod +x ./install
sudo ./install auto
sudo service codedeploy-agent start 

CodeDeploy Service Configuration


AWS CodeDeploy Service will automate the GitHub application deployment to EC2.

Create an Application name called Git_Application with compute platform EC2/On-premises.

GitHub Action will use the application name.
image


Once Application Created, Create a Deployment Group and name development_gropup. Get the Role ARN from CodeDeploy_Role, which we created before and put in the service role.

GitHub Action will use the deployment Group name.

Choose In-place Deployment type. Select Amazon Ec2 Instances environment configuration and Tag key development to create AWS EC2 instance.

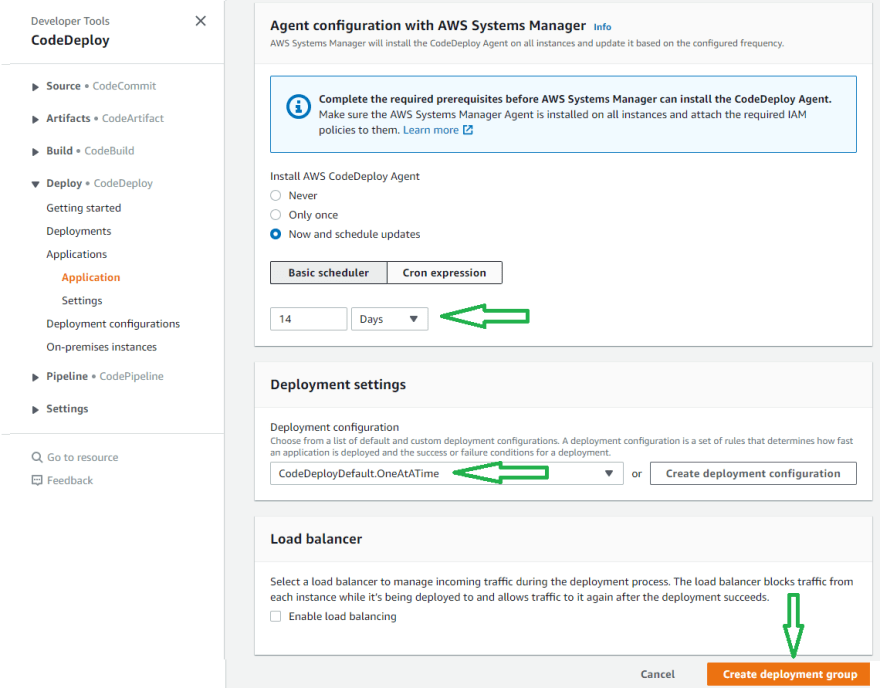
Select a schedule manager to install the CodeDeploy agent. Set OneAtATime deployment setting and Create Deployment Group without a load balancer.

image
image
image


Once Deployment Group created, test the deployment by creating a Deployment with any name.

Select Revision Type My application is stored in GitHub, and select Connect to GitHub by providing the GitHub token.

Once connected to GitHub, Provide the repository name and last Commit ID. Select Overwrite the content and Create Deployment.

image
image

Wait for a few minutes ⏳ .

If Deployment status is unsuccessful, verify the deployment logs from ec2 instance /var/log/aws/codedeploy-agent/codedeploy-agent.log.

Recreate the deployment and fix this first. Once it's successful, you can access the application from a web browser or postman.

curl --location --request GET 'http://{{[ec2_public_ip]}}:8080/student'

Get ec2_public_ip from EC2 Instance


GitHub Project

Fork the spring-boot demo repository.

This project is a spring-boot project which uses MongoDB.
For project deployment, we will use docker-compose, which includes MongoDB.

The appspec.yml file used by codeDeploy to manage the deployment.

The setup.sh will install docker and docker-compose.

The run.sh is used for docker-compose up.

version: 0.0
os: linux
files:
  - source: .
    destination: /home/ec2-user/spring-boot-mongo/
hooks:
  AfterInstall:
   - location: setup.sh
     timeout: 300
     runas: root
  ApplicationStart:
   - location: run.sh
     timeout: 300
     runas: root

GitHub Action

First, create an IAM user with full AWSCodeDeployFullAccess policy and generate an access key and secret access for the user to configure GitHub Action.

Before configuring Action, set the environment in the GitHub repository.

image

GitHub repository changes will trigger GitHub Action, which has two CI/CD job -

The continuous-integration job will compile the code and run the JUnit Test cases.
The continuous-deployment job will call AWS CodeDeploy Service -

application - Git_Application
deployment-group - development_gropup

Paste below YAML in action configuration and commit.

name: CI/CD Pipeline
on:
  push:
    branches: [ main ]

jobs:
  continuous-integration:
    runs-on: ubuntu-latest
    steps:
      # Step 1
      - uses: actions/checkout@v2
      # Step 2
      - name: Set up JDK 11
        uses: actions/setup-java@v2
        with:
          java-version: '11'
          distribution: 'adopt'
      # Step 3
      - name: Build Application and Run unit Test
        run: mvn -B test --file student-service/pom.xml

  continuous-deployment:
    runs-on: ubuntu-latest
    needs: [continuous-integration]
    if: github.ref == 'refs/heads/main'
    steps:
     # Step 1
      - name: Configure AWS credentials
        uses: aws-actions/configure-aws-credentials@v1
        with:
          aws-access-key-id: ${{ secrets.AWS_ACCESS_KEY_ID }}
          aws-secret-access-key: ${{ secrets.AWS_SECRET_ACCESS_KEY }}
          aws-region: ${{ secrets.AWS_REGION }}
     # Step 2
      - name: Create CodeDeploy Deployment
        id: deploy
        run: |
          aws deploy create-deployment \
            --application-name Git_Application \
            --deployment-group-name development_gropup \
            --deployment-config-name CodeDeployDefault.OneAtATime \
            --github-location repository=${{ github.repository }},commitId=${{ github.sha }}


image

Now make a change to your repository. Your changes should automatically deploy to your EC2 server.

Access the application from a web browser or postman.

curl --location --request GET 'http://{{[ec2_public_ip]}}:8080/student'
Sunday, 18 February 2024

Continuous Integration and Deployment with AWS Code Services


Description

Lab Overview

AWS Code Services provide you with all the tools you need to deliver software following DevOps practices. The services under the AWS Code Services umbrella that you will work with in this lab are:

  • CodeCommit – A secure and scalable source control service supporting Git workflows
  • CodePipeline – A service for fast and reliable continuous integration (CI) and continuous delivery (CD)
  • CodeBuild – A scalable service to compile, test, and package source code
  • CodeDeploy – A service to automate code deployments anywhere

You will setup and work with each service as you deploy an application. You will also get experience handling rollbacks in a blue/green deployment environment when a release goes awry.

Lab Objectives

Upon completion of this Lab you will be able to:

  • Create and use AWS CodeCommit repositories for source control
  • Build and test your code with AWS CodeBuild
  • Automate your CI/CD process with AWS CodePipeline
  • Use AWS CodeDeploy to automate your deployments to EC2
  • Release and roll back using a blue/green deployment strategy

Lab Prerequisites

You should be familiar with the following:

  • Using EC2 instances
  • Understanding Elastic Load Balancers (Classic)
  • Working on the command line in Linux
  • Issuing Git commands and version control workflows will be helpful but not required

Lab Environment

Before completing the lab instructions the environment will look as follows:

After completing the lab instructions the environment should look similar to:


Introduction

AWS CodeCommit is a secure, highly scalable, managed source control service that hosts private Git repositories. You can use AWS CodeCommit to store anything from code to binaries. It supports the standard functionality of Git, so it works seamlessly with your existing Git-based tools. In this Lab Step you will set up a repository that you will use for source control of your application (app). Because CodeCommit is secure in terms of storage and network, you need to establish a secure connection to the repository. You will generate credentials to allow you to connect via HTTPS to the repository in following Lab Steps.


Instructions

1. Navigate to Services > Developer Tools > CodeCommit in the AWS Management Console:

alt


2. Click on Get started on the welcome page:


3. On the Create repository form, enter the following values:

  • Repository nameca-app-<Unique_string> (Replace <Unique_string> with a random sequence of approximately six letters and numbers)
  • DescriptionCloud Academy AWS Code services demo app

Note: Repository names must be unique to the AWS Region. The names can consist of any combination of letters, numbers, periods, underscores, and dashes. Names must be between 1 and 100 characters in length. The remaining Lab Steps will use a repository named ca-app, but you should use your unique repository name in its place.


4. Click Create Repository and then skip.

AWS CodeCommit creates the repository in seconds. When the repository is ready, you will see connection instructions:

alt

There are two methods for connecting to your repository: HTTPS and SSH. You will use HTTPS.


5. Copy the git clone command in step 2 under Steps to clone your repository:

alt

The command will create a copy of the repository on your local environment in a later Lab Step.


6. Paste the git clone command into a text document for later use.


7. Click Close on the Connect to your repository dialog.

You will see the repository view for the AWS CodeCommit repository you created:

alt

You will return here when you have committed some code. For now, just notice that the Connect button is always available here in case you lose the git clone command. In order to connect using HTTPS, you need credentials. You will now generate credentials to connect to your repository.


8. Navigate to Services > Security, Identity & Compliance > IAM:

alt

alt Note: You will see error messages after the IAM Dashboard loads. This is normal. You only have the permissions required to complete the Lab.


9. Click on Users in the left navigation panel.


10. In the Users table, click on student.


11. Click on the Security credentials tab.


12. Scroll down to the bottom and click on Generate under HTTPS Git credentials for AWS CodeCommit:

alt

This will show a pop-up dialog showing you your credentials.


13. Click Show to reveal the Password and copy the User name and Password to the file with your git clone command:

alt

Now you are ready to use HTTPS to connect to the AWS CodeCommit repository you created earlier.


Summary

In this Lab Step, you created an AWS CodeCommit repository and copied the Git command to create a clone of it. You also generated credentials that are required to connect to your CodeCommit repository using HTTPS.


Introduction

In this Lab Step, you will commit code into your AWS CodeCommit Repository. You will use an EC2 instance for your development environment. The Cloud Academy Lab environment set up the instance with a code project that you will use throughout the Lab. You will commit the code to your repository using Git with the command and credentials you copied to a text file in the previous Lab Step.


Instructions

1. Navigate to Services > Compute > EC2 in the AWS Management Console:

alt


2. Click on INSTANCES > Instances in the left navigation panel.


3. Select the instance named dev-instance and click Connect:

alt

alt

Follow the instructions if you are using Mac or Linux. If you are using Windows, click on connect using PuTTY. The .pem and .ppk files are available for you to download from the Your lab data section of this Lab.


4. In the SSH shell, enter:

cd app


5. Enter ls to list the directory contents.

The app is a Node.js web application using the Express.js web framework. The front end uses AngularJS and Pug view templates. The specifics of the project are not going to be a focus in this Lab. However, you will learn some details about the project that are common across most production code projects:

  • There is a build procedure. In this case, the build tool (gulp) merges and compresses source files to improve web browser performance. The Cloud Academy Lab environment pre-built the app instance for you.
  • There are automated tests. The app uses a test runner (Karma) and unit tests written in JavaScript (jasmine).
  • The application has a development and a production mode. The development mode makes it easier to debug the code and includes a visual cue on the web app to indicate development mode. For this app, the development server uses port 3000 and the production server uses port 8080.
  • The application can be scaled horizontally. The ability to use multiple instances to run the application creates more interesting deployment scenarios that you will see in later Lab Steps.

The code and commands are relatively simple compared to a production application. Thinking in these general terms will allow you to relate to projects you have worked on. You will see what the web app does shortly.


6. Run the app tests by issuing:

npm test

This will run the automated tests and report a success message when complete. Now that you know the tests are passing, you can try out the app.


7. Run the app by entering:

NODE_ENV=development DEBUG=aws-code-services:* npm start

alt

NODE_ENV and DEBUG are environment variables set to modify how the app behaves. npm start is what starts the server running your app. The output tells you that it is running in development mode and the server is listening on port 3000.


8. Return to the EC2 Instance Console and copy the Public DNS of the instance named dev-instance:

alt


9. Open a new browser tab and enter the DNS value followed by :3000 into the address bar. The address will look like ec2-52-89-201-79.us-west-2.compute.amazonaws.com:3000:

alt

Thursday, 15 February 2024

Dynamic routing protocols


Overview

In the previous chapter, we looked at static routing. We saw how the router finds the best path to a network. We configured static routes and traffic was able to flow between two points.

In this chapter, we will give an overview of dynamic routing protocols. We will define them and learn how they are different from static routes. We will discuss their advantages over static routes, learn the different categories of dynamic routing protocols as well as classless and classful nature. We will also talk about the administrative distance and the metric.

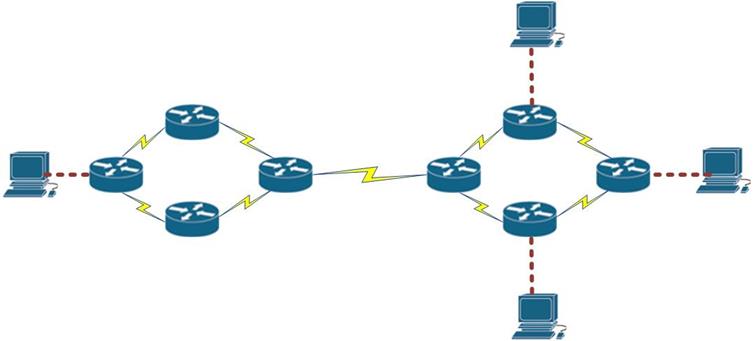
Consider the network diagram shown below.

The administrative overhead that would be needed to make communication between all these devices would be considerable. All the static routes would have to be configured.

Wouldn’t it be much easier, for the network administrator to just “Teach” the routers how to get from one point to another? The solution to this problem would be dynamic routing protocols.

Dynamic routing protocols are a solution that is used in large networks so as to reduce the complexity in configuration that would be occasioned by having to configure static routes. In most networks you will see a mix of both dynamic and static routes.

Definition of dynamic routing protocols

Routing protocols are used to enable the routers exchange routing information, they allow routers to learn about remotely connected networks dynamically. This information is then added to their routing tables as a basis for forwarding packets.

Classification

Dynamic routing protocols can be classified in several ways.

  • Interior and exterior gateway routing protocols,
  • Distance vector, path vector and link state routing protocols,
  • Classful and classless.

The table below shows the various categories of dynamic routing protocols and the ones highlighted in red
will be the focus of this course. Others will be discussed at the CCNP and the CCIE level.

In this course, we will look at EIGRP, OSPFv2 and OSPFv3. These topics will be crucial in passing both your ICND1 and ICND 2 exam, and the CCNA composite exams.

The table below shows more information on the routing protocols to be covered in this course.

Acronym

Full name

standard

year

RFC

EIGRP

Enhanced Interior Gateway Routing Protocol

CISCO

1992

NULL

OSPFv2

Open Shortest Path First version 2

Open

1991

5709

OSPFv3

Open Shortest Path First version 3

Open

1999

5838

Although you may not be examined on the information above directly, both exams will have questions that require knowledge of this information.

Operation of routing protocols

Now that we have an overview of routing protocols, we need to understand how they work.

Routing protocols are comprised of processes, messages and algorithms that are used by routers to learn about remotely connected networks from routers that have been configured with the same routing protocols, the routes that have been learnt are added to the routing table and used as a basis for forwarding packets.

  • Routing protocols function by:
  • Discovering remote networks
  • Maintaining current routing information
  • Path determination

The routing protocol is made up of these components.

  1. Data structures – this is information about remote networks. It is usually stored in the RAM and may be comprised of tables such as neighbor tables and topology tables.
  2. Algorithm – this is the sequential list of steps that the routing takes when determining the best path to a particular network.
  3. Routing protocol messages – these are messages that are used to maintain updated routing information. Examples include; hello messages, update messages among others.

The way routing protocols operate may differ depending on the routing protocol, however, there are certain characteristics inherent in every routing protocol.

  • Exchange of information on interfaces to discover neighboring routers
  • Exchange of routes that have been advertised
  • Running of the algorithm so as to determine the best path
  • Adding of best paths to the routing table
  • Detection of topology changes and making the necessary changes

These are the general steps routers will take. However, the processes differ with each routing protocol and will be discussed at a later stage.

Advantages and disadvantages

Now that we have seen the dynamic routing protocols to be covered in this course, we need to know the advantages and disadvantages of using dynamic routing protocols. We also need to compare them to static routes.

Advantages

  • Exchange of routing information when there is a topology change is dynamic.
  • Less administrative overhead as compared to static routes which have to be manually configured
  • Less error prone than static routing which.
  • Scalability, since there is less administrative overhead than static routes.

Disadvantages

  • Require more expertise by the administrator, they are not as simple to configure as static routes.
  • They use more of the routers resources; such as CPU and RAM.

Egp vs igp

As mentioned earlier, routing protocols fall into two main categories which are;

  • EGP – Exterior Gateway Protocols
  • IGP – Interior Gateway Protocols

This categorization, is based on the Autonomous Systems.

Autonomous systems also known as routing domains; are collections of routers under the same administration. This may mean the routers that are owned by one company.

For example, company XYZ, could have 1 branch connected to the headquarters through a leased line. The networks owned and managed by XYZ would be one autonomous system, while the leased line and interconnections between the branch office and the headquarters which are controlled by the ISP would be another autonomous system. This is shown in the exhibit below.

The networks controlled by XYZ are labelled as AS 100 while AS 650 represents the ISP.

Interior Gateway Protocols (IGP) are used for intra-autonomous system routing – routing inside an autonomous system.

Exterior Gateway Protocols (EGP) are used for inter-autonomous system routing – routing between autonomous systems.

In this scenario for example, routing between XYZ headquarters and the branch office would use and IGP, whilst routing between company XYZ and the ISP would use an EGP.

Distance vector routing protocols vs. link state routing protocols

Interior Gateway Protocols (IGPs) can be classified as two types:

  • Distance vector routing protocols
  • Link-state routing protocols

Distance vector means that routes are advertised as vectors of distance and direction. If we take an example of a tourist getting directions, distance vector protocols would be where the tourist would only use road signs to get to where they are going. They do not know the exact landscape and possible blocks, they only know of the next point towards their destination.

Distance vector protocols work best in situations where:

  • The network is simple and flat and does not require a special hierarchical design.
  • The administrators do not have enough knowledge to configure and troubleshoot link-state protocols.
  • Specific types of networks, such as hub-and-spoke networks, are being implemented.
  • Worst-case convergence times in a network are not a concern

On the other hand, if the tourist had an entire map of the desired destination, with details of different paths to where they were going, they would be using a link-state routing protocol.

Link state routing protocols usually have a complete view of the topology. They usually know of the best paths as well as backup paths to networks. Link state protocols use the shortest-path first algorithm to find the best path to a network.

Link-state protocols work best in situations where:

  • The network design is hierarchical, usually occurring in large networks.
  • The administrators have a good knowledge of the implemented link-state routing protocol.
  • Fast convergence of the network is crucial.

Classful and classless

Classful Routing Protocols

Classful routing protocols don’t include the subnet mask in their routing updates. This is because they were designed prior to the introduction of CIDR and VLSM. RIPv1 is an example of such protocols.

Since they do not include the subnet mask in their routing updates, they cannot work where the networks have been subnetted.

Classless routing protocols

Classless routing protocols include the subnet mask with the network address in routing updates.

In this course, we will focus on the classless routing protocols since the use of classful routing protocols is outdated and no longer used in most modern networks.

Administrative distance and metric

Metric

Suppose a router has more than 1 destination to a network, how would it determine the best path to that network?

The metric, is the mechanism used by the routing protocol to assign costs to reach remote networks. In the tourist example, this may be the amount of fuel the tourist has to use to get to their destination. The metric is used to determine the best path to a network when there are multiple paths.

The table below shows the various metrics used by routing protocols which will be covered in this course.

Routing protocol

Metric

Description

RIPv1

Hop count

The number of routers between the source and destination network.

RIPv2

Hop count

The number of routers between the source and destination network.

EIGRP

Composite metric

A combination of several values used to determine the best path. The composite metric will be discussed in the chapter on EIGRP.

OSPFv2

Cost

The bandwith or cost configured from the router to the destination network

OSPFv3

Cost

The bandwith or cost configured from the router to the destination network

Understanding the different costs types will be crucial in your final exam.

Administrative distance

What if we had configured several routing protocols on one router, how would the router determine the best path to the desired network?

The administrative distance is the way routers use to give preference to routing sources. For example if a router learns of the same route via EIGRP and RIP, it will prefer the route it learnt via EIGRP.

All routes in the routing table are prioritized. With the best and most preferred paths being the directly connected routes. The AD is the trustworthiness of a route.

The AD is usually a value from 0 to 255, the lower the value the better the routing source, a route with an administrative distance of 255 will never be trusted.

If we use the tourist example, the administrative distance would be the trust placed on each means of transport, for example an airline would be more trusted over walking.

The table below shows the various administrative distances for the routing protocols which will be covered in this course.

Routing protocol

Administrative distance

RIP

120

OSPF

110

EIGRP

90

Static routes

1

Summary

In this chapter, we have learnt about dynamic routing protocols. We defined and classified the various routing protocols. We explained how they work as well as their advantages and disadvantages. We also looked at the various classifications of routing protocols such as; EGP and IGP and distance vector and link state routing protocols. We also looked at classful and classless routing protocols as well as explained what the metric and administrative distance mean.

NOTE: The concepts learnt in this chapter are crucial in understanding routing. These concepts are usually examined in both ICND 1 and ICND 2 as well as the CCNA composite exam. These concepts will also be useful at the CCNP and CCIE levels.