Monday, 5 February 2024

AWS CODEBUILD

 AWS CodeBuild is a fully managed build service.  This service will compile the source code, run tests and create deployable software packages.  We’ve created a walkthrough on how to create and configure AWS CodeBuild, so you can implement it on your project if you are using AWS infrastructure.

We are going to review  the AWS DevOps tool  “CodeBuild”.

AWS CodeBuild is a fully managed CI (continuous integration) service that does the following tasks:

  • Compiles source code
  • Runs tests on the compiled code

Using these tasks, you can produce software packages that are ready to deploy anywhere.

Before moving ahead with the documentation, let’s understand the features of CodeBuild.

Core features of AWS CodeBuild:

  • Pay as you go: Pay only for what you use.
  • Extensible: It can be used in collaboration with other AWS DevOps tools.
  • Fully managed build service: You do not have to manage it and it can consume the service directly for your build purposes.
  • On-demand Elastic scaling: Built-in auto-scale for the build agents you use.
  • Ready to use out of the box: Many build templates are available  to use directly with minimum configuration required.

Now that we’ve reviewed the core features, let’s check out how to access the AWS CodeBuild service.

AWS CodeBuild can be accessed from the:

  • AWS Console
  • AWS CLI

Let’s look at the AWS CodeBuild in action using the AWS Console.

AWS CodeBuild in action

For demonstration purposes, we’re going to use the AWS CodeBuild console for managing the CodeBuild service.

Let’s log into the AWS Management Console first to access the CodeBuild service.

Login to AWS Console with your account:

  • Navigate to the AWS Console and click on “Sign in” as shown:
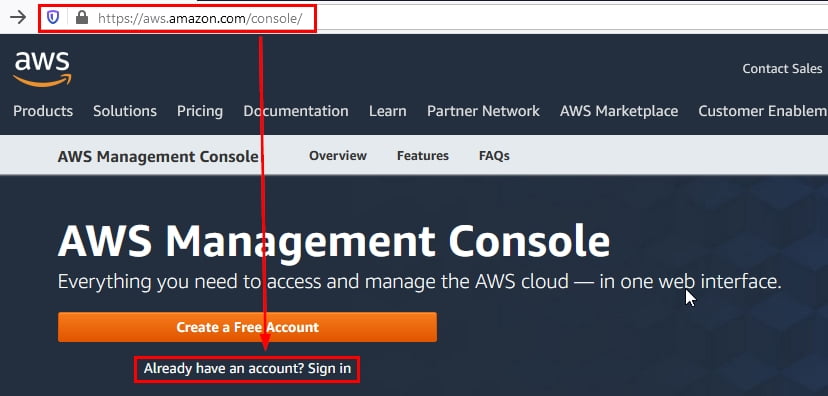
Figure 1: AWS Console main sign-in / signup page

If you don’t have an existing AWS account, click on “Create a Free Account” and complete the account creation wizard to sign up for the free tier with AWS.

  • Sign into AWS as a root user: If you have a root account, select “Root user”, enter the email, and click on “Next” as shown:
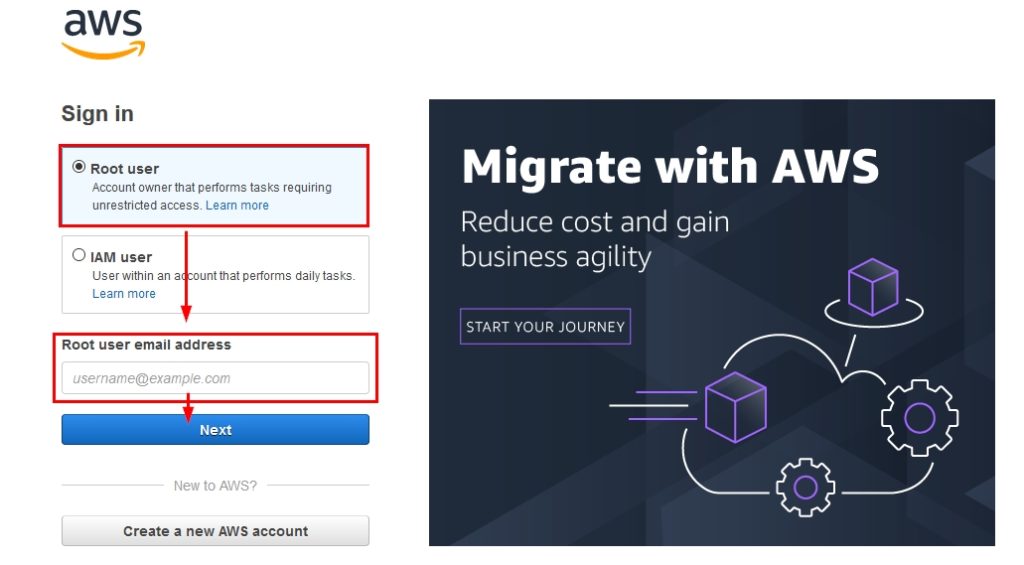
Figure 2: Signing into the AWS console with a root user account’s flow

After clicking on “Next”, provide the password to log into the AWS Console using a root account.

NOTE: It is not recommended to use the AWS account’s root user for daily use.

  • Sign into AWS as an IAM user: If you have an “IAM user”, enter the account ID / account alias then click on “Next” as shown:
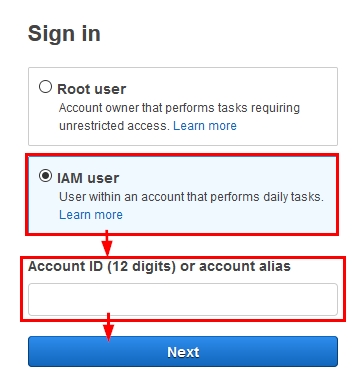
Figure 3: Signing into the AWS console with an IAM user account – AWS account ID / Alias input field

NOTE: If you don’t have your AWS account ID / alias, ask the  AWS account administrator.

  • Provide your username and password and click on “Sign in” to continue as shown:
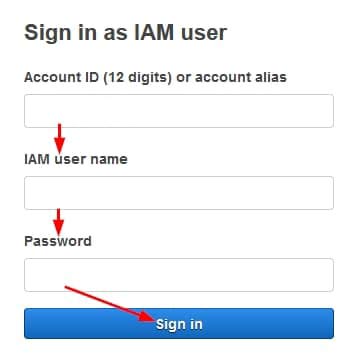
Figure 4: Signing into the AWS console with an IAM user account’s flow

  • Now that we’ve logged into the AWS Management Console, type “codebuild” in the main search bar and click on it as shown below:

Figure 5: Finding the CodeBuild service from the AWS Management Console’s main search box

  • Once you click on “CodeBuild,” as shown in Figure 5, you will be directed to the AWS CodeBuild Console main landing page as shown:

Figure 6: AWS CodeBuild Management Console’s landing page

Now let’s configure the CI (continuous integration) for one JAVA application using the AWS CodeBuild’s pipeline.

The process of configurating the CI is divided into few steps. We’ll briefly review the steps before going deeper into configuration.

Steps to configure a build project in AWS CodeBuild:

  • Source code: Get your source code ready in the CodeCommit Repository
    • Commit source code in the repository
    • Create a build configuration (buildspec) to build your source code
  • Prerequisites:
    • Create required resources – Two S3 buckets
  • Create and test the build project
    • Create a new build project in AWS CodeBuild
    • Run the AWS Codebuild build project
    • View detailed information regarding the build
    • Check the build output artifacts / packages
  • Delete the build project

Now that we’ve reviewed the steps to creating a build project from the AWS Management Console, let’s start by setting up the source code.

Source code: Get your source code ready in the CodeCommit Repository

Create and commit source code in the CodeCommit repository.

  • After you create the CodeCommit repository, connect it to your IDE with the information as shown below:
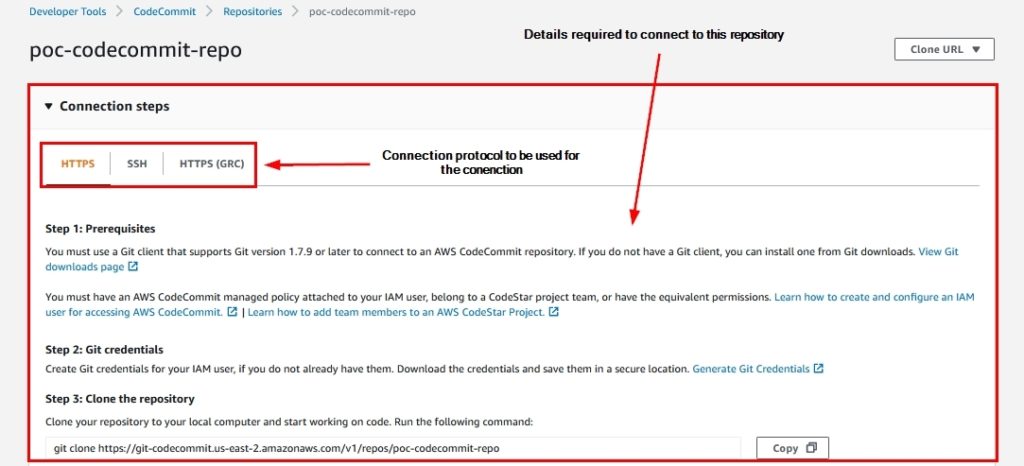
Figure 7: Connection details within the AWS CodeCommit repository

Once you connect your CodeCommit repository to your IDE, load your source code into the repository.

Create a configuration file (buildspec) to build your source code

The buildspec file is used by the CodeBuild pipeline to build your source code. It is stored in the YML format.

In this section, we’re going to create and commit the configuration file used to create a build. In our sample project, we’ll create a buildspec file to build a JAVA project.

  • The buildspec file that is used to build the JAVA project looks like this:

version: 0.2

phases:

  install:

    runtime-versions:

      java: corretto11

  pre_build:

    commands:

      – echo No tasks to do in the pre_build phase…

  build:

    commands:

      – echo Build started on `date`

      – mvn install

  post_build:

    commands:

      – echo Build completed on `date`

artifacts:

  files:

    – output/messageUtil-1.0.jar

The build configuration file (buildspec.yml) is divided into three parts:

  • Version – Represents the version of the build spec standard being used.
  • Phases – Basically, these are steps that represent the build phases where you can instruct CodeBuild to run commands.
  • Artifacts – This section contains the set of build output artifacts that CodeBuild uploads to the output bucket.

Save the above configurations in the file named – “buildspec.yml” in the root of the repository.

Prerequisites – Create required resources – Create an S3 bucket

Create an S3 bucket for storing output for the AWS CodeBuild pipeline.

  • Click this link to navigate to the S3 Management Console and click on “Create bucket” as shown below:

Figure 8: AWS S3 Management Console’s landing page

  • After you click on “Create bucket” as shown in Figure 8, the S3 creation wizard will begin. Provide the name and location of the S3 bucket as shown:
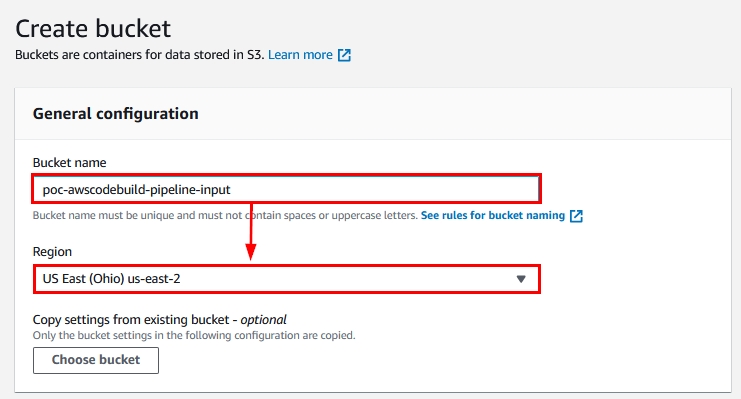
Figure 9: General configurations while creating an S3 bucket using the AWS Management Console

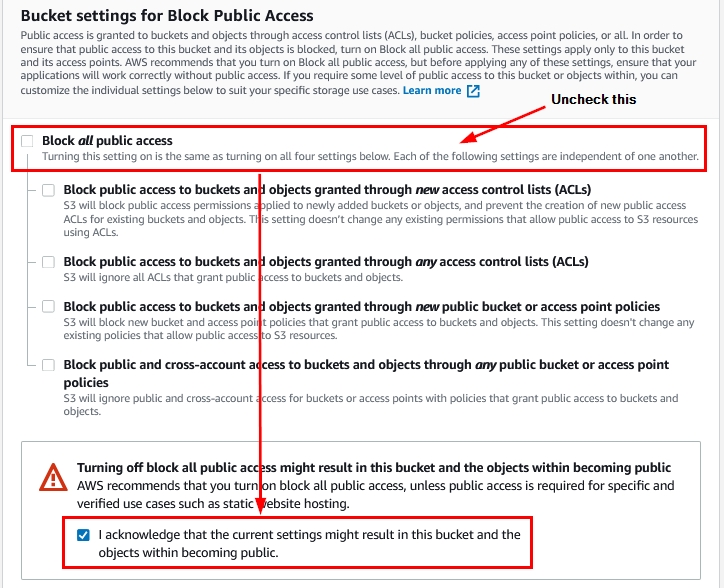
  • As shown below, uncheck the box – “Block all public access” and check the box – “I acknowledge that the current settings might result in this bucket and the objects within becoming public.

Figure 10: Public access settings while creating an S3 bucket using the AWS Management Console

We’ve now made the S3 bucket publicly accessible so that the AWS CodeBuild can access it in order to upload the output artifacts.

  • Add tags (optional) and check the option – “Disable” within the option “Default encryption.” Click on “Create bucket” as shown in the following figure:
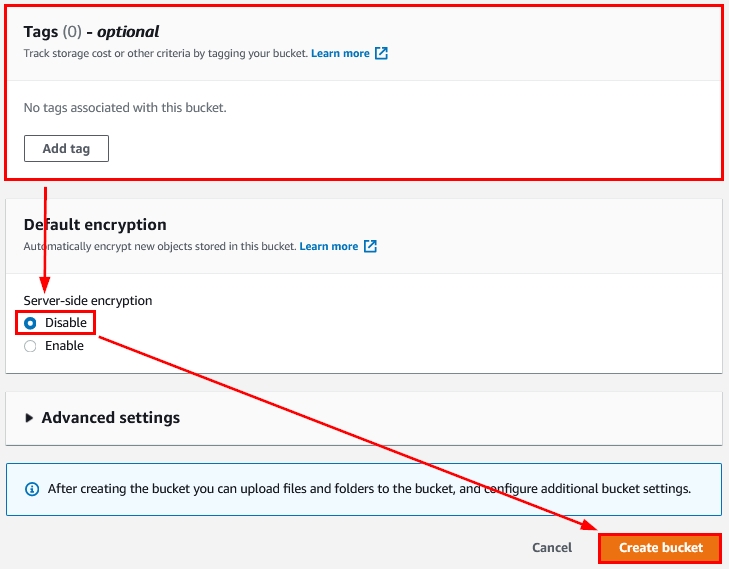
Figure 11: Other options while creating an S3 bucket using the AWS Management Console

We’ve now successfully created an S3 bucket for storing input files. Create another S3 bucket, which will be used to store output files (i.e., Software packages that are created because of the output of the build process.)

Now that we’ve created prerequisites for the build project, let’s move ahead and create a build project using the CodeBuild Management Console.

Create and test the CodeBuild project

In this section, we’re going to create a build project pipeline and learn how to create automated builds using it.

  • Click on this link to navigate to the AWS CodeBuild Management Console and click on “Create build project” as shown in the following figure:

Figure 12: Create build project option within the AWS CodeBuild Management Console

  • After you click on “Create build project” as shown in Figure 12, you will be directed to the project creation wizard as shown:
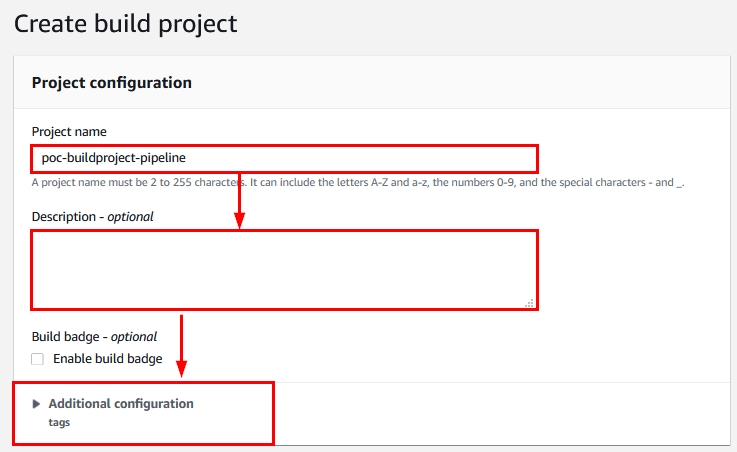
Figure 13: Project configuration section within the new AWS CodeBuild project creation wizard

Provide the name of the build project, a description (optional), and apply tags to the build project (optional) as shown in Figure 13.

  • Moving forward, select the “Source provider” under the Source section as shown below:
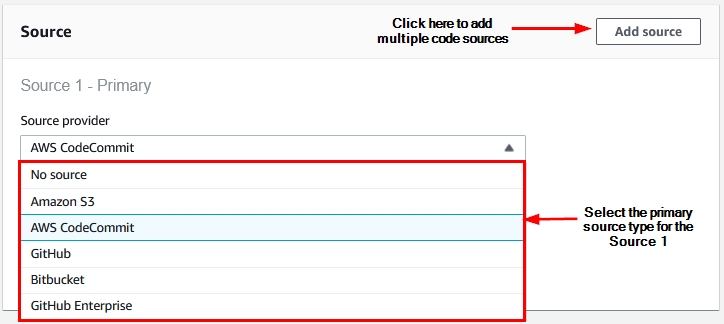
Figure 14: Source provider selection within the new AWS CodeBuild project creation wizard

AWS CodeBuild supports most popular version control providers, as shown in Figure 14. For the sake of simplicity, we’ll proceed with AWS CodeCommit.

  • Once you select “AWS CodeCommit”, you need to select the repository and the branch as demonstrated below:
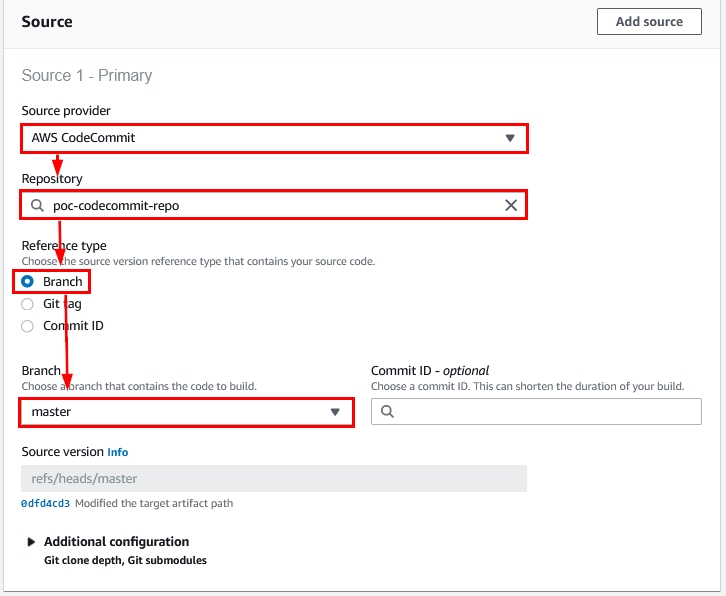
Figure 15: Source provider options within the new AWS CodeBuild project creation wizard

  • Next come the options for the environment where your source code will be built. Select the relevant options as demonstrated below :
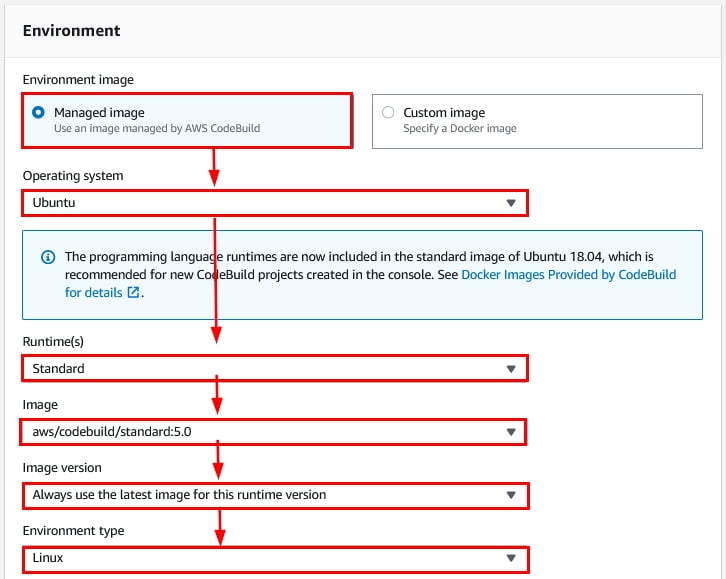
Figure 16: Build environment options within the new AWS CodeBuild project creation wizard

NOTE: The Ubuntu Linux environment is capable of building most languages, including Java, Javascript, .NET Core, etc. Hence, we have selected this type of environment as shown in Figure 16.

  • You will also need a service role to run the build. If you already have this role, select “Existing service role”; otherwise, select “New service role” and provide a name for the new role as shown:

Figure 17: Service role options within the new AWS CodeBuild project creation wizard

  • The next option is for build configurations. If you select “Use a buildspec file,” you will be presented with a text bar where you can enter the name of the configuration file as shown:
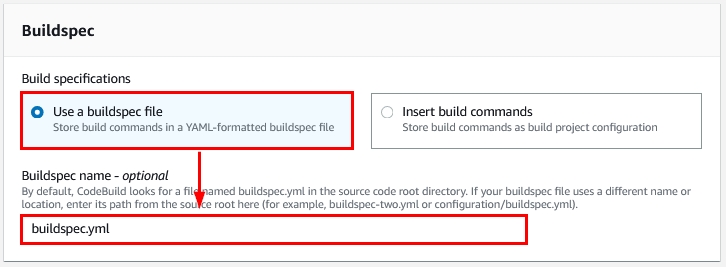
Figure 18: Using a buildspec file option within the new AWS CodeBuild project creation wizard

  • If you don’t have a buildspec file, you can enter the commands that create the build by selecting the option “Insert build commands” as shown below:
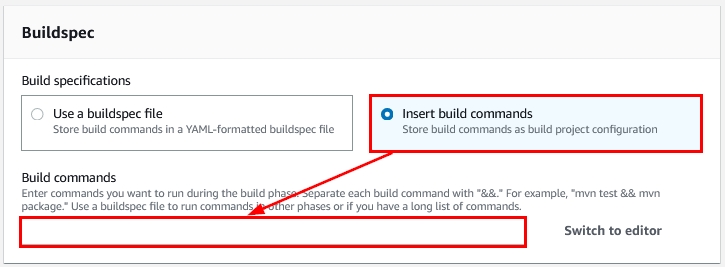
Figure 19: Insert build commands option within the new AWS CodeBuild project creation wizard

  • The next section is Artifacts. At the time that we created this walkthrough, only one option is available for artifact output – the S3 Bucket. Select “Amazon S3” and select the relevant bucket where you want to publish the build’s output, as highlighted in the following figure:
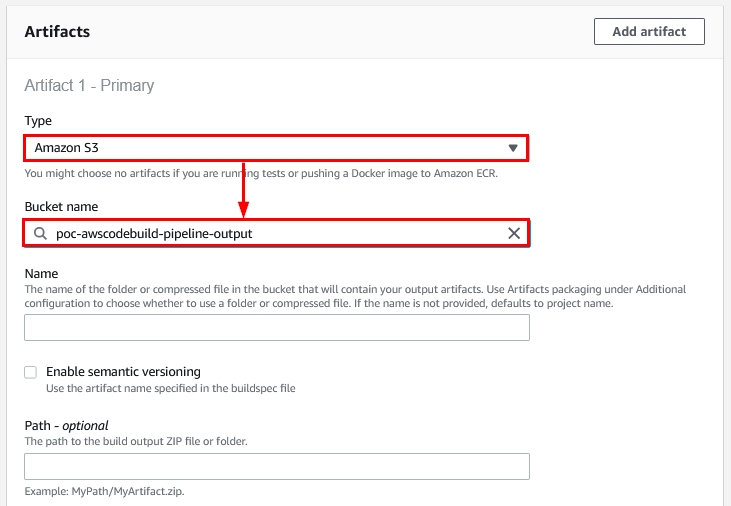
Figure 20: Artifacts options within the new AWS CodeBuild project creation wizard

  • The next section reviews artifacts packaging options, which are used to package artifacts that are produced during the build process. If you want to compress the output, select “Zip”; otherwise select “None,” as shown:

Figure 21: Artifacts packaging options within the new AWS CodeBuild project creation wizard

  • Finally, we review the Logs section. Check the box “CloudWatch logs – optional” and provide the CloudWatch group name and CloudWatch Stream name as shown in the figure below:
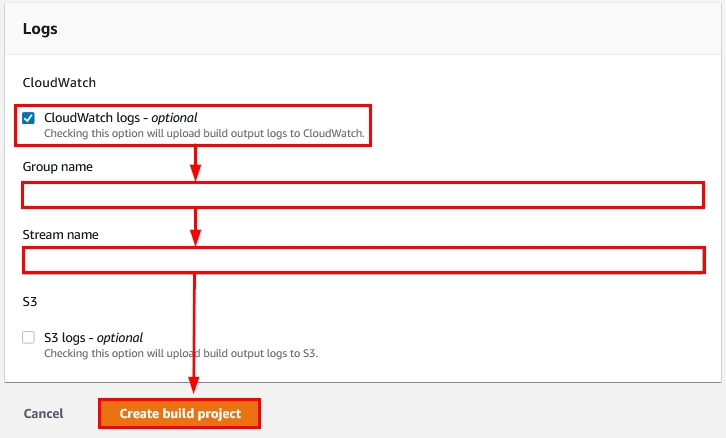
Figure 22: Logs options within the new AWS CodeBuild project creation wizard

When you’re done selecting the options we just reviewed, click on “Create build project,” as shown in Figure 22.

It takes a few seconds to create the AWS CodeBuild project.

Run the AWS Codebuild build project

Now that we’ve created a CodeBuild project, let’s run it to check whether it is working or not.

  • Navigate to the CodeBuild project and click on “Start build” as shown below:

Figure 23: The Start build option within the CodeBuild project in the AWS Console

  • As soon as you click on “Start build” as shown in Figure 23, the CodeBuild pipeline will start with the following notification:
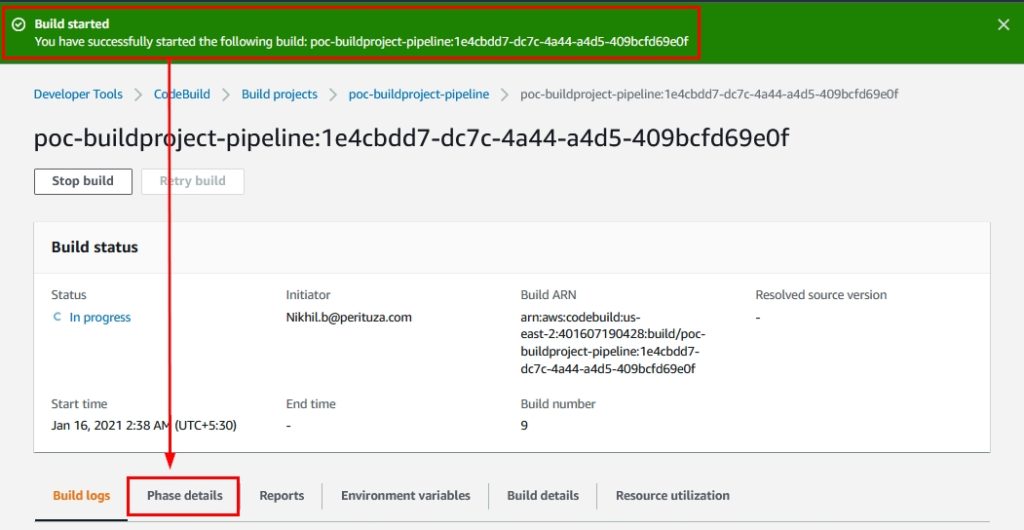
Figure 24: Build started notification within the AWS CodeBuild Management Console

Click on “Phase details” as shown above to see the stepwise build progress.

  • Within “Phase details”, you can see the stepwise progress as highlighted below:
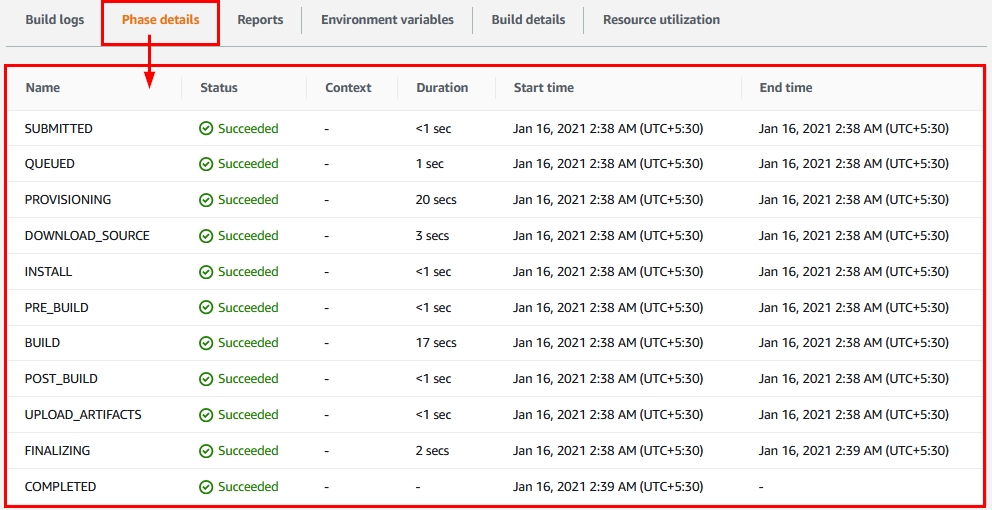
Figure 25: Phase details within the AWS CodeBuild’s build

In this way you can trigger/run a build and check its status.

View detailed information regarding the build

  • Navigate to any successful build. There you can see its details; if you want more details, click on the “Build details” tab as shown:
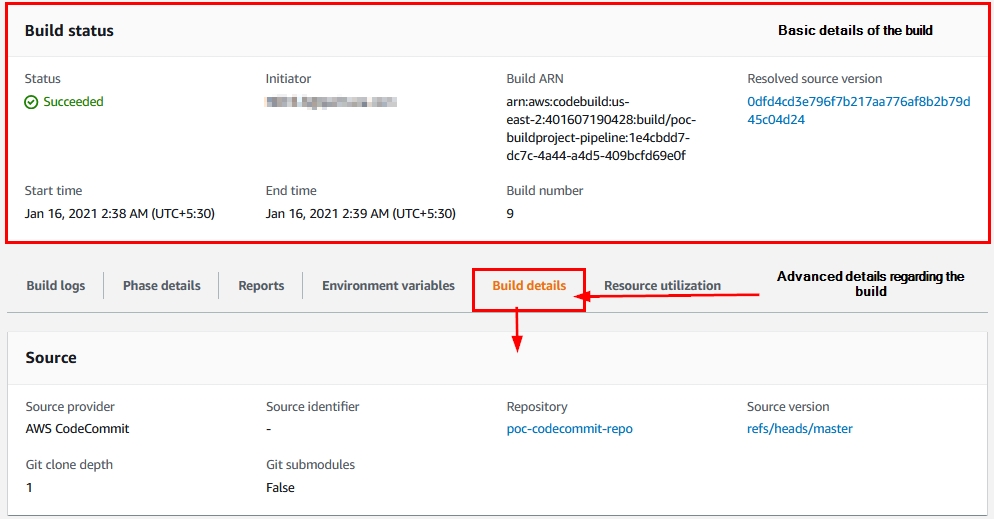
Figure 26: Build details within the AWS CodeBuild

Check the build output artifacts/packages

Here we’re going to check the whether the artifacts are created in the S3 bucket or not.

  • Navigate to the S3 Management Console by clicking on this link. Then navigate to the S3 bucket where you can see the build artifacts, as shown below:
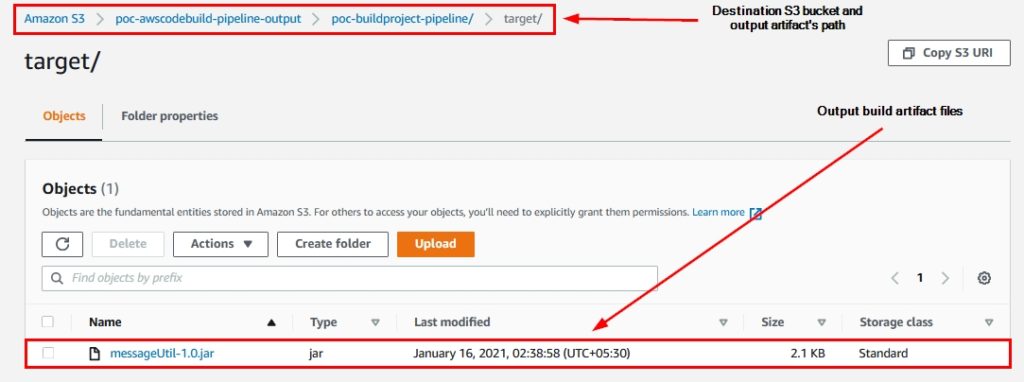
Figure 27: Output artifacts of the AWS CodeBuild pipeline within the Amazon S3 bucket

In this way you can check if your CodeBuild’s pipeline is working and producing expected output artifacts.

Delete the build project

In this section, we’re going to learn how to delete the AWS CodeBuild project using the AWS Management Console.

  • Navigate to the CodeBuild’s build project that you want to delete and click on “Delete build project,” as demonstrated below:

Figure 28: Delete build project option within the CodeBuild’s pipeline

  • Once you click on “Delete build project” as shown in Figure 28, you can see the following prompt confirming the deletion of the build project. Type “delete” in the text box and then click the “Delete” button, as highlighted below:
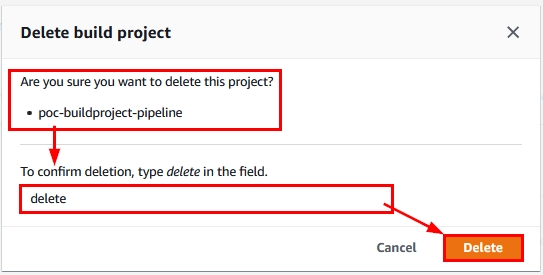
Figure 29: CodeBuild’s pipeline deletion confirmation prompt

In this way you can delete the CodeBuild’s pipeline.

Summary

We’ve reviewed the following:

  • How to create and upload source code to the AWS CodeCommit repository
  • How to create the CodeBuild’s build project using the AWS Console
  • Running the build project and checking its output artifacts in an S3 bucket
  • Deleting a build project via the AWS Console

With this section, we’ve completed the “AWS CodeBuild” walkthrough.

Software development and more

Whether your business is in need of custom software development or simply a technology consultation, Perituza is here for you. Contact us today to get the business technology conversation started.

AWS Developer Tools - CI CD LAB Series

 Welcome to the home for CI CD Lab Series using AWS Developer Tools!


This blog covers an overview of AWS CI CD Services, 3 use cases leveraging AWS CI CD Services, Template files used in CodeBuild, CodeDeploy and Serverless Application Deployment.
How do you debug you build or deployment failures? And how do you rollback in case of failure.
Details around Generic Pipeline and the metrics to gauge DevOps

When you wanted to write about AWS Developer Tools / Code Services many use cases around flashed and puzzled what to write, where to start & when to stop.
Since it sounded little difficult to put the vast knowledge into a frame, decided to coherently sketch them as a blog with hands-on lab so that Cloud enthusiasts can extract the essence of it with the fresh experience.

Introduction

Software Release Phases vs AWS CI CD Services

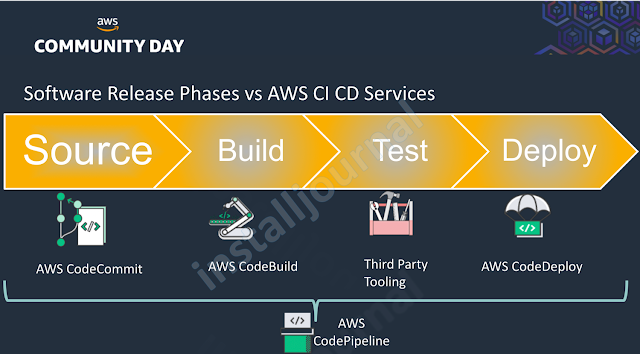
What-so-ever may be the software development methodology (Agile or Feature Driven Development) the company follows for their software development, the ultimate goal is take the code changes from source to production faster than ever which ideally encompasses 4 phases – Source, Build, Test & Deploy. This forms software release phases in general.


Let’s see where does the AWS CI CD Services fits in the above software release phases.
  • Source phase is where the complete Code Management happens comprising check-in source code, peer review, version control and the AWS CodeCommit is all around that.
  • In Build phase, you will compile the code, run unit test or create container images and the AWS CodeBuild is designed for that.
  • In Test phase, you will perform the Integration, UI, Load, Stress Test by integrating with various third-party tools.
  • In Deploy phase, the package generated in the build phase will be deployed to the target environment, be it Dev, QA, PreProd or Prod.
  • AWS CodeDeploy service is here to make your life simple where deploying to thousands of servers is just as easy as deploying to 1. 
  • AWS CodePipeline is an end-to-end solution, which comes handy to glue all these services. CodePipeline enables you to rapidly deliver features and updates with high quality through the automation of your build, test, and release process.
If you are wondering why am I using the term AWS CI CD Services instead of AWS Developer Tools, its just because in this session, we will be talking only about AWS CodeCommit, AWS CodeBuild, AWS CodeDeploy & AWS CodePipeline but not AWS Code-Star, AWS Cloud-9 & AWS X-ray.

AWS CI CD Services - Bird's Eye View

This Lab Series is not AWS Developer Tools 101 course and we will be talking more about how AWS developer tools can be leveraged to create a powerful and scalable developer environment that can help you to get the code changes from the source to production faster than ever.

So will just see the bird’s eye view of AWS CI CD Services.

1. AWS CodeCommit
  • AWS CodeCommit provides a fully-managed source control service, this is where your code is stored and managed securely. 
  • It's powered using Git, so if you're familiar with Git already, well, you already know 90% of CodeCommit. 
  • The key feature of CodeCommit is that it's backed by AWS technology. which means your code repositories can easily scale up and down based on their size.
  • In CodeCommit both data in-transit & at-rest are encrypted using AWS-managed keys. You cannot use a customer-managed key in AWS KMS to encrypt or decrypt data in AWS CodeCommit repositories.
  • There is no size limit on the repos and also no restrictions on the number of repos that can be created.
  • You can have Post Commit hooks to call out to SNS / Lambda Service.
  • All that you do with any traditional source control management software like create a commit, view a commit, compare two commits, create / delete a tag, pull request for code reviews are all very much possible in AWS CodeCommit
  • I really like the DAG (directed acyclic graph) based commit visualizer to view the commits made to a repository (barring the fast forward ones).
  • You can configure an IAM Policy to Limit Pushes and Merges to a Branch (like ready-only user & to specific repo)

2. AWS CodeBuild

  • AWS CodeBuild is a fully managed build service in the cloud that compiles your source code, runs unit tests, and produces artifacts that are ready to deploy.
  • AWS CodeBuild eliminates the need to provision, manage, and scale your own build servers.
  • AWS CodeBuild scales automatically to meet peak build requests. You pay only for the number of build minutes you consume.
  • It provides pre-packaged build environments for the most popular programming languages (.Net core, Python, Ruby, Java, Golang, PHP, node.js, Docker, Android, Base). Please note that only .Net core is supported and not .Net Framework.
  • CodeBuild supports build tools such as Apache Maven, Gradle, and more. You can also customize your own environment by creating a Docker image and uploading it to the Amazon EC2 Container Registry or the Docker Hub registry. 
  • Java, .Net, Go, iOS languages can be compiled whereas PHP, Ruby, Python, Node.js are interpreted
  • In a nutshell, CodeBuild takes raw code, probably straight from CodeCommit, runs some tests & build options and creates a neatly-wrapped deployment package for us and store in S3 zip file or as individual files.

3. AWS CodeDeploy

  • AWS CodeDeploy is a deployment service that automates code deployments to any instance, including Amazon EC2 instances and instances running on-premises or serverless lambda functions.
  • AWS CodeDeploy makes it easier for you to rapidly release new features, helps you avoid downtime during deployment, and handles the complexity of updating your applications.
  • Once the automated deployment is configured & tested for one instance, the complexity of updating the applications is completely off your shoulders
  • With suitable deployment type, you can completely avoid downtime and also configure to rollback automatically, in case of failure.
  • You can deploy a nearly unlimited variety of application content, such as code, serverless AWS Lambda functions, web and configuration files, executables, packages, scripts, multimedia files, and so on.
  • AWS CodeDeploy works with various systems for configuration management, source control, continuous integration, continuous delivery, and continuous deployment
  • Production Integrations page on CodePipline will tell you the pre-built integrations for popular third-party services that are certified by the partners

AWS CodeDeploy Components

Here you go with the components of AWS CodeDeploy
Application: An application is a collection of software and configuration to be deployed to a group of instances. Typically, the instances in the group run the same software. For example, if you have a large distributed system, the web tier will likely constitute one application and the data tier another application.
Revision: A revision is a specific version of deployable content, such as source code, post-build artifacts, web pages, executable files, and deployment scripts, along with an AppSpec file. The AWS CodeDeploy Agent can access a revision from GitHub or an Amazon S3 bucket.
Deployment Group: A deployment group is for grouping EC2 instances or AWS Lambda functions in a CodeDeploy deployment.
appspec.yml is configuration file which specifies the files to be copied and scripts to executed as part of deployment
Deployment configuration: A set of deployment rules that defines the deployment success and failure conditions used by AWS CodeDeploy during a deployment. 
For example, if your application needs at least 50% of the instances in a deployment group to be up and serving traffic, you can specify that in your deployment configuration so that a deployment does not cause downtime. If no deployment configuration is associated with either the deployment or the deployment group, then by default AWS CodeDeploy will deploy to one instance at a time.
There are two types of compute platform on which AWS CodeDeploy deploys an application namely EC2/On-Premises & AWS Lambda. 
In an EC2/On-Premises deployment, a deployment group is a set of individual instances targeted for a deployment.
Deployment is an action of deploying new revision into a instance.
Deployment type is nothing but the method used to make the latest application revision available onto the instances in a deployment group. There are 2 types of deployment – In-place deployment & Blue / Green Deployment.
Instance Setup: Instance setup is key here:
  • Verify your instance has an IAM instance profile and verify the permissions allows it to participate in AWS CodeDeploy deployment
  • Tag the instance - or make sure it is in Auto Scaling Group
  • Install the agent (can be automated)
  • Verify the agent is running


4. AWS CodePipeline

  • Releasing software to the market at a fast pace is at the core of every business. Releasing feature changes & bug fixes to production using traditional approach is often error prone. 
  • AWS CodePipeline is a continuous delivery service you can use to model, visualize, and automate the steps required to release your software. With AWS CodePipeline, you model the full release process from building your code, deploying to pre-production environments, testing your application and releasing it to production.
  • AWS supports many third-party software solutions that you can plug and play into different stages in your development workflow. This can be especially helpful when you only need to use AWS tools for certain pieces of your workflow and wanted to reuse some of your existing implementations.
  • Automating your build, test, and release process allows you to test each code change and catch bugs while they are small and easy to fix. You can assure production quality of your code because each change goes through your standardized release process.”
  • There are two ways in which you can detect the changes in source - periodic checks from & change-detection. The most recommended way is change-detection.
  • There are two ways in which you can detect the changes in source - periodic checks from & change-detection. The most recommended way is change-detection.

AWS CodePipeline Components

There are 3 main components of CodePipeline

  • Stages – The pipeline consists of multiple stages. In your organization, you can have multiple stages such as source, build, test, staging and production.
  • Action – Each stage consists of a series of actions which specify what must be done on the artifact. Each stage can only perform one revision of the source code at a time. All of the artifacts are stored in an S3 bucket. For example, the code which needs to be built will be copied to the S3 bucket for the pipeline. This becomes the input artifact.
  • Transition – A transition is an action which is performed when one stage is moved to the next in the pipeline. An approval action can also put in place so that if a manual approval is required before it goes to the next stage.
  • Important Note: The output of one stage becomes the input of the other and is stored in S3 bucket - either AWS default (say something like `codepipeline-us-east-1-162146562936`) and to the custom S3 bucket of your choice. So when you delete a CodePipeline, make sure to clean-up this artifact content as I do not find them being cleaned up when a CodePipeline is deleted. This might cost you, if the size of your source code and / or artifacts are in GBs, as the objects will be billed at S3 Standard storage class price.

AWS CodePipeline Actions


Here is the CodePipeline Actions in detail, to see what all we can do as part of pipeline and what third-party tools integration are supported.
  • At present we have only Manual Approval Type
  • You can get the source for your build from Amazon S3, AWS CodeCommit or GitHub
  • Build configuration from your existing Jenkins or AWS CodeBuild or Solono CI can be integrated with CodePipeline.
  • You can run your test suites from wide variety of tools, like Jenkins, DeviceFarm, CodeBuild, Blazemeter, Ghost Inspector etc
  • Deployment providers can be AWS ECS, AWS CodeDeploy, AWS CloudFormation, AWS ElasticBean Stack & AWS Opswork Stacks
  • You can invoke AWS Lambda as part of CodePipeline
If you are wondering why they are numbered, simple; if you go back and check AWS documentation few months down the line (after Sep 2018), the numbers would have increased due to evolving integrations. Please refer integrations page for details.


Here you go with the well designed Lab Series!

We will be focusing on three most important streams where AWS CI CD is essential and constructed as 3 workflows in this 13 LAB Series
  1. Web Application Deployments
  2. Infrastructure Rollouts
  3. Serverless Application Deployments 

    What will I learn in this Lab Series ?

    You will learn the following that are bare minimum requirement for this Lab Series
    • Creating IAM Group by attaching existing policies and defining in-line policies
    • Create IAM User & Service Role
    • Create S3 Bucket
    • Create a repo in AWS CodeCommit, add source & commit the changeset
    • Build Sample Java Application using AWS CodeBuild, taking source from CodeCommit
    • Create Security Group, Instance Profile Role, EC2 Instance from console
    • Create CodeDeploy to install pre-requisites & deploy Java Web Application
    • Create CodeDeploy to spin-up EC2 instance & deploy Java Web Application
    • Create & Execute CloudFormation template to create lambda function
    • Create AWS CodePipeline to glue AWS CodeCommit, AWS CodeBuild, AWS CodeDeploy 
    • Integrating Manual Approval with AWS CodePipeline

    Disclaimer: 

    • Note that the entire AWS Developer Tools - CI CD LAB have been created & validated in my personal AWS Account.  Feel free to add comments, if you find any issues.
    • Though this LAB material will cover the AWS resources very well within your monthly free limits, ensure to tear down the unused resources to avoid surprises.
      • AWS CodeCommit: Anyone with an AWS account can get started with AWS CodeCommit for free. Your account gets 5 active users per month for free (within limits), after which you pay $1 per additional active user per month. There are no upfront fees or commitments.
      • AWS CodeBuild: Only pay by minute for the compute resources you use
      • AWS CodeDeploy: There is no additional charge for code deployments to Amazon EC2 instances through AWS CodeDeploy. You pay $0.02 per on-premises instance update using AWS CodeDeploy.
      • AWS CodePipeline: You pay only for what you use. AWS CodePipeline costs $1 per active pipeline* per month. To encourage experimentation, pipelines are free for the first 30 days after creation.