AWS CodeBuild is a fully managed build service. This service will compile the source code, run tests and create deployable software packages. We’ve created a walkthrough on how to create and configure AWS CodeBuild, so you can implement it on your project if you are using AWS infrastructure.
We are going to review the AWS DevOps tool “CodeBuild”.
AWS CodeBuild is a fully managed CI (continuous integration) service that does the following tasks:
- Compiles source code
- Runs tests on the compiled code
Using these tasks, you can produce software packages that are ready to deploy anywhere.
Before moving ahead with the documentation, let’s understand the features of CodeBuild.
Core features of AWS CodeBuild:
- Pay as you go: Pay only for what you use.
- Extensible: It can be used in collaboration with other AWS DevOps tools.
- Fully managed build service: You do not have to manage it and it can consume the service directly for your build purposes.
- On-demand Elastic scaling: Built-in auto-scale for the build agents you use.
- Ready to use out of the box: Many build templates are available to use directly with minimum configuration required.
Now that we’ve reviewed the core features, let’s check out how to access the AWS CodeBuild service.
AWS CodeBuild can be accessed from the:
- AWS Console
- AWS CLI
Let’s look at the AWS CodeBuild in action using the AWS Console.
AWS CodeBuild in action
For demonstration purposes, we’re going to use the AWS CodeBuild console for managing the CodeBuild service.
Let’s log into the AWS Management Console first to access the CodeBuild service.
Login to AWS Console with your account:
- Navigate to the AWS Console and click on “Sign in” as shown:
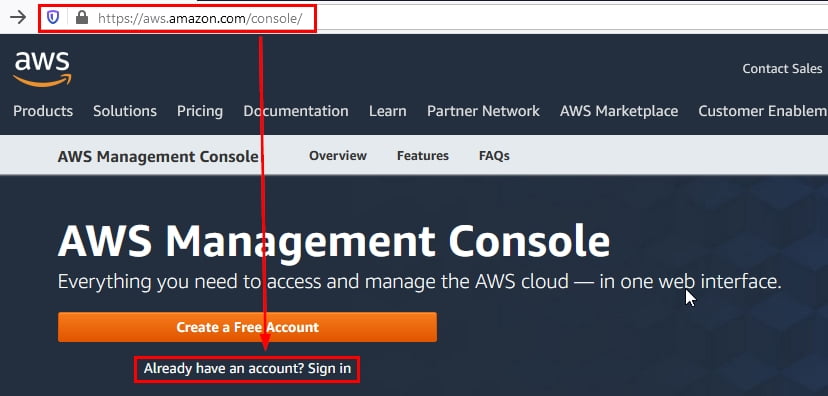
Figure 1: AWS Console main sign-in / signup page
If you don’t have an existing AWS account, click on “Create a Free Account” and complete the account creation wizard to sign up for the free tier with AWS.
- Sign into AWS as a root user: If you have a root account, select “Root user”, enter the email, and click on “Next” as shown:
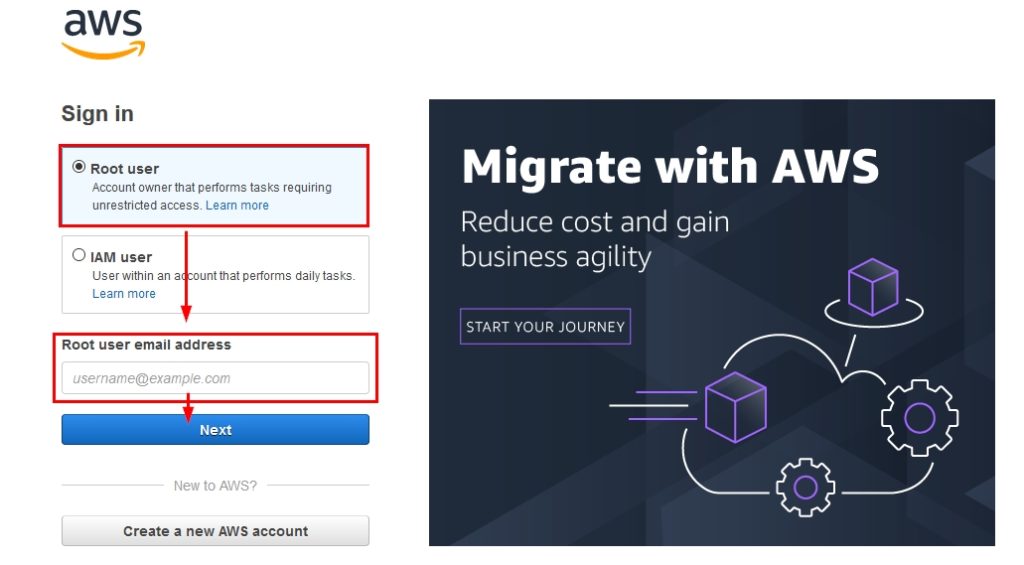
Figure 2: Signing into the AWS console with a root user account’s flow
After clicking on “Next”, provide the password to log into the AWS Console using a root account.
NOTE: It is not recommended to use the AWS account’s root user for daily use.
- Sign into AWS as an IAM user: If you have an “IAM user”, enter the account ID / account alias then click on “Next” as shown:
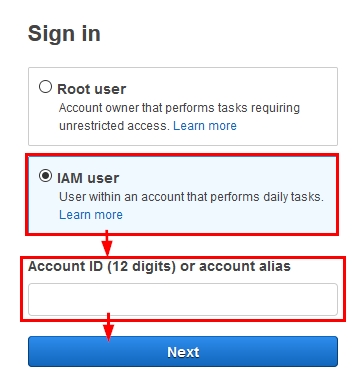
Figure 3: Signing into the AWS console with an IAM user account – AWS account ID / Alias input field
NOTE: If you don’t have your AWS account ID / alias, ask the AWS account administrator.
- Provide your username and password and click on “Sign in” to continue as shown:
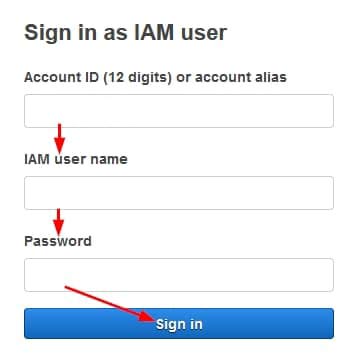
Figure 4: Signing into the AWS console with an IAM user account’s flow
- Now that we’ve logged into the AWS Management Console, type “codebuild” in the main search bar and click on it as shown below:

Figure 5: Finding the CodeBuild service from the AWS Management Console’s main search box
- Once you click on “CodeBuild,” as shown in Figure 5, you will be directed to the AWS CodeBuild Console main landing page as shown:

Figure 6: AWS CodeBuild Management Console’s landing page
Now let’s configure the CI (continuous integration) for one JAVA application using the AWS CodeBuild’s pipeline.
The process of configurating the CI is divided into few steps. We’ll briefly review the steps before going deeper into configuration.
Steps to configure a build project in AWS CodeBuild:
- Source code: Get your source code ready in the CodeCommit Repository
- Commit source code in the repository
- Create a build configuration (buildspec) to build your source code
- Prerequisites:
- Create required resources – Two S3 buckets
- Create and test the build project
- Create a new build project in AWS CodeBuild
- Run the AWS Codebuild build project
- View detailed information regarding the build
- Check the build output artifacts / packages
- Delete the build project
Now that we’ve reviewed the steps to creating a build project from the AWS Management Console, let’s start by setting up the source code.
Source code: Get your source code ready in the CodeCommit Repository
Create and commit source code in the CodeCommit repository.
- After you create the CodeCommit repository, connect it to your IDE with the information as shown below:
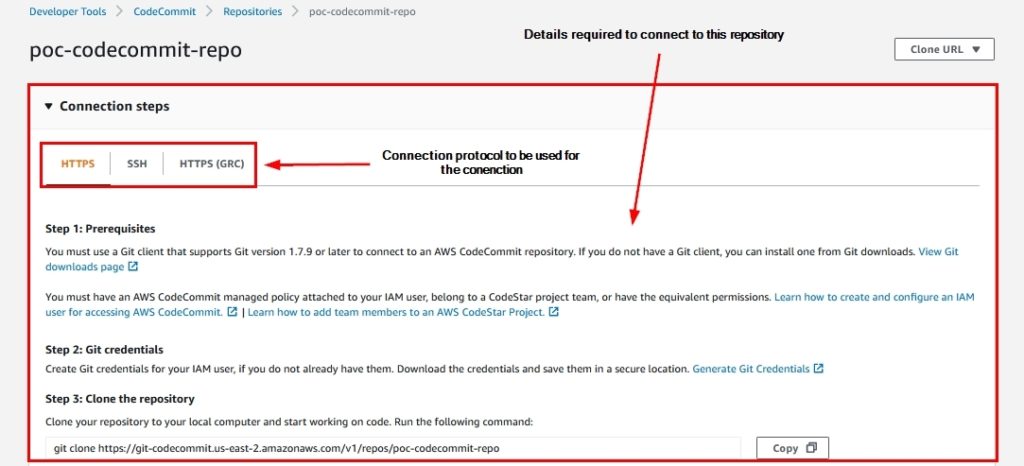
Figure 7: Connection details within the AWS CodeCommit repository
Once you connect your CodeCommit repository to your IDE, load your source code into the repository.
Create a configuration file (buildspec) to build your source code
The buildspec file is used by the CodeBuild pipeline to build your source code. It is stored in the YML format.
In this section, we’re going to create and commit the configuration file used to create a build. In our sample project, we’ll create a buildspec file to build a JAVA project.
- The buildspec file that is used to build the JAVA project looks like this:
version: 0.2
phases:
install:
runtime-versions:
java: corretto11
pre_build:
commands:
– echo No tasks to do in the pre_build phase…
build:
commands:
– echo Build started on `date`
– mvn install
post_build:
commands:
– echo Build completed on `date`
artifacts:
files:
– output/messageUtil-1.0.jar
The build configuration file (buildspec.yml) is divided into three parts:
- Version – Represents the version of the build spec standard being used.
- Phases – Basically, these are steps that represent the build phases where you can instruct CodeBuild to run commands.
- Artifacts – This section contains the set of build output artifacts that CodeBuild uploads to the output bucket.
Save the above configurations in the file named – “buildspec.yml” in the root of the repository.
Prerequisites – Create required resources – Create an S3 bucket
Create an S3 bucket for storing output for the AWS CodeBuild pipeline.
- Click this link to navigate to the S3 Management Console and click on “Create bucket” as shown below:

Figure 8: AWS S3 Management Console’s landing page
- After you click on “Create bucket” as shown in Figure 8, the S3 creation wizard will begin. Provide the name and location of the S3 bucket as shown:
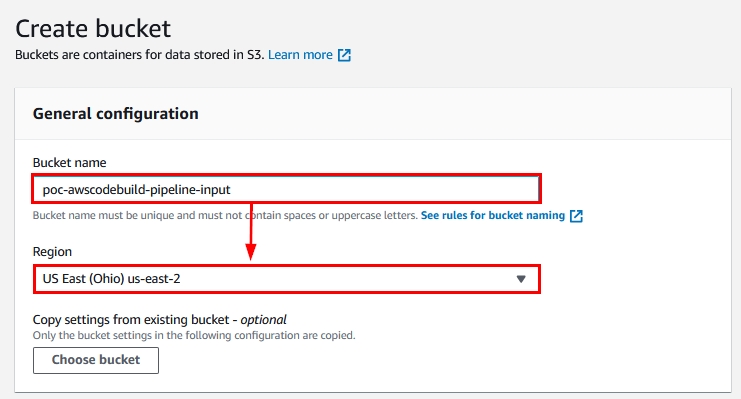
Figure 9: General configurations while creating an S3 bucket using the AWS Management Console
- As shown below, uncheck the box – “Block all public access” and check the box – “I acknowledge that the current settings might result in this bucket and the objects within becoming public.”
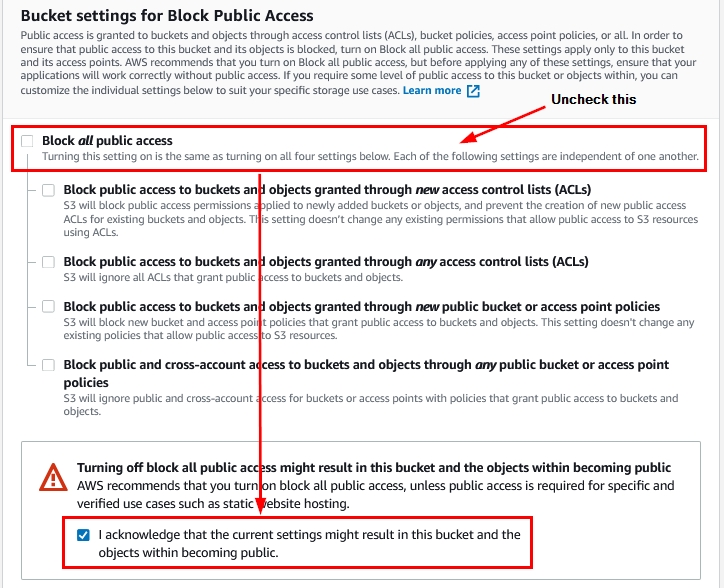
Figure 10: Public access settings while creating an S3 bucket using the AWS Management Console
We’ve now made the S3 bucket publicly accessible so that the AWS CodeBuild can access it in order to upload the output artifacts.
- Add tags (optional) and check the option – “Disable” within the option “Default encryption.” Click on “Create bucket” as shown in the following figure:
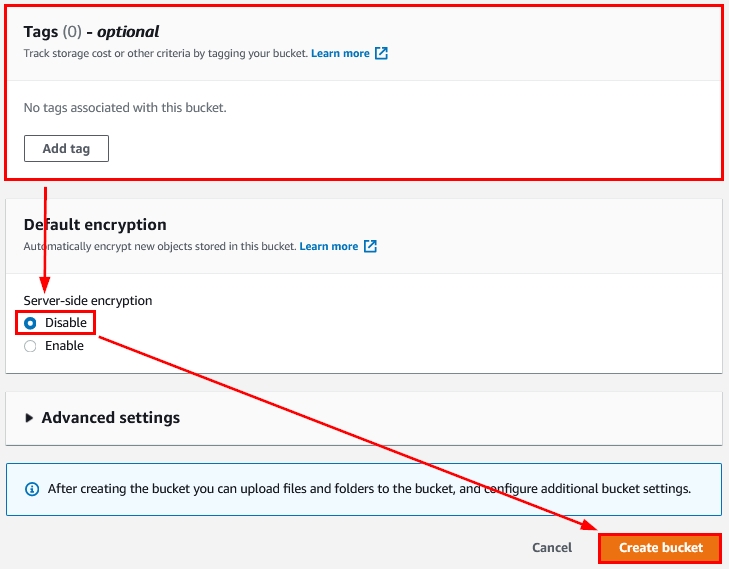
Figure 11: Other options while creating an S3 bucket using the AWS Management Console
We’ve now successfully created an S3 bucket for storing input files. Create another S3 bucket, which will be used to store output files (i.e., Software packages that are created because of the output of the build process.)
Now that we’ve created prerequisites for the build project, let’s move ahead and create a build project using the CodeBuild Management Console.
Create and test the CodeBuild project
In this section, we’re going to create a build project pipeline and learn how to create automated builds using it.
- Click on this link to navigate to the AWS CodeBuild Management Console and click on “Create build project” as shown in the following figure:

Figure 12: Create build project option within the AWS CodeBuild Management Console
- After you click on “Create build project” as shown in Figure 12, you will be directed to the project creation wizard as shown:
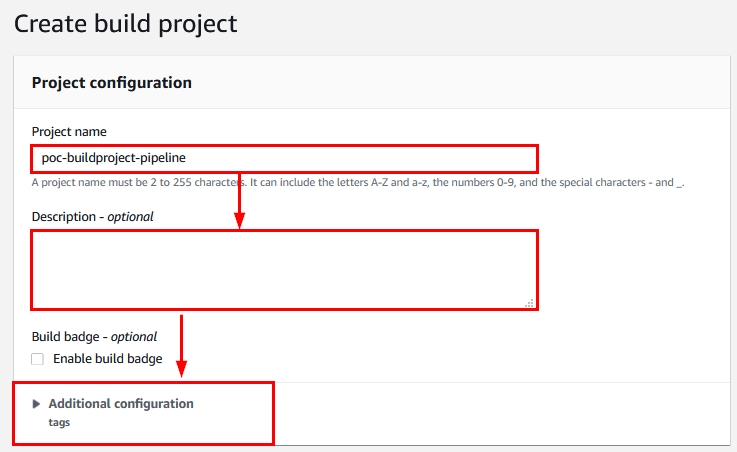
Figure 13: Project configuration section within the new AWS CodeBuild project creation wizard
Provide the name of the build project, a description (optional), and apply tags to the build project (optional) as shown in Figure 13.
- Moving forward, select the “Source provider” under the Source section as shown below:
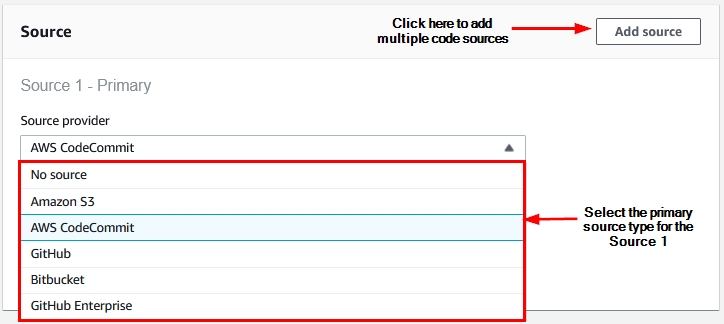
Figure 14: Source provider selection within the new AWS CodeBuild project creation wizard
AWS CodeBuild supports most popular version control providers, as shown in Figure 14. For the sake of simplicity, we’ll proceed with AWS CodeCommit.
- Once you select “AWS CodeCommit”, you need to select the repository and the branch as demonstrated below:
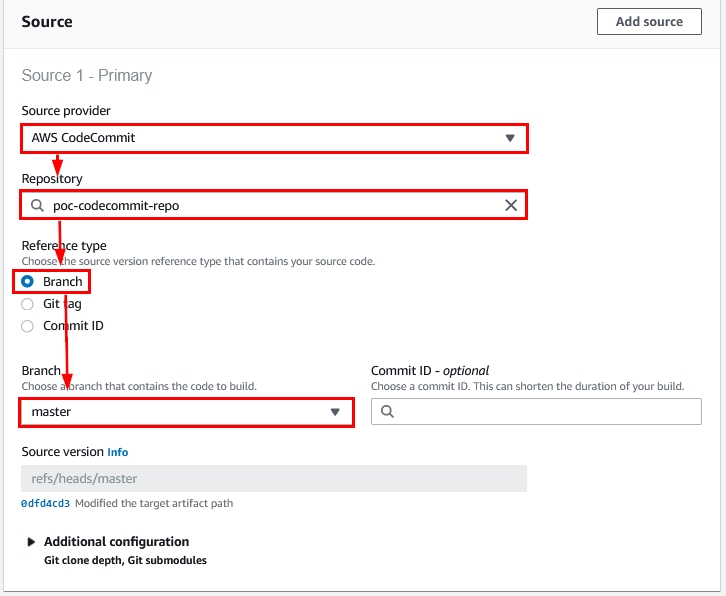
Figure 15: Source provider options within the new AWS CodeBuild project creation wizard
- Next come the options for the environment where your source code will be built. Select the relevant options as demonstrated below :
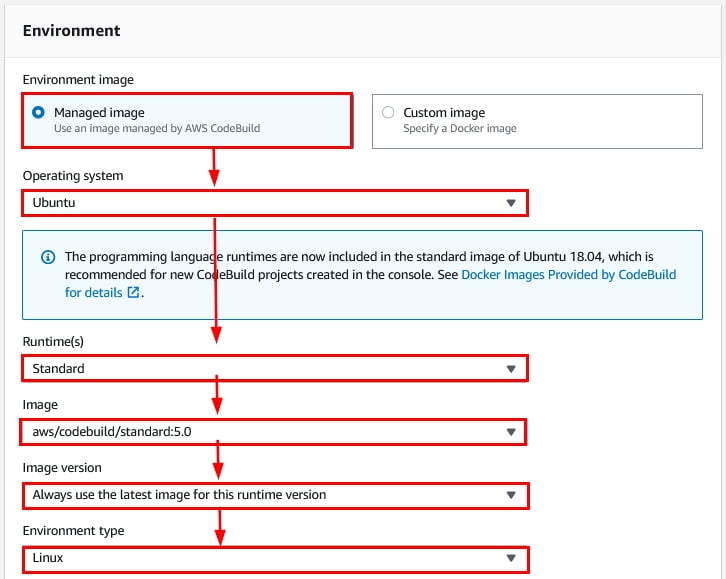
Figure 16: Build environment options within the new AWS CodeBuild project creation wizard
NOTE: The Ubuntu Linux environment is capable of building most languages, including Java, Javascript, .NET Core, etc. Hence, we have selected this type of environment as shown in Figure 16.
- You will also need a service role to run the build. If you already have this role, select “Existing service role”; otherwise, select “New service role” and provide a name for the new role as shown:

Figure 17: Service role options within the new AWS CodeBuild project creation wizard
- The next option is for build configurations. If you select “Use a buildspec file,” you will be presented with a text bar where you can enter the name of the configuration file as shown:
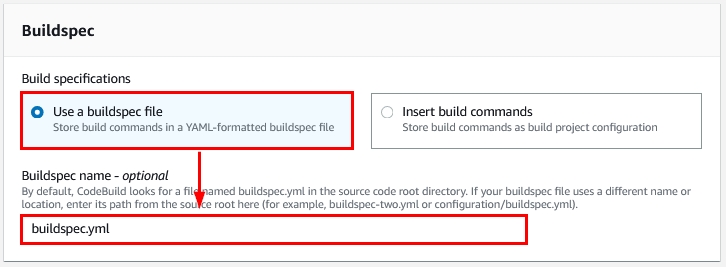
Figure 18: Using a buildspec file option within the new AWS CodeBuild project creation wizard
- If you don’t have a buildspec file, you can enter the commands that create the build by selecting the option “Insert build commands” as shown below:
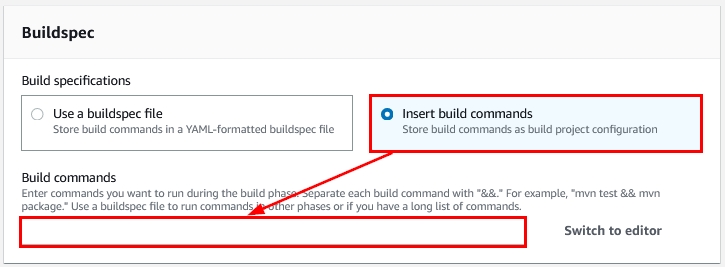
Figure 19: Insert build commands option within the new AWS CodeBuild project creation wizard
- The next section is Artifacts. At the time that we created this walkthrough, only one option is available for artifact output – the S3 Bucket. Select “Amazon S3” and select the relevant bucket where you want to publish the build’s output, as highlighted in the following figure:
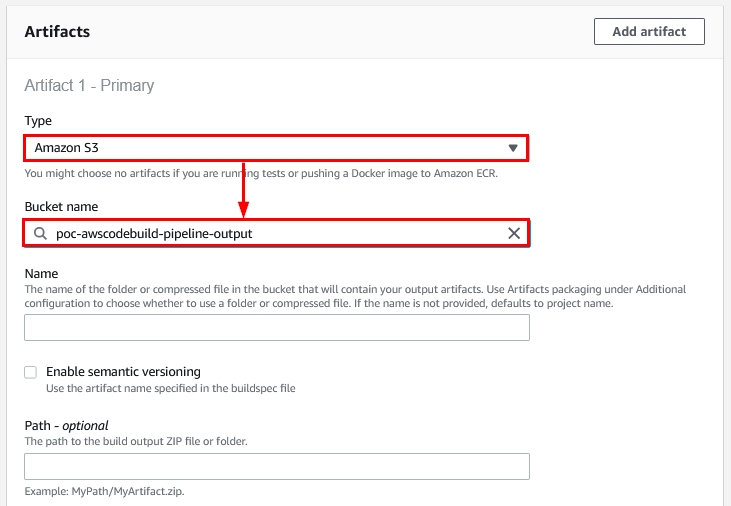
Figure 20: Artifacts options within the new AWS CodeBuild project creation wizard
- The next section reviews artifacts packaging options, which are used to package artifacts that are produced during the build process. If you want to compress the output, select “Zip”; otherwise select “None,” as shown:

Figure 21: Artifacts packaging options within the new AWS CodeBuild project creation wizard
- Finally, we review the Logs section. Check the box “CloudWatch logs – optional” and provide the CloudWatch group name and CloudWatch Stream name as shown in the figure below:
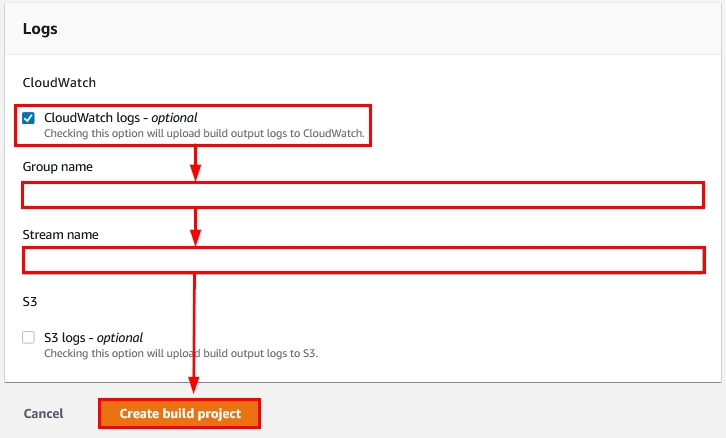
Figure 22: Logs options within the new AWS CodeBuild project creation wizard
When you’re done selecting the options we just reviewed, click on “Create build project,” as shown in Figure 22.
It takes a few seconds to create the AWS CodeBuild project.
Run the AWS Codebuild build project
Now that we’ve created a CodeBuild project, let’s run it to check whether it is working or not.
- Navigate to the CodeBuild project and click on “Start build” as shown below:

Figure 23: The Start build option within the CodeBuild project in the AWS Console
- As soon as you click on “Start build” as shown in Figure 23, the CodeBuild pipeline will start with the following notification:
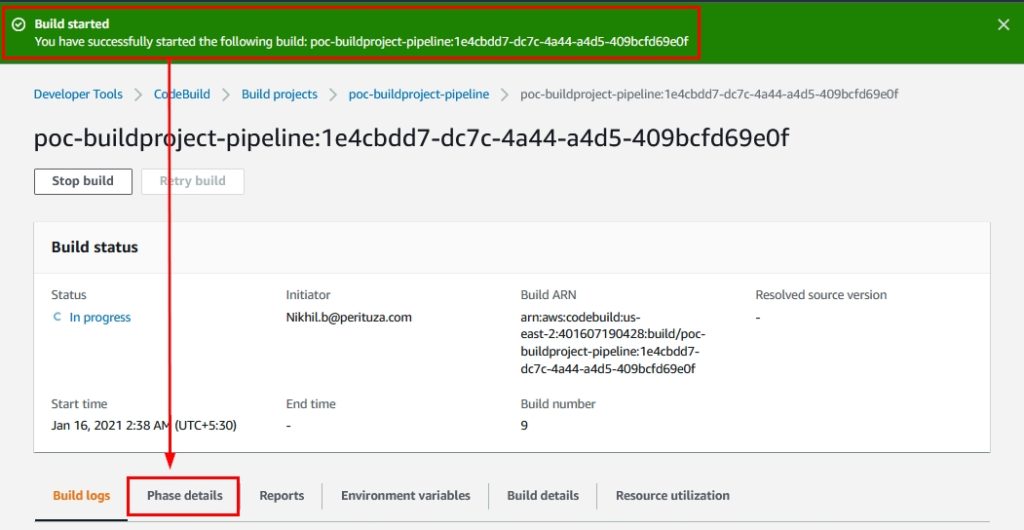
Figure 24: Build started notification within the AWS CodeBuild Management Console
Click on “Phase details” as shown above to see the stepwise build progress.
- Within “Phase details”, you can see the stepwise progress as highlighted below:
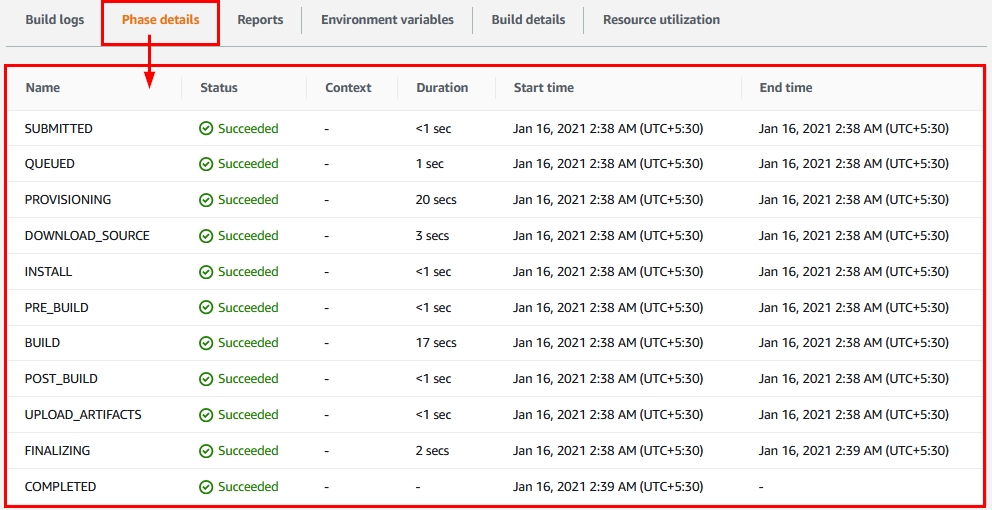
Figure 25: Phase details within the AWS CodeBuild’s build
In this way you can trigger/run a build and check its status.
View detailed information regarding the build
- Navigate to any successful build. There you can see its details; if you want more details, click on the “Build details” tab as shown:
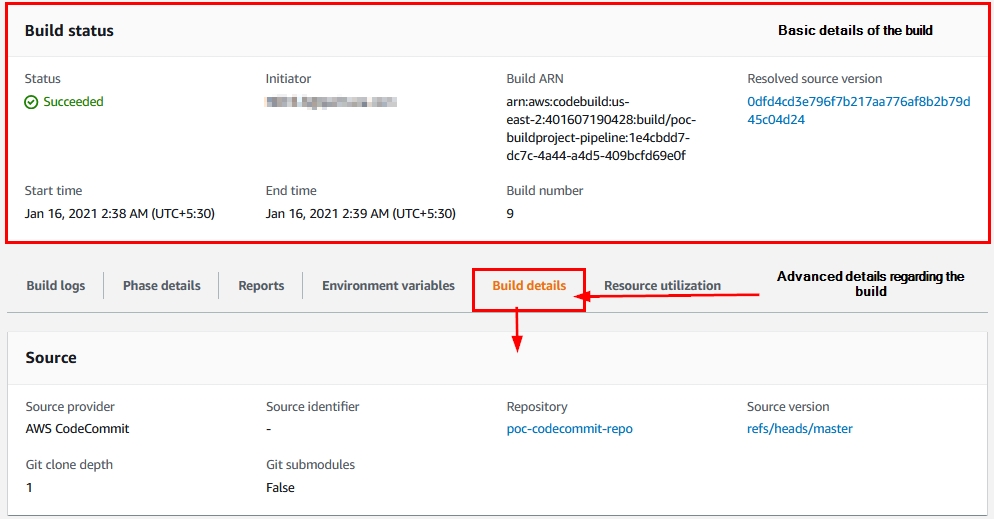
Figure 26: Build details within the AWS CodeBuild
Check the build output artifacts/packages
Here we’re going to check the whether the artifacts are created in the S3 bucket or not.
- Navigate to the S3 Management Console by clicking on this link. Then navigate to the S3 bucket where you can see the build artifacts, as shown below:
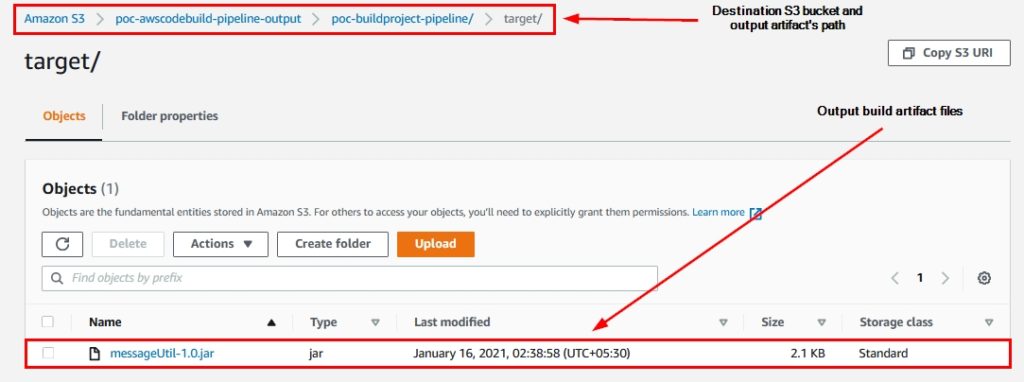
Figure 27: Output artifacts of the AWS CodeBuild pipeline within the Amazon S3 bucket
In this way you can check if your CodeBuild’s pipeline is working and producing expected output artifacts.
Delete the build project
In this section, we’re going to learn how to delete the AWS CodeBuild project using the AWS Management Console.
- Navigate to the CodeBuild’s build project that you want to delete and click on “Delete build project,” as demonstrated below:

Figure 28: Delete build project option within the CodeBuild’s pipeline
- Once you click on “Delete build project” as shown in Figure 28, you can see the following prompt confirming the deletion of the build project. Type “delete” in the text box and then click the “Delete” button, as highlighted below:
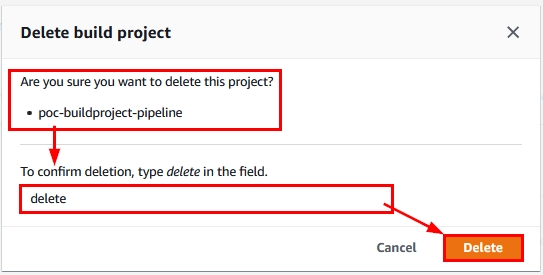
Figure 29: CodeBuild’s pipeline deletion confirmation prompt
In this way you can delete the CodeBuild’s pipeline.
Summary
We’ve reviewed the following:
- How to create and upload source code to the AWS CodeCommit repository
- How to create the CodeBuild’s build project using the AWS Console
- Running the build project and checking its output artifacts in an S3 bucket
- Deleting a build project via the AWS Console
With this section, we’ve completed the “AWS CodeBuild” walkthrough.
Software development and more
Whether your business is in need of custom software development or simply a technology consultation, Perituza is here for you. Contact us today to get the business technology conversation started.

No comments:
Post a Comment