Monday, 2 January 2023

Overview Step-by-Step Blue Green Testing Model Achieving Blue-Green Deployment via AWS Tools & Services Advantages of Blue-Green Deployments Disadvantages of Blue-Green Deployments Alternatives for Blue-Green Deployment

 One of the key criteria by which an application is judged is definitely the downtime.

In this blog post, we’ll discuss Blue-Green Deployment, which leads to Zero downtime. Being developers, we must have faced a situation where our applications’ updated version takes the customers’ heat for being slow or buggy. This leads to rolling back to the previous versions of our application, which are stable. Right? But is rollback easy?

As you must have guessed, rollback isn’t as easy as it sounds. It has several shortcomings as it is implemented by redeploying an older version from scratch. This process takes a lot of time, which can make us lose thousands of customers in realtime. Moreover, even if the bug is small, we do not get time to fix it and move to the stable version. So how to solve this problem?

This post will cover :

Overview 

Here comes Blue-Green Deployment into the picture. Blue-green deployments can reduce common risks associated with deploying software, such as downtime and rollback capability. These deployments give just about a zero-downtime release and rollback capabilities.
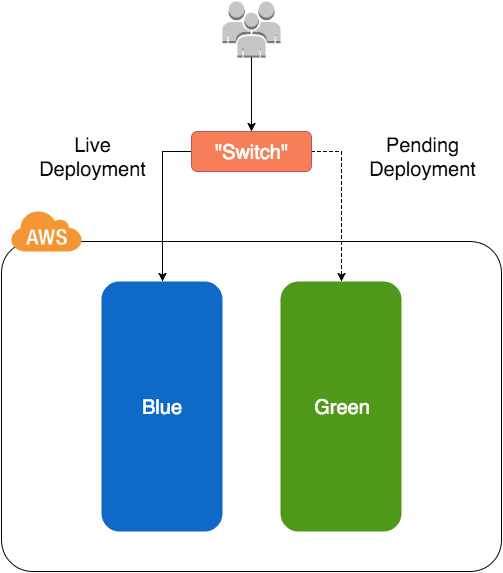
Blue Green Deployment

The basic idea is to shift traffic between two identical environments, running different versions of your application. Although the colours don’t represent a particular version, the blue colour usually signifies the live version, and the green colour signifies the version that needs to be tested. These can be swapped too. After the green environment is ready and tested, production traffic is redirected from blue to green. If you face any problem, you can always roll back by reverting traffic to the blue environment.

The two environments need to be different but as identical as possible. We can use a load balancer to route traffic between them. They can be different hardware pieces or different virtual machines running on the same or different hardware. They can also be a single operating environment partitioned into separate zones with separate IP addresses for the two slices.

Learn with us: Join our AWS Solution Architect Training and understand AWS basics in an easy way.

Step-by-Step Blue Green Testing Model

In Server A, for instance, we’ll have the green version of our application which needs to be deployed to the live production environment. You want to ensure that the update won’t interrupt service and that it can easily be rolled back if any major errors are found. Here comes the Blue-Green deployment model into the picture.

  1. Deploy the updated version of the application (Blue version) to Server B. Run any applicable tests to ensure that the update is working as expected.
  2. Configure the router to start sending live user traffic to Server B.
  3. Configure the router to stop sending live user traffic to Server A.
  4. Keep sending traffic to Server B until you can be certain that there are no errors and no rollbacks will be necessary. If a rollback is necessary, configure the router to send users back to your Green version on Server A until they can be resolved.
  5. Remove the Green version of your application from Server A, or update it to your Blue version so it can continue serving as a back-up version of your application.

Read about: Amazon Elastic Load Balancing (ELB). Its overview, features, and types.

Achieving Blue-Green Deployment via AWS Tools & Services

There are various services available in the AWS ecosystem that makes use of the blue-green deployment strategy. Some of such services are mentioned below which could help you automate your deployment.

Amazon Route 53

Amazon Route 53 is basically a highly available DNS service that can help you buy domains, route traffic by configuring DNS records and to do frequent health checks of your system. DNS is an exemplary way to deal with blue/green deployments as it permits administrators to coordinate traffic by just updating DNS records in the facilitated zone.
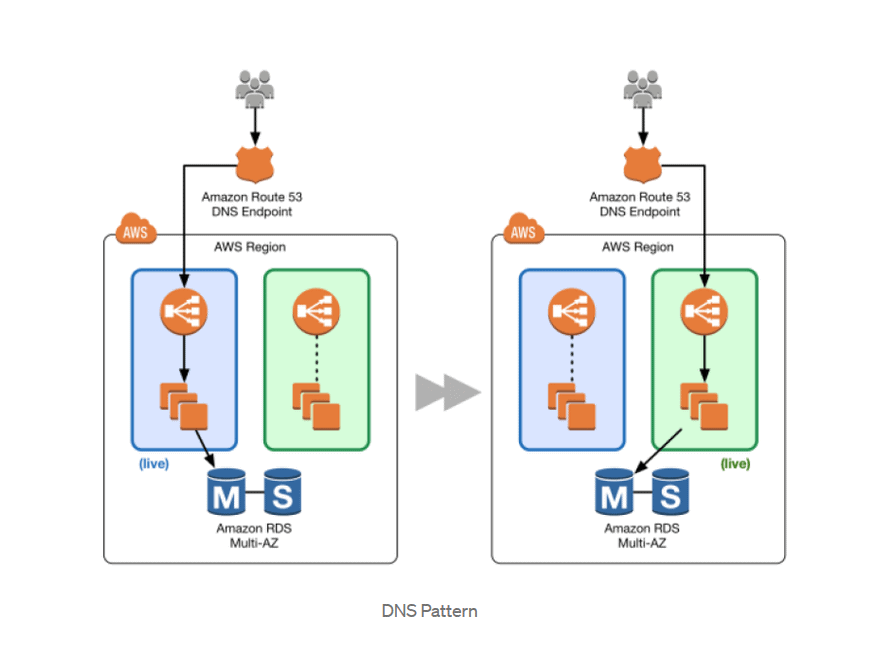
Route53

Amazon Route 53 also supports the weighted distribution of traffic. This means that you can provide a dedicated percentage of traffic you want on each of your servers. Therefore, you can allow a certain percentage of traffic to go to the green environment and gradually update the weights until the green environment carries full production traffic. This type of distribution helps us perform canary analysis where a small percentage of production traffic is introduced to a new environment.
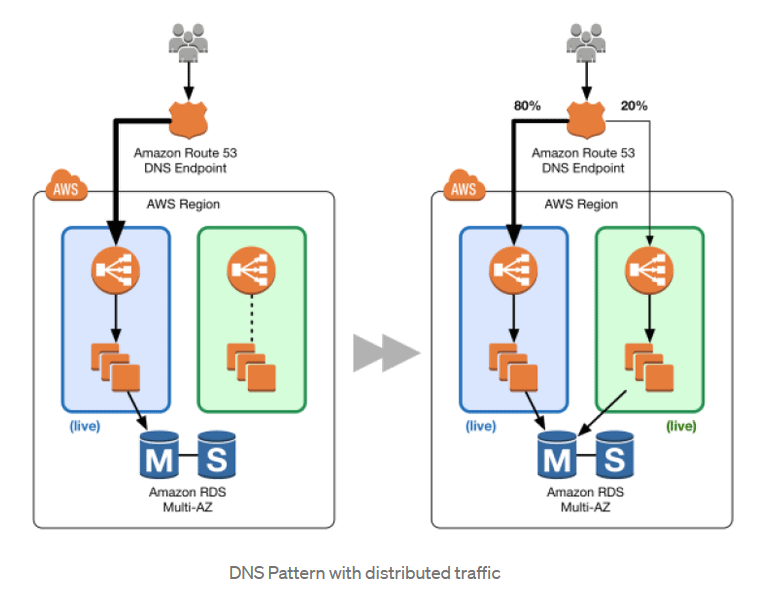
route53-distributed

To Know More About AWS Database Services . Click Here

Elastic Load Balancing

Load balancing provides another fantastic way to route traffic which in turn helps us achieve blue-green deployment. Elastic load balancing is one such technology that distributes traffic across various EC2 instances. Not just that, it does frequent health checks over those instances and can further be integrated with auto-scaling to achieve better performance and zero downtime.

Auto Scaling

Auto Scaling refers to the increase and decrease of instances for our application according to the need. Various templates known as launch configurations can be used to launch EC2 instances in an Auto Scaling group. An Auto Scaling group could also be attached to different versions of the launch configuration to enable blue-green deployment.

The figure below shows the environment boundary reduced to the Auto Scaling group. A blue group carries the production load while a green group is staged and deployed with the new code. When it’s time to deploy, you simply attach the green group to the existing load balancer to introduce traffic to the new environment. For HTTP/HTTPS listeners, the load balancer favours the green Auto Scaling group because it uses the least outstanding requests routing algorithm.
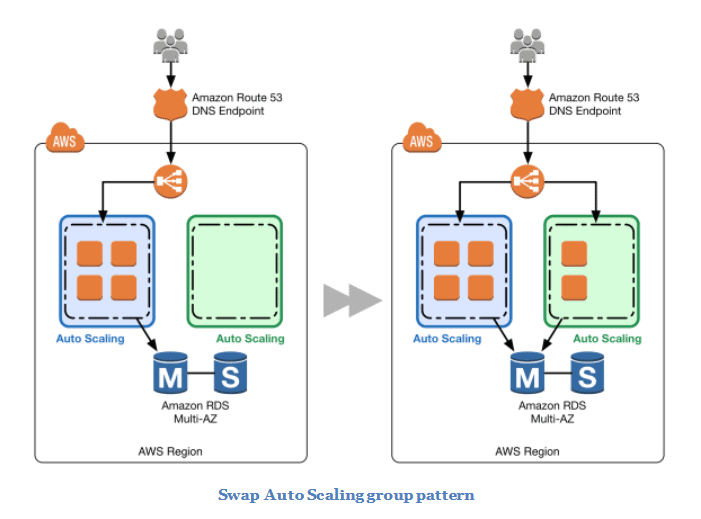
scaling1

As you scale up the green Auto Scaling group, you can take blue Auto Scaling group instances out of service by either terminating them or putting them in a Standby state, as shown in the below figure. Standby is a good option because if you need to roll back to the blue environment, you only have to put your blue server instances back in service and they’re ready to go.
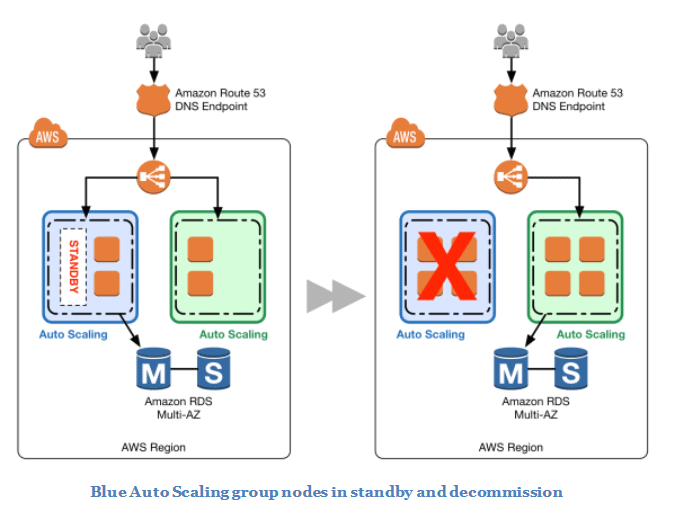
scaling2

Update Auto Scaling Group Launch Configurations

Auto Scaling groups have their own launch configurations. A launch configuration contains information like the Amazon Machine Image (AMI) ID, instance type, key pair, one or more security groups, and a block device mapping. You can associate only one launch configuration with an Auto Scaling group at a time, and it can’t be modified after you create it.

Now we will try to change the launch configuration associated with an Auto Scaling group and replace the existing launch configuration with a new one. To implement this, we will start with an Auto Scaling group and ElasticLoad Balancing load balancer. The current launch configuration has a blue environment.
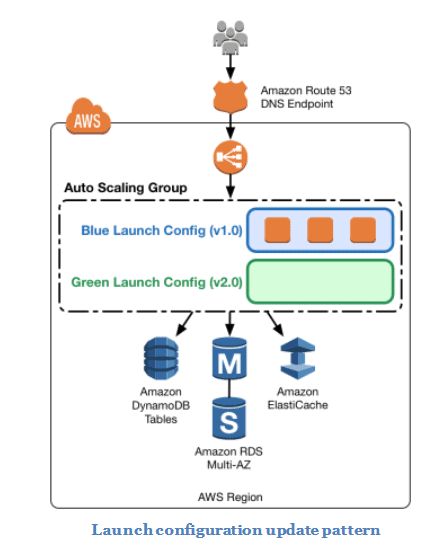
scaling3

To deploy the new version of the application in the green environment, update the Auto Scaling group with the new launch configuration, and then scale the Auto Scaling group to twice its original size.
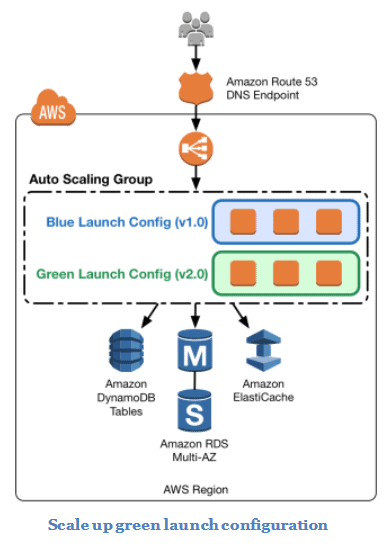
scaling4

Now, shrink the Auto Scaling group back to the original size. By default, instances with the old launch configuration are removed first. You can also leverage a group’s Standby state to temporarily remove instances from an Auto Scaling group.
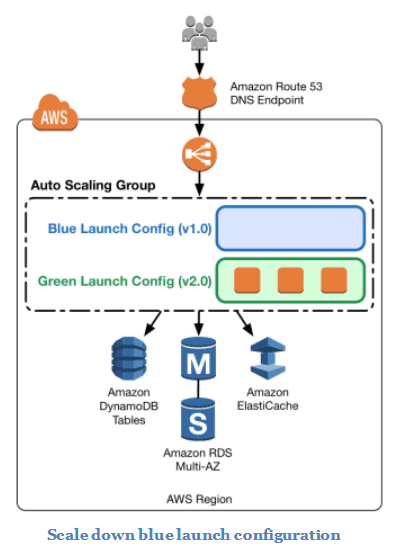
scaling5

To perform a rollback, update the Auto Scaling group with the old launch configuration. Then, do the preceding steps in reverse. If the instances are in a Standby state, bring them back online.

AWS Elastic Beanstalk

AWS Elastic Beanstalk helps you to quickly deploy applications and manage them. It supports Auto Scaling and Elastic Load Balancing, the two of which empower blue-green deployment. It also makes it simple to run different adaptations of your application and gives developers an option to exchange the environment URLs, encouraging blue-green deployment. To gain in-depth knowledge check our blog on AWS Elastic Beanstalk
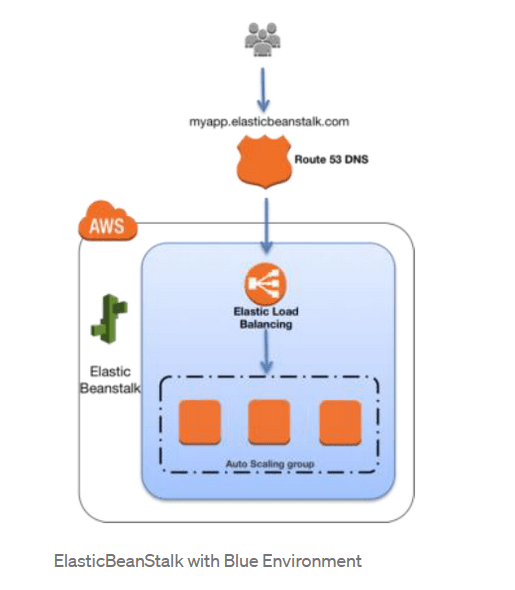
bean1

Elastic Beanstalk provides an environment URL when the application is up and running. Then, the green environment is spun up with its own environment URL. At this time, two environments are up and running, but only the blue environment is serving production traffic.
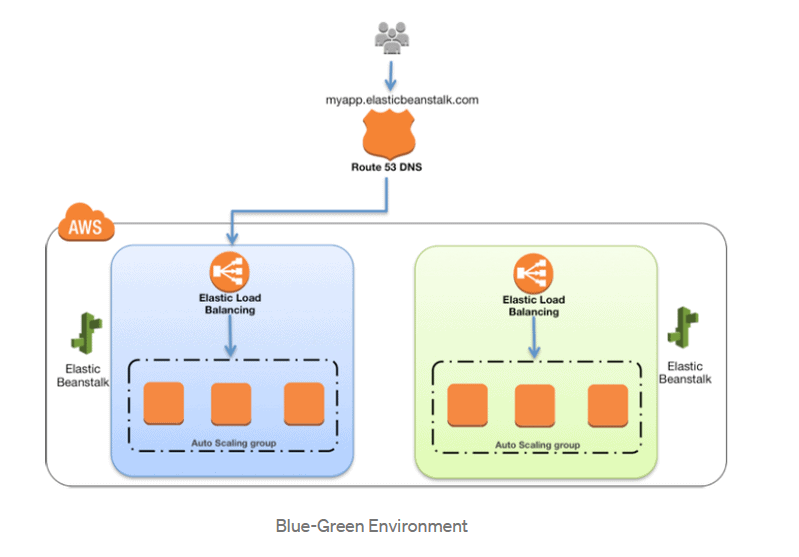
bean2

To promote the green environment to serve production traffic, you go to the environment’s dashboard in the Elastic Beanstalk console and choose the Swap Environment URL from the Actions menu. Elastic Beanstalk performs a DNS switch, which typically takes a few minutes.
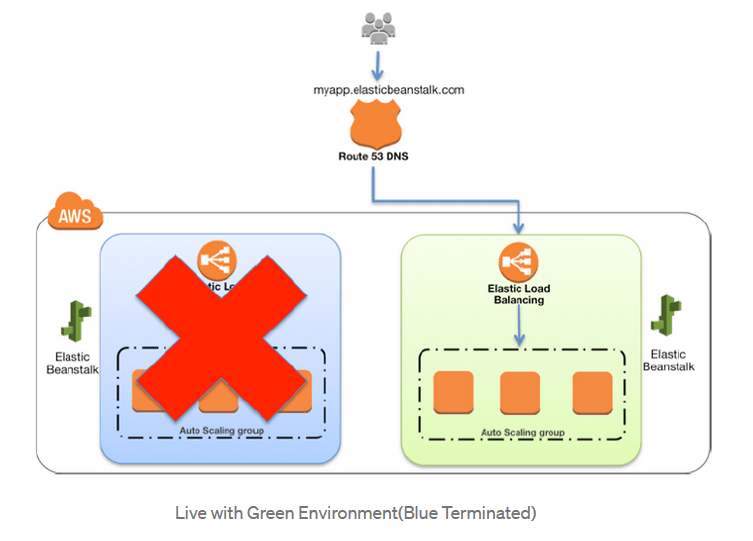
bean3AWS CloudFormation

AWS CloudFormation helps you to integrate, provision, and manage related AWS and third-party resources as a single collection. This service provides very powerful automation capabilities for provisioning blue-green environments and facilitating updates to switch traffic, whether through Route 53 DNS, Elastic LoadBalancing, etc. Want to know more? check our separate blog on Introduction to AWS CloudFormation

Amazon CloudWatch

Amazon CloudWatch acts as a monitoring service for AWS Cloud resources and the applications you run on AWS. It can collect log files, set alarms, and track various performance-based metrics. It provides system-wide visibility which is a key factor while detecting the application health in blue-green deployments.

Advantages of Blue-Green Deployments

  • Debugging: In Blue-green deployment, rollbacks always leave the failed deployment intact for analysis.
  • Zero-downtime: no downtime means that we can make releases at any time. There is no need to wait for maintenance windows.
  • Instant switch: users are switched to another environment instantaneously.
  • Instant rollback: we can easily go back to the previous version in an instant.
  • Replacement: we can easily switch to the other environment if a data center containing our live environment goes down. This will work as long we have had the precaution of not putting blue and green on the same availability zone.

Disadvantages of Blue-Green Deployments

  • Data Migration: database migrations are harder, even to the point of being a showstopper. Databases schema changes must be forward and backwards compatible. We may need to move back and forth between the old and new versions.
  • Sudden Delays: If users are suddenly switched to a new environment, they might experience some slowness.
  • Expenses: Compared to other methods, the blue-green deployments are more expensive. Provisioning infrastructure on-demand helps. But when we’re making several scaled-out deployments per day, the costs can snowball.
  • Time & Effort: setting up the blue-green deployment process takes time and effort. The process is complex and has a great deal of responsibility. We may need to do many iterations before we get it working right.
  • Handling transactions: while switching the environment, some user transactions will get interrupted.
  • Shared services: databases and other shared services can leak information between blue and green. This could break the isolation rule and interfere with the deployment.

Alternatives for Blue-Green Deployment

Canary release is a technique to reduce the risk of introducing a new software version in production by slowly rolling out the change to a small subset of users before rolling it out to the entire infrastructure and making it available to everybody.

With canary testing, if you discover the green environment is not operating as expected, there is no impact on the blue environment. You can route traffic back to it, minimizing impaired operation or downtime, and limiting the blast radius of impact.

AWS OpsWorks Overview, Features & Benefits

 In this blog, we are going to cover one of the important AWS configuration management services i.e AWS OpsWorks which provides managed instances of Puppet and Chef.

Puppet and Chef are platforms for automation that allow you to use code to automate the configurations of your servers. OpsWorks lets you use Puppet and Chef to automate how servers configured, deployed, and managed across your on-premises compute environments or Amazon EC2 instances.

Overview 

It can be counted as an application management service rather than simply an application container. It contributes even more levels of automation with additional features like integration with configuration management software (Chef) and application lifecycle management. You allowed to use application lifecycle management to establish when resources are set up, configured, deployed, undeployed or shut down.

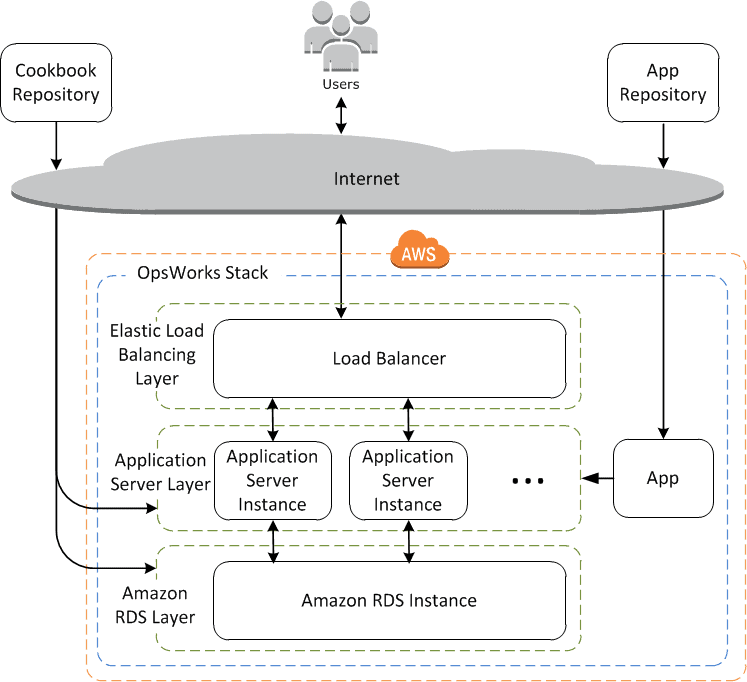
For appended flexibility, AWS OpsWorks can define your application in configurable stacks. You can likewise select predefined application stacks. Application stacks contain all the provisioning for AWS resources that your application requires, including application servers, web servers, load balancers, and databases.

AWS OpsWork

AWS OpsWorks Unique Features

Customers for a long time have been asking for an Application Management solution that allows them to manage the whole application lifecycle. OpsWorks has some unique features that help customers achieve this:

  • Model and support any application
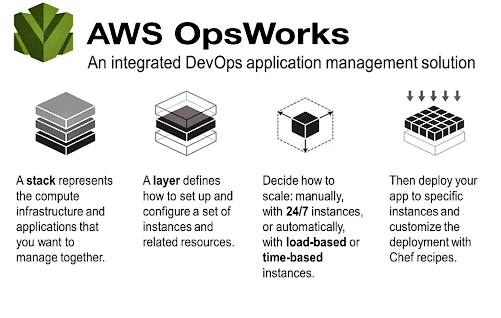
    You can deploy your application in the configuration you choose on Amazon Linux and Ubuntu. OpsWorks lets you model your application with layers. Layers define how to configure a set of resources that are managed together. For example, you might define a web layer for your application that consists of EC2 instances, EBS volumes including RAID configuration and mount points, and Elastic IPs. You can also define the software configuration for each layer, including installation scripts and initialization tasks. When an instance is added to a layer, OpsWorks automatically applies the specified configuration.
  • Automate tasks
    OpsWorks enables you to automate management actions so that they are performed automatically and reliably. You can benefit from automatic failover, package management, EBS volume RAID setup, and rule-based or time-based auto-scaling. Common tasks automatically handled for you, and you can also extend and customize that automation. OpsWorks supports continuous configuration through lifecycle events that automatically update your instances’ configuration to adapt to environmental changes, such as auto-scaling events. With OpsWorks there is no need to log in to several machines and manually update your configuration. Whenever your environment changes, OpsWorks updates your configuration.
  • Control access
    OpsWorks lets you control access to your application. You choose which IAM users should have access to the application’s resources, and assign permissions that define what they can do. These controls can prevent users from inadvertently changing production resources. An event view shows change history to simplify root cause analysis.

AWS OpsWorks has Three Offerings

  • AWS OpsWorks for Puppet Enterprise
  • AWS Opsworks for Chef Automate
  • AWS OpsWorks Stacks

Read here: A good example of how the DevOps principles are used in practice is AWS CloudFormation.

AWS OpsWorks for Puppet Enterprise

AWS OpsWorks for Puppet Enterprise is an entirely managed configuration management service that hosts Puppet Enterprise, a set of automation tools from Puppet for infrastructure and application management. OpsWorks additionally maintains your Puppet master server by automatically patching, updating, and backing up the server.

OpsWorks eliminates the requirement to operate your configuration management systems or fret about maintaining its infrastructure. OpsWorks gives you access to all of the Puppet Enterprise features, which operate through the Puppet console. It also operates seamlessly with your existing Puppet code.

AWS OpsWorks for Puppet Enterprise

Benefits:

  • Fully Managed Puppet Master
  • Programmable Infrastructure
  • Scaling made easy
  • Support from Puppet Community
  • Secure
  • Simple to manage a hybrid environment

AWS Opsworks for Chef Automate

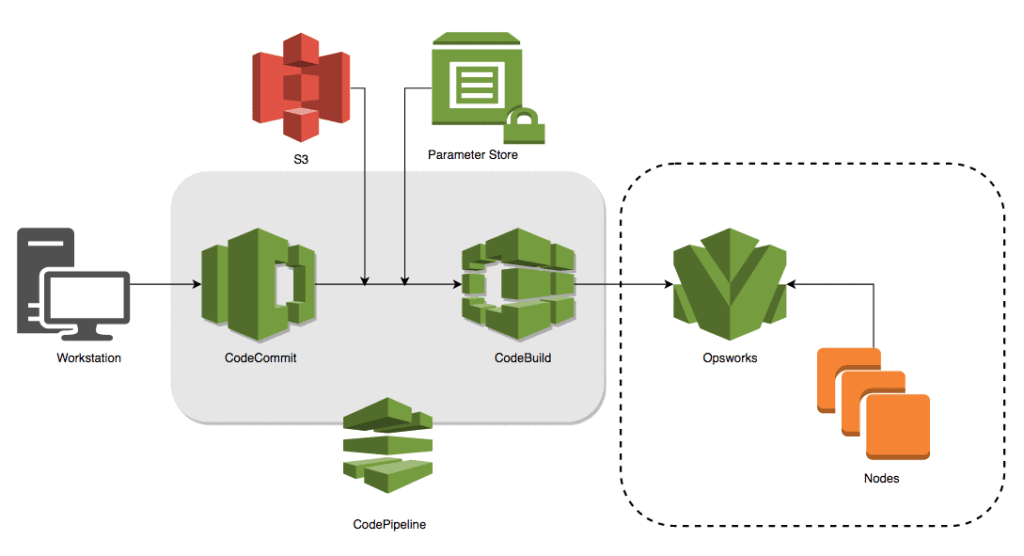
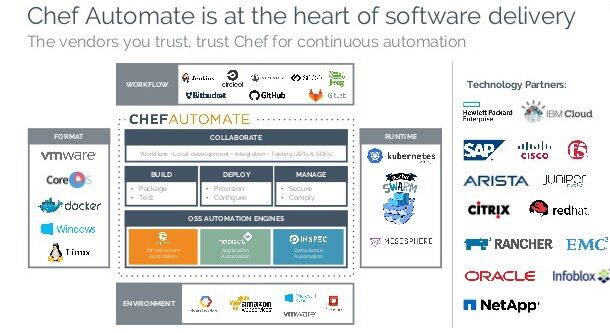
AWS OpsWorks for Chef Automate provides a completely managed Chef Automate server and suite of automation tools that provide you workflow automation for continuous deployment, automated testing for compliance and security, and a user interface that gives you visibility within your nodes and their status. The Chef Automate platform gives you full stack automation by managing operational tasks such as software and operating system configurations, continuous compliance, package installations, database setups, and more.

The Chef server centrally saves your configuration tasks and gives them to each node in your compute environment at any scale, from a few nodes to thousands of nodes. OpsWorks for Chef Automate completely compatible with tooling and cookbooks from the Chef community and automatically registers new nodes with your Chef server.

AWS OpsWorks for Chef Automate

Benefits:

  • Fully Managed Chef Automate Server
  • Programmable Infrastructure
  • Scaling made easy
  • Support from Active Chef Community
  • Simple to manage a hybrid environment

AWS OpsWorks Stacks

AWS OpsWorks Stacks permits you to manage applications including servers on AWS and on-premises. With OpsWorks Stacks, you can shape your application as a stack containing different layers, such as load balancing, application server, and database. You can deploy and configure Amazon EC2 instances in each layer or connect other resources such as Amazon RDS databases.

OpsWorks Stacks allows you to set automatic scaling for your servers based on preset schedules or in response to changing traffic levels, and it uses lifecycle hooks to orchestrate changes as your environment scales. You run Chef recipes using Chef Solo, allowing you to automate tasks such as installing packages and programming languages or configuring software or frameworks, and more.

AWS OpsWorks Stacks

Benefits:

  • Support any application
  • Configuration as Code
  • Automation to Run at Scale
  • Resource Organization
  • Supports any Server

Application stacks are made into architectural layers so that stacks maintained independently. Example layers could include web tier, database tier, an application tier. Out of the box, AWS OpsWorks also simplifies setting up Auto Scaling groups and Elastic Load Balancing load balancers, further demonstrating the DevOps principle of automation. Just like AWS Elastic Beanstalk, AWS OpsWorks supports application versioning, continuous deployment, and infrastructure configuration management.

AWS OpsWorks supports the DevOps practices of monitoring and logging. Monitoring service provided by Amazon CloudWatch. All lifecycle effects logged, and a separate Chef log documents any Chef recipes that run, along with any exceptions.

Note: It is so easy to get confused between AWS Elastic Beanstalk, AWS CloudFormation, and OpsWorks.

How To Deploy Web App From S3 Bucket To EC2 Instance on AWS Using CodePipeline

 Case Study: How To Deploy Web App From S3 Bucket To EC2 Instance on AWS Using CodePipeline

In this post, we are going to cover the case study to deploy a web application from an S3 bucket to an EC2 instance using AWS CodePipeline which is a part of CI/CD DevOps practices.

Topics, we’ll cover :

Before deploying a web application we should understand the basic concept of Continuous Integration(CI) and Continuous Deployment(CD) what are they and What kind of tools are offered by AWS for DevOps CI/CD practices.

Check Also: Free AWS Training and Certifications

Overview Of CI/CD

AWS CI/CD architecture

Continuous Integration(CI) and Continous Deployment(CD) gets rid of the traditional manual gate and implements fully automated verification of the acceptance environment to determine the scenario whether the pipeline can continue to production or not.

Continuous Integration focuses on the software development life cycle (SDLC) of the individual developer in the code repository. This can be executed multiple times with a primary goal to enable early detection of integration bugs, and errors.

Continuous Delivery focuses on automated code deployment in testing or production environment, taking the approval of updates to achieve automated software release process, pre-emptively discovering deployment issues.

CI/CD Tools Offered By AWS Used In Case Study

AWS offers an end-to-end CI/CD stack comprised of the following four services:

AWS CodeCommit – It is a  fully-managed source control service that hosts secure Git-based repositories. CodeCommit makes it easy for teams to collaborate on code in a secure and highly scalable ecosystem.Code Commit

AWS CodeBuild – A fully managed continuous integration service that compiles source code, runs tests and produces software packages that are ready to deploy, on a dynamically created build server.
What is AWS CodeBuild? - AWS CodeBuild

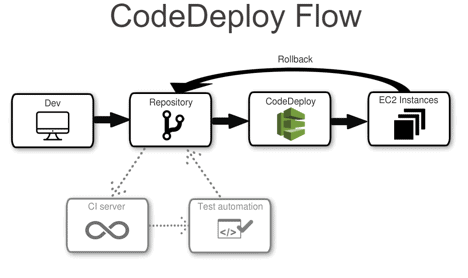
AWS CodeDeploy – A fully managed deployment service that automates software deployments to a variety of computing services such as Amazon EC2, AWS Fargate, AWS Lambda, and your on-premises servers.

aws-codedeploy-flow

AWS CodePipeline – A fully configured continuous delivery service that helps the user to automate their released pipelines for fast and reliable application and infrastructure updates.CI/CD Services Offered By AWS pipeline

Typically in many organizations, there are many tools for code repository but we are using AWS S3 as a code repository.

Steps To Deploy Web Application Using AWS CodePipeline

We will be performing 4 steps to deploy a web application

Step 1: Create an S3 bucket for your application

Note: If you don’t have an AWS account check our blog on how to create AWS Free Tier Account.

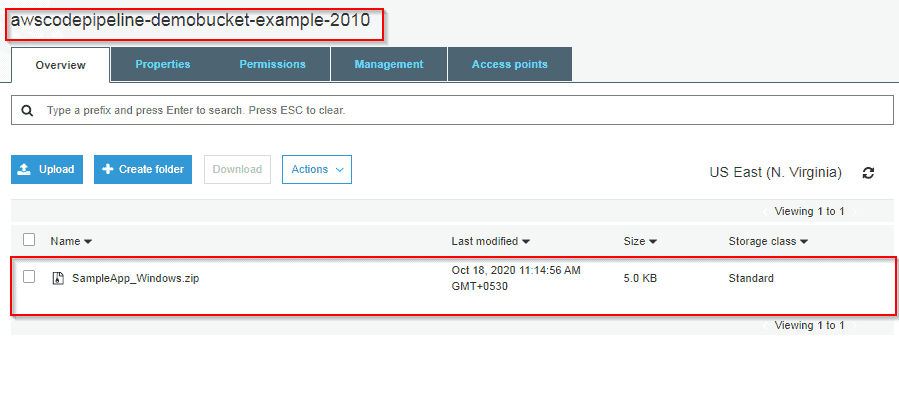
1) Open the Amazon S3 console and Choose Create bucket and In Bucket name, enter a name for your bucket, and also don’t forget to enable Versioning.

2) Next, download the sample code and save it into a folder or directory on your local computer.
Choose one of the following. Choose SampleApp_Windows.zip if you want to follow the steps in this tutorial for Windows Server instances. (Do not Unzip the file while Uploading)
–> If you want to deploy to Amazon Linux instances using CodeDeploy, download the sample application here: SampleApp_Linux.zip.
–> If you want to deploy to Windows Server instances using CodeDeploy, download the sample application here: SampleApp_Windows.zip.

3) In the S3 console, Upload code in the bucket you created.

AWS S3 Bucket

step 2: Create Amazon EC2 Windows instances and install the CodeDeploy agent

1) Create an IAM role that will be required to grant permission to EC2 instance. Select the policy named AmazonEC2RoleforAWSCodeDeploy to create.

Instance Role For EC2

2) Launch instance on which our code will be deployed.

3) Just remember to add the IAM role that we have created. and In Auto-assign Public IP, choose Enable. Expand Advanced Details, and in User data, As text selected, enter the following:
<powershell>
New-Item -Path c:\temp -ItemType “directory” -Force
powershell.exe -Command Read-S3Object -BucketName bucket-name/latest -Key codedeploy-agent.msi -File c:\temp\codedeploy-agent.msi
Start-Process -Wait -FilePath c:\temp\codedeploy-agent.msi -WindowStyle Hidden
</powershell>

Note: bucket-name is the name of the S3 bucket that contains the CodeDeploy Resource Kit files for your region. For example, for the US West (Oregon) Region, replace the bucket-name with AWS-code deploy-us-west-2. For a list of bucket names, see Resource Kit Bucket Names by Region.

4) On the Configure Security Group page, allow port 80 communication so you can access the public instance endpoint. Then follow the default configuration and launch the instance

Created EC2 instance

Also Check: Our blog post on SDLC Automation AWS

Step 3: Create an application in CodeDeploy

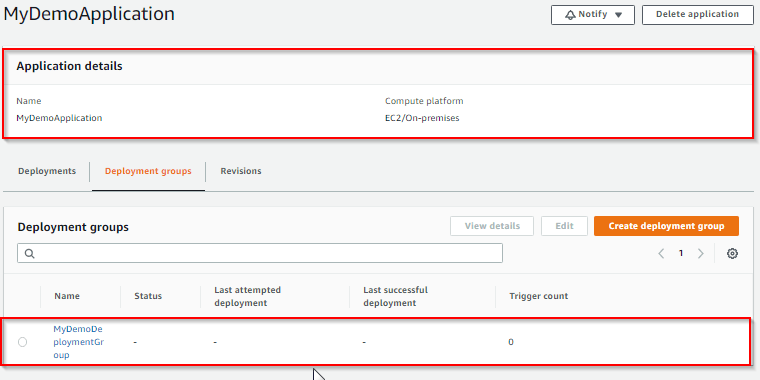
1) Initially create an application in CodeDeploy, and In Compute Platform, choose EC2/On-premises.Choose to Create application.

2) On the page that displays your application, choose to Create a deployment group. In service, role creates an IAM role under code deploy category. Under Deployment type, choose In-place.

3) Under Environment configuration, choose Amazon EC2 Instances.

4) Under Deployment configuration, choose CodeDeployDefault.OneAtaTime.

5) Under Load Balancer, clear Enable load balancing, leave the defaults then choose to Create a deployment group.

Application code deploy for CI/CD Services Offered By AWS

Step 4: Create your first pipeline in CodePipeline

1) Open the CodePipeline console. Choose pipeline settings, Enter your desired name and in Service role, Choose New service role to allow CodePipeline to create a new service role in IAM.  To know more about AWS IAM refer to our blog on AWS Identity And Access Management (IAM).

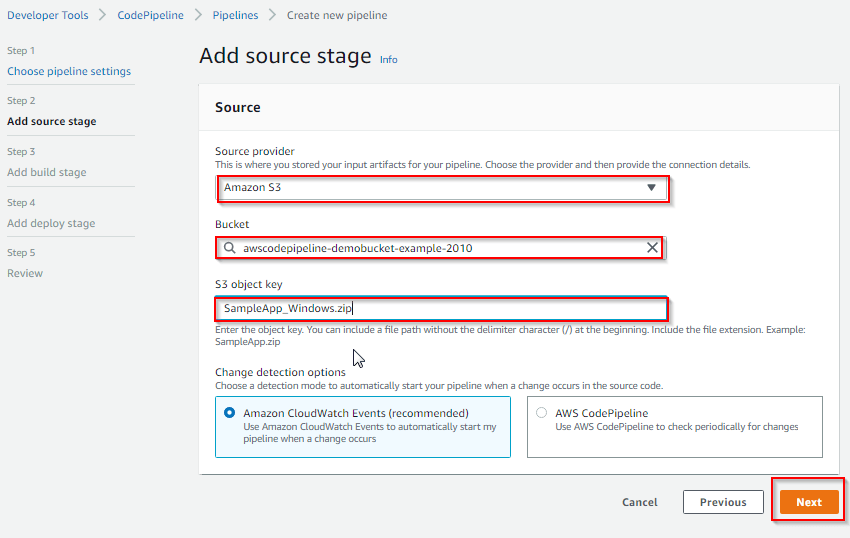
2) In the Add source stage, select Source provider, choose Amazon S3. Under the S3 object key, enter the object key with or without a file path, and remember to include the file extension.

3) In the Add build stage, choose to Skip build stage, and then accept the warning message by choosing Skip again. Choose Next.

4) In the Add deploy stage, in Deploy provider, choose AWS CodeDeploy.Then enter your application name or choose the application name from the list. In the Deployment group, enter MyDemoDeploymentGroup, or choose it from the list, and then choose Next.

AWS Pipeline

Congratulations! You just created a simple pipeline in CodePipeline. you can verify that by coping EC2 Public DNS address and then past it into the address bar of your web browser