Monday, 2 January 2023

Azure Bastion Host Overview And Steps to Create


What is Azure Bastion Host?

Azure Bastion is a fully platform-managed PaaS service that provides RDP/SSH over TLS i.e. port 443 to all the VMs in the network. Think of this as a managed Jump Box or Jump Server service provided by Microsoft.

Before we move on to Azure Bastion, let’s first understand what a Jump Box or Jump Host is. Jump Box is a virtual machine that sits over a virtual network and prevents all the other Virtual Machines from being exposed to the public.

This means that Jump Box acts as the doorway to all the RDP connections made to your VMs. Furthermore, while using a Jump Box, only a single port will be exposed instead of multiple ports that are exposed when we don’t use it.

Now, let’s come back to Azure Bastion. Azure Bastion is a managed Jump Box. What does managed means? It means that we can configure our Jump Box according to our needs. Remember, you cannot interact with it directly, but you can configure it. It supports both RDP (Remote Desktop Protocol) & SSH connections, and you can also play with its NSG (Network Security Group) to make your connection even more secure.

Well, I guess you’re stuck, aren’t you? No, not at all–relax. In this post, I’ll show you how to use Azure Bastion as well.

Azure Bastion Architecture

Azure Bastion deployment is per virtual network, not per subscription/account or virtual machine. Once you provision an Azure Bastion service in your virtual network, the RDP/SSH experience is available to all your VMs in the same virtual network.

bastion

So here is how the connectivity works:

  • You connect to the Azure management portal over HTTPS using any browser, then you select a virtual machine to connect to.
  • Now the Azure portal connects to the Azure Bastion service using the Private IP on port 443.
  • You get a new session in your browser and you can browse the desktop of the virtual machine and any other VMs inside your network using RDP or SSH.

Azure Bastion Use Cases

Now let’s list some possible use-cases. Azure Bastion can be very useful (but not limited) to these scenarios:

  1. Your Azure-based VMs are running in a subscription where you’re unable to connect via VPN, and for security reasons, you cannot set up a dedicated Jump-host within that VNet.
  2. You want to give developers access to a single VM without giving them access to additional services like a VPN or other things running within the VNet.
  3. You want to implement Just in Time (JIT) Administration in Azure. You can deploy and enable Bastion Host on the fly and as you need it.

Azure Bastion Pricing and Features

  1. Secure and seamless RDP and SSH access to your virtual machines.
  2. No Public IP exposure on the VM.
  3. Help limit threats such as port scanning and other types of malware targeting your VMs.
  4. Uses a modern HTML5-based web client and standard SSL ports. This makes Firewall and other security rules very easy to manage.
  5. Fixed charge for the service. This is the charge billed hourly for deploying the service. E.g. in an East US location, this charge is around $0.19 per hour.
  6. Outbound data transfer charges. This is the charge based on the total outbound data transfer. This is further tiered into various categories based on the total consumption.
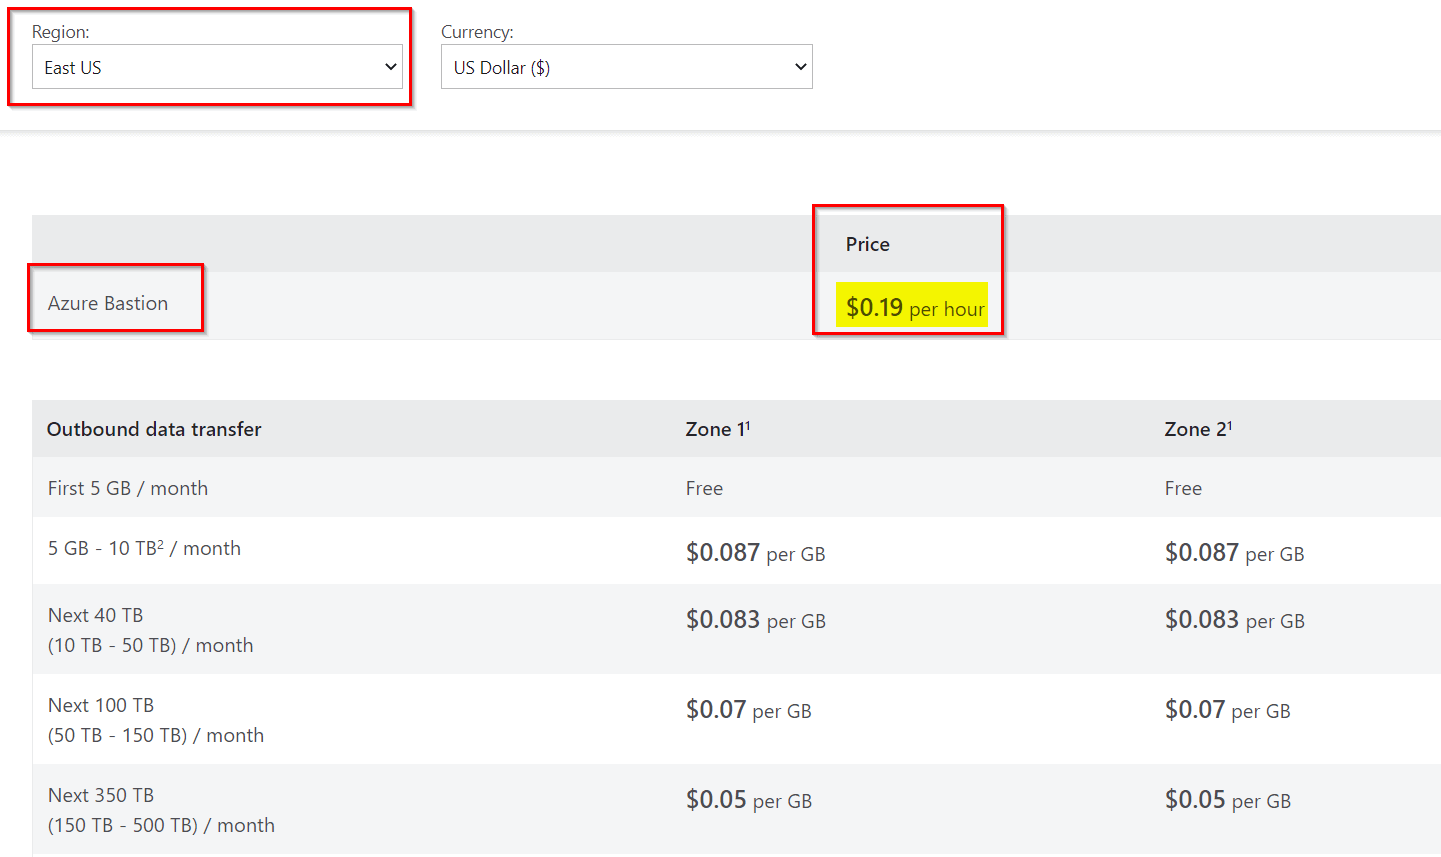
bastion pricing

Connect to the Virtual Machine

1. You can go to the Virtual Machines and select your newly created Bastion one and then click on Connect>Bastion, in the Overview section.
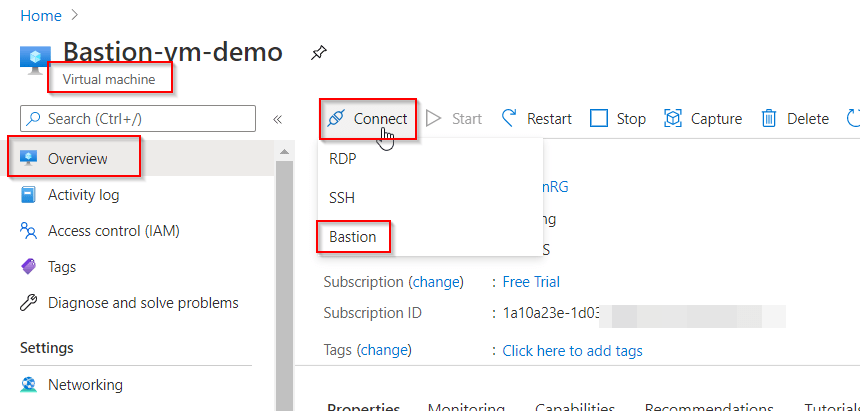
connect

2. Now click on Use Bastion and enter your credentials.
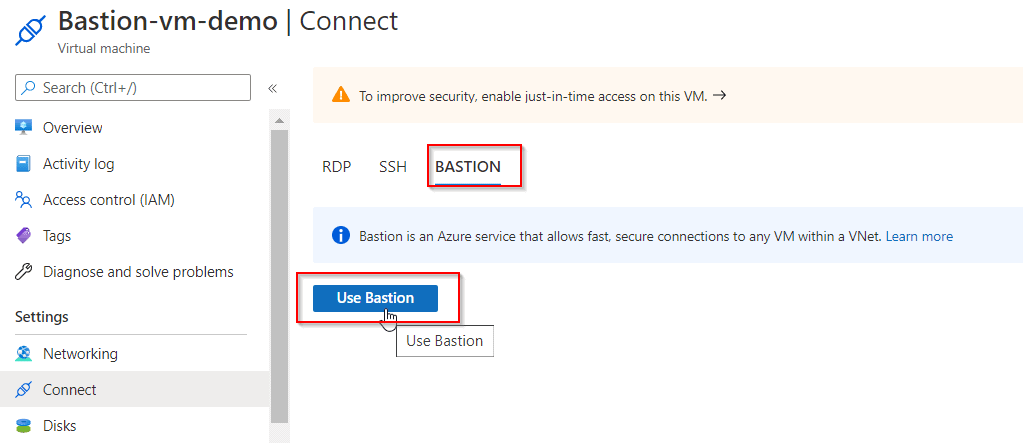
connect vm

You’re now logged in! Now a new browser window opens with the Virtual Machine on that tab.

Also, you can add NSGs to both your Bastion subnet as well as your VM subnets to further enhance security. Read the Azure documentation article “Working with NSG access and Azure Bastion” to get a leg up on which ports and protocols you need to allow to and from the Bastion subnet.

Azure Service Bus Pricing


What is Azure Service Bus

Azure Service Bus is a cloud-based technology for messaging and communicating between different applications and devices. Azure Service Bus avails ‘message brokers to conduct the processing of messages and ‘messaging stores to cache the messages. It helps enhance the availability by constructing topologies with a routing system.

Before using Azure Service Bus, one should know its capabilities to be sure of it. The various features of Azure Service Bus are as follows:

  • Sessions Messaging – This attribute of Service Bus contributes to handling the unbounded message sequences. Request-Response and FIFO are the two patterns where Session messaging is enabled.
  • Dead-lettering  It is a process that helps in holding the messages that have not to be processed or delivered. DLQ (Dead-Letter-Queue) inspect them to take further action.
  • Scheduled Delivery  Messages can be scheduled to be delivered at a particular time into the Queue or the topic.
  • Partitioned – Azure Service Bus enables partition in queue/topic that partition messages across message brokers and stores. Through partition, the transaction is also supported.
  • Filtering – Subscription in Azure Service Bus can set a filter on the type of message it wants to receive. Service Bus makes use of three types of filters: SQL, Boolean and Correlation filters. Learn more about Azure Service Bus filters.
  • Batching – When a batch is enabled, it groups the messages into batches to reduce the number of operations. For example: when multiple messages are sent simultaneously, the Azure Service Bus group them under a single batch and send in fewer operations.
  • Deferral of Message – When a receiver is not ready to receive specific messages due to some circumstances, then those messages are sent back to queue/topic and remain there.
  • Auto Forwarding – This feature helps automatically send messages from one queue/subscription to another under the same namespace.

Azure Service Bus Queue

Service Queue works on First In, First Out (FIFO) model. The communication between the application occurs via a broker, i.e. Queue. The message sender sends the message to this intermediary (queue), then these messages are then pulled from the queue by the Message Receiver. Message sender doesn’t wait for the confirmation from the receiver; it keeps on processing messages as the queue delivers the message to the receiver in the same order as added to the Queue.

Azure Service Bus - Queue

Queue helps when one needs to communicate between web app and Azure application. Further, on-premise cloud and hybrid solution’s hosted apps can make a connection with each other. In addition to that, distributed application’s components can communicate with various organisation.

Queue Benefits

Queue helps in achieving the application scalability and ensure resilience to the application architecture. The load-levelling feature helps the receiver and the sender convey messages at different rates. Application components decoupling is achieved with the queue, which means the sender and the receiver need not communicate simultaneously.

Azure Service Bus Topic

Azure Service Bus Topic follows the ‘publish and subscribe‘ model. The topic is almost similar to the queue, but it has an independent subscription associated with it. Service Bus Topic ensures a one-to-many form of communication. When messages processes in the Topic, they get copied to each independent subscription. A subscription helps set the filter rules for receiving a message from the topic.

Azure Service Bus- Topic

Topic Benefits

Apart from all the benefits offered by the queue, Topic ensures competing consumer, Load Balancing, and Loose Coupling.


Steps to create Azure Service Bus

Prerequisites: You will be required with the Azure Services subscription plan. You can also create a free account valid for one month.


Step 1) Log in to Azure Portal.🚀

Step 2) On the top left corner of the Page, you will see the ‘Create a Resource‘ option, select it and then select ‘Integration‘ to take you to the ‘Service Bus‘ option.

Create a Resource Group


Step 3) To commence the Azure Service Bus facilities, create a unique namespace. The namespace acts as a container to communicate with Service Bus in an application.

A dialogue box will appear with the name ‘Create Namespace’ where you will specify the name of the namespace, Subscription, Resource group, Location, and Pricing Tier.

After filling in all the details, click on the ‘Create’ button.

Create a namespace

The different types of pricing tier offered are shown in the image below. You have to keep in mind that you won’t be able to create a Topic with the Basic tier. A Standard/ Premium tier is mandatory to proceed further for Topics.

Pricing Tier


Step 4) After clicking on the ‘Create‘ button in the above step, deployment gets initiated. It takes several minutes to deploy the resource. Click on ‘Go to Resource‘ to proceed for Service Bus creation.

Deployment process

Step 5) The successful deployment of the service bus namespace can be verified when the following homepage appears. Azure Service Bus provides two entities: Queue and Topic (refer to the image below).

Queue / Topic

Here we will create both entities, i.e. Queue and Topic.

First, we will “Create a Queue.”

Step 6) From the created Service Bus Namespace (k21ServiceBus, in this case) page, select ‘Queue’ from the navigational menu, then select ‘+ Queue to create the queue.

Select Queue

Step 7) On the Create Queue page, specify the queue’s name, check for the green right tick mark, then click on ‘Create’. The default values get filled automatically.

Create a Queue

Step 8) Under the Queue page, we will see the created queue.

Queue is created

Now, we will look at how to create a Topic.

Step 9) From the created Service Bus Namespace (k21ServiceBus, in this case) page, select ‘Topics’ from the navigational menu, select ‘+ Topic’ to create the topic.

Create Topic

Step 10) On the Create Topic page, specify the topic’s name, then click on ‘Create‘. The default values get filled automatically.

Create Topic Name

Step 11) Under the Topics page, we will see the created topic.

Topic Created

Step 12) Topic includes the additional step of creating a subscription. The subscription option come under the page named Service Bus Topic. (1) – Select the ‘Subscription’ from the navigation menu, and click on (2) ‘+Subscription’.

Select Subscription


Sunday, 1 January 2023

ARM Template


What are ARM Template?

ARM Template

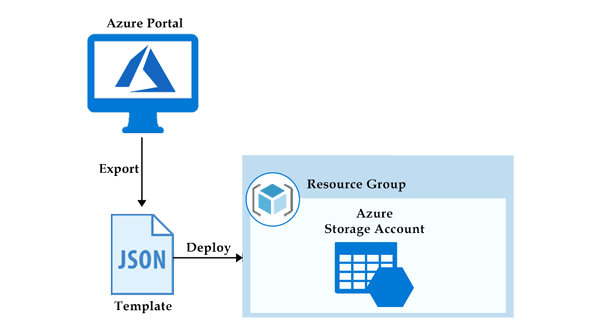
ARM (Azure Resource Manager) template is a block of code that defines the infrastructure and configuration for your project. These templates use a declarative syntax to let you define your deployment in the form of JSON (JavaScript Object Notation) files. All the resources and their properties are defined in this template. This helps in automating the deployment process in a constant flow.

Benefits of Using ARM Templates

ARM Templates provides multiple advantages over the deployment process.

  • Using ARM Templates, we can declare network infrastructure, storage and any other resources.
  • Over the development lifecycle, ARM Templates allows the deployment of resources repeatedly in a consistent manner.
  • User can deploy templates parallelly, and only one command is sufficient to deploy all your resource settings.
  • Templates can be divided into different modules. In other words, templates can be broken into multiple templates so that a parent template can consist of small templates.
  • The PowerShell or Bash Scripts can be added to the templates using deployment scripts.
  • The working of ARM Templates can be tested using the ARM template toolkit.
  • A user can see the preview of the template. All the resources that are being created or deleted in this template will be shown in the preview.
  • A user can integrate templates with Continuous Integration (CI) and Continuous Deployment (CD) tools to automate the release.

Azure Quickstart Template

Azure Quickstart Templates are ready to deploy sample templates. The Microsoft community creates these templates. You will find various Azure Quickstart templates on Microsoft’s official site like creating a VM (Virtual Machine), deploying the VM, etc. A beginner can use these quickstart templates to get familiar with the concept.


After visiting the Azure QuickStart Template portal, you will see some template samples. Click on any sample and then choose ‘Browse on Github‘. Next, you can click on the ‘Visualize‘ button to see the preview of templates. Finally, you can choose the ‘Deploy‘ option to deploy the template to your Azure Portal.

Create and Deploy ARM Template

After learning the format of the ARM Templates, we are ready to learn the process of creating and deploying ARM templates. For writing a template, any JSON editor will work. Also, Visual Studio Code is a tool provided by Microsoft for writing codes in various formats, including JSON. You can get Visual Studio Code from the official Microsoft website or store. No tool is required by the users with access to Azure Portal as the platform already contains built-in editors. So, we will use Azure Portal in this blog and assume that you have Azure access. Now, visit and log in to your Azure Portal. Then, follow the steps with us to create and deploy ARM Templates.

Create Resource

Cross-check the highlighted URL in the image below. Now, the first step is to create resources in the Azure Portal.

Azure Portal

Check the above image. You will find the options to create a resource in Azure Portal. Click on the ‘Create a Resource‘ button.

Create Resource

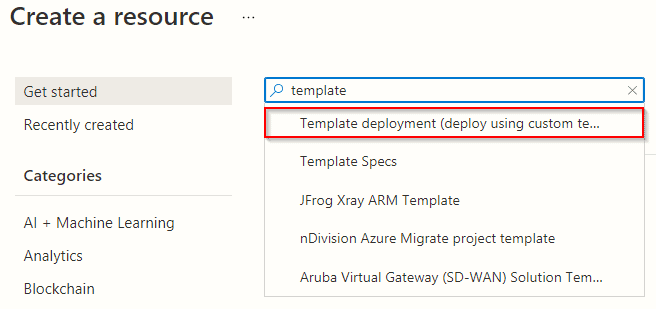
In the next window, you will see various options listed to create a resource. Some of these options are to create Windows, Ubuntu, Web App, SQL Database etc. We will use a template for creating resources, so click on the search bar. Search template and click on ‘Template Deployment (deploy using custom template)’ as highlighted in the above image.

Deploy Template

Template Deployment (deploy using custom template) window will open up. Now, click on the ‘Create‘ button as shown in the above image.

Build Your Own Template

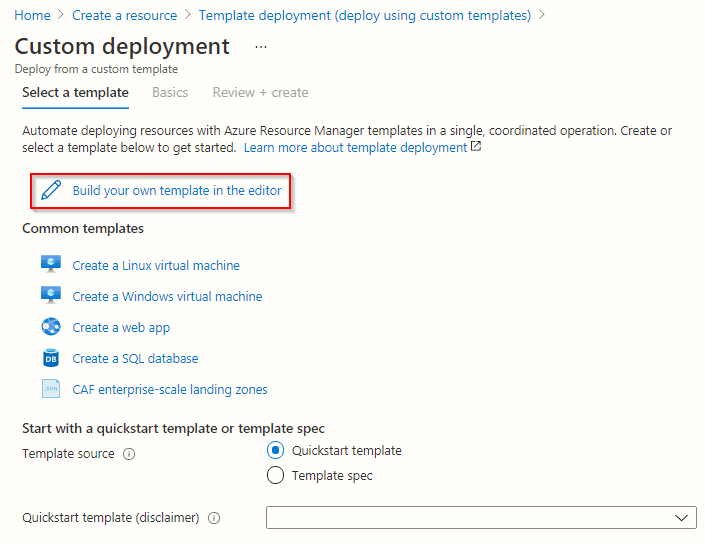
Azure Portal will show the ‘Custom Deployment‘ window after clicking the ‘Create‘ button in the previous steps.

Build Template

To create a template from scratch, click on the ‘Build your own template in the editor‘ option as highlighted in the above image. Also, if you want to import your own create a template, you can pick the same option.

Create ARM Template in Template Editor

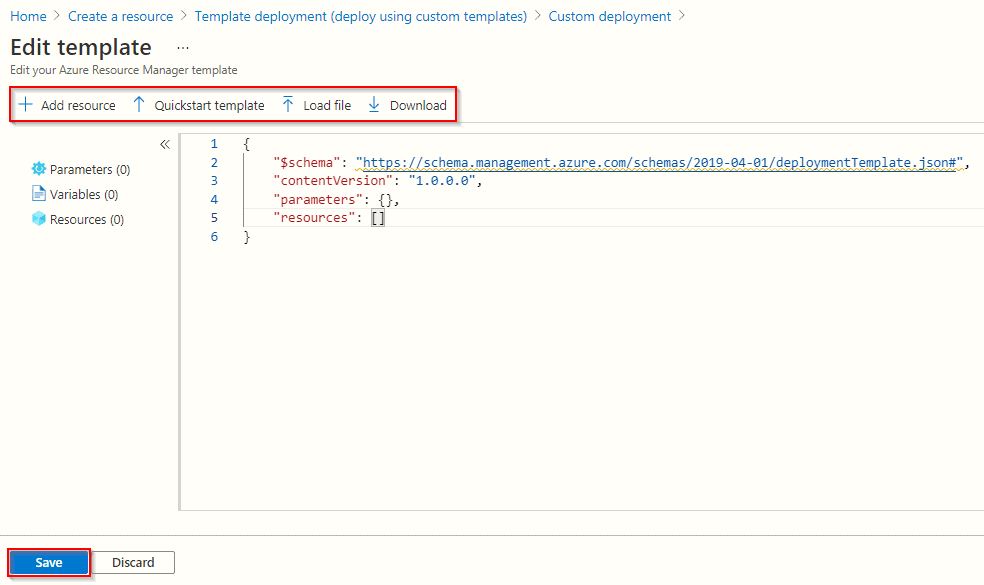
Now, Azure Portal will open the ‘Template Editor‘ window. Here a simple format of the ARM Template will be available in the editor. Using the format, you can write and add your own code in the editor. The highlighted menu at the top in the above image are options that you can pick to add a resource, use a quickstart template, load your template file and download the created template.

Use QuickStart Template

Creating a template from scratch might be complicated for you, especially when you are a beginner. In Azure Portal, you can use quickstart templates instead of creating a template from the start.

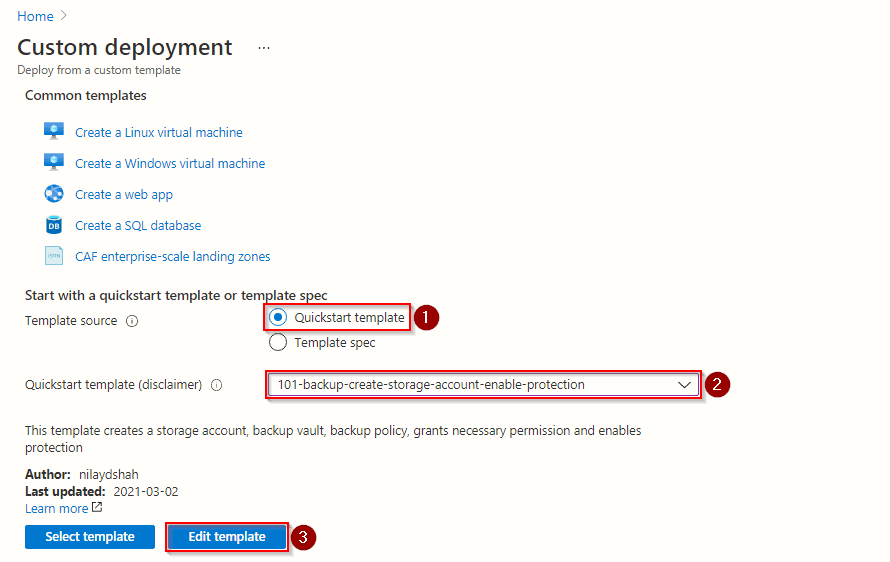
Quickstart Templates

For using quickstart templates, instead of opting for the ‘Build your own template in the editor‘, we will follow the below steps.

Step 1) Click on the ‘Quickstart template‘ radio button.

Step 2) Click on the drop-down button to see all the quickstart templates you can use. Next, search for the template that you want to use. Here, we choose a basic template to create a storage account and enable security on it.

Step 3) Click on the ‘Edit template‘ to modify and make changes in your quickstart template before deploying.

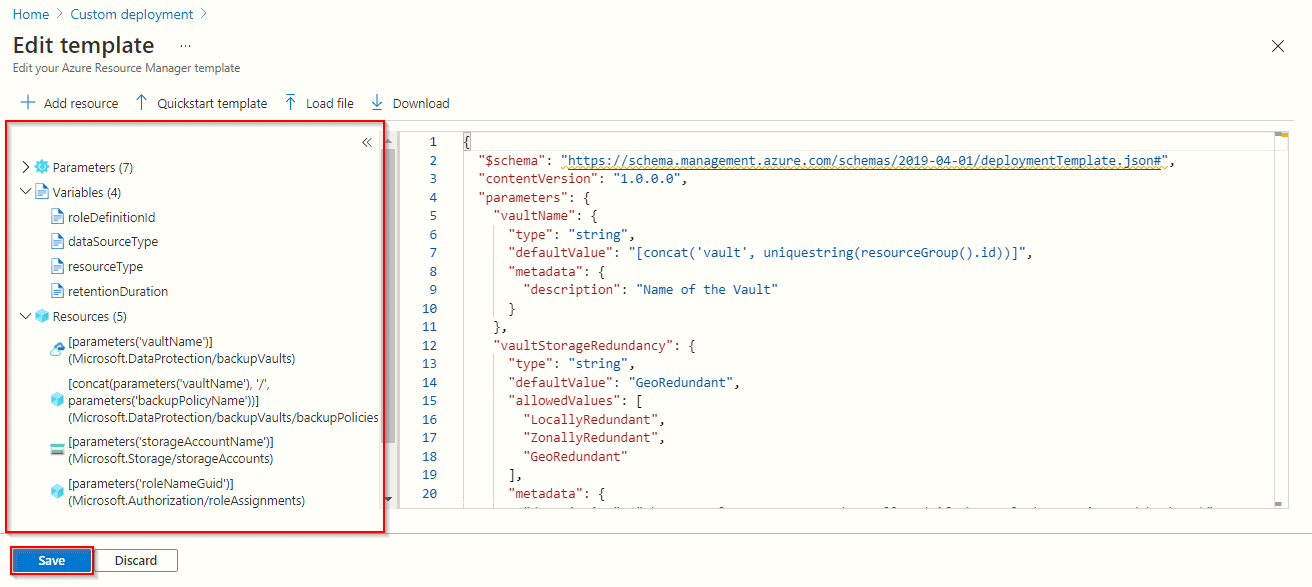
Edit Template

In the template editor window, you can make the required changes. On the left side of the editor window are the parameters, variables and resources that this code will create. You can also use the above menu for downloading this template. When you are ready with the template code, click on the ‘Save‘ button as highlighted in the above image. After saving the template, another window will open to confirm all the resources that this template will create. After completing all the verification, you are ready to deploy your template and purchase the resources.

How to Deploy ARM Templates using PowerShell

While there are several ways to deploy Azure resources using ARM templates, this tutorial focuses on deploying a storage account using PowerShell. You will need the following items to follow along with this tutorial:

  • PowerShell 5.1 or later is required. This tutorial makes use of version 7.1.3.
  • PowerShell module for Azure (Az). This tutorial makes use of version 6.0.0.
  • An Azure administrator account with resource creation permissions, such as Owner or Contributor.

i) Connect to Azure

To use the Az PowerShell module commands, you must first connect to Azure with an authenticated account. When you run the Connect-AzAccount command, PowerShell will launch an Internet browser to complete the authentication process.

ii) Create a Resource Group

Create a resource group to house the ARM template resources. Give the resource group a name and an Azure region by using the New-AzResourceGroup command. Save the command output to a variable called $rg so you can refer to it later. The resource group’s name is “armdemo-rg,” and the location is “WestUs2.”

$rg = New-AzResourceGroup -Name armdemo-rg -Location WestUs2

iii) Create an ARM Template

To create the resource, you will need an ARM template with a storage account defined. Here is a simple ARM template that uses a single parameter called StorageAccountName to set the storage account name. This should be saved to a file called storageAccount.json.

Azure Network Models


Azure Network Models

Network Models are the representation and methods of connecting multiple networks. In Azure also, Microsoft enables some ways to connect multiple networks. I have listed down some of the most used network models.

VNet Peering

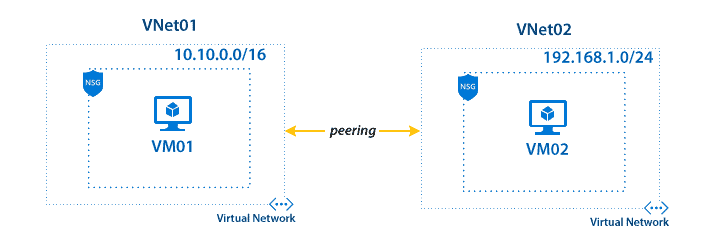
Azure VNet Peering

Virtual Network peering enables to connect the two or more Virtual Networks in Azure. It also allows transferring data between deployment models, Azure Subscriptions, Azure Active Directory Tenants and Azure regions without downtime and failure. The traffic between the peered virtual networks use  Microsoft’s backbone infrastructure and is routed through a private network. Thus, gateways, encryption and public internet are not required.

There are two types of Virtual Network Peering:

  1. Regional VNet Peering – When the two networks needed to peer are in the same region, the peering is called Regional VNet Peering.
  2. Global VNet Peering – When the two networks are from different regions, the peering is called Global VNet Peering.


Virtual WAN (Wide Area Network)

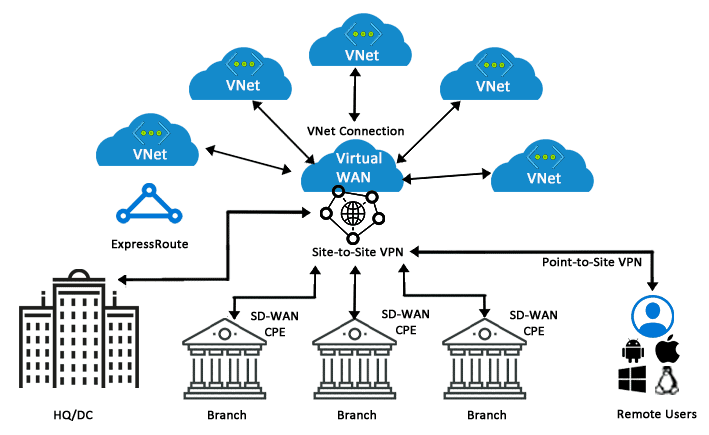
Virtual WAN in Azure allows creating a web of multiple networks that are interconnected to each other. It brings multiple networking, security, and routing functionalities together to provide a new single operational interface.

Virtual WAN

In the above diagram, a Virtual WAN at the centre acts as a single operational hub to manage all the traffic coming from multiple resources in a VNet. Instead of contacting the multiple branches separately, a VNet can contact the central hub to connect with all the branches connected to it.

More Azure Virtual Network Information

Pricing

There is no charge for using Azure VNet; it’s freed from cost. Standard charges are applicable for resources, like Virtual Machines (VMs) and other products. to be told more, see VNet pricing and the Azure pricing calculator

Protecting Resources

Network security may well be defined because the process of protecting resources from unauthorized access or attack by applying controls to network traffic. The goal is to confirm that only legitimate traffic is allowed. Azure includes a sturdy networking infrastructure to support your application and repair connectivity requirements. Network connectivity is feasible between resources located in Azure, between on-premises and Azure hosted resources, and to and from the net and Azure.

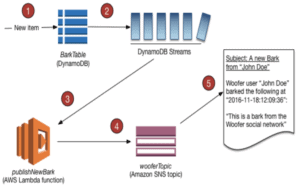
Process New Item with DynamoDB Streams & Lambda


Process New Item with DynamoDB Streams & Lambda

DynamoDB is a service by AWS which provides a fully managed Key-Value database service by AWS which provides fast and predictable performance with compatible scalability.

AWS Lambda is a service by AWS which lets you run your code without managing the servers, you pay only for the compute time you consume. With Lambda service, you can run code for virtually any type of app or backend services, all with zero administration. here you just have to upload your code and Lambda takes care of everything required to run and scale your code with high availability and durability. Also, you can set up your code to automatically trigger from other AWS services or call it directly from any web or mobile application.

In this activity guide, we will learn how to create an AWS Lambda trigger to process a stream from a DynamoDB table.

Azure Network Security


Network Security

Azure provides various protection methods for securing a service in a network. I have listed down some of the basic network security tools with a short description.

Network Security Group (NSG)

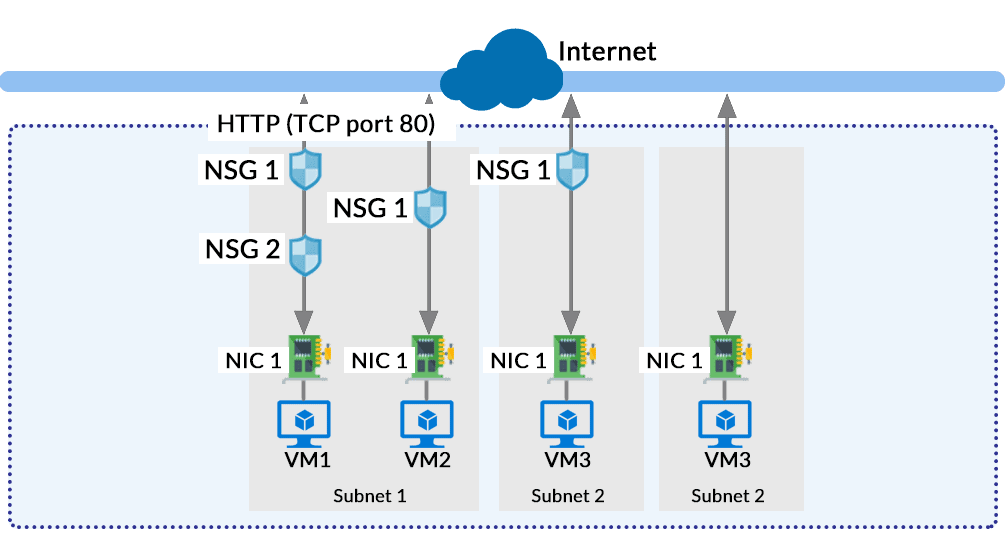
Network Security Group

The Network Security Group in Azure acts like a firewall at the network level. It filters the traffic passing through Azure Resources in a virtual network. NSG is a group of security rules that defines the priority, source or destination, protocol, direction, port range and action. Using these rules, NSG allows or deny inbound and outbound traffic. The rules for entering traffic inside a resource is also called ‘Ingress‘, and the rules for exiting the traffic or going out of the resource is called ‘Egress‘. When all the rules are created, the NSG can be used in a Virtual Machine that will interact with a network.

Service Endpoints

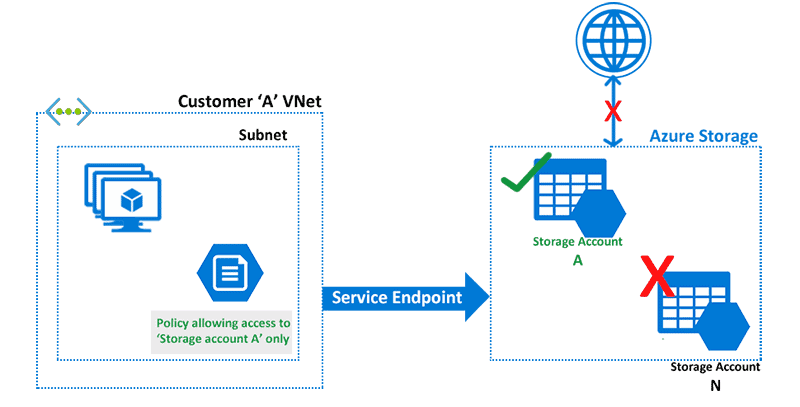
Azure Service Endpoint

Service Endpoints in Azure provides secure connectivity over the optimized route of the Azure Network. Without needing a public IP address, Service Endpoints allows Private IP address in a VNet to reach the endpoint of an Azure Service. It is simple to set up and improves security for the Azure resources in a network. The services here can be Azure Storage, Azure Database, etc.

Web Application Firewall (WAF)

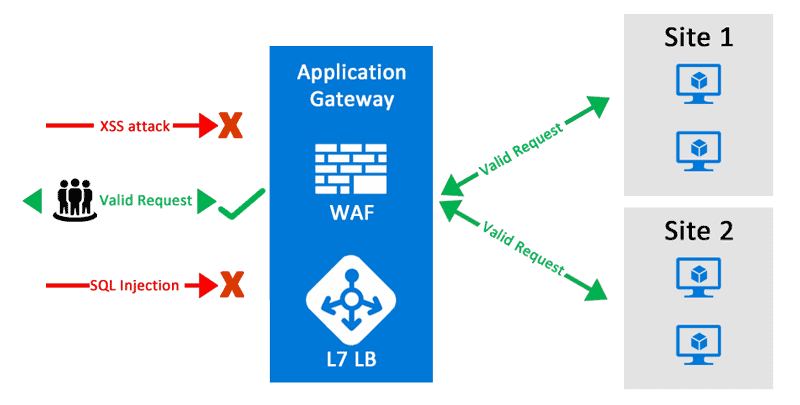
Web Application Firewall

Web applications are a common target for hackers to steal user information. So, protection from the most common attacks like SQL injection, cross-site scripting, etc., is a must. Web Application Firewall by Azure is a firewall for protecting the web application from these common threats. It provides an easy setup for applying various protection of layers that results in better security management. A user can deploy the WAF with other services like Azure Application Gateway, Azure Content Delivery Network (CDN) and Azure Front Door.

Create & Query with Amazon DynamoDB


Create & Query with Amazon DynamoDB

DynamoDB is a service by AWS which provides a fully managed Key-Value database service by AWS which provides fast and predictable performance with compatible scalability. DynamoDB unloads the administrative burdens of operating, managing, and scaling a distributed database so that you don’t have to worry about hardware that you provisioned, setup, and configuration, replication, software patching, or cluster scaling.

With DynamoDB, you can create database tables in which you can store and retrieve any amount of data and serve at any level. It allows you to create a full backup of your tables for long-term retention and archival for perspective compliance needs.

In this activity guide, you will learn about the creation and management of DynamoDB.