Tuesday, 27 December 2022

Create and Deploy an ARM Template :


What Are ARM And ARM Templates?

ARM is an Azure Resource Manager. It is an interface for managing and organizing cloud resources. The Azure Resource Manager(ARM) is what organizes the resource group that lets you deploy, manage, and delete all of the resources together in a single action.
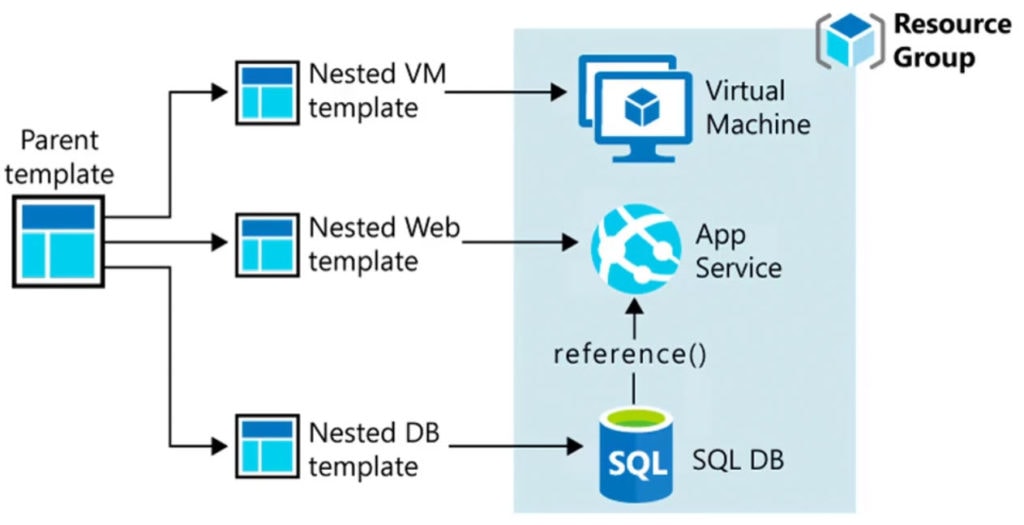
ARM Template

ARM Templates

Azure Resource Manager templates precisely define all the resource manager resources in a deployment. So it’s like a manifest of resources that you want to deploy, So you can write a list of resources and deploy them in a single click with the help of templates. ARM Templates is a JSON file that is written in the form of declarative automation i.e.,  you define what resources you need but not how to create them.

Here in this picture, you can see what parameters are in ARM Templates and how they look like:

Template overview


Evaluate Location Of New Resources

When creating a resource group we need to provide a location. Resource group stores metadata about resources, so when you exactly provide location it means we are providing a location to metadata. If a region of a resource group is temporarily unavailable at that time you will unable to update your resources, because metadata is unavailable however a resource in another location still can work.

When deploying an ARM Template we must provide a location for each resource and locations can be different or the same. You can use Azure PowerShell and Azure CLI to get available resources in your subscription. In this below image you can see it is going to “Microsoft. Batch” resource provider and trying to get available locations for your resources

AZ LocationsWhenever we create a resource using ARM Templates we have to define a location in a “location” parameter you can see that in the below image.
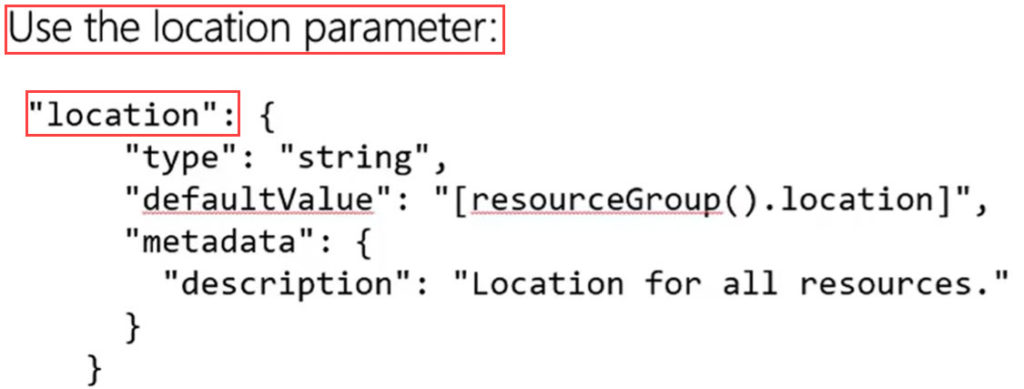
Azure resource location


Disk Images Of Azure VM’s

What Is An Azure Virtual Hard Disk?

A virtual machine can have multiple hard disks like there will be an OS disk and multiple data disks typically a virtual machine has an OS VHD on which the OS is installed and also have one or more VHDs that contains applications and data. The difference between VHD and the physical disk is the VHD store as a virtual file in Azure it is not a part of physical hardware.

What Is A Virtual Machine Image?

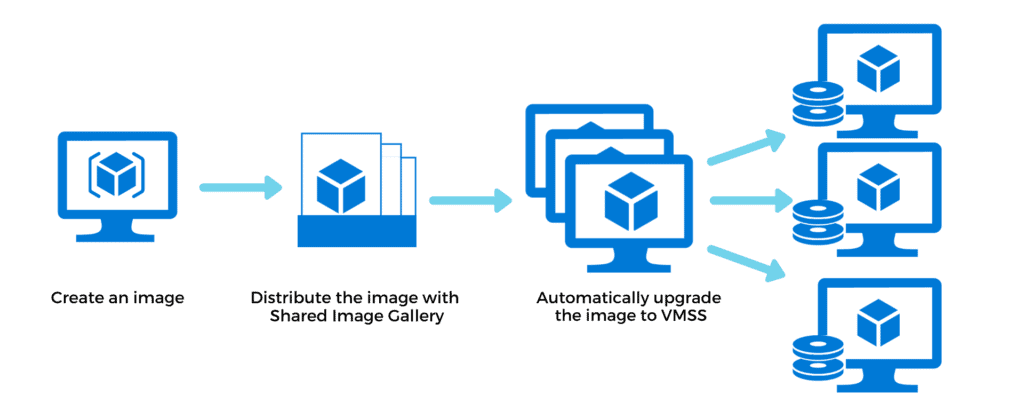
A virtual machine image is a template form which you can create VHDs to run a virtual machine. The Azure Marketplace contains various of VMIs which have inbuilt applications installed and configured for you like MySQL, Apache, and WordPress from which you can build your VM’s easily in a single click.

What Is Generalized Image?

You can also build your own virtual machine image by adapting some methods, You can customize the image which is available in Azure and install your software. So when you create your own generalized image you can use it for your future deployments.

What Is A Specialized Virtual Image?

A specialized virtual machine image is a copy of a live virtual machine after it has reached a specific state. You can use the specialized image an as a backup system image so if your one system fails then you can restore it by using a specialized image


Deploy From A Template

There are some prerequisites before deployment of templates:

  1. Editor/Extension: You need an editor or software when you want to write a template like VS Code, Notepad++ and Sublime text editor, etc..
  2. Azure CLI: You need to download and install Azure CLI to connect you with Azure and deployment of templates.
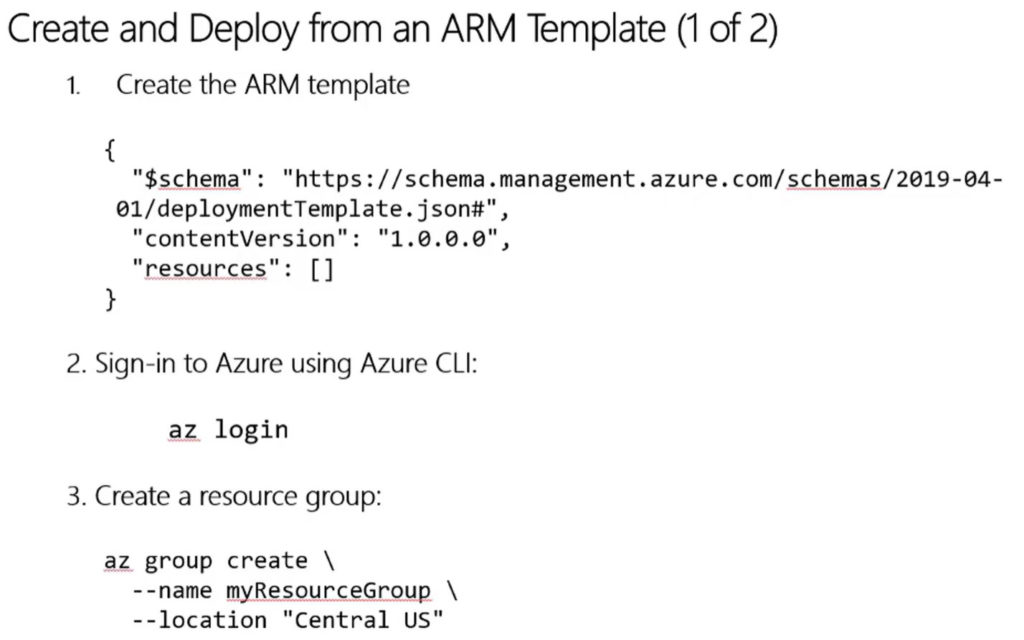
Deployment ARM


Runbooks In Azure Automation

Runbooks are stored and managed in Azure Automation and then delivered to one or more designated Hybrid Worker computers.

Azure Automation runbooks can run in an Azure Sandbox which is a shared environment against Azure resources and A Hybrid Runbook Worker: in any environment, directly on the computer that hosts the worker role and against local resources in the environment.

Life Cycle Of Runbook In Azure
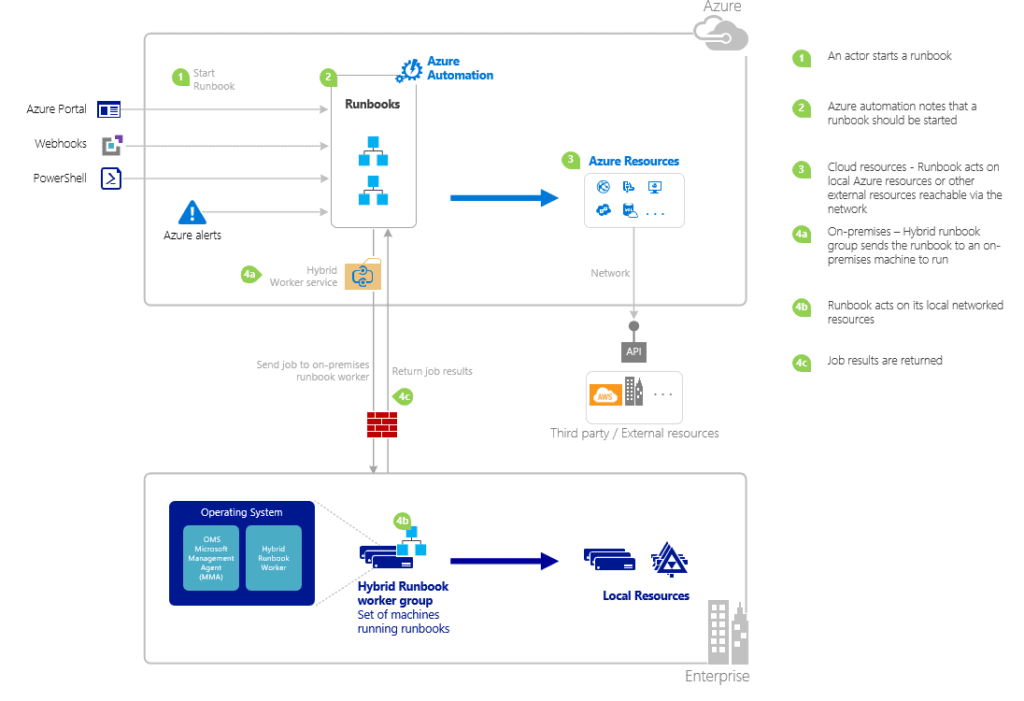
lifecycle of runbook


Monitoring Capabilities In Azure

 Exploring Monitoring Capabilities In Azure :

Azure Cloud Monitoring

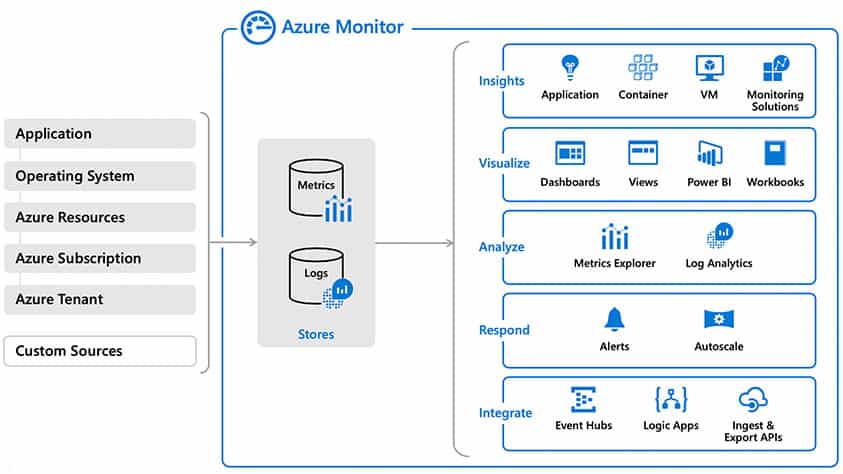
  1. Azure cloud monitor is an extensive solution for the collection, analysis, and action on the telemetry data it collects from the enterprises’ cloud and on-premises environment.
  2. It also enables us to figure out how well the applications are performing and identifies issues affecting them and the resources they are dependent on.
  3. Listed below are some of the key points about the service:
  4. The Azure Monitor has insights from all the Azure cloud solutions which lead to a very handy collection of user activity logsdiagnostic logsstorage logs and compute logsHence making sure no activity or error goes unnoticed.
  5. A cloud environment by nature is highly distributed, meaning that at any single moment there can be multiple sources generating telemetry data. The Azure Monitor’s ability to aggregate and process that data allows the user to create alerts for issues with potential business impacts in the Azure environment.

Azure Monitor

Azure Cloud Service Health

  1. The Azure Cloud provides a suite of services that keep you informed about the health of all your cloud resources in the form of Azure Service Health.
  2. The information that is provided includes things such as service impacting events, planned maintenanceand various other changes that may affect the availability of your cloud resources.
  3. The Azure Service Health is a combined suite of three smaller services listed below:
  • Azure service health: the main module that provides you with personalized information on the services and regions being used by you.
  • Azure Status: provides information on service outages, in case of a service outage from Azure’s side this can help an enterprise to quickly migrate its resources temporarily to non-impacted regions or plan its cloud deployments keeping previous service outages in mind.
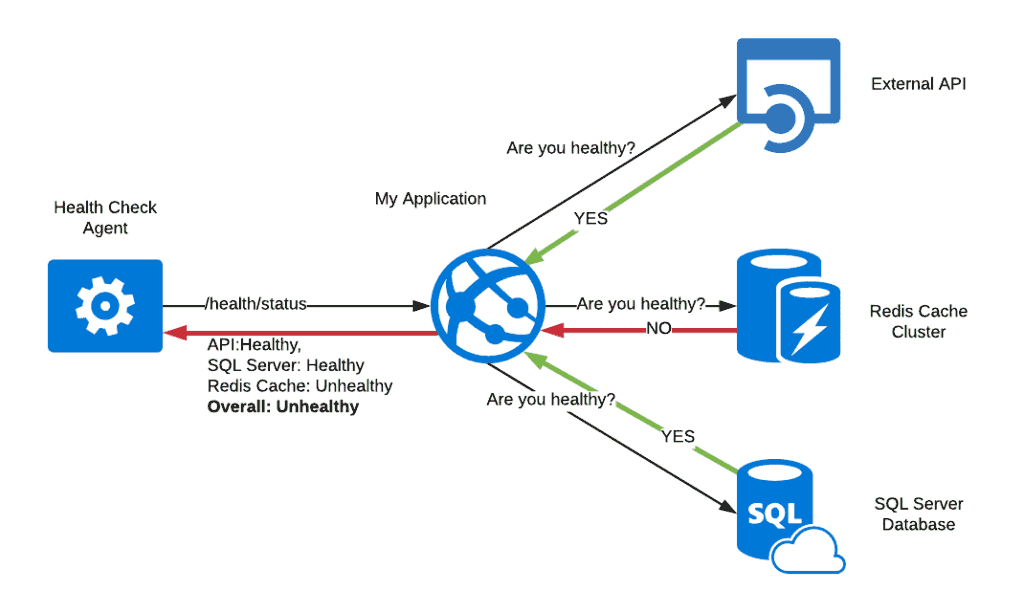
  • Azure resource health: provides information regarding the health of your individual resources such as a specific virtual machine instance.

Azure Service health

A Virtual Machine Scale Set

 Deploy A Virtual Machine Scale Set :

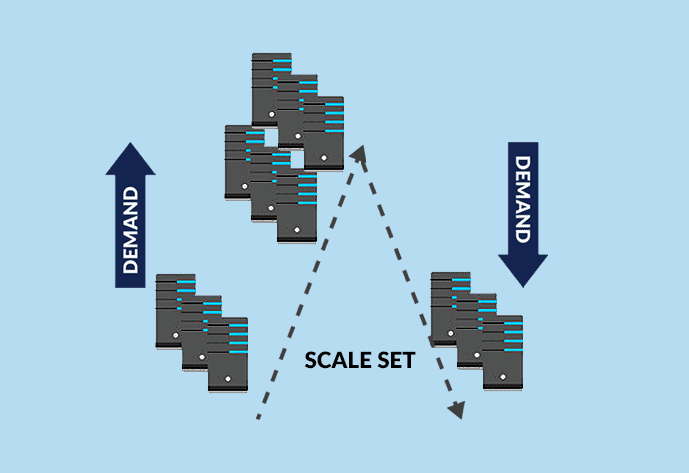
Azure virtual machine scale sets let you create and manage a group of identical, load-balanced VMs. The number of VM instances can automatically increase or decrease in response to demand or a defined schedule. Scale sets provide high availability to your applications and allow you to centrally manage, configure, and update a large number of VMs.

This guide will cover the deployment of the Azure VM Scale Set using the Azure QuickStart template.

VM Scale set


What Are Virtual Machine Scale Sets (VMSS)?

Virtual Machine Scale Sets (VMSS), an interesting service offered by Microsoft Azure, helps to create and manage a set of identical, auto-scaling Virtual Machines (VMs). The number of VM instances can automatically increase or decrease based on scheduled conditions.

VMSS


Auto-Scaling

Auto-scaling is a way to automatically scale up or down the number of compute resources that are being allocated to your application based on its needs at any given time.

The key point is that you can now design a scalable architecture that will automatically scale-up or scale-down to meet your needs over the lifetime of your setup regardless of how fast/slow or big/small your site grows over that time.

Here are the most popular ways of autoscaling:

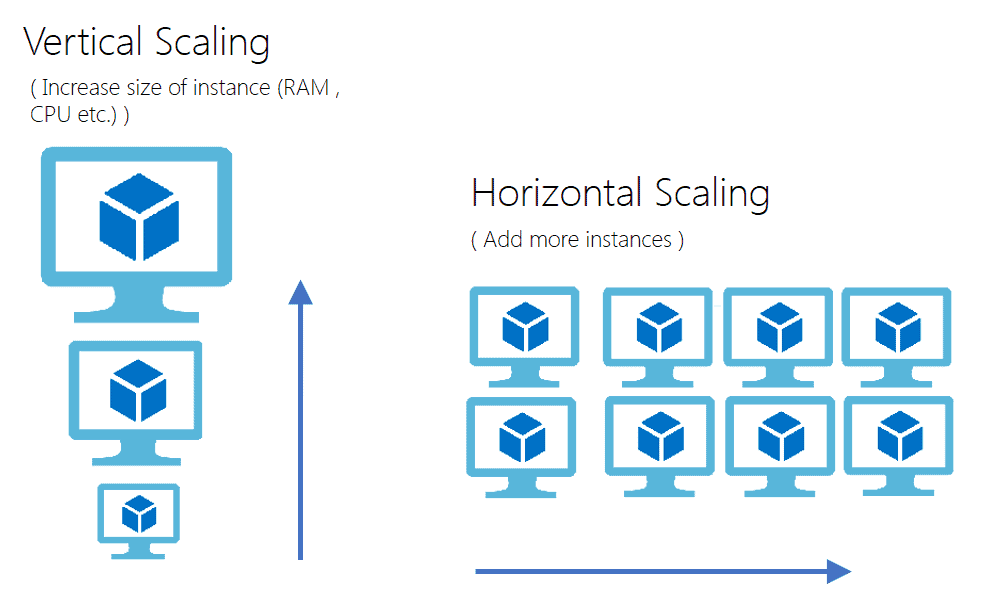
  • Horizontal Scaling
  • Vertical Scaling

Vertical Scaling:

Vertical Scaling is an attempt to increase or decrease the capacity of a single machine, also called scaling up or down. Here the resources such as processing power, storage, memory, and more are added to an existing work unit.

It is done to increase the capacity of existing hardware or software by adding resources. It can enhance your server without manipulating your code. But it is limited by the fact that you can only get as big as the size of the server.

For example, you could move an application to a larger VM size.


Horizontal Scaling:

Horizontal Scaling is a must use technology – whenever a high availability of (server) services are required, also called scaling out and in, means adding or removing instances of a resource. Scaling horizontally involves adding more processing units or physical machines to your server or database.

It involves growing the number of nodes in the cluster, the application continues running without interruption as new resources are provisioned.

If demand drops, the additional resources can be shut down cleanly and deallocated.

scaling

In Autoscaling you have to specify a minimum and the maximum number of instances to run and add or remove VMs automatically based on a set of rules.

autoscale

When rule conditions are met, one or more autoscale actions are triggered. You can add and remove VMs, or perform other actions.


Autoscale Settings

An autoscale setting is read by the autoscale engine to determine whether to scale up or down.

You can create custom autoscaling rules as needed for your situation. Rule types include:

  • Minimum Instance: The minimum number of instances you want to deploy in your scale set.
  • Maximum Instances: The maximum number of instances you want to deploy while scaling out. (Note: In Azure, you can have maximum, 1000 instances)
  • Metric-based – It measures application load and add or remove VMs based on that load. For example, add instance in scale set when CPU usage is above 50%.
  • Time-based – For example, trigger an instance every 8 am on Saturday in a given time zone.

T

Here are a few points which are important when we think about going with Horizontal scaling or Vertical Scaling.

  • Scaling up requires downtime, in this case, you need to upgrade server’s configuration like RAM, memory, CPU, etc. so while upgrading this configuration your server requires downtime. Once you are done with the update, the restart of the server is required.
  • Scaling up will Increase performance but not available because its only one instance and it can go down anytime when it reaches out the scaling rules.
  • Scale-Out doesn’t require downtime, in Scale-out its creates new instances of server it doesn’t touch the existing instance, so no downtime required.
  • Scale-Out, Increase performance and availability as well. When autoscaling increase no. of instances and handle load/request using load balancer it increases the performance of the server and also increases availability as well.

Create A Virtual Machine

 Create A Virtual Machine With Custom VM Images :

Azure Virtual Machines (VM) is one of several types of on-demand, scalable computing resources that Azure offers. Typically, you choose a VM when you need more control over the computing environment than the other choices offer. This article gives you information about what you should consider before you create a VM, how you create it, and how to connect to it.

An Azure VM gives you the flexibility of virtualization without having to buy and maintain the physical hardware that runs it. However, you still need to maintain the VM by performing tasks, such as configuring, scale-up/down the machine, and installing the software that runs on it.

Azure virtual machines can be used in various ways. Some examples are:

  • Development and test – Azure VMs offer a quick and easy way to create a computer with specific configurations required to code and test an application.
  • Applications in the cloud – Because demand for your application can fluctuate, it might make economic sense to run it on a VM in Azure. You pay for extra VMs when you need them and shut them down when you don’t.
  • Extended datacenter – Virtual machines in an Azure virtual network can easily be connected to your organization’s network.

The number of VMs that your application uses can scale up and out to whatever is required to meet your needs.

Prerequisites

  • An Azure Cloud Account ( you can learn how to create one from our previous blog here.)
  • Access to an SSH client: for this tutorial, we will be using Putty and Putty Key Generator installed on our Windows computer for accessing our Ubuntu Virtual Machine.

Creating An Ubuntu Virtual Machine

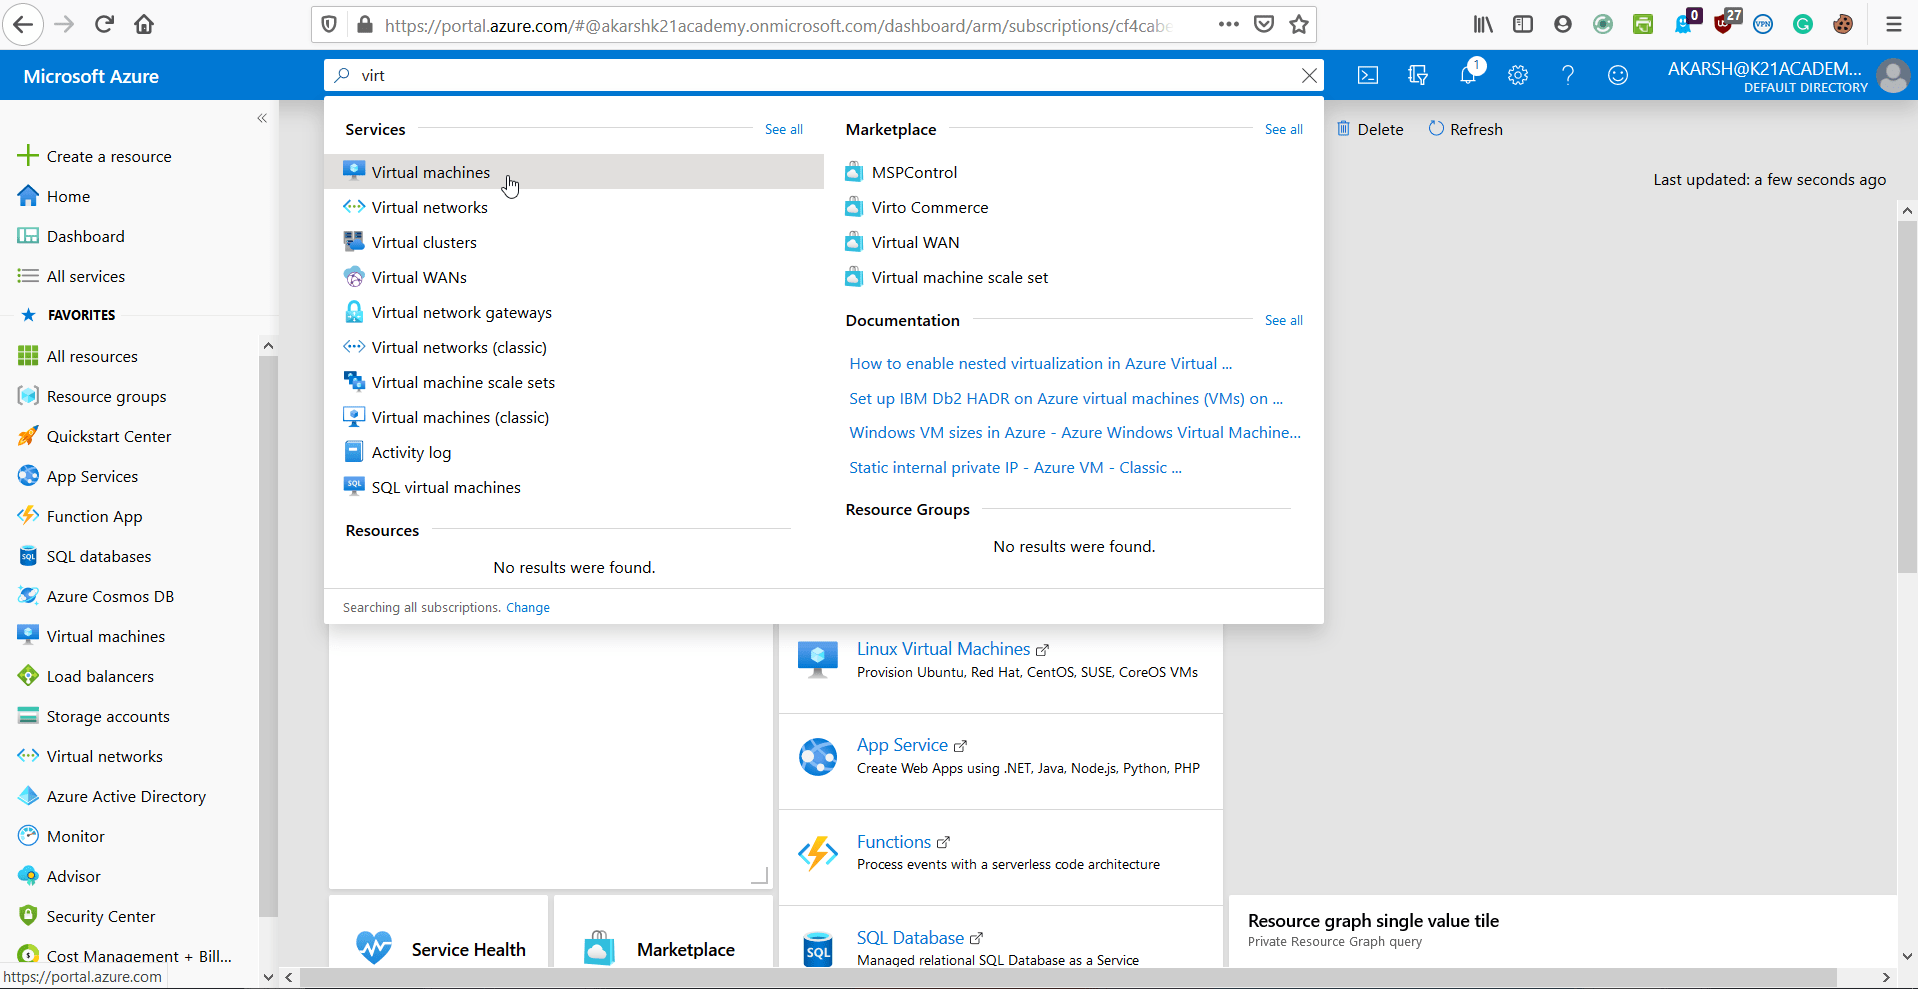
Step 1: In the Azure portal, search for Virtual Machine and select Virtual Machine.

Azure Portal

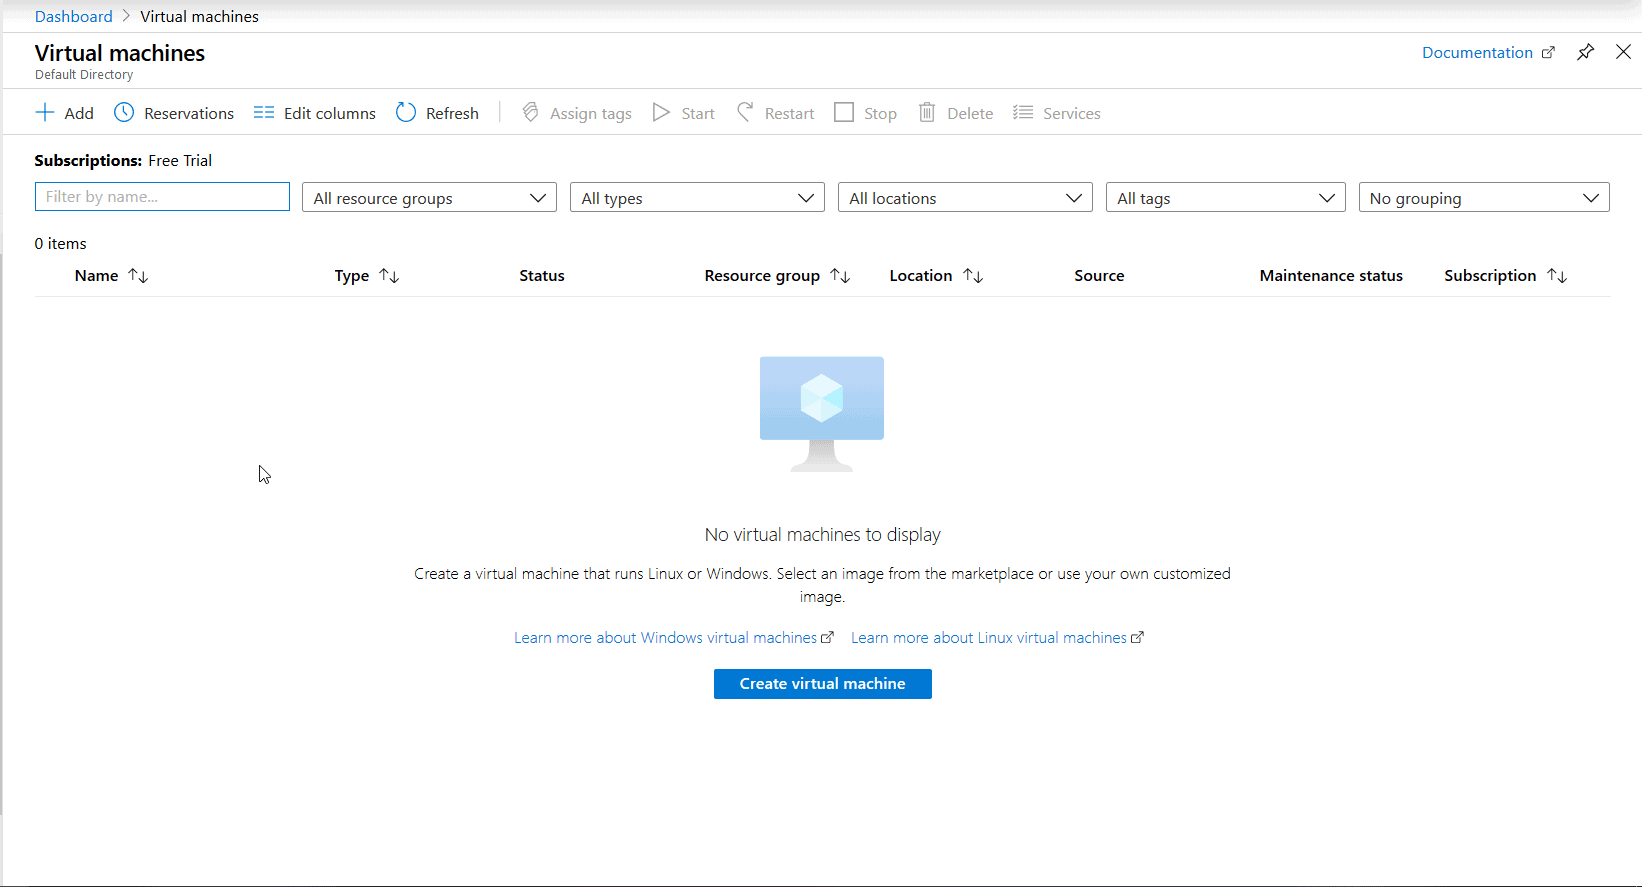
Step 2: Select Add.

VM Hub


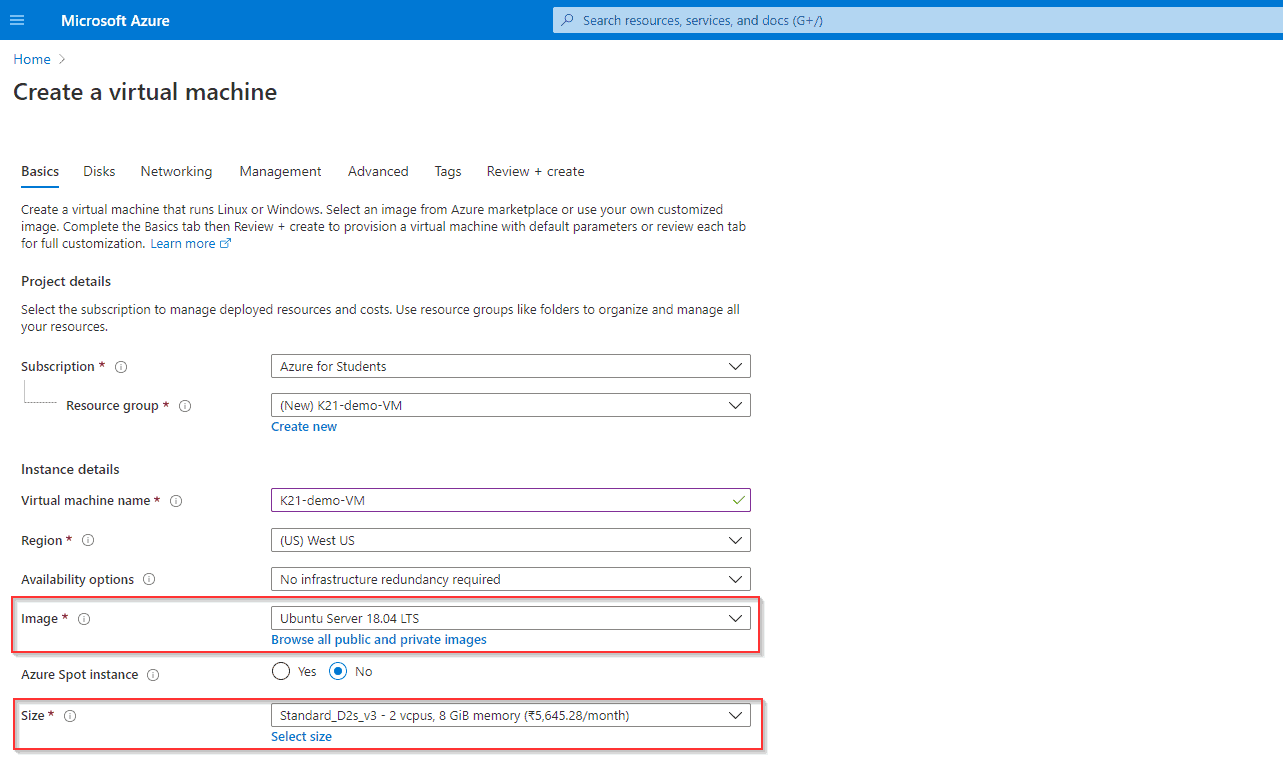
Step 3: Enter the following values:

  1. Subscription: Select your Azure subscription.
  2. Resource group: Enter a new resource group name.
  3. Virtual Machine name: It should be a unique name throughout the Azure network.
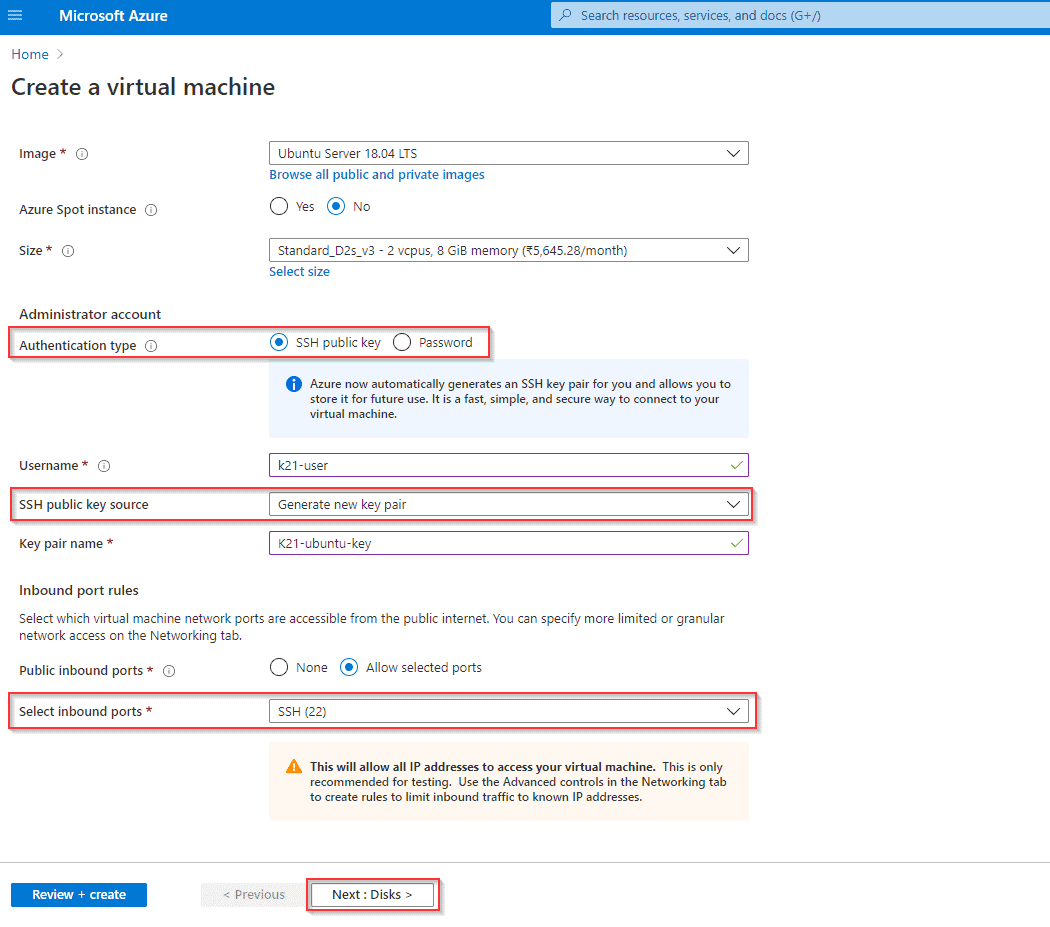
  4. Region: Select an Azure location, such as Western India, Central US, etc.Azure VM Configuration
  5. Authentication Type: SSH Public Key
  6. SSH Public Key Source: Generate new key pair
  7. Select Inbound Ports: SSH (22), this is the port that we will be using to connect to our Virtual Ubuntu Machine.Azure_VM_configuration_pt2
  8. Select the Username and Key name as required and note them down as we will need them later.
  9. Once done, click on Next: Disks >


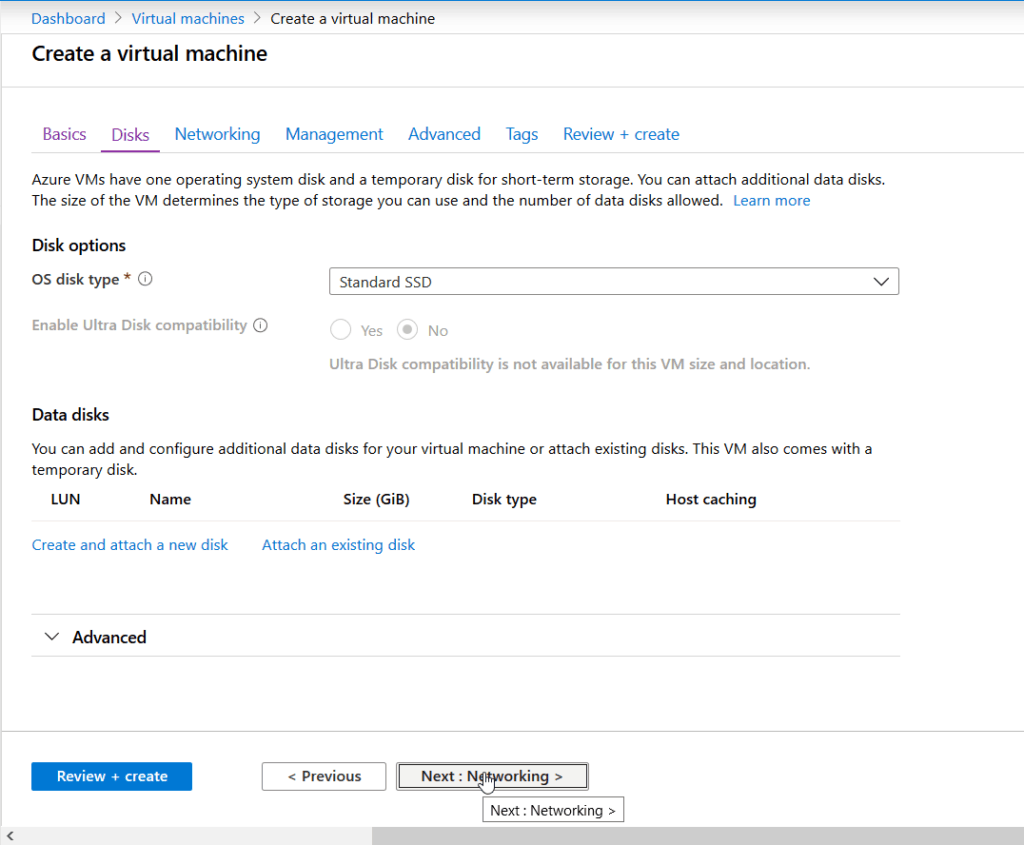
Step 4: Select the type of disk you want to use. Click Next.

VM disk selection


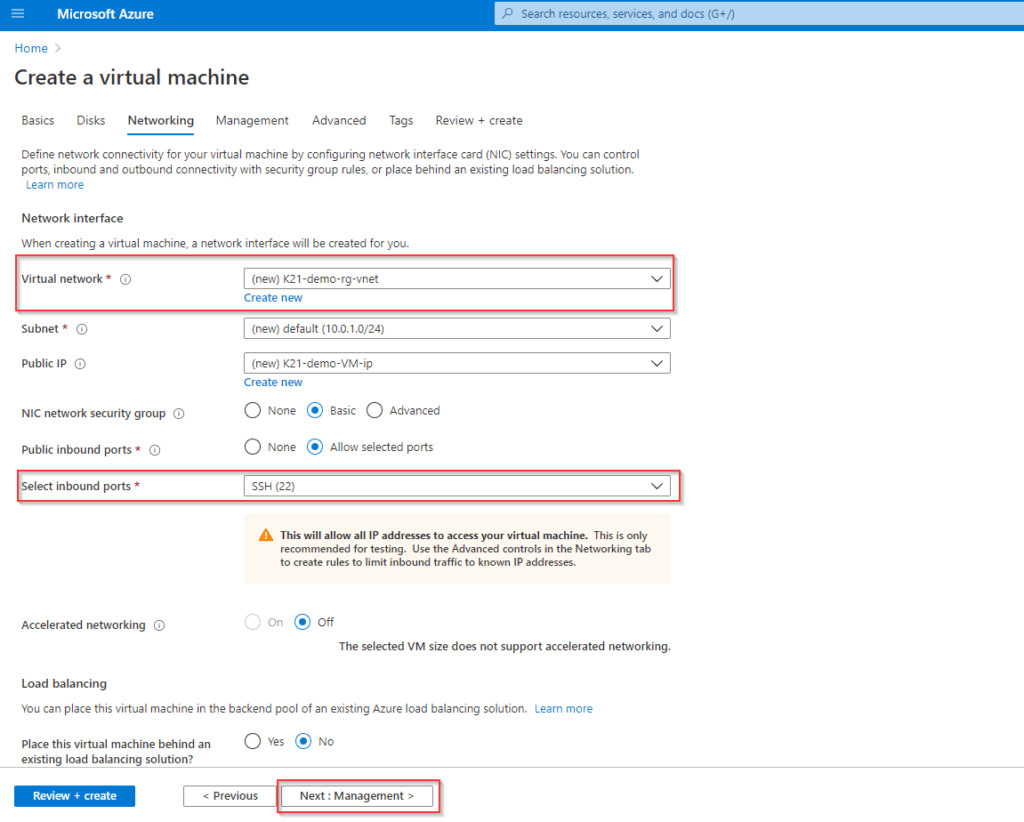
Step 5: Configure Networking

  1. Virtual Network: Create a new one or use your existing Network.
  2. Select Inbound Ports: SSH(22), This allows Port 22 to be opened in your Virtual Network for incoming traffic and will enable us to connect to our Virtual Machine inside our Virtual Network.
  3. Leave everything else as default and click next to go to the Management Section.

VM Network Configuration


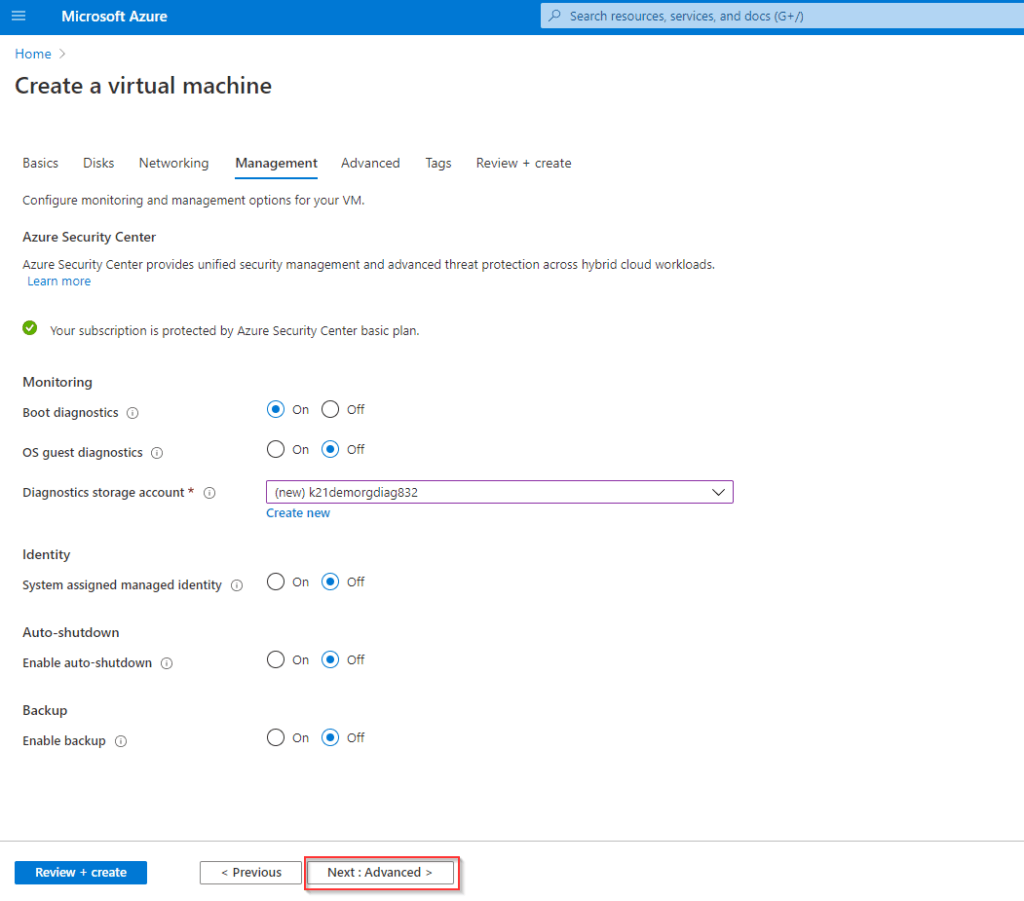
Step 6: Management

Leave all options as default and click on next to go to the Advanced Section.

VM Management Configuration

Step 7: Advanced Configuration

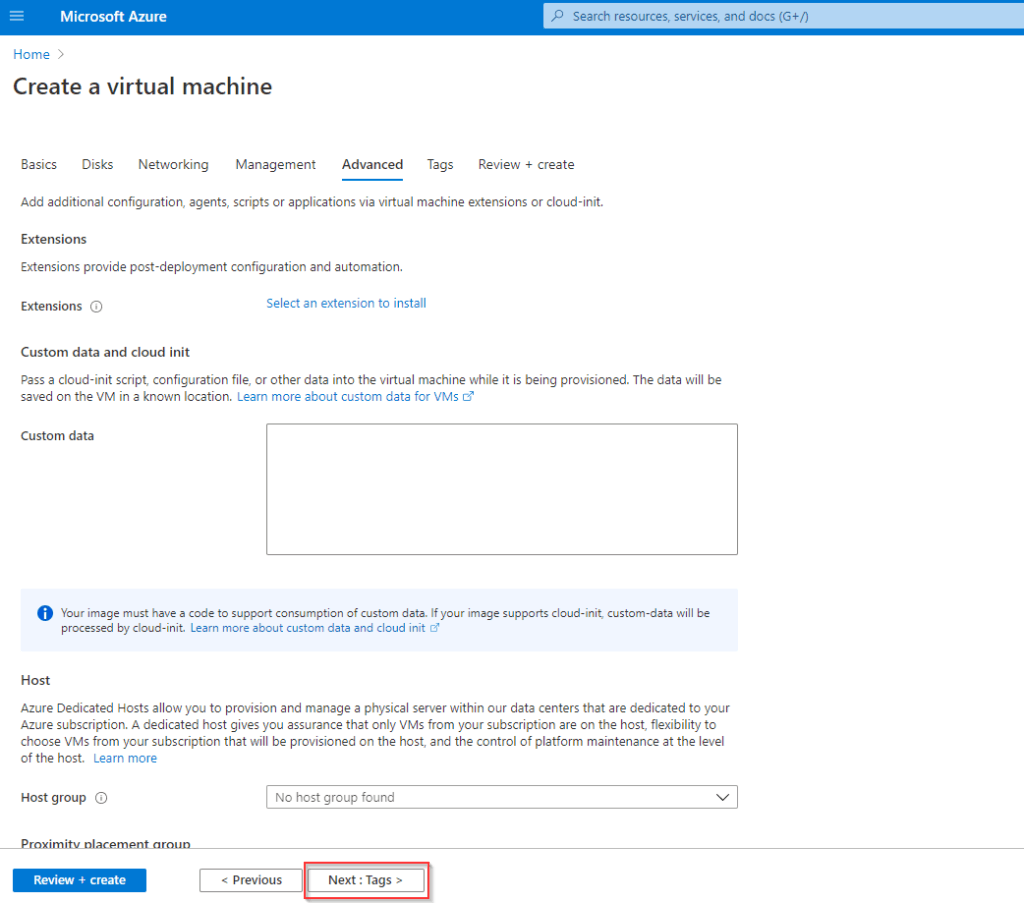
Add any custom data you want to run when the VM is being created or leave all options as default and click on next to go to the Tags Section.

VM Advanced Configuration

Also Read: Our previous blog post on VM Scale Set Azure. Click here

Step 8: Tags Configuration

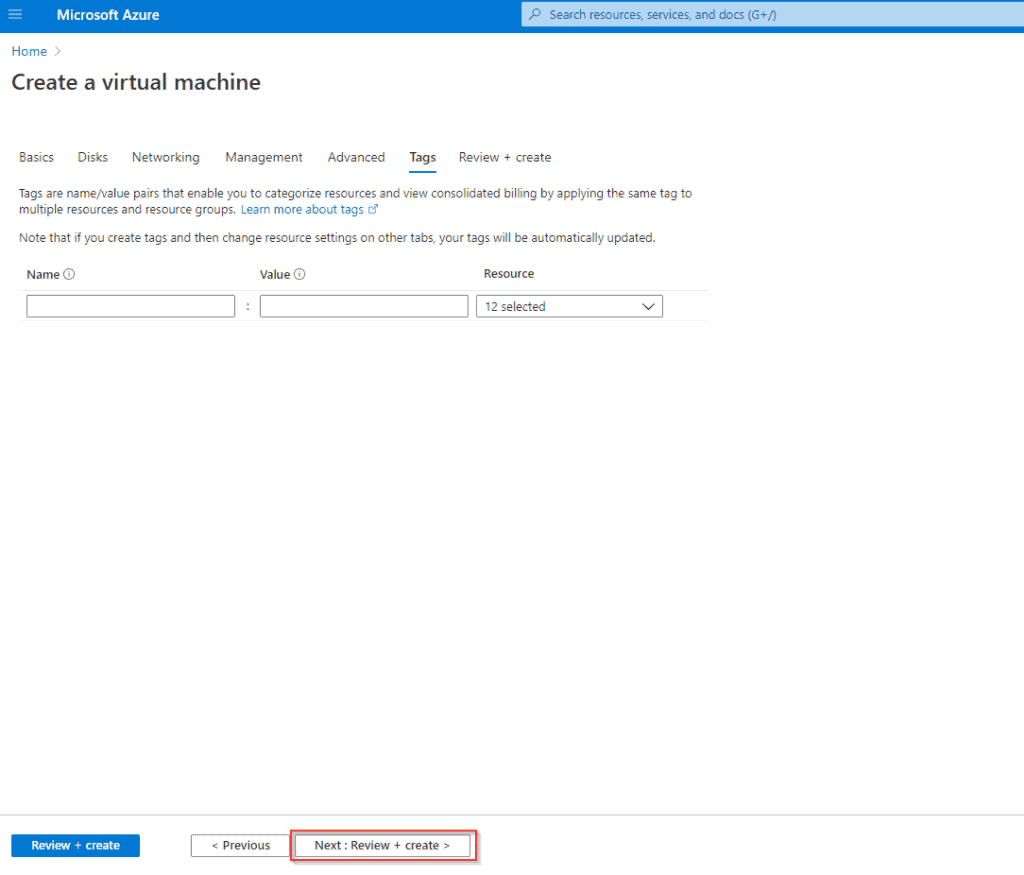
Add any descriptive tags you would like to put to identify your VM at a later stage or leave Options at default and click on next to review and create your Virtual Machine.

VM Tags Configuration

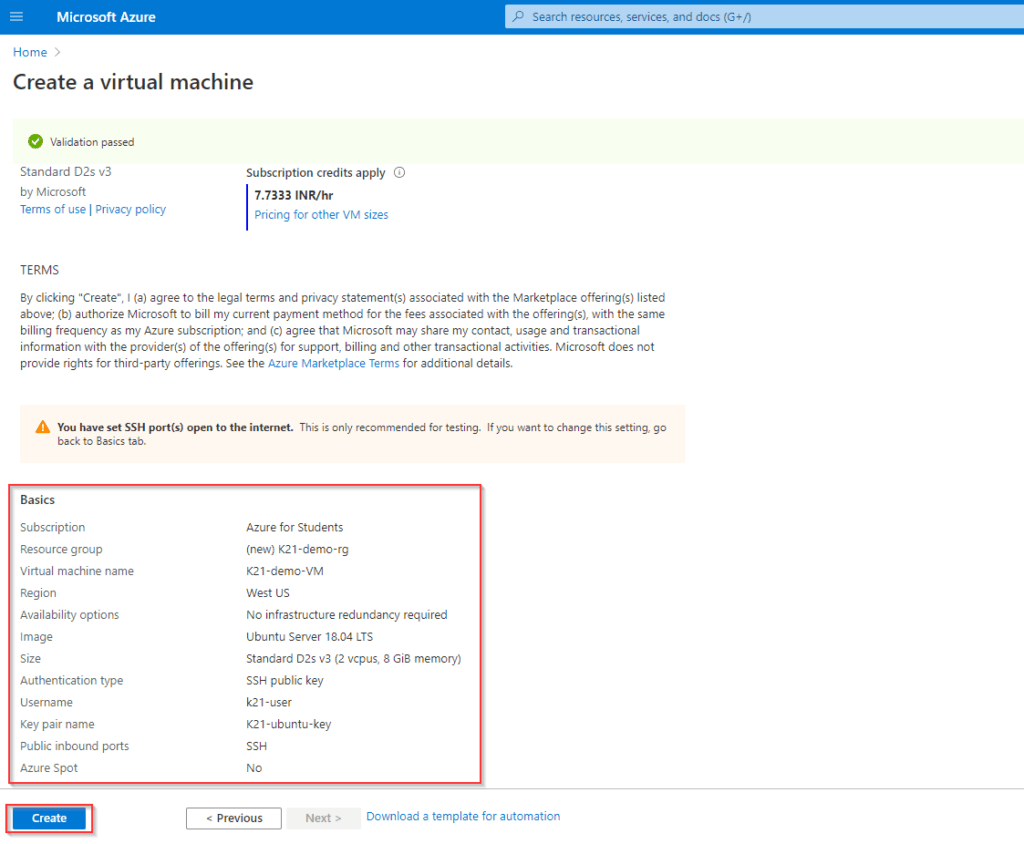
Step 9: Review your settings and make any changes if required and select Create. It takes a few seconds to create a VM.

VM review and create


Step 10: SSH Keys

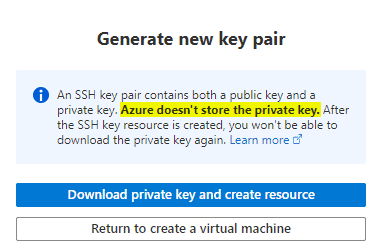
  1. After you click on Create Azure will create an SSH Key Pair that we will be using to connect to our VM later. Make sure to download the private key and keep it somewhere safe.
  2. Azure does not store your private key and this is the only instance when you will be able to access your private key from Azure.

VM Private key pair

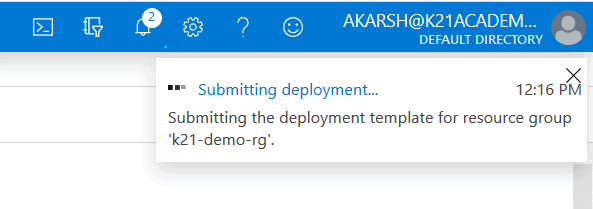
VM creation wait

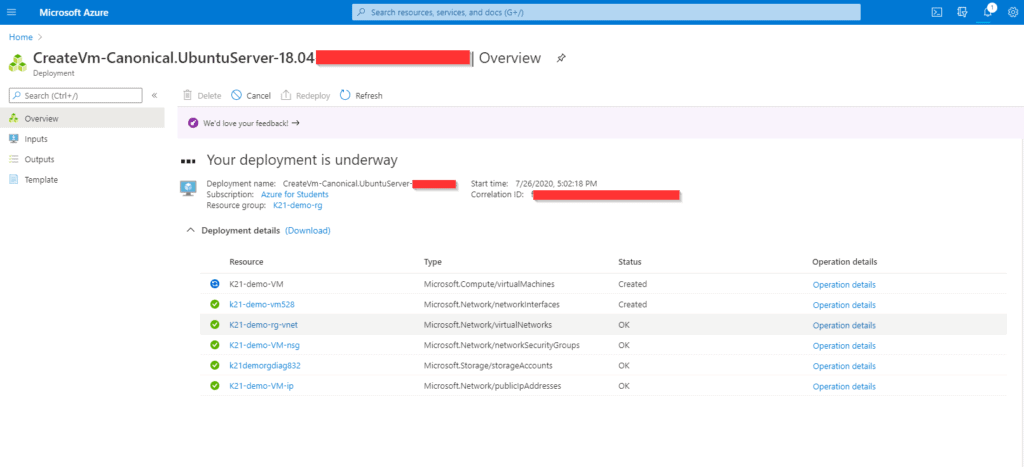
VM deployment process

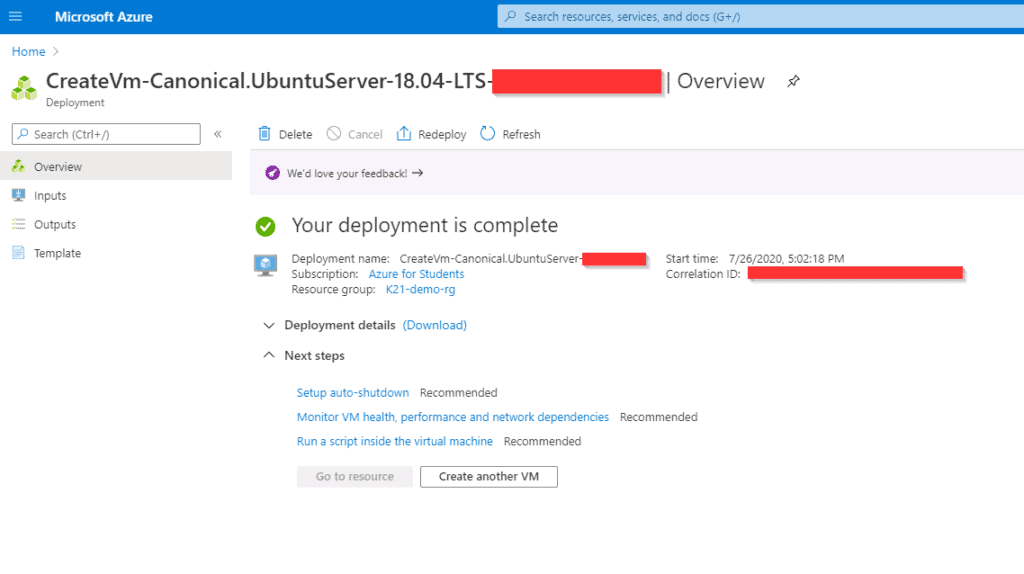
Deployment Completion Summary


Connecting to Ubuntu Virtual Machine

As we have configured our VM to be accessible via SSH we will be using the PuTTY SSH client on our Windows machine.

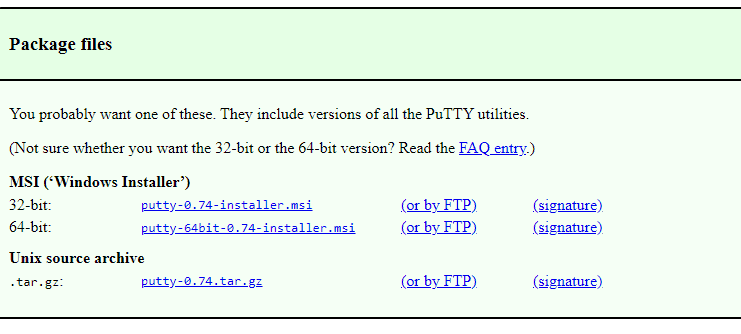
You can download and install PuTTY from its official website. Simply select Download Putty and choose the appropriate installation file (32-bit or 64-bit as per your system) from the choices shown.

PuTTY configuration

Step 1: Converting our Private key into the proper extension.

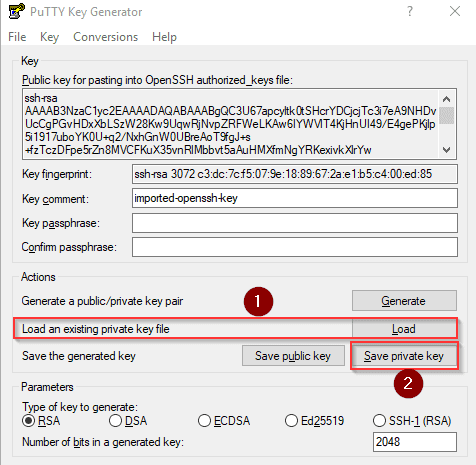
The Azure private key we downloaded is in the (.pem) format, for using it with PuTTY we need to convert it into the (.ppk) format.

  1. Open PuTTYgen, an application automatically installed alongside PuTTY.
  2. Select load an existing private key. (make sure to select All files option while browsing to your Azure Key)
  3. You will get an Operation successful message if the key was imported correctly.
  4. Click on Save Private Key to save the key in a PuTTY usable format.
  5. you can optionally set a password to be used with this key for further security but for this tutorial, we will be skipping that.

PuTTYgen configuration


Step 2: Getting the SSH connection information.

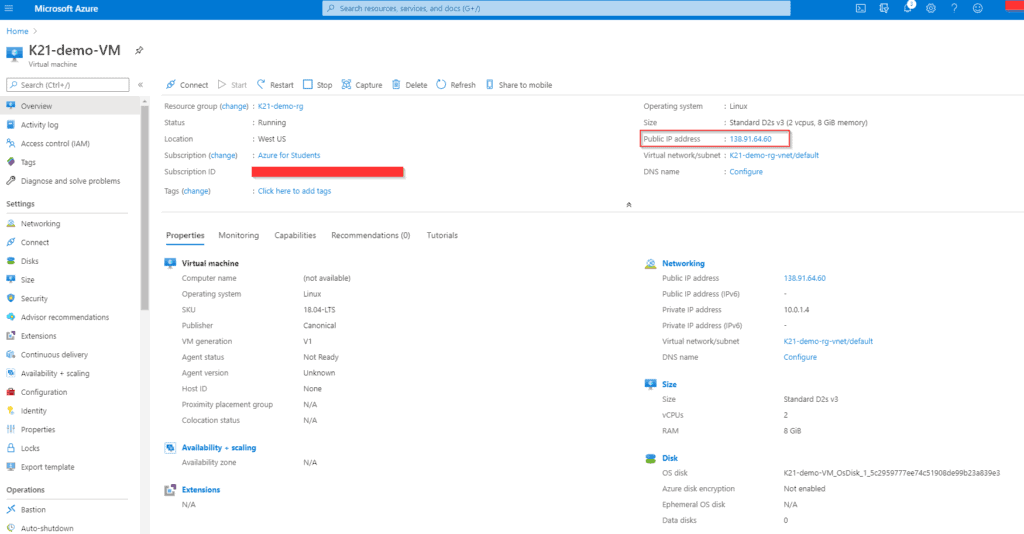
  1. Go to the VM dashboard
  2. Select your VM
  3. Note the public IP address. 

VM Public IP


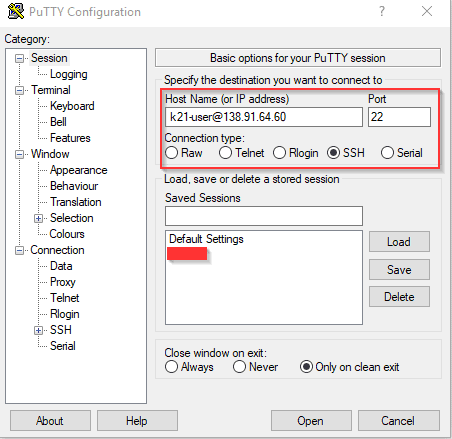
Step 3: Open the PuTTY installation on your Windows Machine.

  1. Enter the Host Name details in the following format: <Username of VM>@<Public IP of VM>
  2. Make sure Port is 22.
  3. The connection type is SSH.

PuTTY VM Connection


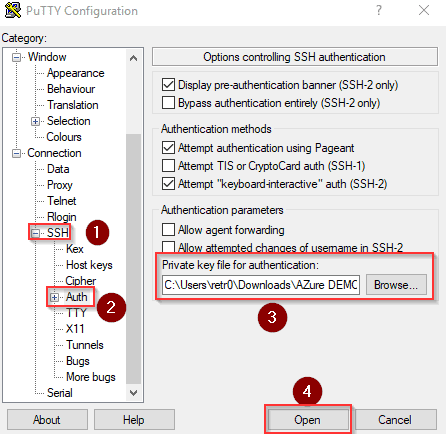
Step 4: Inserting our SSH key for authentication.

  1. Expand the SSH option under Connection in the sidebar.
  2. Select Auth, Do not expand it.
  3. Leave all options at default settings and under private key file for authentication, browse to the Private Key we had created from PuTTYgen earlier.
  4. Click Open.
  5. Click yes in the security alert box to allow the remote connection.

VM PuTTY connection

If all the steps were done correctly then the connection will be successful and you will be logged into your Ubuntu Virtual Machine.

VM Connection Sucessfull