Friday, 23 December 2022

SAP HANA on Azure

 SAP HANA ON AZURE:

The Azure CAT Patterns & Practices team has published their first reference architecture on SAP NetWeaver and SAP HANA on Azure, which covers SAP workloads running in Azure. It provides prescriptive guidance on how to run SAP HANA on Azure including the following topics:

  • Architecture resources necessary for the deployment, including recommendations.
  • Scalability considerations.
  • Availability considerations.
  • Manageability considerations.
  • Security considerations.

Like all reference architectures that can be found at the Azure Architecture Center, it provides a set of PowerShell scripts and Azure Resource Manager templates to deploy the reference architecture. The deployment time for this one is about 2 hours, making simple a task that previously would take days.

This reference architecture expands on the Hybrid VPN reference architecture that will typically be used in a production environment. However, this reference architecture does not deploy the Hybrid VPN resources. Instead, it deploys everything but the VPN gateway in the cloud. So, if you plan to implement the SAP HANA reference architecture in a production environment consider deploying the Hybrid VPN reference architecture first. Then, you’ll be able to deploy the SAP HANA reference architecture into your virtual network configured with VPN.

We invite you to review the reference architecture, try out the deployment, and even contribute to this and other reference architectures on GitHub.


image


The deployed resources have been tuned for SAP HANA, as follows:

  • VM SKUs have been validated for small to medium SAP deployments.
  • VM computer names are set up per SAP requirements.
  • .NET 3.5 is loaded for the SCS machines, as required by SIOS DataKeeper.
  • Health probe has been set up for TCP 59999 with a 10 second interval and 30 second idle.
  • A jumpbox for administrative purposes was deployed.


Azure Citrix Virtual Apps Essentials

  Citrix Virtual Apps Essentials :

Citrix Virtual Apps Essentials allows you to deliver Windows applications and shared hosted desktops from Microsoft Azure to any user on any device. The service combines the industry-leading Citrix Virtual Apps service with the power and flexibility of Microsoft Azure. You can also use Virtual Apps Essentials to publish Windows Server desktops.

Server OS machines run multiple sessions from a single machine to deliver multiple applications and desktops to multiple, simultaneously connected users. Each user requires a single session from which they can run all their hosted applications.

The service is delivered through Citrix Cloud and helps you to deploy your application workloads within your Azure subscription with ease. When users open applications from the workspace experience, the application appears to run locally on the user computer. Users can access their apps securely from any device, anywhere.

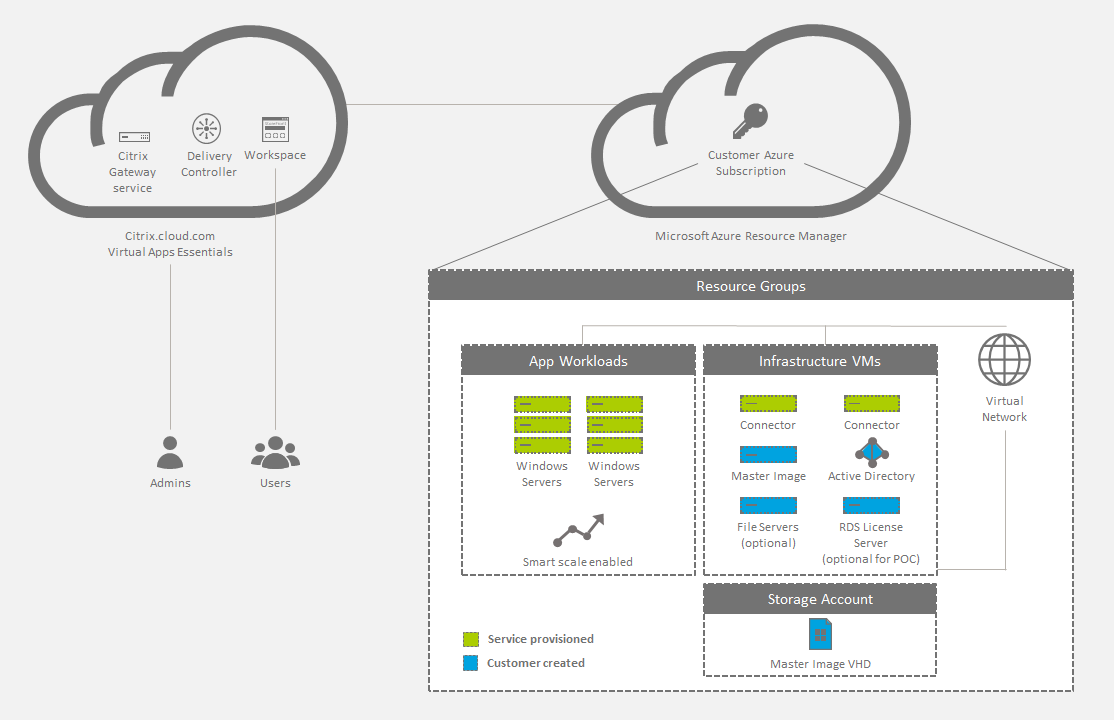
Virtual Apps Essentials includes the workspace experience and the Citrix Gateway service, in addition to its core management services. Your app workloads run in your Azure subscription.

Deployment architecture

The following diagram shows an architectural overview of a basic Virtual Apps Essentials cloud deployment:Virtual Apps Essentials standard deployment

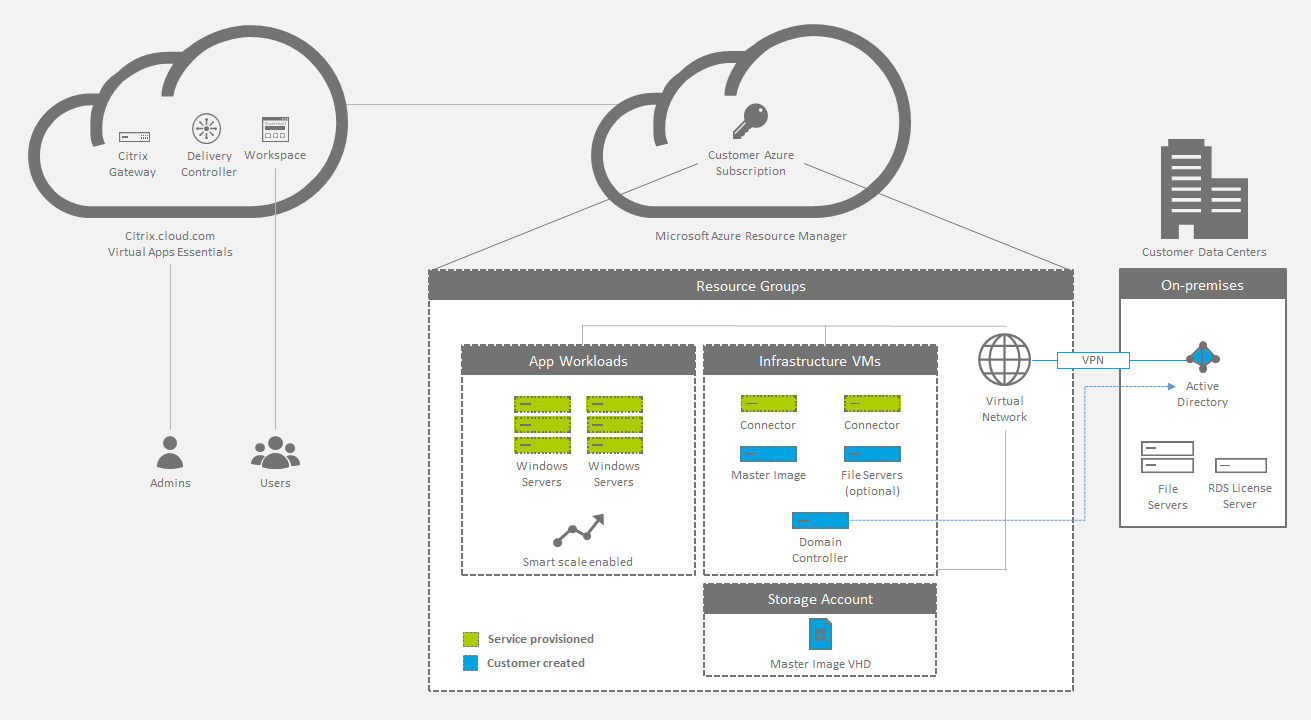
You can also allow users to connect to your on-premises data center. Connections between the Azure cloud and your on-premises data center occur through a VPN connection. Users connect through Virtual Apps Essentials to your license server, file servers, or Active Directory over the VPN connection.Virtual Apps Essentials on-premises deployment

Deployment summary

Follow these steps to deploy Citrix Virtual Apps Essentials:

  • Buy Citrix Virtual Apps Essentials from the Azure Marketplace.
  • Prepare and link your Azure subscription.
  • Create and upload your master image.
  • Deploy a catalog, publish apps and desktops, and assign subscribers

Azure Citrix Virtual Desktops Essentials

 Citrix Virtual Desktops Essentials :

Citrix Virtual Desktops Essentials allows management and delivery of Windows 10 virtual desktops from Microsoft Azure.

Virtual Desktops Essentials is designed specifically for the Azure Marketplace. Citrix and Microsoft partner to deliver an integrated experience for Virtual Desktops Essentials and Azure IaaS. This partnership gives you a single interface to deliver a complete Windows 10 digital workspace from Azure.

Using Virtual Desktops Essentials, you can:

  • Deploy and secure Windows 10 virtual desktops on Azure
  • Deliver best-in-class user experience by using Citrix HDX capabilities
  • Provide secure access on any device by using Citrix Workspace app
  • Manage and administer the deployment from Microsoft Azure and Citrix Cloud

Citrix Virtual Desktops Essentials simplifies Windows 10 deployment. You can deploy desktops quickly, manage at scale, and deliver a rich user access experience from a single management plane.

You manage the Windows 10 desktops using Studio and monitor sessions using Director. Users connect to their Windows 10 virtual desktops by logging on with Citrix Workspace app.

After you configure Citrix Virtual Desktops Essentials, you provide your users with a URL to Citrix Workspace. Users connect to their desktops through the Citrix Workspace app on their devices, with the URL you provide. When users log on to the Citrix Workspace app, the Windows 10 desktop icon appears in the workspace window.

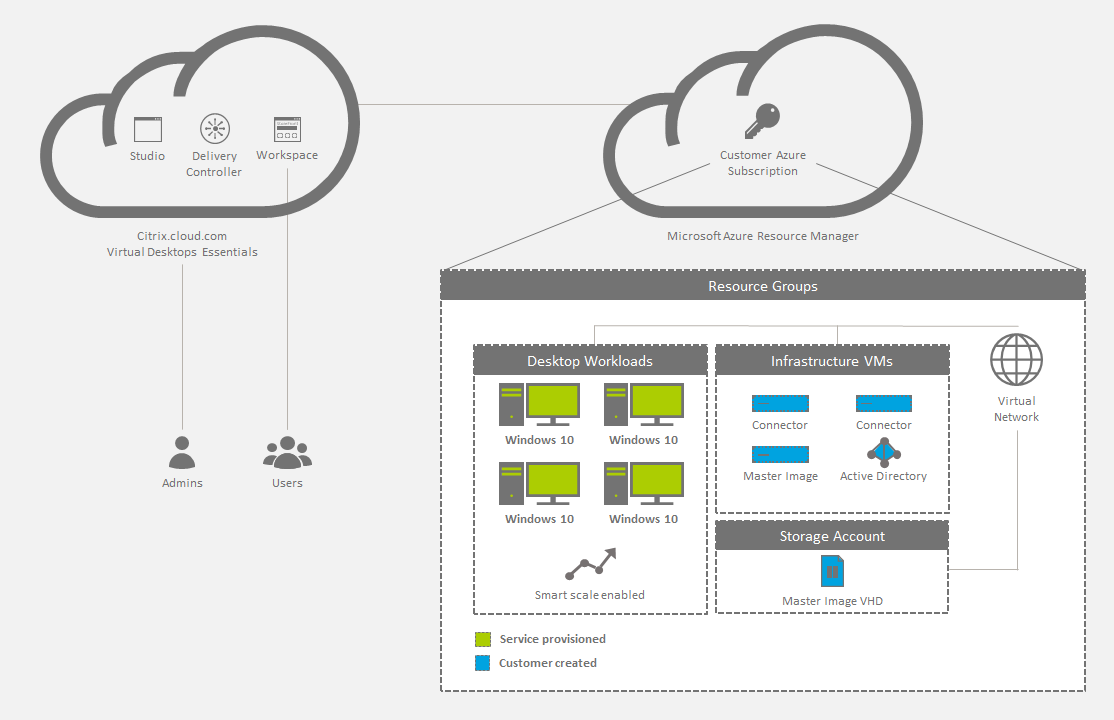
The diagram shows an architectural overview of a Virtual Desktops Essentials deployment.

Virtual Desktops Essentials architectural overview


Thursday, 22 December 2022

VM images (classic)

 VM Image :

Once you have a virtual machine set up and configured as you want, you can capture the instance as a VM Image.  During the capture process, all relevant properties of the virtual machine and disks are stored and copies of the backing VHD page blob(s) are made.  The copy of each VHD is stored in the same storage account and container as the original VHD being copied.  If you are interested in finding the copied VHDs in Azure Storage, search for page blobs with the following naming convention: for the OS VHD, we use <VM Image Name>-os-YYYY-MM-DD<-ZZ> and for the copied data VHDs, we use <VM Image Name>-datadisk-<Lun>-YYYY-MM-DD(-ZZ).  The date is when the VM Image was captured and the -ZZ is a number, added only if there is a collision, to make the name unique.  During capture, no in-memory state is saved and as such, this feature is not meant to replace the current backup and restore options for Microsoft Azure.  If you are interested in more information about backup and restore. If the OS has been generalized/deprovisioned, the virtual machine must be shut down in order to capture it as a VM Image.  Once the VM has been captured as a VM Image, the virtual machine will automatically be deleted.  If the OS is specialized, the virtual machine can be captured while it is running or shut down.  The captured virtual machine remains untouched.  If an application consistent or cross-disk capture is needed, we recommend the virtual machine is shut down prior to capturing the VM Image.

 Use a VM Image :

You can use a VM Image when creating a virtual machine as part of a new or existing deployment.  To deploy a new VM, make sure the virtual machine and VM Image location are the same and then simply provide the name of the VM Image to use.  If the VM Image is generalized, provisioning information and network configuration should also be provided, like with an OS Image today.  Once the virtual machine has been deployed, it behaves the same as any other VM created from OS Images or OS disks.  The role can be updated, additional disks may be attached, or the existing disks detached. If the VM Image is specialized, no provisioning information is needed, like with an OS disk today.  When a virtual machine is deployed from a VM Image, a copy of the VHDs are made for the new VM; in other words, the existing VHDs are not attached directly.  After deploying a virtual machine from a specialized VM Image, the VM will spin up and look to be in a running state very quickly after deployment, since provisioning was not required.  However, the virtual machine may still be booting up, requiring a few additional minutes for remote desktop/SSH to be ready. Once again, after the virtual machine is deployed and running, it behaves the same as any other VM created from OS Images or OS disks.  One small caveat to this statement is when you deploy a new virtual machine from a specialized Windows VM Image that was captured from a running VM. When using such a VM Image, you may see a dialog pop up stating the VM was not properly shutdown when you first remote desktop into the newly deployed VM.


Get-AzureVMImage

To list all VM Images in the image repository, use the Get-AzureVMImage cmdlet:
Get-AzureVMImage

OS images (classic)

OS images :

 Two types of images can be used in Azure: VM image and OS image. A VM image includes an operating system and all disks attached to a virtual machine when the image is created. This is the newer type of image. Before VM images were introduced, an image in Azure could have only a generalized operating system and no additional disks. A VM image that contains only a generalized operating system is basically the same as the original type of image, the OS image.

You can create your own images, based on a virtual machine in Azure, or a virtual machine running elsewhere that you copy and upload. If you want to use an image to create more than one virtual machine, you’ll need to prepare it for use as an image by generalizing it. To create a Windows Server image, run the Sysprep command on the server to generalize it before you upload the .vhd file. For details about Sysprep, see How to Use Sysprep: An Introduction. To create a Linux image, depending on the software distribution, you’ll need to run a set of commands that are specific to the distribution, as well as run the Azure Linux Agent.

Working with images

You can use the Azure Command-Line Interface (CLI) for Mac, Linux, and Windows or Azure PowerShell module to manage the images available to your Azure subscription. You also can use the Azure classic portal for some image tasks, but the command line gives you more options.

For information about using these tools with Resource Manager deployments, see Navigating and Selecting Azure Virtual Machine images with PowerShell and the Azure CLI.

For examples of using the tools in a classic deployment:

  • For CLI, see "Commands to manage your Azure virtual machine images" in Using the Azure CLI for Mac, Linux, and Windows with Azure Service Management

  • For Azure PowerShell, see the following list of commands. For an example of finding an image to create a VM, see "Step 3: Determine the ImageFamily" in Use Azure PowerShell to create and preconfigure Windows-based Virtual Machines

  • Get all images:Get-AzureVMImagereturns a list of all the images available in your current subscription: your images as well as those provided by Azure or partners. This means you might get a large list. The next examples show how to get a shorter list.

  • Get image families:Get-AzureVMImage | select ImageFamily gets a list of image families by showing strings ImageFamily property.

  • Get all images in a specific familyGet-AzureVMImage | Where-Object {$_.ImageFamily -eq $family}

  • Find VM ImagesGet-AzureVMImage | where {(gm –InputObject $_ -Name DataDiskConfigurations) -ne $null} | Select -Property Label, ImageName this works by filtering the DataDiskConfiguration property, which only applies to VM Images. This example also filters the output to only the label and image name.

  • Save a generalized imageSave-AzureVMImage –ServiceName "myServiceName" –Name "MyVMtoCapture" –OSState "Generalized" –ImageName "MyVmImage" –ImageLabel "This is my generalized image"

  • Save a specialized imageSave-AzureVMImage –ServiceName "mySvc2" –Name "MyVMToCapture2" –ImageName "myFirstVMImageSP" –OSState "Specialized" -Verbose

[Azure.Tip] The OSState parameter is required if you want to create a VM image, which includes data disks as well as the operating system disk. If you don’t use the parameter, the cmdlet creates an OS image. The value of the parameter indicates whether the image is generalized or specialized, based on whether the operating system disk has been prepared for reuse.

  • Delete an imageRemove-AzureVMImage –ImageName "MyOldVmImage"

Azure Availability Sets


Definition of Azure Availability Set

When you deploy new virtual machines (VMs), Azure, by default, does not possess the necessary information to identify dependencies among them. Hence, this may lead to a single point of failure in the hosted service due to an unexpected hardware fault or a maintenance operation.

An Azure Availability Set is a logical grouping capability that guarantees that the VMs included in the same group are isolated from each other. Availability Sets are based on two logical groupings: fault domains and update domains.

  • VMs in the same fault domain share common power and network resources, similar to a rack at an on-premises datacenter.
  • VMs belonging to the same update domain group can undergo planned and unplanned maintenance and simultaneous reboots. This configuration covers 99.95% of service-level agreements (SLAs).

When working with Availability Sets, a best practice is to create one Availability Set per workload, understanding the workload as a set of servers that work together running the same service (for example, Active Directory Domain Controllers).

Availability Sets and Availability Zones: What’s the Difference?

Depending on the SLAs required by different organizations, Azure includes different options for building and configuring high availability solutions. Availability Zones are unique physical locations within an Azure Region (set of datacenters). Each zone comprises one or more data centers equipped with independent power, cooling, and networking resources.

The main difference between Availability Zones and Availability Sets is that Availability Zones protect your resources from a potential datacenter failure. In contrast, Availability Sets only offer protection from hardware failures within a datacenter, thus increasing SLA coverage from 99.95% to 99.99%.

Steps to Set Up an Availability Set in Azure

To configure an Availability Set in Azure, two steps are required: creating the Availability Set and the assignment of VMs.

Create an Availability Set

To create an availability Set from the Azure portal, follow these steps:

  1. Log on to your Azure account.
  1. Click on Create a Resource, search for Availability Set, and click on the Create button.
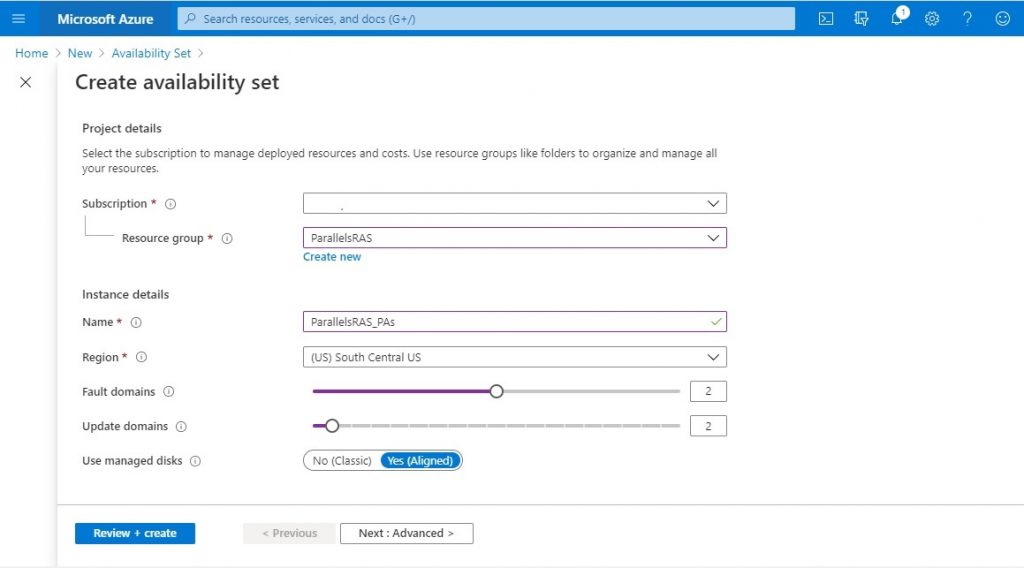
  1. Fill in the Subscription, Resource Group, Name, and Region fields according to your requirements. Next, specify the number of fault domains and update domains needed for this Availability Set. Azure automatically manages the distribution of virtual machines among the created domains, always ensuring the best possible configuration within a group. For this example, we configure two fault domains and two update domains.

Figure 1 - Azure Availability Set

  1. Click on the Review + create button. Once the validation process is complete, click on the Create button.
  1. Once the deployment is complete, you can explore the resource and review its features before assigning new virtual machines.

Availability Sets can also be created using Azure PowerShell.

Assign a Virtual Machine

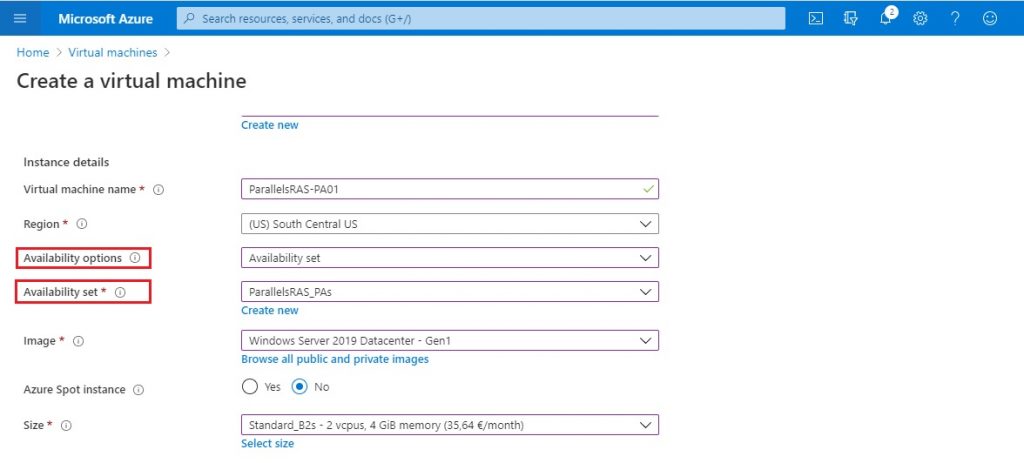
You assign a VM to an Availability Set through the Create a virtual machine wizard. Under the Basics tab, locate the Availability options field. Select Availability set from the drop-down list, and choose the Availability Set resource needed for the VM being created. Complete the rest of the configuration fields according to your requirements.

Figure 2 - Azure Availability Set

Important things to note are that VMs can be included in an Availability Set only when deployed (existing machines cannot be assigned to an Availability Set). The Availability Set of a virtual machine can’t be changed after being created.

Read more regarding how Azure distributes virtual machines among existing fault and update domains.

Azure Kubernetes Service (AKS)

 Azure Kubernetes Service:

Microsoft Azure is a world-renown cloud platform for SMBs to large scale business, while Kubernetes is a modern-day approach that is rapidly becoming the regular methodology to manage cloud-native applications in a production environment. Azure Kubernetes Service (AKS) has brought both solutions together that allow customers to create fully-managed Kubernetes clusters quickly and easily.

AKS is an open-source fully managed container orchestration service that became available in June 2018 and is available on the Microsoft Azure public cloud that can be used to deploy, scale and manage Docker containers and container-based applications in a cluster environment.

Azure Kubernetes Service offers provisioning, scaling, and upgrades of resources as per requirement or demand without any downtime in the Kubernetes cluster and the best thing about AKS is that you don’t require deep knowledge and expertise in container orchestration to manage AKS.

AKS is certainly an ideal platform for developers to develop their modern applications using Kubernetes on the Azure architecture where Azure Container Instances are the pretty right choice to deploy containers on the public cloud. The Azure Container Instances help in reducing the stress on developers to deploy and run their applications on Kubernetes architecture.

To learn more about Kubernetes, check out Cloud Academy’s Introduction to Kubernetes. This is the second course in the Certified Kubernetes Administrator (CKA) Exam Preparation Learning Path and will teach you all about Kubernetes, including what it is and how to use it.


Azure Kubernetes Service Benefits:

Azure Kubernetes Service is currently competing with both Amazon Elastic Kubernetes Service (EKS) and Google Kubernetes Engine (GKE). It offers numerous features such as creating, managing, scaling, and monitoring Azure Kubernetes Clusters, which is attractive for users of Microsoft Azure. The following are some benefits offered by AKS:

  • Efficient resource utilization: The fully managed AKS offers easy deployment and management of containerized applications with efficient resource utilization that elastically provisions additional resources without the headache of managing the Kubernetes infrastructure.
  • Faster application development: Developers spent most of the time on bug-fixing. AKS reduces the debugging time while handling patching, auto-upgrades, and self-healing and simplifies the container orchestration. It definitely saves a lot of time and developers will focus on developing their apps while remaining more productive.
  • Security and compliance: Cybersecurity is one of the most important aspects of modern applications and businesses. AKS integrates with Azure Active Directory (AD) and offers on-demand access to the users to greatly reduce threats and risks. AKS is also completely compliant with the standards and regulatory requirements such as System and Organization Controls (SOC), HIPAA, ISO, and PCI DSS.
  • Quicker development and integration: Azure Kubernetes Service (AKS) supports auto-upgrades, monitoring, and scaling and helps in minimizing the infrastructure maintenance that leads to comparatively faster development and integration. It also supports provisioning additional compute resources in Serverless Kubernetes within seconds without worrying about managing the Kubernetes infrastructure.

Azure Kubernetes Service Features:

  • Microsoft Azure offers Azure Kubernetes Service that simplifies managed Kubernetes cluster deployment in the public cloud environment and also manages health and monitoring of managed Kubernetes service. Customers can create AKS clusters using the Azure portal or Azure CLI and can manage the agent nodes.

    A template-based deployment using Terraform and Resource Manager templates can also be chosen to deploy the AKS cluster that manages the auto-configuration of master and worker nodes of the Kubernetes cluster. Some additional features such as advanced networking, monitoring, and Azure AD integration can also be configured. Let’s take a look into the features that Azure Kubernetes Service (AKS) offers:

Open-source environment with enterprise commitment:

  • Microsoft has inducted the number of employees in last couple of years to make Kubernetes easier for the businesses and developers to use and participate in open-source projects and became the third giant contributor to make Kubernetes more business-oriented, cloud-native, and accessible by bringing the best practices and advanced learning with diverse customers and users to the Kubernetes community.