Wednesday, 21 December 2022

What Is Kubernetes?

Kubernetes:

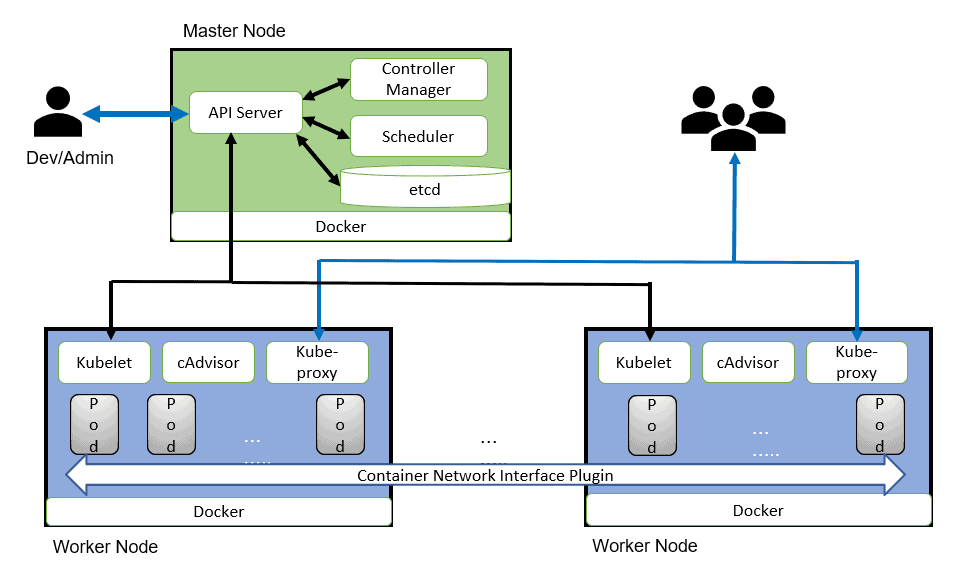
In organizations, multiple numbers of containers running on multiple hosts at a time so it is very hard to manage all the containers together we use Kubernetes. Kubernetes is an open-source platform for managing containerized workloads and services. Kubernetes takes care of scaling and failover for your application running on the container.


Kubernetes_Architecture

Azure container instance (ACI)


Azure Container Instances (ACI)

Azure Container Instances (ACI) is Microsoft PaaS (Platform as service) solution that offers the fastest and simplest way to run a container in Azure, without having to manage any underlying infrastructure. For container orchestration in Azure (build, manage, and deploy multiple containers) use Azure Kubernetes Service (AKS). You can deploy Azure Container Instances using Azure Portal, Azure CLI, Powershell, or ARM Template. Same as the docker registry we can push our images to Azure Container Registry (ACR) which is a private secure registry propose by the Azure platform.

Azure-Container-Instances

Azure Docker Architecture & Components

Docker Architecture & Components

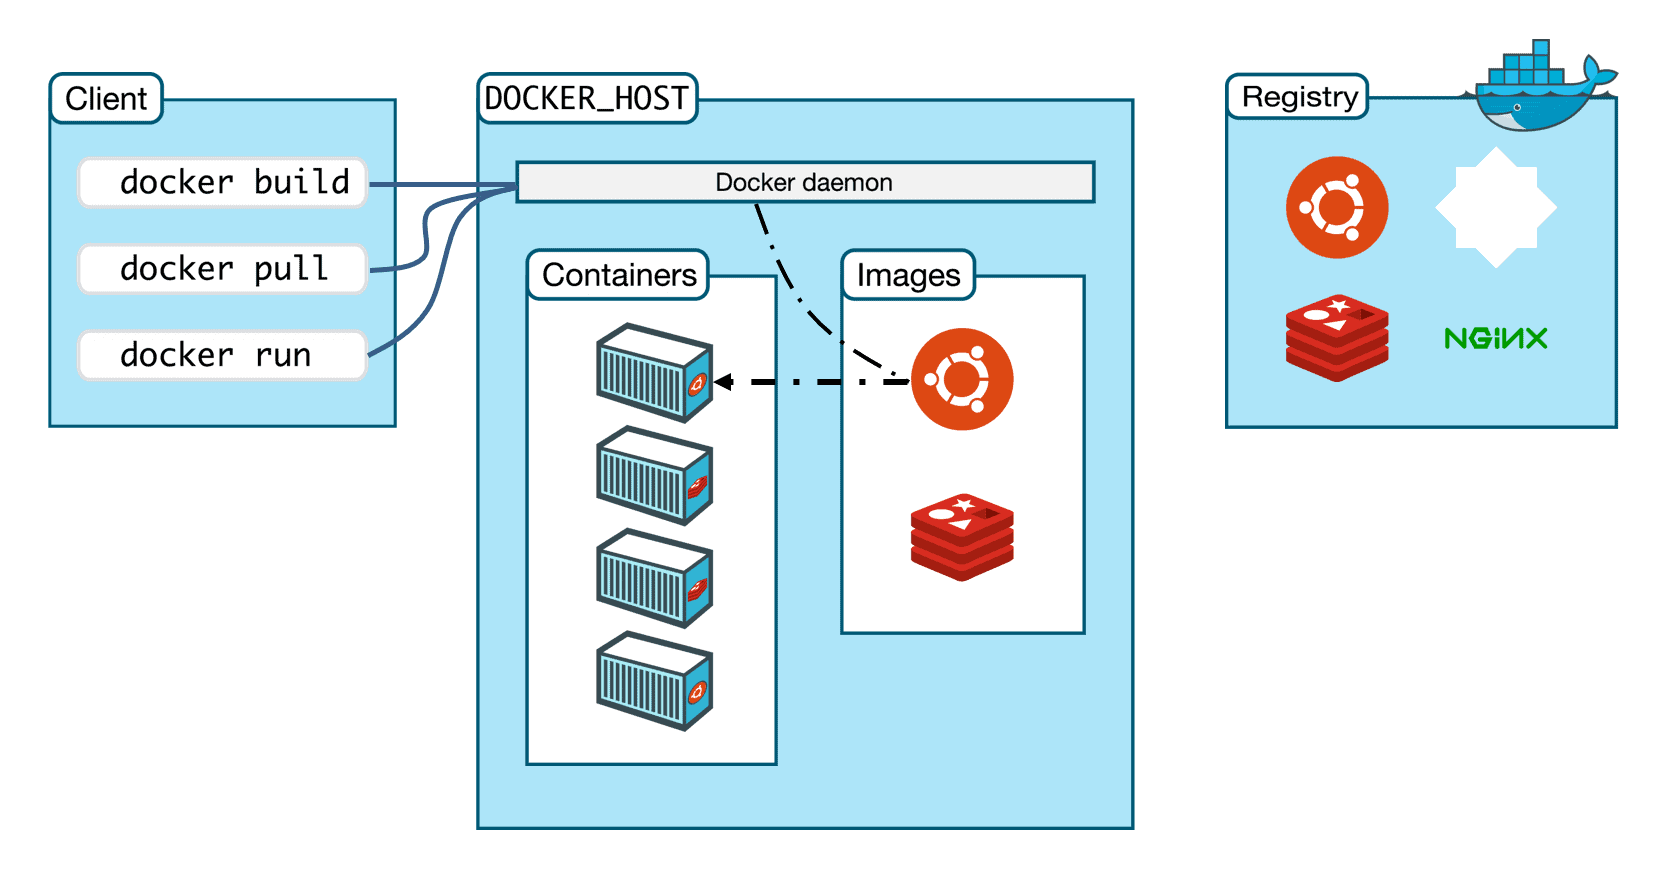
Docker uses a client-server architecture. The docker client talks to the Docker daemon, which used to building, running, and distributing the Docker containers. The Docker client and daemon communicate using a REST API, over UNIX sockets, or a network interface.

Docker Architecture

AZURE CONTAINER INSTANCES

 COINTAINER INSTANCES :

Containers are a software package into a logical box with everything that the application needs to run. That includes the operating system, application code, runtime, system tools, system libraries, and etc. Docker containers are built off Docker images. Since images are read-only, Docker adds a read-write file system over the read-only file system of the image to create a container.

Difference Between Virtual Machine & Container (Docker)

The major difference between the VMs and Container is In VMs a hypervisor is used to virtualize physical hardware. Each VM contains a guest OS, a virtual copy of the hardware that the OS requires to run while in Containers Instead of virtualizing the underlying hardware, containers virtualize the operating system so each container contains only the application and its libraries.


Difference Between Virtual Machine & Container (Docker)


Docker Architecture & Components

Docker uses a client-server architecture. The docker client talks to the Docker daemon, which used to building, running, and distributing the Docker containers. The Docker client and daemon communicate using a REST API, over UNIX sockets, or a network interface.

Docker Architecture

Azure Container Instances (ACI)

Azure Container Instances (ACI)  is Microsoft PaaS (Platform as service) solution that offers the fastest and simplest way to run a container in Azure, without having to manage any underlying infrastructure. For container orchestration in Azure (build, manage, and deploy multiple containers) use Azure Kubernetes Service (AKS). You can deploy Azure Container Instances using Azure Portal, Azure CLI, Powershell, or ARM Template. Same as the docker registry we can push our images to Azure Container Registry (ACR) which is a private secure registry propose by the Azure platform.


Tuesday, 20 December 2022

AZURE APP SERVICES

 APP SERVICES :

Awesome Azure App Services Features

1. Easiest Way to Deploy Apps to the Cloud

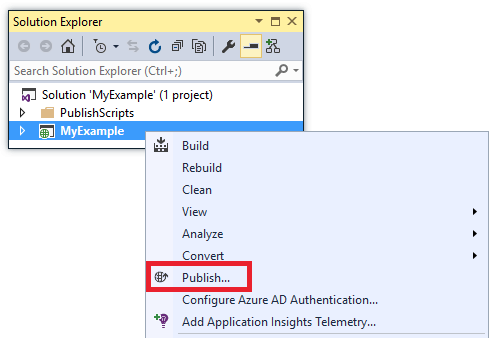
If you are using Visual Studio, deploying your application to Azure is just a couple of clicks. You can also deploy your app automatically via git, Powershell, and other options. Azure automatically handles deploying your code to multiple servers and high availability. Deployments are very fast.

Azure-App-Service-Deploy-Click

2. Combine Multiple Apps to Save Money

One of the best features is being able to combine multiple applications together. If you used Azure Worker Roles before, they required that each app had its own servers. You can save a lot of money by switching to App Services and combining your application together. If you want to separate them, you can just put them on different App Service Plans, which is more like different groups of servers.

3. Automatic High Availability & Auto-Scaling

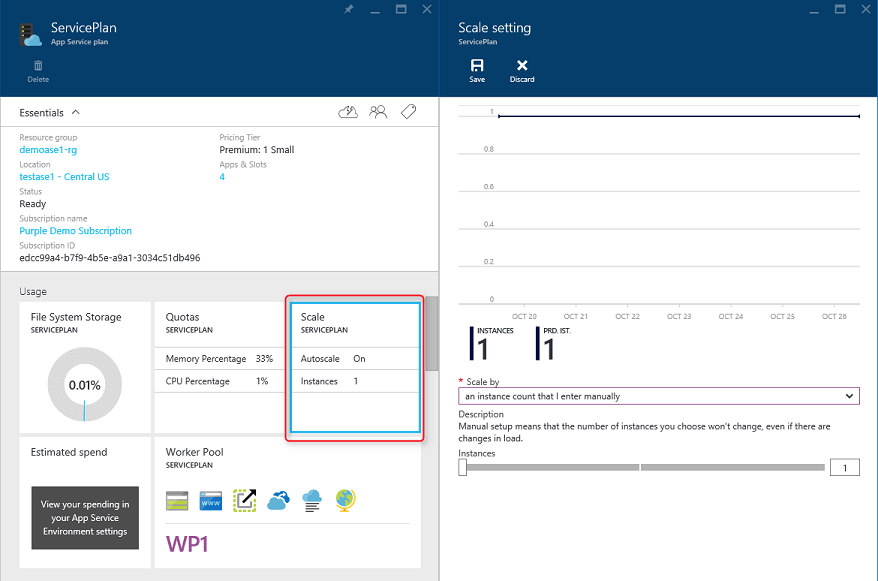
You can automatically or manually autoscale your app out to use additional servers. Based on your App Service Plan, you can define the server size and the rules about autoscaling. Azure also automatically takes care of high availability and provides a 99.95% SLA.

Azure-App-Service-scaling-config

4. Low Cost

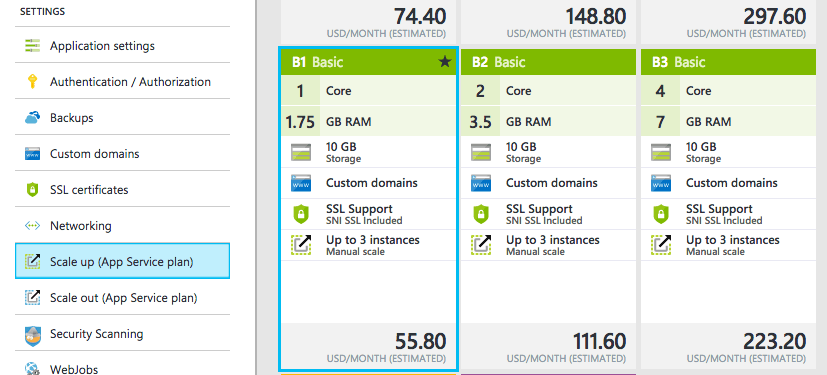
Microsoft Azure offers pay-as-you-go pricing. It is very cost effective for small and medium enterprises. App Services also has built-in load balancers that help save infrastructure costs.

Azure-App-Service-low-cost

You only pay for the services that are active on your Azure account. With this flexibility, developers can purchase the services only when necessary during the development process.

Azure-App-Service-pick-services

5. Security

Along with the security, given by the developer, Azure App Service also provides Infrastructure and platform security where the application is run securely on the cloud. App service provides layered security like multi-factor authentication to access the application. Azure App Service is also ISO and PCI compliant.

6. IDE Integration

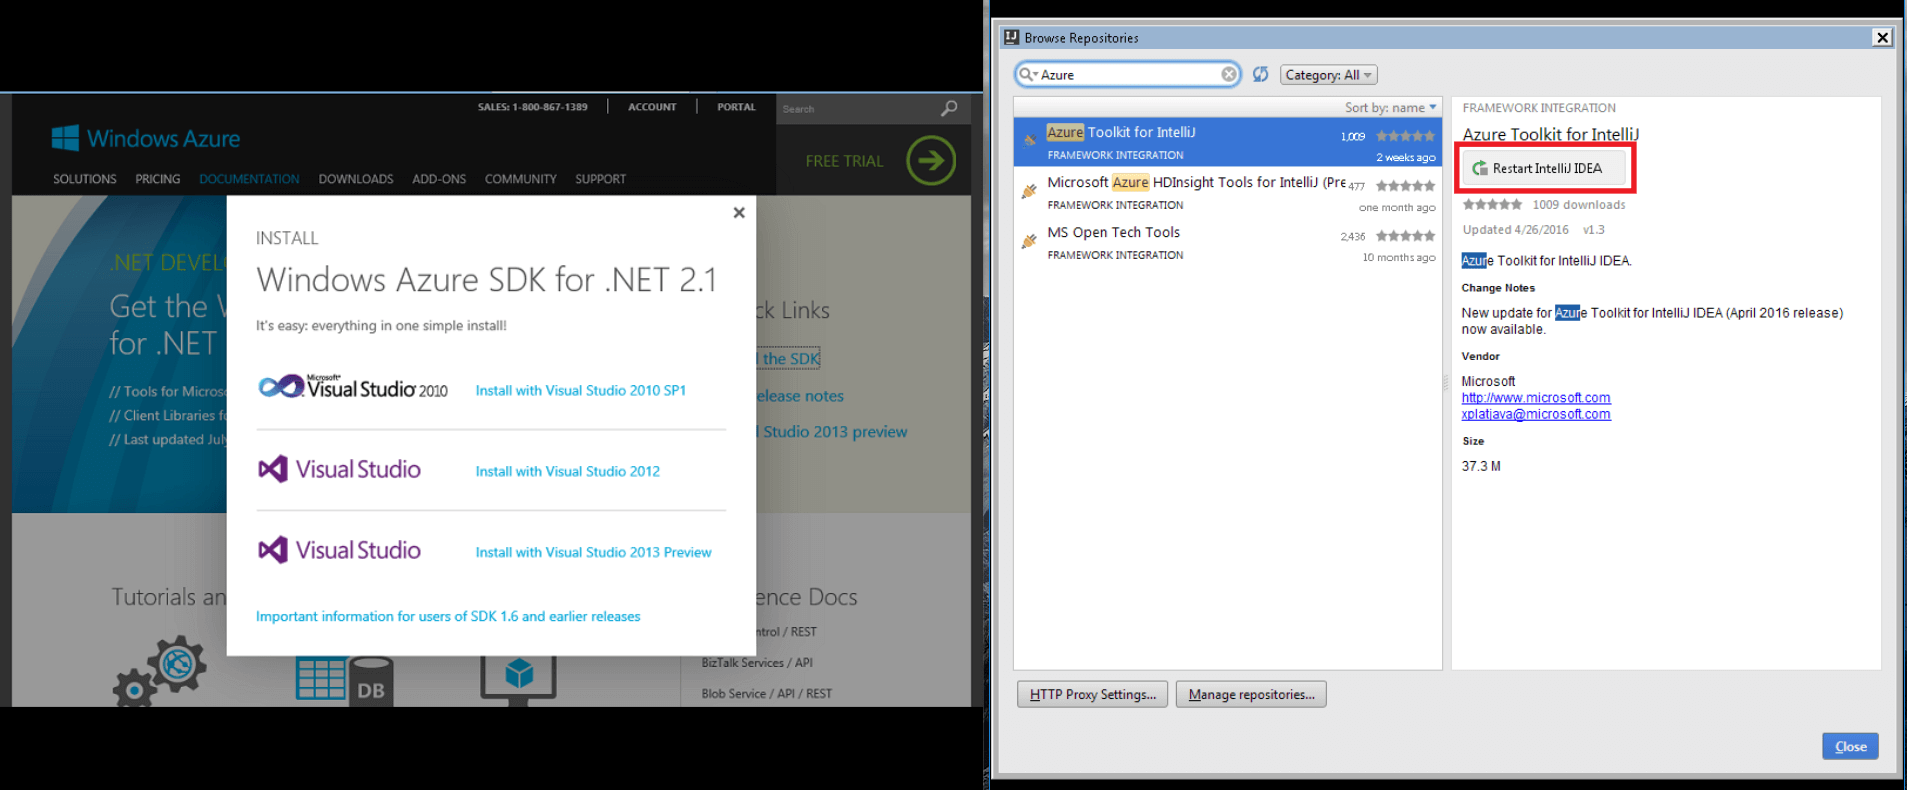
Azure has made it much easier to deploy your applications directly from various IDE’s like Visual Studio (with Azure SDK), Xcode, IntelliJ IDEA. It helps the developer on the first hand aiding to get deeper insights into the application development lifecycle covering the basic tasks of developing the application by debugging and other code integrations.

Azure-App-Service-ide-integration

Azure SDK on Visual Studio makes all the instances first class citizens, making it easy to query the database hosted on one of the Azure App Services and make CRUD operations easier and live on Azure app.

7. Deployment Slots

Deployments slots are one of the best features for App Services. They essentially provide a duplicated environment for your app so you can deploy a new version to a “staging” slot to test before swapping to production. The best part is they don’t cost any money like they did with Cloud Services.

8. No Server Maintenance

The bad news is you don’t have access to login to the servers. The good news is you don’t need to. All you have to worry about is deploying your app. Microsoft Azure will take care of deploying it to servers, keeping the servers running, and all the other stuff that nobody wants to spend time on. App Services do have various logs that you can access to troubleshoot application issues.

9. Site Extensions

Site Extensions are essentially plug-ins that can add various monitoring solutions additional management functions, Let’s Encrypt SSL, Azure Service Profiler, and much more.

Sunday, 18 December 2022

AZURE FUNCTION APP

 FUNCTION APP :

Creating the Azure Function App

There are three ways in which we can create a Function app:

  • Using the Azure portal https://portal.azure.com
  • Using the Azure CLI (Command Line Interface)
  • Using a code editor, like Visual Studio Code

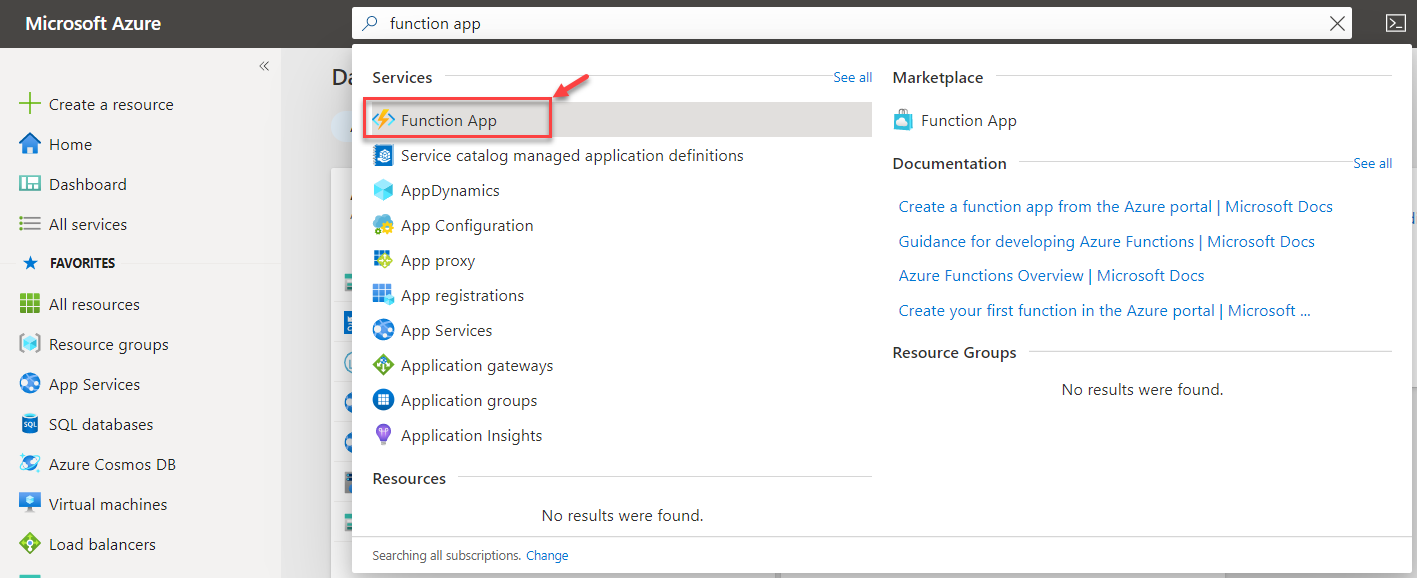
In this article, we will explore the first option, that is, using the Azure portal. Let us sign in to the Azure portal by visiting https://portal.azure.com and search for Function App.

Search in the Azure Portal


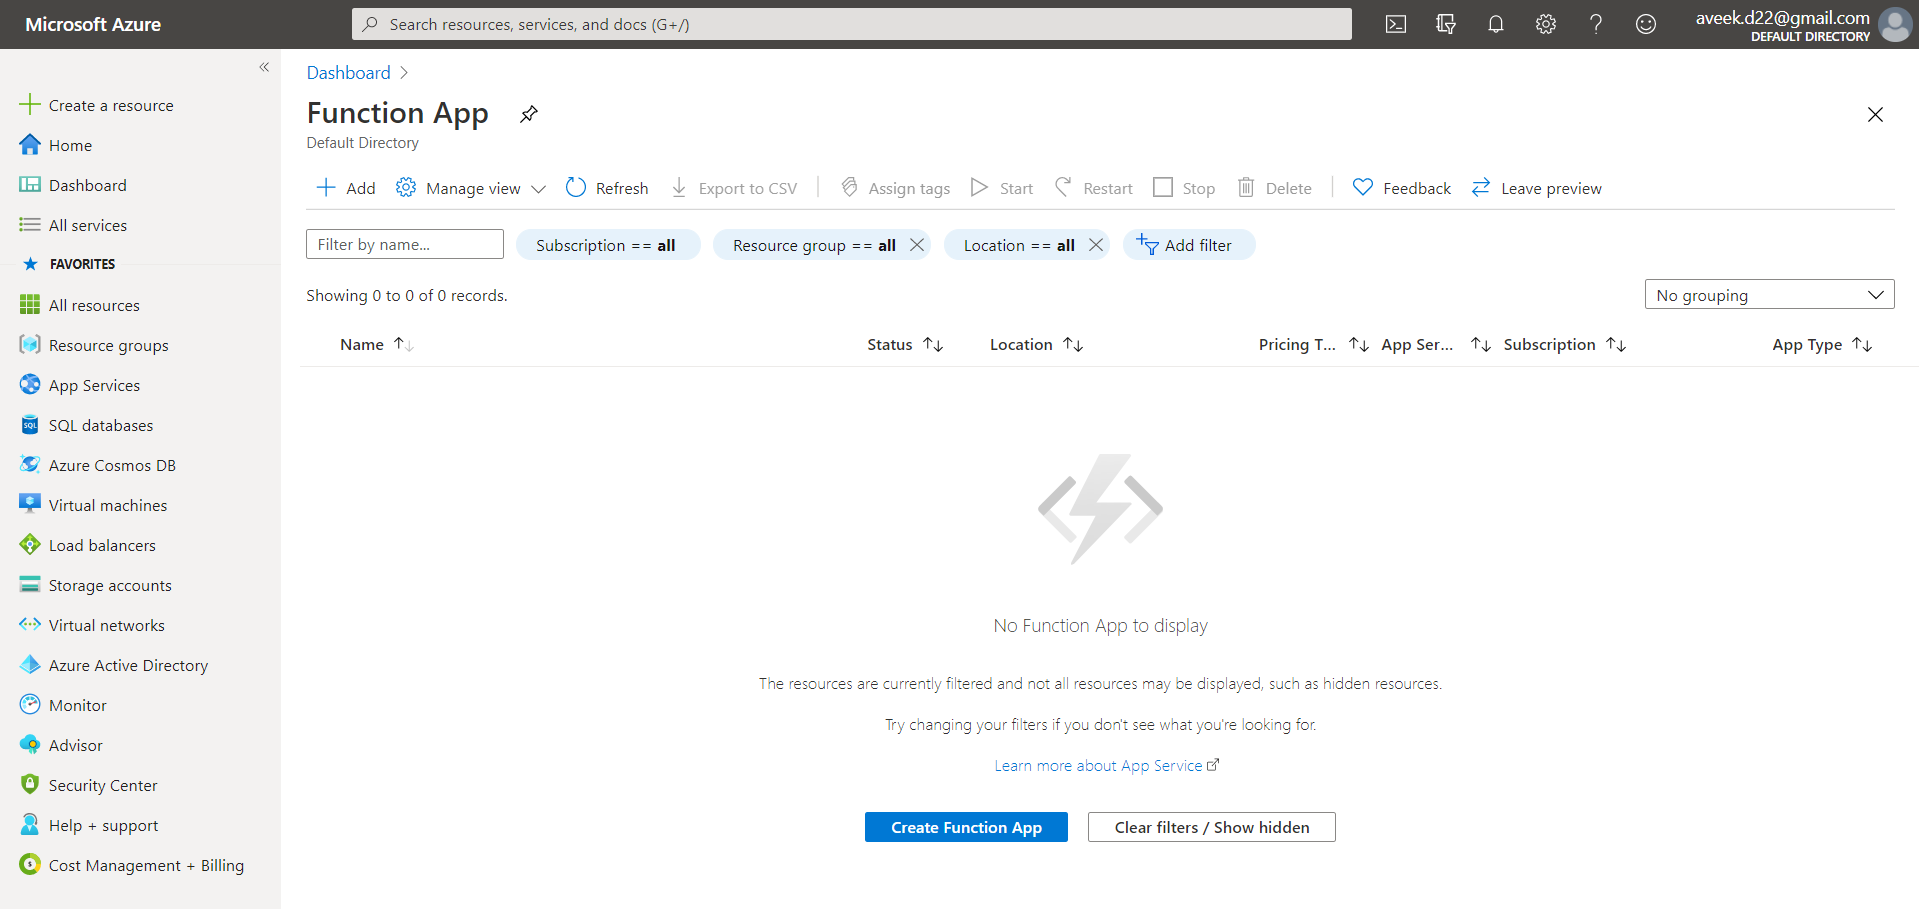
The Function App dashboard opens up, which is as below. Since I do not have any function already created, therefore the dashboard is empty. Otherwise, it will display a list of all the available functions that are created in this account.

Dashboard to list all the Azure Function App


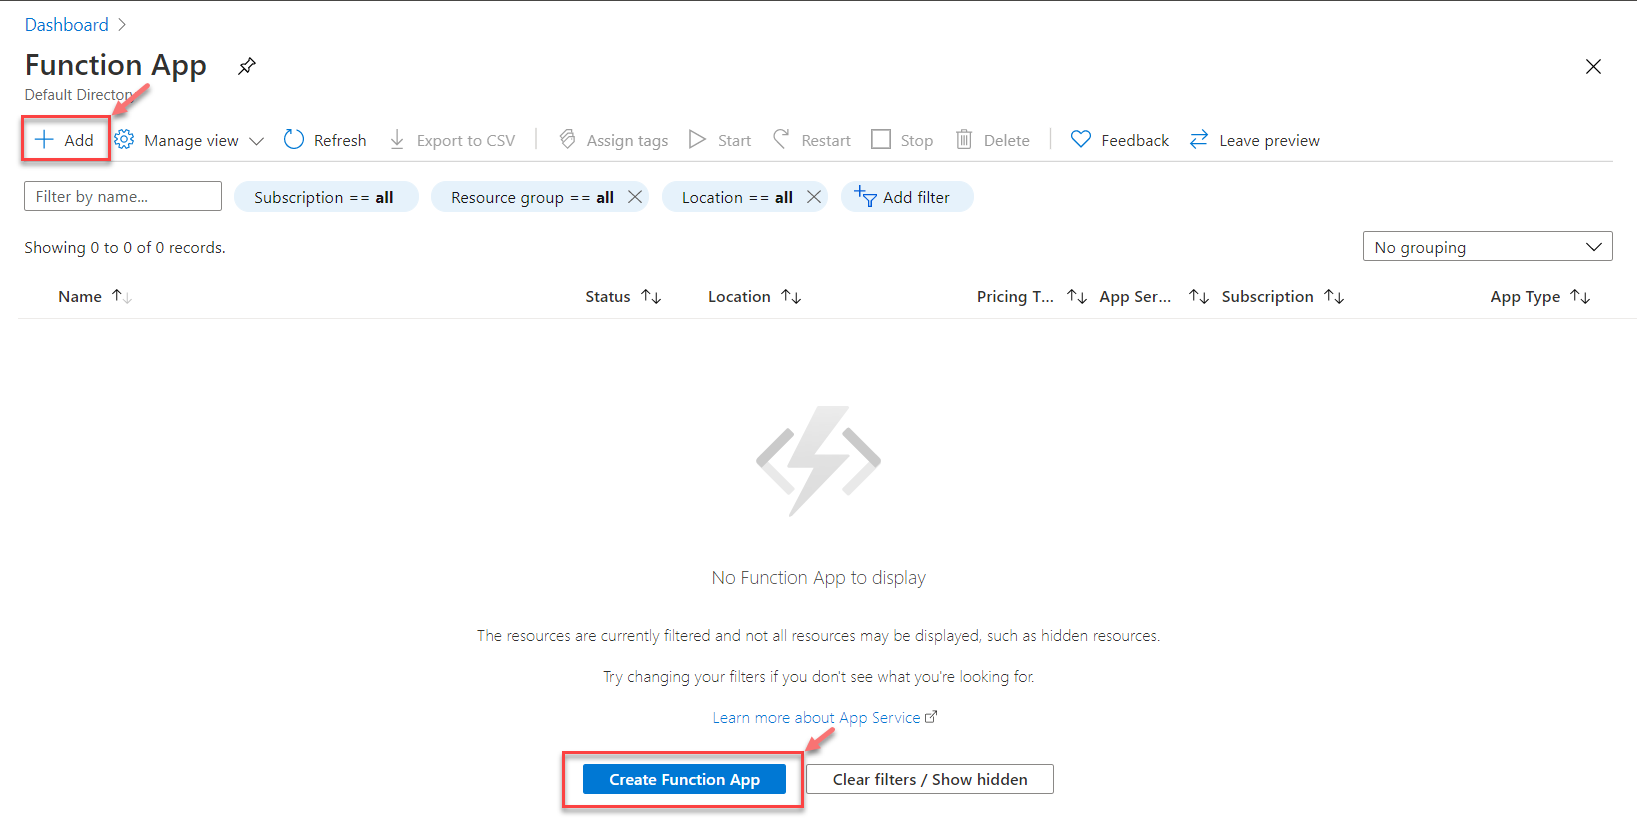
Click on Add on the top, or you can also click on the Create Function App button to start creating the application.

Creating the Azure Function App


On the next page, you will need to provide a few configuration details about how you would like to create the function and its name along with a few other parameters. The first option here is to select the subscription account under which the function is to be created. You may consider this as a logical grouping for your billing management. I have a default subscription, which I am going to select and proceed forward.

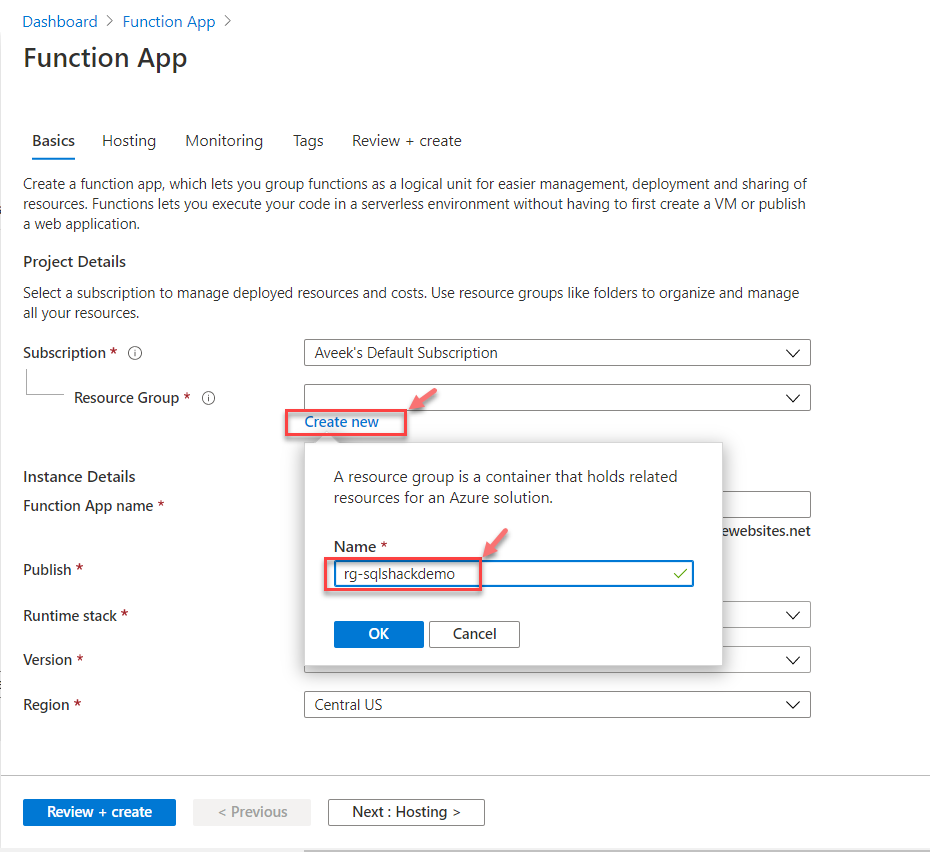
The next parameter here is to select the resource group. The resource group is also a logical group and can be used to group various resources that belong to the same solution. You can select a pre-existing resource group or proceed by creating a new one as follows.

Creating a new Resource Group


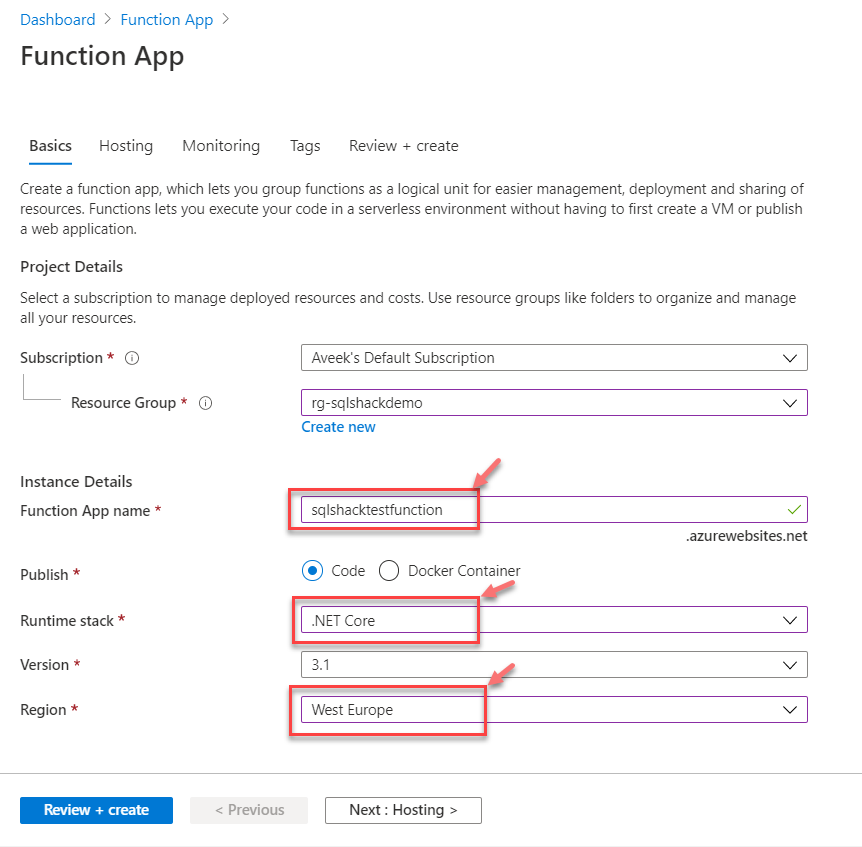
Once the resource group is created, we can move ahead with the other parameters. The next important point here is to provide a valid name for the function. Remember that this name has to be globally unique as it is going to be used as a part of the base URL.

Select the Publish option as Code and Runtime Stack as .NET Core. You can choose any other runtime stack based on your preference. Finally, you must select the region in which you want to deploy your function. As a best practice, the function should be deployed to a region nearer to where your customer is based upon. In my example, I am going to select the region as West Europe.

Creating the App Function


Once all this information is filled up, click on Next: Hosting and set up the hosting related parameters there.

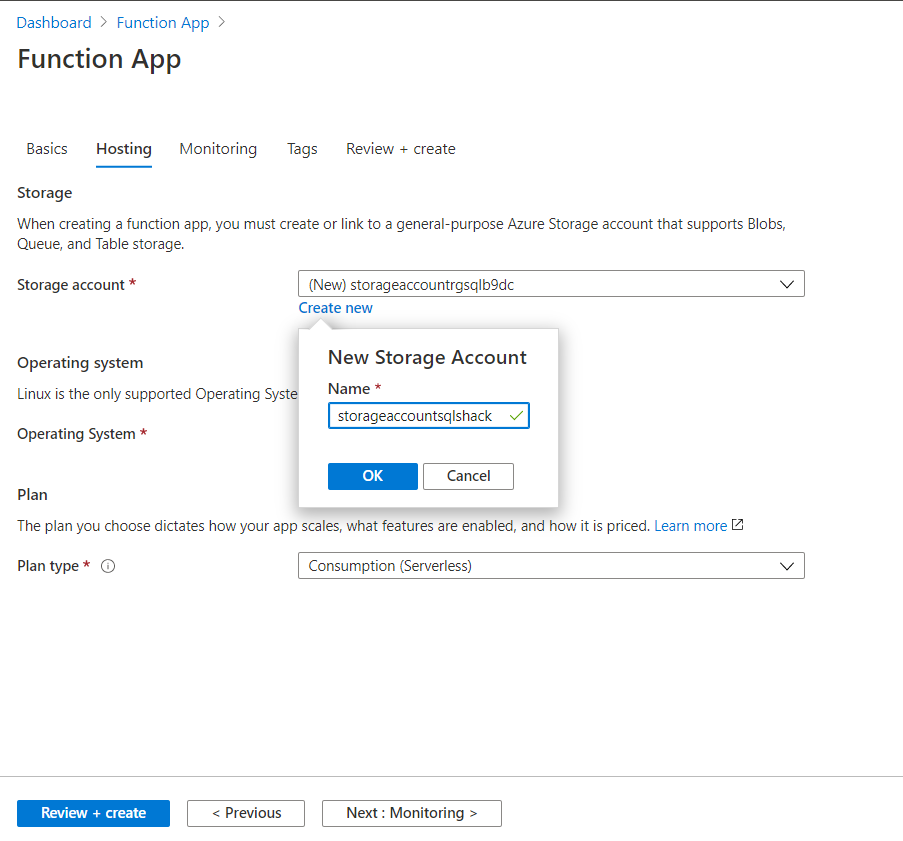
Here we need to define the storage account details, which will be used by our function. If you already have a storage account, you can use that or create a new one.

Creating a Storage Account


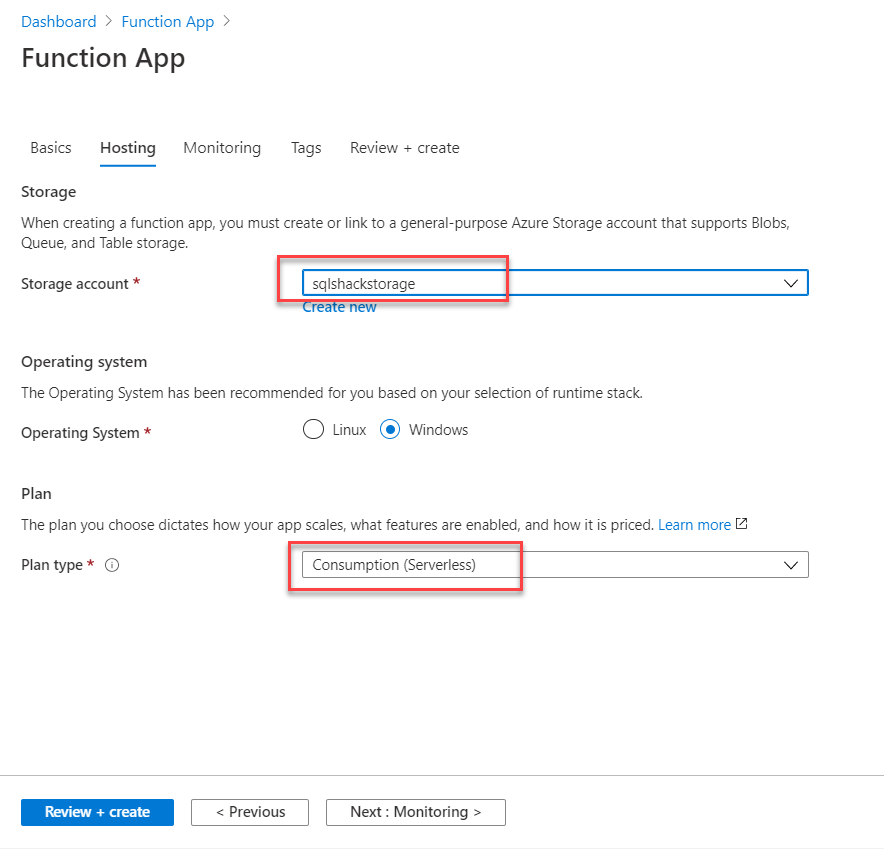
Once the storage account is created, you can select the Operating System and the Plan for the function. The operating system for .NET Core, by default, is Windows. For the plan, we are going to select the Consumption Service Plan, which will be scaled based on when the function is triggered and priced based on the execution time.

Selecting the Operating System and Plan


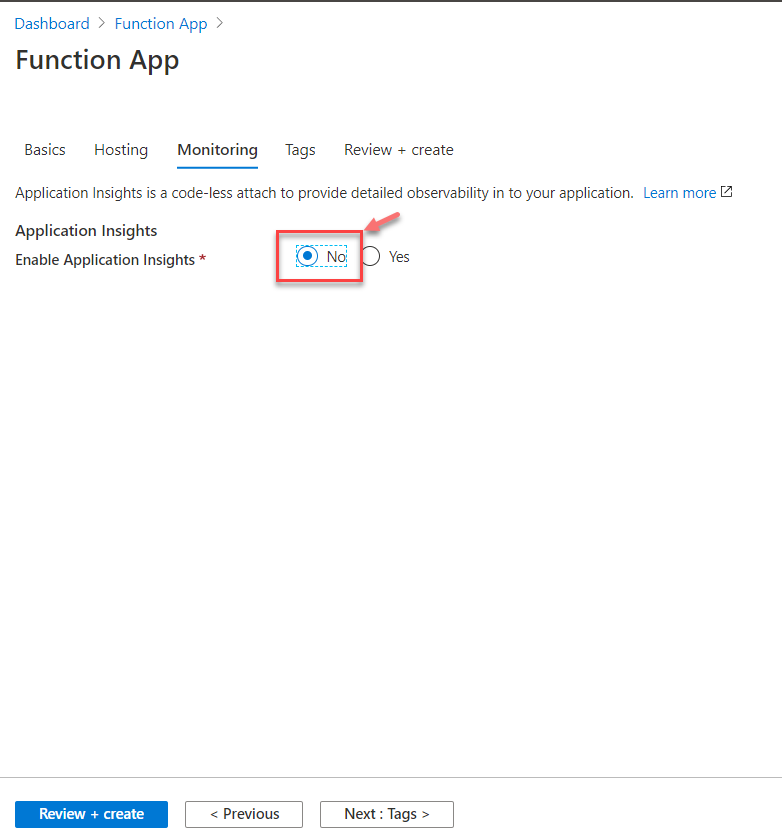
Click on Next: Monitoring to set up the monitoring parameters. Here, you will be asked if you want to enable Application Insights or not. For this tutorial, I am going to disable it as it is out of scope. Click on No and proceed forward.

Disable Application Insights


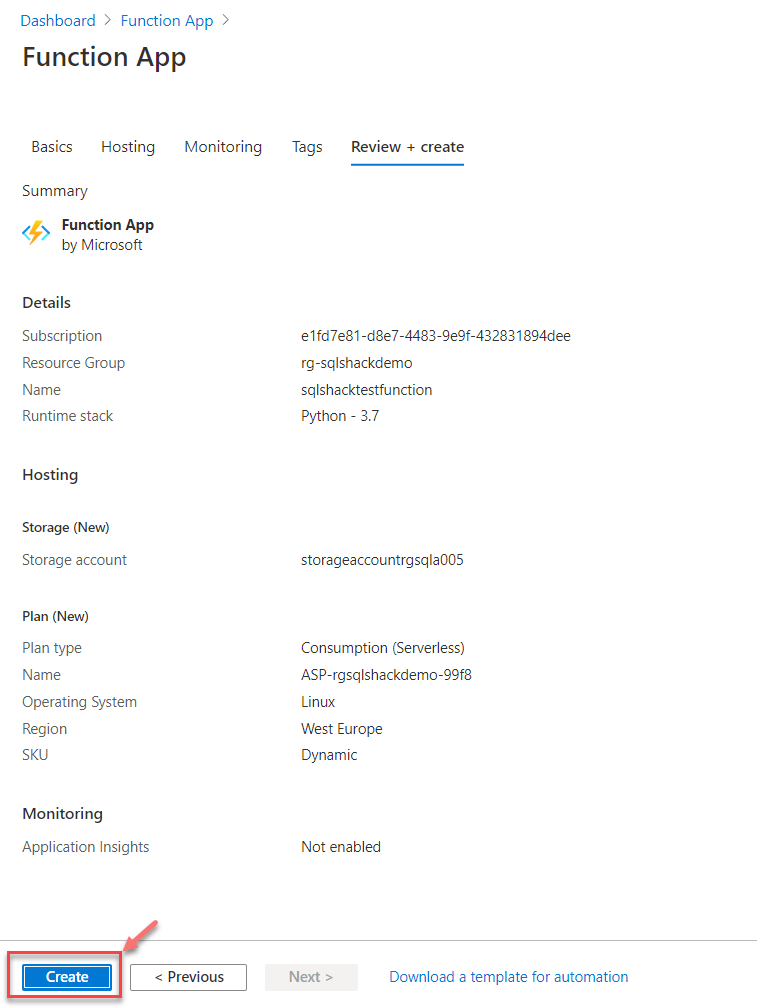
In this stage, you can click on Review + Create to create the function as specified. It will verify all the details and then display the details for your review. Once you have finally reviewed the details on this page, go ahead and click on Create.

Create the Function


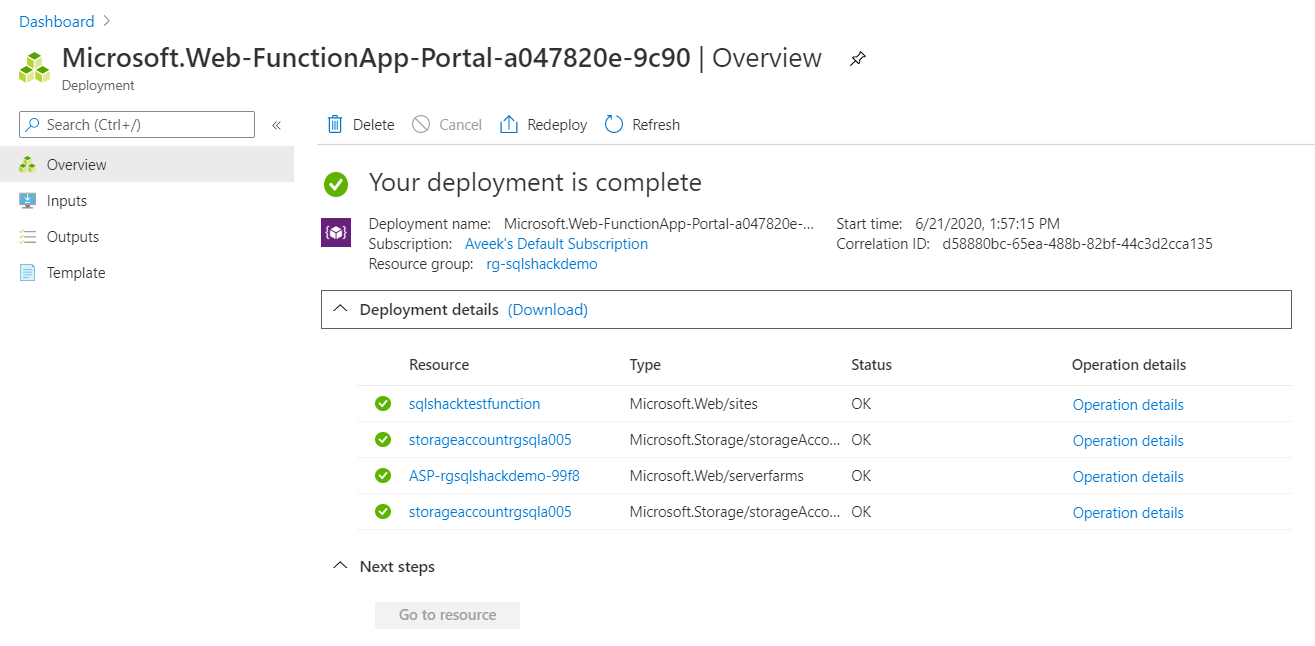
The deployment of the function might take some time, depending on the resources available. Once the deployment is completed, you will see the following information appear on the dashboard.

Function App Created


Verify the function

Once the app function has been created, the next step is to verify the function URL and confirm if the app is up and running. Click on the URL, and you will be navigated to the homepage for your app function.

Verify an App URL


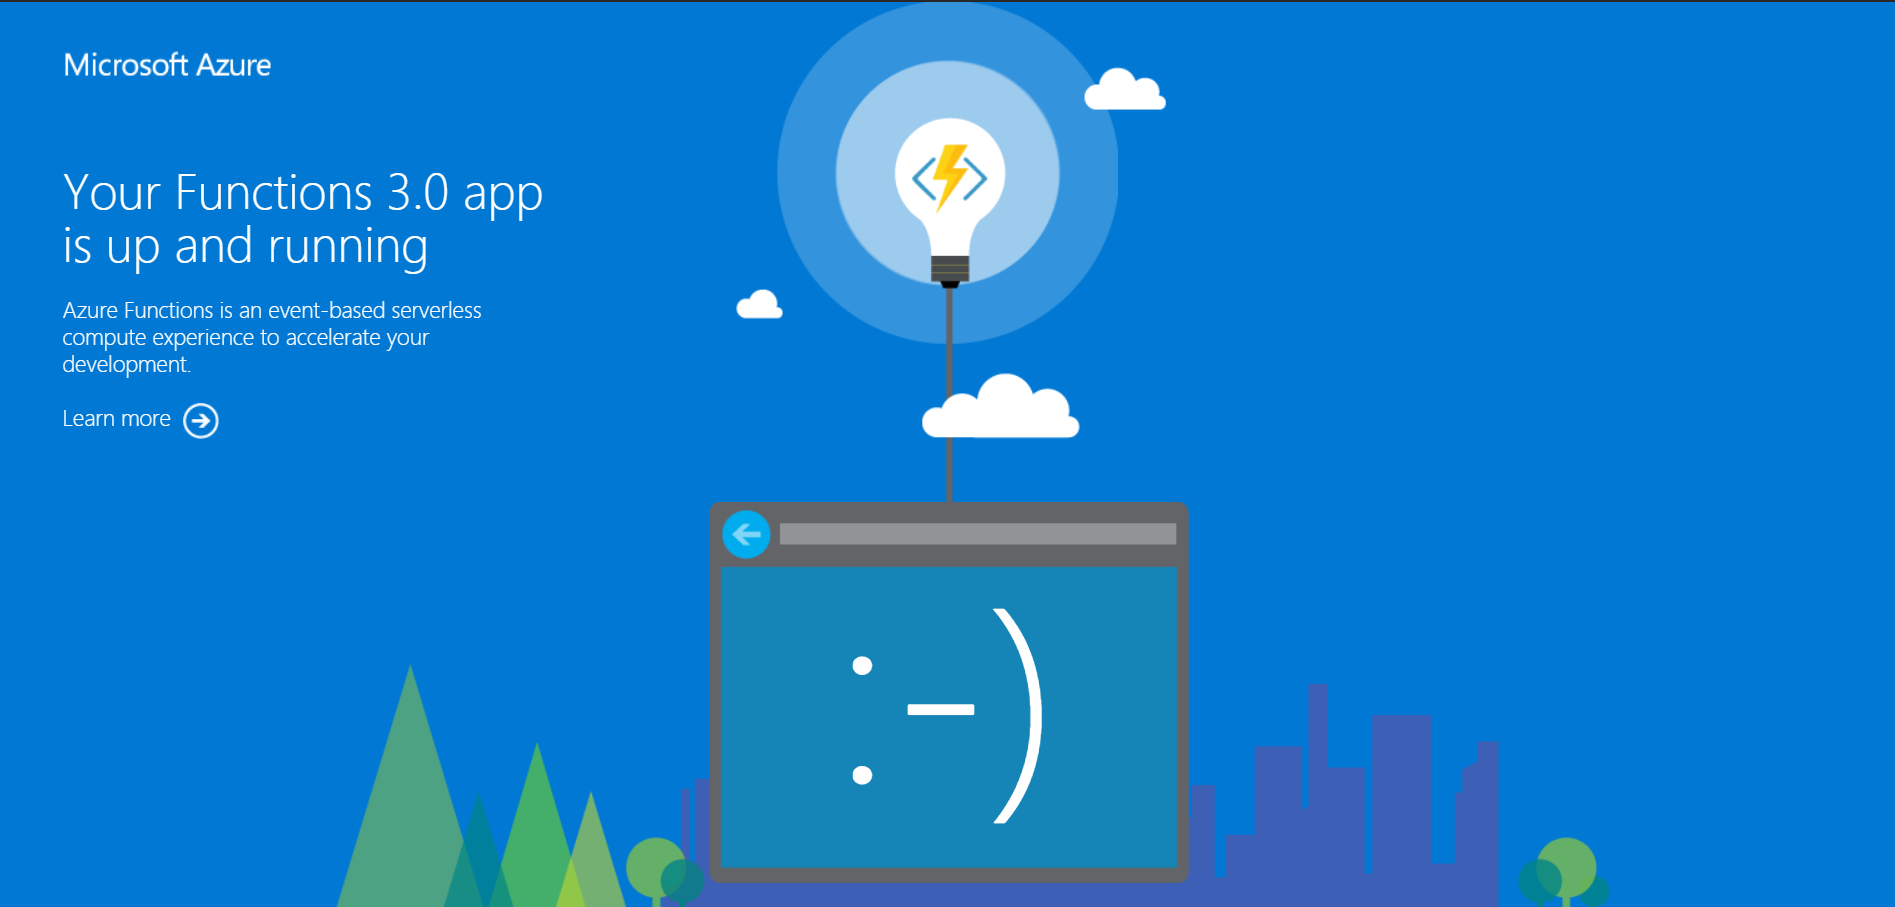
You will be redirected to a new page, which looks something like the figure below. It means that the Azure Function App is now up and running.

Function URL up and running


Write code for the Azure Function App

Now that we know that our function is up and running, its time we write the code that we need to deploy to this function. While creating the new function, the following two points should be kept in mind before proceeding forward.

  • Trigger Type – Defines how the function is to be called, it can be an HTTP call or a change in a database table or anything other which can trigger a function
  • Authoring Options – Users can choose how they would prefer to write the code for this function. They can either write code using the built-in code editor in Azure, or they can choose from a preferred desktop code editor, like Visual Studio Code or Sublime Text

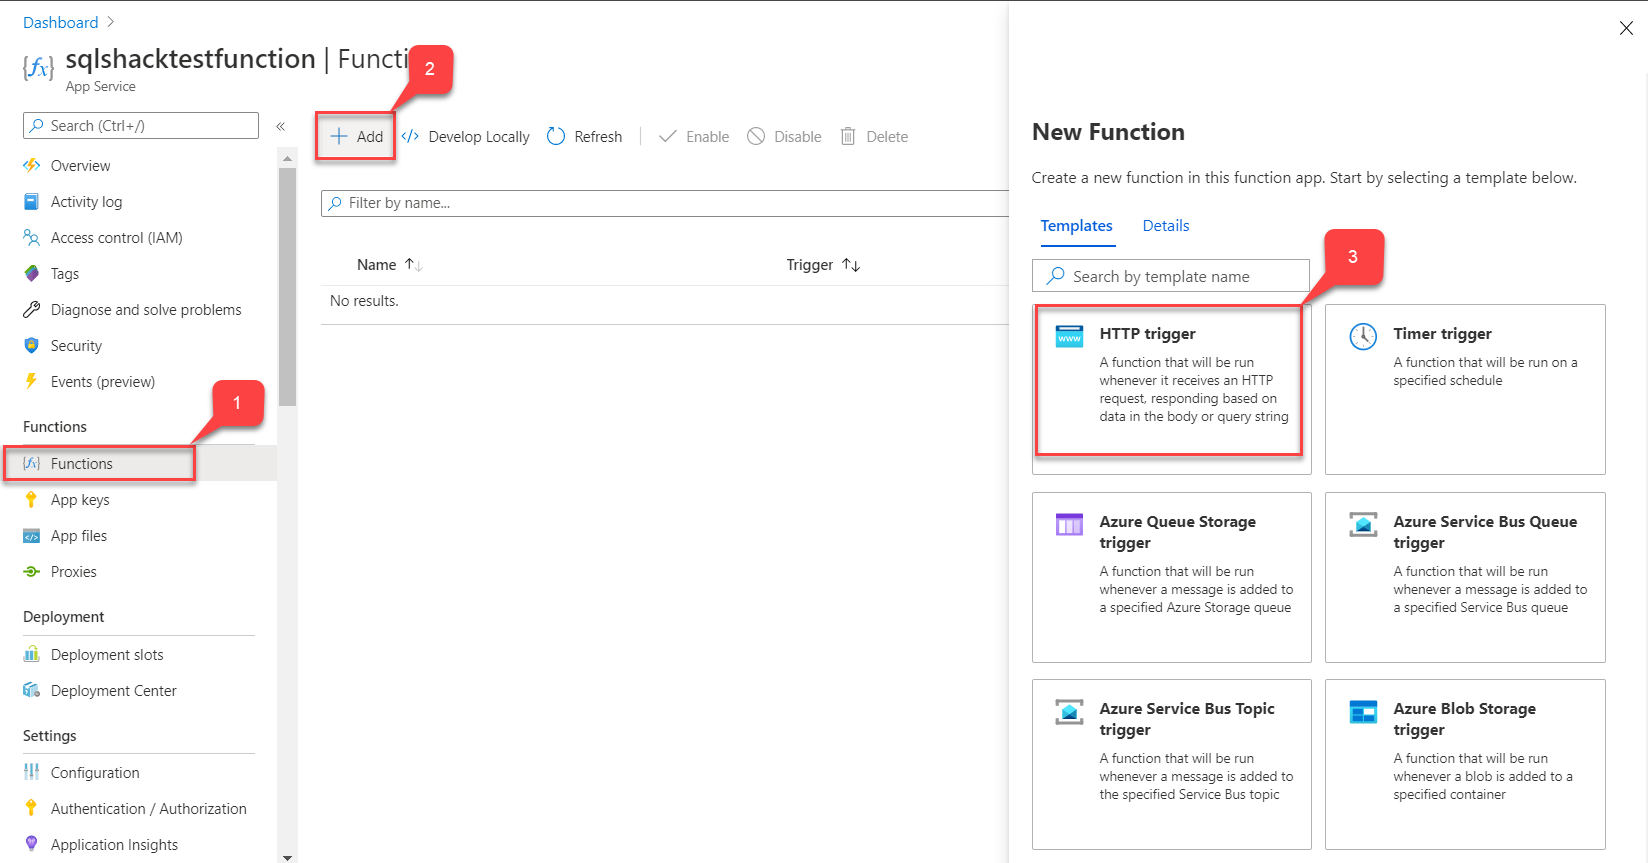
Click on Functions and then select Add. A list of templates will appear on the right, from which select HTTP Trigger.

Selecting a new Function Trigger

Figure 13 – Selecting a New Function Trigger

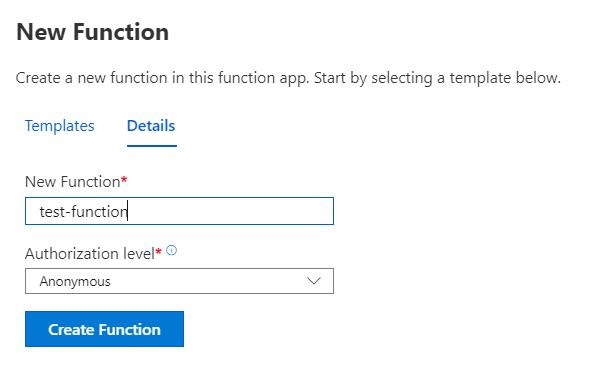
Once the trigger type has been selected, please provide details about the function. Provide a name for the function and the authentication level. Select Anonymous as the authentication level and click on Create Function.

Function Name and Authentication Level


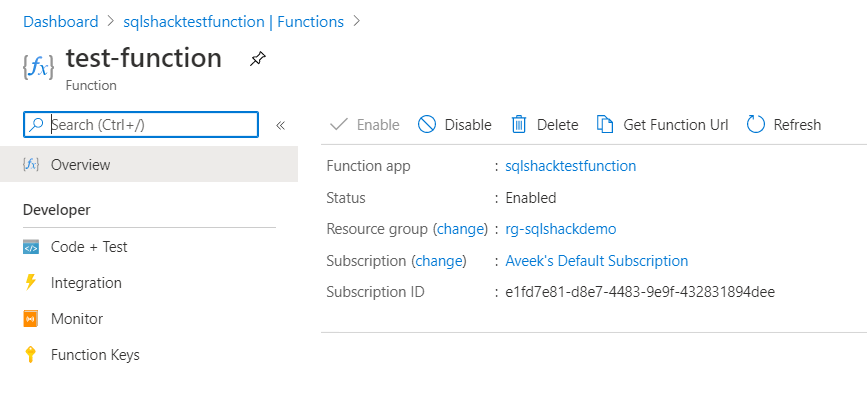
The function will be created and deployed within minutes, and you can verify the details as follows.

Function Created


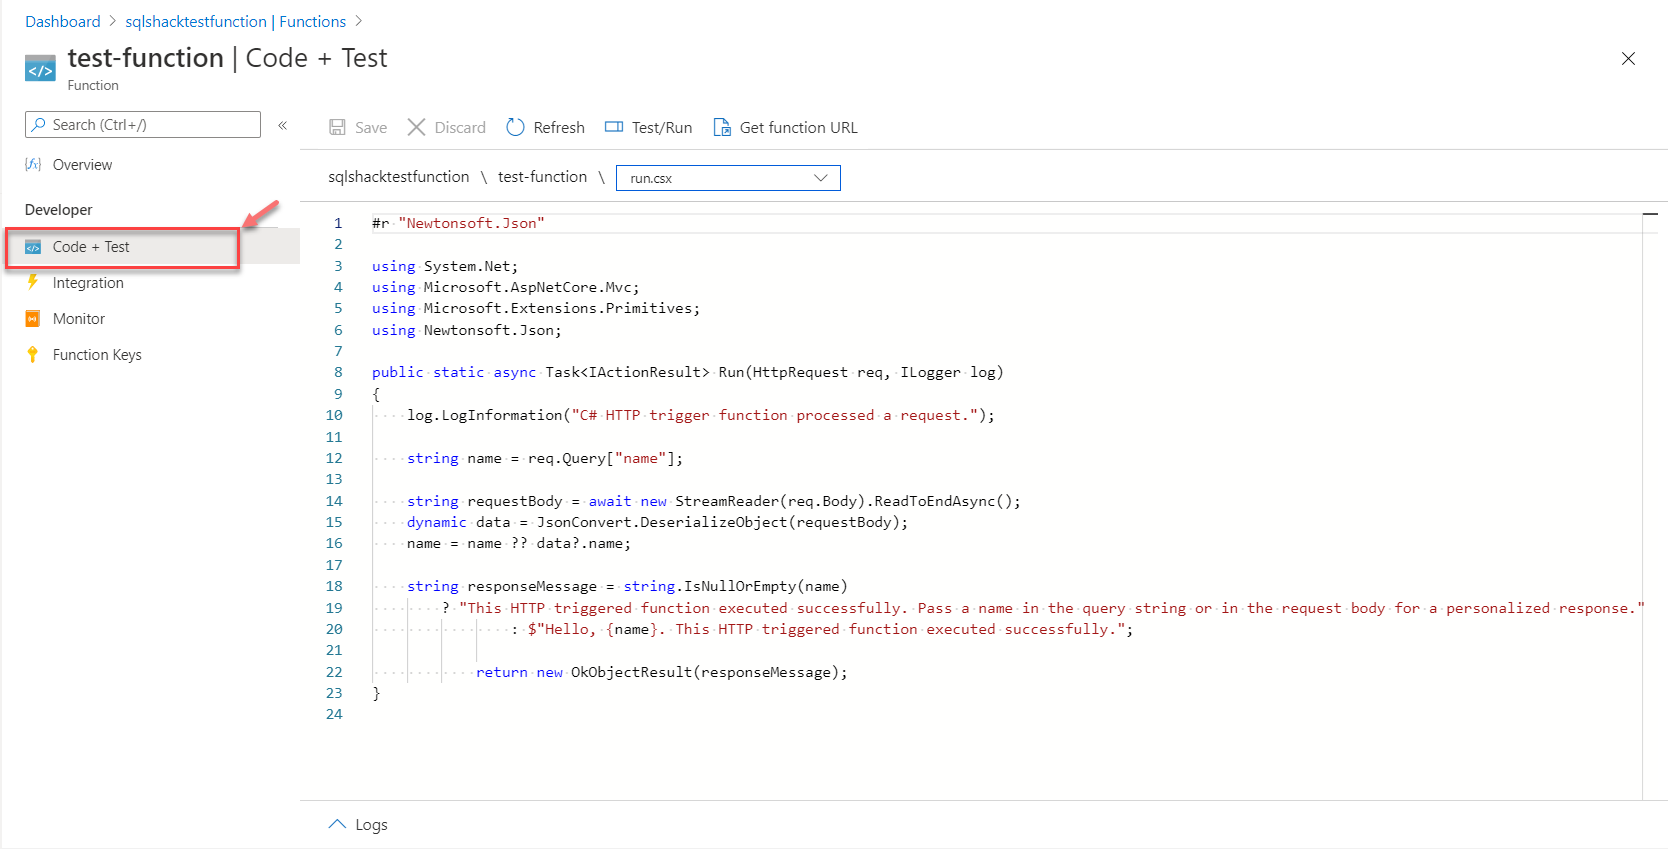
Click on Code + Test to view the code, which is provided by default.

Code and Test


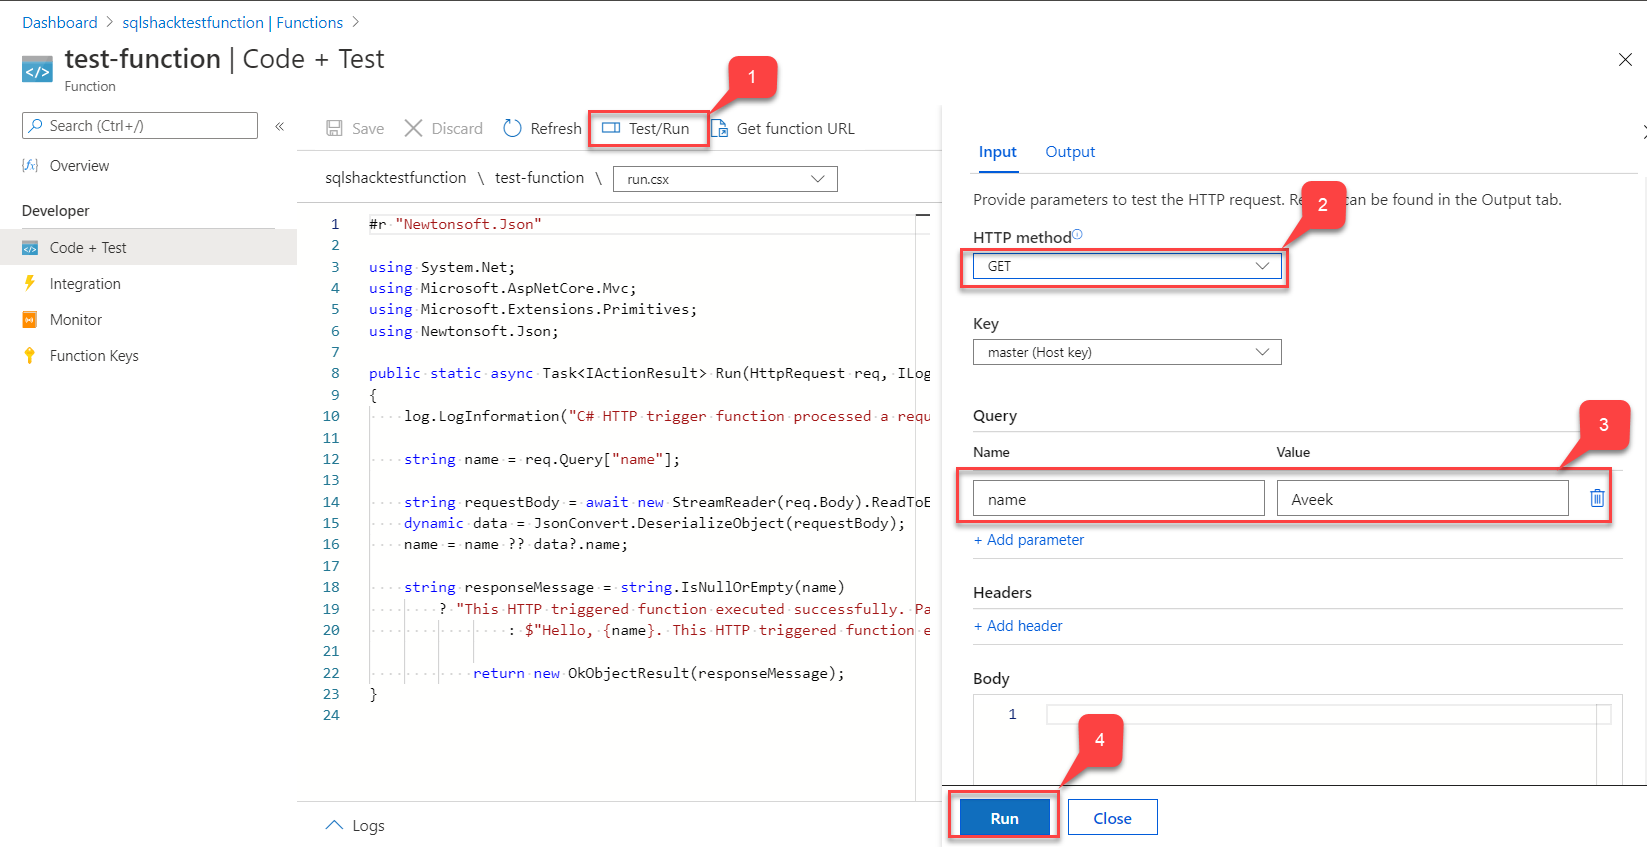
In order to test this function, click on Test/Run. A blade appears on the right in which you need to set the HTTP Method as GET. Also, add a “name” to the list of queries with any value to it. In my example, I am adding my name here. Hit Run once completed.

Test the function


Virtual Machine Scale Sets in Azure

 VIRTUAL MACHINE SCALE SETS (VMSS) :

VMSS is a great way to deploy and manage a set of identical Virtual Machines in your Azure subscription. I mean that you can deploy three Virtual Machines, which are identical instead of creating three individual Virtual Machines. Many pros can be noticed:

  • Starting and stopping Virtual Machines is very easy
  • Easily auto-scaling the number of instances in your VMSS to increase the availability
  • Reducing the number of instances to save money

VMSS is just an Azure Compute Resource (e.g Microsoft.Compute/VirtualMachineScaleSets). One cool thing is that you can integrate Virtual Machine Scale Sets with Azure Load Balancer and Azure Traffic Manager. You can build a Virtual Machine Scale Set using pre-defined Azure Template or by creating a new VMSS from the Azure Portal. Of course, you can also create a new VMSS using Azure CLI or PowerShell.

Another thing to notice is that VMSS is compatible both with Windows VMs and Linux VMs.

For those of you who are wondering why not simply these three Virtual Machines from scratch, then I must admit that it is not the new best practice. Think Azure Next Generation to save time and money!

In order to create three identical IIS Virtual Machines without VMSS, you would need to:

  • Create a Resource Group
  • Create the first VM with network card, storage, Public IP, …
  • Create the second VM with network card, storage, Public IP, …
  • Create the third VM with network card, storage, Public IP, …

Now, let’s imagine you no longer need the third IIS VM, then you would remove this VM, and two hours later the traffic increase significantly, so you must add a new IIS Virtual Machine for scalability, right? Of course, you can automate this process using JSON, PowerShell, and so on …, but thanks to Azure VMSS, you will be able to increase the number of Virtual Machines just by clicking on a button and that’s all! Scale set VMs are configured identically, you just choose how many new VMs you need. You do not need to independently define:

  • Network,
  • Storage,
  • Extension resources,

As shown below, you will also be able to use an Azure Load Balancer with your Azure VMSS. It means that you can redirect an inbound request to a specific Virtual Machine inside your Azure VMSS.
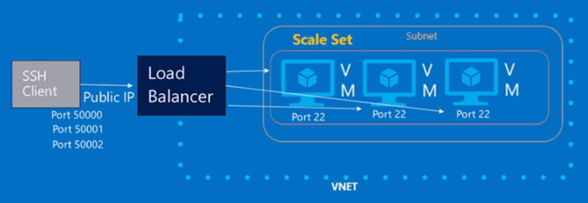
Azure-Virtual-Machine-Scale-Sets


Source: Channel9 – Episode 191: Virtual Machine Scale Sets with Guy Bowerman

In the previous example, the SSH request will be “NATed” through the Load Balancer and redirected to the Virtual Machine depending the inbound port number.

Another complex scenario can help you to redirect your traffic between multiple Azure Regions using Azure Traffic Manager, as shown below:
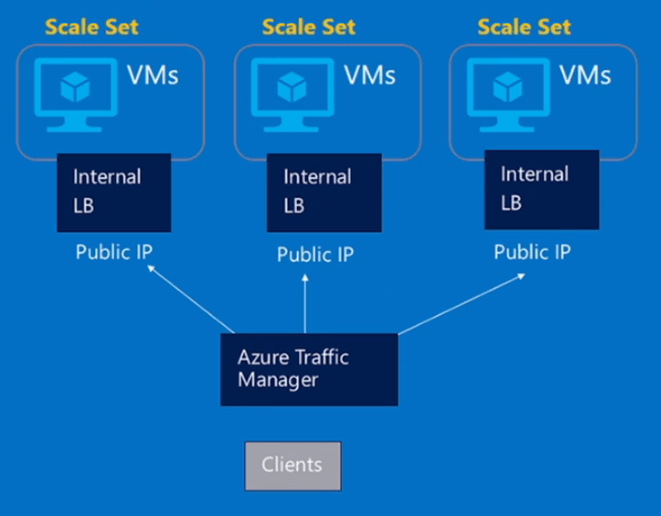
Azure-Virtual-Machine-Scale-Sets


Source: Channel9 – Episode 191: Virtual Machine Scale Sets with Guy Bowerman

Create Virtual Machine Scale Set

To create a new Virtual Machine Scale Set, log in to the Azure portal at https://portal.azure.com and click Create a resource, Search for Scale Set, then select Create:

Azure-Virtual-Machine-Scale-Sets

Enter the following information to create the Virtual Machine Scale Set:

  • Name: It is a friendly name for your VMSS. This name will be incremented to name your Virtual Machines
  • Operating System: Choose which OS you want to deploy
  • Subscription: Select your Azure subscription
  • Resource group: Select an existing Resource Group or create a new one
  • Location: Select the location
  • Username/password: It is the admin username that you will use to connect on your Virtual Machines
  • Instance count: The number of virtual machines in the scale set. Minimum is 0 and maximum is 1000. Default is two VMs, which is nice to start working with VMSS
  • Instance size: It is the size of each VM in the scale set. It means that all the virtual machine will be created using the same instance size. Note that you can modify the size later
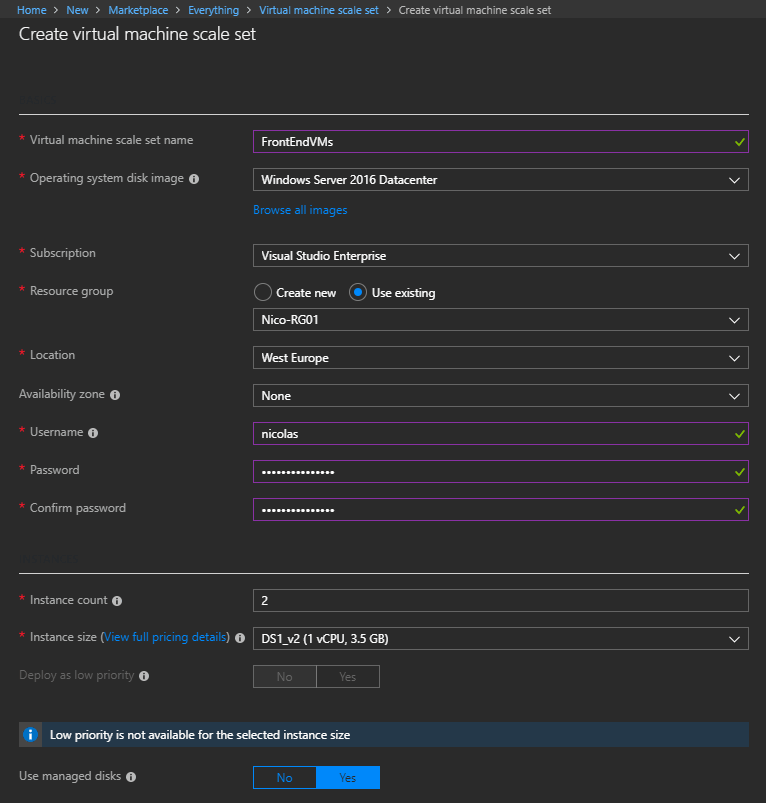
Azure-Virtual-Machine-Scale-Sets

Click Show Advanced Settings to configure the Load Balancer. In this example, I want to leave these virtual machines behind a load balancer with NAT rules for inbound connections.
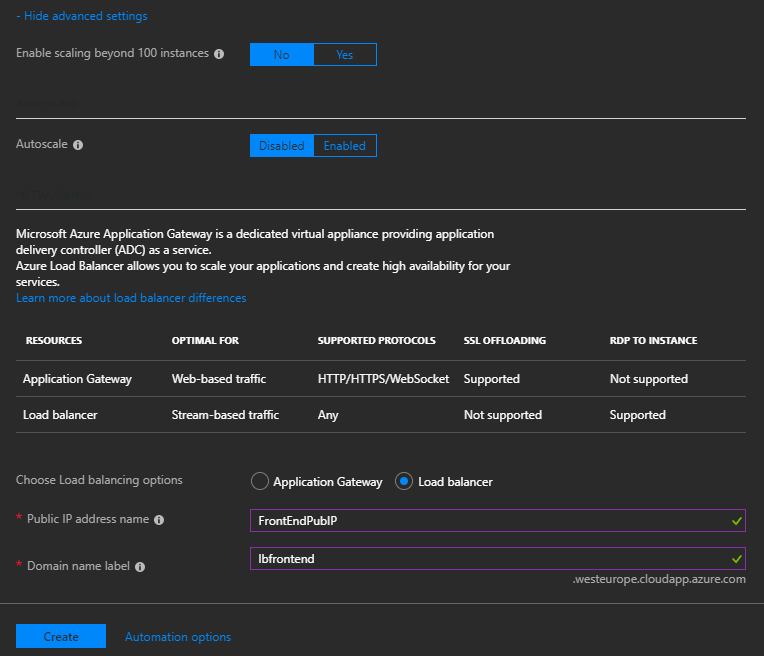
Azure-Virtual-Machine-Scale-Sets

After it has been deployed, use the Azure Portal to find the public IP address of the load balancer and see the NAT rules associated with the load balancer.

Note that you cannot see the Virtual Machines created through your VMSS individually as an Azure Resource. You must use the VMSS blade to interact with these VMs.

Navigate to your Azure Resources and confirm that a new Load Balancer has been successfully created:

Azure-Virtual-Machine-Scale-Sets

Click on the Load Balancer and check the NAT Rules. One NAT rule has been created per instance:
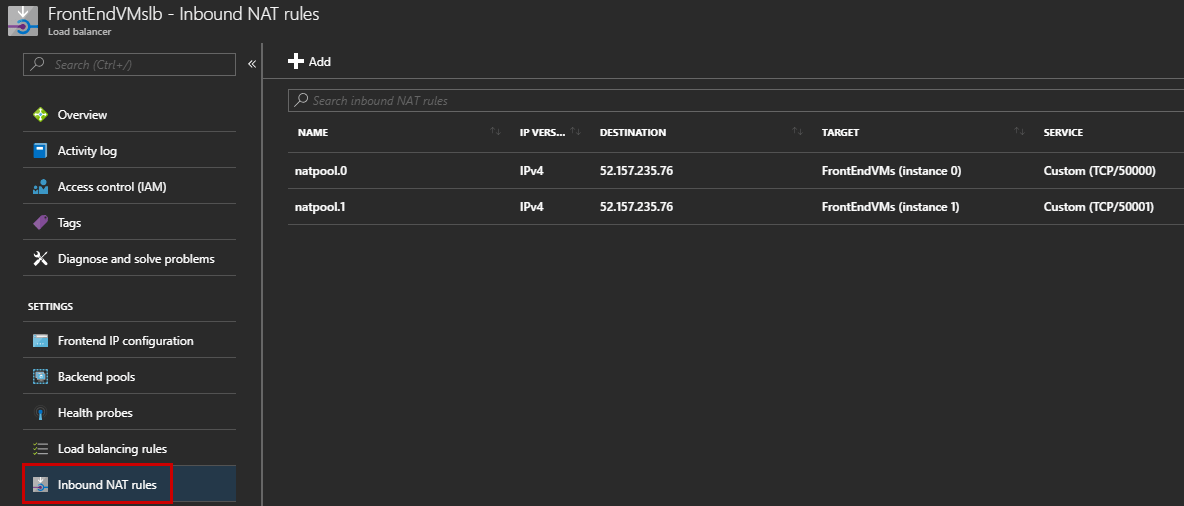
Azure-Virtual-Machine-Scale-Sets

Go back to your VMSS and confirm the number of deployed instances:

Azure-Virtual-Machine-Scale-Sets

Confirm that you can connect to your Virtual Machines. Use the following ::

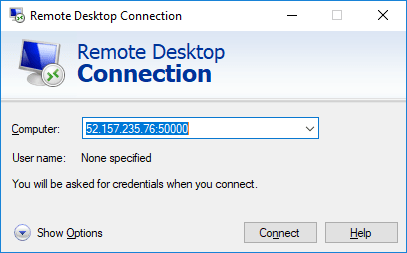
  • VM1 => 52.157.235.76:50000
  • VM2 => 52.157.235.76:50001

Azure-Virtual-Machine-Scale-Sets

Here, you use the Load Balancer to redirect the RDP request to the specific Virtual Machine.

At this step, your Virtual Machine Scale Set is up and running with two VMs. However, the auto-scaling feature is disabled by default:

Azure-Virtual-Machine-Scale-Sets

Click “Scaling” and “Enable autoscale”:
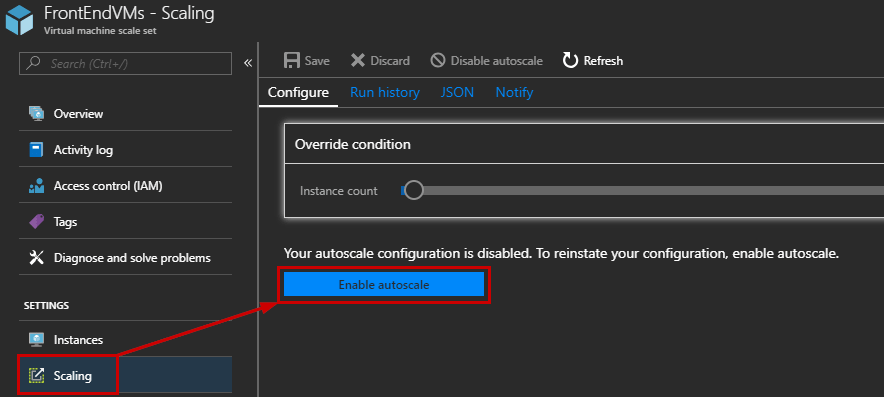
Azure-Virtual-Machine-Scale-Sets

Now, you can play with the auto scale conditions. You must define the behavior of your Virtual Machine Scale Set when a specific metric is detected. In this example, I configure the following:

  • The friendly name of the condition, which is just for the ease of management
  • The scale mode, which lets you add a rule based on a metric or a specific instance count
  • Add a rule depending on the CPU, network, storage, … Usually, a standard rule will check the CPU and increase or decrease the number of Virtual Machines in your VMSS
  • Configure the limit: minimum, maximum, and default number of VM instances. These limits are essential to make sure that you do not scale out beyond the maximum number of instances allowed in your Azure subscription
  • You can also create auto scale rules based on schedules. This setting is interesting if you know that the traffic will increase at a specific moment
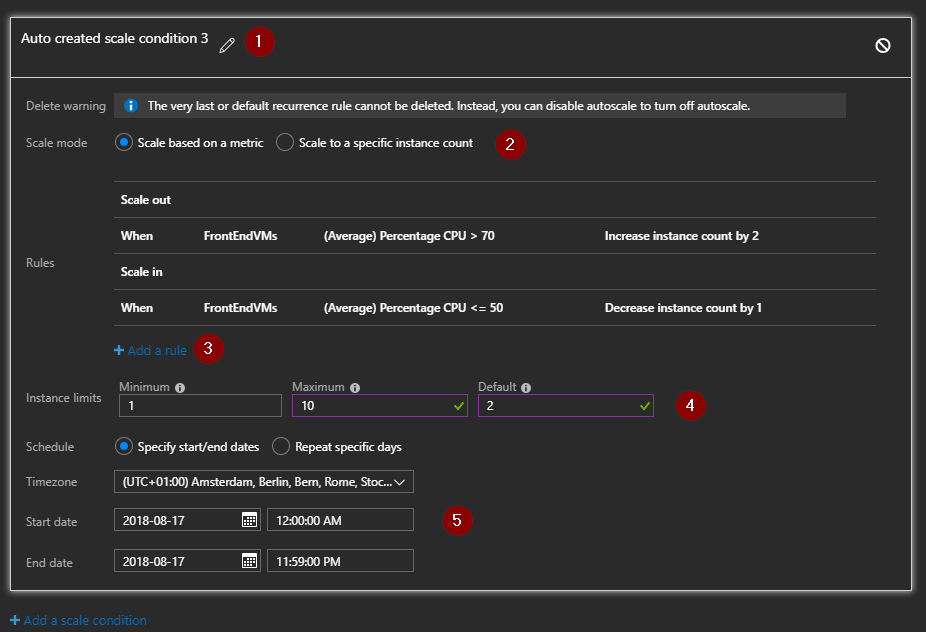
Azure-Virtual-Machine-Scale-Sets

After configuring the auto scale feature, you can confirm that auto scaling feature is ON.
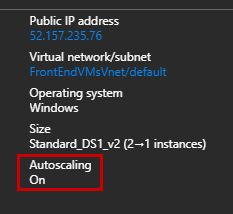
Azure-Virtual-Machine-Scale-Sets

To finish, note that you can easily manage your VMSS using the following buttons:

  • Start all instances in the scale set
  • Restart all instances in the scale set
  • Shut down all instances in the scale set

Azure-Virtual-Machine-Scale-Sets

Useful Links

Here are some useful links to start with Azure VM Scale Sets:

Azure Templates: https://github.com/Azure/azure-quickstart-templates/
You can send suggestions to vmssfeedback@microsoft.com
VM Scale Set Template on Channl9: https://channel9.msdn.com/Blogs/Windows-Azure/VM-Scale-Set-Template-Dissection/player

Conclusion

Thanks to Azure Virtual Machine Scale Sets, you will save time to manage your Virtual Machines in your Azure subscription and it will make it easier to define your Azure infrastructure by providing greater efficiency. Depending on the traffic, you will be able to add or remove Virtual Machines very easily.

BDRSuite is a one-stop solution for the Backup & DR needs of diverse IT environments that include VMware VMs, Hyper-V VMs, physical servers, and workstations – Windows, Linux, Mac, AWS EC2 instances, Microsoft 365 and Google Workspace.

BDRSuite for Azure

BDRSuite provides backup and disaster recovery solutions for IT administrators running their workloads on Microsoft Azure VMs. It helps IT administrators to securely backup the Azure VMs to other regions or to other public clouds or to their own Data Centers with RTO and RPO of less than 15 minutes and minimal administration effort.

How it works

Vembu BDR backup server needs to be installed on a Windows machine running on any public cloud or local data center with an assigned public DNS/IP if you would like to back up the Azure VMs over WAN. Then, using BDRSuite client (installed on one of the VMs), these VMs can be backed up to the BDR backup server over LAN or WAN.