Tuesday, 11 September 2018

Windows Server 2016 - Network Services

Windows has many network services too and you might already be knowing that it can become a router or a VPN Server too. Let us see how to use the Windows server 2012 as a router by installing the Remote Access role to it.
PS − Server should have 2 network cards – One inside the LAN and the other facing the internet.
To add the Remote Access role, we should follow the steps given below.
Step 1 − Go to, Server Manager → Manage → Add Roles and Features → Next → Check Role-based or feature-based installation → Check Select a server from the server pool → Next.
Once all of it is done, then at the list of the roles find Remote Access and check it → A pop-up window will open.
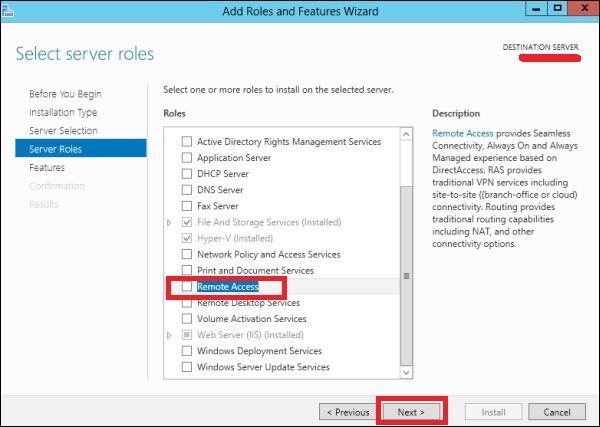
Remote Access
Step 2 − Click “Add Features” → Next.
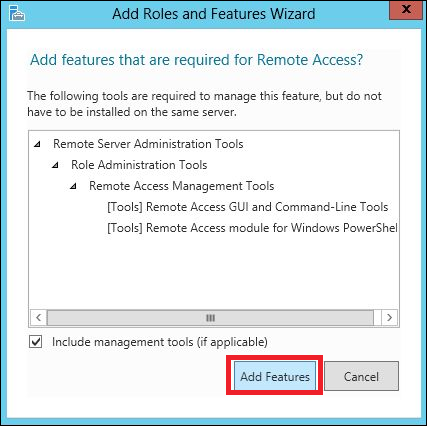
Remote Access Features
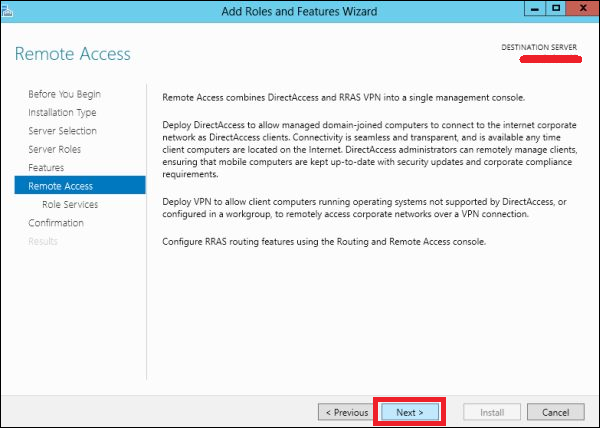
Step 3 − Click Next.
Remote Access Combines
Step 4 − Check on the DirectAccess and VPN(RAS) and Routing check boxes.
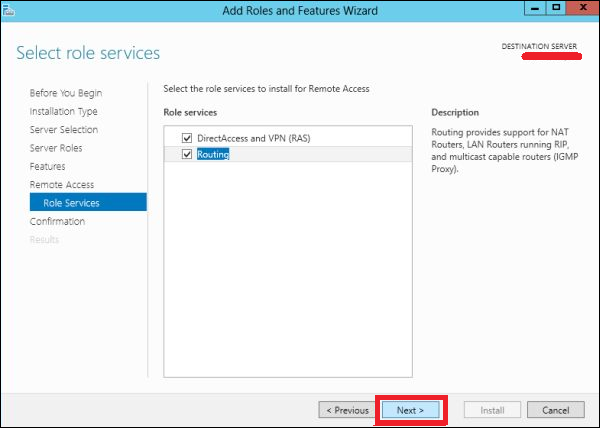
RAS
Step 5 − Click Install and wait for it to be installed completely.
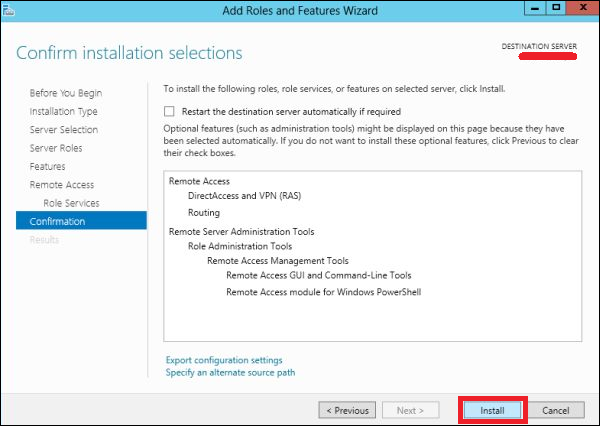
Installed Completely
After the installation is done, let us now see the setup of the router. For this, we need to follow the steps given below.
Step 1 − Go to, Server Manager → Tools → Routing and Remote Access.
Routing
Step 2 − Right click → and then again click on Configure and Enable Routing and Remote Access as shown in the following screenshot.
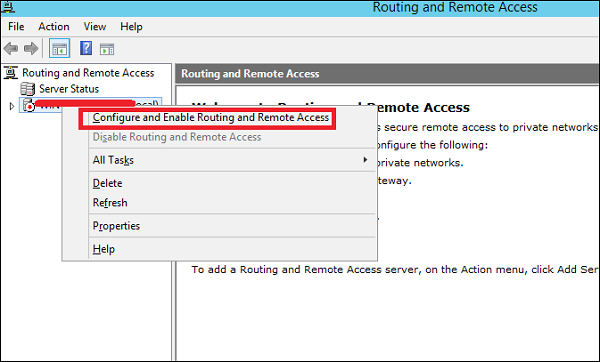
Enable Routing
Step 3 − Select the Network address translation (NAT) option → Next.
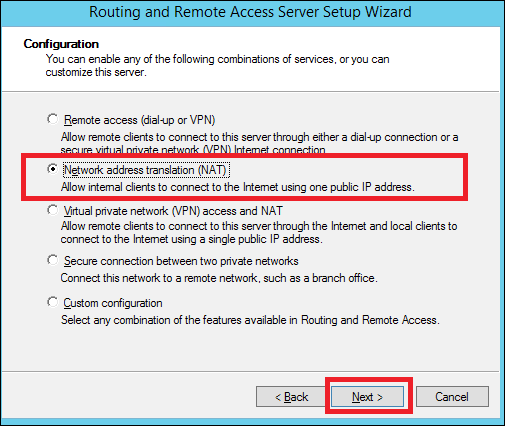
NAT
Step 4 − Now choose your Ethernet card that will be facing your internet site as shown in the following image and then → Next.
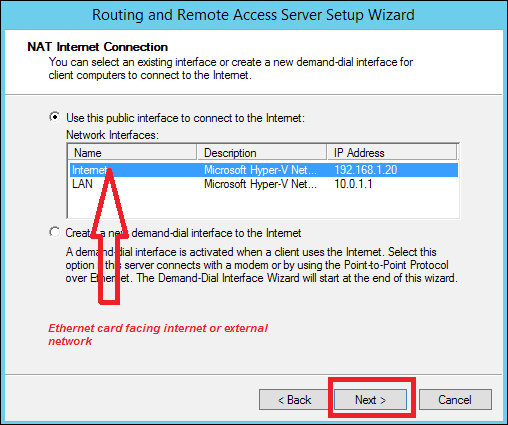
Ethernet Card
Step 5 − Choose I will set up name and address services later as we have already set up the DHCP and DNS and then → Next.
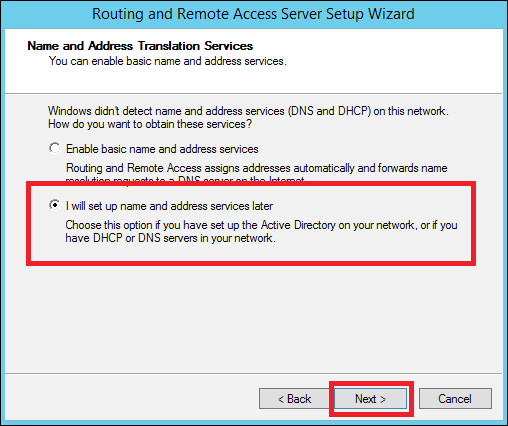
DHCP DNS
Step 6 − Click the Finish button.
Finished
Now let us see how to make the VPN Setup to allow the employees to connect from home. To do this, we must follow the steps given below.
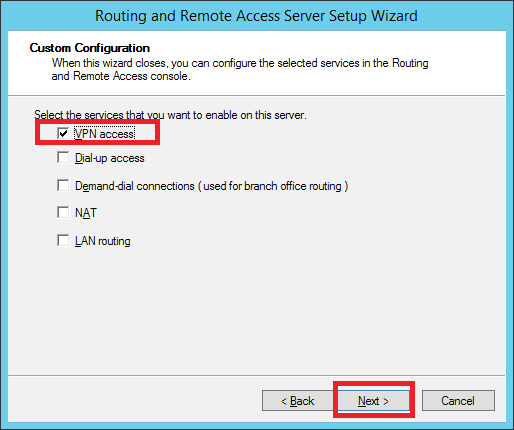
Step 1 − Go to, Server Manager → Tools → Routing and Remote Access → Right click → and then again click on Configure and Enable Routing and Remote Access → Custom Configuration and then → Next.
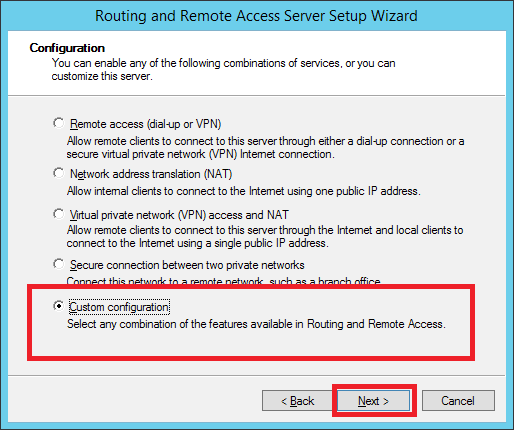
Configure and Enable Routing
Step 2 − VPN Access and then → Next.
VPN Access
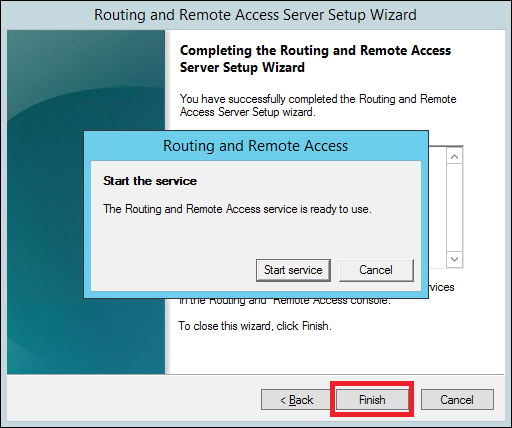
Step 3 − Click the Finish button.
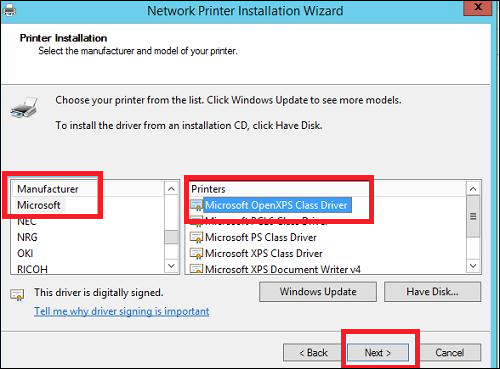
Click Finish Button

Configure Print Drivers

If we want to add other additional drivers, so that our clients find them easier to install a printer on their own. We must follow the steps given below −
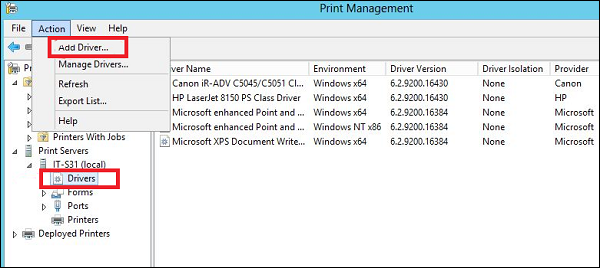
Step 1 − Go to, Server Manager → Tools → Print Manager → Action → Add Driver…
Add Driver
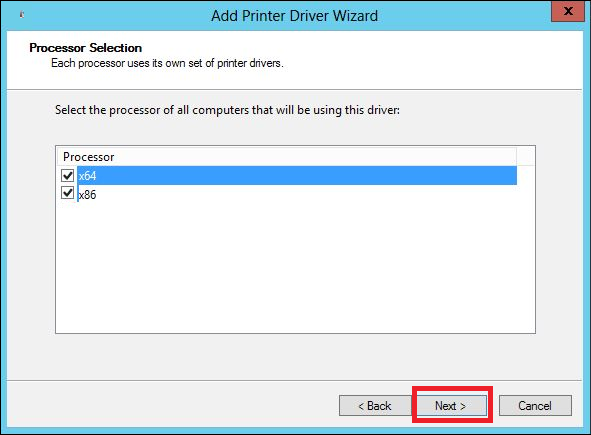
Step 2 − Check both boxes → Next.
Check Boxes
Step 3 − Choose the drivers Path to be installed and then → Next.
Drivers Path
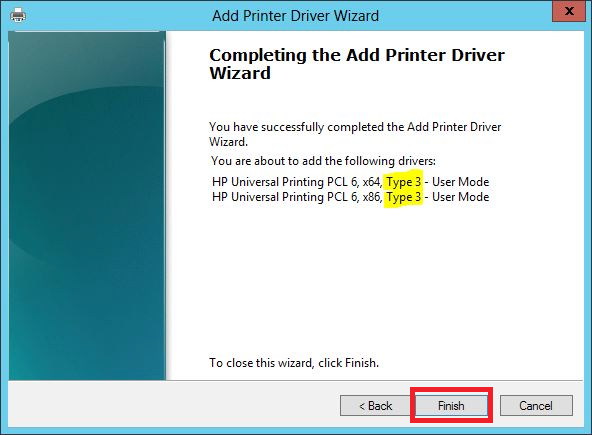
Step 4 − Click the Finish button.
Button Finish

Windows Server 2016 - Easy Printing

Easy Printing is a feature which allows the client that connects via RDS to print over the network. It is installed in Windows server 2016 by default. Easy Printing is basically where the printer device is defined on the client system and a printer is connected directly via the network. All configuration is done via Group Policy Objects.
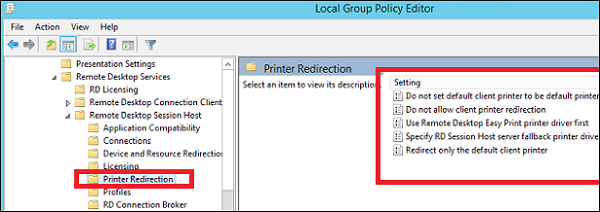
The configuration settings can be found at Computer Configuration – Administrative Templates – Remote Desktop Services – Printer Redirection.
For User Configuration, it will be have the same path – Administrative Templates – Remote Desktop Services – Printer Redirection.
Printer Redirection
In administration, another important aspect is to set the priority for the printer, so the users have the same printer installer and can print as per their priorities. In this, the users printing with higher priorities overpass the printing will lower priorities.
To do so, you need to add different logical printers and then add then as per the users or departments that have different priorities.
To do this, firstly let us add a printer to the print server by following the steps given below.
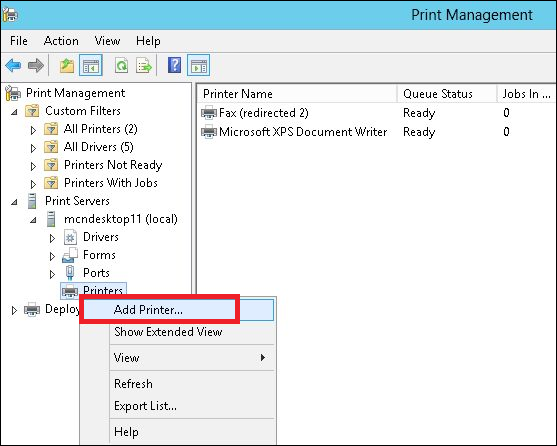
Step 1 − Click on Server Manager → Tools → Print Management → then on the left panel click Print Servers → then right click on Printers and → Add Printer.
Add Printer
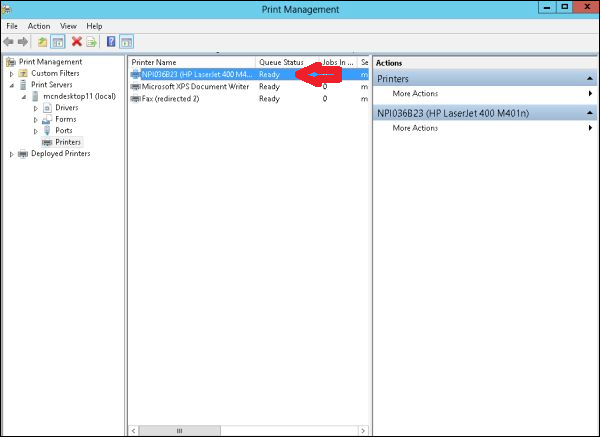
Step 2 − Next, follow the wizard to add the network printer like you do for a normal workstation and at the end this printer will be shown in the Printer Management.
Print Management
Step 3 − Now that we have installed the printer, we can set the priority on this printer – Right click on the printer → Advanced → put a number at Priority from 1-99 → OK.
Advanced

Windows Server 2016 - Print Server

In this chapter, we will see how to install a Print Server which plays some very important roles for the system administrator and the management. We should follow the steps given below.
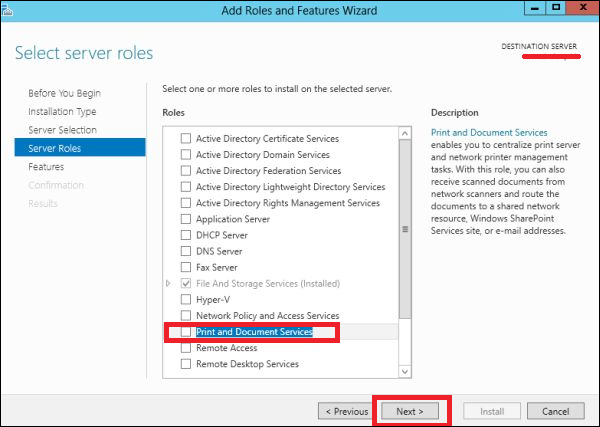
Step 1 − Go to Server Manager → Manage → Add Roles and Features → Next → Check on the Role-based or feature-based installation box and → Check on Select a server from the server pool and then → Next.
Once it is done then, at the list of the roles find Print and Document Services → A popup window will open.
Print Document Services
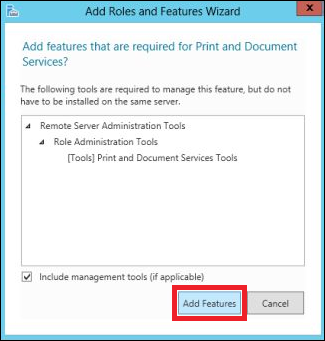
Step 2 − Click on Add features and then → Next → Next → Next.
Role Administration
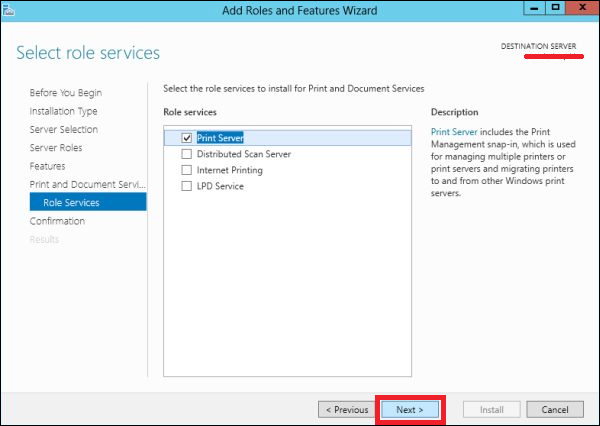
Step 3 − Check on the Print Server box and → Next.
Print Server
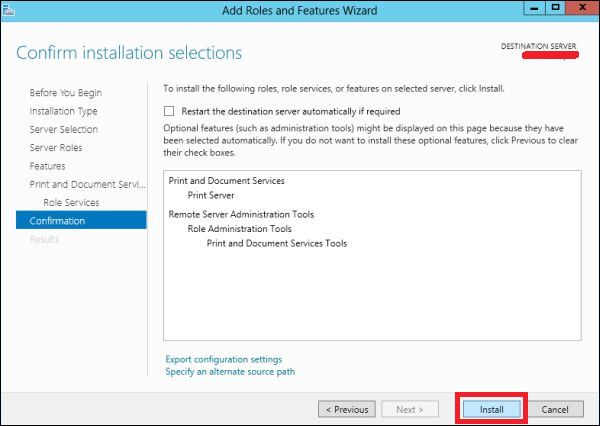
Step 4 − Click Install.
Confirm Installation Selections

Windows Server 2016 - File Manager

Like its previous versions, the present Windows Server 2012 version has a File Server Resource Manager Role. As you know, this is a role that helps system administrators to manage shared folders in the features link in setting up limits or file extension restrictions. To install it, we should follow the steps given below.
Step 1 − Go to Server Manager → Manage → Add Roles and Features → Next → Check on the Role-based or feature-based installation box → Check on the Select a server from the server pool box → Next.
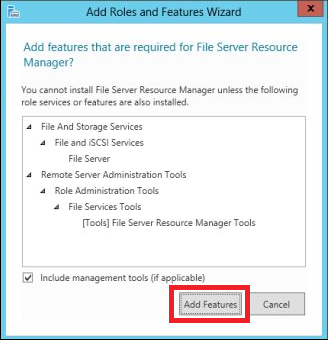
Then, at the list of the roles find File and Storage Services and expand it. After this, expand the Files and iSCSI Services → Check on the File Server Resource Manager box and then a pop-up window will open.
Files
Step 2 − Click on Add features and then → Next.
Click Add Features
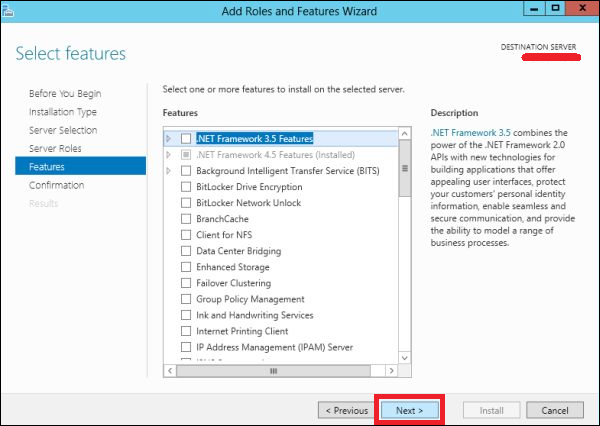
Step 3 − Click the Next button.
Next Buttons
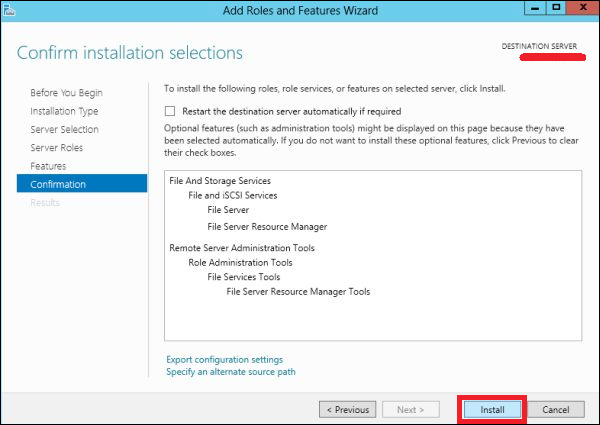
Step 4 − Click the Install button.
Install Button
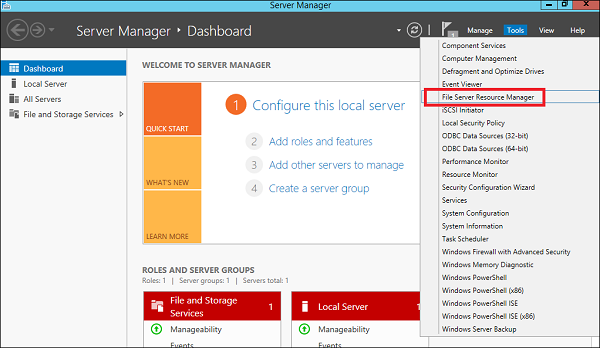
Now that we installed the File Server Resource Manager, let us open it by following the path given below.
Step 1 − Click on Server Manager → Tools → File Server Resource Manager.
File Server Resource Manager
To set quota to a folder, we should follow the steps as below.
Step 2 − On the left panel click on Quota Management → expand Quota Templates → click on Create Quota Template… on the right-hand side panel as shown in the screenshot given below.
Quota Management
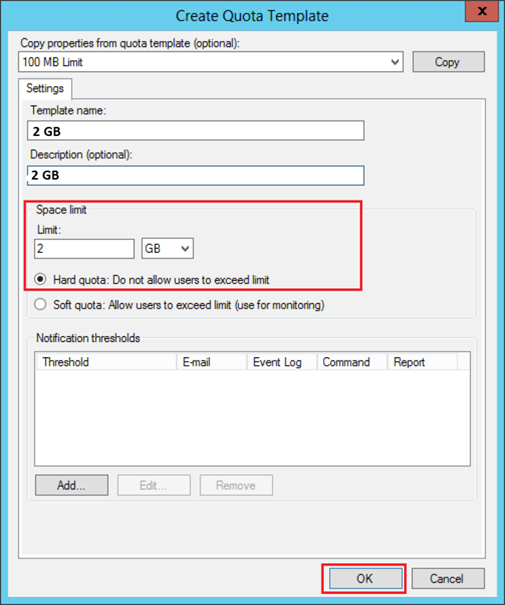
Step 3 − A new table will be opened, where the most important aspect to put is Space Limit depending on the need. Here, we will put 2GB and then → OK.
Space Limit
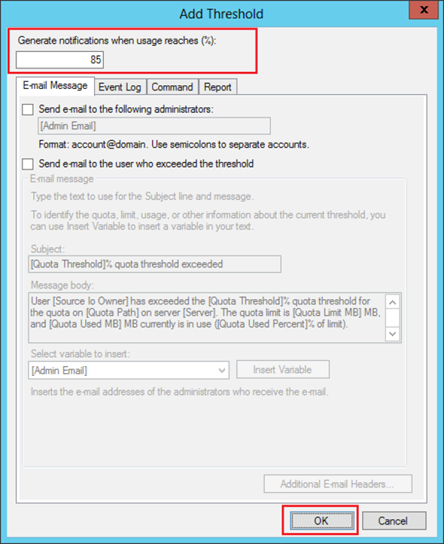
Step 4 − You must put the threshold for it and once the folder reaches the capacity, it will send you a notification where you will have an option to put the email.
Threshold
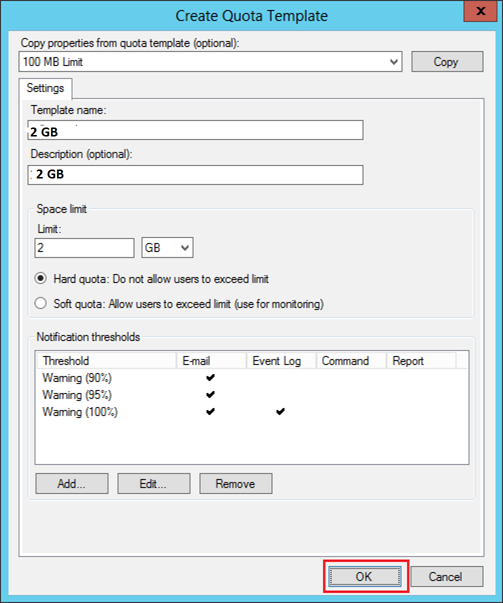
Step 5 − Click Ok.
Limit
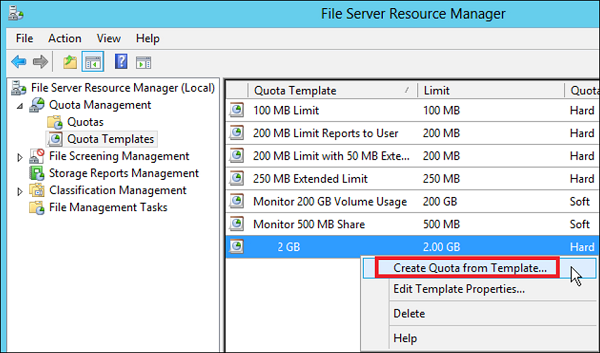
Step 6 − Then to attach this quota to a folder – Right Click on the template → click on Create Quota from Template…
Create Quota
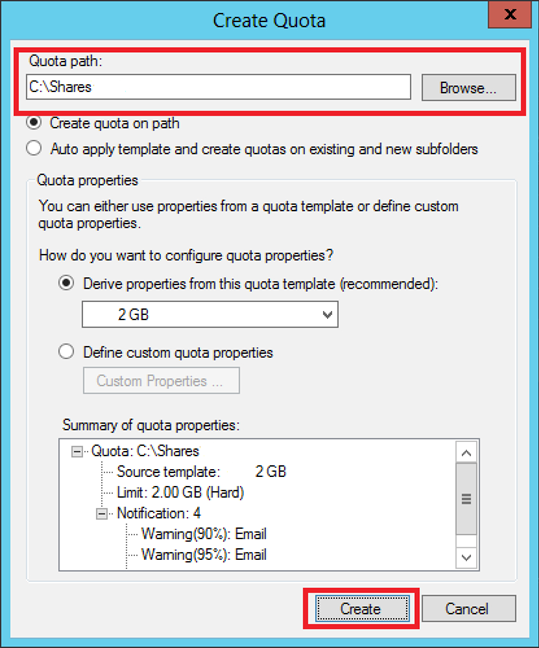
Step 7 − Click on Browse… and then select your folder → Create.
Click On Browser
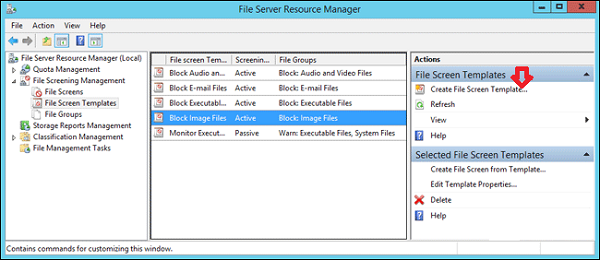
Step 8 − To put a file restriction to your folders, you can go to the left pane File Screening Management → File screening templates → Click on the left panel Create File Screen Template…
File Screening
Step 9 − Click on Browse… and find the folder that you want → Create.
Browser

Windows Server 2016 - Sharing of Files

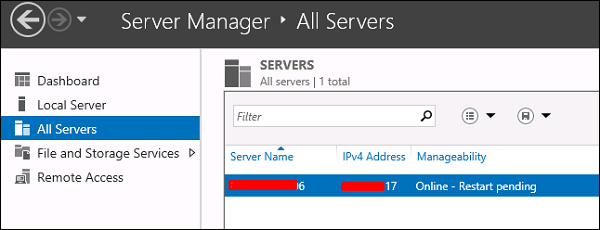
Another important service for Windows Server is Sharing Files and for this purpose the Windows Server 2016 has – File and Storage Services, which is found in Server Manager on the left pane as shown in the screenshot given below.
All Servers
Now let us see how to create a Share in the system with its respective rights. To do this, we should follow the steps given below.
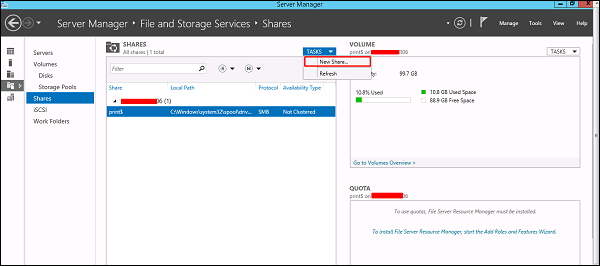
Step 1 − Click Server Manager → then click on File and Storage Services in the Server Manager sidebar → click on Shares → click on the Shares drop-down list → click on New Share.
Click on Shares
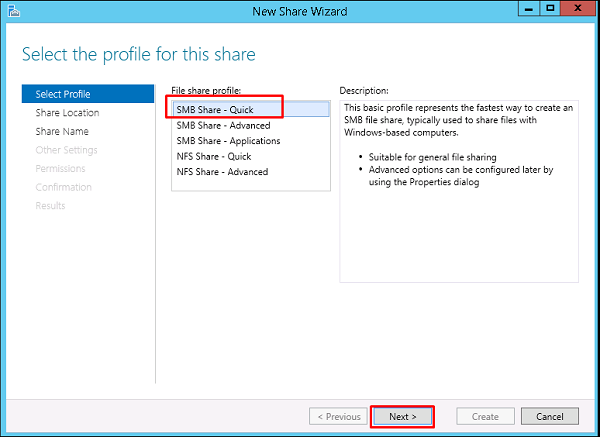
Step 2 − This will open the New Share Wizard → From here, select a type of share → I will create a very basic SMB share, so click on SMB Share – Quick. We can later configure the user rights of this share.
SMB Share
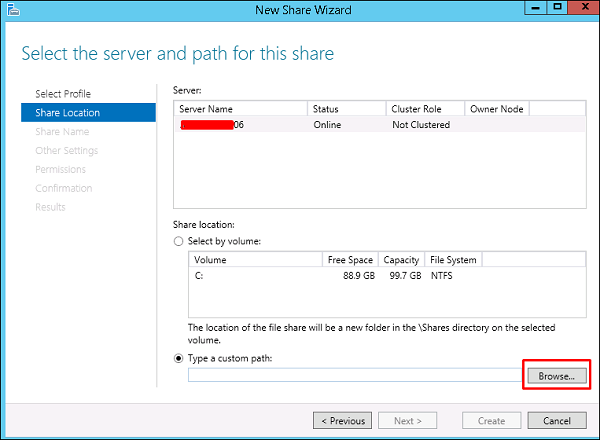
Step 3 − Click “Type a custom path” → click on Browse button.
Custom Path
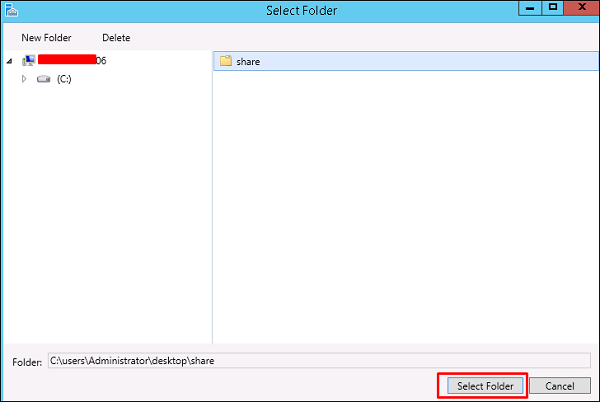
Step 4 − Select the folder that you want to share → Click Select Folder.
Select Folder
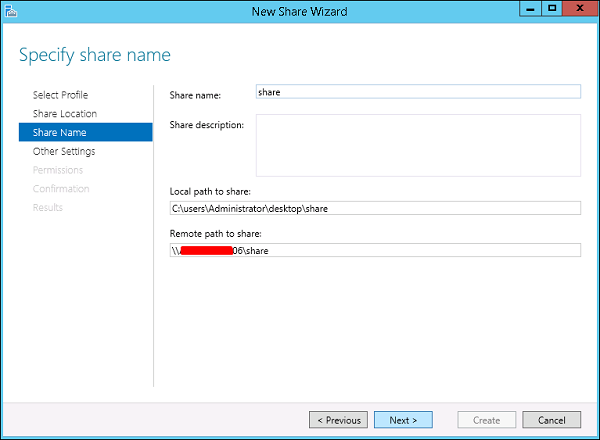
Step 5 − Click Next.
Share Name
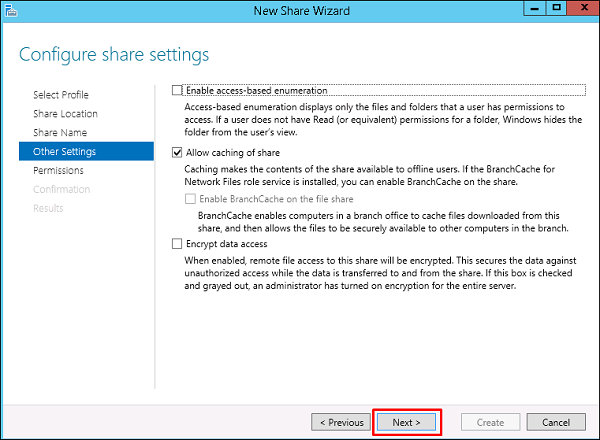
Step 6 − You can choose one of the three options as per your need. The explanations are also mentioned alongside the check boxes, once selected → Next.
Other Settings
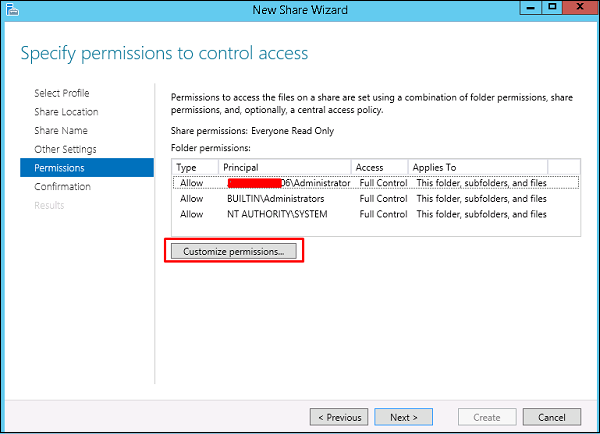
Step 7 − Click on Customize Permissions to authorize the rights that your users need to have.
Customize Permissions
Step 8 − Click on Add if you would like to add other users.
Add
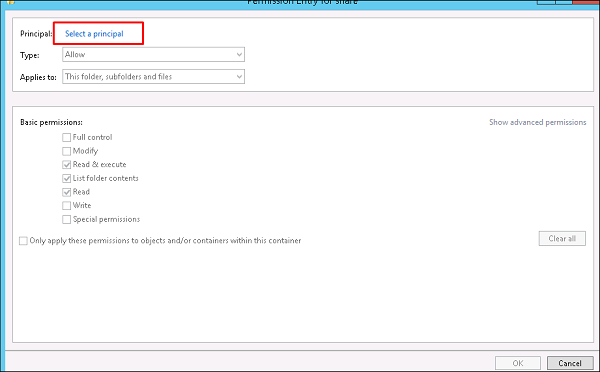
Step 9 − Click on Select a principal.
Select Principal
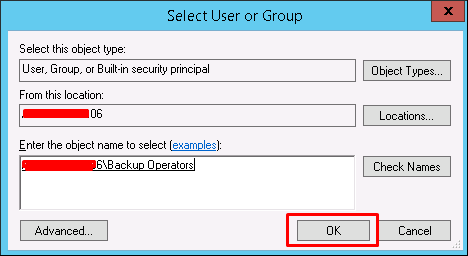
Step 10 − We should give rights that can be done by entering the object name, which is Backup Operator in this case and then → OK.
Backup Operator
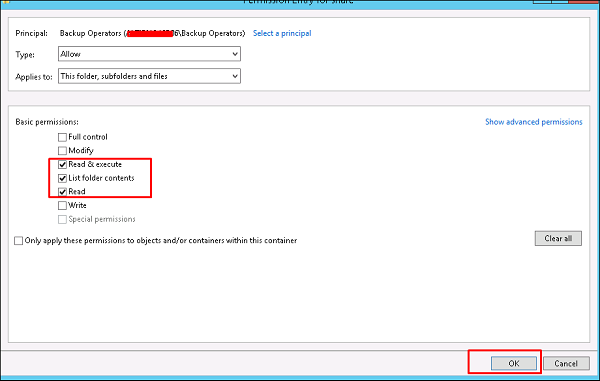
Step 11 − To this user we will give Read\Write rights, for that we will check the respective boxes and then → OK → OK → Next.
Respective Boxes
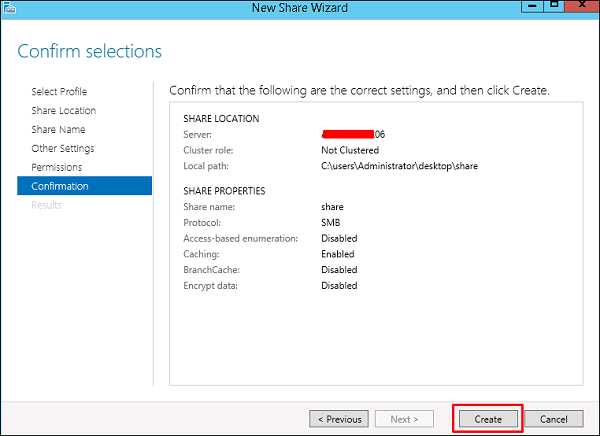
Step 12 − Click on Create.
Click on Create