Wednesday, 5 September 2018

Microsoft Azure - Setting Up Alert Rules

While monitoring a virtual machine we can see different metrics related to a virtual machine in Azure. Azure has also provisioned a way to alert the administrator of virtual machine when these metrics go above or below a specified limit through e-mail. Setting up an alert can be very useful in notifying the administrator about issues that require attention.
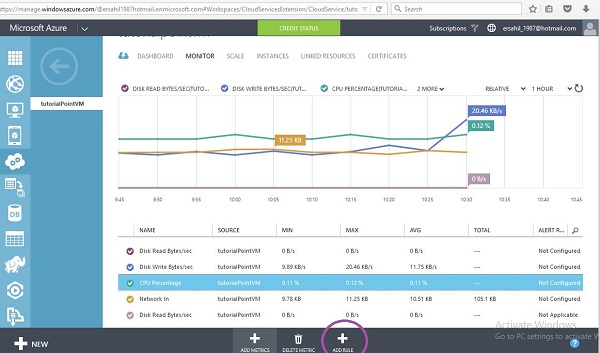
Step 1 − Go to the ‘Monitoring’ section of your virtual machine.
Step 2 − Select the metrics you want to set alert for.
Step 3 − Select ‘Add Rule’ from the bottom.
Add Rule
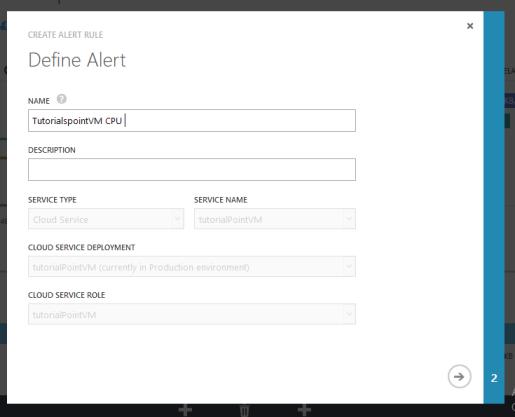
Step 4 − Enter the name for alert and enter other information.
Alert Details
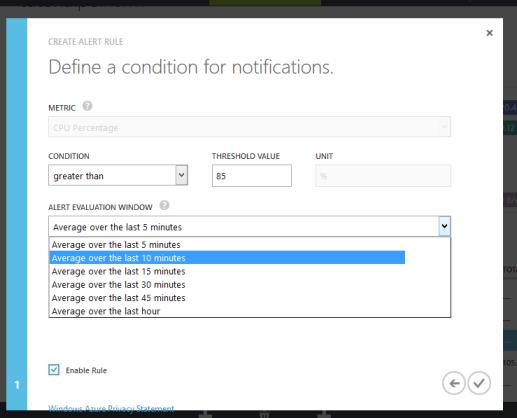
Step 5 − In the following screen that pops up, select condition. It can be greater than, less than or equal to.
Step 6 − Enter the threshold value which will be in percentage. In this example, let’s enter 85 which means you will get an e-mail when utilization for processor of your virtual machine reaches the 85% average over the last 10 minutes.
Condition for Notifications
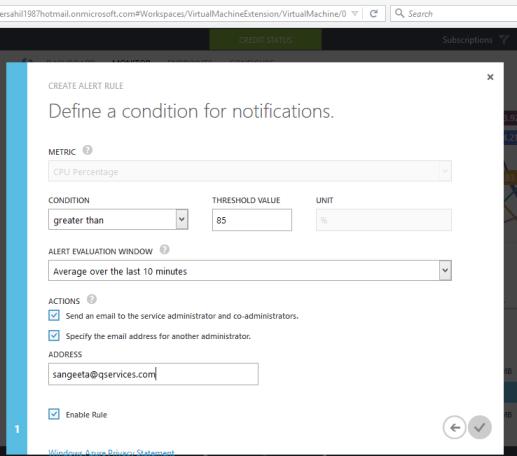
In addition to sending the alert e-mail to service administrator and co-administrators, you can receive alert in one more e-mail.
Setting-Up Add Rule
You can set maximum 10 alerts for each subscription. Alerts can be sent to the administrator’s e-mail plus one more e-mail provided at the time of setting up an alert.
Similarly, you can set alerts for other Azure services like web applications and mobile applications.

Microsoft Azure - Monitoring Virtual Machines

Microsoft Azure - Monitoring Virtual Machines


Monitoring virtual machines is important to keep a track of its performance and health. Windows Azure provides an interactive interface to monitor the statistics related to the performance of virtual machine. The five key statistics are −
  • CPU percentage
  • Disk Read Bytes/sec
  • Disk Write Bytes/sec
  • Network in
  • Network out

Monitor VM in Azure Management Portal.

Step 1 − Login to Azure Management Portal.
Step 2 − Go to Virtual Machine.
Step 3 − Select the virtual machine you want to monitor.
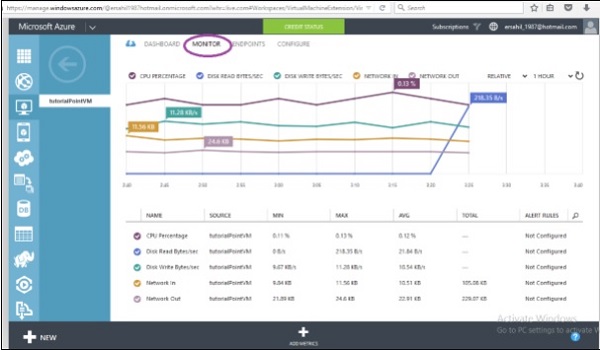
Step 4 − Select Monitor from the top menu as shown in following image.
Monitoring Virtual Machines
You can see 5 key terms on the above screen. It seems pretty complicated at first glance but when you look carefully, you can see that each line on the graph is in a different color which matches the color of the term. For example, CPU Percentage is in purple color and the purple line on the graph represents it. The machine shown in the above image is quite new. The following sections will explain how figures are read.

CPU Percentage

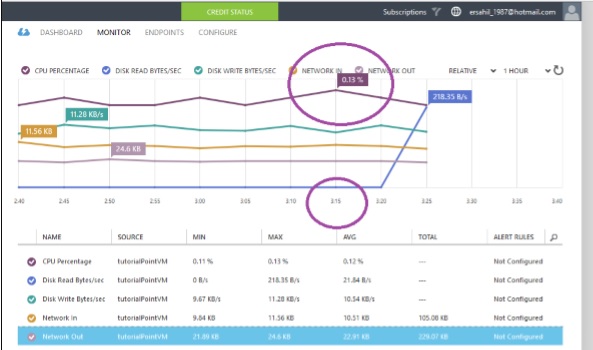
CPU percentage is the most common statistics to check whenever there is a performance issue in an application. It tells the processor’s utilization in percentage. In the following image, you can see that in the last dropdown at the right top corner 1 hour is selected and, highest utilization is at 3:15 which is 0.13%.
CPU Percentage

Disk Read Bytes/Sec

Another factor affecting performance is disk input/output operations. Disk read byte/second measures the amount of data read every second on the disk. If the read operations are done more frequently on the disk, performance issues can be resolved using a faster disk.

Disk Write Bytes/sec

Similarly, disk write byte/sec measures the amount of data written every second. If the application needs writing large amount of data on the disk, a bigger disk can be chosen.
Disk Write Bytes/sec
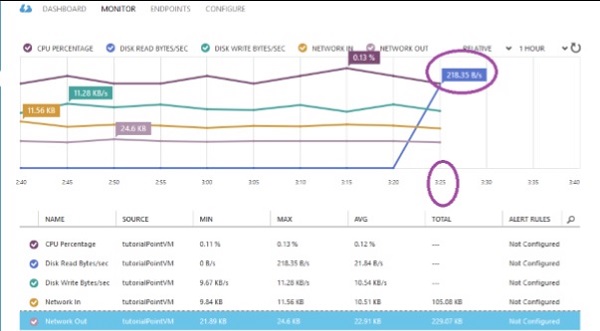
In the image above, you can see the highest point in disk read is 218.35 byte/sec at 3:25. You can see the last hour’s data because ‘1 Hour’ is selected in the dropdown. You can also see data for last 24 hours and 7 days.

Network In

Monitoring the network traffic can be done by looking at the ‘network in’ figures in the ‘Monitor’ section. The network-in statistics can be in bytes or TCP segments received.

Network Out

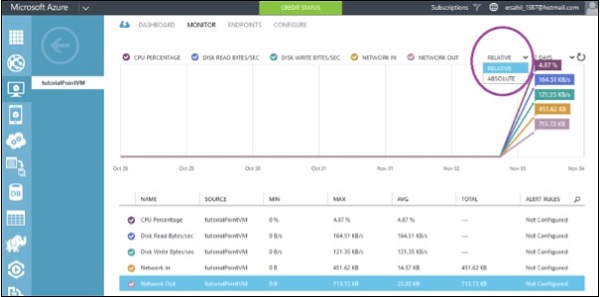
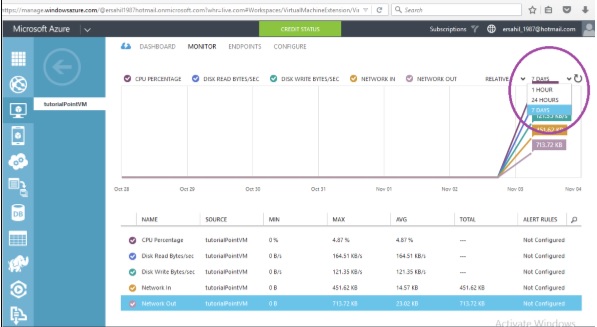
Network-out statics tells about TCP segments sent per second. You can also see relative or absolute statistics by selecting an option from dropdown encircled in the following image.
Network Out
Similarly, you can choose the duration from the dropdown highlighted in the following image.
Network Out
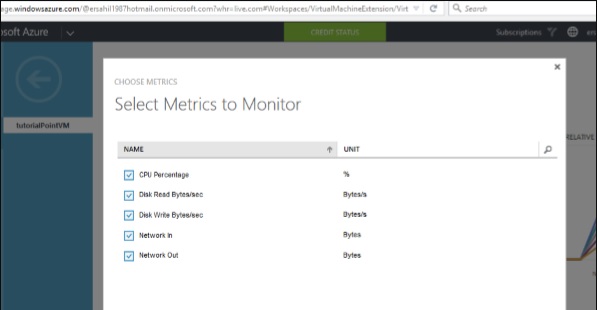
You can also choose particular metrics, by clicking on ‘Add Metrics’ at the bottom of the screen. The following screen will appear, in which you can check the desired metrics.
Network Out

Enable Diagnostics

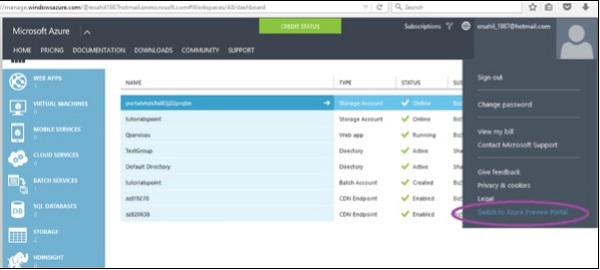
Enabling diagnostics allows you to collect logs. Azure will collect logs and store in a storage account you specified. We can enable diagnostics by switching to the ‘Preview Portal’. Diagnostic figures help in troubleshooting as the logs for errors can be tracked in the storage account.
Step 1 − Switch to the ‘preview portal’.
Enable Diagnostics
Step 2 − Locate the ‘Virtual Machine (classic)’ in the left panel.
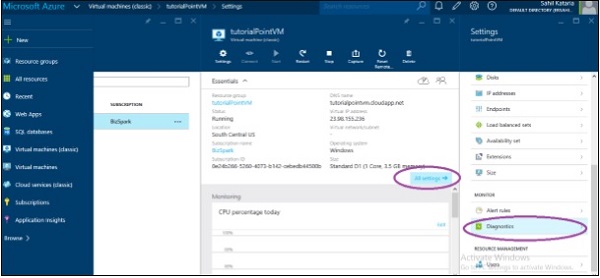
Step 3 − Select the Machine and ‘All Settings’.
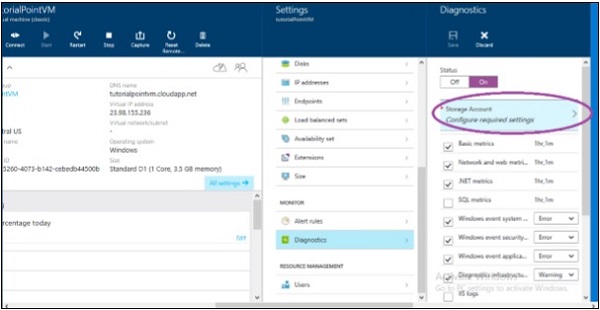
Step 4 − Scroll down and locate ‘Diagnostics’. Select ‘Diagnostic’ as shown in the following image.
Diagnostics
Step 5 − Select ‘On’ in the next panel displayed on the right side. By default it will be set off.
Step 6 − Since it uses a storage account to store the logs you will have to configure the setting for the storage account by clicking on the encircled part in the following image.
Configure Settings
Step 7 − You can also select or deselect the type of logs you want to keep.
You will also see a panel at the bottom with the heading ‘Monitoring’. This section displays the same metrics that we discussed in the section above.
These figures help users to identify the causes of performance slide of an application. They can also generate alerts for these features; they go above the set limits.

Microsoft Azure - PowerShell

Microsoft Azure - PowerShell


PowerShell is a framework or you can say an interface built by Azure team that lets the user to automate and manage Windows Azure services. It is a command line tool that uses the scripts or cmdlets to perform tasks such as creating and managing storage accounts or Virtual Machines that can easily be done using the preset commands.

Installing Azure PowerShell

Step 1 − Login into Azure Management Portal.
Step 2 − Click ‘Downloads’.
Installing PowerShell
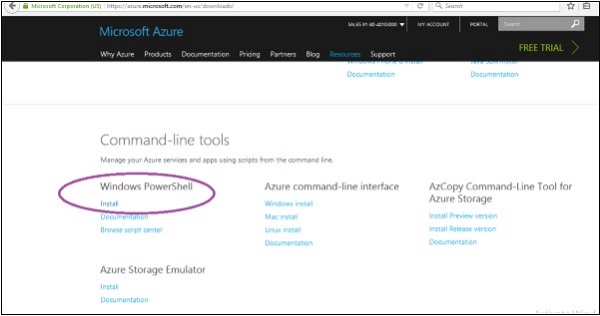
Step 3 − In the following screen, locate ‘command-line tools’ and then ‘Windows Azure PowerShell’. Click ‘Install’ listed under it to download the setup and install it.
Command-Line Tools
Alternatively, you can visit the link http://www.windowsazure.com/en-us/manage/downloads/

Connecting to Your Subscription

Once you have installed Azure PowerShell, you will have to connect it to your Azure subscription.
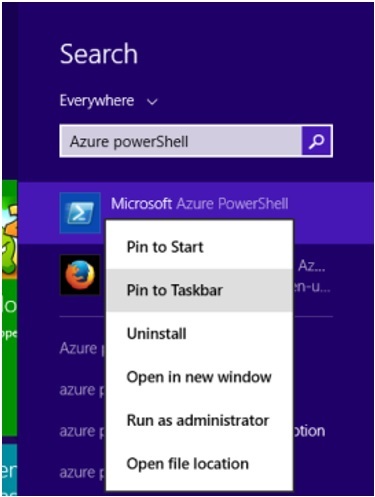
Step 1 − Locate Microsoft ‘Azure PowerShell’ in your programs.
Azure PowerShell
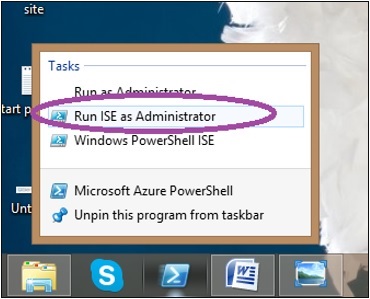
Step 2 − Pin it to the taskbar. You can run it as ISE by pinning it to the taskbar in Windows 8. Somehow, if it doesn’t show the option of ‘Run ISE as Administrator’ it is in programs. ISE lets copy paste commands easily.
Step 3 − Right-click on ‘Microsoft Azure PowerShell’ and select ‘Run ISE as Administrator’.
ISE Administrator

Connect to Your Azure Account

Using Active Directory

To get started with Azure tasks, you will have to first add your Azure account to PowerShell. You just have to perform this step once on your computer and every time you run Azure PowerShell, it will connect to the account automatically.
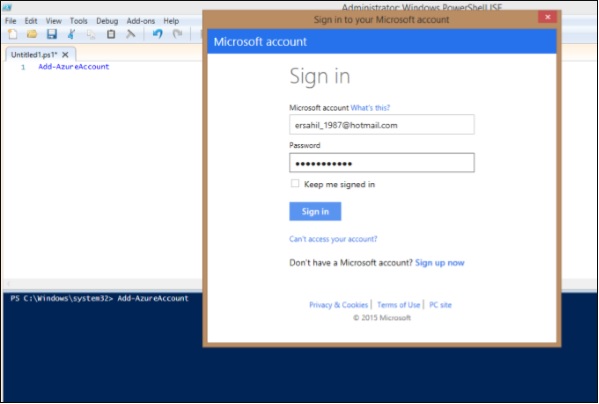
Step 1 − Enter the following cmdlet in PowerShell.
Add-AzureAccount
Step 2 − The screen shown in the following image will pop up and ask for credentials of your account. Enter the credentials and sign in.
Active Directory
Step 3 − Now you are ready to perform tasks in Azure using Azure PowerShell.

Using Certificate

In this method, you can download a certificate on your machine and login to our account using that certificate.
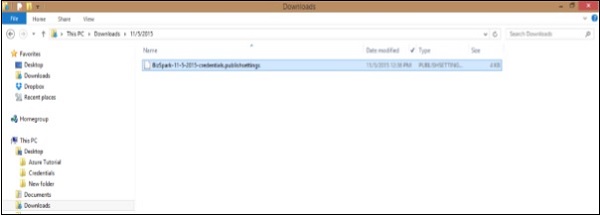
Step 1 − Enter the following cmdlet in PowerShell. You will be prompted to save a file and the file will be downloaded on your computer with the extension. publishsettings.
Get-AzurePublishSettingsFile 
You will see a similar file on your computer.
Certificate
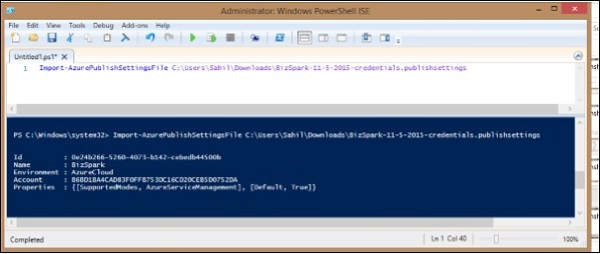
Step 2 − Enter the following cmdlet. Highlighted part is the path of the file downloaded in previous step. Also replace the name of the file with yours
Import-AzurePublishSettingsFile C:\Users\Sahil\Downloads\BizSpark-11-5-2015credentials.publishsettings 
PowerShell ISE
Step 3 − Just to make sure that everything has gone right. Run the following cmdlet. It will display the details of your account and subscription.
Get-AzureAccount 
Get-AzureSubscription
You can add many accounts to Azure PowerShell.

Remove Azure Account

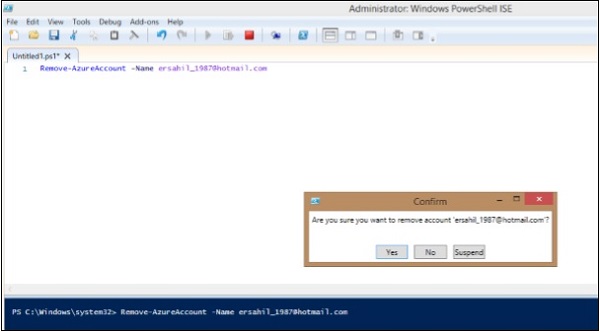
Run the following cmdlets. Replace the highlighted part with your account ID. It will ask for your confirmation and it is done.
Remove-AzureAccount -Name myaccount@somesite.example
Remove Azure Account

Get Help

The following cmdlet will list all the commands available for Azure tasks.
Get-Help Azure 
There are lots of tasks that can be managed using PowerShell such as creating and managing web applications, storage accounts, virtual machines, etc. In fact, many users find it quicker and better as compared to Azure Management Portal. To manage the Azure Storage using PowerShell refer to Table, Blobs and Queues chapter in this tutorial.

Microsoft Azure - Traffic Manager

Microsoft Azure - Traffic Manager


Let us first understand what is the service provided by Azure traffic manager. Basically, this service balances the traffic load of services hosted in Azure. The routing policy is defined by the client and traffic to the services hosted in Azure is redirected according to set policies. Traffic manager is a DNS-based service. Thus, it will improve the availability and performance applications.
Let’s see how to create and configure traffic manager in Azure.

Create Traffic Manager

Step 1 − Login to Azure management portal and click ‘New’ at the bottom left corner.
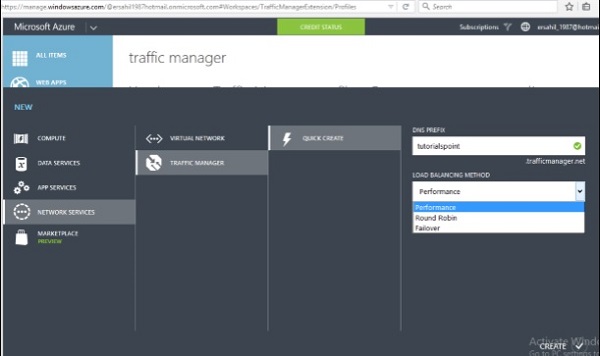
Step 2 − Select Network Services → Traffic Manager → Quick Create.
Create Traffic Manager
Step 3 − Enter the DNS prefix and select the Load Balancing Method.
There are three options in this dropdown.
  • Performance − This option is ideal when you have endpoints in two different locations. When a DNS is requested, it is redirected to the region closest to the user.
  • Round Robin − This option is ideal when you want to distribute the traffic among multiple endpoints. Traffic is distributed in round robin fashion by selecting a healthy endpoint.
  • Failover − In this option, a primary access point is set up, but in case of failure alternate endpoints are made available as backup.
Step 4 − Based on your needs you can choose a load balancing method. Let’s choose performance here.
Step 5 − Click create.
You will see the traffic manager created and displayed in your management portal. Its status will be inactive until it is configured.
Traffic Manager Status

Create Endpoints to be Monitored via Traffic Manager

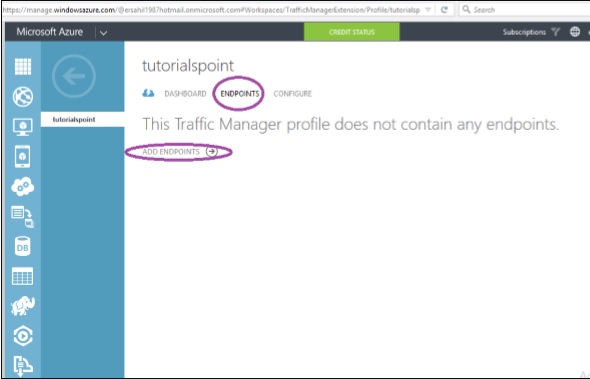
Step 1 − Select the ‘Traffic Manager’ from the left panel in the management portal that you want to work on.
Step 2 − Select ‘Endpoints’ from the top horizontal menu as shown in the following image. Then select ‘Add Endpoints’.
Endpoints Traffic Manager
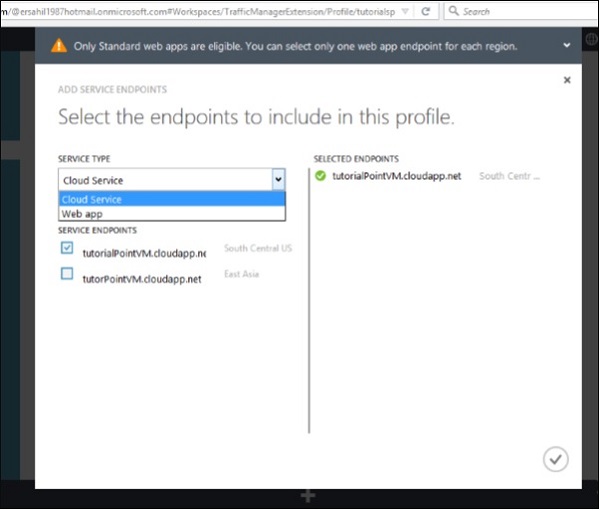
Step 3 − The screen shown in the following image will appear. Choose the service type and items under that service will be listed.
Step 4 − Select the service endpoints and proceed.
Endpoints Traffic Manager
Step 5 − The service endpoints will be provisioned.
You can see that in this case, the service ‘tutorialsPointVM’ created in Azure will now be monitored by the traffic manager and its traffic will be redirected according to the specified policy.

Configure the Policy

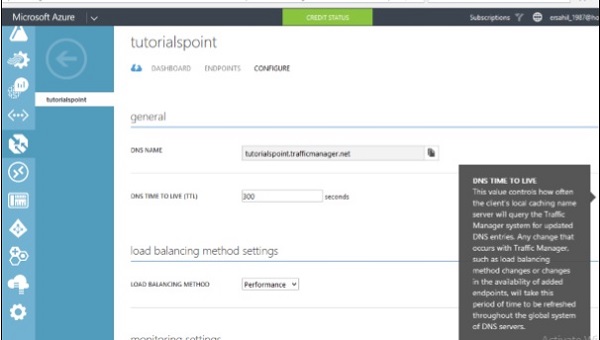
Step 1 − Click on ‘Configure’ in the top menu bar as shown in the following image.
Step 2 − Enter the DNS Time to Live (TIL). It is the amount of time for which a client/user will continue to use a particular endpoint. For example, if you enter 40 seconds the traffic manager will be queried after every 40 seconds for the changes in the traffic management system.
Configure the Policy
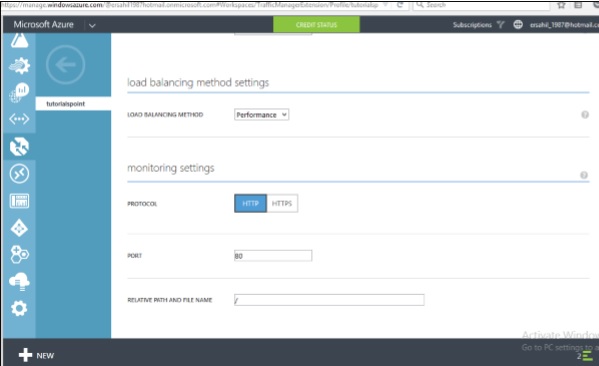
Step 3 − You can change the load balancing method here by choosing a desired method from the dropdown. Here, let’s choose ‘Performance’ as chosen earlier.
Load Balancing Settings
Step 4 − If you scroll down, you will see heading ‘Monitoring Setting’. You can choose the protocol; enter port number and relative path for a service to be monitored.

Microsoft Azure - Site-to-Site Connectivity

Microsoft Azure - Site-to-Site Connectivity


Most organizations already have a network on their premises and would want to connect it to Windows Azure rather than putting everything on cloud. It is also called hybrid network connectivity. It is connecting virtual net in Azure to on-premises network. Setting up a site-to-site connectivity network is quite easy for someone who knows the basics of networking like IPs, subnetting and default gateways.
The things that are required before configuring the network in this case are −
  • A VPN device that can be configured.
  • Externally facing IP address for that VPN device.

Creating a Site-to-Site Connectivity Network

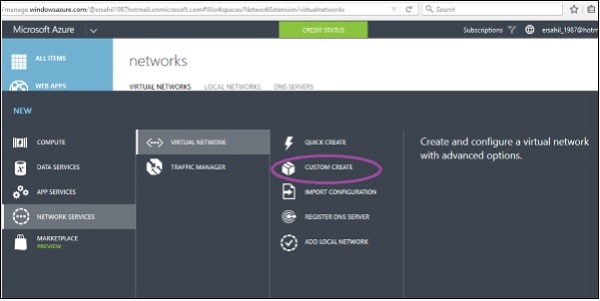
Step 1 − Select New → Network Services → Virtual Network → Custom Create
Creating a Site-to-Site
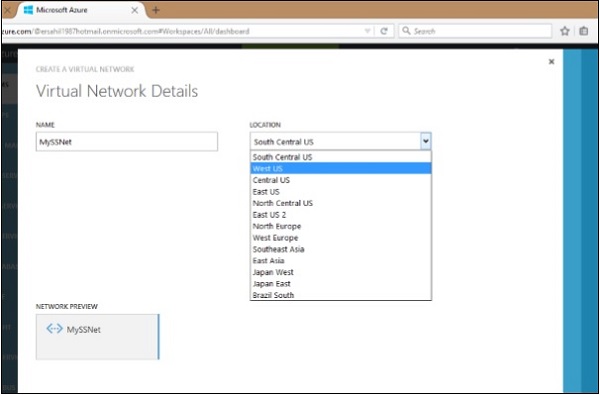
Step 2 − Enter the name of the network and select the region.
Select Region
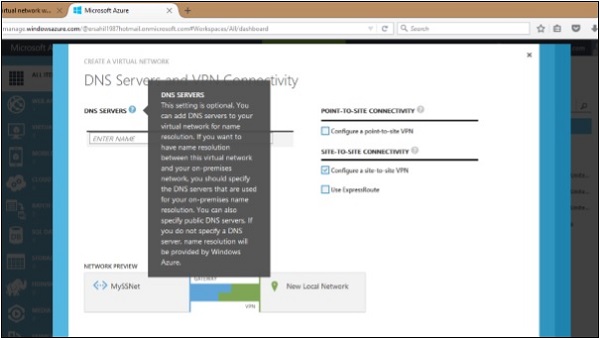
Step 3 − Enter the DNS name for name resolution if you want, otherwise you can leave it empty if you want it to be automatically done by Azure.
Step 4 − Check the ‘Configure site-to-site VPN’ option.
Configure Site-to-Site VPN
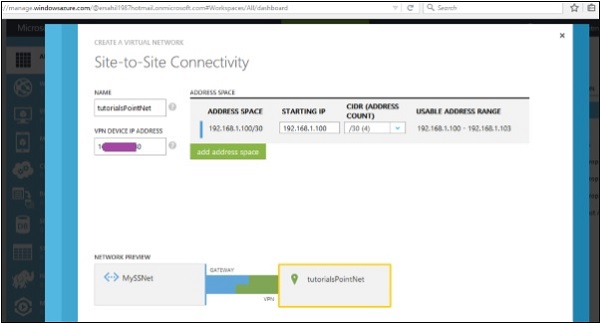
Step 5 − Enter the details of your VPN device in the address space as shown in the following image.
Site-to-Site Connectivity Address
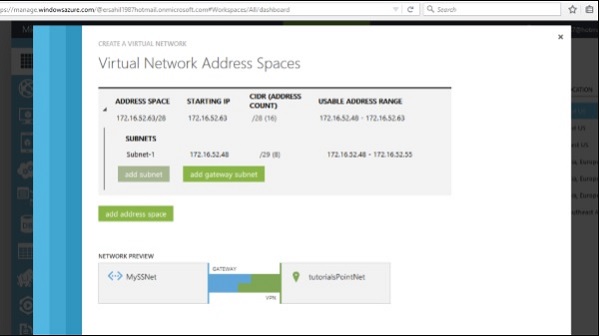
Step 6 − Enter the details of your virtual network in the address space.
Virtual Network Address Spaces
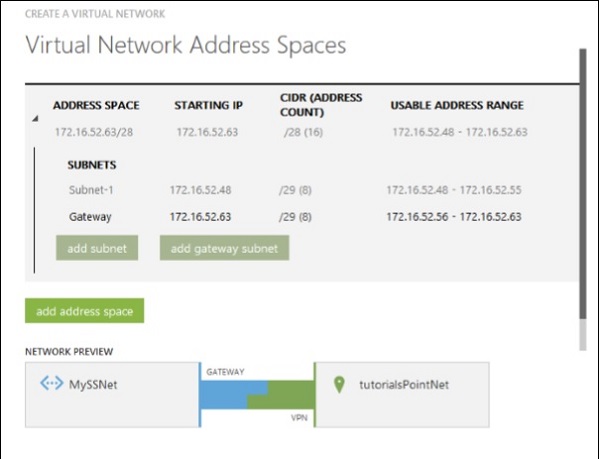
Step 7 − After entering the subnets, enter the gateway subnet for your virtual network.
Virtual Network Subnet
Step 8 − Click next and the network is created.
Step 9 − Select the network and go to its ‘Dashboard’. You will have to create a gateway for it.
Step 10 − Click ‘Create Gateway’ at the bottom of the screen. Once gateway is created ‘Gateway IP address’ is displayed on the following screen.
You can configure the VPN device now using the information.
Site-to-site connectivity is faster than the point-to-site connectivity. It makes transferring of data easier. You just need a shared key to access the network. Unlike point-to-site connectivity, you don’t have to install certificates on each machine you want to connect with the virtual machine. In fact, the same shared key works for each machine.

Microsoft Azure - Point-to-Site Connectivity

Microsoft Azure - Point-to-Site Connectivity


In the last chapter, we saw how an endpoint can be created to access a virtual machine; this is quite a tedious task. If a virtual machine in virtual network needs to be connected with on-premise machine, the point-to-site connectivity is needed. Point-to-site connectivity makes it very productive to work with remote virtual machines.
Basically, a machine on-premise is connected to virtual network using point-to-site connectivity. However, we can connect up to 128 on-premise machines to virtual network in Azure. The access to the virtual network in cloud is granted through a certificate. The certificate has to be installed on each local machine that needs to be connected to the virtual network.

Enabling Point-to-Site Connectivity on Existing Virtual Network

If you have already created a virtual network in Azure, you can access it in management portal.
Step 1 − Log in to Azure management portal.
Step 2 − Click on ‘Networks’ in the left panel and select the network you want to work with.
Step 3 − Click on ‘Configure’ as shown in the following image.
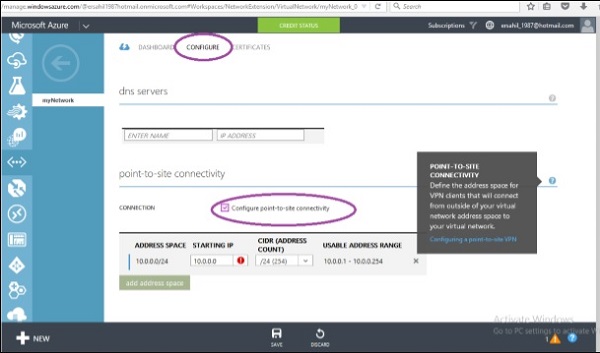
Point-to-Site Connectivity
Step 4 − Check the ‘Configure Point-to-site connectivity’ checkbox. It will allow you to enter the starting IP and CIDR.
Step 5 − Scroll down and click ‘add gateway subnet’.
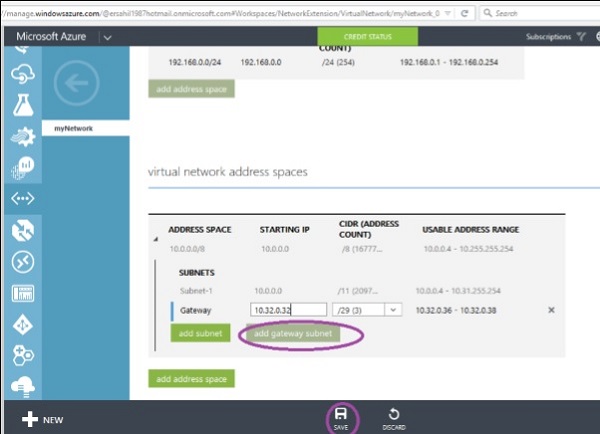
Point-to-Site Connectivity
Step 6 − Enter the Gateway subnet and click ‘Save’. Message shown in the following screen will pop up.
Step 7 − Click Yes and a point-to-site connectivity is done.
Point-to-Site Connectivity
You will need a certificate to access your virtual network.

Create a New Virtual Network with Point-to-site Connectivity

Step 1 − Click New → Network Services → Virtual Network → Custom Create.
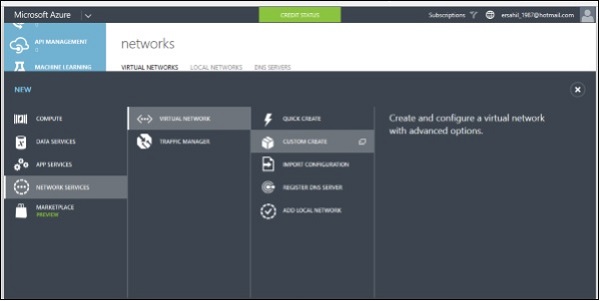
Create New Connectivity
Step 2 − Enter Network’s name, select location and click on Next.
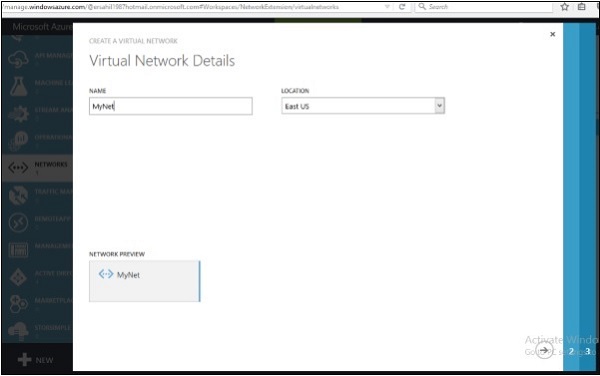
Virtual Network Details
Step 3 − On the next screen, Select ‘Configure a point-to-site VPN’ and click next.
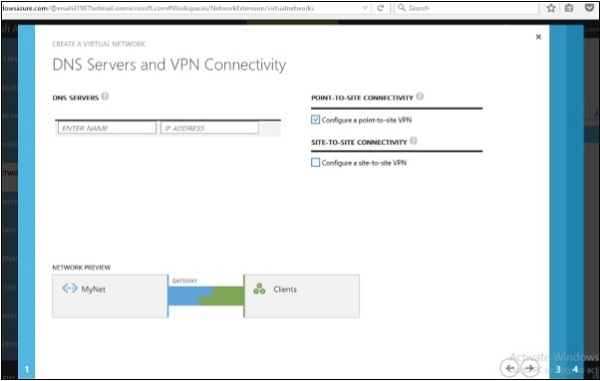
Point-to-Site Connectivity VPN
Step 4 − You can select or enter starting IP and select CIDR.
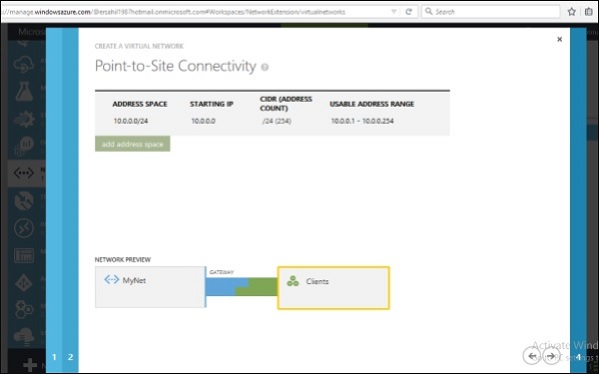
Create New Connectivity
Step 5 − Enter Subnet and click ‘Add Gateway Subnet’ as done earlier and enter the required information.
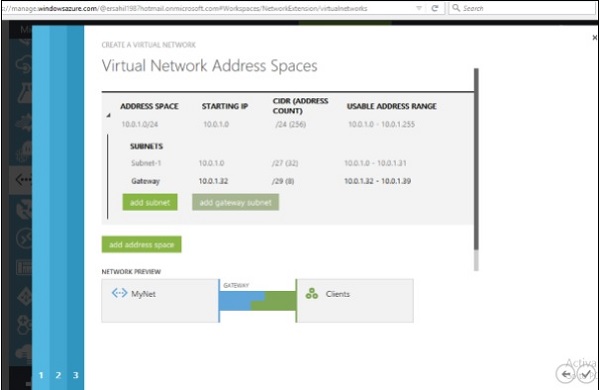
Create New Connectivity
Step 6 − Point-to-Site connectivity is done.
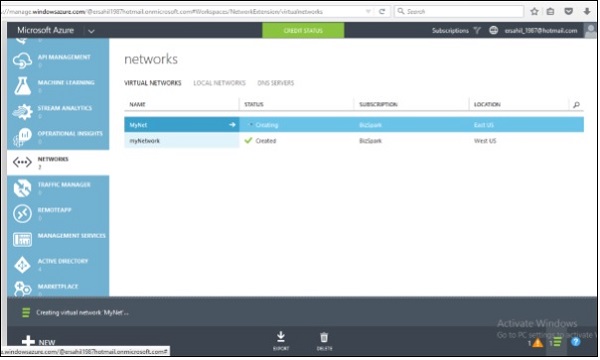
Point-to-Site Connectivity Success
Step 7 − Click on the name of the network, as it is ‘MyNet’ in the above image.
Step 8 − Click on ‘Dashboard’ as shown in the following screen.
Dashboard
You will see that the gateway is not created yet. For it to happen, you will have to generate a certificate first.

Generate Certificates

The point-to-site VPN supports only self-signed certificate.

Create a Certificate

Step 1 − Go to the link msdn.microsoft.com or google ‘windows SDK for 8.1’. Then go to msdn link or the version of Windows for which you want the tool.
Step 2 − Download the encircled file as shown in the following image. It will be saved as .exe file named sdksetup on your machine.
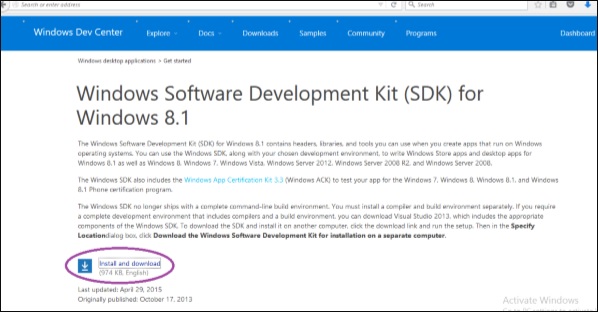
Create a Certificate
Step 3 − Run the file. While running the installation wizard, when you reach the following screen uncheck the encircled part. By default they are checked.
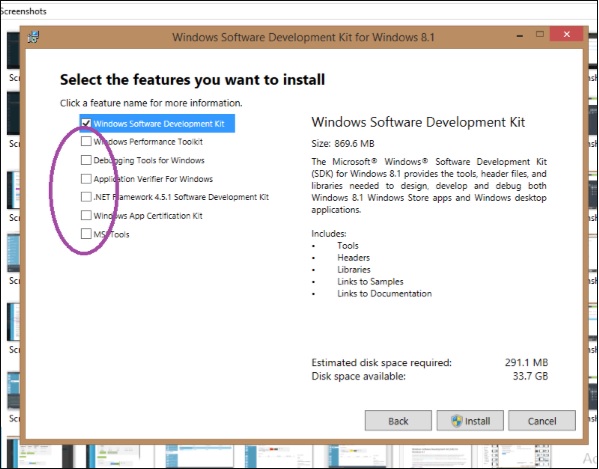
SDK Features
Step 4 − After installation is complete, run Command Prompt as Administrator on your computer.
Step 5 − Enter the following commands one by one for creating root certificate
cd C:\Program Files (x86)\Windows Kits\8.1\bin\x64 

makecert -sky exchange -r -n "CN=MyNet" -pe -a sha1 -len 2048 -ss My
First command will change the directory in command prompt. In the above command change the highlighted part to the name of your network.
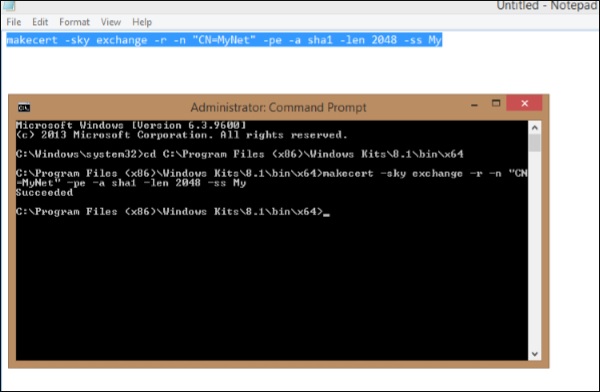
Command Prompt
Step 6 − Next enter the following command for creating client certificate.
makecert -n "CN=MyNetClient" -pe -sky exchange -m 96 -ss My -in "MyNet" -is my -a sha1 
Step 7 − Look for ‘mmc’ on your computer and run it.
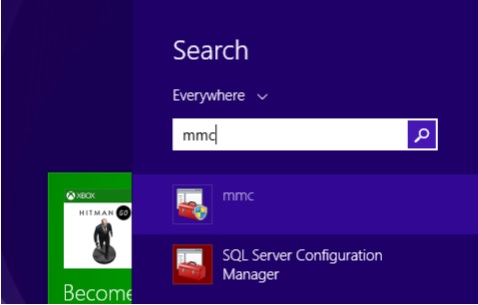
MMC
Step 8 − Click ‘File’ and ‘Add/Remove Snap-in’.
Step 9 − In the screen that pops up, click ‘Certificate’ and then on ‘add’.
Step 10 − Select ‘My User Account’ and click on ‘Finish’.
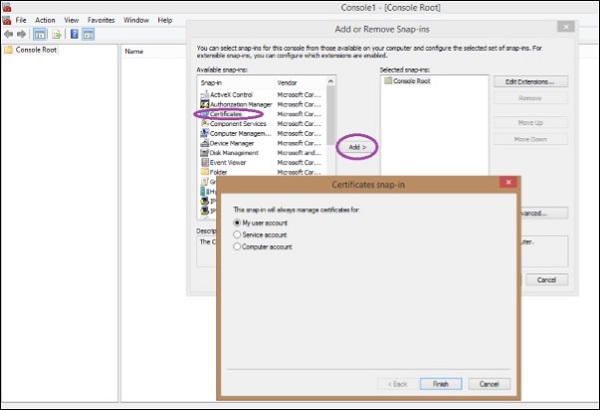
Create a Certificate
Step 11 − Expand ‘Current User’ in the left panel, then ‘Personal’ and then ‘Certificates’.
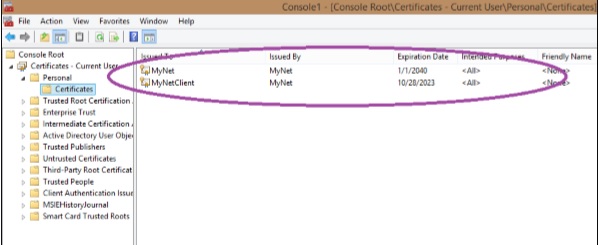
Create a Certificate
You can see the certificates here.
Step 12 − Right click on certificate and click ‘All Tasks’ and then ‘Export’.
Export
Step 13 − Follow the wizard. You will have to name the certificate and select a location to save it.

Upload the Certificate

Step 1 − Login to Azure management portal.
Step 2 − Go to the network and click ‘Certificate’ and then click ‘Upload Root Certificate’.
Step 3 − Click browse and select the location of the certificate you just created.

Download the Client VPN Package

Client VPN Package will connect you to the network.
Step 1 − Go to network’s dashboard in azure management portal.
Step 2 − Scroll down and locate the following options at the right side of the screen.
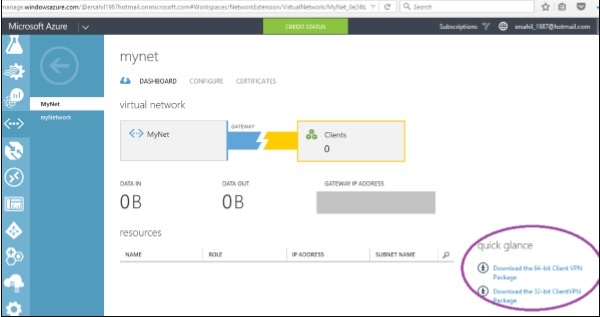
Client VPN Package
Step 3 − Select the suitable option and download it. You will see a similar file on your computer. Run and install it.
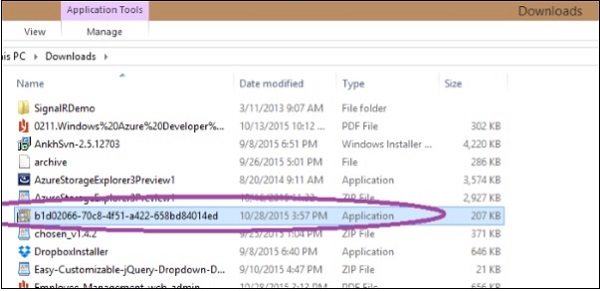
Client VPN Package
Step 4 − When you’ll install it, Windows might try to prevent it. Choose ‘Run Anyway’ if this happens.
Step 5 − Go to ‘Networks’ on your machine and you will see a VPN connection available as shown in the following image.
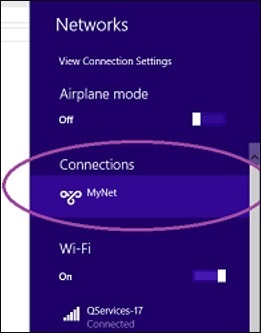
VPN Connections
Step 6 − Click on that network as in this example ‘MyNet’ and connect. You will be connected to the network.