Wednesday, 5 September 2018

Microsoft Azure - Endpoint Configuration

Microsoft Azure - Endpoint Configuration


When creating a virtual machine, we come across a part where endpoints can be configured. The two default endpoints enabled while creating a virtual machine are Remote Desktop and PowerShell. What actually is an endpoint? Virtual machine on same cloud can communicate to each other automatically. But in case we need them to communicate with our own computer, we will need an endpoint configured to make it happen. It is basically accessing the virtual machine through a port. An endpoint provides remote access to the services running on virtual machine. It has a public and private port that needs to be specified while creating an endpoint. Additionally, an endpoint can be accessed securely by activating Access Control Lists (ACL).
In the following section, it is demonstrated how a new endpoint can be configured for virtual machine that’s already been created. However, it can also be done in the same way as creating a new one on configuration part of wizard.
Step 1 − Click on Virtual Machine in your Azure Management portal.
Step 2 − Click on ‘Endpoint’ and then Click on ‘Add’.
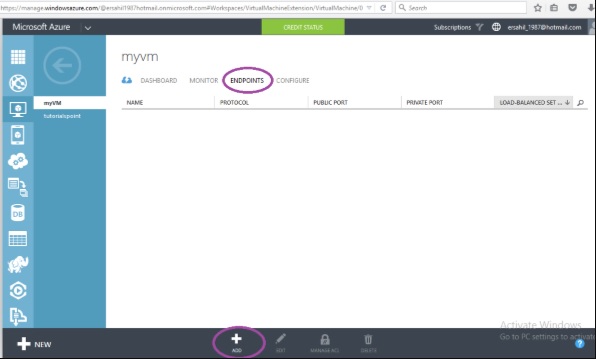
New Endpoint
Step 3 − Select ‘Add a Stand-Alone Endpoint’ as shown in the following image.
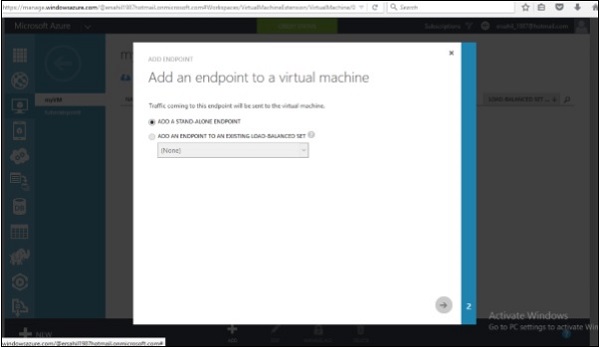
Stand-Alone Endpoint
Step 4 − Select the name from dropdown. Alternatively, you can enter a custom name. Here let’s select Http from options. It will assign unused ports automatically. Or you can enter it manually.
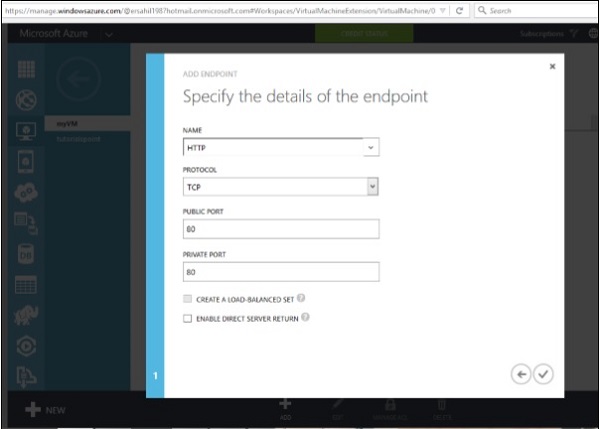
Endpoint Details
Step 5 − If you tick ‘Create a Load Balanced Set’, it will allow distributing the load across virtual machines. Let’s leave it unchecked here because it can be configured later, if needed.
Step 6 − The ‘Enable Direct Server Return’ is checked when SQL server’s ‘Always On’ feature is required, so let’s leave it unchecked.
Step 7 − Click on Next arrow.
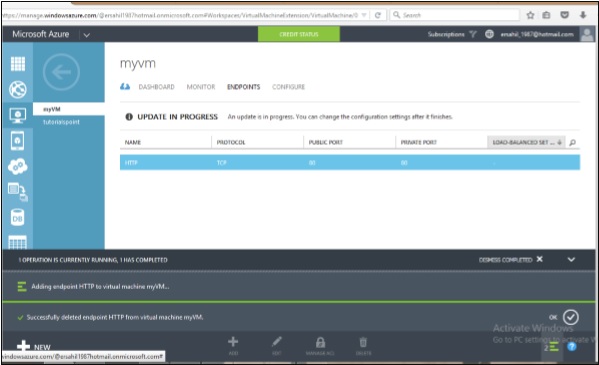
New Endpoint

Access Control of Endpoint

We can grant or deny the access of services to an individual host or network. If nothing is specified, the endpoint can be accessed from any host and network.
Step 1 − Select ‘Manage ACL’ as shown in the following image.
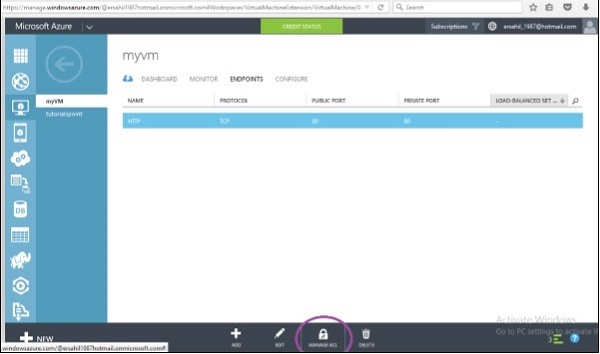
Access Endpoint
Step 2 − Enter access description.
Step 3 − Enter Subnet Mask.
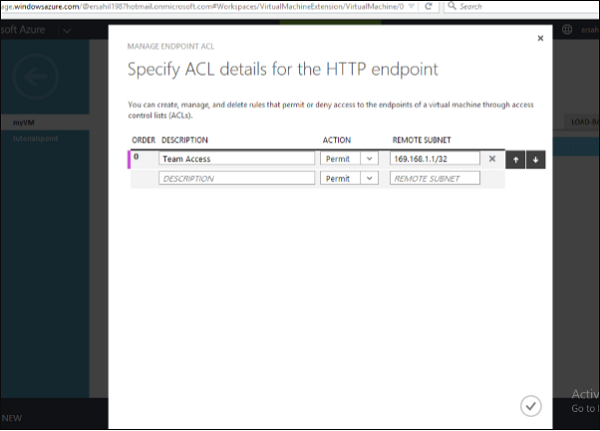
ACL Endpoint Details
Step 4 − Click on Next and it’s done.
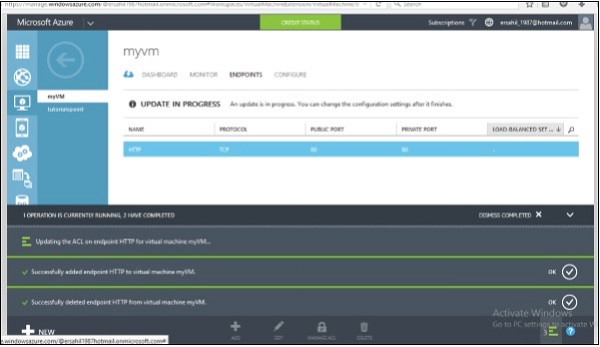
Access Endpoint Success

Microsoft Azure - Deploying Virtual Machines

                  Microsoft Azure - Deploying Virtual Machines


A quick process of creating a virtual machine was included in the chapter ‘Compute Module’. This chapter contains the detailed process including how to configure virtual machines.

Quick Create

Step 1 − Login to Azure Management Portal.
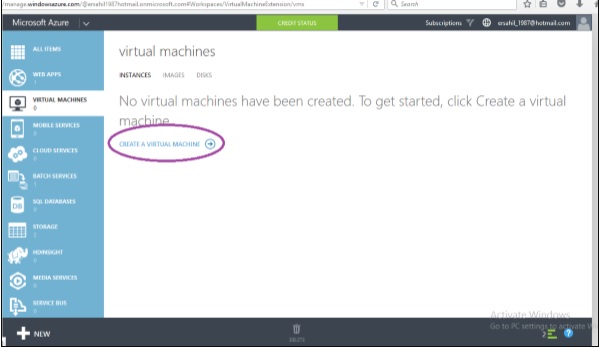
Step 2 − Locate and click on ‘Virtual Machines’ in the left panel and then click on ‘Create a Virtual Machine’.
Quick Create
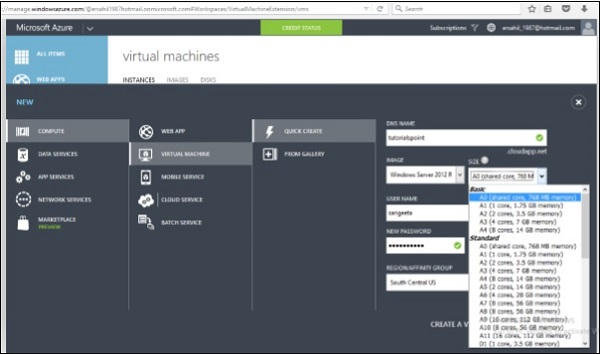
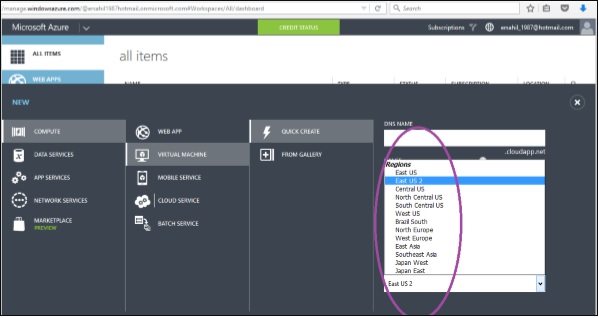
Step 3 − Alternatively, click ‘New’ at the bottom left corner and then click ‘Compute’ → ‘Virtual Machine’ →‘Quick Create’.
Quick Create
Step 4 − Enter DNS name. This has to be unique. The DNS name is used to connect to the virtual machine.
Step 5 − Select the image and size from the dropdown list. The size affects the cost of running virtual machine.
Step 6 − Enter username and password. You must remember to log in to the virtual machine later.
Step 7 − Select the relevant region.
Step 8 − Click on ‘Create a virtual machine’ and you are ready to use your new machine. It will take a few seconds for the machine to be created.

Create Virtual Machine with Advanced Settings

Step 1 − Choose ‘Custom Create’ instead of ‘Quick Create’ in the options and you will be taken to the following screen.
Create Virtual with Advanced
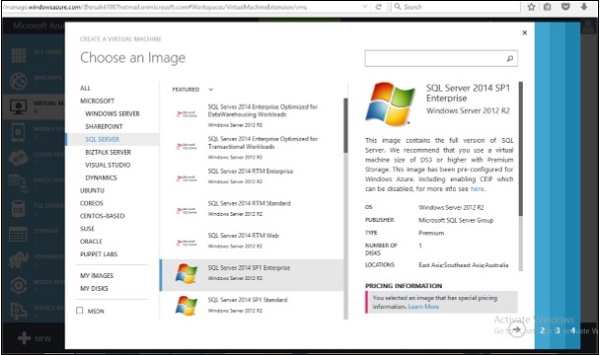
Step 2 − Choose an image from the list. In this screen, you find that choosing an image is easier based on their category shown on the left side. Let us create a virtual machine for SQL Server for which we have chosen SQL Server on the left side and all the software in this category are shown in the middle.
Step 3 − Click on the Next arrow.
Virtual Machine Configuration
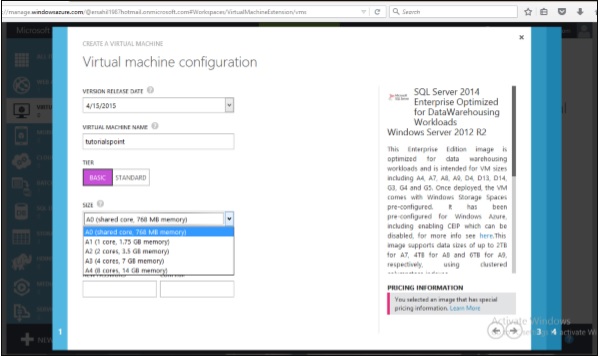
Step 4 − Choose Version Release Date and enter the VM’s name.
Step 5 − Select the Tier. The size dropdown would change items according to tier. In the basic version, you will get only first 5 options, while in the standard version you will get more options. It should be according to you and you image’s requirements. For example, in this case let’s choose SQL server. It requires minimum A4 machine with 8 cores and 14GB memory.
Step 6 − Enter the username and password and click Next arrow.
Create Virtual with Advanced
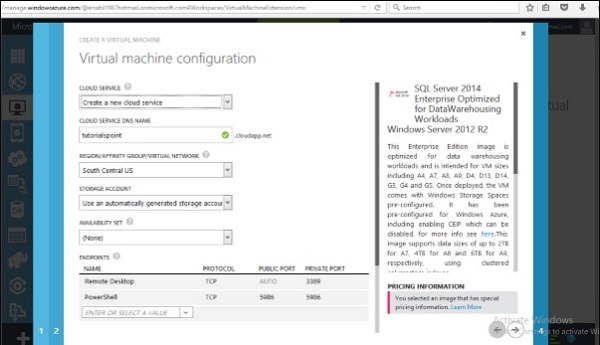
Step 7 − Enter DNS name which should be unique as mentioned earlier and select the region.
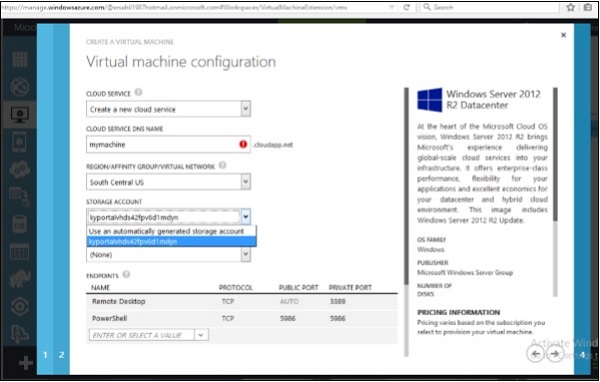
Under the storage account, it will display the storage accounts that you have already created. As seen in the following screen, an account name is shown in the dropdown which is a storage account created earlier. You can choose an already created account or even use an automatically generated account.
Create Virtual with Advanced
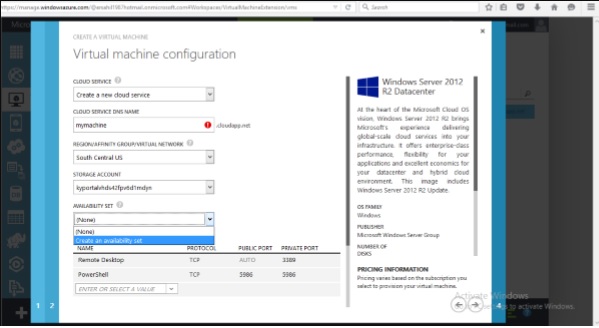
Step 8 − Next is Availability set. This option lets you create a set of virtual machines that will ensure that if a single point fails, it doesn’t affect your machine and keeps the work going on. Let’s choose the option ‘none’ here.
Availability Set
The last option is End Points. End points are used to communicate with virtual machines by other resources you can leave. In a subsequent chapter, we will provide a detailed illustration to configure endpoints.
Step 9 − Click on Next and the virtual machine will be created in a few seconds for you.

Connecting with a Virtual Network

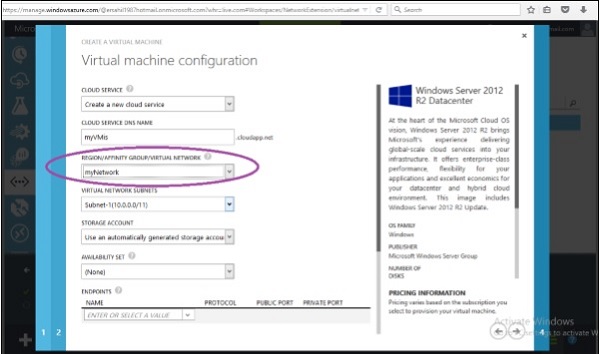
Step 1 − Create a virtual machine using the steps described earlier. If you already have a virtual network created in Azure, it will be diplayed in the highlighted dropdown list as shown in the following screen. You can choose the network as shown in following picture.
Connecting Virtual Network
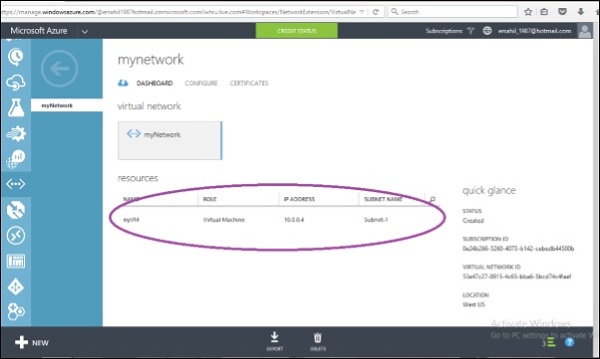
Step 2 − When you go to your Virtual Network and management portal created earlier, click on ‘Dashboard’. The virtual machine will be displyed in the resources of that network as shown in the following picture.
Virtual Network Resources

Accessing the Virtual Machine

There is a step by step guide on connecting to VM in ‘Compute Module’ chapter earlier in this tutorial. Please refer to it.

Considerations

While creating a virtual machine following considerations should be made −
  • Choose the location according to the user’s location to avoid any latency issues. It is best to choose the region nearest to the physical location of end users.
  • You must go through the costs that will be incurred based on the size you choose for the virtual machine beforehand, to make sure it is in control.
  • If you use the already created storage account you will be able to manage things better.

Microsoft Azure - Create Virtual Network

You can create virtual network on cloud or you can also connect to the on-premise local network to the cloud network in Windows Azure. This tutorial will first explain how to create a cloud only network.

Creating a Virtual Network in Clouds Only

Step 1 − Login in to Azure Management Portal.
Step 2 − Click on ‘New’ at the bottom left corner.
Step 3 − Click on ‘Network Services’ and then ‘Virtual Network’.
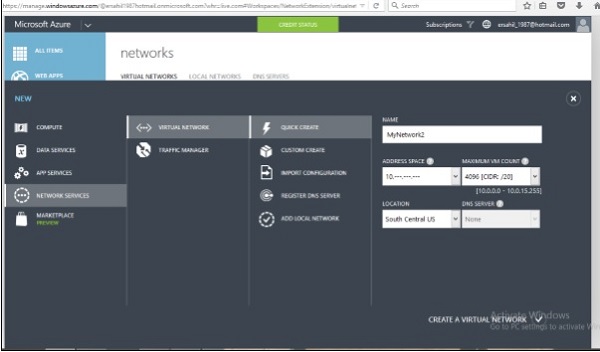
Step 4 − Click on ‘Quick Create’.
Creating a Virtual Network
Step 5 − Enter the name and leave all other fields as they are except location. You don’t need to specify anything in this case since everything will be decided by Azure itself.
Step 6 − Click on ‘Create a Virtual Network’ and it is done.
Creating a Virtual Network in Cloud Only (Advanced Settings)

Step 1 − Click on ‘custom create’ instead of ‘quick create’ when creating a new virtual network and the following screen will appear.
Virtual Network Cloud
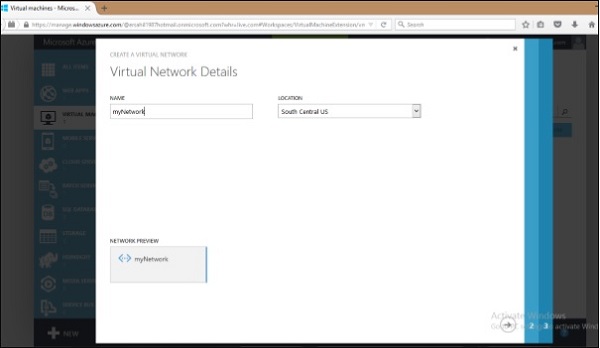
Step 2 − Enter the name of the ‘Network’ and choose a location. You will see that it will draw an image at the bottom.
Virtual Network Cloud
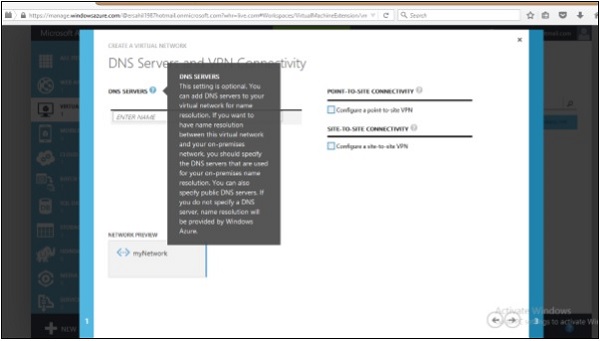
DNS Server Name is optional to enter as we are creating a cloud only network. Also, leave the options ‘Point to Site connectivity’ and ‘Site to Site connectivity’ as they are. The subsequent chapters will have a demo on configuration of these two options.
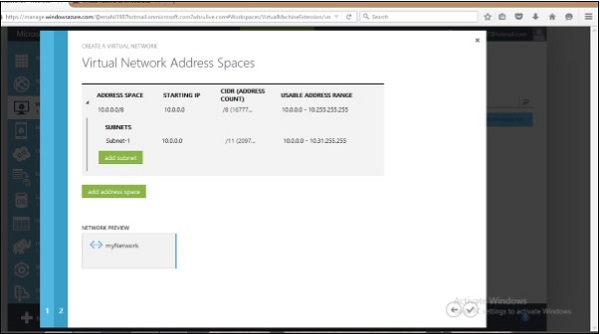
Step 3 − Click next and leave the default values on the following screen.
Virtual Network Address
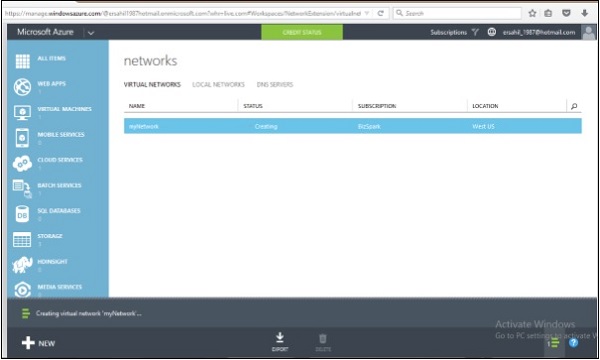
Step 4 − Click the next arrow and a virtual network is created.
Virtual Network Created
You can add DNS servers and local network even after creating a virtual network.

Microsoft Azure - Management Portal

Microsoft Azure - Management Portal


As the name suggests this is a portal to manage Azure services, which was released in 2012. This is a platform provided by Microsoft for its Azure clients where they can see, manage and buy the services offered by Azure. A different portal called ‘Azure Preview Portal’ was released by Azure team in 2014, which makes it easier to access the platform on mobiles and tablets. However, features are more or less same in both the portals.
To access the management portal −
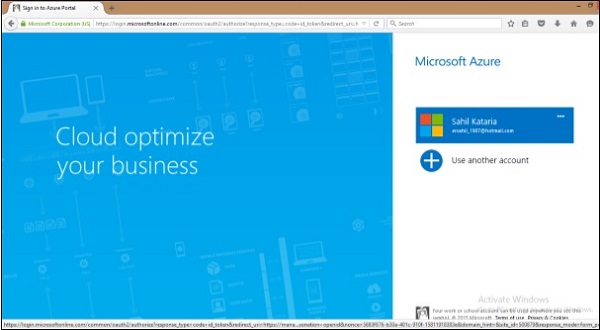
Step 2 − Sign in with your Hotmail or live ID. If you don’t have Azure accounts, sign up for one. You will get a free trial and you can explore, learn and create your own applications using Windows Azure.
Management Portal
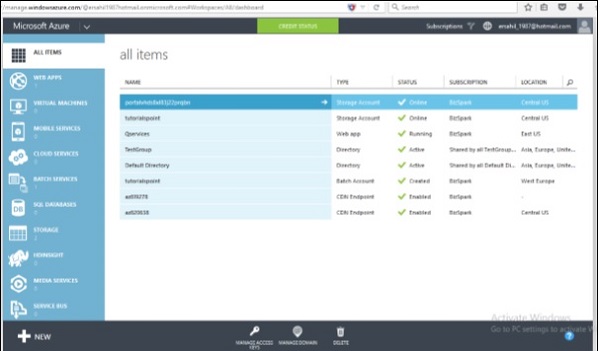
The following screen will appear.
Management Portal
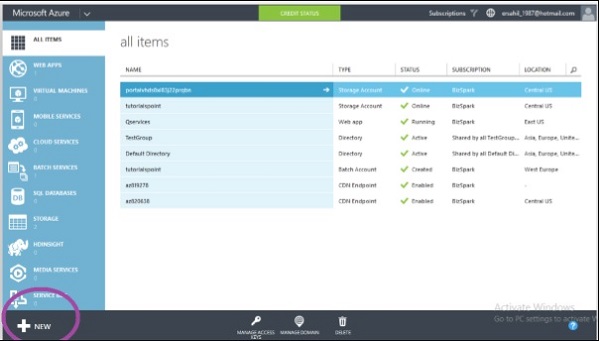
Since here we have an application already running, you can see a list of them. Your account will be empty for the first time. Left panel categorizes the application and the middle part lists all the application in the account.

Create a New Application

Step 1 − Click on the ‘New’ left bottom corner.
Management Portal Create New
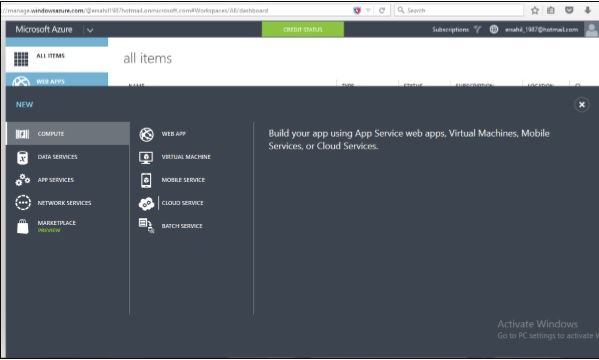
Step 2 − Following screen will come up and you can choose what you want to create.
Management Portal Create New

Check Credit and Subscriptions

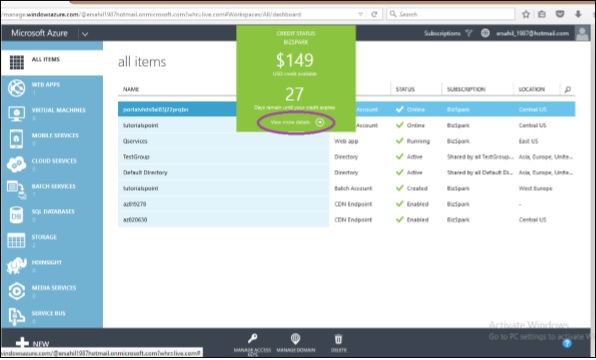
Step 1 − Click on ‘Credit’ in the green block at the top of the screen.
Management Subscriptions
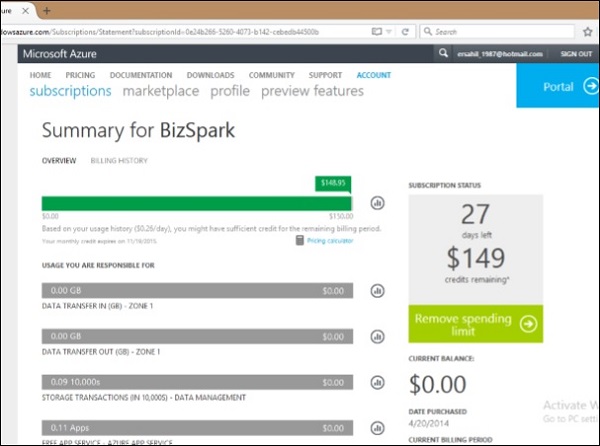
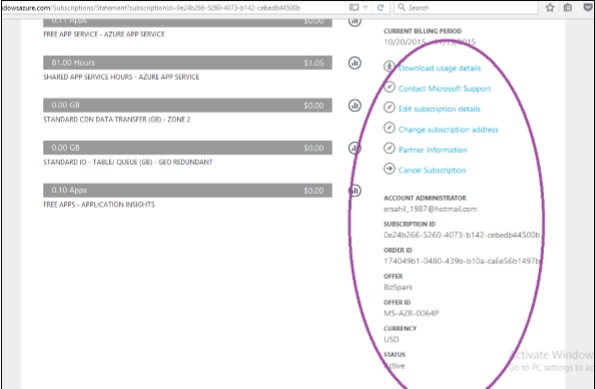
Step 2 − Click on ‘View more details’. It will take you to the following screen. This screen will show you all the details of your subscription, spending, and data usage.
Subscriptions Details
As the spending limit is set here, it says ‘Remove Spending Limit’. If the limit would not have been set, it would have said ‘Set Spending Limit’. This way you can set a spending limit for you. Your services will be stopped once you reach the spending limit.
If you scroll down on the page in the above image, you can see all that is available with your subscription and see the details on the right side.
Account Administrator
You are absolutely in control of your spending. The green block in which ‘Credit’ button is displayed will change color if you are about to fall short of your credit. This is calculated by your average per day spending and it would tell you in how many days your credit is going to get over.

Add a New Subscription

Step 1 − Click on your account e-mail id or on the picture at the top right corner.
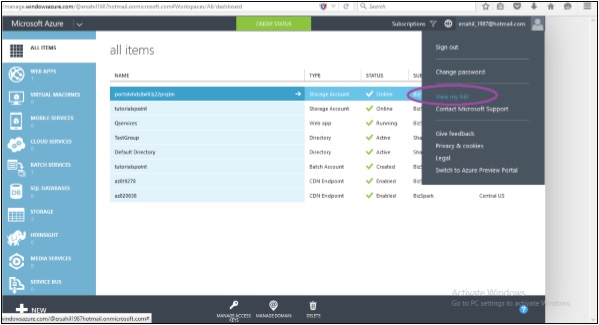
Step 2 − Click on ‘View my bill’ in the list.
View My Bill
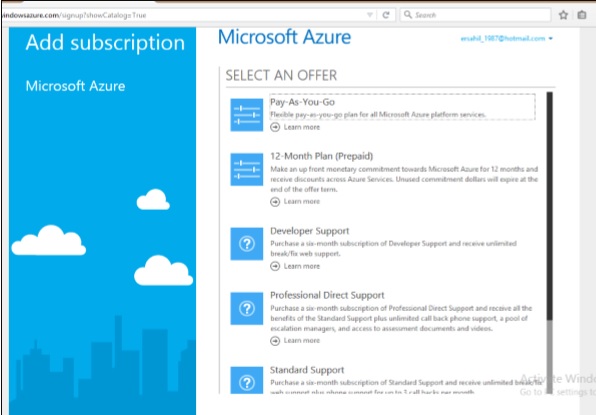
Step 3 − It will take you the following screen. Click on ‘add subscription’.
Management Add Subscriptions
Step 4 − Choose the subscription from the list in the following screen.
Choose Subscriptions

Azure Preview Portal

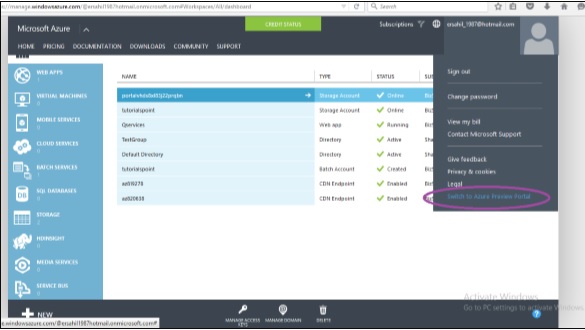
Step 1 − Click on your account e-mail at the top right corner.
Step 2 − Select ‘Switch to Azure Preview Portal’.
Preview Portal
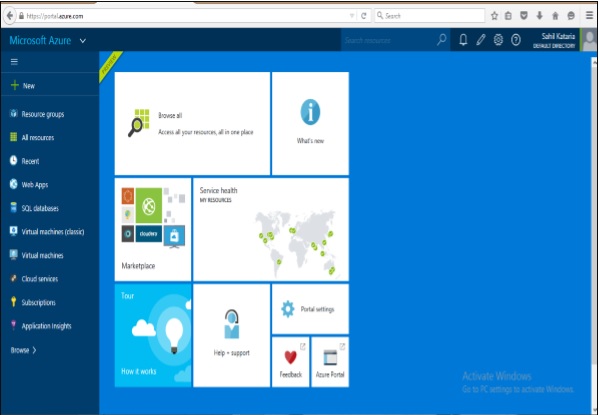
Step 3 − The following screen will appear. All the functionalities are same. ‘Azure Preview Portal’ is built for mobile and tablet screen with a responsive design.
Azure Preview Portal

Microsoft Azure - Scenarios

Microsoft Azure - Scenarios


Understanding the basic scenarios of Windows Azure will help us understand its use. Additionally, it will help us understand the services offered. Three basic scenarios are discussed here. In addition to the following scenarios, there can be many more ways of using Azure services based on the needs of clients, but all the basic uses are covered in this chapter.

Software Development

Software development is the most popular scenario of Windows Azure. The software is developed and tested on local development fabric and then deployed in cloud of Windows Azure. Azure hosts the web application and also the supporting processes, communicating with other web services.
Testing of application in software development phase usually becomes too long for developers, if they need to change the configurations of environment being used to host the application. In Windows Azure, this is the not a problem as resources are absolutely in their control and can be modified as needed by the application. Once a web application is hosted in cloud of Windows Azure, it is ready to be used by the end users and organizations.
Moreover, deploying the application is very easy in Windows Azure using the tools provided by them. These tools are MS deploy, PowerShell, integration with Team Foundation Server (TFS). The Visual Studio cloud project is also an easy option to deploy the application.
An application is tested in the staging environment and then it is deployed in the production environment for end users to use it.

Enterprise Process Offloading

There are situations for an organization where they need to reduce loads from their onpremise systems for a certain period of time or on a regular basis. This could be easily achieved by using Windows Azure services at a very low cost. Clients have to pay for only those transactions made on their application instead of paying for entire hardware and software.
This is an extremely cost-efficient way of using new resources for the organization. Azure in this context offers quite quick growth to businesses by extending resources on cloud when needed.

Enterprise Application Integration

This is commonly called as EAI scenario. Let us think of a scenario, when there is need for two different organizations to send and receive data between applications which is further processed by those applications. The cross-enterprise application integration can be done using Windows Azure. The service is called BizTalk service, which facilitates B2B messaging between on-premise or on-cloud applications of different organizations.
This service enables a connection between applications even if they are following different transport protocols. The process also includes validating and extracting the properties as required by the application at the receiving end. In a normal scenario, where communication is needed between applications of two organizations, the interaction will have to bypass the firewall by completing the due process. However, in the service offered by Windows Azure, the communication between applications does not need to bypass the organization’s firewall.

Microsoft Azure - Datacenters

Microsoft Azure - Datacenters


When we think of cloud, we imagine a place with large number of machines in big rooms. There must be a place where all the data is stored. Microsoft has datacenters all over the world from where Windows Azure services are managed. Datacenters are divided in regions. The exact location of these datacenters is not revealed by Microsoft for obvious security reasons.
Following are the 20 listed regions as can also be seen in the image.
  • Central US
  • East US
  • East US 2
  • US Gov Iowa
  • US Gov Virginia
  • North Central US
  • South Central US
  • West US
  • North Europe
  • West Europe
  • East Asia
  • Southeast Asia
  • Japan East
  • Japan West
  • Brazil South
  • Australia East
  • Australia Southeast
  • Central India
  • South India
Datacenters

How to Choose the Right Data Center for Your Application

When creating Windows Azure application, whether it is mobile application, web application or database storage it asks to specify the region. Region here specifies a regional datacenter.
Performance − You should select the nearest datacenter to the users of your application. The performance can be affected by the relative location of the users who want to access the application. If a user is closer to the datacenter, the performance will be better.
Cost − The price of hosting the application may also increase or decrease depending upon the datacenter you choose. Price actually can vary according to the database hosting location or any other service being used by the application. You should choose the same location for all the services that are being used by your application. For example, database or any media service. If they are kept in separate datacenter there will be charges per transaction, but anything extra won’t be charged if they are kept at the same datacenter.
Legal Aspect − Laws vary from country to country and restrictions could be enforced in some regions on what information can be shared and what cannot.

Microsoft Azure - Security

Microsoft Azure - Security


Security is about managing the access of users to the organization’s applications, platforms and portals. Active directory is used to manage the database of users in a protected manner. The same kind of service is provided by Windows Azure to keep the users and their password safe. Active directory is a feature that lets you create users, manage their roles, grant access and delete them.

Creating an Active Directory

Step 1 − Sign in to Azure Management Portal.
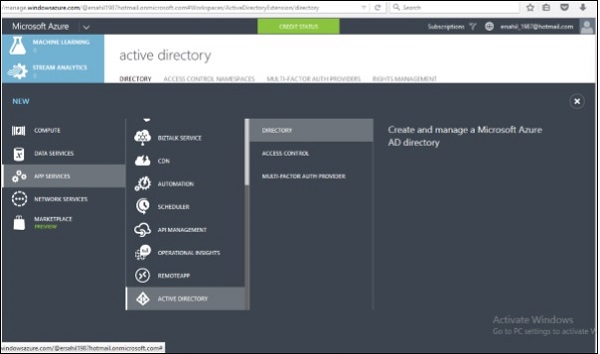
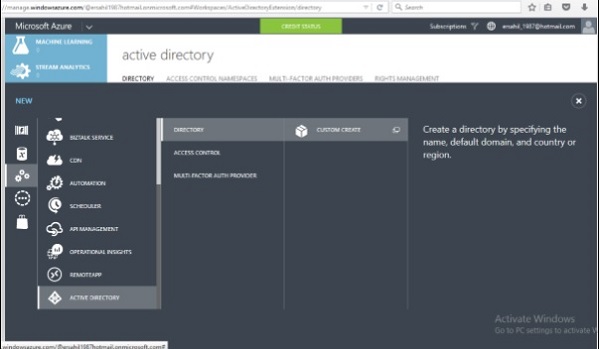
Step 2 − Click ‘New’ and then click ‘App Services’.
Creating Active Directory
Step 3 − Click ‘Active Directory’ and then ‘Directory’.
Step 4 − Click ‘Custom Create’.
Creating an Active Directory
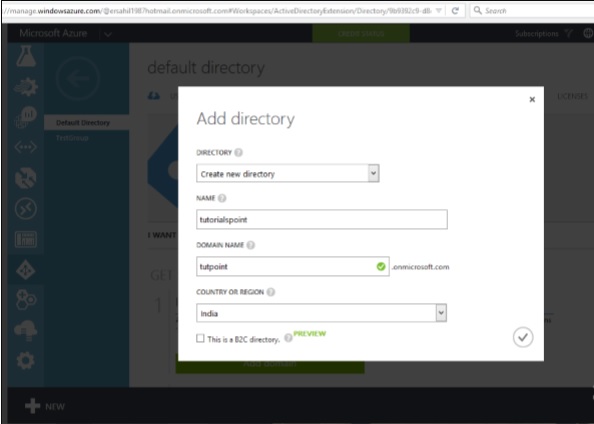
Step 5 − Enter the details and you are done. In the following image, ‘tutpoint’ is the domain name. Enter a domain name which is a temporary DNS. Once its directory is created, you can map it to your own domain.
Creating an Active Directory

Mapping a Custom Domain

Since you have provided a temporary domain name, when creating a directory in Windows Azure, you can map it to your own domain using this functionality.
Step 1 − Click on the directory name in the list of your directory.
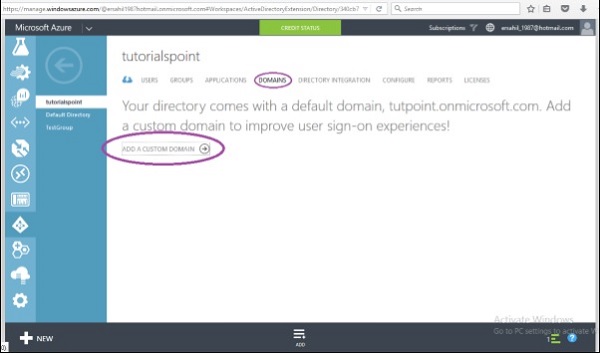
Step 2 − Click on ‘Domains’ from the top menu items.
Step 3 − Click ‘Add a Custom Domain’.
Mapping a Custom Domain
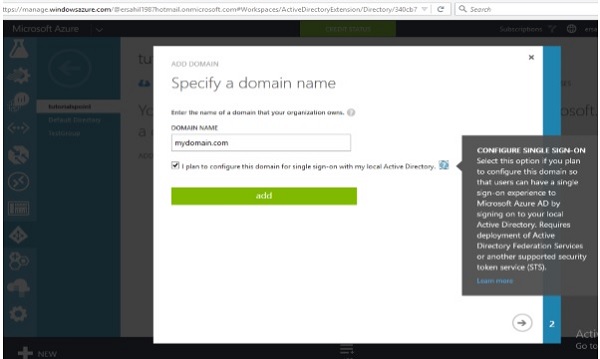
Step 4 − In the screen that pops up, enter the details. You can choose for ‘single sign in option’ if needed.
Mapping a Custom Domain

Creating Users

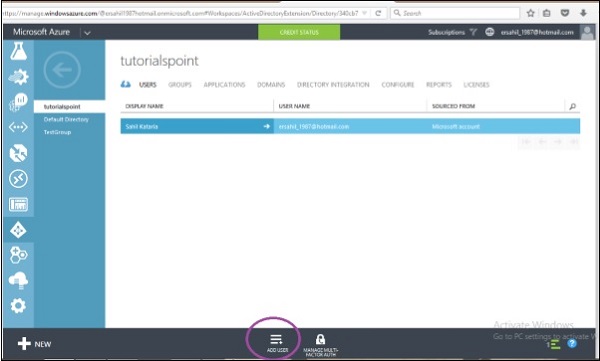
Step 1 − Click on ‘Add User’ button at the bottom of the screen.
Creating Users
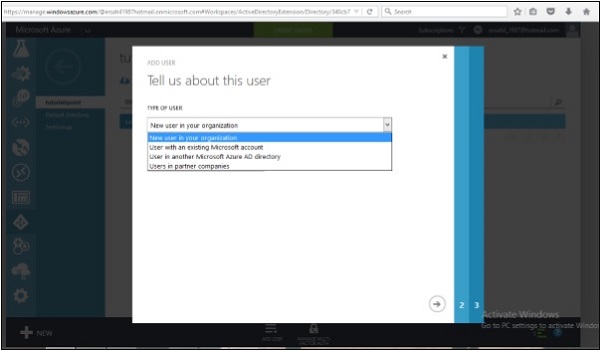
Step 2 − The following screen pops up. You can create a new user or link an existing Microsoft account. You can even import a user from other directory in Azure. Let’s choose ‘Create a new user’ here.
Creating Users
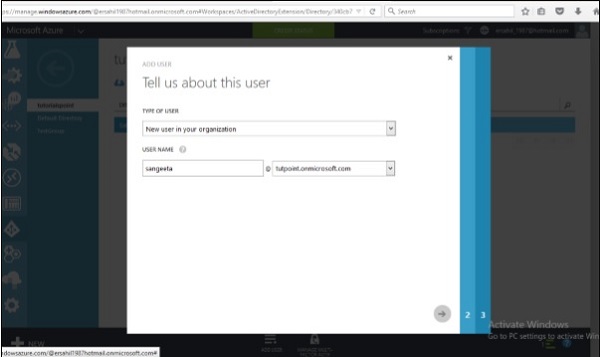
Step 3 − Enter the user name in the following screen.
Creating Users
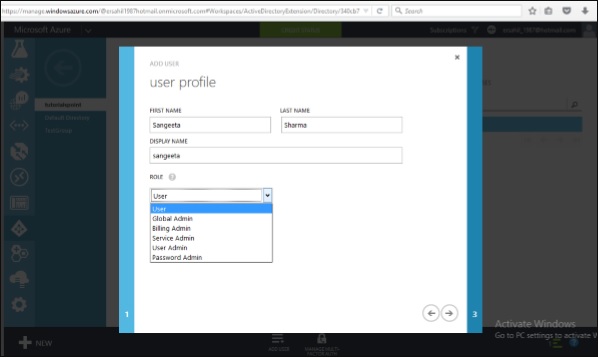
Step 4 − Enter other details and choose the role for the user.
Creating Users
Step 5 − Click next arrow and it will create a user for your application and give you a temporary password which can be changed by the user.

Integrating with Azure Active Directory

Step 1 − Locate and click ‘Application’ at top of screen.
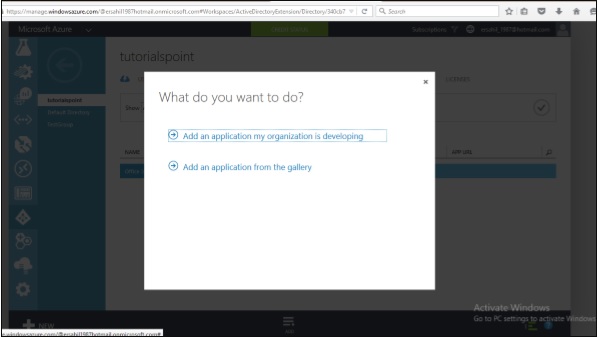
Step 2 − Click on ‘Add’ displayed at the bottom of the screen. A pop up shown in the following image will be seen on the screen.
Integrating Active Directory
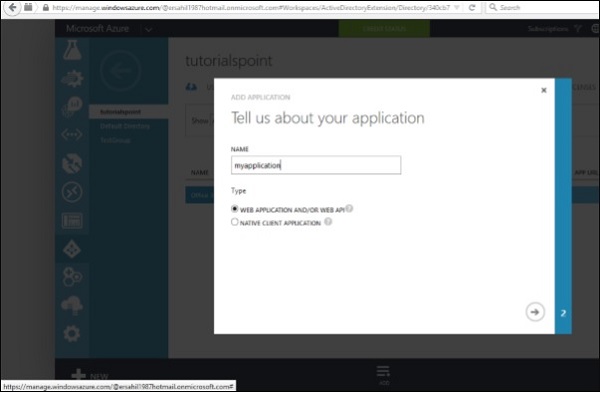
Step 3 − If you click the first option, it will take you to the following screen. You can enter the name of the application and follow the wizard.
Integrating Active Directory
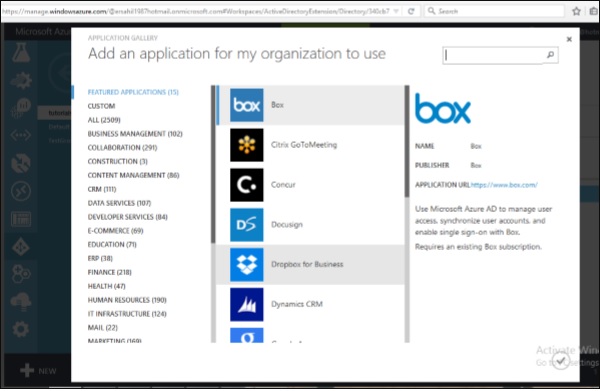
Step 4 − Similarly, if you choose the second option in ‘What do you want to do’ pop up, it will let you choose an application from the gallery as shown in the following screen.
Integrating Active Directory

Integrating On-Premise Active Directory

Azure active directory lets you run an active directory in cloud and also lets you connect it to your on-premise active directory. Basically, it will replicate your user database residing on your on-premise machine in cloud. It will also automatically synchronize whenever changes are made on-premise.
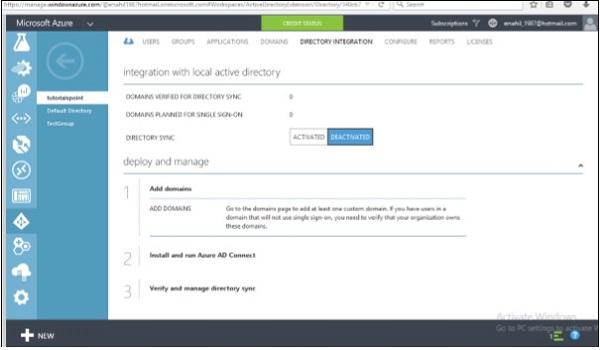
Click on the ‘Directory Integration’ from the top menu. An on-premise directory can be connected using the three steps as shown in the following image.
Integrating Active Directory

Reports

This is a very useful feature of Active Directory as it shows different reports such as number of times a user is signing in, or signing in from an unknown device can be seen here.
Security Reports