How to create API connection (Logic App consumption) using ARM REST API
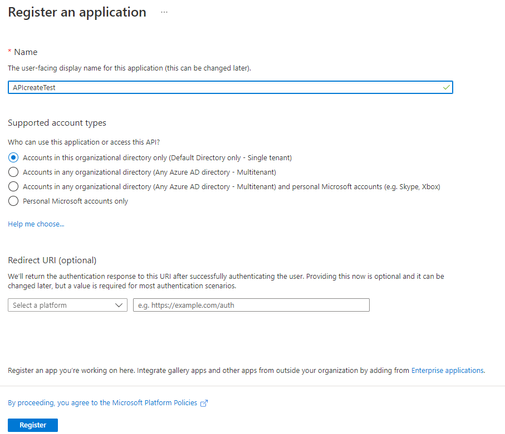
4. Select Register to complete the initial app registration.
5. Once the registration finishes, the Azure portal displays the app registration's Overview pane. The Application (client) ID uniquely identifies your application in the Microsoft identity platform. Please note down the Application (client) ID and Directory (tenant) ID for later use:
6. In the left panel, select Certificates & secrets > Client secrets > New client secret:
7. Add a description for your client secret and select an expiration for the secret or specify a custom lifetime.
8. Select Add.
Note: Please make sure to record the secret's value for use later. This secret value is never displayed again after you leave this page.
9. In the left panel, select API permissions > Add a permission > Microsoft APIs, select Azure Service Management. Select Delegated permissions and select the permissions the client app should have on behalf of the signed-in user. Currently, Azure Service Management API has only one permission listed - user_impersonation.
10. Select Add permissions;
11. Back to the API permissions page, click Grant admin consent:
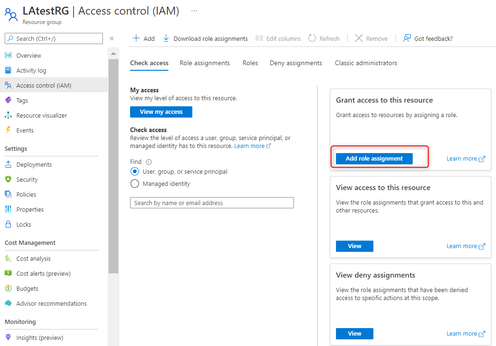
12. Please grant the registered application the Logic App Contributor role of the target resource group. Go to the resource group, in the left panel, select Access control (IAM)-> Add role assignment:
13. Search for Logic App Contributor:
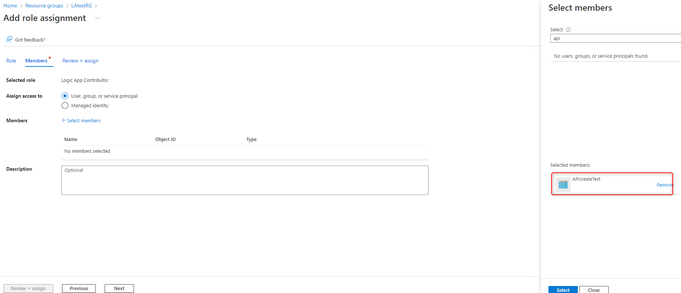
14. Select the registered application to be assigned the role -> Review + assign:
Note: If the Logic App Contributor role is not assigned, when trying to create the API connection using ARM API, you may encounter the following error:
	{
	    "error": {
	        "code": "AuthorizationFailed",
	        "message": "The client 'xxxxxxxx-xxxx-xxxx-xxxx-xxxxxxxxxx' with object id 'xxxxxxxx-xxxx-xxxx-xxxx-xxxxxxxxxx' does not have authorization to perform action 'Microsoft.Web/connections/write' over scope '/subscriptions/<subscriptionid>/resourceGroups/LAtestRG/providers/Microsoft.Web/connections/testconn58' or the scope is invalid. If access was recently granted, please refresh your credentials."
	    }
}
Acquire an access token
After we have a valid client registration, we can use the OAuth 2.0 client credentials grant (non-interactive clients) to acquire an access token:
In the Postman, create a request like below:
1. From Method dropdown list, select POST method;
2. For URI, enter "https://login.microsoftonline.com/<Your tenant id>/oauth2/v2.0/token", please check step 5 above for your tenant id;
3. Add header with key: Content-Type, value: application/x-www-form-urlencoded:
4. In Body, select x-www-form-urlencoded and enter keys:
client_id= <your Application ID> (refer step 5 above)
scope=https://management.azure.com/.default
client_secret=<your secret value> (refer step 8 above)
grant_type=client_credentials
After sending the request, you should get the response like below and the access_token will be Bearer token used for the next call to create the API connection.
	{
	    "token_type": "Bearer",
	    "expires_in": 3599,
	    "ext_expires_in": 3599,
	    "access_token": "<encoded bearer-token>"
}
Call the ARM REST API to create the API connection
After we have a valid bearer token, we can send an HTTPS PUT request method for an Azure Resource Manager provider to create the API connection:
In the Postman, create a request like below:
1. From Method dropdown list, select PUT method;
2. For URI, enter "https://management.azure.com/subscriptions/<Your subscription id>/resourceGroups/<Your Resource Group Name>/providers/Microsoft.Web/connections/<API connection name>?api-version=2018-07-01-preview", for example: https://management.azure.com/subscriptions/11111111-1111-1111-1111-111111111111/resourceGroups/LAtes...
3. Add header with keys:
Content-Type: application/json
Authorization: Bearer <bearer-token> (it's the access_token in the above step)
4. In Body, select raw and enter ARM template body of the API connection resource, for example:
{
        "properties": {
            "api": {
               "id": "/subscriptions/11111111-1111-1111-1111-111111111111/providers/Microsoft.Web/locations/australiaeast/managedApis/servicebus"
            },
            "parameterValueSet": {
            "name":"connectionstringauth",
            "values":{
               "connectionString":{
                    "value":"Endpoint=sb://<sbnamespace>.servicebus.windows.net/;SharedAccessKeyName=RootManageSharedAccessKey;SharedAccessKey=<Access key>"
                    }
                }
            },
            "displayName":"sbtest03"
        },
        "kind": "V1",
        "location": "australiaeast"
}
5. Then the successful response should be like below:
{
	    "kind": "V1",
	    "properties": {
	        "displayName": "sbtest03",
	        "authenticatedUser": {},
	        "overallStatus": "Connected",
	        "statuses": [
	            {
	                "status": "Connected"
	            }
	        ],
	        "parameterValueSet": {
	            "name": "connectionstringauth",
	            "values": {}
	        },
	        "customParameterValues": {},
	        "createdTime": "2022-07-06T03:39:23.9337935Z",
	        "changedTime": "2022-07-06T03:39:24.340078Z",
	        "api": {
	            "name": "servicebus",
	            "displayName": "Service Bus",
	            "description": "Connect to Azure Service Bus to send and receive messages. You can perform actions such as send to queue, send to topic, receive from queue, receive from subscription, etc.",
	            "iconUri": "https://connectoricons-prod.azureedge.net/releases/v1.0.1568/1.0.1568.2757/servicebus/icon.png",
	            "brandColor": "#c4d5ff",
	            "category": "Standard",
	            "id": "/subscriptions/711111111-1111-1111-1111-111111111111/providers/Microsoft.Web/locations/australiaeast/managedApis/servicebus",
	            "type": "Microsoft.Web/locations/managedApis"
	        },
	        "testLinks": [],
	        "testRequests": []
	    },
	    "id": "/subscriptions/11111111-1111-1111-1111-111111111111/resourceGroups/LAtestRG/providers/Microsoft.Web/connections/testconn61",
	    "name": "testconn61",
	    "type": "Microsoft.Web/connections",
	    "location": "australiaeast"
}
6. And in the target resource group, the API connection should be created:


No comments:
Post a Comment