Azure Compute Gallery Virtualization
A virtual machine (VM) can be deployed in Azure and accessed from a launch lab using Azure Compute Gallery (formerly known as Shared Image Gallery). The VM can be replicated to multiple regions, so that it can geolocate the lab user and launch the VM in the Azure region that is physically closest to the lab user.
Overview
To set a VM using a Compute Gallery, there is some configuration to do in Azure before you can configure a VM profile and Lab profile in Skillable Studio. You will need to create several components in Azure. These must be completed in the order below, as each one builds upon the previous.
- Compute Gallery
- Image Definition
- Image Version
- Disk
- Snapshot
Enable Scoring, Life Cycle Actions and Activity Based Assessments
Azure Setup
When a region option must be selected, it is recommended to select the same region for each to avoid issues during the process. Once the process is completed, the files needed to launch the VM in a different region can be replicated to all needed regions.
Create a Resource Group
Create a new resource group. This will be used to store your Compute Gallery.
- Go to the Azure portal and log in to your account.
- From the Azure Admin page, click Resource Groups on the left side navigation.
- Click +Add in the upper-left of the page.
- Subscription: Select the subscription that the resource group will bill to when resource are deployed.
- Resource Group: Name the resource group.
- Region: Select a region where the resource group will be deployed.
- Click Next: Review + Create.
- Click Create.
Create a Compute Gallery
Create a Compute Gallery. This will be used to store your Image Definitions, Image Versions, Snapshots and Disks.
Go to the resource group you just created.
Click +Add in the upper-left of the resource group section of the page.
Search for Azure Compute Gallery and select it from the search results.
- Subscription: Select the subscription that the Compute Gallery will bill to when resource are deployed.
- Resource Group: Select the resource group where the Compute Gallery will be deployed to. This should default to the resource group selected in the previous step.
- Name: Name the Compute Gallery.
- Region: Select a region where the Compute Gallery will be deployed.
- Click Next: Review + Create.
- Click Create.
Add Image Definition
Create an image definition to define specifications for virtual machines that are created and deployed from your Compute Gallery.
Go to the Compute Gallery you just created.
Click +Add new image definition in the upper-left of the page.
Region: Select a region where the image definition will be created.
Image definition name: Name the image definition. This name will be used in Skillable Studio in the Machine Image fields on the VM profile.
Operating system: select the operating system that your VM will use.
Skillable Studio only supports Windows virtual machines in Azure.
VM Generation: Select the VM generation that your VM will use.
Operating system state: Select the state that the OS will be in at the time of launch. Generalized typically boots slower, but may be needed for some learning scenarios. Specialized typically boots quicker, but may skip some basic configuration steps that some learning scenarios may benefit from including.
Publisher: Enter a publisher name for the Image Definition. This can be the lab author or the organization that is publishing the VM for student use.
Offer: Enter the name of the Image Definition offer.
SKU: Enter the name of the Image Definition SKU.
Select Next: Publishing options in the Azure portal to add Publishing options.
- Recommended VM vCPUs: Select the minimum and maximum number of vCPUs that can be used in any VMs that are deployed using this image definition.
- Recommended VM memory: Select the minimum and maximum amount of memory that can be used in any VMs that are deployed using this image definition.
- Excluded disk types: select any disk types that should be excluded.
Click Next: Review + Create.
Click Create.
Upload a VHD file
To upload template VHDs into a Microsoft Azure subscription using the Microsoft Azure Portal, you must perform the following tasks:
- Create a storage account inside of your resource group where template VHDs will be stored in a storage container.
- Create a container inside your storage account.
- Upload each template VHD.
Create a Storage Account Inside the Resource Group
- Navigate to the resource group created at the beginning of this document.
- Click + Add to add a resource to the resource group.
- Search for Storage and select the Storage Accounts service.
- Select the Resource group drop-down and select the resource group you created in a previous task.
- Enter a name for your storage account in the Storage account name field. This name must be globally unique, so it is a good idea to choose a name that is meaningful to you and that will be unique.
- Choose the region where you want to store your storage account from the list of regions available in the Location drop-down.
- Click Review + create to create the storage account.
Create Containers Inside of the Blob Service in Your Storage Account
Once you have created a resource group and a storage account within it, you need to create containers inside of the blob service in your storage account to store VHD files and host running virtual machine instances. This can be done from within the Microsoft Azure Portal, by following these steps:
- Navigate to the storage account that you created in the previous task. This will open the storage account blade.
- Click on the Containers service in the storage account blade. This will open the container service blade.
- Click on the + container button to create a new storage container.
- In the Name field, enter the name that you would like to use for your storage container (e.g. template-vhds for the container for template virtual hard disks, or instance-vhds for the container for running virtual machine instances). Save the name in a document because you will need it later on.
- Select Blob for the Public access level.
- Click on OK to create the container.
- Repeat these steps to create a second storage container, this time for running virtual machine instances.
Uploading a VHD To Azure
Navigate to the storage account you are going to use to store VHD files and host running virtual machine instances.
In the storage account, go to the container where the VHD files will uploaded (template VHD storage).
Click the upload button near the top of the page.
Click the blue folder icon and select the VHD file that you want to upload.
Click Advanced.
Select the drop-down menu for Blob type and change the blob type to Page blob.
If the VHD is uploaded as a Block Blob (default upload setting), the VHD will not be able to be used for a VM in a lab. The VHD must be uploaded as a page blob.
Click the Upload button to upload the VHD to the container.
After the VHD uploads, copy the VHD file name and save the name in a document because you will need it later on.
Create Managed Disk
Go back to the Azure admin dashboard and in the upper search bar, search for Managed Disks and select the Managed Disks service.
On the Create a managed disk page, enter the following:
- Subscription: select the same subscription as previous selections.
- Resource Group: Select the resource group where the Managed Disk will be deployed to. This should be the resource group selected in previous steps.
- Disk Name: Name the shared disk.
- Region: select the same region selected in previous steps.
- Click Review + Create.
Create a Snapshot
- From the Managed Disk overview page, click +Create Snapshot.
- Resource Group: select the resource group selected in previous steps.
- Name: Name the snapshot.
- Click Review + Create.
- This may take several minutes, depending on the size of the disk.
Create Image Version
- Go back to your image definition that was created in previous steps.
- Click +Add Version.
- Region: select the same region selected in previous steps. The region selected must be the same region where the managed disk is stored.
- Name (version number): enter a name for the image version. E.g.
1.0.0. - OS Disk snapshot: select the snapshot that was created in the previous steps.
- Exclude from latest: this is an optional step. If this flag is set to yes, VMs created using the latest version will omit this version.
- Click Review + Create.
Update Replication
- Go to the Image Version that was created in the previous steps.
- Click Update replication on the left side of the page.
- Target regions: select all regions that you want the VM to launch from. Geolocating labs and launching VMs in the region closest to the lab user, is dependent on the regions that the image version is replicated to.
- Target region replica count: select the number of replicas that will be needed in each region.
- Storage account type: select the type of storage that will be used; Standard HDD, Premium SSD or Zone-redundant.
- Click Save to begin replicating to the chosen regions.
- If you wish to replicate more replicas, or replicate to different regions, you can do so after the current replication job is completed by completing these steps again.
Azure Check List
At this point, you should have the following created in your resource group in Azure:
- Compute Gallery
- Image Definition
- Image Version
- Disk
- Snapshot
If you are missing any of these items in your resource group, please go back to previous steps and complete any sections that were missed.
Skillable Studio Setup
Subscription Pool
Create a subscription pool, using the authentication information from your subscription in Azure.
- Click Create Cloud Subscription.
- Configure the storage settings on the subscription itself.
The Compute Gallery where the image definition is stored needs to be mapped in the cloud subscription that is associated with the lab that will use the VM.
To map the Compute Gallery in the subscription:
Navigate to the cloud subscription in Skillable Studio.
Click Edit next to the subscription that you want to map.
Click the Storage tab of the Edit Cloud Subscription dialog.
Enter the name of each in Skillable Studio, to align with the containers in your Azure storage account.
- Image Library Name:
- Image Library Resource Group:
These fields need to be configured for each subscription in the subscription pool.
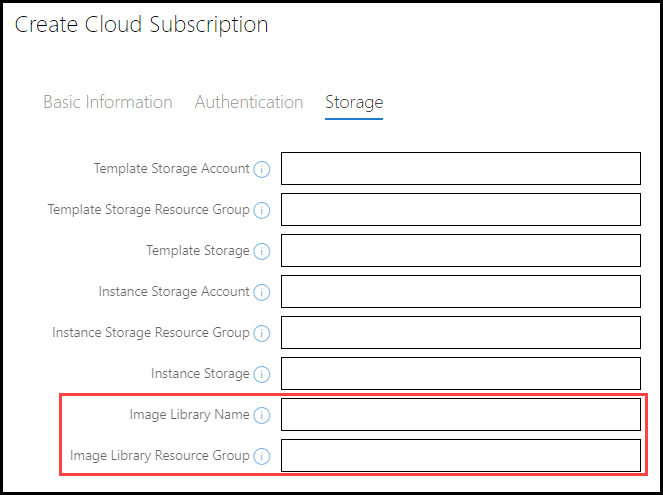
[knowledge] The following fields are used for Managed Disk VMs, skip these fields for Compute Gallery configuration. To learn more about managed disk configuration, read Azure Managed Disk Virtualization.
- Template Storage Account
- Template Storage Resource Group
- Template Storage
- Instance Storage Account
- Instance Storage Resource Group
- Instance Storage
Virtual Machine Profile
Create a virtual machine profile that can be assigned to a lab profile.
- Select Azure as the virtualization platform.
- Select Use Image Library.
- Enter the Machine Name. This will be the Image Definition name that was created during previous steps.
- Enter a version number if you want the VM profile to use a specific version of your image. If you do not want to specify an image, you can leave this blank.
- Enter the VM username.
- Enter the VM log in password.
Lab profile
Create a lab profile that launches your VM against your Azure subscription, to deploy the virtual machine in Azure.
- Configure the lab for cloud slice as normal.
- Add the VM profile to your lab profile.
- Configure the Network tab
- Configure the Cloud tab
- On the Virtual Machines tab, select the Network and Resource Group that the VM will use.
Persist Changes in the Virtual Machine for Future Launches
Persisting changes to a virtual machine allows you to configure virtual machine settings and/or software, then capture those changes so that they are present in the VM for all users that launch the lab in the future.
Persist Changes
- Navigate to the VM in the Azure portal.
- On Overview tab, select Capture at the top of the page.
- Select the resource group where the image library is stored.
- Select the target Azure Compute Gallery.
- Select Specialized Operating System State.
- Select the Target VM image definition where your image definition is stored.
- Enter a version number. This version number will be used to configure the VM profile in Skillable Studio.
- Select replication settings if you would like to replicate this VM for availability in other Azure regions.
- Select Review+Create.
Edit VM Profile to Use New Version
- Login to Skillable Studio.
- Navigate to the VM profile.
- Select Edit on the profile.
- Change the version number to the new version number that was set in Azure during previous steps.
- Launch lab and confirm changes are present.
Enable Scoring, Life Cycle Actions and Activity Based Assessments
To enable scoring, Life Cycle Actions (LCA) and Activity Based Assessments (ABA), the Skillable integration service must be installed on all Windows based virtual machines that will use these features.
These features are enabled by installing the Skillable Integration Service by executing a PowerShell script in the VM.
Copy Integration Service Files and Run Configuration Script
Before installing the integration service, there must not be any previous version of the service installed on the VM.
Ensure there are no previous versions of the integration service installed on the VM:
- Navigate to Programs and Features in the Control Panel and ensure there is no integration service listed in the installed list.
Navigate to Skillable Integration Service GitHub page and download the contents of the repository. This repository contains a PowerShell script and a folder that contains the integration service.
You can download the repository contents by selecting the green Code button and then selecting Download ZIP.
Copy the downloaded files to the Virtual Machine, using your preferred method to transfer files into the VM.
The simplest method to get these files into the VM is to access this repository from the VM and download the files.
In the VM, move the downloaded VmIntegrationService folder to the root of the VM's C drive.
Navigate back to the downloaded files, and run the
install.ps1PowerShell script, as an administrator by right-clicking and selecting the option to run as administrator.After the script is executed, reboot the VM.
Once the VM is rebooted, the integration service may take a few minutes to start. Scoring, LCA and ABA will not function correctly until the integration service is running. >[!knowledge] Subsequent launches of this VM will have the same delayed start with the integration service. It is recommended to configure a delay to any Life Cycle Actions that are configured on lab profiles that use this VM.
Verify Integration Service is Running
You can verify the service is running by following the steps below.
Open a web browser in the VM.
Navigate to the following URL:
localhost:2724If a page is displayed with Skillable Integration Service on the page, the service is running. Scoring, LCA and ABA will now function correctly.
No comments:
Post a Comment